Ac control SUZUKI SWIFT 2017 5.G Owners Manual
[x] Cancel search | Manufacturer: SUZUKI, Model Year: 2017, Model line: SWIFT, Model: SUZUKI SWIFT 2017 5.GPages: 336, PDF Size: 6.24 MB
Page 163 of 336
5-36
OTHER CONTROLS AND EQUIPMENT
74LH0-74E
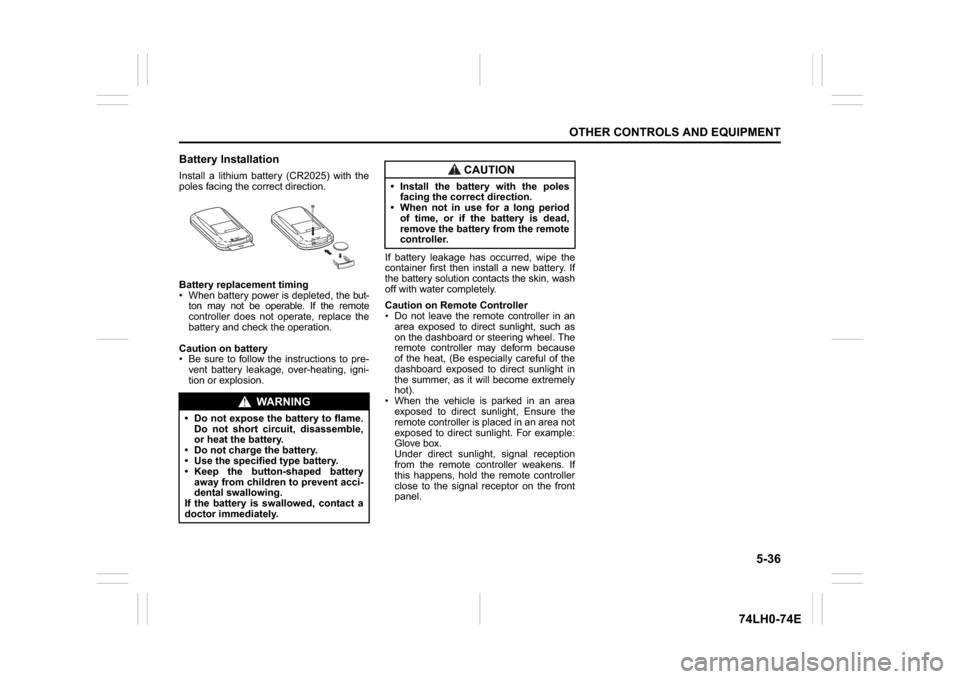
Battery InstallationInstall a lithium battery (CR2025) with the
poles facing the correct direction.
Battery replacement timing
When battery power is depleted, the but-
ton may not be operable. If the remote
controller does not operate, replace the
battery and check the operation.
Caution on battery
Be sure to follow the instructions to pre-
vent battery leakage, over-heating, igni-
tion or explosion.If battery leakage has occurred, wipe the
container first then install a new battery. If
the battery solution contacts the skin, wash
off with water completely.
Caution on Remote Controller
Do not leave the remote controller in an
area exposed to direct sunlight, such as
on the dashboard or steering wheel. The
remote controller may deform because
of the heat, (Be especially careful of the
dashboard exposed to direct sunlight in
the summer, as it will become extremely
hot).
When the vehicle is parked in an area
exposed to direct sunlight, Ensure the
remote controller is placed in an area not
exposed to direct sunlight. For example:
Glove box.
Under direct sunlight, signal reception
from the remote controller weakens. If
this happens, hold the remote controller
close to the signal receptor on the front
panel.
WA R N I N G
Do not expose the battery to flame.
Do not short circuit, disassemble,
or heat the battery.
Do not charge the battery.
Use the specified type battery.
Keep the button-shaped battery
away from children to prevent acci-
dental swallowing.
If the battery is swallowed, contact a
doctor immediately.
CAUTION
Install the battery with the poles
facing the correct direction.
When not in use for a long period
of time, or if the battery is dead,
remove the battery from the remote
controller.
Page 164 of 336
5-37OTHER CONTROLS AND EQUIPMENT
74LH0-74E
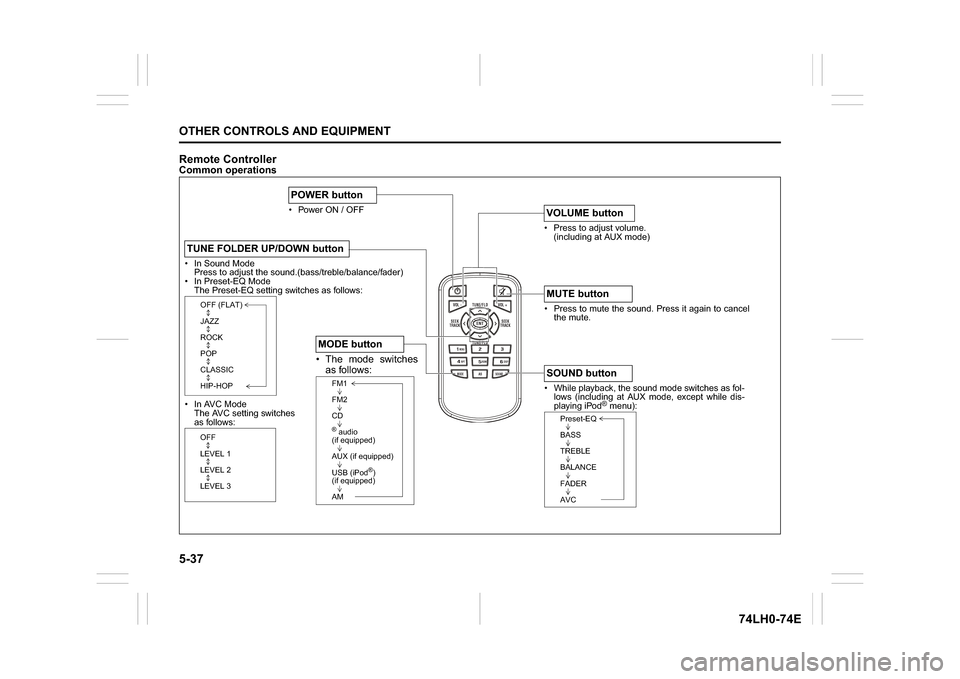
Remote ControllerCommon operations
/TUNE
VOL -VOL + FLD/TUNE
MODE
AS
SOUND
1
5
4
FLDENT
SEEK
TRACK
SEEK
TRACK
RPT RDM
6
MENU
3 2DISP
In Sound Mode
Press to adjust the sound.(bass/treble/balance/fader)
In Preset-EQ Mode
The Preset-EQ setting switches as follows:
In AVC Mode
The AVC setting switches
as follows:TUNE FOLDER UP/DOWN button
OFF (FLAT)
JAZZ
ROCK
POP
CLASSIC
HIP-HOPOFF
LEVEL 1
LEVEL 2
LEVEL 3
Power ON / OFFPOWER button
Press to adjust volume.
(including at AUX mode)VOLUME button Press to mute the sound. Press it again to cancel
the mute.MUTE button While playback, the sound mode switches as fol-
lows (including at AUX mode, except while dis-
playing iPod
® menu):
SOUND button
Preset-EQ
BASS
TREBLE
BALANCE
FADER
AVC
The mode switches
as follows: MODE button
FM1
FM2
CD® audio
(if equipped)
AUX (if equipped)
USB (iPod
®)
(if equipped)
AM
Page 165 of 336
5-38
OTHER CONTROLS AND EQUIPMENT
74LH0-74E
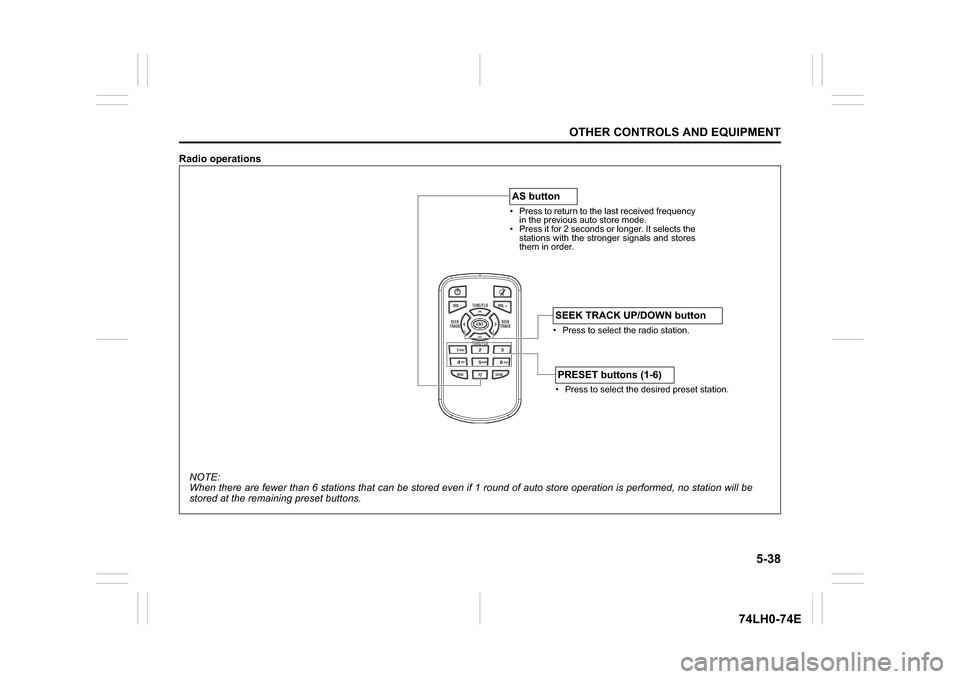
Radio operations
/TUNE
VOL -VOL + FLD/TUNE
MODE
AS
SOUND
1
5
4
FLDENT
SEEK
TRACK
SEEK
TRACK
RPT RDM
6
MENU
3 2DISP
NOTE:
When there are fewer than 6 stations that can be stored even if 1 round of auto store operation is performed, no station will be
stored at the remaining preset buttons.
Press to return to the last received frequency
in the previous auto store mode.
Press it for 2 seconds or longer. It selects the
stations with the stronger signals and stores
them in order.AS button
Press to select the radio station.SEEK TRACK UP/DOWN button Press to select the desired preset station.PRESET buttons (1-6)
Page 166 of 336
5-39OTHER CONTROLS AND EQUIPMENT
74LH0-74E
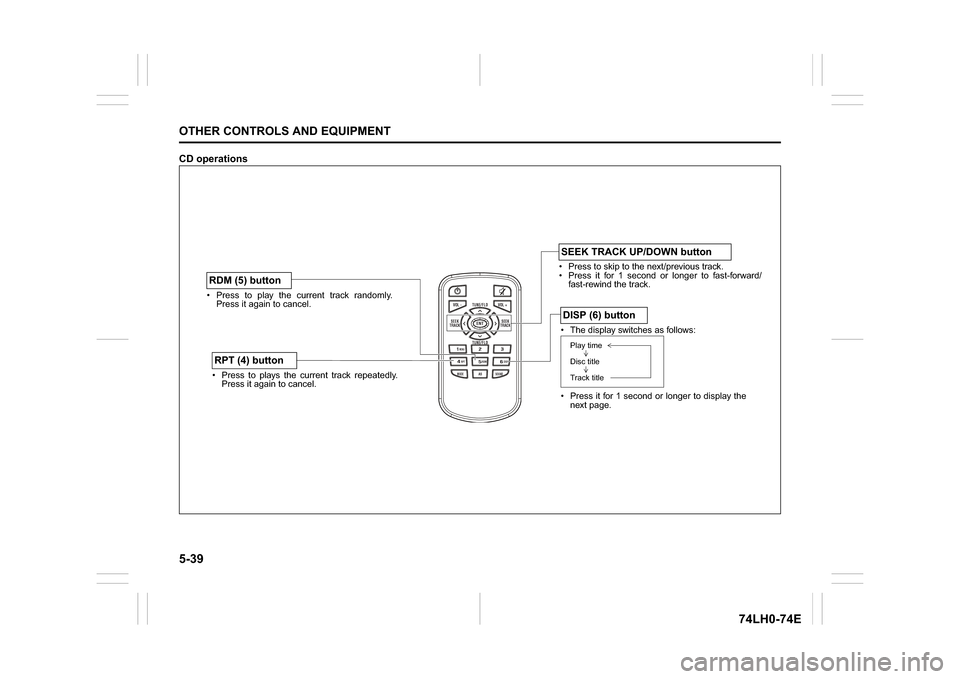
CD operations
/TUNE
VOL -VOL + FLD/TUNE
MODE
AS
SOUND
1
5
4
FLDENT
SEEK
TRACK
SEEK
TRACK
RPT RDM
6
MENU
3 2DISP
Press to play the current track randomly.
Press it again to cancel.RDM (5) button Press to plays the current track repeatedly.
Press it again to cancel.RPT (4) button
Press to skip to the next/previous track.
Press it for 1 second or longer to fast-forward/
fast-rewind the track.SEEK TRACK UP/DOWN button The display switches as follows:
Press it for 1 second or longer to display the
next page.DISP (6) buttonPlay time
Disc title
Track title
Page 167 of 336
5-40
OTHER CONTROLS AND EQUIPMENT
74LH0-74E
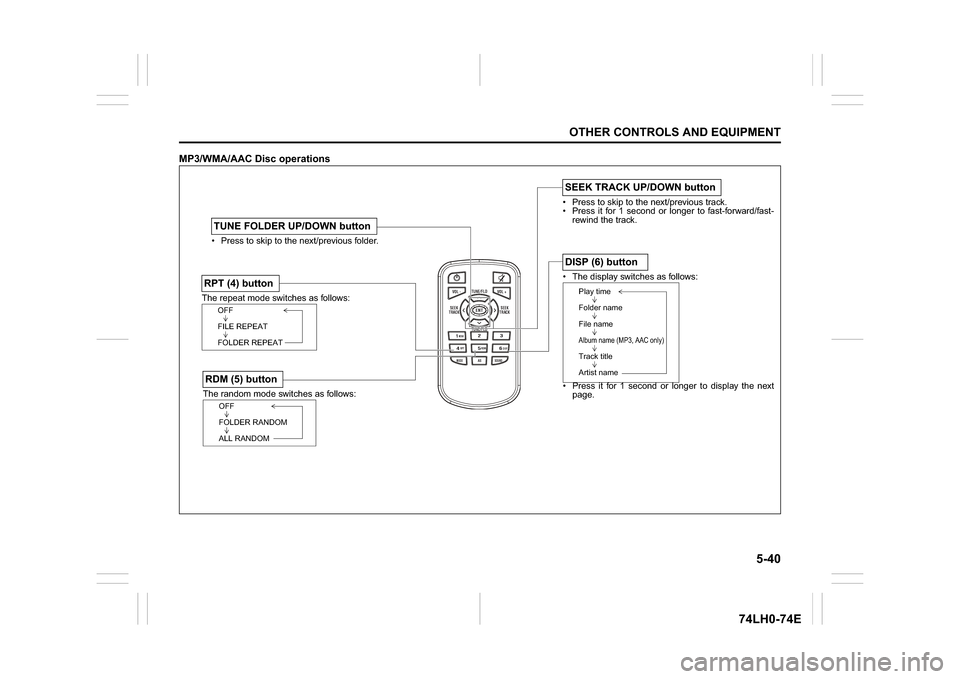
MP3/WMA/AAC Disc operations
/TUNE
VOL -VOL + FLD/TUNE
MODE
AS
SOUND
1
5
4
FLDENT
SEEK
TRACK
SEEK
TRACK
RPT RDM
6
MENU
3 2DISP
The random mode switches as follows:RDM (5) button
OFF
FOLDER RANDOM
ALL RANDOM
The repeat mode switches as follows:RPT (4) button
OFF
FILE REPEAT
FOLDER REPEAT Press to skip to the next/previous folder.TUNE FOLDER UP/DOWN button
The display switches as follows:
Press it for 1 second or longer to display the next
page.DISP (6) button
Play time
Folder name
File nameAlbum name (MP3, AAC only)Track title
Artist name
Press to skip to the next/previous track.
Press it for 1 second or longer to fast-forward/fast-
rewind the track.SEEK TRACK UP/DOWN button
Page 168 of 336
5-41OTHER CONTROLS AND EQUIPMENT
74LH0-74E
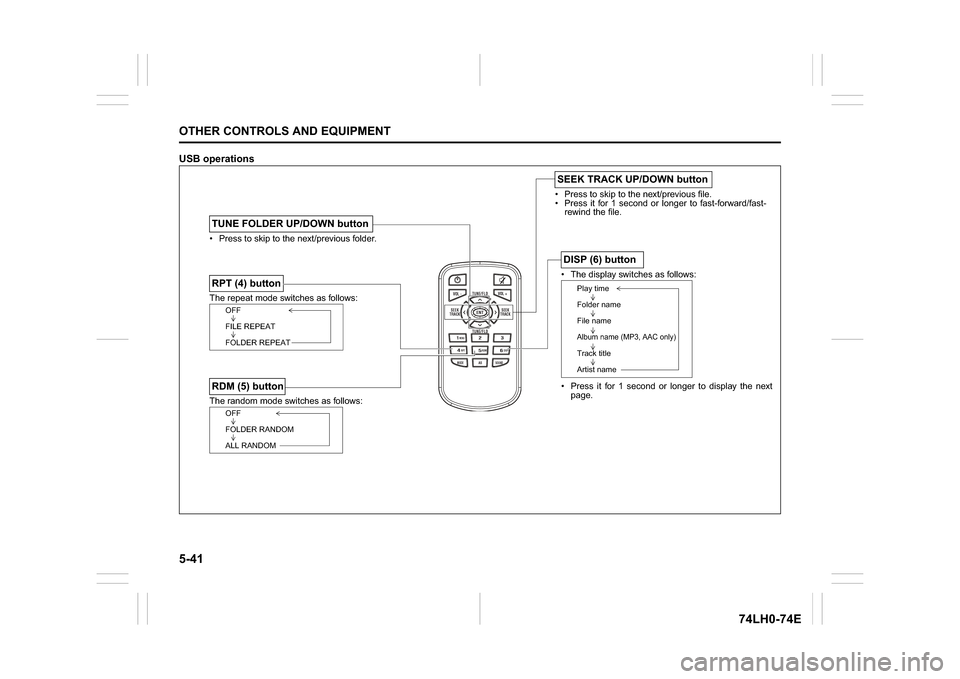
USB operations
/TUNE
VOL -VOL + FLD/TUNE
MODE
AS
SOUND
1
5
4
FLDENT
SEEK
TRACK
SEEK
TRACK
RPT RDM
6
MENU
3 2DISP
Press to skip to the next/previous file.
Press it for 1 second or longer to fast-forward/fast-
rewind the file.SEEK TRACK UP/DOWN button
The repeat mode switches as follows:RPT (4) button
OFF
FILE REPEAT
FOLDER REPEAT
The display switches as follows:
Press it for 1 second or longer to display the next
page.DISP (6) button
Play time
Folder name
File nameAlbum name (MP3, AAC only)Track title
Artist name
Press to skip to the next/previous folder.TUNE FOLDER UP/DOWN buttonThe random mode switches as follows:RDM (5) button
OFF
FOLDER RANDOM
ALL RANDOM
Page 169 of 336
5-42
OTHER CONTROLS AND EQUIPMENT
74LH0-74E
iPod
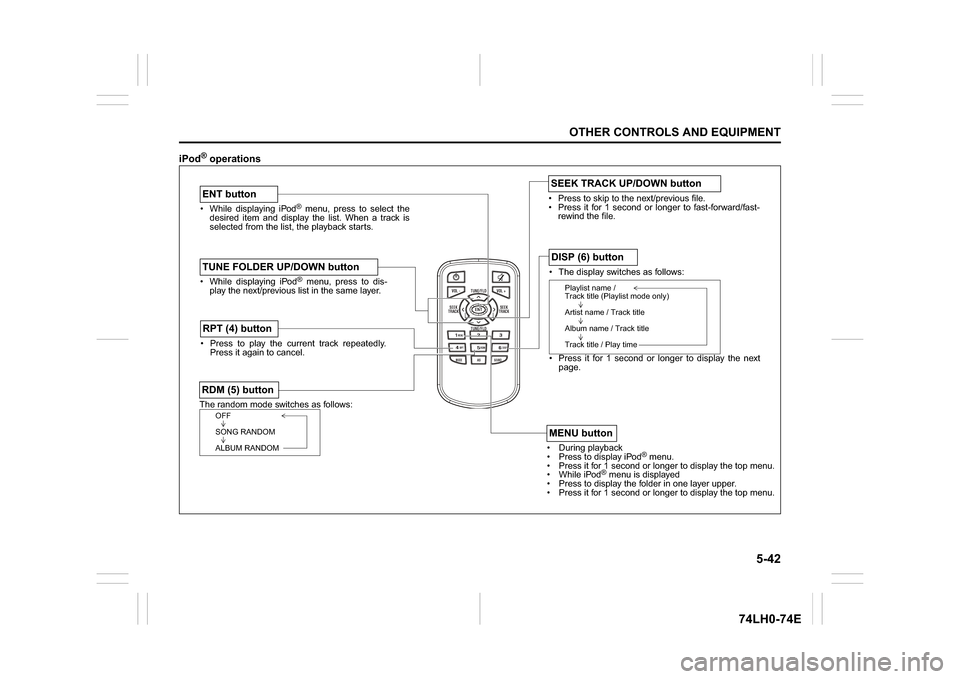
® operations
/TUNE
VOL -VOL + FLD/TUNE
MODE
AS
SOUND
1
5
4
FLDENT
SEEK
TRACK
SEEK
TRACK
RPT RDM
6
MENU
3 2DISP
While displaying iPod
® menu, press to select the
desired item and display the list. When a track is
selected from the list, the playback starts.
ENT buttonThe random mode switches as follows:RDM (5) button
OFF
SONG RANDOM
ALBUM RANDOM
Press to play the current track repeatedly.
Press it again to cancel.RPT (4) button
The display switches as follows:
Press it for 1 second or longer to display the next
page.DISP (6) button
Playlist name /
Track title (Playlist mode only)
Artist name / Track title
Album name / Track title
Track title / Play time
During playback
Pres
s to display iPod
® menu.
Press it for 1 second or longer to display the top menu.
While iPod
® menu is displayed
Press to displa
y the folder in one layer upper.
Press it for 1 second or longer to display the top menu.
MENU button
While displaying iPod
® menu, press to dis-
play the next/previous list in the same layer.
TUNE FOLDER UP/DOWN button
Press to skip to the next/previous file.
Press it for 1 second or longer to fast-forward/fast-
rewind the file.SEEK TRACK UP/DOWN button
Page 170 of 336
5-43OTHER CONTROLS AND EQUIPMENT
74LH0-74E
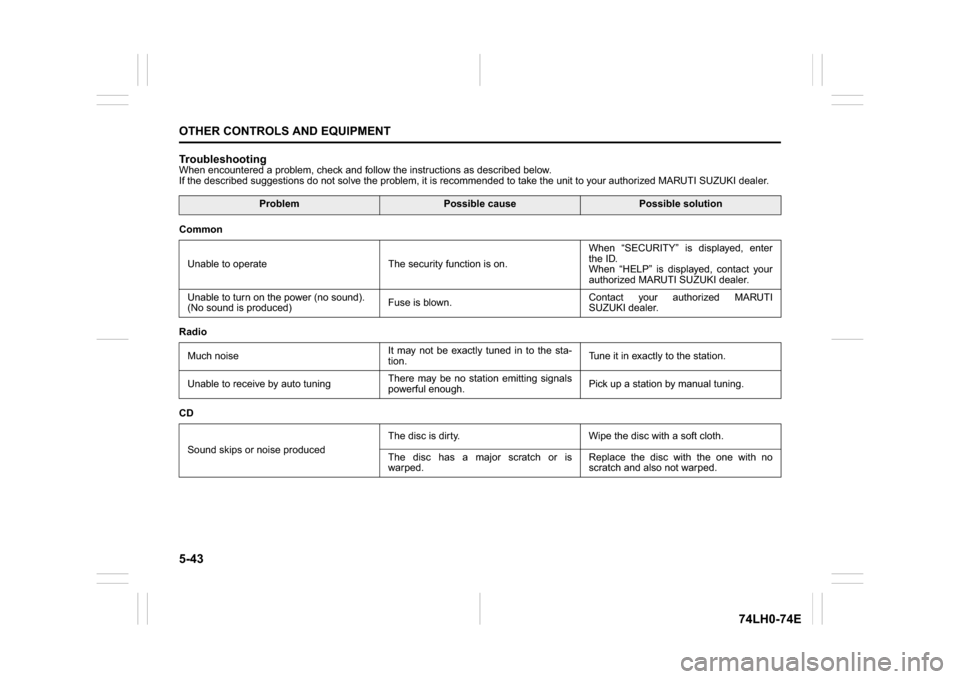
TroubleshootingWhen encountered a problem, check and follow the instructions as described below.
If the described suggestions do not solve the problem, it is recommended to take the unit to your authorized MARUTI SUZUKI dealer.
Problem
Possible cause
Possible solution
Common
Unable to operate The security function is on.When “SECURITY” is displayed, enter
the ID.
When “HELP” is displayed, contact your
authorized MARUTI SUZUKI dealer.
Unable to turn on the power (no sound).
(No sound is produced)Fuse is blown.Contact your authorized MARUTI
SUZUKI dealer.
Radio
Much noiseIt may not be exactly tuned in to the sta-
tion.Tune it in exactly to the station.
Unable to receive by auto tuningThere may be no station emitting signals
powerful enough.Pick up a station by manual tuning.
CD
Sound skips or noise producedThe disc is dirty. Wipe the disc with a soft cloth.
The disc has a major scratch or is
warped.Replace the disc with the one with no
scratch and also not warped.
Page 171 of 336
5-44
OTHER CONTROLS AND EQUIPMENT
74LH0-74E
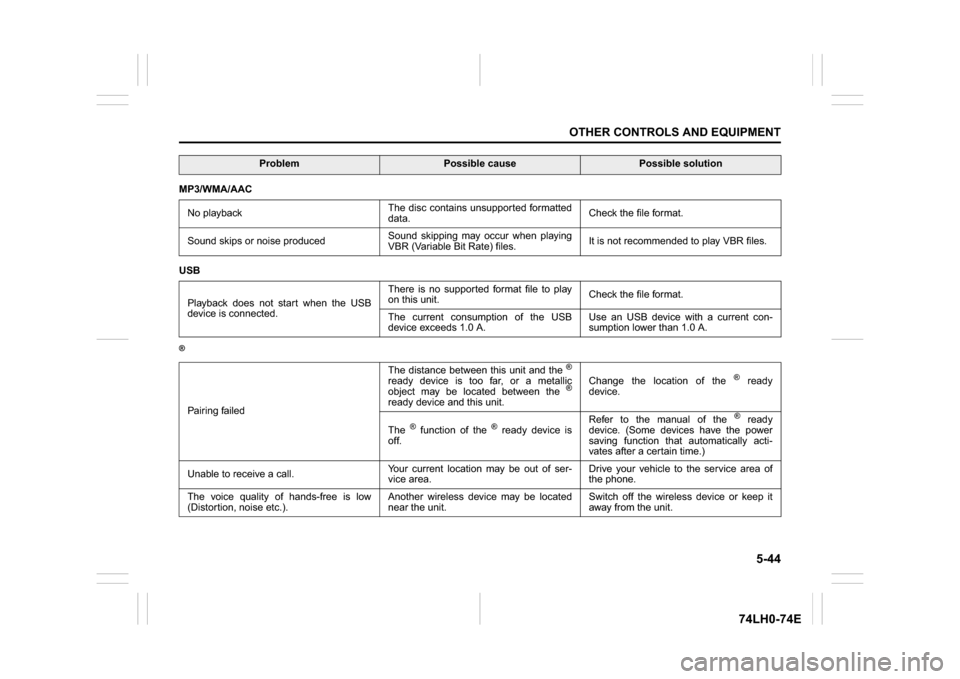
MP3/WMA/AAC
No playbackThe disc contains unsupported formatted
data.Check the file format.
Sound skips or noise producedSound skipping may occur when playing
VBR (Variable Bit Rate) files.It is not recommended to play VBR files.
USB
Playback does not start when the USB
device is connected.There is no supported format file to play
on this unit.Check the file format.
The current consumption of the USB
device exceeds 1.0 A.Use an USB device with a current con-
sumption lower than 1.0 A.®Pairing failedThe distance between this unit and the
®
ready device is too far, or a metallic
object may be located between the
®
ready device and this unit.Change the location of the
® ready
device.
The
® function of the
® ready device is
off.Refer to the manual of the
® ready
device. (Some devices have the power
saving function that automatically acti-
vates after a certain time.)
Unable to receive a call.Your current location may be out of ser-
vice area.Drive your vehicle to the service area of
the phone.
The voice quality of hands-free is low
(Distortion, noise etc.).Another wireless device may be located
near the unit.Switch off the wireless device or keep it
away from the unit.
Problem
Possible cause
Possible solution
Page 172 of 336
5-45OTHER CONTROLS AND EQUIPMENT
74LH0-74E
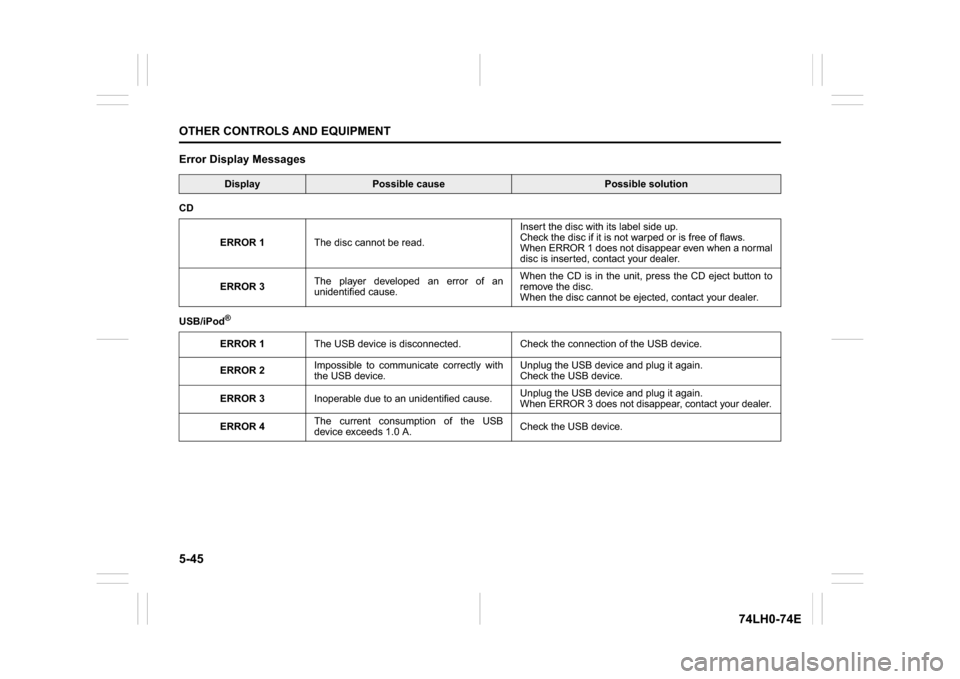
Error Display Messages
Display
Possible cause
Possible solution
CD
ERROR 1The disc cannot be read.Insert the disc with its label side up.
Check the disc if it is not warped or is free of flaws.
When ERROR 1 does not disappear even when a normal
disc is inserted, contact your dealer.
ERROR 3The player developed an error of an
unidentified cause.When the CD is in the unit, press the CD eject button to
remove the disc.
When the disc cannot be ejected, contact your dealer.
USB/iPod
®ERROR 1The USB device is disconnected. Check the connection of the USB device.
ERROR 2Impossible to communicate correctly with
the USB device.Unplug the USB device and plug it again.
Check the USB device.
ERROR 3Inoperable due to an unidentified cause.Unplug the USB device and plug it again.
When ERROR 3 does not disappear, contact your dealer.
ERROR 4The current consumption of the USB
device exceeds 1.0 A.Check the USB device.