Proper SUZUKI SWIFT 2017 5.G Service Manual
[x] Cancel search | Manufacturer: SUZUKI, Model Year: 2017, Model line: SWIFT, Model: SUZUKI SWIFT 2017 5.GPages: 336, PDF Size: 6.24 MB
Page 206 of 336
7-15
INSPECTION AND MAINTENANCE
74LH0-74E
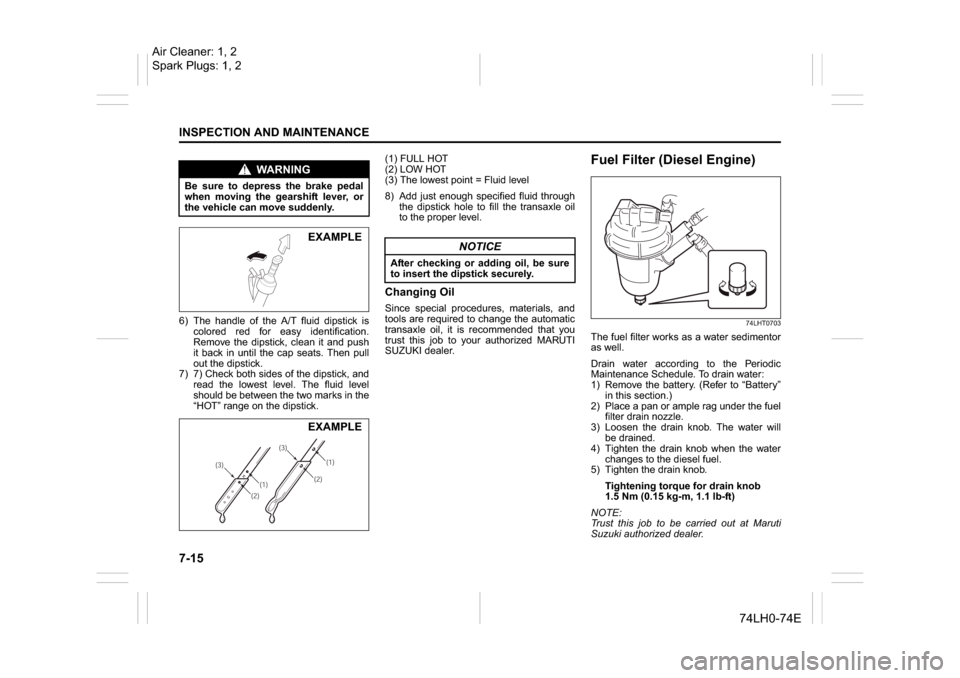
6) The handle of the A/T fluid dipstick is
colored red for easy identification.
Remove the dipstick, clean it and push
it back in until the cap seats. Then pull
out the dipstick.
7) 7) Check both sides of the dipstick, and
read the lowest level. The fluid level
should be between the two marks in the
“HOT” range on the dipstick.(1) FULL HOT
(2) LOW HOT
(3) The lowest point = Fluid level
8) Add just enough specified fluid through
the dipstick hole to fill the transaxle oil
to the proper level.
Changing Oil
Since special procedures, materials, and
tools are required to change the automatic
transaxle oil, it is recommended that you
trust this job to your authorized MARUTI
SUZUKI dealer.
Fuel Filter (Diesel Engine)
74LHT0703
The fuel filter works as a water sedimentor
as well.
Drain water according to the Periodic
Maintenance Schedule. To drain water:
1) Remove the battery. (Refer to “Battery”
in this section.)
2) Place a pan or ample rag under the fuel
filter drain nozzle.
3) Loosen the drain knob. The water will
be drained.
4) Tighten the drain knob when the water
changes to the diesel fuel.
5) Tighten the drain knob.
Tightening torque for drain knob
1.5 Nm (0.15 kg-m, 1.1 lb-ft)
NOTE:
Trust this job to be carried out at Maruti
Suzuki authorized dealer.
WA R N I N G
Be sure to depress the brake pedal
when moving the gearshift lever, or
the vehicle can move suddenly.
EXAMPLE
(1)(2) (3)(1)
(2)(3)
EXAMPLE
NOTICE
After checking or adding oil, be sure
to insert the dipstick securely.
Air Cleaner: 1, 2
Spark Plugs: 1, 2
Page 208 of 336
7-17INSPECTION AND MAINTENANCE
74LH0-74E
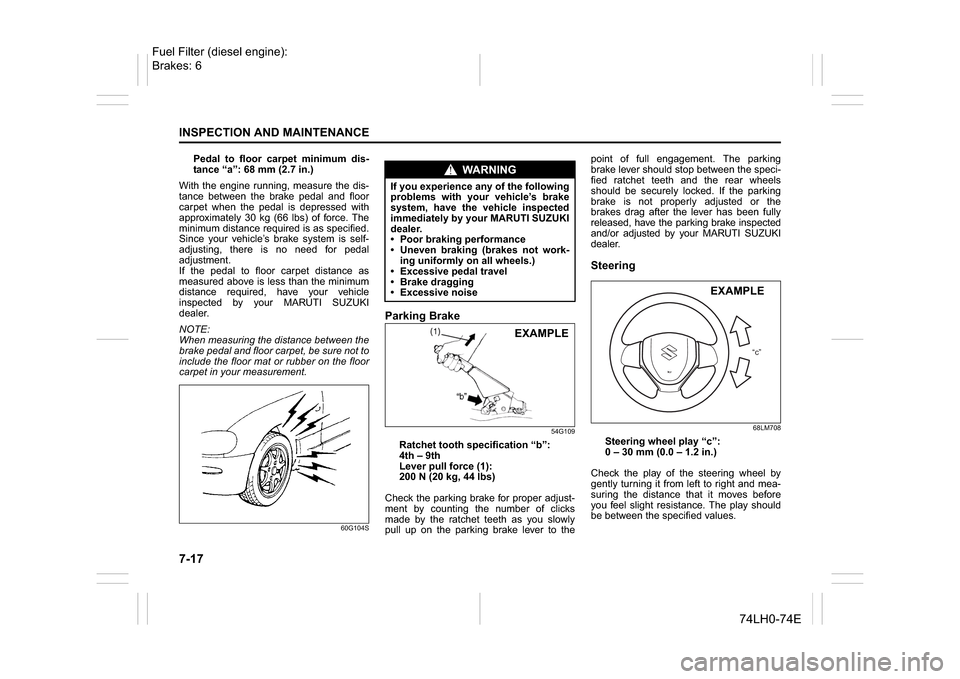
Pedal to floor carpet minimum dis-
tance “a”: 68 mm (2.7 in.)
With the engine running, measure the dis-
tance between the brake pedal and floor
carpet when the pedal is depressed with
approximately 30 kg (66 lbs) of force. The
minimum distance required is as specified.
Since your vehicle’s brake system is self-
adjusting, there is no need for pedal
adjustment.
If the pedal to floor carpet distance as
measured above is less than the minimum
distance required, have your vehicle
inspected by your MARUTI SUZUKI
dealer.
NOTE:
When measuring the distance between the
brake pedal and floor carpet, be sure not to
include the floor mat or rubber on the floor
carpet in your measurement.
60G104S
Parking Brake
54G109
Ratchet tooth specification “b”:
4th – 9th
Lever pull force (1):
200 N (20 kg, 44 lbs)
Check the parking brake for proper adjust-
ment by counting the number of clicks
made by the ratchet teeth as you slowly
pull up on the parking brake lever to thepoint of full engagement. The parking
brake lever should stop between the speci-
fied ratchet teeth and the rear wheels
should be securely locked. If the parking
brake is not properly adjusted or the
brakes drag after the lever has been fully
released, have the parking brake inspected
and/or adjusted by your MARUTI SUZUKI
dealer.
Steering
68LM708
Steering wheel play “c”:
0 – 30 mm (0.0 – 1.2 in.)
Check the play of the steering wheel by
gently turning it from left to right and mea-
suring the distance that it moves before
you feel slight resistance. The play should
be between the specified values.
WA R N I N G
If you experience any of the following
problems with your vehicle’s brake
system, have the vehicle inspected
immediately by your MARUTI SUZUKI
dealer.
Poor braking performance
Uneven braking (brakes not work-
ing uniformly on all wheels.)
Excessive pedal travel
Brake dragging
Excessive noise
EXAMPLE
“c”
EXAMPLE
Fuel Filter (diesel engine):
Brakes: 6
Page 210 of 336
7-19INSPECTION AND MAINTENANCE
74LH0-74E
Tire Rotation
60G-09-019E
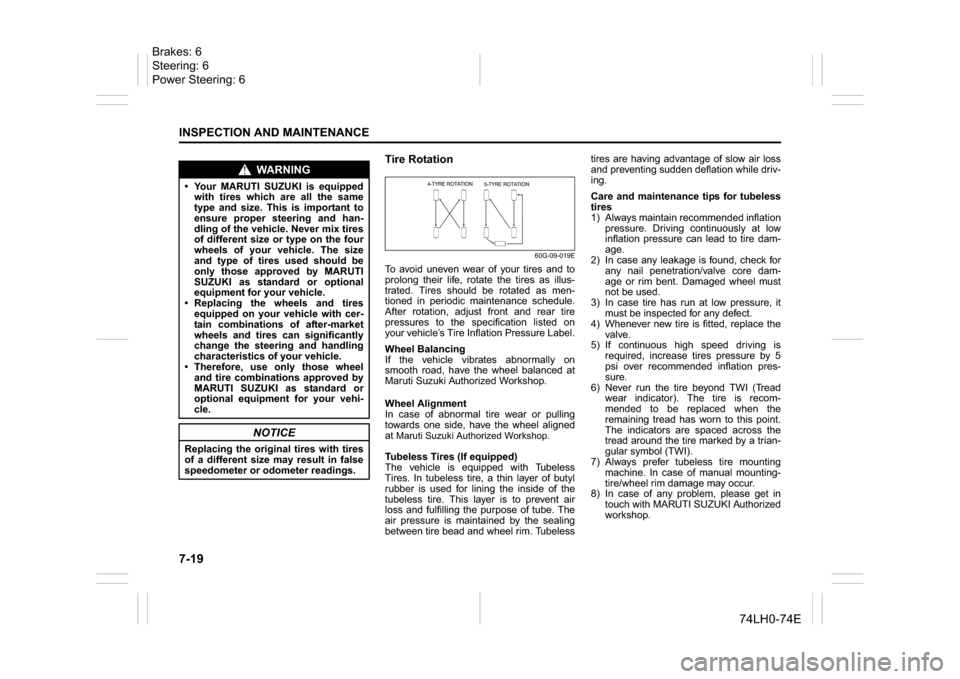
To avoid uneven wear of your tires and to
prolong their life, rotate the tires as illus-
trated. Tires should be rotated as men-
tioned in periodic maintenance schedule.
After rotation, adjust front and rear tire
pressures to the specification listed on
your vehicle’s Tire Inflation Pressure Label.
Wheel Balancing
If the vehicle vibrates abnormally on
smooth road, have the wheel balanced at
Maruti Suzuki Authorized Workshop.
Wheel Alignment
In case of abnormal tire wear or pulling
towards one side, have the wheel aligned
at Maruti Suzuki Authorized Workshop.Tubeless Tires (If equipped)
The vehicle is equipped with Tubeless
Tires. In tubeless tire, a thin layer of butyl
rubber is used for lining the inside of the
tubeless tire. This layer is to prevent air
loss and fulfilling the purpose of tube. The
air pressure is maintained by the sealing
between tire bead and wheel rim. Tubelesstires are having advantage of slow air loss
and preventing sudden deflation while driv-
ing.
Care and maintenance tips for tubeless
tires
1) Always maintain recommended inflation
pressure. Driving continuously at low
inflation pressure can lead to tire dam-
age.
2) In case any leakage is found, check for
any nail penetration/valve core dam-
age or rim bent. Damaged wheel must
not be used.
3) In case tire has run at low pressure, it
must be inspected for any defect.
4) Whenever new tire is fitted, replace the
valve.
5) If continuous high speed driving is
required, increase tires pressure by 5
psi over recommended inflation pres-
sure.
6) Never run the tire beyond TWI (Tread
wear indicator). The tire is recom-
mended to be replaced when the
remaining tread has worn to this point.
The indicators are spaced across the
tread around the tire marked by a trian-
gular symbol (TWI).
7) Always prefer tubeless tire mounting
machine. In case of manual mounting-
tire/wheel rim damage may occur.
8) In case of any problem, please get in
touch with MARUTI SUZUKI Authorized
workshop.
WA R N I N G
Your MARUTI SUZUKI is equipped
with tires which are all the same
type and size. This is important to
ensure proper steering and han-
dling of the vehicle. Never mix tires
of different size or type on the four
wheels of your vehicle. The size
and type of tires used should be
only those approved by MARUTI
SUZUKI as standard or optional
equipment for your vehicle.
Replacing the wheels and tires
equipped on your vehicle with cer-
tain combinations of after-market
wheels and tires can significantly
change the steering and handling
characteristics of your vehicle.
Therefore, use only those wheel
and tire combinations approved by
MARUTI SUZUKI as standard or
optional equipment for your vehi-
cle.
NOTICE
Replacing the original tires with tires
of a different size may result in false
speedometer or odometer readings.
Brakes: 6
Steering: 6
Power Steering: 6
Page 219 of 336
7-28
INSPECTION AND MAINTENANCE
74LH0-74E
63J127
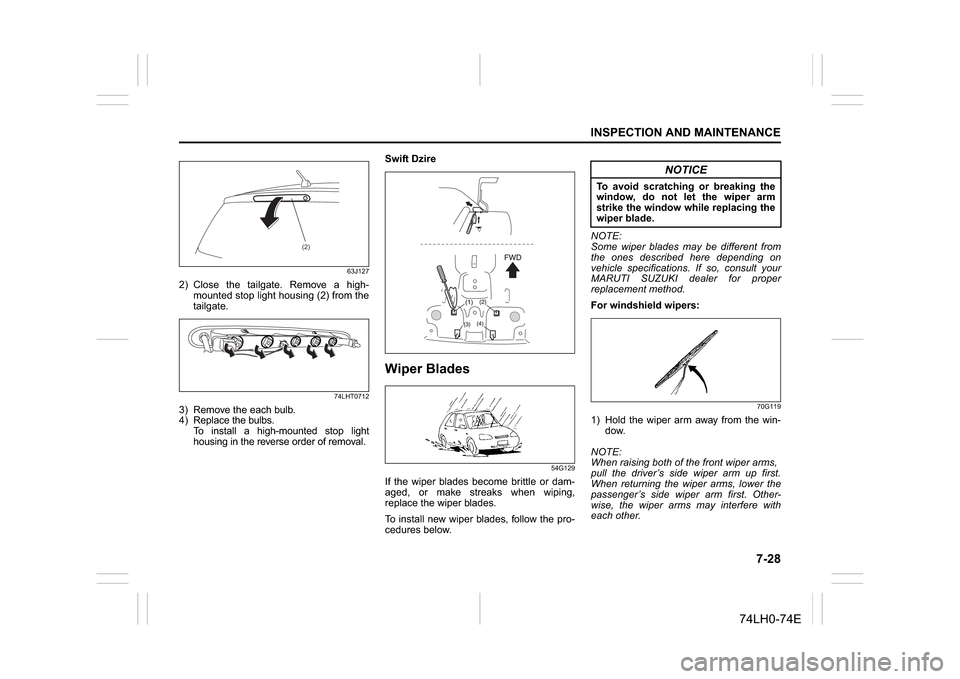
2) Close the tailgate. Remove a high-
mounted stop light housing (2) from the
tailgate.
74LHT0712
3) Remove the each bulb.
4) Replace the bulbs.
To install a high-mounted stop light
housing in the reverse order of removal.Swift Dzire
Wiper Blades
54G129
If the wiper blades become brittle or dam-
aged, or make streaks when wiping,
replace the wiper blades.
To install new wiper blades, follow the pro-
cedures below.NOTE:
Some wiper blades may be different from
the ones described here depending on
vehicle specifications. If so, consult your
MARUTI SUZUKI dealer for proper
replacement method.
For windshield wipers:
70G119
1) Hold the wiper arm away from the win-
dow.
NOTE:
When raising both of the front wiper arms,
pull the driver’s side wiper arm up first.
When returning the wiper arms, lower the
passenger’s side wiper arm first. Other-
wise, the wiper arms may interfere with
each other.
(2)
NOTICE
To avoid scratching or breaking the
window, do not let the wiper arm
strike the window while replacing the
wiper blade.
Page 220 of 336
7-29INSPECTION AND MAINTENANCE
74LH0-74E
54G130
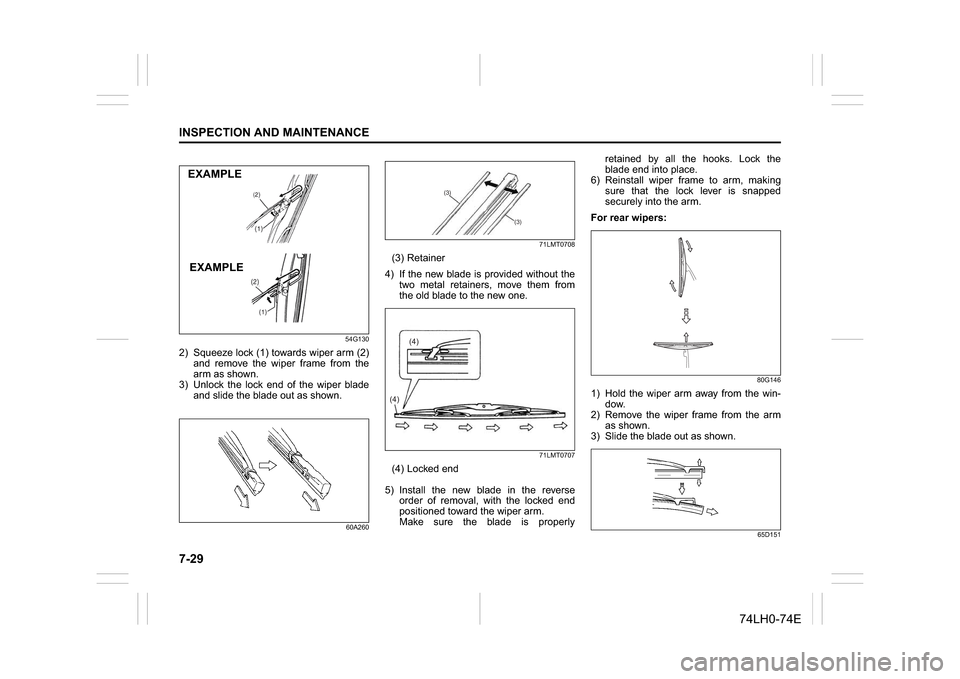
2) Squeeze lock (1) towards wiper arm (2)
and remove the wiper frame from the
arm as shown.
3) Unlock the lock end of the wiper blade
and slide the blade out as shown.
60A26071LMT0708
(3) Retainer
4) If the new blade is provided without the
two metal retainers, move them from
the old blade to the new one.
71LMT0707
(4) Locked end
5) Install the new blade in the reverse
order of removal, with the locked end
positioned toward the wiper arm.
Make sure the blade is properlyretained by all the hooks. Lock the
blade end into place.
6) Reinstall wiper frame to arm, making
sure that the lock lever is snapped
securely into the arm.
For rear wipers:
80G146
1) Hold the wiper arm away from the win-
dow.
2) Remove the wiper frame from the arm
as shown.
3) Slide the blade out as shown.
65D151
EXAMPLE
EXAMPLE
(3)
(3)
(4)(4)
Page 221 of 336
7-30
INSPECTION AND MAINTENANCE
74LH0-74E
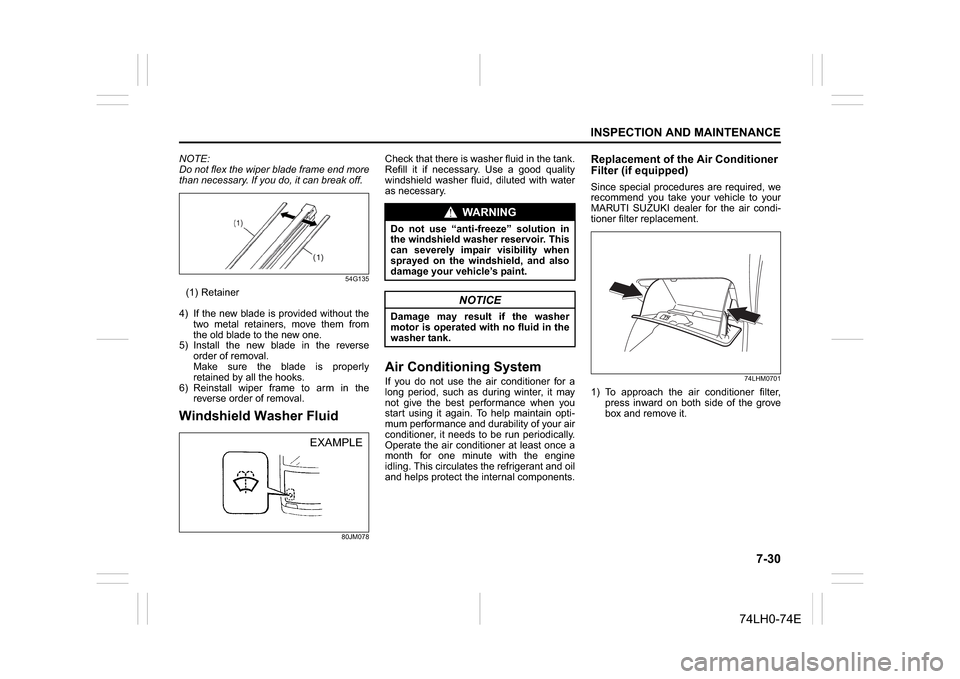
NOTE:
Do not flex the wiper blade frame end more
than necessary. If you do, it can break off.
54G135
(1) Retainer
4) If the new blade is provided without the
two metal retainers, move them from
the old blade to the new one.
5) Install the new blade in the reverse
order of removal.
Make sure the blade is properly
retained by all the hooks.
6) Reinstall wiper frame to arm in the
reverse order of removal.Windshield Washer Fluid
80JM078
Check that there is washer fluid in the tank.
Refill it if necessary. Use a good quality
windshield washer fluid, diluted with water
as necessary.Air Conditioning SystemIf you do not use the air conditioner for a
long period, such as during winter, it may
not give the best performance when you
start using it again. To help maintain opti-
mum performance and durability of your air
conditioner, it needs to be run periodically.
Operate the air conditioner at least once a
month for one minute with the engine
idling. This circulates the refrigerant and oil
and helps protect the internal components.
Replacement of the Air Conditioner
Filter (if equipped)Since special procedures are required, we
recommend you take your vehicle to your
MARUTI SUZUKI dealer for the air condi-
tioner filter replacement.
74LHM0701
1) To approach the air conditioner filter,
press inward on both side of the grove
box and remove it.
EXAMPLE
WA R N I N G
Do not use “anti-freeze” solution in
the windshield washer reservoir. This
can severely impair visibility when
sprayed on the windshield, and also
damage your vehicle’s paint.
NOTICE
Damage may result if the washer
motor is operated with no fluid in the
washer tank.
Page 227 of 336
8-4
EMERGENCY SERVICE
74LH0-74E
Changing WheelsTo change a wheel, use the following pro-
cedure:
1) Clear all passengers and luggage from
the vehicle.
NOTE:
The Jack and tools are located under the
spare wheel.
2) Remove the jack, tools and spare wheel
from the vehicle.
3) Loosen, but do not remove the wheel
nuts.
4) Jack up the vehicle (follow the jacking
instructions in this section).
5) Remove the wheel nuts and wheel.
6) Before installing the new wheel, clean
any mud or dirt off from the surface of
the wheel and hub with a clean cloth.
Clean the hub carefully; it may be hot
from driving.
7) Install the new wheel and replace the
wheel nuts with their cone shaped end
facing the wheel. Tighten each nuts
snugly by hand until the wheel is
securely seated on the hub.
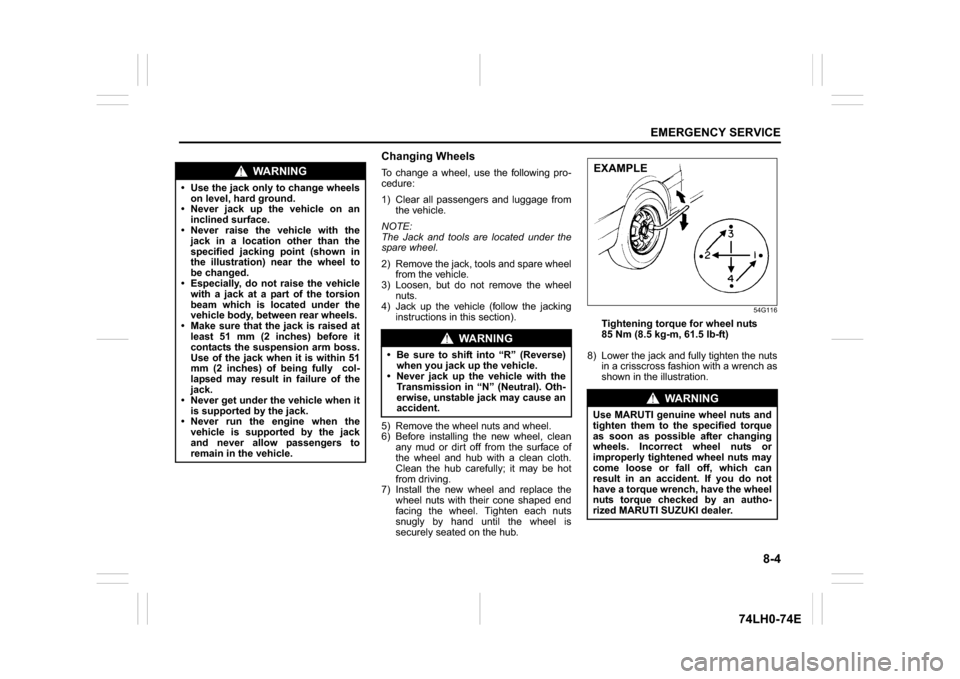
54G116
Tightening torque for wheel nuts
85 Nm (8.5 kg-m, 61.5 lb-ft)
8) Lower the jack and fully tighten the nuts
in a crisscross fashion with a wrench as
shown in the illustration.
WARNING
Use the jack only to change wheels
on level, hard ground.
Never jack up the vehicle on an
inclined surface.
Never raise the vehicle with the
jack in a location other than the
specified jacking point (shown in
the illustration) near the wheel to
be changed.
Especially, do not raise the vehicle
with a jack at a part of the torsion
beam which is located under the
vehicle body, between rear wheels.
Make sure that the jack is raised at
least 51 mm (2 inches) before it
contacts the suspension arm boss.
Use of the jack when it is within 51
mm (2 inches) of being fully col-
lapsed may result in failure of the
jack.
Never get under the vehicle when it
is supported by the jack.
Never run the engine when the
vehicle is supported by the jack
and never allow passengers to
remain in the vehicle.
WARNING
Be sure to shift into “R” (Reverse)
when you jack up the vehicle.
Never jack up the vehicle with the
Transmission in “N” (Neutral). Oth-
erwise, unstable jack may cause an
accident.
WARNING
Use MARUTI genuine wheel nuts and
tighten them to the specified torque
as soon as possible after changing
wheels. Incorrect wheel nuts or
improperly tightened wheel nuts may
come loose or fall off, which can
result in an accident. If you do not
have a torque wrench, have the wheel
nuts torque checked by an autho-
rized MARUTI SUZUKI dealer.EXAMPLE