SUZUKI SWIFT 2017 5.G Manual PDF
Manufacturer: SUZUKI, Model Year: 2017, Model line: SWIFT, Model: SUZUKI SWIFT 2017 5.GPages: 336, PDF Size: 6.24 MB
Page 71 of 336
2-52
BEFORE DRIVING
74LH0-74E
When the low fuel warning light (1) comes
on, a ding sounds once to remind you to fill
the fuel.
If you do not fill the fuel, a ding sounds
every time when the ignition switch is
turned to “ON” position.
NOTE:
The activation point of the low fuel warning
light (1) varies depending on road condi-
tions (for example, slope or curve) and
driving conditions because of fuel moving
in the tank.
The mark (2) indicates that the fuel filler
door is located on the left side of the vehi-
cle.
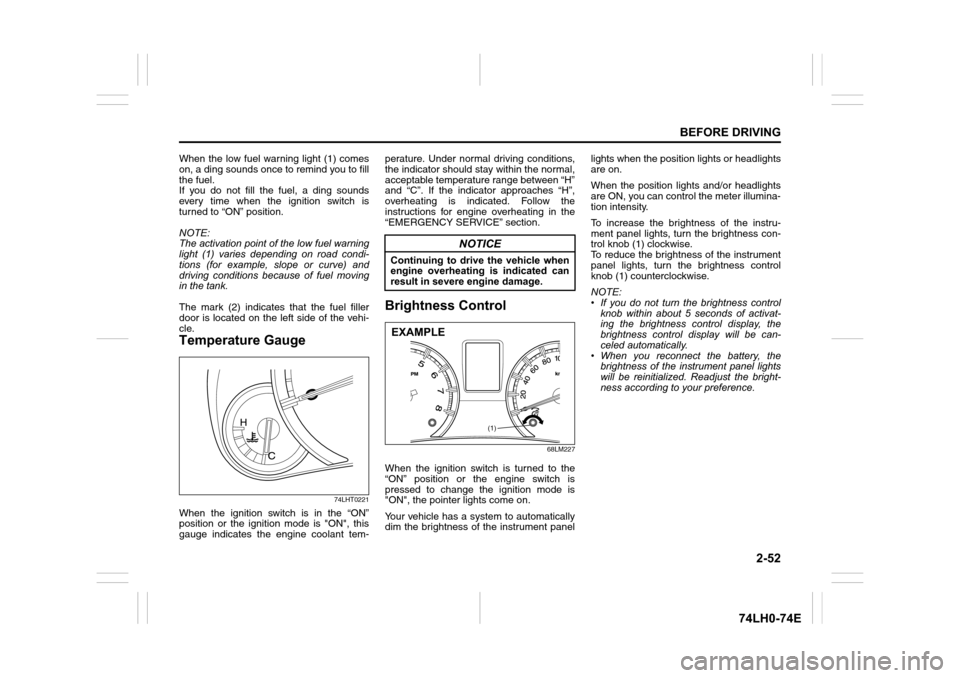
Temperature Gauge
74LHT0221
When the ignition switch is in the “ON”
position or the ignition mode is "ON", this
gauge indicates the engine coolant tem-perature. Under normal driving conditions,
the indicator should stay within the normal,
acceptable temperature range between “H”
and “C”. If the indicator approaches “H”,
overheating is indicated. Follow the
instructions for engine overheating in the
“EMERGENCY SERVICE” section.
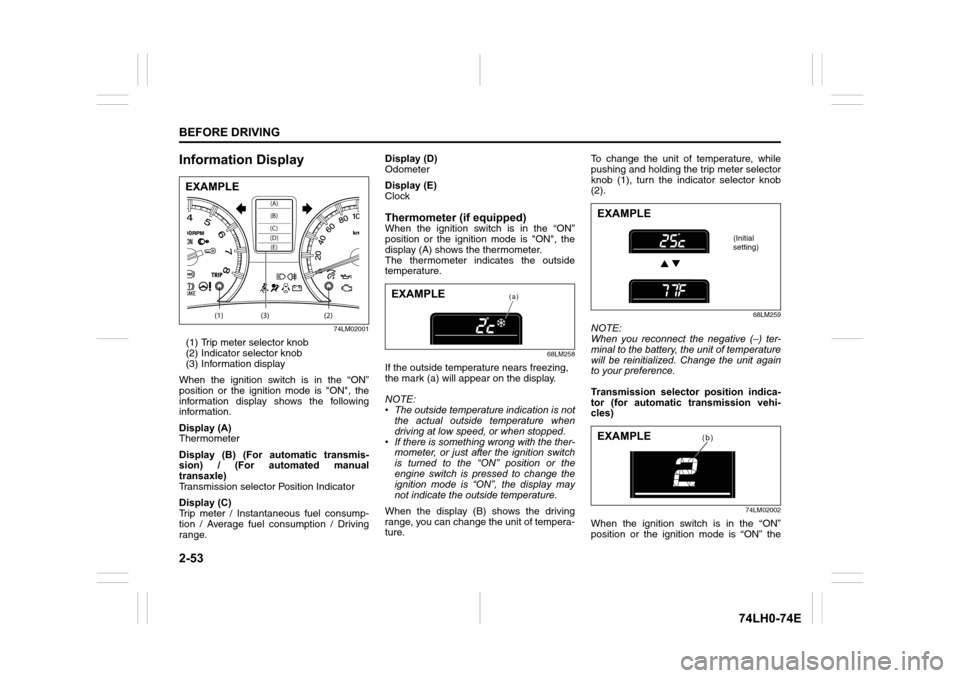
Brightness Control
68LM227
When the ignition switch is turned to the
“ON” position or the engine switch is
pressed to change the ignition mode is
"ON", the pointer lights come on.
Your vehicle has a system to automatically
dim the brightness of the instrument panellights when the position lights or headlights
are on.
When the position lights and/or headlights
are ON, you can control the meter illumina-
tion intensity.
To increase the brightness of the instru-
ment panel lights, turn the brightness con-
trol knob (1) clockwise.
To reduce the brightness of the instrument
panel lights, turn the brightness control
knob (1) counterclockwise.
NOTE:
• If you do not turn the brightness control
knob within about 5 seconds of activat-
ing the brightness control display, the
brightness control display will be can-
celed automatically.
• When you reconnect the battery, the
brightness of the instrument panel lights
will be reinitialized. Readjust the bright-
ness according to your preference.
NOTICE
Continuing to drive the vehicle when
engine overheating is indicated can
result in severe engine damage.
(1)
EXAMPLE
Page 72 of 336
2-53
BEFORE DRIVING
74LH0-74E
Information Display
74LM02001
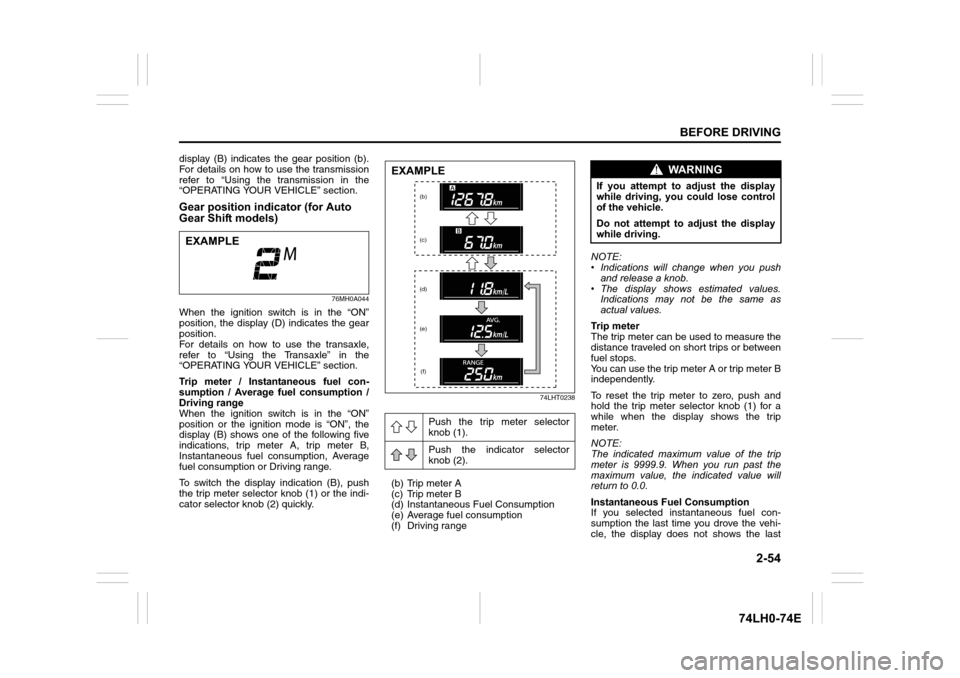
(1) Trip meter selector knob
(2) Indicator selector knob
(3) Information display
When the ignition switch is in the “ON”
position or the ignition mode is "ON", the
information display shows the following
information.
Display (A)
Thermometer
Display (B) (For automatic transmis-
sion) / (For automated manual
transaxle)
Transmission selector Position Indicator
Display (C)
Trip meter / Instantaneous fuel consump-
tion / Average fuel consumption / Driving
range.Display (D)
Odometer
Display (E)
Clock
Thermometer (if equipped)When the ignition switch is in the “ON”
position or the ignition mode is "ON", the
display (A) shows the thermometer.
The thermometer indicates the outside
temperature.
68LM258
If the outside temperature nears freezing,
the mark (a) will appear on the display.
NOTE:
• The outside temperature indication is not
the actual outside temperature when
driving at low speed, or when stopped.
• If there is something wrong with the ther-
mometer, or just after the ignition switch
is turned to the “ON” position or the
engine switch is pressed to change the
ignition mode is “ON”, the display may
not indicate the outside temperature.
When the display (B) shows the driving
range, you can change the unit of tempera-
ture.To change the unit of temperature, while
pushing and holding the trip meter selector
knob (1), turn the indicator selector knob
(2).
68LM259
NOTE:
When you reconnect the negative (–) ter-
minal to the battery, the unit of temperature
will be reinitialized. Change the unit again
to your preference.
Transmission selector position indica-
tor (for automatic transmission vehi-
cles)
74LM02002
When the ignition switch is in the “ON”
position or the ignition mode is “ON” the
(1) (2)(3)
(D)(B) (A)
(C)(E)
EXAMPLE
(a)EXAMPLE
EXAMPLE
(Initial
setting)
(b)EXAMPLE
Page 73 of 336
2-54
BEFORE DRIVING
74LH0-74E
display (B) indicates the gear position (b).
For details on how to use the transmission
refer to “Using the transmission in the
“OPERATING YOUR VEHICLE” section.
Gear position indicator (for Auto
Gear Shift models)
76MH0A044
When the ignition switch is in the “ON”
position, the display (D) indicates the gear
position.
For details on how to use the transaxle,
refer to “Using the Transaxle” in the
“OPERATING YOUR VEHICLE” section.
Trip meter / Instantaneous fuel con-
sumption / Average fuel consumption /
Driving range
When the ignition switch is in the “ON”
position or the ignition mode is “ON”, the
display (B) shows one of the following five
indications, trip meter A, trip meter B,
Instantaneous fuel consumption, Average
fuel consumption or Driving range.
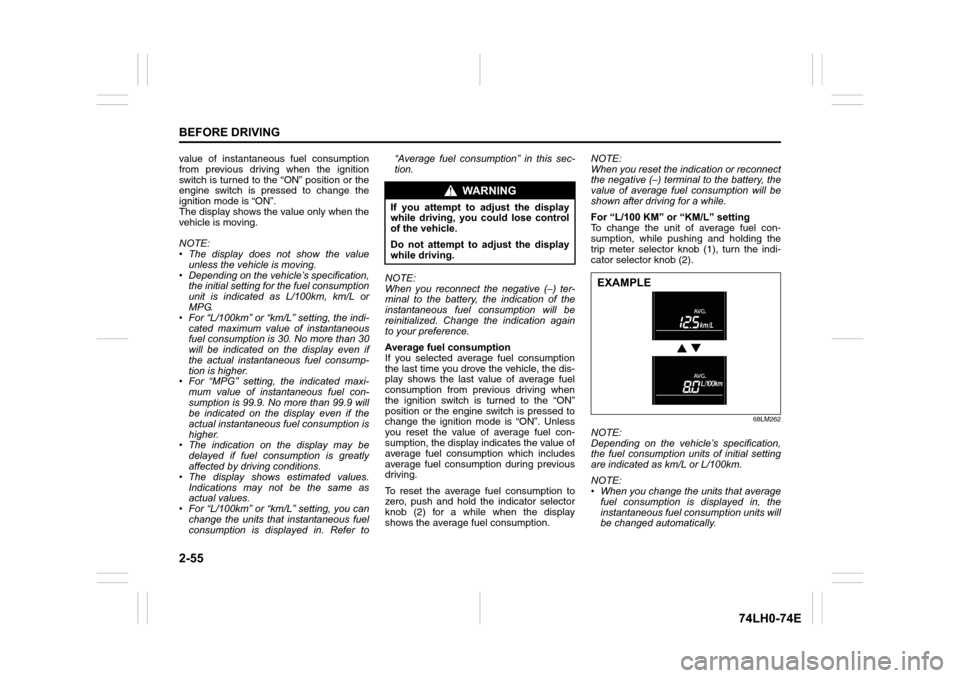
To switch the display indication (B), push
the trip meter selector knob (1) or the indi-
cator selector knob (2) quickly.
74LHT0238
(b) Trip meter A
(c) Trip meter B
(d) Instantaneous Fuel Consumption
(e) Average fuel consumption
(f) Driving rangeNOTE:
• Indications will change when you push
and release a knob.
• The display shows estimated values.
Indications may not be the same as
actual values.
Trip meter
The trip meter can be used to measure the
distance traveled on short trips or between
fuel stops.
You can use the trip meter A or trip meter B
independently.
To reset the trip meter to zero, push and
hold the trip meter selector knob (1) for a
while when the display shows the trip
meter.
NOTE:
The indicated maximum value of the trip
meter is 9999.9. When you run past the
maximum value, the indicated value will
return to 0.0.
Instantaneous Fuel Consumption
If you selected instantaneous fuel con-
sumption the last time you drove the vehi-
cle, the display does not shows the last
EXAMPLE
Push the trip meter selector
knob (1).
Push the indicator selector
knob (2).
EXAMPLE
(b)
(c)
(d)
(e)
(f)
WA R N I N G
If you attempt to adjust the display
while driving, you could lose control
of the vehicle.
Do not attempt to adjust the display
while driving.
Page 74 of 336
2-55
BEFORE DRIVING
74LH0-74E
value of instantaneous fuel consumption
from previous driving when the ignition
switch is turned to the “ON” position or the
engine switch is pressed to change the
ignition mode is “ON”.
The display shows the value only when the
vehicle is moving.
NOTE:
• The display does not show the value
unless the vehicle is moving.
• Depending on the vehicle’s specification,
the initial setting for the fuel consumption
unit is indicated as L/100km, km/L or
MPG.
• For “L/100km” or “km/L” setting, the indi-
cated maximum value of instantaneous
fuel consumption is 30. No more than 30
will be indicated on the display even if
the actual instantaneous fuel consump-
tion is higher.
• For “MPG” setting, the indicated maxi-
mum value of instantaneous fuel con-
sumption is 99.9. No more than 99.9 will
be indicated on the display even if the
actual instantaneous fuel consumption is
higher.
• The indication on the display may be
delayed if fuel consumption is greatly
affected by driving conditions.
• The display shows estimated values.
Indications may not be the same as
actual values.
• For “L/100km” or “km/L” setting, you can
change the units that instantaneous fuel
consumption is displayed in. Refer to“Average fuel consumption” in this sec-
tion.
NOTE:
When you reconnect the negative (–) ter-
minal to the battery, the indication of the
instantaneous fuel consumption will be
reinitialized. Change the indication again
to your preference.
Average fuel consumption
If you selected average fuel consumption
the last time you drove the vehicle, the dis-
play shows the last value of average fuel
consumption from previous driving when
the ignition switch is turned to the “ON”
position or the engine switch is pressed to
change the ignition mode is “ON”. Unless
you reset the value of average fuel con-
sumption, the display indicates the value of
average fuel consumption which includes
average fuel consumption during previous
driving.
To reset the average fuel consumption to
zero, push and hold the indicator selector
knob (2) for a while when the display
shows the average fuel consumption.NOTE:
When you reset the indication or reconnect
the negative (–) terminal to the battery, the
value of average fuel consumption will be
shown after driving for a while.
For “L/100 KM” or “KM/L” setting
To change the unit of average fuel con-
sumption, while pushing and holding the
trip meter selector knob (1), turn the indi-
cator selector knob (2).
68LM262
NOTE:
Depending on the vehicle’s specification,
the fuel consumption units of initial setting
are indicated as km/L or L/100km.
NOTE:
• When you change the units that average
fuel consumption is displayed in, the
instantaneous fuel consumption units will
be changed automatically.
WA R N I N G
If you attempt to adjust the display
while driving, you could lose control
of the vehicle.
Do not attempt to adjust the display
while driving.
EXAMPLE
Page 75 of 336
2-56
BEFORE DRIVING
74LH0-74E
• When you reconnect the negative (–)
terminal to the battery, the unit of the
average fuel consumption will be reini-
tialized. Change the unit again to your
preference.
Driving range
If you selected driving range the last time
you drove the vehicle, the display indicates
“---” for a few seconds and then indicates
the current driving range when the ignition
switch is turned to the “ON” position or the
engine switch is pressed to change the
ignition mode is “ON”.
The driving range shown in the display is
the approximate distance you can drive
until the fuel gauge indicates “E”, based on
current driving conditions.
When the low fuel warning light comes on,
the display “---” will appear.
If the low fuel warning light comes on, fill
the fuel tank immediately regardless of the
value of driving range shown in the display.
As the driving range after refueling is cal-
culated based on the most recent driving
condition, the value is different each time
you refuel.
NOTE:
• If you refuel when the ignition switch is in
the “ON” position or the ignition mode is
"ON", the driving range may not indicate
the correct value.
• When you reconnect the negative (–)
terminal to the battery, the value of driv-ing range will be shown after driving for a
while.
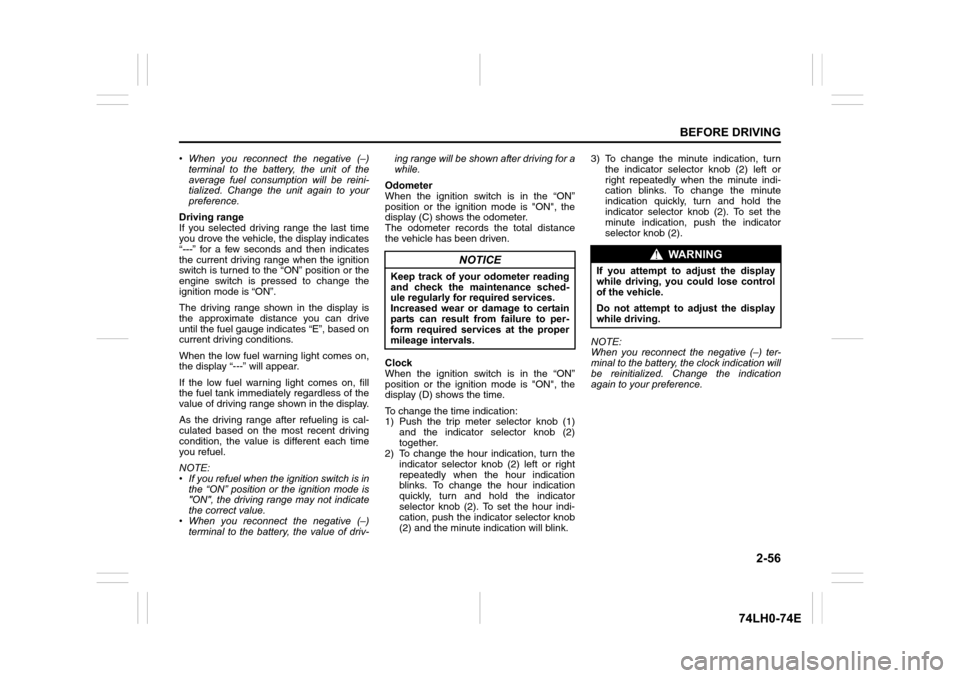
Odometer
When the ignition switch is in the “ON”
position or the ignition mode is "ON", the
display (C) shows the odometer.
The odometer records the total distance
the vehicle has been driven.
Clock
When the ignition switch is in the “ON”
position or the ignition mode is "ON", the
display (D) shows the time.
To change the time indication:
1) Push the trip meter selector knob (1)
and the indicator selector knob (2)
together.
2) To change the hour indication, turn the
indicator selector knob (2) left or right
repeatedly when the hour indication
blinks. To change the hour indication
quickly, turn and hold the indicator
selector knob (2). To set the hour indi-
cation, push the indicator selector knob
(2) and the minute indication will blink.3) To change the minute indication, turn
the indicator selector knob (2) left or
right repeatedly when the minute indi-
cation blinks. To change the minute
indication quickly, turn and hold the
indicator selector knob (2). To set the
minute indication, push the indicator
selector knob (2).
NOTE:
When you reconnect the negative (–) ter-
minal to the battery, the clock indication will
be reinitialized. Change the indication
again to your preference.
NOTICE
Keep track of your odometer reading
and check the maintenance sched-
ule regularly for required services.
Increased wear or damage to certain
parts can result from failure to per-
form required services at the proper
mileage intervals.
WA R N I N G
If you attempt to adjust the display
while driving, you could lose control
of the vehicle.
Do not attempt to adjust the display
while driving.
Page 76 of 336
2-57
BEFORE DRIVING
74LH0-74E
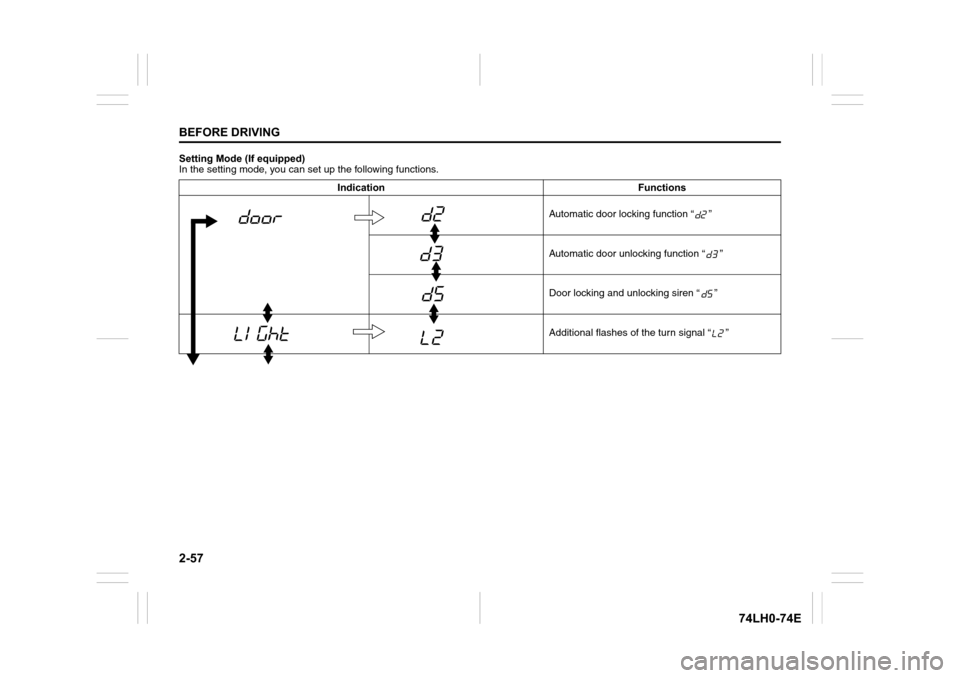
Setting Mode (If equipped)
In the setting mode, you can set up the following functions.
Indication Functions
Automatic door locking function “ ”
Automatic door unlocking function “ ”
Door locking and unlocking siren “ ”
Additional flashes of the turn signal “ ”
Page 77 of 336
2-58
BEFORE DRIVING
74LH0-74E
NOTE:
Depending on vehicle’s specifications,
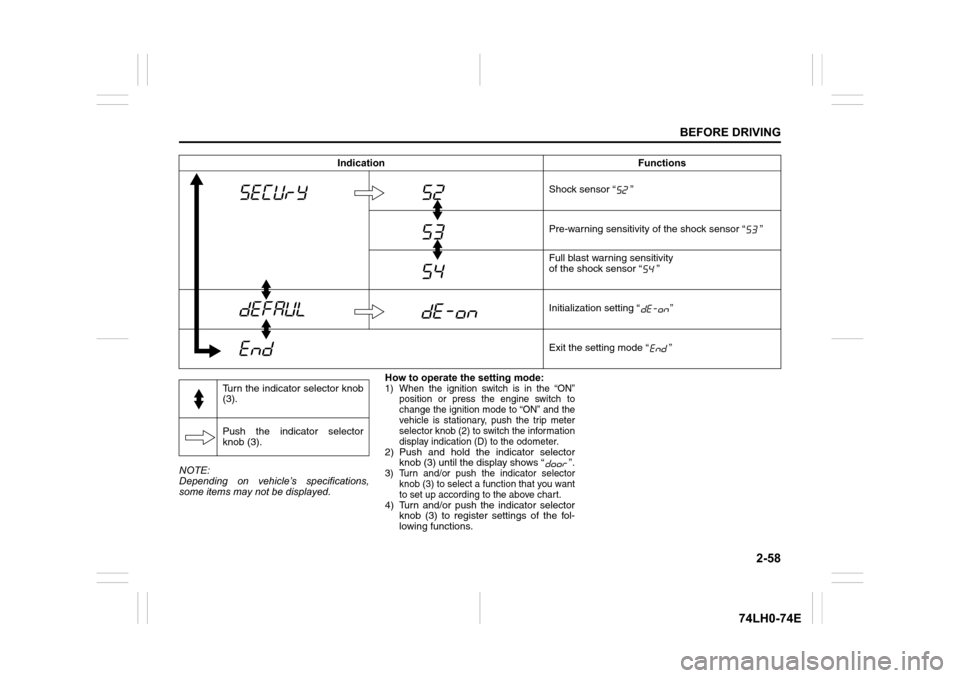
some items may not be displayed.How to operate the setting mode:
1) When the ignition switch is in the “ON”
position or press the engine switch to
change the ignition mode to “ON” and the
vehicle is stationary, push the trip meter
selector knob (2) to switch the information
display indication (D) to the odometer.
2) Push and hold the indicator selector
knob (3) until the display shows “ ”.
3) Turn and/or push the indicator selector
knob (3) to select a function that you want
to set up according to the above chart.
4) Turn and/or push the indicator selector
knob (3) to register settings of the fol-
lowing functions.Shock sensor “ ”
Pre-warning sensitivity of the shock sensor “ ”
Full blast warning sensitivity
of the shock sensor “ ”
Initialization setting “ ”
Exit the setting mode “ ” Indication Functions
Turn the indicator selector knob
(3).
Push the indicator selector
knob (3).
Page 78 of 336
2-59
BEFORE DRIVING
74LH0-74E
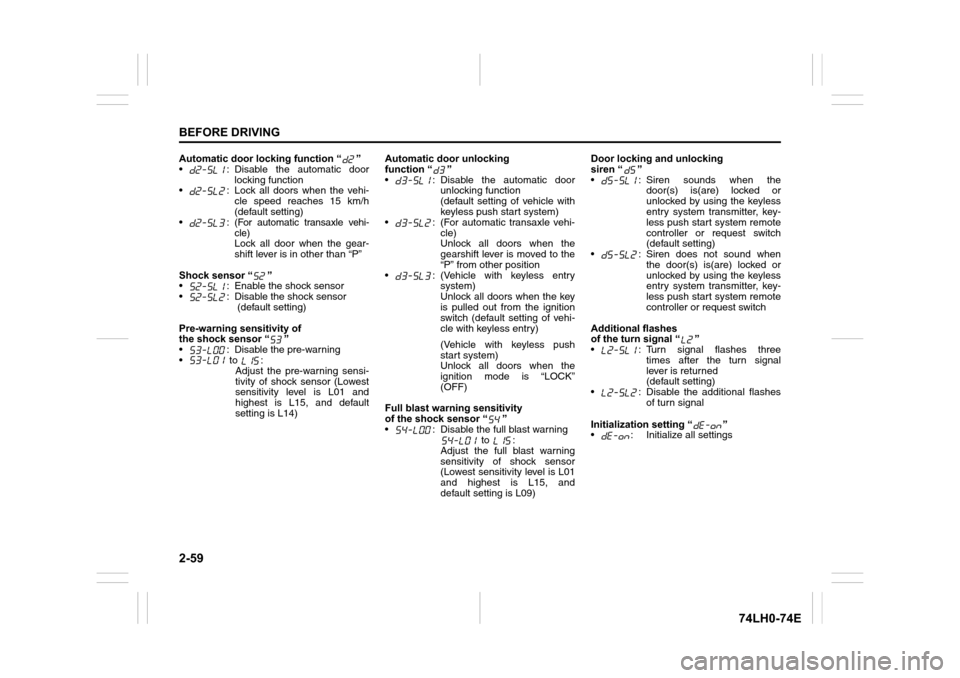
Automatic door locking function “ ”
• : Disable the automatic door
locking function
• : Lock all doors when the vehi-
cle speed reaches 15 km/h
(default setting)
•:
(For automatic transaxle vehi-
cle)
Lock all door when the gear-
shift lever is in other than “P”
Shock sensor “ ”
• : Enable the shock sensor
• : Disable the shock sensor
(default setting)
Pre-warning sensitivity of
the shock sensor “ ”
• : Disable the pre-warning
• to :
Adjust the pre-warning sensi-
tivity of shock sensor (Lowest
sensitivity level is L01 and
highest is L15, and default
setting is L14)Automatic door unlocking
function “ ”
• : Disable the automatic door
unlocking function
(default setting of vehicle with
keyless push start system)
• : (For automatic transaxle vehi-
cle)
Unlock all doors when the
gearshift lever is moved to the
“P” from other position
• : (Vehicle with keyless entry
system)
Unlock all doors when the key
is pulled out from the ignition
switch (default setting of vehi-
cle with keyless entry)
(Vehicle with keyless push
start system)
Unlock all doors when the
ignition mode is “LOCK”
(OFF)
Full blast warning sensitivity
of the shock sensor “ ”
• : Disable the full blast warning
to :
Adjust the full blast warning
sensitivity of shock sensor
(Lowest sensitivity level is L01
and highest is L15, and
default setting is L09)Door locking and unlocking
siren “ ”
• : Siren sounds when the
door(s) is(are) locked or
unlocked by using the keyless
entry system transmitter, key-
less push start system remote
controller or request switch
(default setting)
• : Siren does not sound when
the door(s) is(are) locked or
unlocked by using the keyless
entry system transmitter, key-
less push start system remote
controller or request switch
Additional flashes
of the turn signal “ ”
• : Turn signal flashes three
times after the turn signal
lever is returned
(default setting)
• : Disable the additional flashes
of turn signal
Initialization setting “ ”
• : Initialize all settings
Page 79 of 336
2-60
BEFORE DRIVING
74LH0-74E
76MH0017
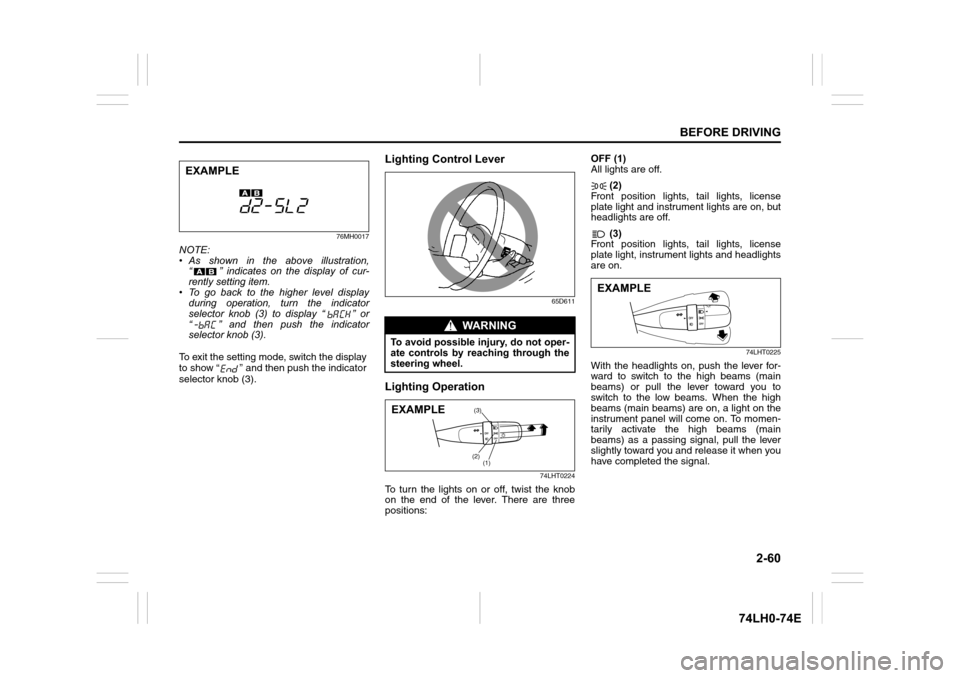
NOTE:
• As shown in the above illustration,
“ ” indicates on the display of cur-
rently setting item.
• To go back to the higher level display
during operation, turn the indicator
selector knob (3) to display “ ” or
“ ” and then push the indicator
selector knob (3).
To exit the setting mode, switch the display
to show “ ” and then push the indicator
selector knob (3).
Lighting Control Lever
65D611
Lighting Operation
74LHT0224
To turn the lights on or off, twist the knob
on the end of the lever. There are three
positions:OFF (1)
All lights are off.
(2)
Front position lights, tail lights, license
plate light and instrument lights are on, but
headlights are off.
(3)
Front position lights, tail lights, license
plate light, instrument lights and headlights
are on.
74LHT0225
With the headlights on, push the lever for-
ward to switch to the high beams (main
beams) or pull the lever toward you to
switch to the low beams. When the high
beams (main beams) are on, a light on the
instrument panel will come on. To momen-
tarily activate the high beams (main
beams) as a passing signal, pull the lever
slightly toward you and release it when you
have completed the signal.
EXAMPLE
WA R N I N G
To avoid possible injury, do not oper-
ate controls by reaching through the
steering wheel.
(3)
(2)
(1)EXAMPLE
EXAMPLE
Page 80 of 336
2-61
BEFORE DRIVING
74LH0-74E
Light Reminder Buzzer
(if equipped)
A buzzer sounds to remind you to turn off
the lights if they are left on when the igni-
tion key is removed and the driver’s door is
opened.
Rear Fog Light Switch (if equipped)
74LHT0226
To turn the rear fog light on, twist the knob
as shown in the illustration with the head-
lights are on. When the rear fog light is on,
an indicator light on the instrument cluster
will come on.
Front Fog Light Switch (if equipped)
64J058
The front fog light comes on when the fog
light switch is pushed in with the position
lights, tail lights and/or the headlights are
on. An indicator light above the switch will
be lit when the front fog light is on.
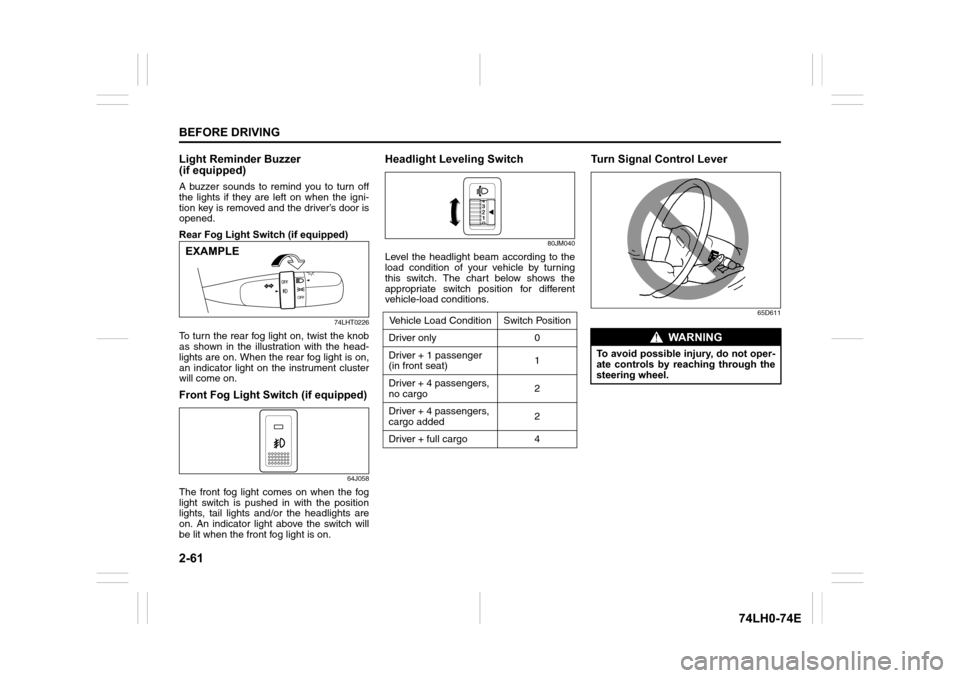
Headlight Leveling Switch
80JM040
Level the headlight beam according to the
load condition of your vehicle by turning
this switch. The chart below shows the
appropriate switch position for different
vehicle-load conditions.
Turn Signal Control Lever
65D611
EXAMPLE
Vehicle Load Condition Switch Position
Driver only 0
Driver + 1 passenger
(in front seat)1
Driver + 4 passengers,
no cargo2
Driver + 4 passengers,
cargo added2
Driver + full cargo 4
WA R N I N G
To avoid possible injury, do not oper-
ate controls by reaching through the
steering wheel.