meter SUZUKI SX4 2006 1.G Service Workshop Manual
[x] Cancel search | Manufacturer: SUZUKI, Model Year: 2006, Model line: SX4, Model: SUZUKI SX4 2006 1.GPages: 1556, PDF Size: 37.31 MB
Page 923 of 1556

Downloaded from www.Manualslib.com manuals search engine Power Assisted Steering System: 6C-43
8) Using ammeter (2), check that P/S motor current (1)
is as following table with idling engine. If check result
is not satisfactory, check P/S control module for
torque sensor signal and P/S motor output referring
to “Inspection of P/S Control Module and Its
Circuits”. If they are OK, replace steering gear case
assembly.
NOTE
When P/S motor is cold condition (that is,
armature coil of P/S motor is not heated),
motor current in the following table can be
measured
Motor current at hoisted vehicle (reference
value)
Specifications
Tightening Torque SpecificationsS6RW0D6307001
NOTE
The specified tightening torque is also described in the following.
“Steering Gear Case Assembly Components”
Reference:
For the tightening torque of fastener not specified in this section, refer to “Fasteners Information in Section 0A”. ConditionWhen
steering
wheel is left
at straight
position: [A]When steering
wheel is turned
left or right by
turning speed
with 90° /sec:
[B]When
steering
wheel is
kept fully
turned left
or right
until it
stops.: [C]
Motor
currentApprox. 0 A Approx. 0 – 5 AApprox.
45 – 60 A
3. P/S control module
1
32
E12-1
E12-2
[C][A]
[B] [B]
I7RW01632012-01
Fastening partTightening torque
Note
N⋅mkgf-mlb-ft
Tie-rod end nut 45 4.5 32.5�)
Tie-rod end lock nut 45 4.5 32.5�)
Wheel bolt 85 8.5 61.5�)
Steering gear case mounting bolt 70 7.0 51.0�)
Steering lower shaft assembly upper joint bolt 25 2.5 18.5�)
Steering lower shaft assembly lower joint bolt 25 2.5 18.5�)
Tie-rod 75 7.5 54.5�)
Earth cable bolt 4.0 0.4 2.8�)
Rack damper screw Tighten 25 N⋅m (2.5 kgf-m, 18.0 lb-ft) and
loosen 180° and then tighten 3.9 N⋅m (0.39
kgf-m, 3.0 lb-ft) and turn it back by 10° or
less by the specified procedure.�)
Rotation torque of pinion 2.2 0.22 1.5�)
Steering rack damper lock nut 60 6.0 43.5�)
Page 926 of 1556
Downloaded from www.Manualslib.com manuals search engine 7-ii Table of Contents
Compressor Drive Belt Removal and
Installation ....................................................... 7B-31
Compressor Assembly Removal and
Installation ....................................................... 7B-31
Compressor Assembly Components................. 7B-32
Magnet Clutch Inspection.................................. 7B-32
Magnet Clutch Removal and Installation........... 7B-33
Thermal Switch Inspection ................................ 7B-35
Thermal Switch Removal and Installation ......... 7B-35
Relief Valve Inspection...................................... 7B-36
Relief valve Removal and Installation ............... 7B-36
Specifications .....................................................7B-37
Tightening Torque Specifications ...................... 7B-37
Special Tools and Equipment ...........................7B-37
Recommended Service Material ....................... 7B-37
Special Tool ...................................................... 7B-37
Automatic Type .....................................................7B-38
Precautions.........................................................7B-38
A/C System Caution .......................................... 7B-38
Precautions in Diagnosing Trouble ................... 7B-38
Precautions on Servicing A/C System .............. 7B-38
General Description ...........................................7B-39
Auto A/C System Description ............................ 7B-39
HVAC Control Description................................. 7B-40
Sub-Cool A/C System Description .................... 7B-40
On-Board Diagnostic System Description ......... 7B-41
Schematic and Routing Diagram ......................7B-41
A/C System Air Flow Diagram........................... 7B-41
A/C System Wiring Diagram ............................. 7B-42
Component Location .........................................7B-43
A/C System Major Components Location ......... 7B-43
Electronic Control System Components
Location .......................................................... 7B-44
Diagnostic Information and Procedures ..........7B-45
Air Conditioning System Check......................... 7B-45
A/C System Symptom Diagnosis ...................... 7B-47
Abnormal Noise Symptom Diagnosis of A/C
System ............................................................ 7B-49
DTC Check........................................................ 7B-49
DTC Clearance ................................................. 7B-51
DTC Table ......................................................... 7B-52
Fail-Safe Table .................................................. 7B-54
Scan Tool Data ................................................. 7B-55
Visual Inspection ............................................... 7B-57
DTC B1502: Inside Air Temperature Sensor
Circuit Malfunction .......................................... 7B-57
DTC B1503: Evaporator Temperature Sensor
Circuit Malfunction .......................................... 7B-59
DTC B1504: Sunload Sensor Circuit
Malfunction ...................................................... 7B-60
DTC B1511: Temperature Control Actuator
(Position Sensor) and/or Its Circuit
Malfunction ...................................................... 7B-61
DTC B1512: Air flow Control Actuator
(Position Sensor) and/or Its Circuit
Malfunction ...................................................... 7B-63
DTC B1513: Temperature Control Actuator
(Motor) and/or Its Circuit Malfunction .............. 7B-65DTC B1514: Air Flow Control Actuator (Motor)
and/or Its Circuit Malfunction........................... 7B-67
DTC B1520 / B1521 / B1522: Temperature /
Blower Speed / Air Flow Selector
Malfunction ...................................................... 7B-68
DTC B1541: Back-Up Power Supply Circuit
Malfunction ...................................................... 7B-69
DTC B1546: A/C Refrigerant Pressure
Malfunction ...................................................... 7B-70
DTC B1551: Serial Communication Circuit
Malfunction ...................................................... 7B-70
DTC B1552: HVAC Control Module Check
Sum Error ........................................................ 7B-72
DTC B1553: CAN Communication Circuit
Malfunction ...................................................... 7B-72
DTC B1557: VSS Signal Failure ....................... 7B-73
DTC B1561: ECT Signal Failure ....................... 7B-73
DTC B1562: Outside Air Temperature Signal
Failure ............................................................. 7B-74
DTC B1563: A/C Refrigerant Pressure Signal
Failure ............................................................. 7B-74
DTC B1570: Engine Type Signal Failure .......... 7B-75
DTC B1571: Combination Meter Spec Signal
Failure ............................................................. 7B-75
Inspection of HVAC Control Module and Its
Circuit .............................................................. 7B-76
A/C System Inspection at ECM ......................... 7B-79
Repair Instructions ............................................7B-79
Operation Procedure for Refrigerant Charge .... 7B-79
HVAC Unit Components ................................... 7B-80
HVAC Unit Removal and Installation ................ 7B-81
Temperature Control Actuator Removal and
Installation ....................................................... 7B-81
Temperature Control Actuator and Its Circuit
Inspection ........................................................ 7B-81
Air Flow Control Actuator Removal and
Installation ....................................................... 7B-83
Air Flow Control Actuator and Its Circuit
Inspection ........................................................ 7B-83
Air Intake Actuator Removal and Installation .... 7B-84
Air Intake Actuator Inspection ........................... 7B-84
Actuator Linkage Inspection.............................. 7B-84
Blower Motor Controller Removal and
Installation ....................................................... 7B-84
Blower Motor Controller Inspection ................... 7B-85
HVAC Control Module Removal and
Installation ....................................................... 7B-85
Sunload Sensor Removal and Installation ........ 7B-85
Sunload Sensor Inspection ............................... 7B-86
Outside Air Temperature Sensor Removal
and Installation ................................................ 7B-86
Outside Air Temperature Sensor Inspection ..... 7B-86
Inside Air Temperature Sensor Removal and
Installation ....................................................... 7B-86
Inside Air Temperature Sensor Inspection ........ 7B-86
Condenser Cooling Fan Relay Inspection......... 7B-87
Condenser Cooling Fan Removal and
Installation ....................................................... 7B-87
Condenser Cooling Fan Inspection ................... 7B-87
Condenser Assembly On-Vehicle Inspection .... 7B-87
Page 933 of 1556
Downloaded from www.Manualslib.com manuals search engine Heater and Ventilation: 7A-5
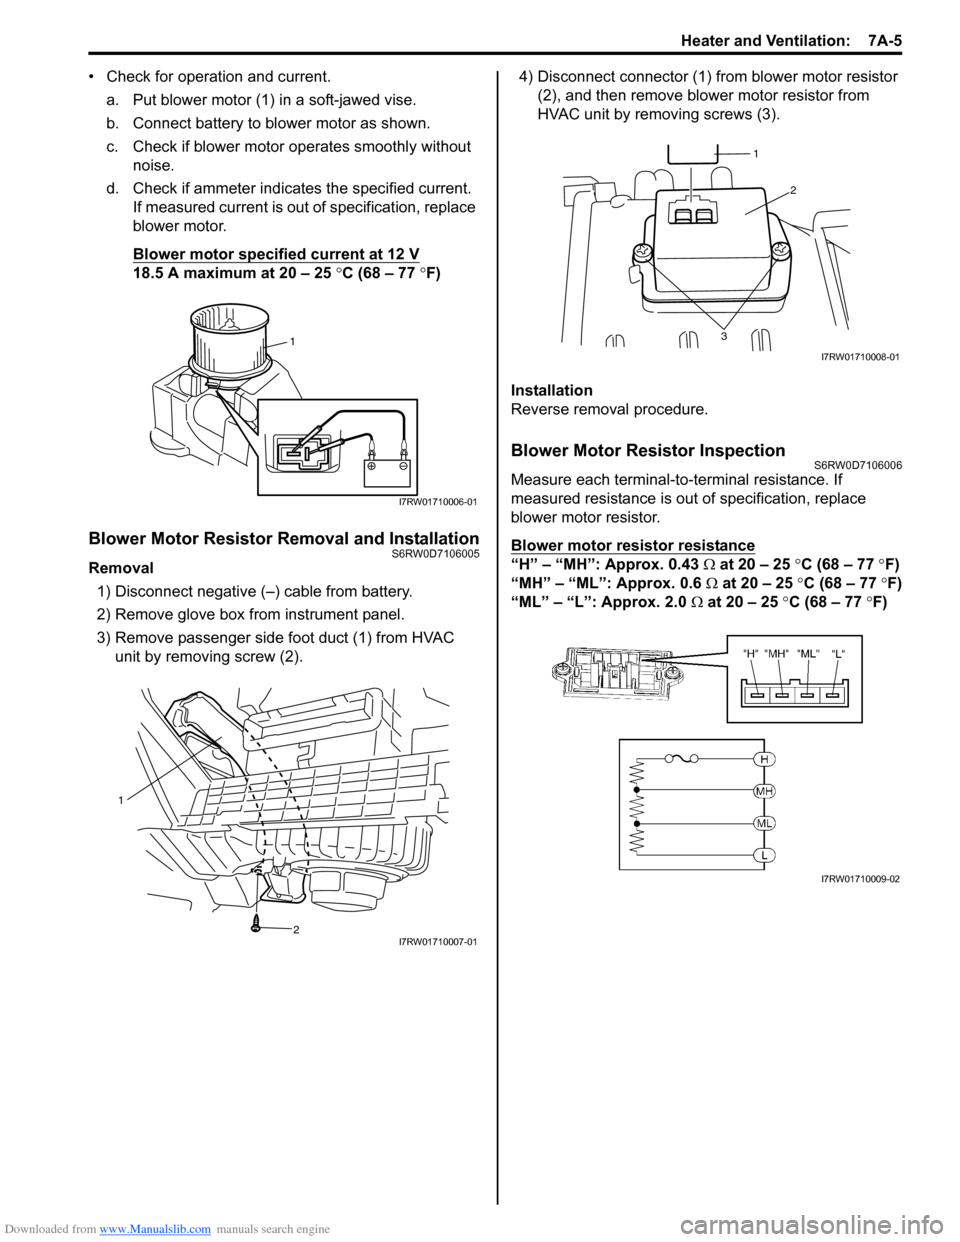
• Check for operation and current.
a. Put blower motor (1) in a soft-jawed vise.
b. Connect battery to blower motor as shown.
c. Check if blower motor operates smoothly without
noise.
d. Check if ammeter indicates the specified current.
If measured current is out of specification, replace
blower motor.
Blower motor specified current at 12 V
18.5 A maximum at 20 – 25 °C (68 – 77 °F)
Blower Motor Resistor Removal and InstallationS6RW0D7106005
Removal
1) Disconnect negative (–) cable from battery.
2) Remove glove box from instrument panel.
3) Remove passenger side foot duct (1) from HVAC
unit by removing screw (2).4) Disconnect connector (1) from blower motor resistor
(2), and then remove blower motor resistor from
HVAC unit by removing screws (3).
Installation
Reverse removal procedure.
Blower Motor Resistor InspectionS6RW0D7106006
Measure each terminal-to-terminal resistance. If
measured resistance is out of specification, replace
blower motor resistor.
Blower motor resistor resistance
“H” – “MH”: Approx. 0.43 Ω at 20 – 25 °C (68 – 77 °F)
“MH” – “ML”: Approx. 0.6 Ω at 20 – 25 °C (68 – 77 °F)
“ML” – “L”: Approx. 2.0 Ω at 20 – 25 °C (68 – 77 °F)
1
I7RW01710006-01
1
2
I7RW01710007-01
2
3
1
I7RW01710008-01
I7RW01710009-02
Page 948 of 1556
Downloaded from www.Manualslib.com manuals search engine 7B-8 Air Conditioning System: Manual Type
Diagnostic Information and Procedures
A/C System Performance InspectionS6RW0D7214001
1) Confirm that vehicle and environmental conditions
are as follows.
• Vehicle is put indoors.
• Ambient temperature is within 25 – 35 °C (77 – 95
°F).
• Relative humidity is within 30 – 70%.
• There is no wind indoors.
• HVAC unit is normal.
• Blower motor is normal.
• There is no air leakage from air ducts.
• Condenser fins are clean.
• HVAC air filter is not clogged with dirt and dust (if
equipped).
• Battery voltage is about 12 V.
• Radiator cooling fan operates normally.
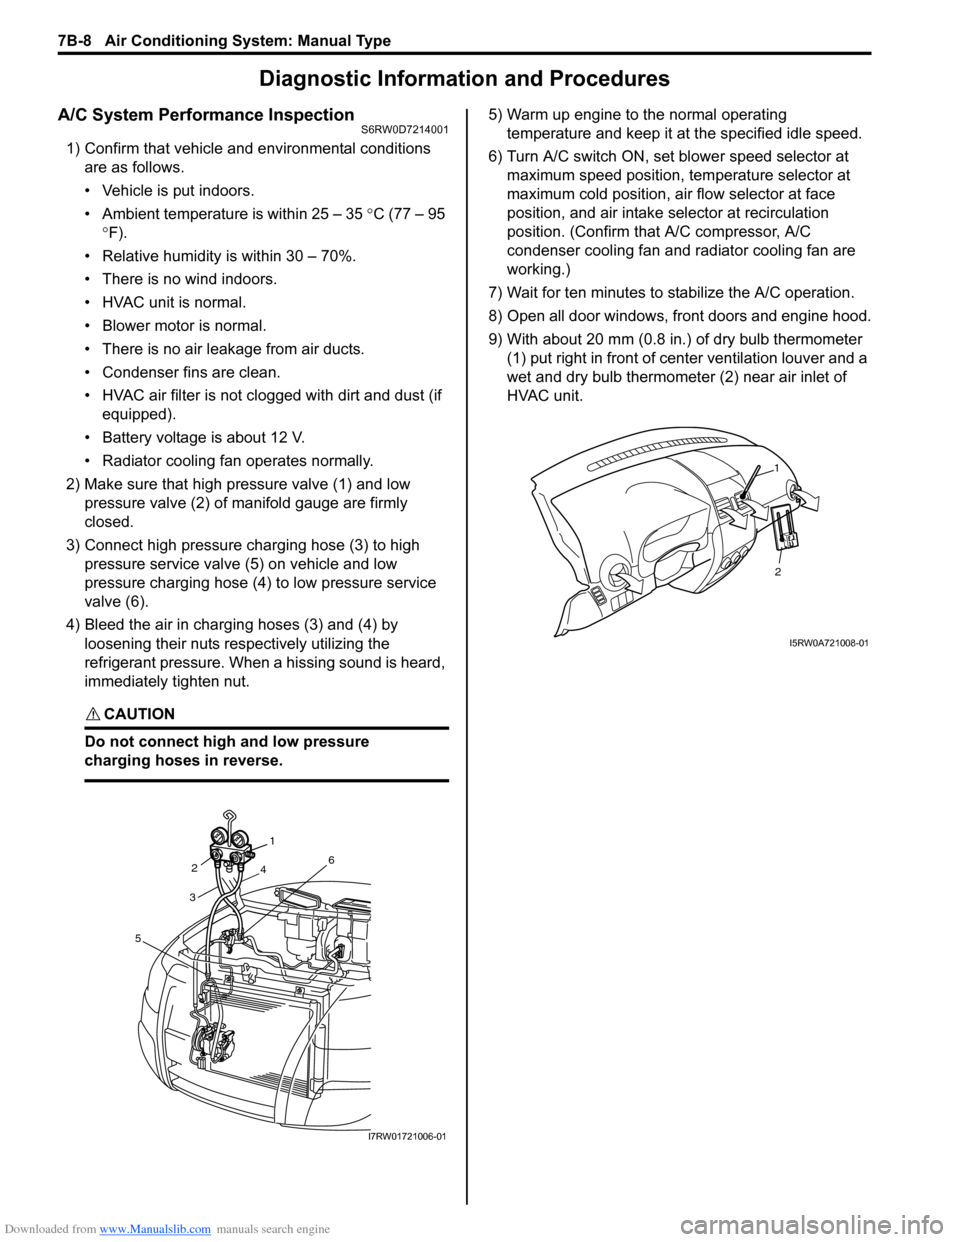
2) Make sure that high pressure valve (1) and low
pressure valve (2) of manifold gauge are firmly
closed.
3) Connect high pressure charging hose (3) to high
pressure service valve (5) on vehicle and low
pressure charging hose (4) to low pressure service
valve (6).
4) Bleed the air in charging hoses (3) and (4) by
loosening their nuts respectively utilizing the
refrigerant pressure. When a hissing sound is heard,
immediately tighten nut.
CAUTION!
Do not connect high and low pressure
charging hoses in reverse.
5) Warm up engine to the normal operating
temperature and keep it at the specified idle speed.
6) Turn A/C switch ON, set blower speed selector at
maximum speed position, temperature selector at
maximum cold position, air flow selector at face
position, and air intake selector at recirculation
position. (Confirm that A/C compressor, A/C
condenser cooling fan and radiator cooling fan are
working.)
7) Wait for ten minutes to stabilize the A/C operation.
8) Open all door windows, front doors and engine hood.
9) With about 20 mm (0.8 in.) of dry bulb thermometer
(1) put right in front of center ventilation louver and a
wet and dry bulb thermometer (2) near air inlet of
HVAC unit.
321
4
6
5
I7RW01721006-01
2
1
I5RW0A721008-01
Page 951 of 1556
Downloaded from www.Manualslib.com manuals search engine Air Conditioning System: Manual Type 7B-11
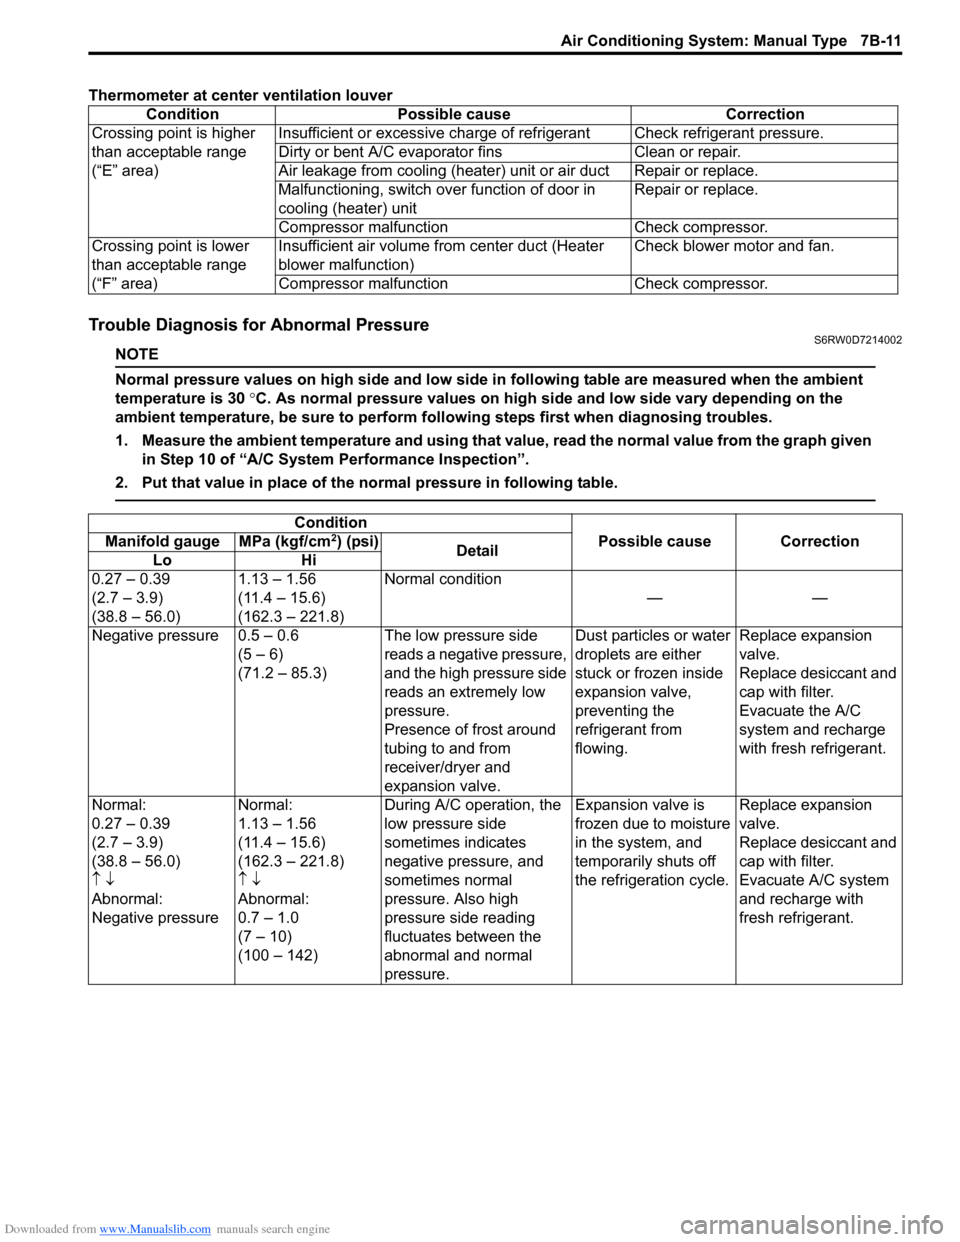
Thermometer at center ventilation louver
Trouble Diagnosis for Abnormal PressureS6RW0D7214002
NOTE
Normal pressure values on high side and low side in following table are measured when the ambient
temperature is 30 °C. As normal pressure values on high side and low side vary depending on the
ambient temperature, be sure to perform following steps first when diagnosing troubles.
1. Measure the ambient temperature and using that value, read the normal value from the graph given
in Step 10 of “A/C System Performance Inspection”.
2. Put that value in place of the normal pressure in following table.
Condition Possible cause Correction
Crossing point is higher
than acceptable range
(“E” area)Insufficient or excessive charge of refrigerant Check refrigerant pressure.
Dirty or bent A/C evaporator fins Clean or repair.
Air leakage from cooling (heater) unit or air duct Repair or replace.
Malfunctioning, switch over function of door in
cooling (heater) unitRepair or replace.
Compressor malfunction Check compressor.
Crossing point is lower
than acceptable range
(“F” area)Insufficient air volume from center duct (Heater
blower malfunction)Check blower motor and fan.
Compressor malfunction Check compressor.
Condition
Possible cause Correction Manifold gauge MPa (kgf/cm2) (psi)
Detail
Lo Hi
0.27 – 0.39
(2.7 – 3.9)
(38.8 – 56.0)1.13 – 1.56
(11.4 – 15.6)
(162.3 – 221.8)Normal condition
——
Negative pressure 0.5 – 0.6
(5 – 6)
(71.2 – 85.3)The low pressure side
reads a negative pressure,
and the high pressure side
reads an extremely low
pressure.
Presence of frost around
tubing to and from
receiver/dryer and
expansion valve.Dust particles or water
droplets are either
stuck or frozen inside
expansion valve,
preventing the
refrigerant from
flowing.Replace expansion
valve.
Replace desiccant and
cap with filter.
Evacuate the A/C
system and recharge
with fresh refrigerant.
Normal:
0.27 – 0.39
(2.7 – 3.9)
(38.8 – 56.0)
↑ ↓
Abnormal:
Negative pressureNormal:
1.13 – 1.56
(11.4 – 15.6)
(162.3 – 221.8)
↑ ↓
Abnormal:
0.7 – 1.0
(7 – 10)
(100 – 142)During A/C operation, the
low pressure side
sometimes indicates
negative pressure, and
sometimes normal
pressure. Also high
pressure side reading
fluctuates between the
abnormal and normal
pressure.Expansion valve is
frozen due to moisture
in the system, and
temporarily shuts off
the refrigeration cycle.Replace expansion
valve.
Replace desiccant and
cap with filter.
Evacuate A/C system
and recharge with
fresh refrigerant.
Page 979 of 1556
Downloaded from www.Manualslib.com manuals search engine Air Conditioning System: Automatic Type 7B-39
General Description
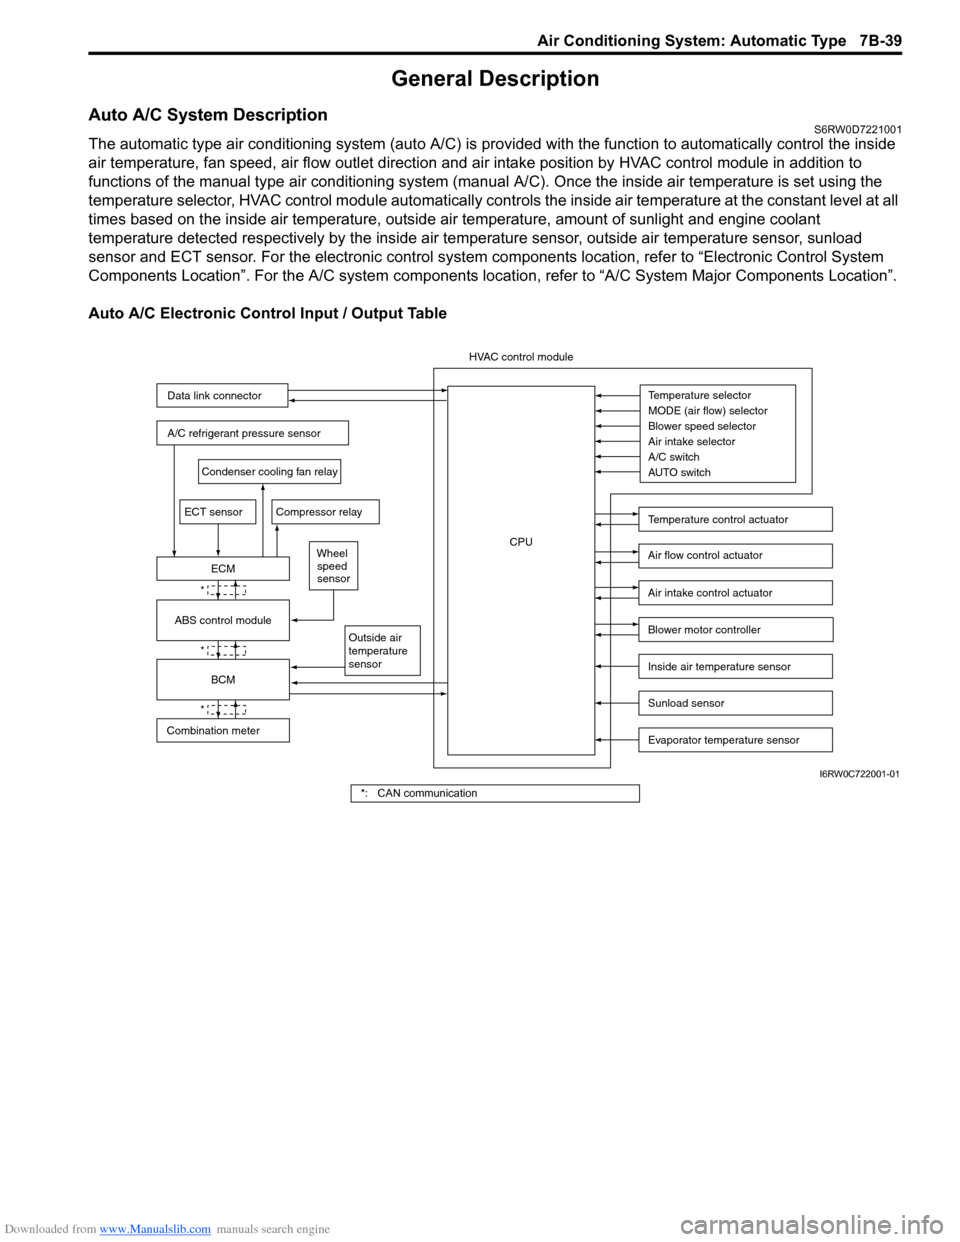
Auto A/C System DescriptionS6RW0D7221001
The automatic type air conditioning system (auto A/C) is provided with the function to automatically control the inside
air temperature, fan speed, air flow outlet direction and air intake position by HVAC control module in addition to
functions of the manual type air conditioning system (manual A/C). Once the inside air temperature is set using the
temperature selector, HVAC control module automatically controls the inside air temperature at the constant level at all
times based on the inside air temperature, outside air temperature, amount of sunlight and engine coolant
temperature detected respectively by the inside air temperature sensor, outside air temperature sensor, sunload
sensor and ECT sensor. For the electronic control system components location, refer to “Electronic Control System
Components Location”. For the A/C system components location, refer to “A/C System Major Components Location”.
Auto A/C Electronic Control Input / Output Table
Temperature selector
MODE (air flow) selector
Blower speed selector
Air intake selector
AUTO switch A/C switch
Outside air
temperature
sensor
A/C refrigerant pressure sensor
Compressor relay
Blower motor controller
Temperature control actuator
Air flow control actuator
Air intake control actuator
BCM
ECM
Data link connector
HVAC control module
CPU
ECT sensor
Sunload sensor
Inside air temperature sensor
Evaporator temperature sensor
Condenser cooling fan relay
Wheel
speed
sensor
*
*
*
Combination meterABS control module
I6RW0C722001-01
*: CAN communication
Page 981 of 1556
Downloaded from www.Manualslib.com manuals search engine Air Conditioning System: Automatic Type 7B-41
On-Board Diagnostic System DescriptionS6RW0D7221004
NOTE
The diagnostic information as diagnostic
trouble code (DTC) can be known by using
SUZUKI scan tool. For further details, refer to
“DTC Check”.
HVAC control module detects malfunctions, which may
occur in the following area.
• Inside air temperature sensor
• Evaporator temperature sensor
• Sunload sensor
• Temperature control actuator
• Air flow control actuator
• Temperature selector of HVAC control module
• Air flow selector of HVAC control module
• Blower speed selector of HVAC control module
• Back-up power supply circuit of HAVC control module
• Serial communication line between BCM and HVAC
control module• Received data from BCM as follows
– Outside air temperature sensor signal
– ECT sensor signal
– A/C refrigerant pressure sensor signal
– VSS signal
– Engine type signal
– Combination meter spec signal
– CAN communication circuit failure signal
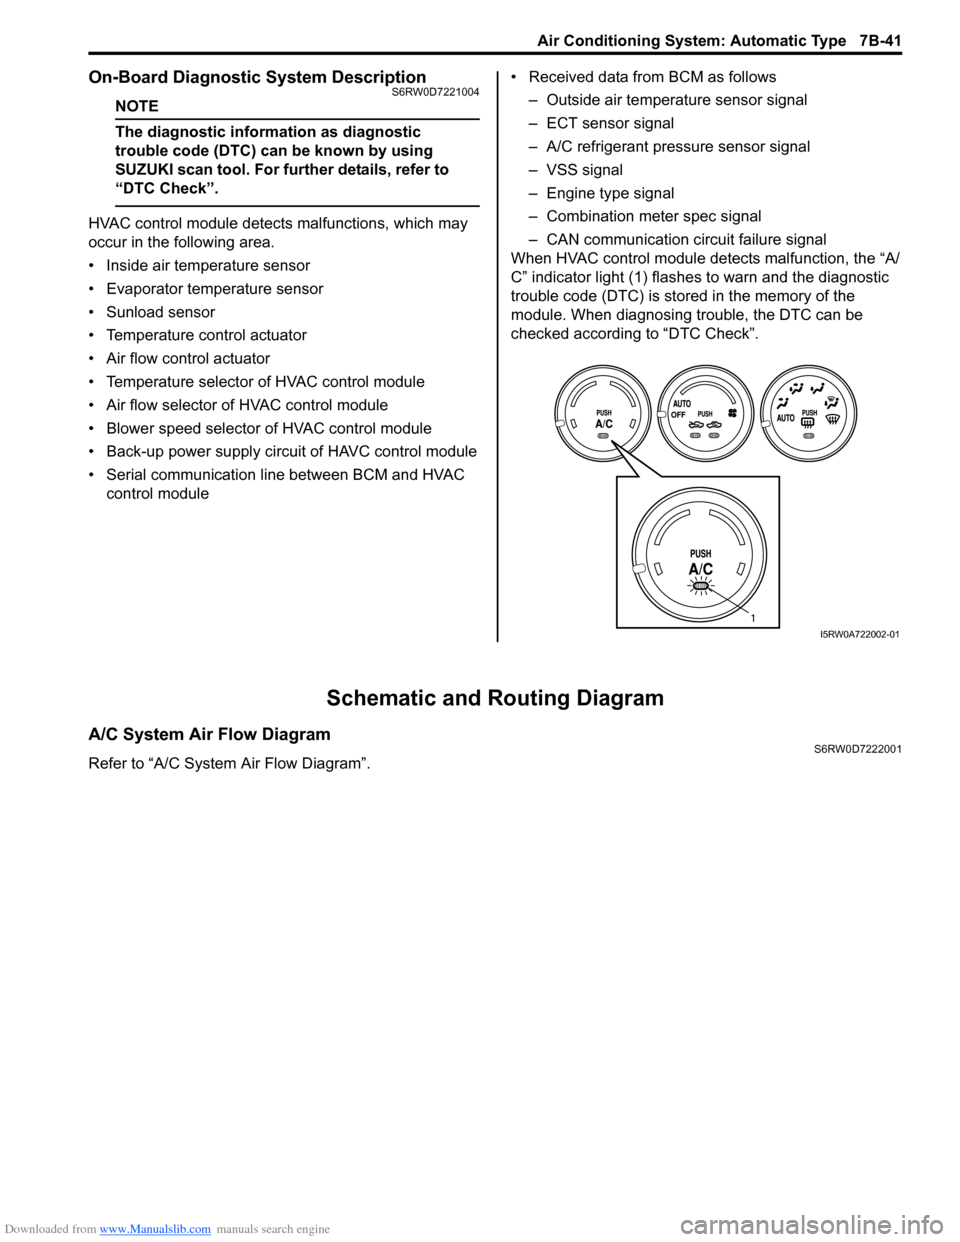
When HVAC control module detects malfunction, the “A/
C” indicator light (1) flashes to warn and the diagnostic
trouble code (DTC) is stored in the memory of the
module. When diagnosing trouble, the DTC can be
checked according to “DTC Check”.
Schematic and Routing Diagram
A/C System Air Flow DiagramS6RW0D7222001
Refer to “A/C System Air Flow Diagram”.
1
I5RW0A722002-01
Page 993 of 1556
Downloaded from www.Manualslib.com manuals search engine Air Conditioning System: Automatic Type 7B-53
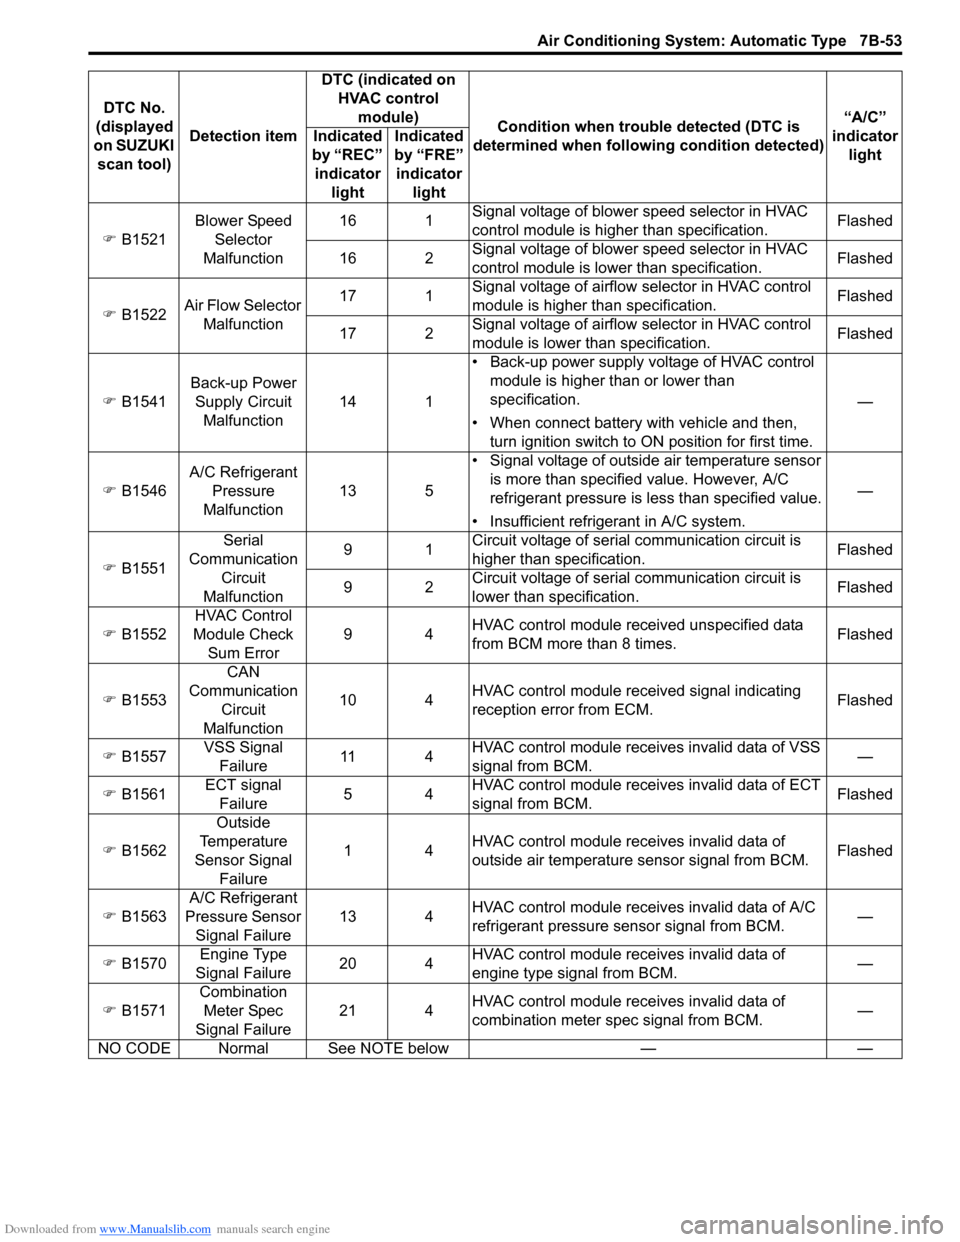
�) B1521Blower Speed
Selector
Malfunction16 1Signal voltage of blower speed selector in HVAC
control module is higher than specification.Flashed
16 2Signal voltage of blower speed selector in HVAC
control module is lower than specification.Flashed
�) B1522Air Flow Selector
Malfunction17 1Signal voltage of airflow selector in HVAC control
module is higher than specification.Flashed
17 2Signal voltage of airflow selector in HVAC control
module is lower than specification.Flashed
�) B1541Back-up Power
Supply Circuit
Malfunction14 1• Back-up power supply voltage of HVAC control
module is higher than or lower than
specification.
• When connect battery with vehicle and then,
turn ignition switch to ON position for first time.—
�) B1546A/C Refrigerant
Pressure
Malfunction13 5• Signal voltage of outside air temperature sensor
is more than specified value. However, A/C
refrigerant pressure is less than specified value.
• Insufficient refrigerant in A/C system.—
�) B1551Serial
Communication
Circuit
Malfunction91Circuit voltage of serial communication circuit is
higher than specification.Flashed
92Circuit voltage of serial communication circuit is
lower than specification.Flashed
�) B1552HVAC Control
Module Check
Sum Error94HVAC control module received unspecified data
from BCM more than 8 times.Flashed
�) B1553CAN
Communication
Circuit
Malfunction10 4HVAC control module received signal indicating
reception error from ECM.Flashed
�) B1557VSS Signal
Failure11 4HVAC control module receives invalid data of VSS
signal from BCM.—
�) B1561ECT signal
Failure54HVAC control module receives invalid data of ECT
signal from BCM.Flashed
�) B1562Outside
Temperature
Sensor Signal
Failure14HVAC control module receives invalid data of
outside air temperature sensor signal from BCM.Flashed
�) B1563A/C Refrigerant
Pressure Sensor
Signal Failure13 4HVAC control module receives invalid data of A/C
refrigerant pressure sensor signal from BCM.—
�) B1570Engine Type
Signal Failure20 4HVAC control module receives invalid data of
engine type signal from BCM.—
�) B1571Combination
Meter Spec
Signal Failure21 4HVAC control module receives invalid data of
combination meter spec signal from BCM.—
NO CODE Normal See NOTE below — —DTC No.
(displayed
on SUZUKI
scan tool)Detection itemDTC (indicated on
HVAC control
module)
Condition when trouble detected (DTC is
determined when following condition detected)“A/C”
indicator
light Indicated
by “REC”
indicator
lightIndicated
by “FRE”
indicator
light
Page 995 of 1556
Downloaded from www.Manualslib.com manuals search engine Air Conditioning System: Automatic Type 7B-55
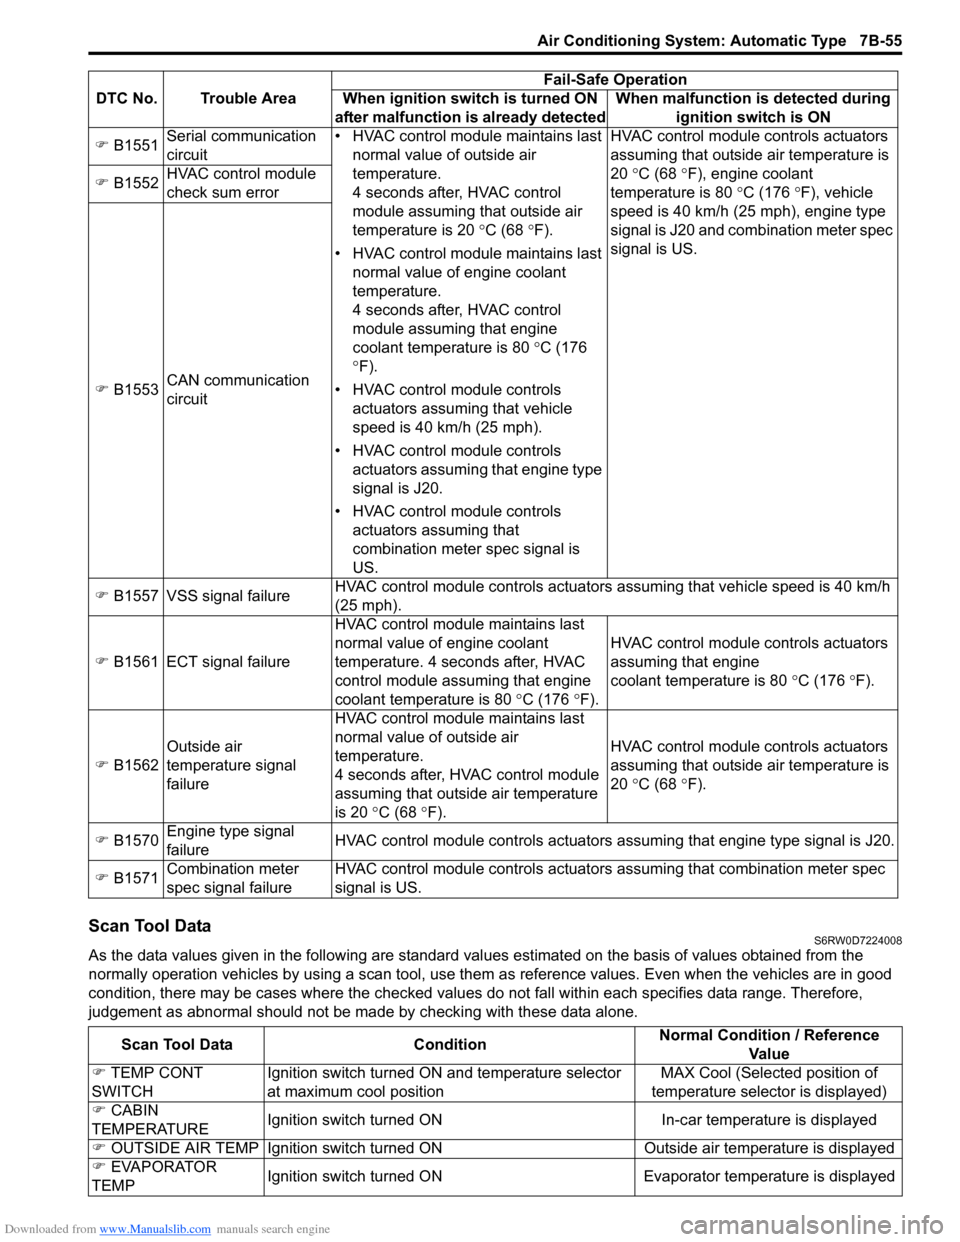
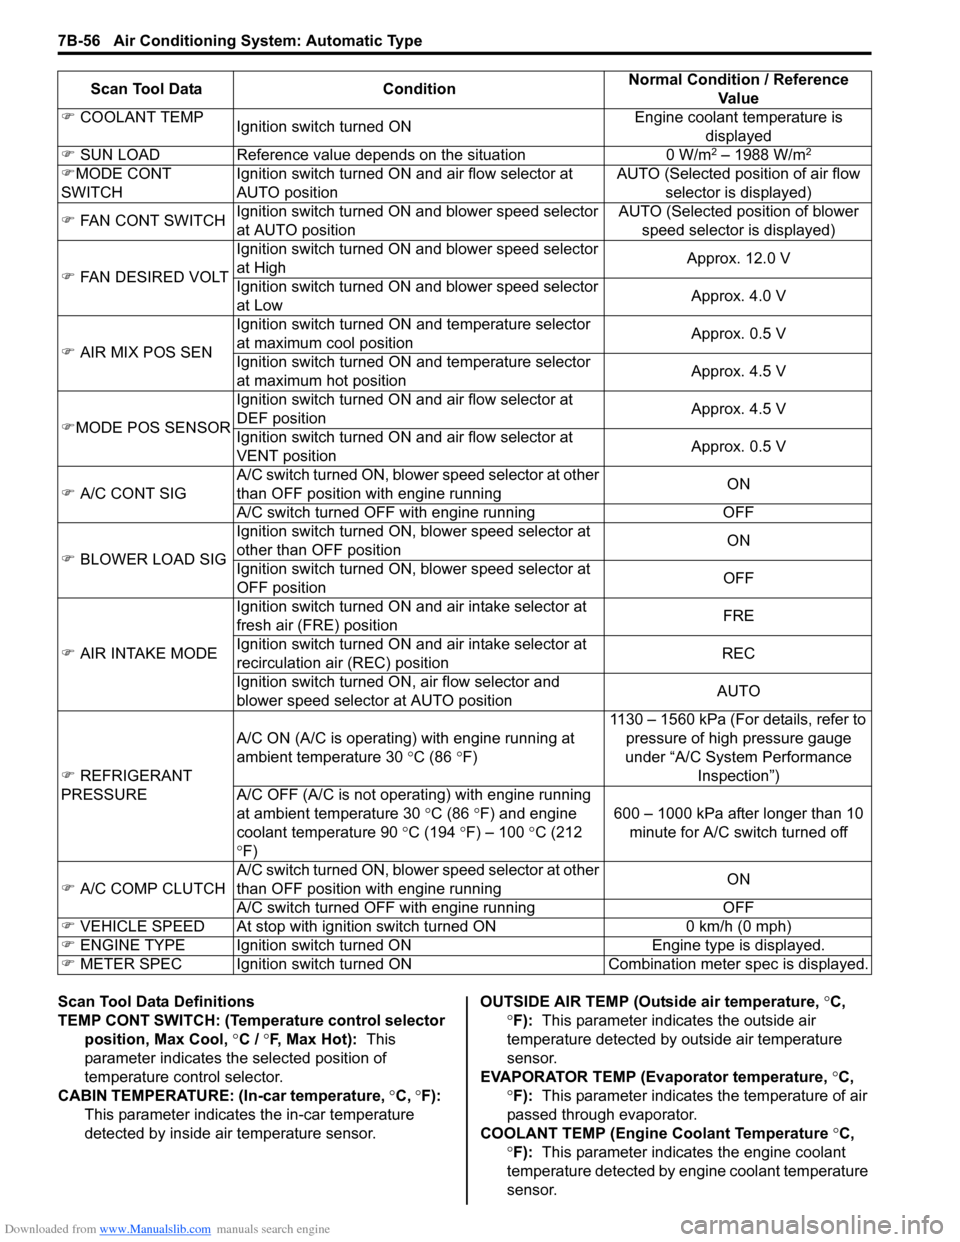
Scan Tool DataS6RW0D7224008
As the data values given in the following are standard values estimated on the basis of values obtained from the
normally operation vehicles by using a scan tool, use them as reference values. Even when the vehicles are in good
condition, there may be cases where the checked values do not fall within each specifies data range. Therefore,
judgement as abnormal should not be made by checking with these data alone. �) B1551Serial communication
circuit• HVAC control module maintains last
normal value of outside air
temperature.
4 seconds after, HVAC control
module assuming that outside air
temperature is 20 °C (68 °F).
• HVAC control module maintains last
normal value of engine coolant
temperature.
4 seconds after, HVAC control
module assuming that engine
coolant temperature is 80 °C (176
°F).
• HVAC control module controls
actuators assuming that vehicle
speed is 40 km/h (25 mph).
• HVAC control module controls
actuators assuming that engine type
signal is J20.
• HVAC control module controls
actuators assuming that
combination meter spec signal is
US.HVAC control module controls actuators
assuming that outside air temperature is
20 °C (68 °F), engine coolant
temperature is 80 °C (176 °F), vehicle
speed is 40 km/h (25 mph), engine type
signal is J20 and combination meter spec
signal is US. �) B1552HVAC control module
check sum error
�) B1553CAN communication
circuit
�) B1557 VSS signal failureHVAC control module controls actuators assuming that vehicle speed is 40 km/h
(25 mph).
�) B1561 ECT signal failureHVAC control module maintains last
normal value of engine coolant
temperature. 4 seconds after, HVAC
control module assuming that engine
coolant temperature is 80 °C (176 °F).HVAC control module controls actuators
assuming that engine
coolant temperature is 80 °C (176 °F).
�) B1562Outside air
temperature signal
failureHVAC control module maintains last
normal value of outside air
temperature.
4 seconds after, HVAC control module
assuming that outside air temperature
is 20 °C (68 °F).HVAC control module controls actuators
assuming that outside air temperature is
20 °C (68 °F).
�) B1570Engine type signal
failureHVAC control module controls actuators assuming that engine type signal is J20.
�) B1571Combination meter
spec signal failureHVAC control module controls actuators assuming that combination meter spec
signal is US. DTC No. Trouble AreaFail-Safe Operation
When ignition switch is turned ON
after malfunction is already detectedWhen malfunction is detected during
ignition switch is ON
Scan Tool Data ConditionNormal Condition / Reference
Va l u e
�) TEMP CONT
SWITCHIgnition switch turned ON and temperature selector
at maximum cool positionMAX Cool (Selected position of
temperature selector is displayed)
�) CABIN
TEMPERATUREIgnition switch turned ON In-car temperature is displayed
�) OUTSIDE AIR TEMP Ignition switch turned ON Outside air temperature is displayed
�) EVAPORATOR
TEMPIgnition switch turned ON Evaporator temperature is displayed
Page 996 of 1556
Downloaded from www.Manualslib.com manuals search engine 7B-56 Air Conditioning System: Automatic Type
Scan Tool Data Definitions
TEMP CONT SWITCH: (Temperature control selector
position, Max Cool, °C / °F, Max Hot): This
parameter indicates the selected position of
temperature control selector.
CABIN TEMPERATURE: (In-car temperature, °C, °F):
This parameter indicates the in-car temperature
detected by inside air temperature sensor.OUTSIDE AIR TEMP (Outside air temperature, °C,
°F): This parameter indicates the outside air
temperature detected by outside air temperature
sensor.
EVAPORATOR TEMP (Evaporator temperature, °C,
°F): This parameter indicates the temperature of air
passed through evaporator.
COOLANT TEMP (Engine Coolant Temperature °C,
°F): This parameter indicates the engine coolant
temperature detected by engine coolant temperature
sensor. �) COOLANT TEMP
Ignition switch turned ONEngine coolant temperature is
displayed
�) SUN LOAD Reference value depends on the situation 0 W/m
2 – 1988 W/m2
�)MODE CONT
SWITCHIgnition switch turned ON and air flow selector at
AUTO positionAUTO (Selected position of air flow
selector is displayed)
�) FAN CONT SWITCHIgnition switch turned ON and blower speed selector
at AUTO positionAUTO (Selected position of blower
speed selector is displayed)
�) FAN DESIRED VOLTIgnition switch turned ON and blower speed selector
at HighApprox. 12.0 V
Ignition switch turned ON and blower speed selector
at LowApprox. 4.0 V
�) AIR MIX POS SENIgnition switch turned ON and temperature selector
at maximum cool positionApprox. 0.5 V
Ignition switch turned ON and temperature selector
at maximum hot positionApprox. 4.5 V
�)MODE POS SENSORIgnition switch turned ON and air flow selector at
DEF positionApprox. 4.5 V
Ignition switch turned ON and air flow selector at
VENT positionApprox. 0.5 V
�) A/C CONT SIGA/C switch turned ON, blower speed selector at other
than OFF position with engine runningON
A/C switch turned OFF with engine running OFF
�) BLOWER LOAD SIGIgnition switch turned ON, blower speed selector at
other than OFF positionON
Ignition switch turned ON, blower speed selector at
OFF positionOFF
�) AIR INTAKE MODEIgnition switch turned ON and air intake selector at
fresh air (FRE) positionFRE
Ignition switch turned ON and air intake selector at
recirculation air (REC) positionREC
Ignition switch turned ON, air flow selector and
blower speed selector at AUTO positionAUTO
�) REFRIGERANT
PRESSUREA/C ON (A/C is operating) with engine running at
ambient temperature 30 °C (86 °F)1130 – 1560 kPa (For details, refer to
pressure of high pressure gauge
under “A/C System Performance
Inspection”)
A/C OFF (A/C is not operating) with engine running
at ambient temperature 30 °C (86 °F) and engine
coolant temperature 90 °C (194 °F) – 100 °C (212
°F)600 – 1000 kPa after longer than 10
minute for A/C switch turned off
�) A/C COMP CLUTCHA/C switch turned ON, blower speed selector at other
than OFF position with engine runningON
A/C switch turned OFF with engine running OFF
�) VEHICLE SPEED At stop with ignition switch turned ON 0 km/h (0 mph)
�) ENGINE TYPE Ignition switch turned ON Engine type is displayed.
�) METER SPEC Ignition switch turned ONCombination meter spec is displayed. Scan Tool Data ConditionNormal Condition / Reference
Va l u e