sensor SUZUKI SX4 2006 1.G Service Workshop Manual
[x] Cancel search | Manufacturer: SUZUKI, Model Year: 2006, Model line: SX4, Model: SUZUKI SX4 2006 1.GPages: 1556, PDF Size: 37.31 MB
Page 230 of 1556
Downloaded from www.Manualslib.com manuals search engine 1A-180 Engine General Information and Diagnosis:
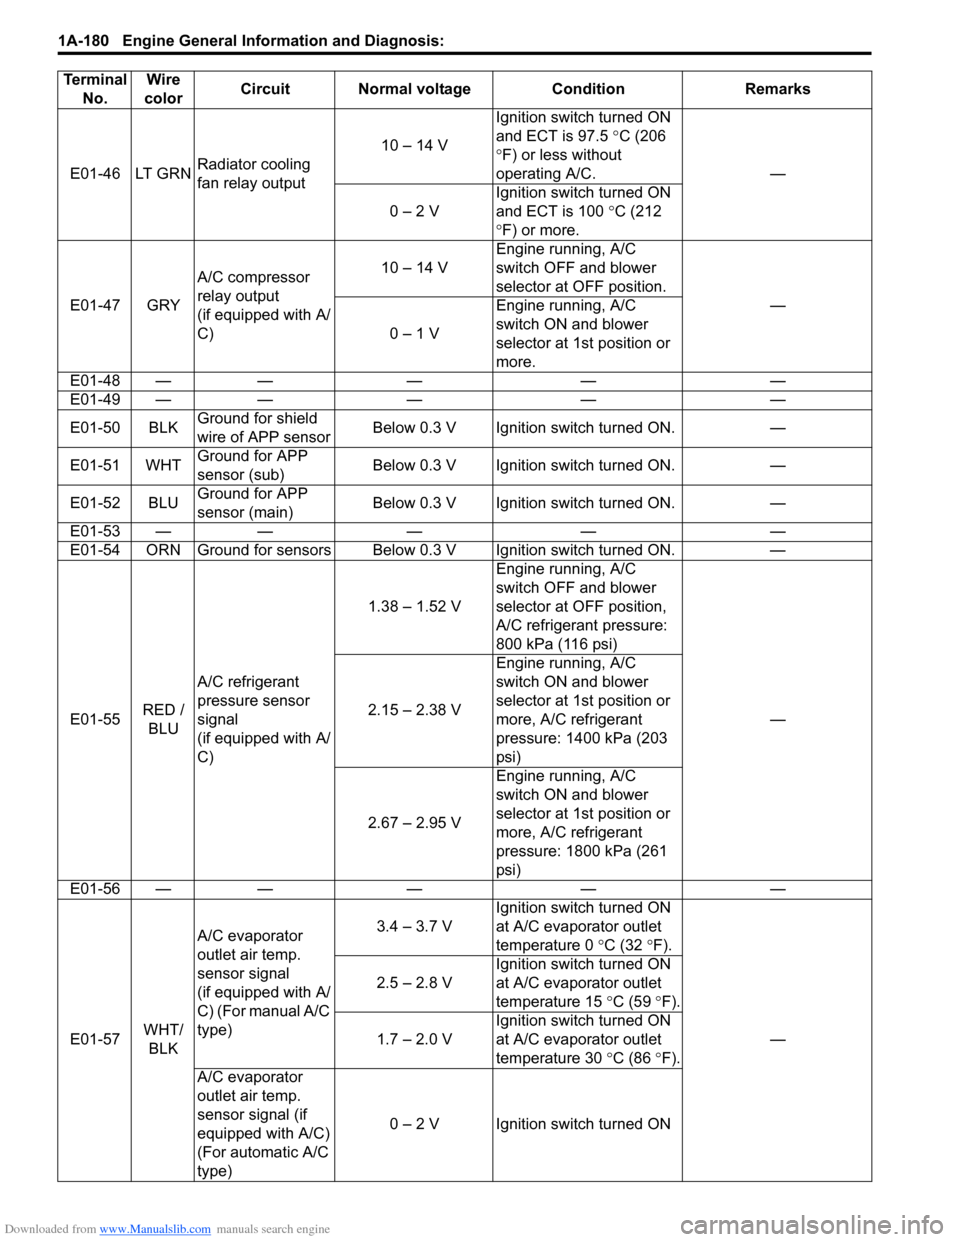
E01-46 LT GRNRadiator cooling
fan relay output10 – 14 VIgnition switch turned ON
and ECT is 97.5 °C (206
°F) or less without
operating A/C. —
0 – 2 VIgnition switch turned ON
and ECT is 100 °C (212
°F) or more.
E01-47 GRYA/C compressor
relay output
(if equipped with A/
C)10 – 14 VEngine running, A/C
switch OFF and blower
selector at OFF position.
—
0 – 1 VEngine running, A/C
switch ON and blower
selector at 1st position or
more.
E01-48 — — — — —
E01-49 — — — — —
E01-50 BLKGround for shield
wire of APP sensorBelow 0.3 V Ignition switch turned ON. —
E01-51 WHTGround for APP
sensor (sub)Below 0.3 V Ignition switch turned ON. —
E01-52 BLUGround for APP
sensor (main)Below 0.3 V Ignition switch turned ON. —
E01-53 — — — — —
E01-54 ORN Ground for sensors Below 0.3 V Ignition switch turned ON. —
E01-55RED /
BLUA/C refrigerant
pressure sensor
signal
(if equipped with A/
C)1.38 – 1.52 VEngine running, A/C
switch OFF and blower
selector at OFF position,
A/C refrigerant pressure:
800 kPa (116 psi)
— 2.15 – 2.38 VEngine running, A/C
switch ON and blower
selector at 1st position or
more, A/C refrigerant
pressure: 1400 kPa (203
psi)
2.67 – 2.95 VEngine running, A/C
switch ON and blower
selector at 1st position or
more, A/C refrigerant
pressure: 1800 kPa (261
psi)
E01-56 — — — — —
E01-57WHT/
BLKA/C evaporator
outlet air temp.
sensor signal
(if equipped with A/
C) (For manual A/C
type)3.4 – 3.7 VIgnition switch turned ON
at A/C evaporator outlet
temperature 0 °C (32 °F).
— 2.5 – 2.8 VIgnition switch turned ON
at A/C evaporator outlet
temperature 15 °C (59 °F).
1.7 – 2.0 VIgnition switch turned ON
at A/C evaporator outlet
temperature 30 °C (86 °F).
A/C evaporator
outlet air temp.
sensor signal (if
equipped with A/C)
(For automatic A/C
type)0 – 2 V Ignition switch turned ON Terminal
No.Wire
colorCircuit Normal voltage Condition Remarks
Page 234 of 1556

Downloaded from www.Manualslib.com manuals search engine 1A-184 Engine General Information and Diagnosis:
Reference waveform No.8
Heated oxygen sensor-1 signal (1) with engine idling
Reference waveform No.9
Heated oxygen sensor-1 heater signal (2) with engine
idlingReference waveform No.10
Heated oxygen sensor-2 heater signal (4) with engine
idling
Measurement
terminalCH1: “C01-10” to “C01-57”
CH2: “C01-46” to “C01-58”
Oscilloscope
settingCH1: 500 mV/DIV, CH2: 20 V/DIV
TIME: 1 s/DIV
Measurement
condition• After warmed up to normal
operating temperature
• Engine at specified idle speed
2. Heated oxygen sensor-1 heater signal
Measurement
terminalCH1: “C01-10” to “C01-57”
CH2: “C01-46” to “C01-58”
Oscilloscope
settingCH1: 500 mV/DIV, CH2: 10 V/DIV
TIME: 200 ms/DIV
Measurement
condition• After warmed up to normal
operating temperature
• Engine at specified idle speed
1. Heated oxygen sensor-1 signal 4. ON signal
3. OFF signal 5. One duty cycle
I4RS0B110058-01
I4RS0B110059-01
Measurement
terminalCH1: “C01-11” to “C01-57”
CH2: “C01-47” to “C01-58”
Oscilloscope
settingCH1: 500 mV/DIV, CH2: 10 V/DIV
TIME: 2 s/DIV
Measurement
condition• After warmed up to normal
operating temperature
• Vehicle driving at 60 km/h (37
mph) for 10 min.
• Engine at specified idle speed
1. Heated oxygen sensor-2 signal upper limit
2. Heated oxygen sensor-2 signal lower limit
3. Normal waveform range
I4RS0B110060-01
Page 236 of 1556

Downloaded from www.Manualslib.com manuals search engine 1A-186 Engine General Information and Diagnosis:
Reference waveform No.13
CMP sensor signal with engine idlingReference waveform No.14
CMP sensor signal with engine idling
Measurement
terminalCH1: “C01-20” to “C01-58”
CH2: “C01-21” to “C01-58”
Oscilloscope
settingCH1: 2 V/DIV, CH2: 2 V/DIV
TIME: 20 ms/DIV
Measurement
condition• After warmed up to normal
operating temperature
• Engine at specified idle speed
[A]: For VVT model
[B]: For non-VVT model
1. Cylinder reference signal (CMP reference signal)
2. CKP signal
3. 360° crank angle
4. 4 – 5 V
5. 36 – 6 = 30 CKP pulse
I4RS0B110064-01
Measurement
terminalCH1: “C01-20” to “C01-58”
CH2: “C01-21” to “C01-58”
Oscilloscope
settingCH1: 2 V/DIV, CH2: 2 V/DIV
TIME: 10 ms/DIV
Measurement
condition• After warmed up to normal
operating temperature
• Engine at specified idle speed
[A]: For VVT model
[B]: For non-VVT model
1. Cylinder reference signal (CMP reference signal)
2. CKP signal
3. 30° crank angle
4. 10° crank angle
5. 360° crank angle
6. 36 – 6 = 30 CKP pulse
I4RS0B110065-01
Page 237 of 1556
Downloaded from www.Manualslib.com manuals search engine Engine General Information and Diagnosis: 1A-187
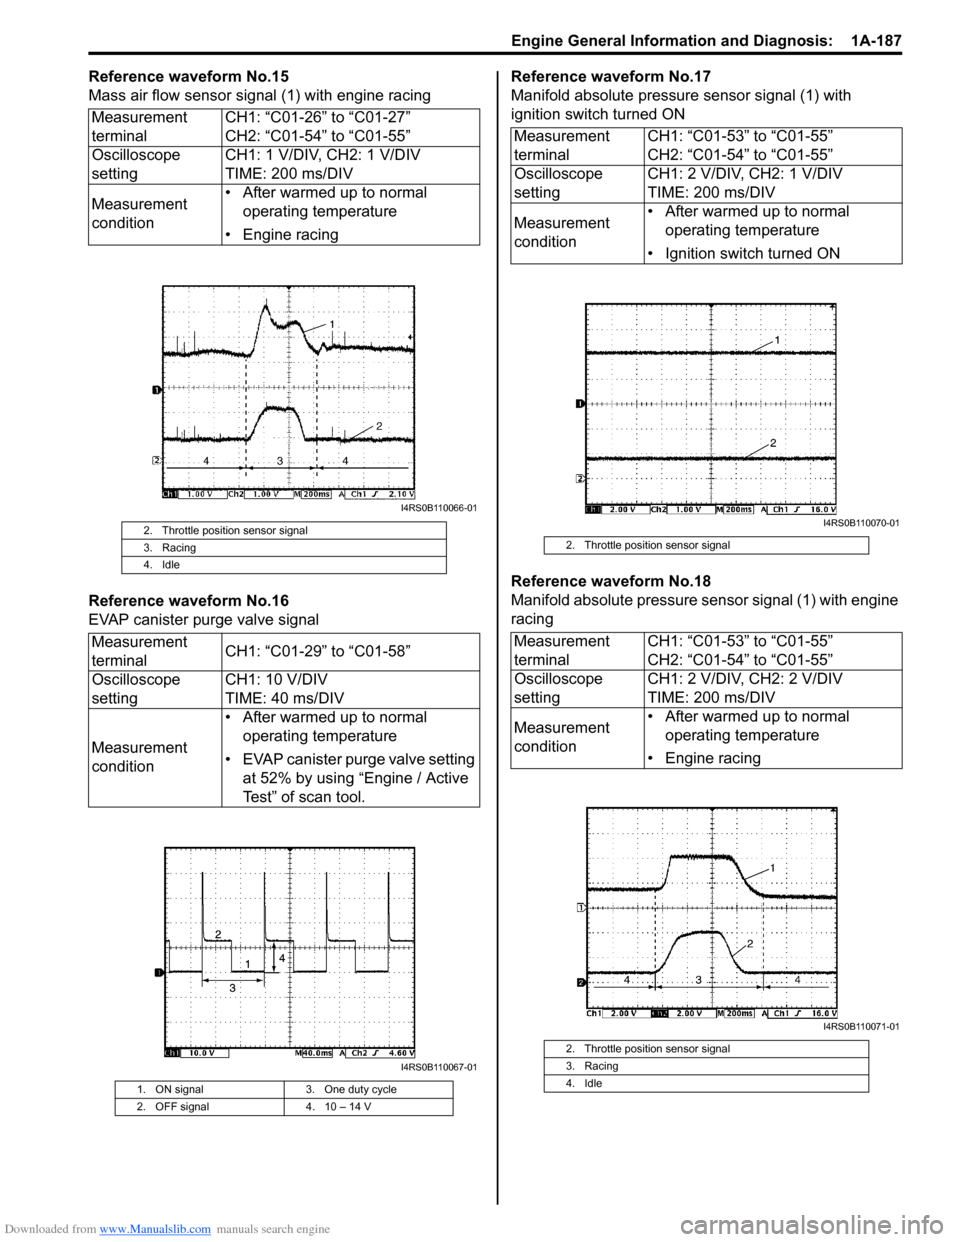
Reference waveform No.15
Mass air flow sensor signal (1) with engine racing
Reference waveform No.16
EVAP canister purge valve signalReference waveform No.17
Manifold absolute pressure sensor signal (1) with
ignition switch turned ON
Reference waveform No.18
Manifold absolute pressure sensor signal (1) with engine
racing Measurement
terminalCH1: “C01-26” to “C01-27”
CH2: “C01-54” to “C01-55”
Oscilloscope
settingCH1: 1 V/DIV, CH2: 1 V/DIV
TIME: 200 ms/DIV
Measurement
condition• After warmed up to normal
operating temperature
• Engine racing
2. Throttle position sensor signal
3. Racing
4. Idle
Measurement
terminalCH1: “C01-29” to “C01-58”
Oscilloscope
settingCH1: 10 V/DIV
TIME: 40 ms/DIV
Measurement
condition• After warmed up to normal
operating temperature
• EVAP canister purge valve setting
at 52% by using “Engine / Active
Test” of scan tool.
1. ON signal 3. One duty cycle
2. OFF signal 4. 10 – 14 V
I4RS0B110066-01
I4RS0B110067-01
Measurement
terminalCH1: “C01-53” to “C01-55”
CH2: “C01-54” to “C01-55”
Oscilloscope
settingCH1: 2 V/DIV, CH2: 1 V/DIV
TIME: 200 ms/DIV
Measurement
condition• After warmed up to normal
operating temperature
• Ignition switch turned ON
2. Throttle position sensor signal
Measurement
terminalCH1: “C01-53” to “C01-55”
CH2: “C01-54” to “C01-55”
Oscilloscope
settingCH1: 2 V/DIV, CH2: 2 V/DIV
TIME: 200 ms/DIV
Measurement
condition• After warmed up to normal
operating temperature
• Engine racing
2. Throttle position sensor signal
3. Racing
4. Idle
I4RS0B110070-01
I4RS0B110071-01
Page 238 of 1556

Downloaded from www.Manualslib.com manuals search engine 1A-188 Engine General Information and Diagnosis:
Reference waveform No.19
Knock sensor signal at engine speed 4000 r/min.
Reference waveform No.20
Knock sensor signal at engine speed 4000 r/min.Reference waveform No.21
Oil control valve signal with engine idling (for engine with
VVT system)
Reference waveform No.22
Oil control valve signal with engine racing (for engine
with VVT system) Measurement
terminalCH1: “C01-56” to “C01-58”
Oscilloscope
settingCH1: 1 V/DIV
TIME: 10 ms/DIV
Measurement
condition• After warmed up to normal
operating temperature
• Engine running at 4000 r/min.
Measurement
terminalCH1: “C01-56” to “C01-58”
Oscilloscope
settingCH1: 1 V/DIV
TIME: 200 µs/DIV
Measurement
condition• After warmed up to normal
operating temperature
• Engine running at 4000 r/min.
I4RS0B110072-01
I4RS0B110073-01
Measurement
terminalCH1: “C01-60” to “C01-59”
Oscilloscope
settingCH1: 5 V/DIV
TIME: 2 ms/DIV
Measurement
conditionAt the moment of the ignition switch
turned on
1. ON signal 3. Only duty cycle
2. OFF signal
Measurement
terminalCH1: “C01-60” to “C01-59”
Oscilloscope
settingCH1: 5 V/DIV
TIME: 400 µs/DIV
Measurement
condition• After warmed up to normal
operating temperature
• Vehicle running at 20 km/h (12
mph) and depress accelerator
pedal fully
1. Accelerator pedal depressed fully 4. ON signal
2. Accelerator pedal depressed partially 5. OFF signal
3. Oil control valve signal
I4RS0B110074-01
I4RS0B110075-01
Page 241 of 1556

Downloaded from www.Manualslib.com manuals search engine Engine General Information and Diagnosis: 1A-191
Reference waveform No.28
Ignition coil signal and fuel injector signal with engine
crankingReference waveform No.29
Throttle position sensor main (1) and sub (2) signal
Reference waveform No.30
Pedal position sensor main (1) and sub (2) signal Measurement
terminalCH1: “C01-20” to “C01-58”
CH2: “C01-6” to “C01-58”
CH3: “C01-1” to “C01-58”
CH4: “C01-48” to “C01-58”
Oscilloscope
settingCH1: 5 V/DIV, CH2: 5 V/DIV
CH3: 50 V/DIV, CH4: 10 V/DIV
TIME: 200 ms/DIV
Measurement
condition• After warmed up to normal
operating temperature
• Engine at cranking
[A]: For VVT model
[B]: For non-VVT model
1. Cylinder reference signal (CMP reference signal)
2. Ignition coil No.1 and No.4 signal
3. No.1 fuel injector signal
4. Engine start signal
I4RS0B110083-01
Measurement
terminalCH1: “C01-54” to “C01-58”
CH2: “C01-40” to “C01-58”
Oscilloscope
settingCH1: 1 V/DIV, CH2: 1 V/DIV
TIME: 200 ms/DIV
Measurement
condition• After warmed up to normal
operating temperature
• Ignition switch turned ON and
depress accelerator pedal fully
3. Accelerator pedal released
4. Accelerator pedal depressed fully
Measurement
terminalCH1: “E01-37” to “C01-58”
CH2: “E01-36” to “C01-58”
Oscilloscope
settingCH1: 1 V/DIV, CH2: 1 V/DIV
TIME: 100 ms/DIV
Measurement
condition• After warmed up to normal
operating temperature
• Ignition switch turned ON and
depress accelerator pedal fully
3. Accelerator pedal released
4. Accelerator pedal depressed fully
3431
2
I5RW0C110023-01
3431
2
I5RW0C110024-01
Page 243 of 1556
Downloaded from www.Manualslib.com manuals search engine Engine General Information and Diagnosis: 1A-193
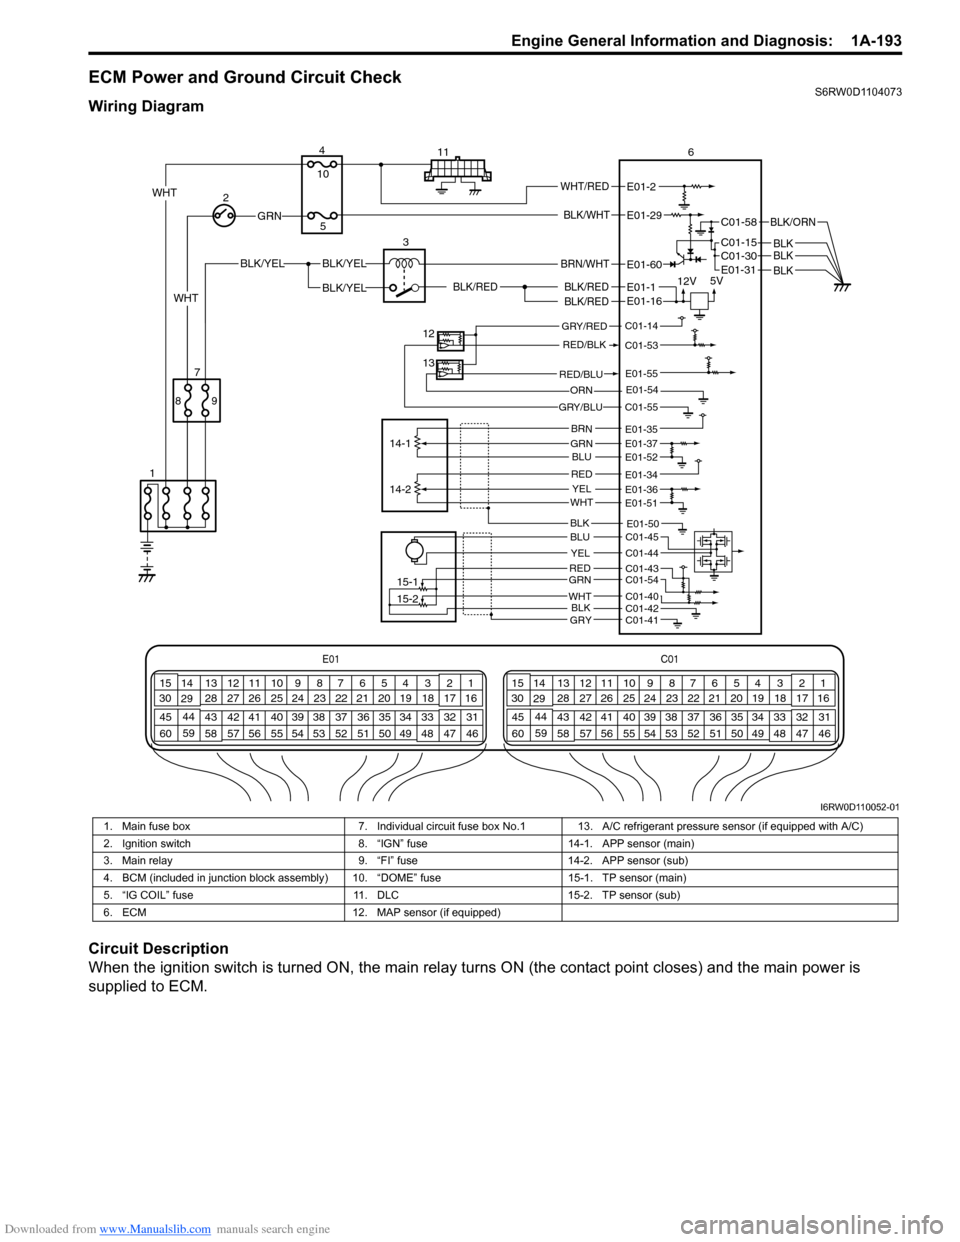
ECM Power and Ground Circuit CheckS6RW0D1104073
Wiring Diagram
Circuit Description
When the ignition switch is turned ON, the main relay turns ON (the contact point closes) and the main power is
supplied to ECM.
E01C01
3 4
18 19 5 6 7 10 11
17 20
47 46 49 50 51 21 22
5216 259
24 14
29
55 57 54 53 59
60 582
26 27 28 15
30
56 4832 31 34 35 36 37 40 42 39 38 44
45 43 41 331 12 13
238 3 4
18 19 5 6 7 10 11
17 20
47 46 49 50 51 21 22
5216 259
24 14
29
55 57 54 53 59
60 582
26 27 28 15
30
56 4832 31 34 35 36 37 40 42 39 38 44
45 43 41 331 12 13
238
BLK/WHT
BLK/RED
BLK/RED
BLK/RED
BLK/YELBLK/YEL
BLK/YEL
GRN
BRN/WHT
12V5V
2
13
12
13
14-1
15-1
15-2 14-2 4
56
E01-29
E01-1
E01-60
E01-16
9 87
1011
WHTWHT/REDE01-2
C01-58
C01-15 C01-30
BLK/ORN
BLKBLKBLK
WHT
GRY/RED
RED/BLK
GRY/BLU
C01-14
C01-53
C01-55
E01-54ORN
RED/BLUE01-55
BRNGRNBLU
REDYELWHT
E01-35E01-37E01-52
E01-51
E01-34E01-36
E01-50
REDGRN
WHTBLK
BLU
YEL
C01-43C01-54
C01-40C01-42
C01-45
C01-44
C01-41
E01-31
GRY
BLK
I6RW0D110052-01
1. Main fuse box 7. Individual circuit fuse box No.1 13. A/C refrigerant pressure sensor (if equipped with A/C)
2. Ignition switch 8. “IGN” fuse 14-1. APP sensor (main)
3. Main relay 9. “FI” fuse 14-2. APP sensor (sub)
4. BCM (included in junction block assembly) 10. “DOME” fuse 15-1. TP sensor (main)
5. “IG COIL” fuse 11. DLC 15-2. TP sensor (sub)
6. ECM 12. MAP sensor (if equipped)
Page 246 of 1556
Downloaded from www.Manualslib.com manuals search engine 1A-196 Engine General Information and Diagnosis:
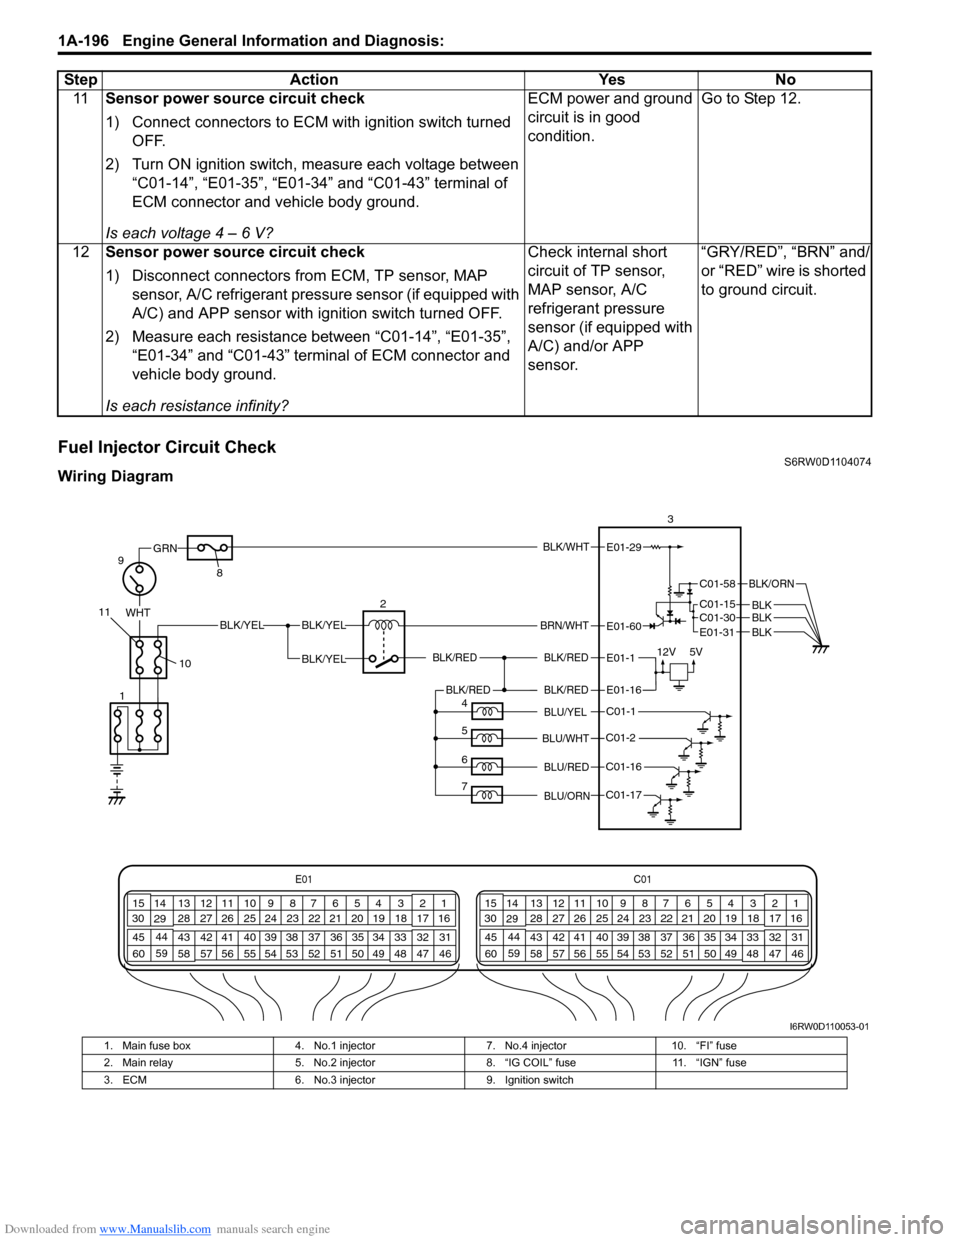
Fuel Injector Circuit CheckS6RW0D1104074
Wiring Diagram11Sensor power source circuit check
1) Connect connectors to ECM with ignition switch turned
OFF.
2) Turn ON ignition switch, measure each voltage between
“C01-14”, “E01-35”, “E01-34” and “C01-43” terminal of
ECM connector and vehicle body ground.
Is each voltage 4 – 6 V?ECM power and ground
circuit is in good
condition.Go to Step 12.
12Sensor power source circuit check
1) Disconnect connectors from ECM, TP sensor, MAP
sensor, A/C refrigerant pressure sensor (if equipped with
A/C) and APP sensor with ignition switch turned OFF.
2) Measure each resistance between “C01-14”, “E01-35”,
“E01-34” and “C01-43” terminal of ECM connector and
vehicle body ground.
Is each resistance infinity?Check internal short
circuit of TP sensor,
MAP sensor, A/C
refrigerant pressure
sensor (if equipped with
A/C) and/or APP
sensor.“GRY/RED”, “BRN” and/
or “RED” wire is shorted
to ground circuit. Step Action Yes No
BLK/WHT
BLK/RED
BLK/RED
WHTBLK/YELBLK/YEL
BLK/YEL
GRN
BRN/WHT
12V5V
9
2 83E01-29
E01-1
E01-60
10 11
E01C01
3 4
18 19 5 6 7 10 11
17 20
47 46 49 50 51 21 22
5216 259
24 14
29
55 57 54 53 59
60 582
26 27 28 15
30
56 4832 31 34 35 36 37 40 42 39 38 44
45 43 41 331 12 13
238 3 4
18 19 5 6 7 10 11
17 20
47 46 49 50 51 21 22
5216 259
24 14
29
55 57 54 53 59
60 582
26 27 28 15
30
56 4832 31 34 35 36 37 40 42 39 38 44
45 43 41 331 12 13
238
C01-1
C01-2
C01-16
C01-17
BLK/REDBLK/RED
BLU/YEL
BLU/RED
BLU/ORN
BLU/WHT
E01-16
4
5
6
71
C01-58
C01-15 C01-30
BLK/ORN
BLKBLKBLKE01-31
I6RW0D110053-01
1. Main fuse box 4. No.1 injector 7. No.4 injector 10. “FI” fuse
2. Main relay 5. No.2 injector 8. “IG COIL” fuse 11. “IGN” fuse
3. ECM 6. No.3 injector 9. Ignition switch
Page 255 of 1556
Downloaded from www.Manualslib.com manuals search engine Engine General Information and Diagnosis: 1A-205
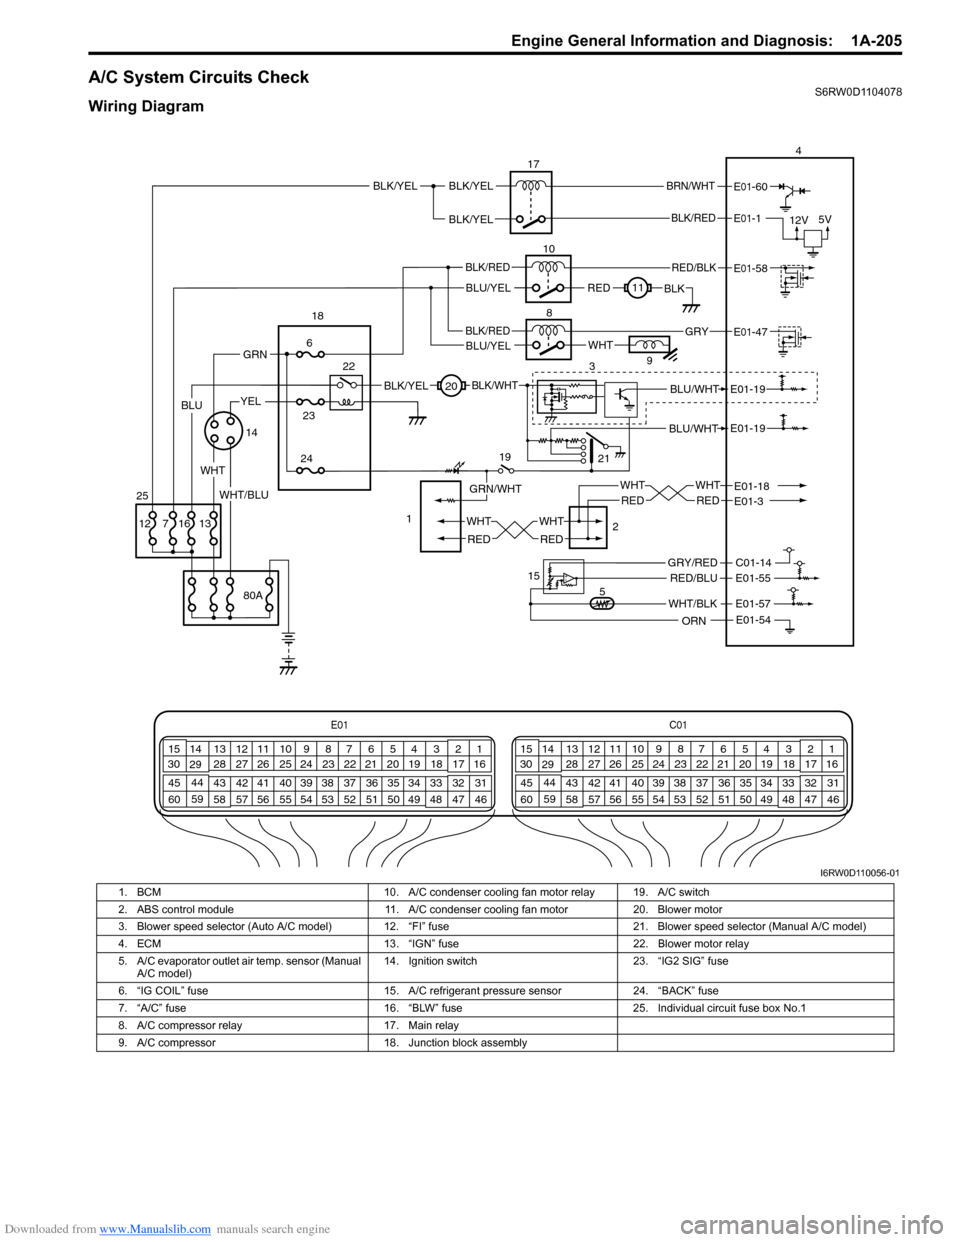
A/C System Circuits CheckS6RW0D1104078
Wiring Diagram
BLU/WHT
BLU/WHTE01-19
E01-19
21
E01C01
3 4
18 19 5 6 7 10 11
17 20
47 46 49 50 51 21 22
5216 259
24 14
29
55 57 54 53 59
60 582
26 27 28 15
30
56 4832 31 34 35 36 37 40 42 39 38 44
45 43 41 331 12 13
238 3 4
18 19 5 6 7 10 11
17 20
47 46 49 50 51 21 22
5216 259
24 14
29
55 57 54 53 59
60 582
26 27 28 15
30
56 4832 31 34 35 36 37 40 42 39 38 44
45 43 41 331 12 13
238
BLK/RED
BRN/WHT
12V5V
17
10
8
E01-1
E01-60
BLK/YEL
REDBLK11
WHT9
34
RED/BLK
BLK/REDE01-47
E01-58
BLU/YELGRY
19
2 1
20
5 15
WHT
RED
WHT
RED
WHT
RED
WHT
RED
E01-18E01-3
WHT/BLK
C01-14
E01-57
E01-54
E01-55RED/BLU
ORN
GRY/RED
BLK/YEL
GRN/WHT
BLK/WHT
WHT
1423
24
6
22 18
80A
1316 7 12
GRN
25
BLK/RED
BLU/YEL
YEL
WHT/BLU
BLK/YELBLK/YEL
BLU
I6RW0D110056-01
1. BCM 10. A/C condenser cooling fan motor relay 19. A/C switch
2. ABS control module 11. A/C condenser cooling fan motor 20. Blower motor
3. Blower speed selector (Auto A/C model) 12. “FI” fuse 21. Blower speed selector (Manual A/C model)
4. ECM 13. “IGN” fuse 22. Blower motor relay
5. A/C evaporator outlet air temp. sensor (Manual
A/C model)14. Ignition switch 23. “IG2 SIG” fuse
6. “IG COIL” fuse 15. A/C refrigerant pressure sensor 24. “BACK” fuse
7. “A/C” fuse 16. “BLW” fuse 25. Individual circuit fuse box No.1
8. A/C compressor relay 17. Main relay
9. A/C compressor 18. Junction block assembly
Page 256 of 1556
Downloaded from www.Manualslib.com manuals search engine 1A-206 Engine General Information and Diagnosis:
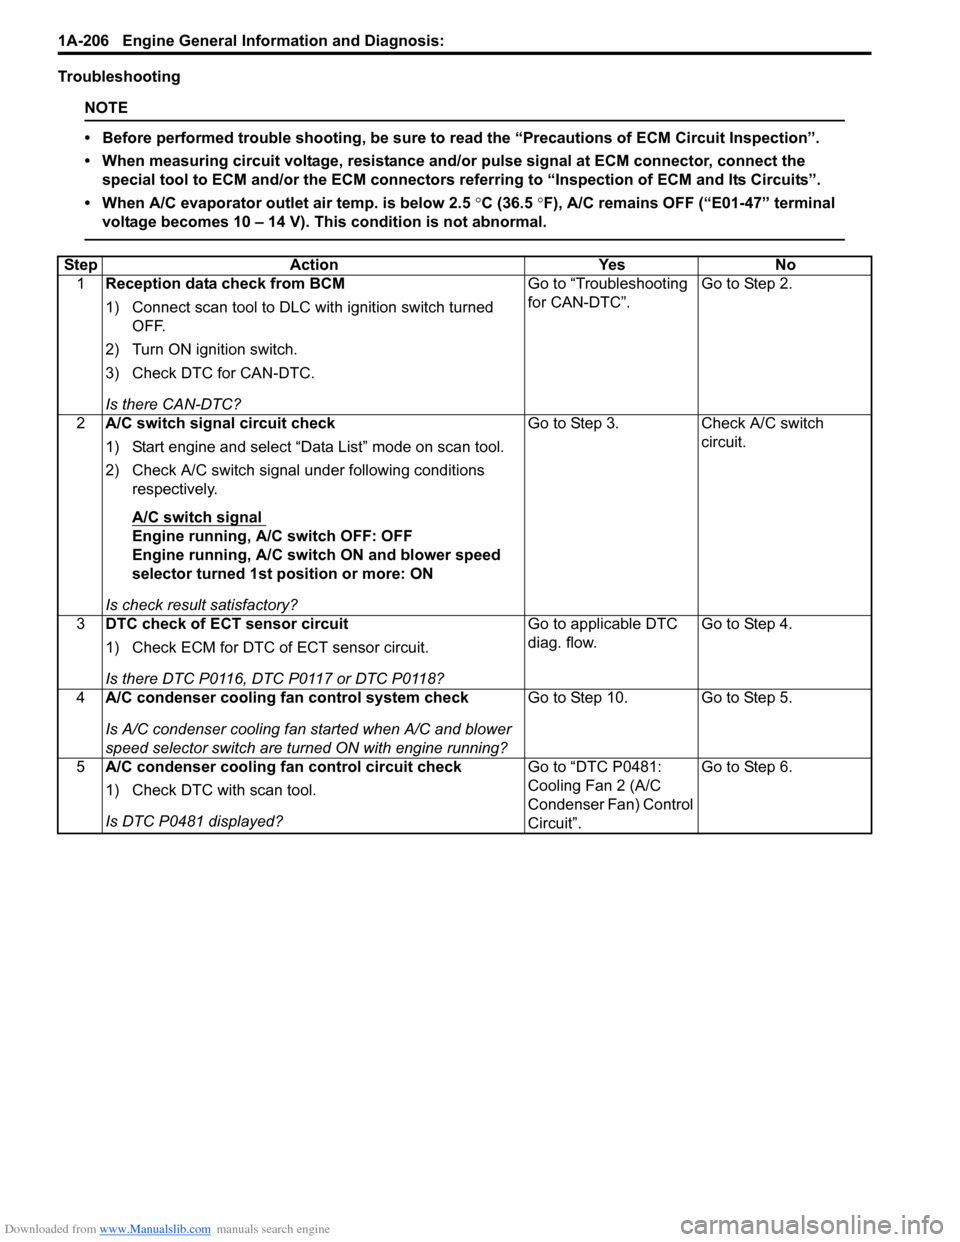
Troubleshooting
NOTE
• Before performed trouble shooting, be sure to read the “Precautions of ECM Circuit Inspection”.
• When measuring circuit voltage, resistance and/or pulse signal at ECM connector, connect the
special tool to ECM and/or the ECM connectors referring to “Inspection of ECM and Its Circuits”.
• When A/C evaporator outlet air temp. is below 2.5 °C (36.5 °F), A/C remains OFF (“E01-47” terminal
voltage becomes 10 – 14 V). This condition is not abnormal.
Step Action Yes No
1Reception data check from BCM
1) Connect scan tool to DLC with ignition switch turned
OFF.
2) Turn ON ignition switch.
3) Check DTC for CAN-DTC.
Is there CAN-DTC?Go to “Troubleshooting
for CAN-DTC”.Go to Step 2.
2A/C switch signal circuit check
1) Start engine and select “Data List” mode on scan tool.
2) Check A/C switch signal under following conditions
respectively.
A/C switch signal
Engine running, A/C switch OFF: OFF
Engine running, A/C switch ON and blower speed
selector turned 1st position or more: ON
Is check result satisfactory?Go to Step 3. Check A/C switch
circuit.
3DTC check of ECT sensor circuit
1) Check ECM for DTC of ECT sensor circuit.
Is there DTC P0116, DTC P0117 or DTC P0118?Go to applicable DTC
diag. flow.Go to Step 4.
4A/C condenser cooling fan control system check
Is A/C condenser cooling fan started when A/C and blower
speed selector switch are turned ON with engine running?Go to Step 10. Go to Step 5.
5A/C condenser cooling fan control circuit check
1) Check DTC with scan tool.
Is DTC P0481 displayed?Go to “DTC P0481:
Cooling Fan 2 (A/C
Condenser Fan) Control
Circuit”.Go to Step 6.