section 9 SUZUKI SX4 2006 1.G Service Workshop Manual
[x] Cancel search | Manufacturer: SUZUKI, Model Year: 2006, Model line: SX4, Model: SUZUKI SX4 2006 1.GPages: 1556, PDF Size: 37.31 MB
Page 374 of 1556
Downloaded from www.Manualslib.com manuals search engine 1F-9 Engine Cooling System:
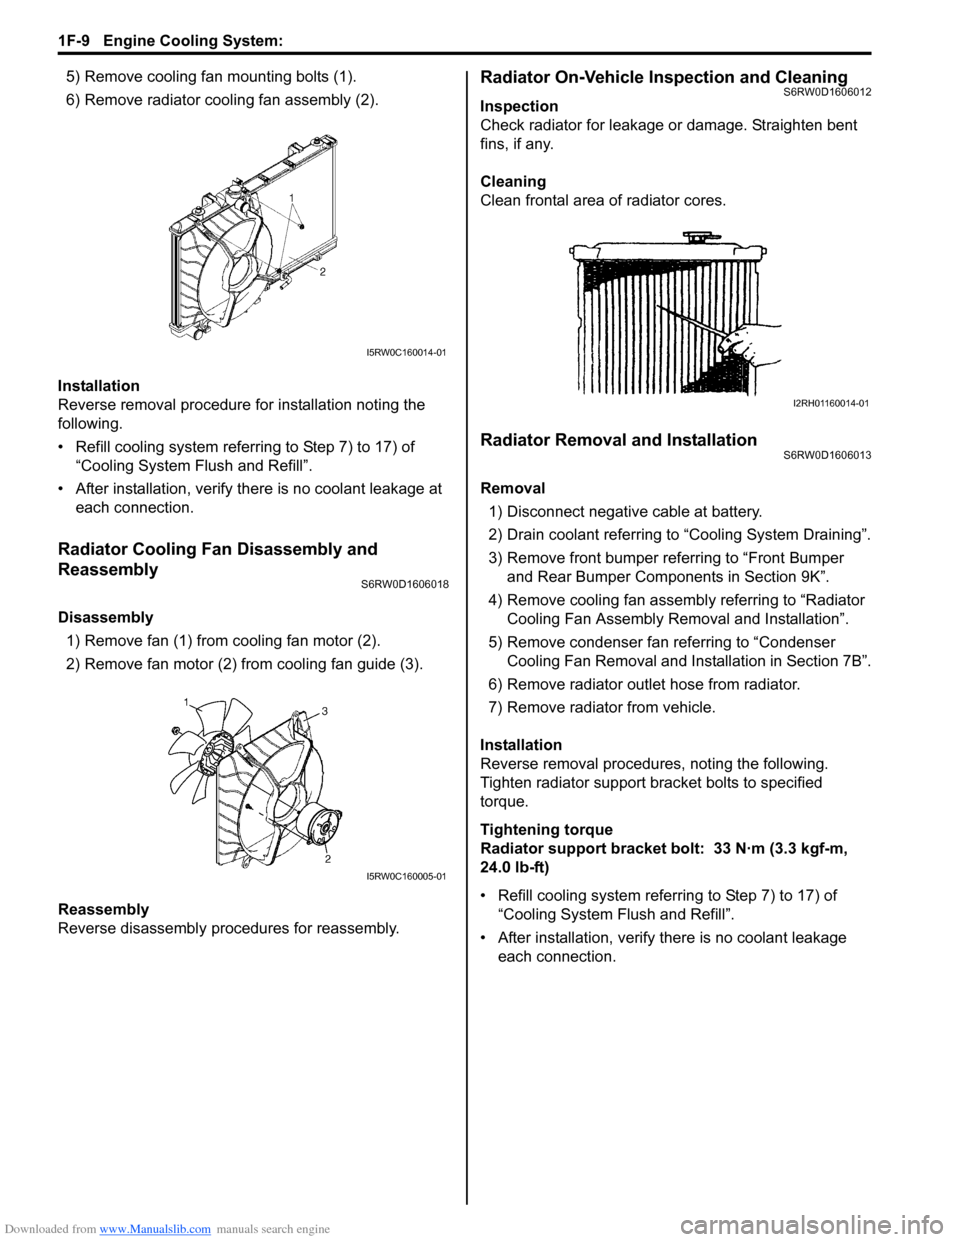
5) Remove cooling fan mounting bolts (1).
6) Remove radiator cooling fan assembly (2).
Installation
Reverse removal procedure for installation noting the
following.
• Refill cooling system referring to Step 7) to 17) of
“Cooling System Flush and Refill”.
• After installation, verify there is no coolant leakage at
each connection.
Radiator Cooling Fan Disassembly and
Reassembly
S6RW0D1606018
Disassembly
1) Remove fan (1) from cooling fan motor (2).
2) Remove fan motor (2) from cooling fan guide (3).
Reassembly
Reverse disassembly procedures for reassembly.
Radiator On-Vehicle Inspection and CleaningS6RW0D1606012
Inspection
Check radiator for leakage or damage. Straighten bent
fins, if any.
Cleaning
Clean frontal area of radiator cores.
Radiator Removal and InstallationS6RW0D1606013
Removal
1) Disconnect negative cable at battery.
2) Drain coolant referring to “Cooling System Draining”.
3) Remove front bumper referring to “Front Bumper
and Rear Bumper Components in Section 9K”.
4) Remove cooling fan assembly referring to “Radiator
Cooling Fan Assembly Removal and Installation”.
5) Remove condenser fan referring to “Condenser
Cooling Fan Removal and Installation in Section 7B”.
6) Remove radiator outlet hose from radiator.
7) Remove radiator from vehicle.
Installation
Reverse removal procedures, noting the following.
Tighten radiator support bracket bolts to specified
torque.
Tightening torque
Radiator support bracket bolt: 33 N·m (3.3 kgf-m,
24.0 lb-ft)
• Refill cooling system referring to Step 7) to 17) of
“Cooling System Flush and Refill”.
• After installation, verify there is no coolant leakage
each connection.
I5RW0C160014-01
I5RW0C160005-01
I2RH01160014-01
Page 375 of 1556
Downloaded from www.Manualslib.com manuals search engine Engine Cooling System: 1F-10
Water Pump / Generator Drive Belt Tension
Inspection and Adjustment
S6RW0D1606014
WARNING!
• Disconnect negative cable at battery
before checking and adjusting belt
tension.
• To help avoid danger of being burned, do
not remove radiator cap while engine and
radiator are still hot. Scalding fluid and
steam can be blown out under pressure if
cap is taken off too soon.
1) Inspect belt for cracks, cuts, deformation, wear and
cleanliness. If it is necessary to replace belt, refer to
“Water Pump / Generator Drive Belt Removal and
Installation”.
2) Check belt for tension. Belt is in proper tension when
it deflects the following specification under thumb
pressure (about 100 N (10kgf, 22 lbs.).
If belt tension is out of specification, go to next steps.
Water pump / generator drive belt tension
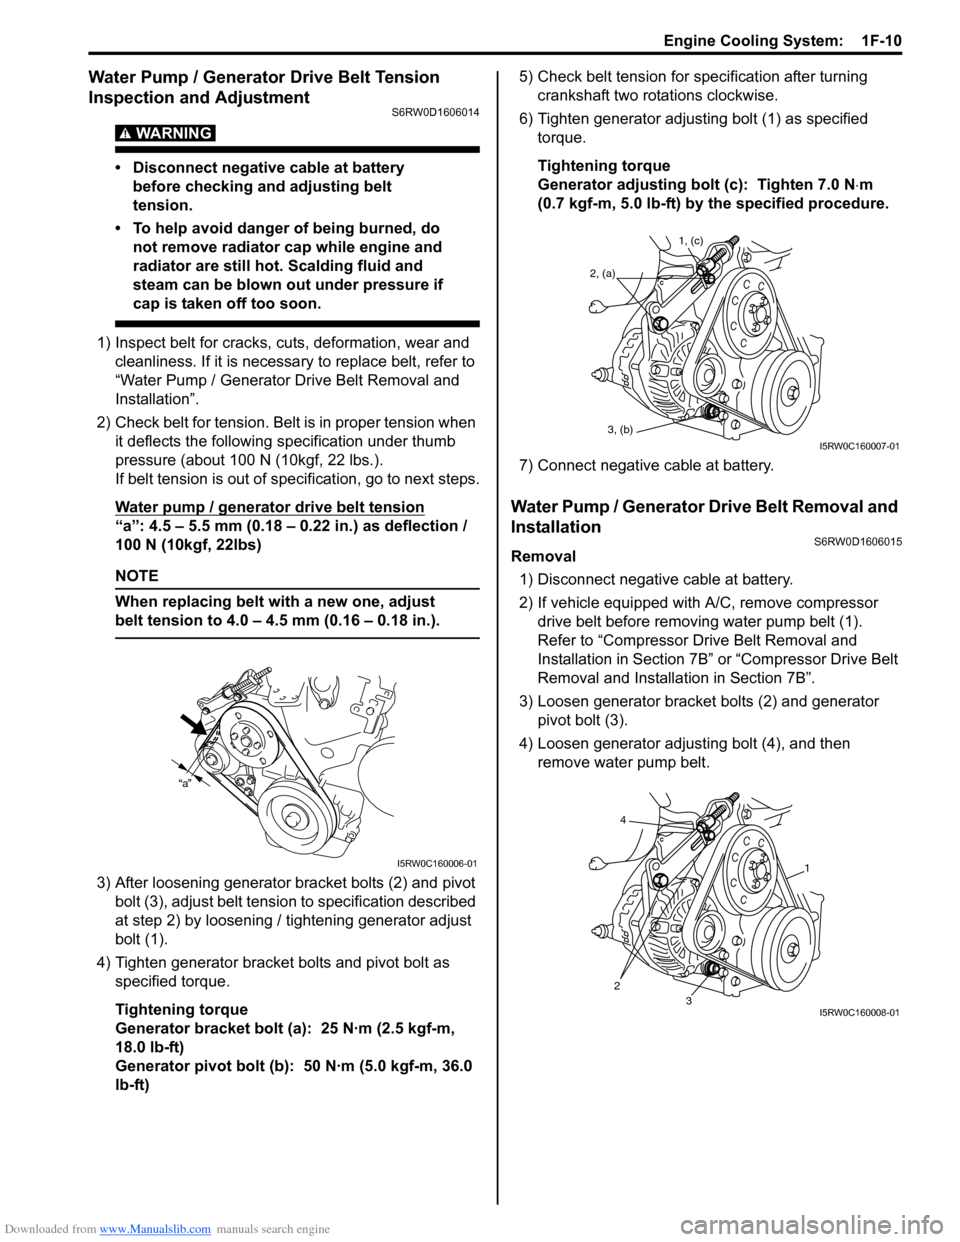
“a”: 4.5 – 5.5 mm (0.18 – 0.22 in.) as deflection /
100 N (10kgf, 22lbs)
NOTE
When replacing belt with a new one, adjust
belt tension to 4.0 – 4.5 mm (0.16 – 0.18 in.).
3) After loosening generator bracket bolts (2) and pivot
bolt (3), adjust belt tension to specification described
at step 2) by loosening / tightening generator adjust
bolt (1).
4) Tighten generator bracket bolts and pivot bolt as
specified torque.
Tightening torque
Generator bracket bolt (a): 25 N·m (2.5 kgf-m,
18.0 lb-ft)
Generator pivot bolt (b): 50 N·m (5.0 kgf-m, 36.0
lb-ft)5) Check belt tension for specification after turning
crankshaft two rotations clockwise.
6) Tighten generator adjusting bolt (1) as specified
torque.
Tightening torque
Generator adjusting bolt (c): Tighten 7.0 N⋅m
(0.7 kgf-m, 5.0 lb-ft) by the specified procedure.
7) Connect negative cable at battery.
Water Pump / Generator Drive Belt Removal and
Installation
S6RW0D1606015
Removal
1) Disconnect negative cable at battery.
2) If vehicle equipped with A/C, remove compressor
drive belt before removing water pump belt (1).
Refer to “Compressor Drive Belt Removal and
Installation in Section 7B” or “Compressor Drive Belt
Removal and Installation in Section 7B”.
3) Loosen generator bracket bolts (2) and generator
pivot bolt (3).
4) Loosen generator adjusting bolt (4), and then
remove water pump belt.
a
I5RW0C160006-01
1, (c)
2, (a)
3, (b)
I5RW0C160007-01
4
23
1
I5RW0C160008-01
Page 376 of 1556
Downloaded from www.Manualslib.com manuals search engine 1F-11 Engine Cooling System:
Installation
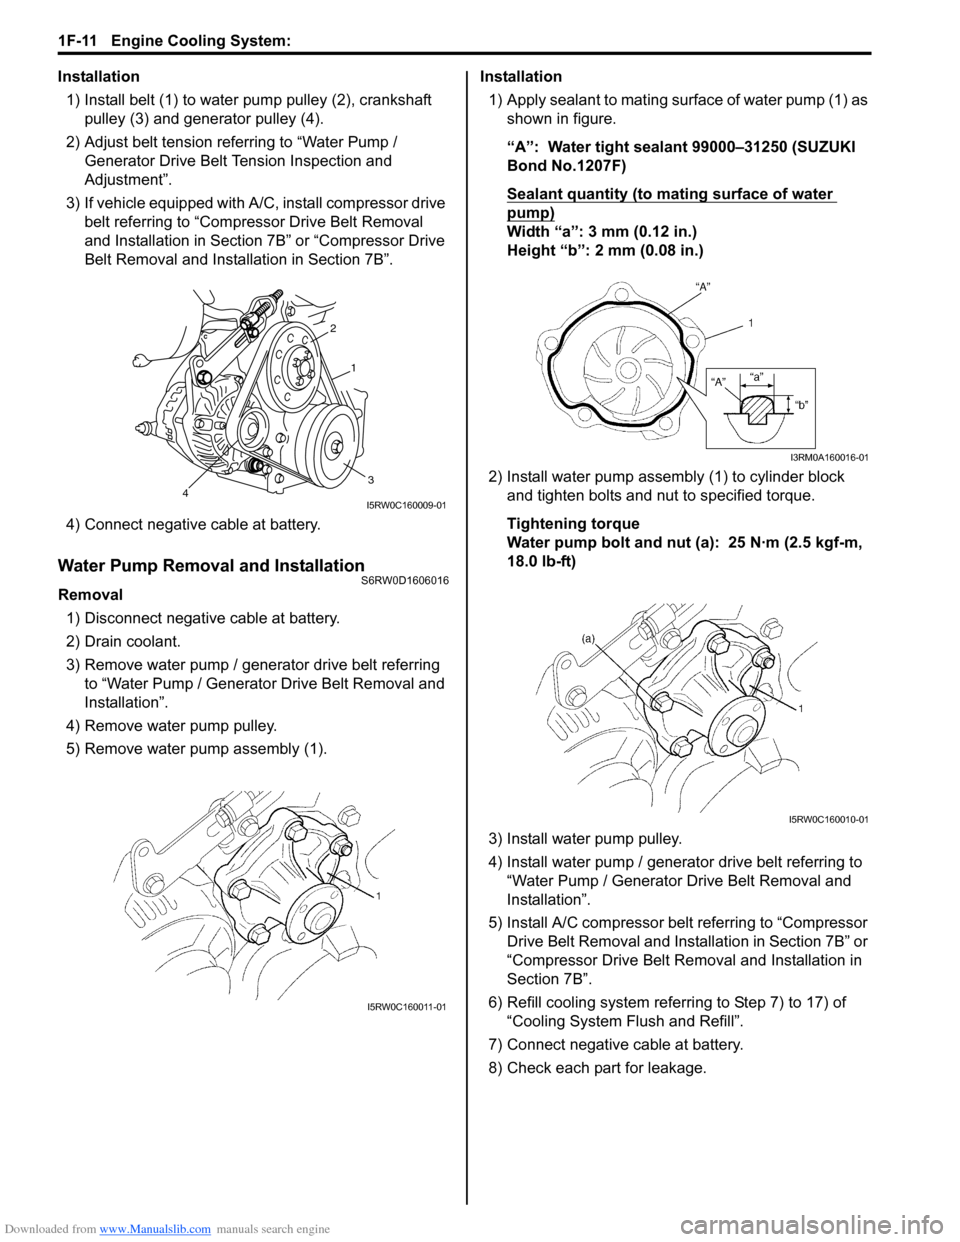
1) Install belt (1) to water pump pulley (2), crankshaft
pulley (3) and generator pulley (4).
2) Adjust belt tension referring to “Water Pump /
Generator Drive Belt Tension Inspection and
Adjustment”.
3) If vehicle equipped with A/C, install compressor drive
belt referring to “Compressor Drive Belt Removal
and Installation in Section 7B” or “Compressor Drive
Belt Removal and Installation in Section 7B”.
4) Connect negative cable at battery.
Water Pump Removal and InstallationS6RW0D1606016
Removal
1) Disconnect negative cable at battery.
2) Drain coolant.
3) Remove water pump / generator drive belt referring
to “Water Pump / Generator Drive Belt Removal and
Installation”.
4) Remove water pump pulley.
5) Remove water pump assembly (1).Installation
1) Apply sealant to mating surface of water pump (1) as
shown in figure.
“A”: Water tight sealant 99000–31250 (SUZUKI
Bond No.1207F)
Sealant quantity (to mating surface of water
pump)
Width “a”: 3 mm (0.12 in.)
Height “b”: 2 mm (0.08 in.)
2) Install water pump assembly (1) to cylinder block
and tighten bolts and nut to specified torque.
Tightening torque
Water pump bolt and nut (a): 25 N·m (2.5 kgf-m,
18.0 lb-ft)
3) Install water pump pulley.
4) Install water pump / generator drive belt referring to
“Water Pump / Generator Drive Belt Removal and
Installation”.
5) Install A/C compressor belt referring to “Compressor
Drive Belt Removal and Installation in Section 7B” or
“Compressor Drive Belt Removal and Installation in
Section 7B”.
6) Refill cooling system referring to Step 7) to 17) of
“Cooling System Flush and Refill”.
7) Connect negative cable at battery.
8) Check each part for leakage.
2
1
34I5RW0C160009-01
I5RW0C160011-01
I3RM0A160016-01
I5RW0C160010-01
Page 377 of 1556
Downloaded from www.Manualslib.com manuals search engine Engine Cooling System: 1F-12
Water Pump InspectionS6RW0D1606017
CAUTION!
Do not disassemble water pump.
If any repair is required on pump, replace it
as assembly.
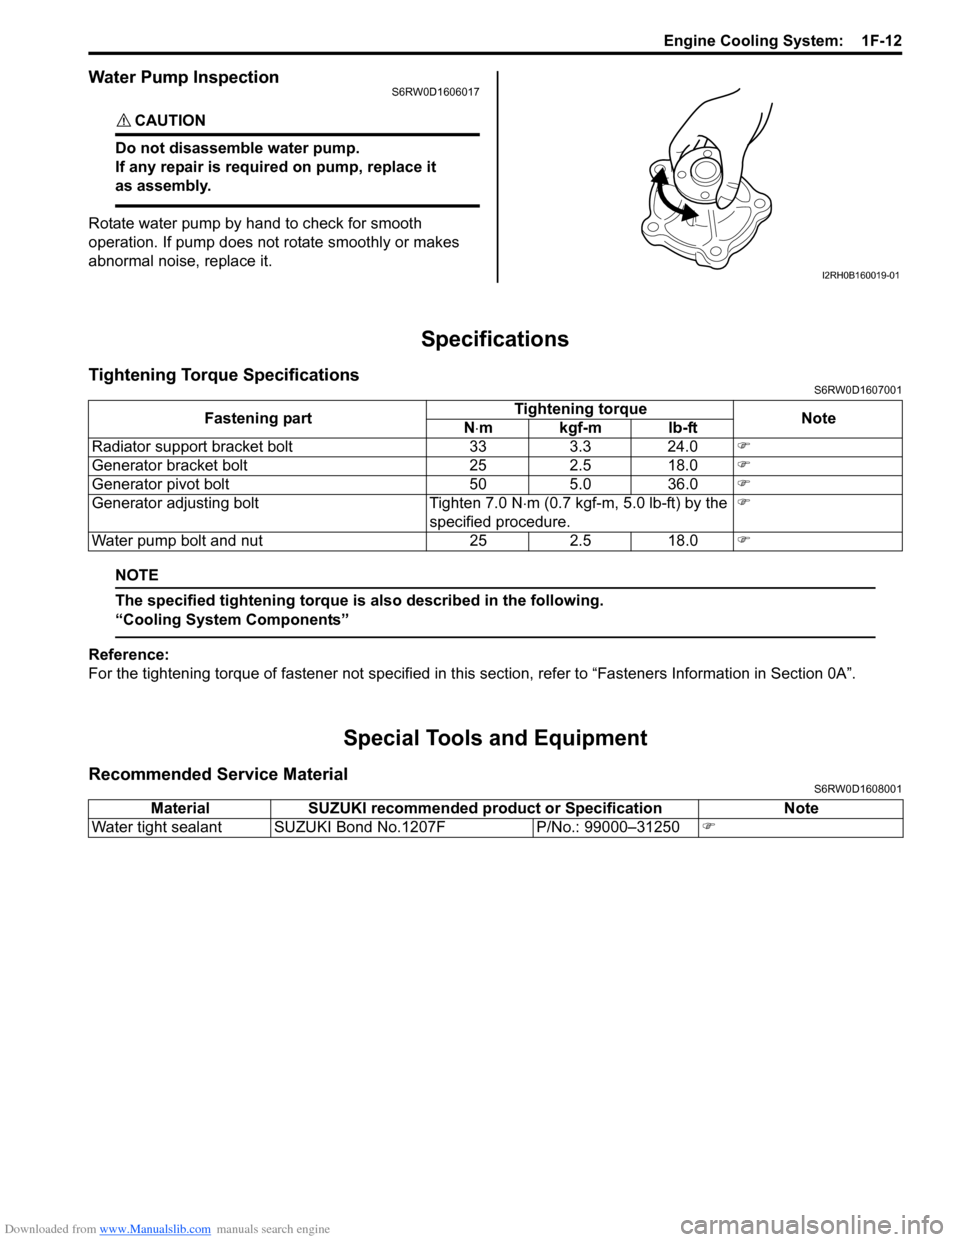
Rotate water pump by hand to check for smooth
operation. If pump does not rotate smoothly or makes
abnormal noise, replace it.
Specifications
Tightening Torque SpecificationsS6RW0D1607001
NOTE
The specified tightening torque is also described in the following.
“Cooling System Components”
Reference:
For the tightening torque of fastener not specified in this section, refer to “Fasteners Information in Section 0A”.
Special Tools and Equipment
Recommended Service MaterialS6RW0D1608001
I2RH0B160019-01
Fastening partTightening torque
Note
N⋅mkgf-mlb-ft
Radiator support bracket bolt 33 3.3 24.0�)
Generator bracket bolt 25 2.5 18.0�)
Generator pivot bolt 50 5.0 36.0�)
Generator adjusting bolt Tighten 7.0 N⋅m (0.7 kgf-m, 5.0 lb-ft) by the
specified procedure.�)
Water pump bolt and nut 25 2.5 18.0�)
Material SUZUKI recommended product or Specification Note
Water tight sealant SUZUKI Bond No.1207F P/No.: 99000–31250�)
Page 381 of 1556
Downloaded from www.Manualslib.com manuals search engine Fuel System: 1G-4
4) Check that battery voltage is 11 V or more.
5) Measure fuel pressure at each condition.
If measured pressure is out of specification, refer to
“Fuel Pressure Check in Section 1A” and check each
possibly defective part. Replace if found defective.
a) Turn ignition switch ON to operate fuel pump and
after 2 seconds turn it OFF. Repeat this 3 or 4
times and then check fuel pressure.
Fuel pressure specification
With fuel pump operating and engine
stopped: 360 – 400 kPa (3.6 – 4.0 kgf/cm2,
51.2 – 56.9 psi)
b) Start engine and warm it up to normal operating
temperature, and measure fuel pressure at
idling.
Fuel pressure specification
At specified idle speed: 360 – 400 kPa (3.6 –
4.0 kgf/cm2, 51.2 – 56.9 psi)
c) Stop engine, and measure fuel pressure at one
minute after stopping.
Fuel pressure specification
With 1 min. after engine (fuel pump) stop
(Pressure reduces as time passes): Over 250
kPa (2.5 kgf/cm
2, 35.6 psi)
6) After checking fuel pressure, remove fuel pressure
gauge.
WARNING!
As fuel feed line is still under high fuel
pressure, make sure to release fuel pressure
according to the following procedures.
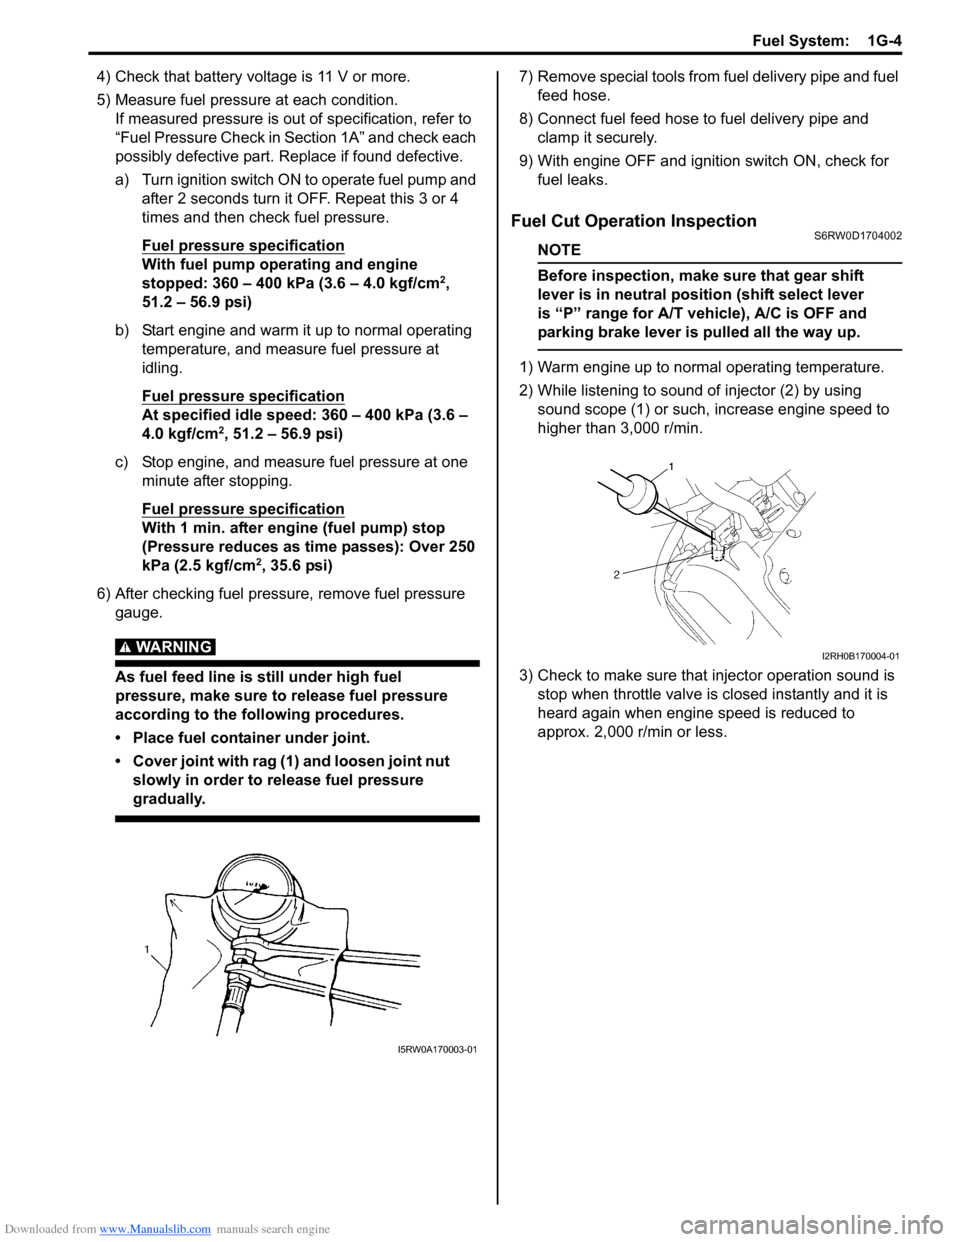
• Place fuel container under joint.
• Cover joint with rag (1) and loosen joint nut
slowly in order to release fuel pressure
gradually.
7) Remove special tools from fuel delivery pipe and fuel
feed hose.
8) Connect fuel feed hose to fuel delivery pipe and
clamp it securely.
9) With engine OFF and ignition switch ON, check for
fuel leaks.
Fuel Cut Operation InspectionS6RW0D1704002
NOTE
Before inspection, make sure that gear shift
lever is in neutral position (shift select lever
is “P” range for A/T vehicle), A/C is OFF and
parking brake lever is pulled all the way up.
1) Warm engine up to normal operating temperature.
2) While listening to sound of injector (2) by using
sound scope (1) or such, increase engine speed to
higher than 3,000 r/min.
3) Check to make sure that injector operation sound is
stop when throttle valve is closed instantly and it is
heard again when engine speed is reduced to
approx. 2,000 r/min or less.
I5RW0A170003-01
I2RH0B170004-01
Page 384 of 1556
Downloaded from www.Manualslib.com manuals search engine 1G-7 Fuel System:
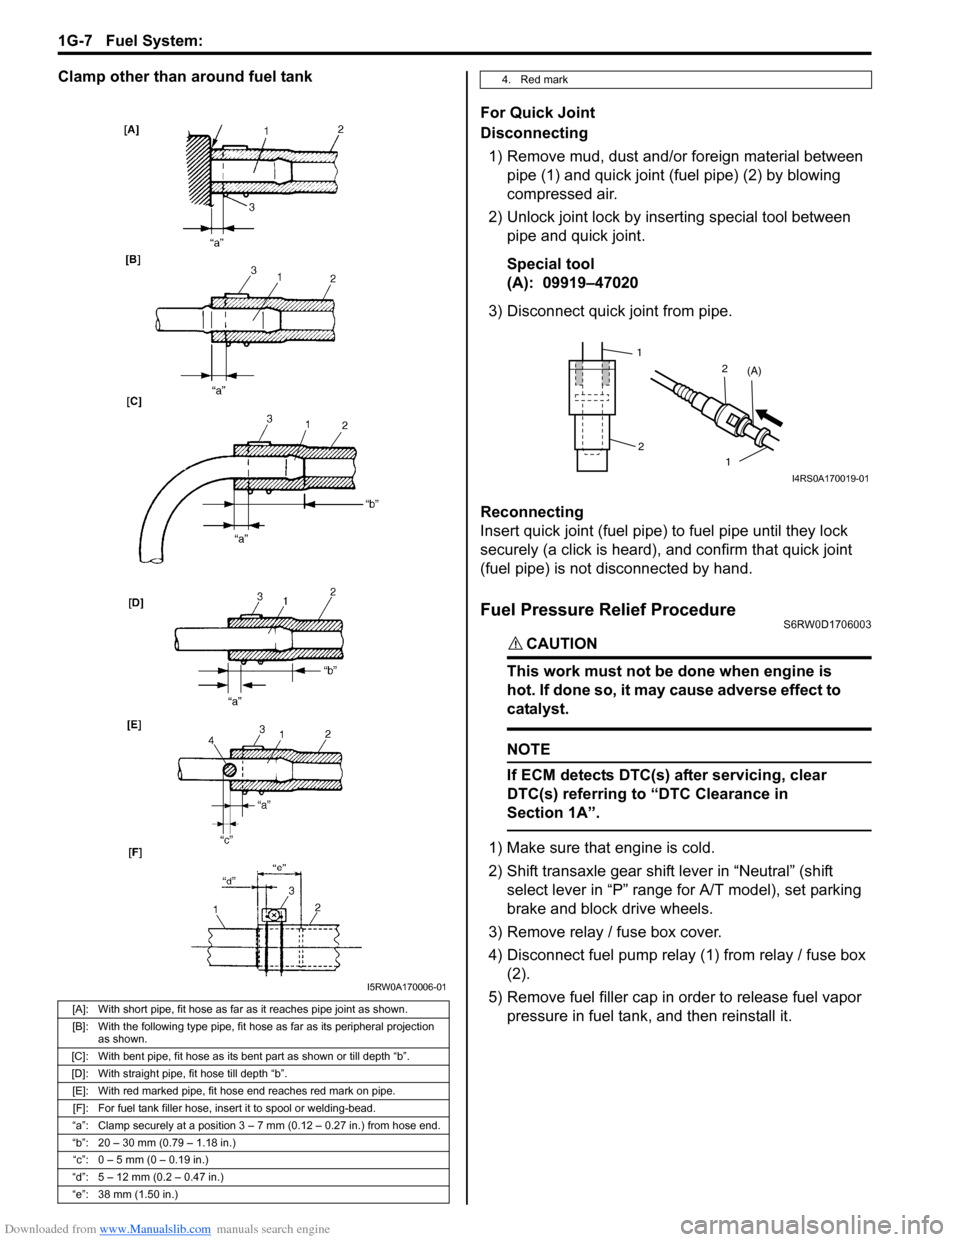
Clamp other than around fuel tank
For Quick Joint
Disconnecting
1) Remove mud, dust and/or foreign material between
pipe (1) and quick joint (fuel pipe) (2) by blowing
compressed air.
2) Unlock joint lock by inserting special tool between
pipe and quick joint.
Special tool
(A): 09919–47020
3) Disconnect quick joint from pipe.
Reconnecting
Insert quick joint (fuel pipe) to fuel pipe until they lock
securely (a click is heard), and confirm that quick joint
(fuel pipe) is not disconnected by hand.
Fuel Pressure Relief ProcedureS6RW0D1706003
CAUTION!
This work must not be done when engine is
hot. If done so, it may cause adverse effect to
catalyst.
NOTE
If ECM detects DTC(s) after servicing, clear
DTC(s) referring to “DTC Clearance in
Section 1A”.
1) Make sure that engine is cold.
2) Shift transaxle gear shift lever in “Neutral” (shift
select lever in “P” range for A/T model), set parking
brake and block drive wheels.
3) Remove relay / fuse box cover.
4) Disconnect fuel pump relay (1) from relay / fuse box
(2).
5) Remove fuel filler cap in order to release fuel vapor
pressure in fuel tank, and then reinstall it.
[A]: With short pipe, fit hose as far as it reaches pipe joint as shown.
[B]: With the following type pipe, fit hose as far as its peripheral projection
as shown.
[C]: With bent pipe, fit hose as its bent part as shown or till depth “b”.
[D]: With straight pipe, fit hose till depth “b”.
[E]: With red marked pipe, fit hose end reaches red mark on pipe.
[F]: For fuel tank filler hose, insert it to spool or welding-bead.
“a”: Clamp securely at a position 3 – 7 mm (0.12 – 0.27 in.) from hose end.
“b”: 20 – 30 mm (0.79 – 1.18 in.)
“c”: 0 – 5 mm (0 – 0.19 in.)
“d”: 5 – 12 mm (0.2 – 0.47 in.)
“e”: 38 mm (1.50 in.)
I5RW0A170006-01
4. Red mark
1
2
1 2
(A)
I4RS0A170019-01
Page 390 of 1556
Downloaded from www.Manualslib.com manuals search engine 1G-13 Fuel System:
Fuel Tank Removal and InstallationS6RW0D1706011
WARNING!
Before starting the following procedure, be
sure to observe “Precautions on Fuel System
Service” in order to reduce the risk of fire and
personal injury.
Removal
1) Relieve fuel pressure in fuel feed line according to
“Fuel Pressure Relief Procedure”.
2) Disconnect negative cable at battery.
3) Remove fuel filler cap.
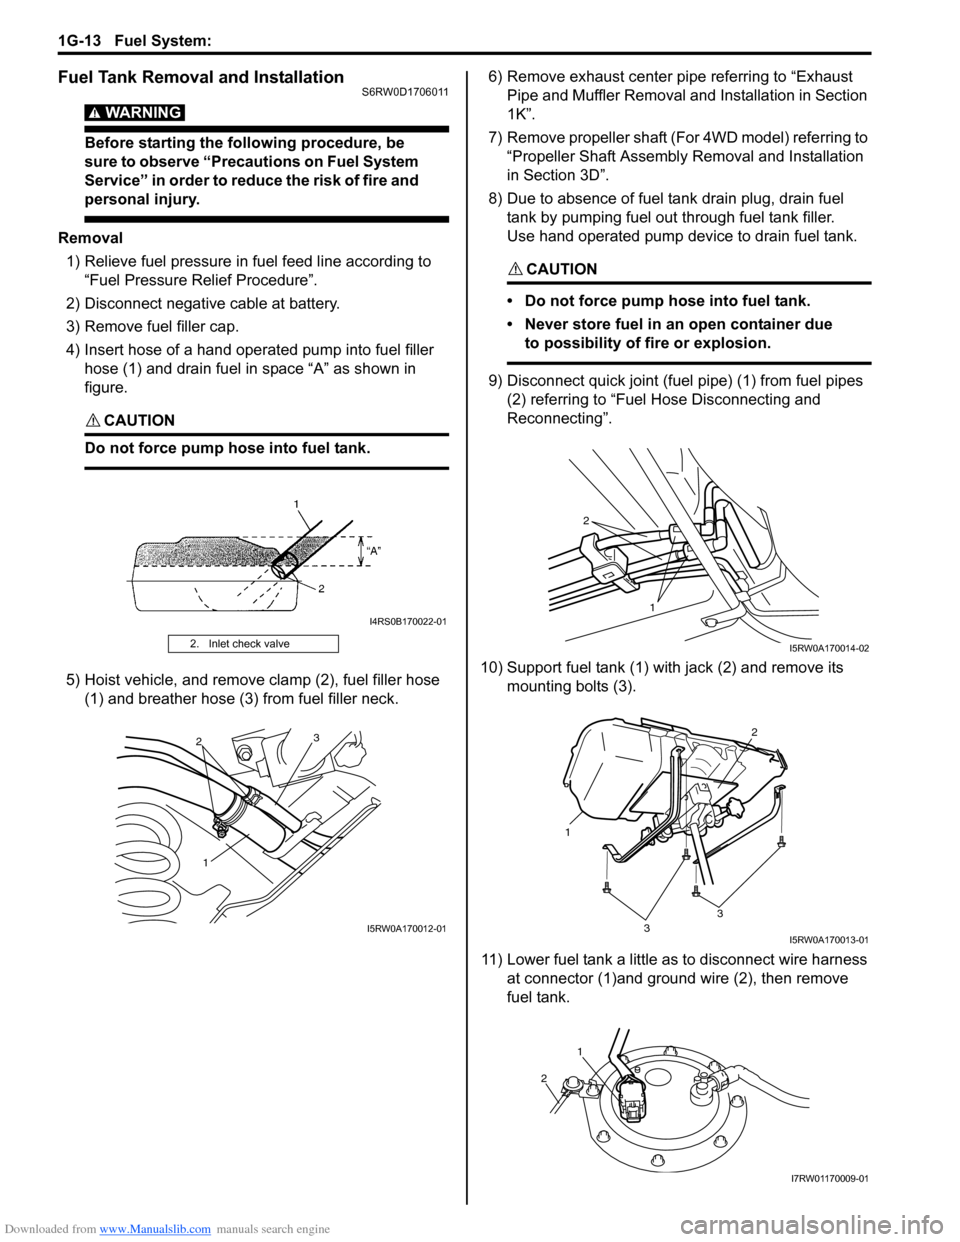
4) Insert hose of a hand operated pump into fuel filler
hose (1) and drain fuel in space “A” as shown in
figure.
CAUTION!
Do not force pump hose into fuel tank.
5) Hoist vehicle, and remove clamp (2), fuel filler hose
(1) and breather hose (3) from fuel filler neck.6) Remove exhaust center pipe referring to “Exhaust
Pipe and Muffler Removal and Installation in Section
1K”.
7) Remove propeller shaft (For 4WD model) referring to
“Propeller Shaft Assembly Removal and Installation
in Section 3D”.
8) Due to absence of fuel tank drain plug, drain fuel
tank by pumping fuel out through fuel tank filler.
Use hand operated pump device to drain fuel tank.
CAUTION!
• Do not force pump hose into fuel tank.
• Never store fuel in an open container due
to possibility of fire or explosion.
9) Disconnect quick joint (fuel pipe) (1) from fuel pipes
(2) referring to “Fuel Hose Disconnecting and
Reconnecting”.
10) Support fuel tank (1) with jack (2) and remove its
mounting bolts (3).
11) Lower fuel tank a little as to disconnect wire harness
at connector (1)and ground wire (2), then remove
fuel tank.
2. Inlet check valve
I4RS0B170022-01
1 23
I5RW0A170012-01
2
1
I5RW0A170014-02
1
2
33
I5RW0A170013-01
1
2
I7RW01170009-01
Page 391 of 1556
Downloaded from www.Manualslib.com manuals search engine Fuel System: 1G-14
Installation
CAUTION!
• When connecting joint, clean outside
surfaces of pipe where joint is to be
inserted, push joint into pipe till joint lock
clicks and check to ensure that pipes are
connected securely, or fuel leak may
occur.
• Never let the fuel hoses touch the ABS
sensor harness (if equipped).
1) If parts have been removed from fuel tank, install
them before installing fuel tank to vehicle.
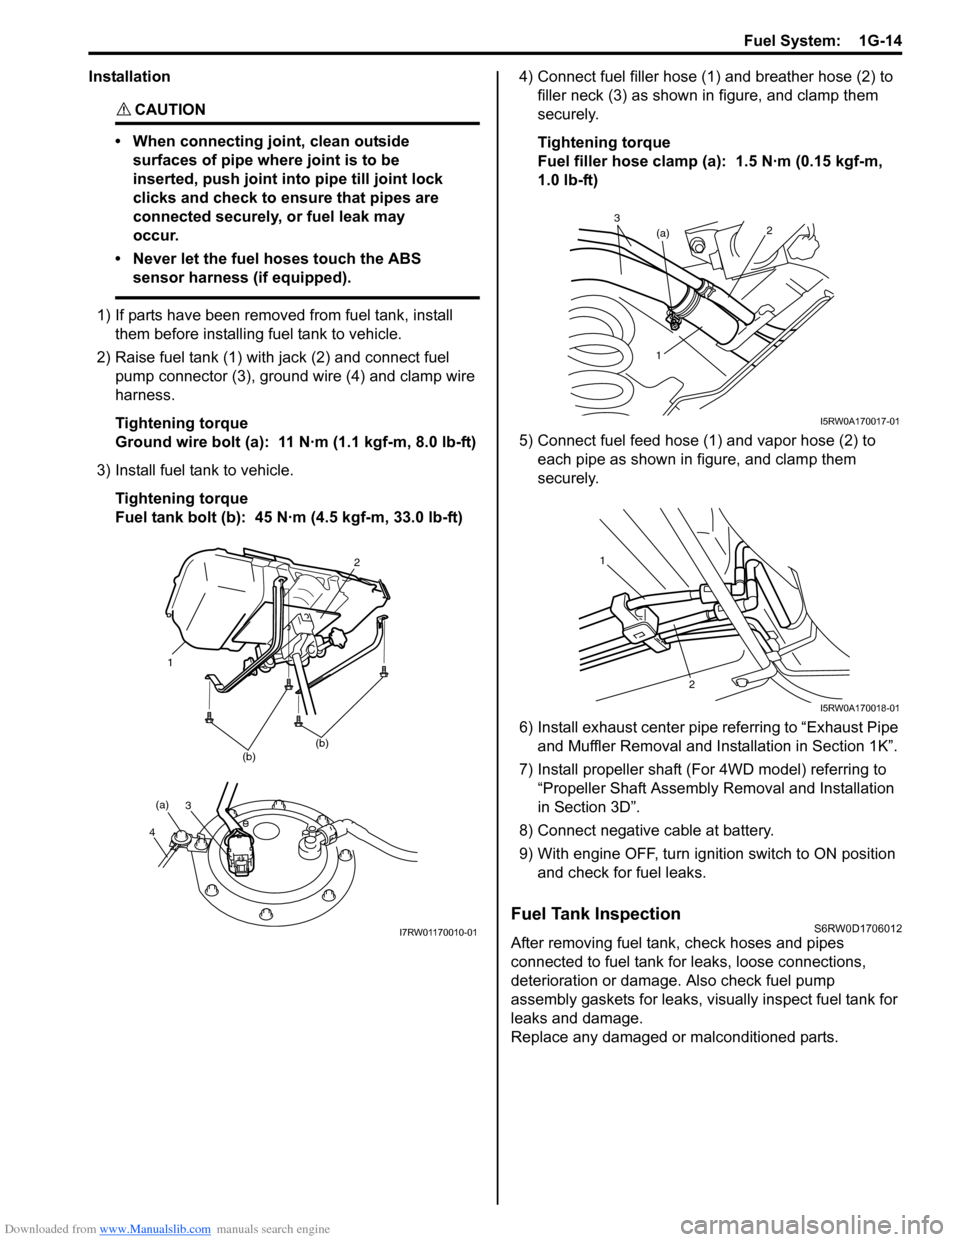
2) Raise fuel tank (1) with jack (2) and connect fuel
pump connector (3), ground wire (4) and clamp wire
harness.
Tightening torque
Ground wire bolt (a): 11 N·m (1.1 kgf-m, 8.0 lb-ft)
3) Install fuel tank to vehicle.
Tightening torque
Fuel tank bolt (b): 45 N·m (4.5 kgf-m, 33.0 lb-ft)4) Connect fuel filler hose (1) and breather hose (2) to
filler neck (3) as shown in figure, and clamp them
securely.
Tightening torque
Fuel filler hose clamp (a): 1.5 N·m (0.15 kgf-m,
1.0 lb-ft)
5) Connect fuel feed hose (1) and vapor hose (2) to
each pipe as shown in figure, and clamp them
securely.
6) Install exhaust center pipe referring to “Exhaust Pipe
and Muffler Removal and Installation in Section 1K”.
7) Install propeller shaft (For 4WD model) referring to
“Propeller Shaft Assembly Removal and Installation
in Section 3D”.
8) Connect negative cable at battery.
9) With engine OFF, turn ignition switch to ON position
and check for fuel leaks.
Fuel Tank InspectionS6RW0D1706012
After removing fuel tank, check hoses and pipes
connected to fuel tank for leaks, loose connections,
deterioration or damage. Also check fuel pump
assembly gaskets for leaks, visually inspect fuel tank for
leaks and damage.
Replace any damaged or malconditioned parts.
(b)(b)
1
2
3
4
(a)
I7RW01170010-01
1(a)2
3
I5RW0A170017-01
1
2
I5RW0A170018-01
Page 392 of 1556
Downloaded from www.Manualslib.com manuals search engine 1G-15 Fuel System:
Fuel Tank Purging ProcedureS6RW0D1706013
WARNING!
• Before starting the following procedure, be
sure to observe “Precautions on Fuel
System Service” in order to reduce the risk
of fire and personal injury.
• This purging procedure will not remove all
fuel vapor.
Do not attempt any repair on tank using
heat of flame as an explosion resulting in
personal injury could occur.
CAUTION!
Never remain water in fuel tank after washing,
or fuel tank inside will get corrosion.
The following procedure are used for purging fuel tank.
1) After removing fuel tank, remove all hoses, pipes
and fuel pump assembly from fuel tank.
2) Drain all remaining fuel from tank.
3) Place fuel tank to flushing area.
4) Fill tank with warm water or tap water, and agitate
vigorously and drain. Repeat this washing until
inside of tank is clean. Replace tank if its inside is
rusty.
5) Completely flush out remaining water after washing.
6) Be sure to dry fuel tank assembly thoroughly out of
direct sunlight after washing.
Fuel Pump On-Vehicle InspectionS6RW0D1706014
WARNING!
Before starting the following procedure, be
sure to observe “Precautions on Fuel System
Service” in order to reduce the risk of fire and
personal injury.
NOTE
The fuel pressure regulator is incorporated
with the fuel pump assembly so individual
inspection of it is impossible.
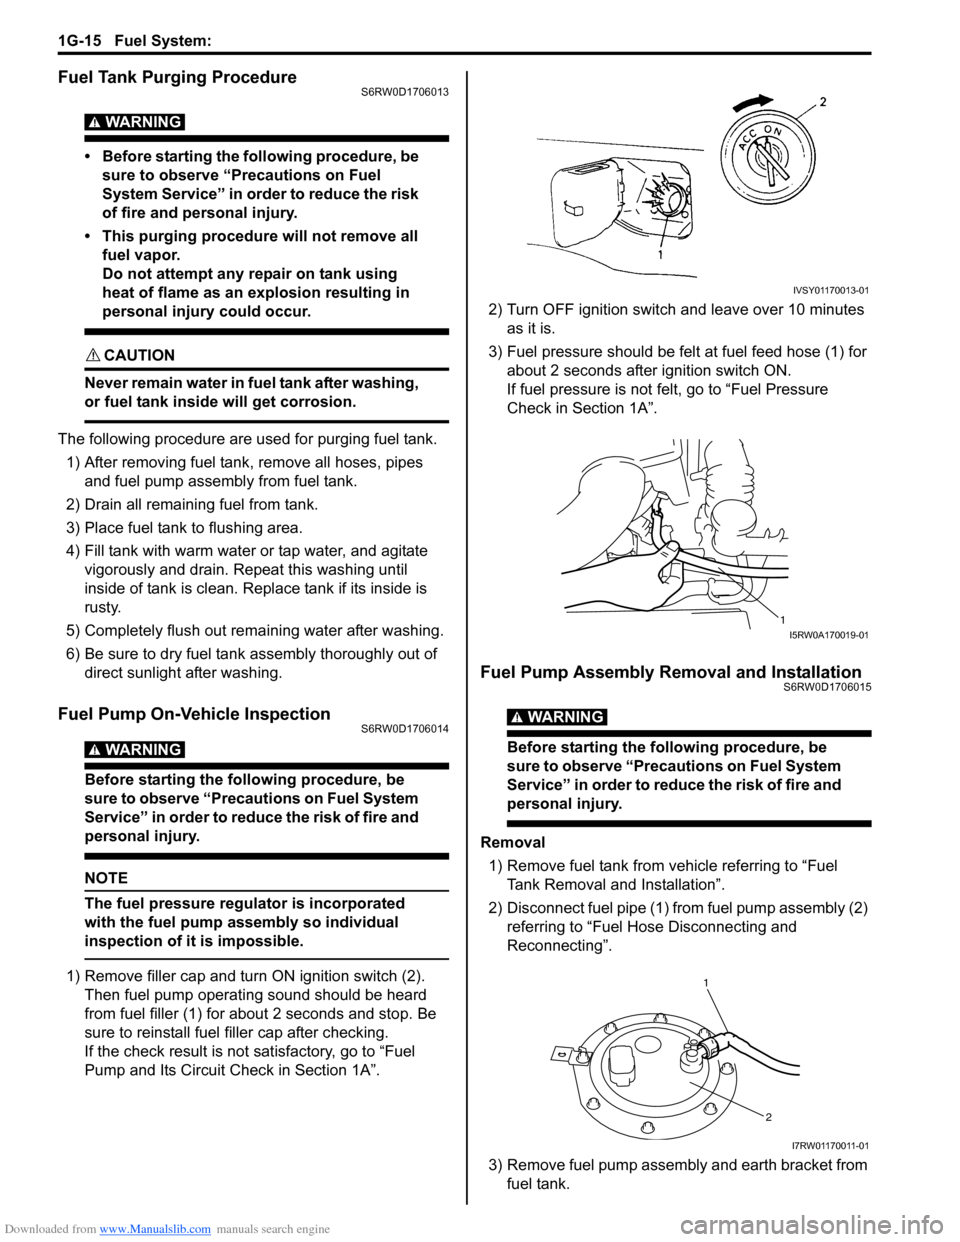
1) Remove filler cap and turn ON ignition switch (2).
Then fuel pump operating sound should be heard
from fuel filler (1) for about 2 seconds and stop. Be
sure to reinstall fuel filler cap after checking.
If the check result is not satisfactory, go to “Fuel
Pump and Its Circuit Check in Section 1A”.2) Turn OFF ignition switch and leave over 10 minutes
as it is.
3) Fuel pressure should be felt at fuel feed hose (1) for
about 2 seconds after ignition switch ON.
If fuel pressure is not felt, go to “Fuel Pressure
Check in Section 1A”.
Fuel Pump Assembly Removal and InstallationS6RW0D1706015
WARNING!
Before starting the following procedure, be
sure to observe “Precautions on Fuel System
Service” in order to reduce the risk of fire and
personal injury.
Removal
1) Remove fuel tank from vehicle referring to “Fuel
Tank Removal and Installation”.
2) Disconnect fuel pipe (1) from fuel pump assembly (2)
referring to “Fuel Hose Disconnecting and
Reconnecting”.
3) Remove fuel pump assembly and earth bracket from
fuel tank.
IVSY01170013-01
1I5RW0A170019-01
1
2
I7RW01170011-01
Page 393 of 1556
Downloaded from www.Manualslib.com manuals search engine Fuel System: 1G-16
Installation
CAUTION!
When connecting joint, clean outside surface
of pipe where joint is to be inserted, push
joint into pipe till joint lock clicks and check
to ensure that pipes are connected securely,
or fuel leak may occur.
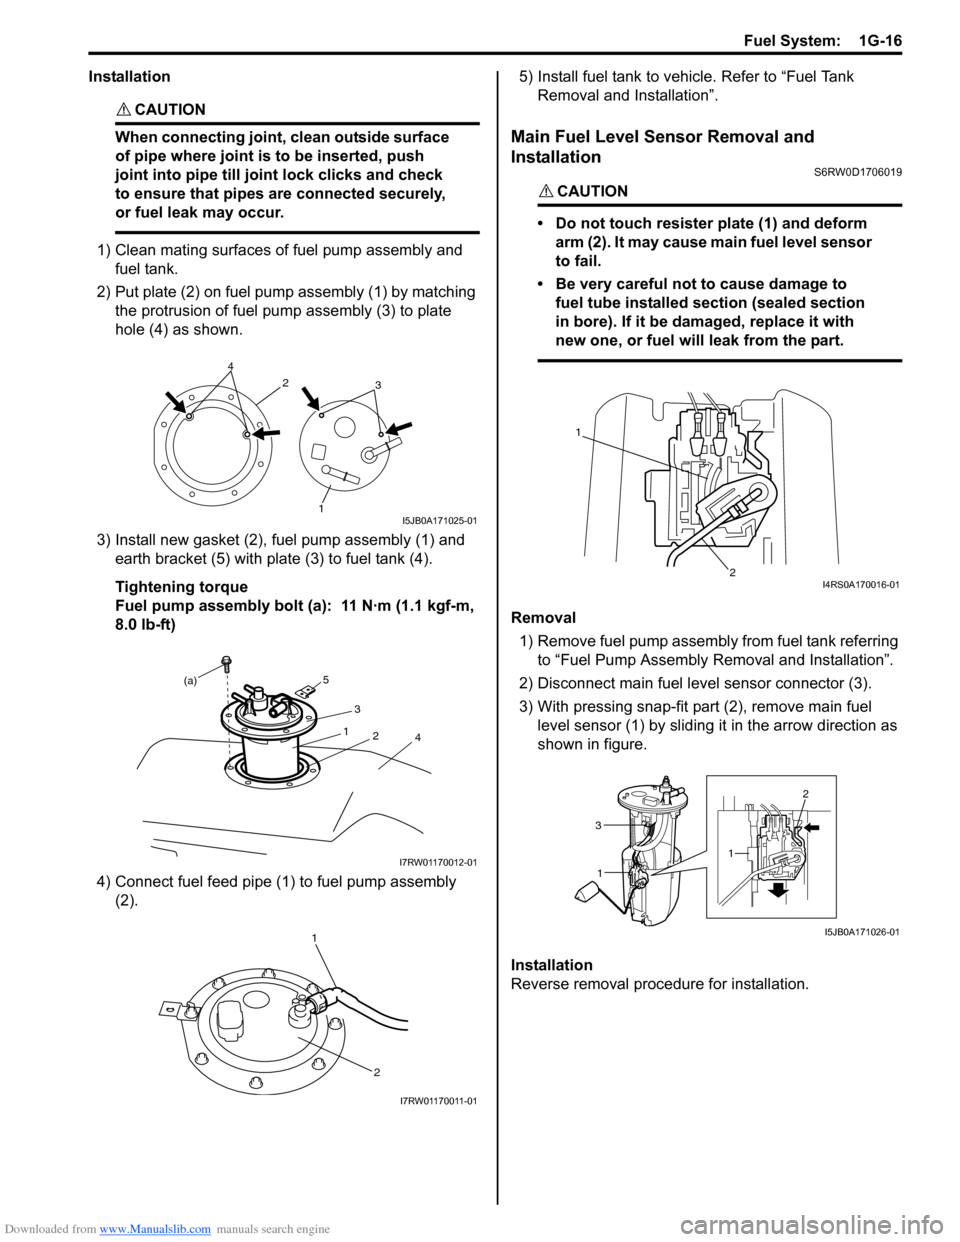
1) Clean mating surfaces of fuel pump assembly and
fuel tank.
2) Put plate (2) on fuel pump assembly (1) by matching
the protrusion of fuel pump assembly (3) to plate
hole (4) as shown.
3) Install new gasket (2), fuel pump assembly (1) and
earth bracket (5) with plate (3) to fuel tank (4).
Tightening torque
Fuel pump assembly bolt (a): 11 N·m (1.1 kgf-m,
8.0 lb-ft)
4) Connect fuel feed pipe (1) to fuel pump assembly
(2).5) Install fuel tank to vehicle. Refer to “Fuel Tank
Removal and Installation”.
Main Fuel Level Sensor Removal and
Installation
S6RW0D1706019
CAUTION!
• Do not touch resister plate (1) and deform
arm (2). It may cause main fuel level sensor
to fail.
• Be very careful not to cause damage to
fuel tube installed section (sealed section
in bore). If it be damaged, replace it with
new one, or fuel will leak from the part.
Removal
1) Remove fuel pump assembly from fuel tank referring
to “Fuel Pump Assembly Removal and Installation”.
2) Disconnect main fuel level sensor connector (3).
3) With pressing snap-fit part (2), remove main fuel
level sensor (1) by sliding it in the arrow direction as
shown in figure.
Installation
Reverse removal procedure for installation.
3
1 2 4
I5JB0A171025-01
3
1
2
(a)
4
5
I7RW01170012-01
1
2
I7RW01170011-01
1
2I4RS0A170016-01
1 3
12
I5JB0A171026-01