section 9 SUZUKI SX4 2006 1.G Service Workshop Manual
[x] Cancel search | Manufacturer: SUZUKI, Model Year: 2006, Model line: SX4, Model: SUZUKI SX4 2006 1.GPages: 1556, PDF Size: 37.31 MB
Page 432 of 1556
Downloaded from www.Manualslib.com manuals search engine 1K-5 Exhaust System:
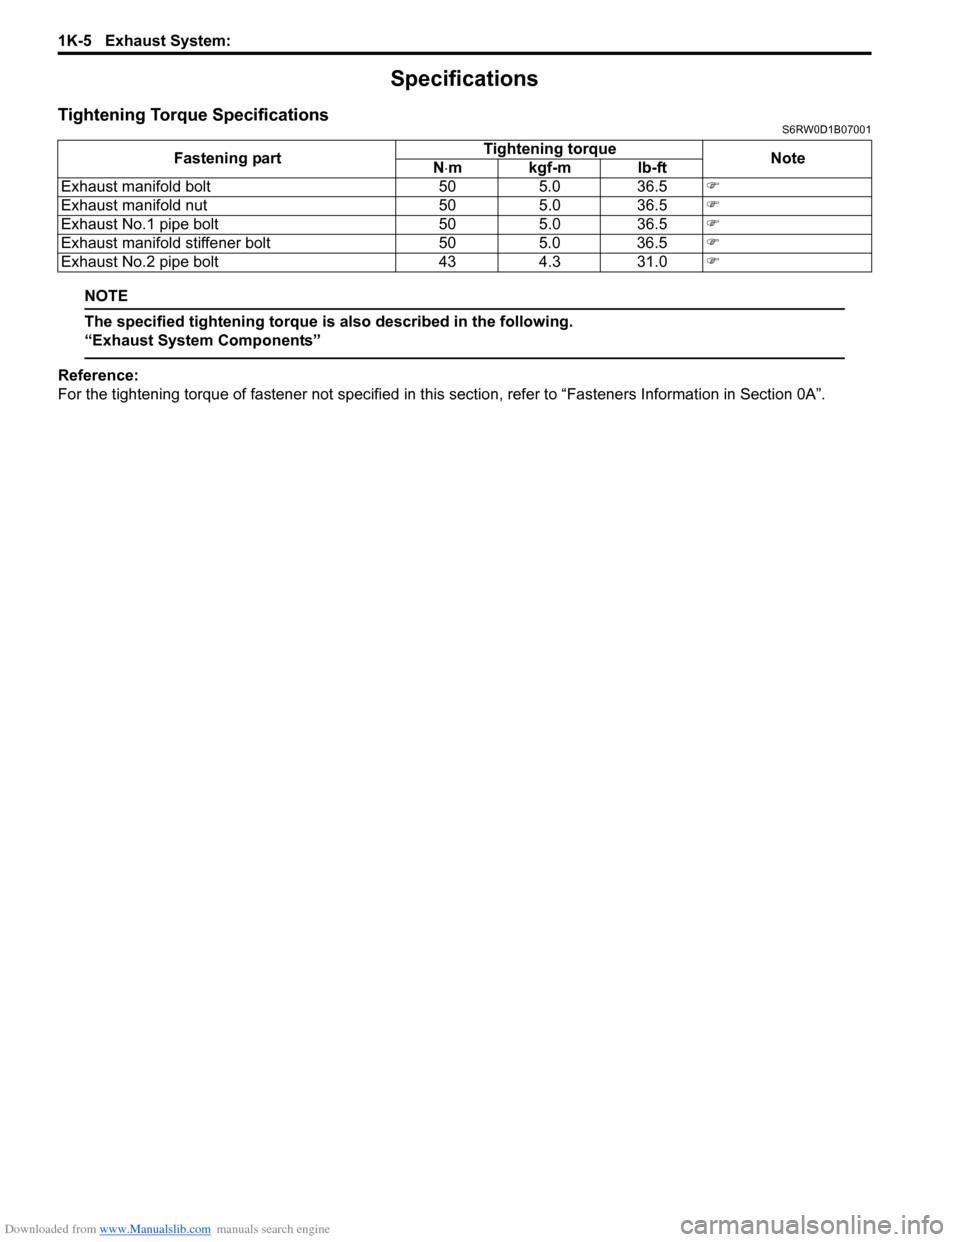
Specifications
Tightening Torque SpecificationsS6RW0D1B07001
NOTE
The specified tightening torque is also described in the following.
“Exhaust System Components”
Reference:
For the tightening torque of fastener not specified in this section, refer to “Fasteners Information in Section 0A”. Fastening partTightening torque
Note
N⋅mkgf-mlb-ft
Exhaust manifold bolt 50 5.0 36.5�)
Exhaust manifold nut 50 5.0 36.5�)
Exhaust No.1 pipe bolt 50 5.0 36.5�)
Exhaust manifold stiffener bolt 50 5.0 36.5�)
Exhaust No.2 pipe bolt 43 4.3 31.0�)
Page 433 of 1556
Downloaded from www.Manualslib.com manuals search engine Table of Contents 2- i
2
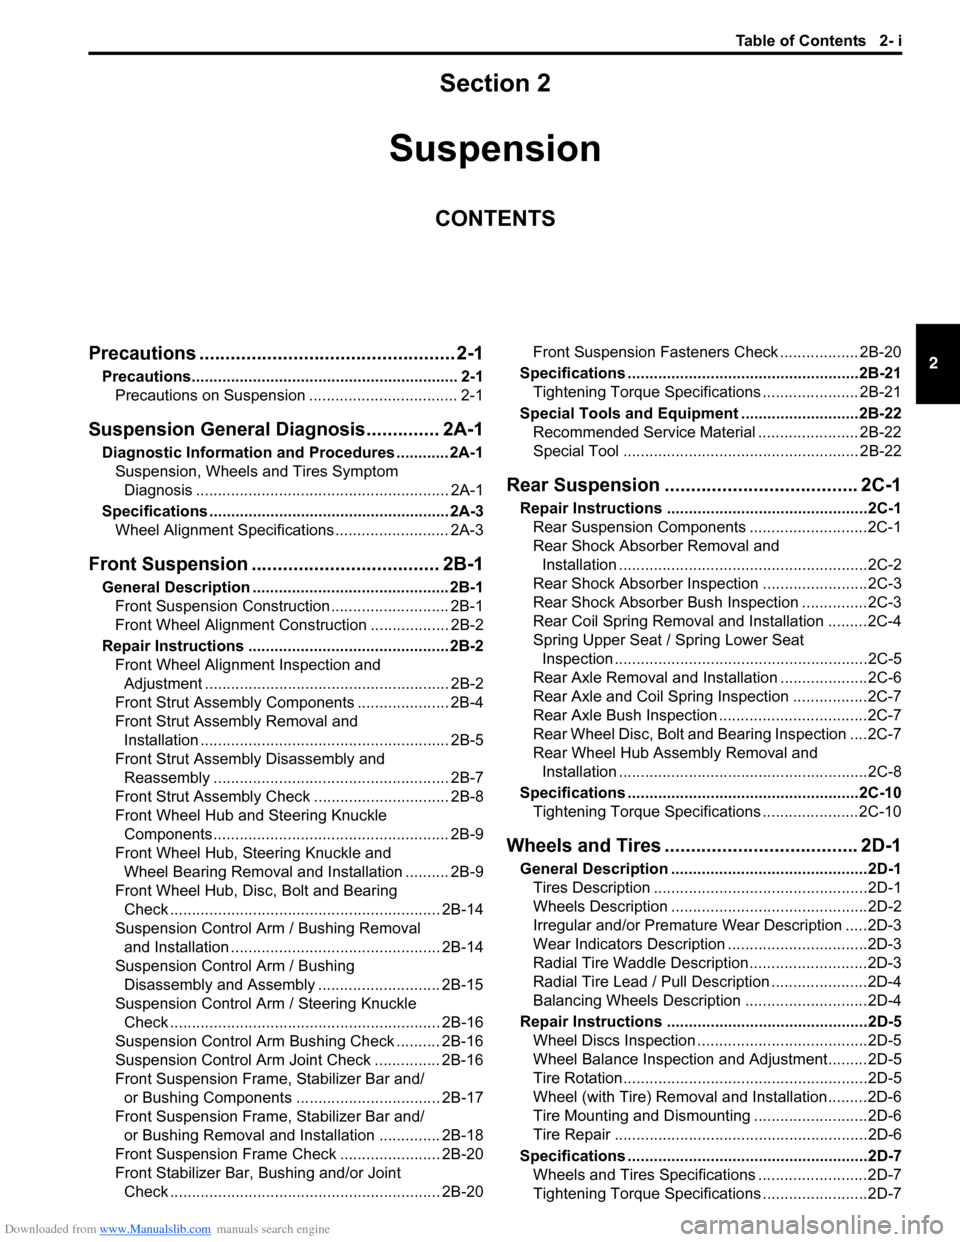
Section 2
CONTENTS
Suspension
Precautions ................................................. 2-1
Precautions............................................................. 2-1
Precautions on Suspension .................................. 2-1
Suspension General Diagnosis.............. 2A-1
Diagnostic Information and Procedures ............ 2A-1
Suspension, Wheels and Tires Symptom
Diagnosis .......................................................... 2A-1
Specifications....................................................... 2A-3
Wheel Alignment Specifications .......................... 2A-3
Front Suspension .................................... 2B-1
General Description ............................................. 2B-1
Front Suspension Construction ........................... 2B-1
Front Wheel Alignment Construction .................. 2B-2
Repair Instructions .............................................. 2B-2
Front Wheel Alignment Inspection and
Adjustment ........................................................ 2B-2
Front Strut Assembly Components ..................... 2B-4
Front Strut Assembly Removal and
Installation ......................................................... 2B-5
Front Strut Assembly Disassembly and
Reassembly ...................................................... 2B-7
Front Strut Assembly Check ............................... 2B-8
Front Wheel Hub and Steering Knuckle
Components...................................................... 2B-9
Front Wheel Hub, Steering Knuckle and
Wheel Bearing Removal and Installation .......... 2B-9
Front Wheel Hub, Disc, Bolt and Bearing
Check .............................................................. 2B-14
Suspension Control Arm / Bushing Removal
and Installation ................................................ 2B-14
Suspension Control Arm / Bushing
Disassembly and Assembly ............................ 2B-15
Suspension Control Arm / Steering Knuckle
Check .............................................................. 2B-16
Suspension Control Arm Bushing Check .......... 2B-16
Suspension Control Arm Joint Check ............... 2B-16
Front Suspension Frame, Stabilizer Bar and/
or Bushing Components ................................. 2B-17
Front Suspension Frame, Stabilizer Bar and/
or Bushing Removal and Installation .............. 2B-18
Front Suspension Frame Check ....................... 2B-20
Front Stabilizer Bar, Bushing and/or Joint
Check .............................................................. 2B-20Front Suspension Fasteners Check .................. 2B-20
Specifications .....................................................2B-21
Tightening Torque Specifications ...................... 2B-21
Special Tools and Equipment ...........................2B-22
Recommended Service Material ....................... 2B-22
Special Tool ...................................................... 2B-22
Rear Suspension ..................................... 2C-1
Repair Instructions ..............................................2C-1
Rear Suspension Components ...........................2C-1
Rear Shock Absorber Removal and
Installation .........................................................2C-2
Rear Shock Absorber Inspection ........................2C-3
Rear Shock Absorber Bush Inspection ...............2C-3
Rear Coil Spring Removal and Installation .........2C-4
Spring Upper Seat / Spring Lower Seat
Inspection ..........................................................2C-5
Rear Axle Removal and Installation ....................2C-6
Rear Axle and Coil Spring Inspection .................2C-7
Rear Axle Bush Inspection ..................................2C-7
Rear Wheel Disc, Bolt and Bearing Inspection ....2C-7
Rear Wheel Hub Assembly Removal and
Installation .........................................................2C-8
Specifications .....................................................2C-10
Tightening Torque Specifications ......................2C-10
Wheels and Tires ..................................... 2D-1
General Description .............................................2D-1
Tires Description .................................................2D-1
Wheels Description .............................................2D-2
Irregular and/or Premature Wear Description .....2D-3
Wear Indicators Description ................................2D-3
Radial Tire Waddle Description...........................2D-3
Radial Tire Lead / Pull Description ......................2D-4
Balancing Wheels Description ............................2D-4
Repair Instructions ..............................................2D-5
Wheel Discs Inspection .......................................2D-5
Wheel Balance Inspection and Adjustment.........2D-5
Tire Rotation........................................................2D-5
Wheel (with Tire) Removal and Installation.........2D-6
Tire Mounting and Dismounting ..........................2D-6
Tire Repair ..........................................................2D-6
Specifications .......................................................2D-7
Wheels and Tires Specifications .........................2D-7
Tightening Torque Specifications ........................2D-7
Page 434 of 1556
Downloaded from www.Manualslib.com manuals search engine 2-1 Precautions:
Suspension
Precautions
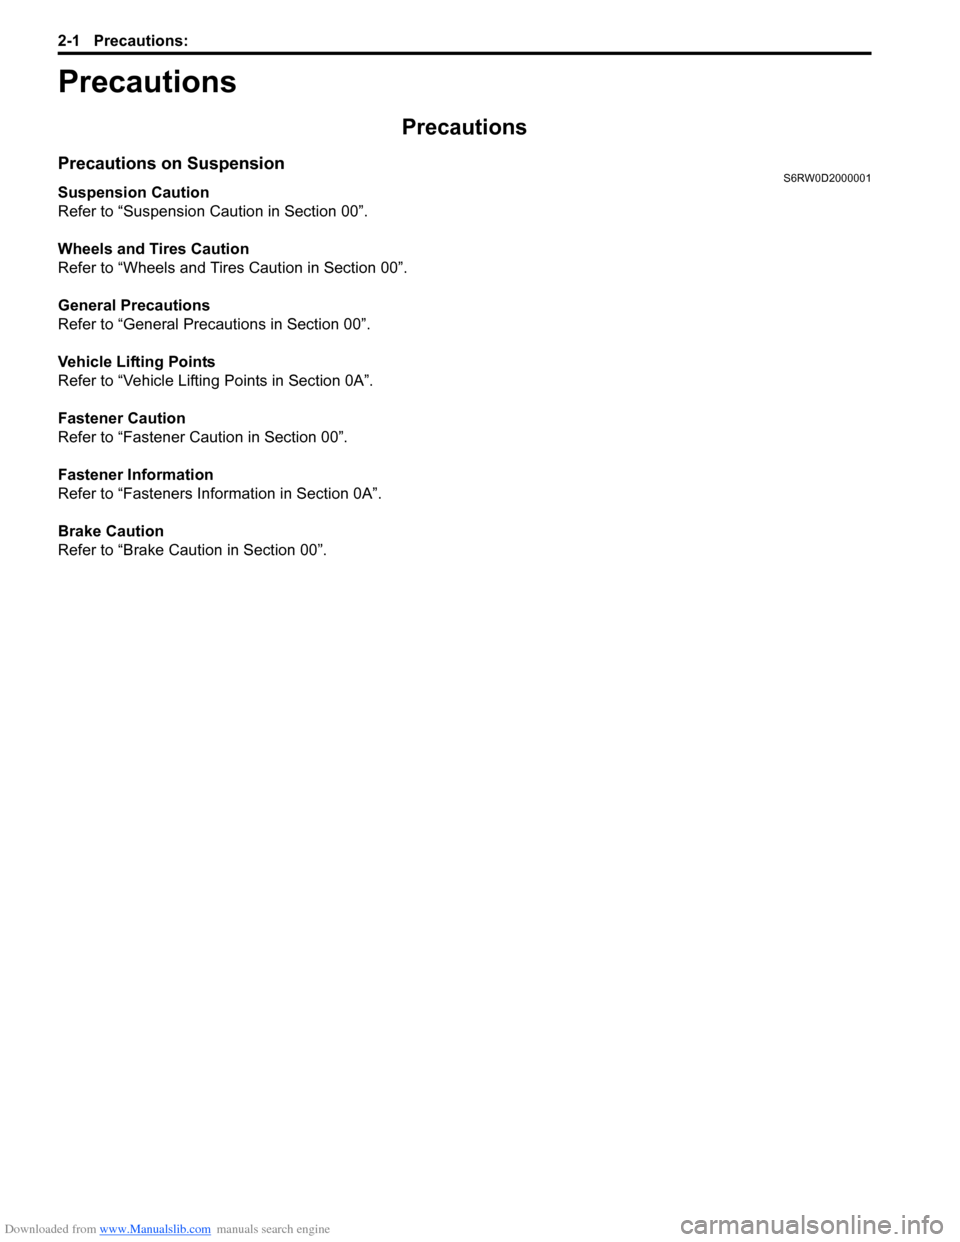
Precautions
Precautions on SuspensionS6RW0D2000001
Suspension Caution
Refer to “Suspension Caution in Section 00”.
Wheels and Tires Caution
Refer to “Wheels and Tires Caution in Section 00”.
General Precautions
Refer to “General Precautions in Section 00”.
Vehicle Lifting Points
Refer to “Vehicle Lifting Points in Section 0A”.
Fastener Caution
Refer to “Fastener Caution in Section 00”.
Fastener Information
Refer to “Fasteners Information in Section 0A”.
Brake Caution
Refer to “Brake Caution in Section 00”.
Page 439 of 1556
Downloaded from www.Manualslib.com manuals search engine Front Suspension: 2B-2
Front Wheel Alignment ConstructionS6RW0D2201002
Among factors for front wheel alignment, only toe setting
can be adjusted. Camber and caster are not adjustable.
Therefore, should camber or caster be out of
specification due to the damage caused by hazardous
road conditions or collision, whether the damage is in
body or in suspension should be determined and
damaged body should be repaired or damaged
suspension should be replaced.
Preliminary Checks Prior to Adjustment Front Wheel
Alignment
Steering and vibration complaints are not always the
result of improper wheel alignment. An additional item to
be checked is the possibility of tire lead due to worn or
improperly manufactured tires. “Lead” is the vehicle
deviation from a straight path on a level road without
hand pressure on the steering wheel. Refer to “Radial
Tire Lead / Pull Description in Section 2D” in order to
determine if the vehicle has a tire lead problem. Before
making any adjustment affecting wheel alignment, the
following checks and inspections should be made to
ensure correctness of alignment readings and alignment
adjustments:• Check all tires for proper inflation pressures and
approximately the same tread wear.
• Check for loose of ball joints. Check tie-rod ends; if
excessive looseness is noted, it must be corrected
before adjusting.
• Check for run-out of wheels and tires.
• Check vehicle trim heights; if it is out of limit and a
correction is needed, it must be done before adjusting
toe.
• Check for loose of suspension control arms.
• Check for loose or missing stabilizer bar attachments.
• Consideration must be given to excess loads, such as
tool boxes. If this excess load is normally carried in
vehicle, it should remain in vehicle during alignment
checks.
• Consider condition of equipment being used to check
alignment and follow manufacturer’s instructions.
• Regardless of equipment used to check alignment,
vehicle must be placed on a level surface.
NOTE
To prevent possible incorrect reading of toe,
camber or caster, vehicle front and rear end
must be moved up and down a few times
before inspection.
Repair Instructions
Front Wheel Alignment Inspection and
Adjustment
S6RW0D2206001
Toe Inspection and Adjustment
Preparation for toe inspection and adjustment.
• Place vehicle in unloaded state on level surface.
• Set steering wheel in straight state.
• Check that inflation pressure of each tire is adjusted
properly and wheel is free from deflection.
• Check that each suspension part is free from bend,
dent, wear or damage in any other form.
• Check that ground clearance at the right and left is
just about the same.Inspection
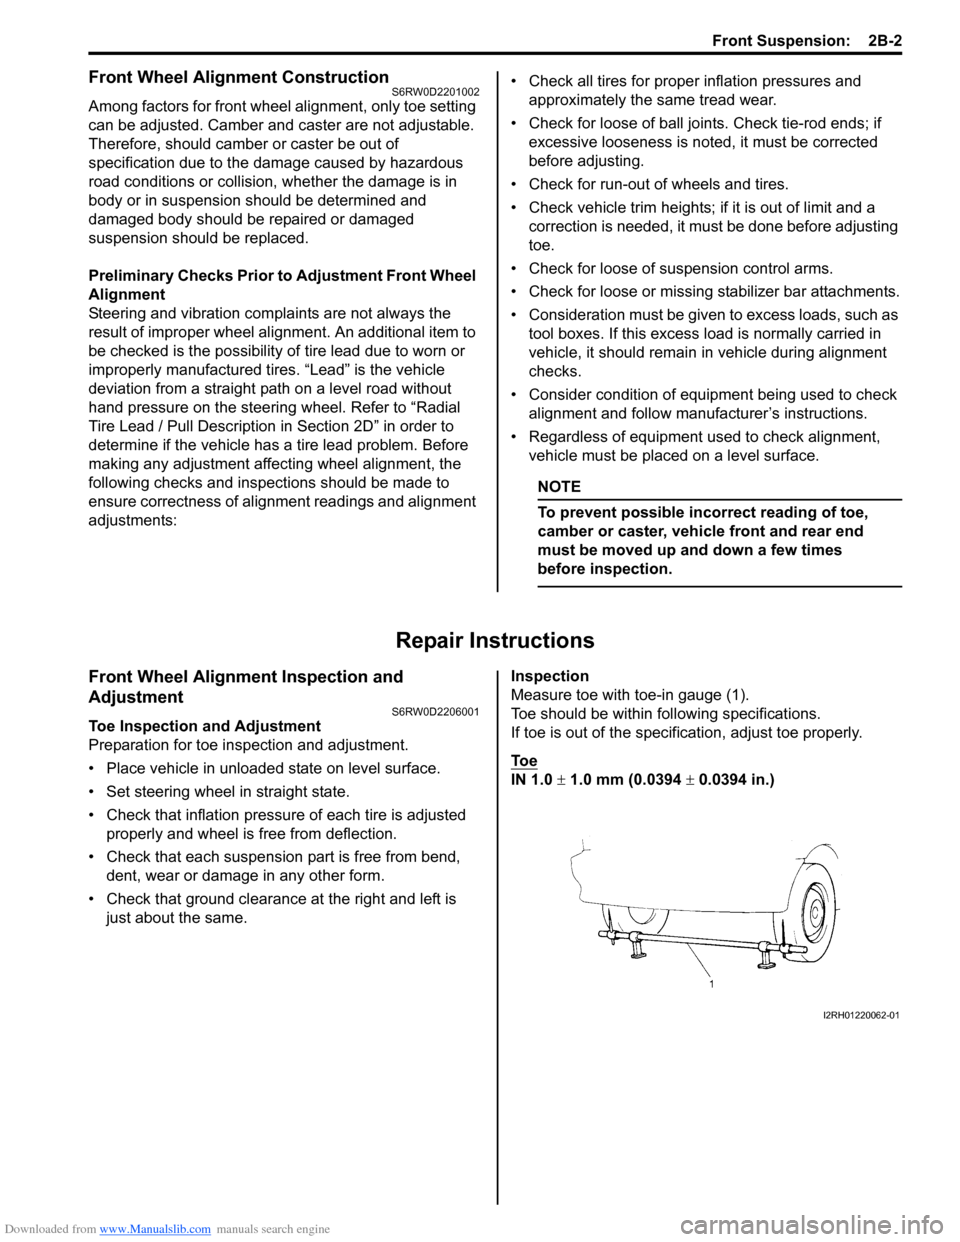
Measure toe with toe-in gauge (1).
Toe should be within following specifications.
If toe is out of the specification, adjust toe properly.
To e
IN 1.0 ± 1.0 mm (0.0394 ± 0.0394 in.)
I2RH01220062-01
Page 449 of 1556
Downloaded from www.Manualslib.com manuals search engine Front Suspension: 2B-12
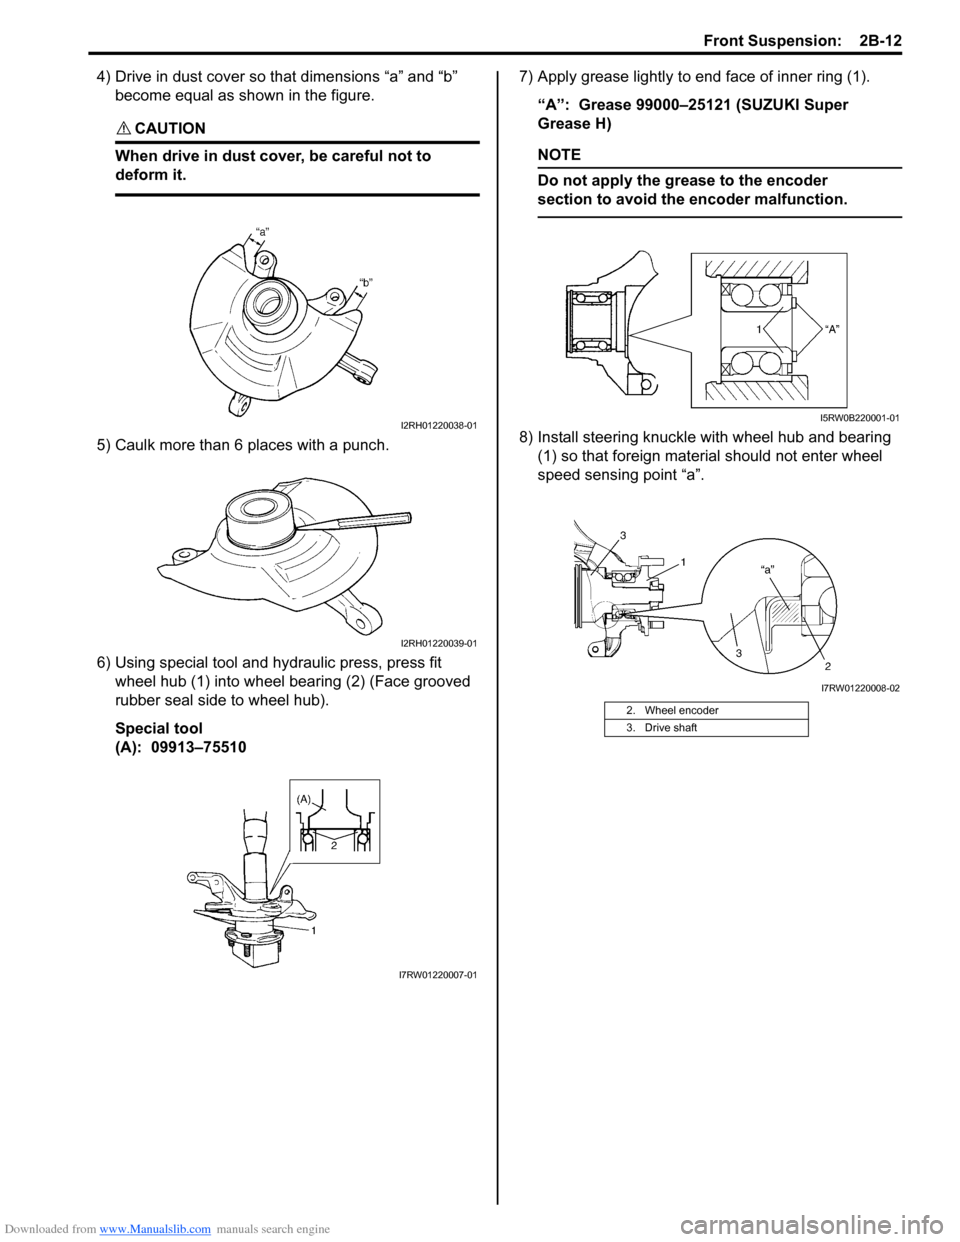
4) Drive in dust cover so that dimensions “a” and “b”
become equal as shown in the figure.
CAUTION!
When drive in dust cover, be careful not to
deform it.
5) Caulk more than 6 places with a punch.
6) Using special tool and hydraulic press, press fit
wheel hub (1) into wheel bearing (2) (Face grooved
rubber seal side to wheel hub).
Special tool
(A): 09913–75510 7) Apply grease lightly to end face of inner ring (1).
“A”: Grease 99000–25121 (SUZUKI Super
Grease H)
NOTE
Do not apply the grease to the encoder
section to avoid the encoder malfunction.
8) Install steering knuckle with wheel hub and bearing
(1) so that foreign material should not enter wheel
speed sensing point “a”.I2RH01220038-01
I2RH01220039-01
I7RW01220007-01
2. Wheel encoder
3. Drive shaft
I5RW0B220001-01
I7RW01220008-02
Page 455 of 1556
Downloaded from www.Manualslib.com manuals search engine Front Suspension: 2B-18
Front Suspension Frame, Stabilizer Bar and/or
Bushing Removal and Installation
S6RW0D2206015
WARNING!
When supporting and installing front
suspension frame, be sure to apply some
supporting equipment (such as mission jack)
at well-balanced position in the center
section of front suspension frame so as to
prevent from its drop. Otherwise drop and
injure.
CAUTION!
When removal and installing suspension
control arm, be careful not to damage dust
boots of suspension control arm joint by
drive shaft dust cover and brake dust cover.
Removal
1) Disconnect negative (–) cable at battery.
2) Remove air cleaner assembly referring to “Air
Cleaner Assembly Removal and Installation in
Section 1D”.
3) Remove hood referring to “Hood Removal and
Installation in Section 9J”.
4) Hoist vehicle and remove front wheels.
5) Remove exhaust No.1, No.2 and center pipes
referring to “Exhaust System Components in Section
1K”.
6) Remove steering gear case mounting bolt referring
to “Steering Gear Case Assembly Components in
Section 6C”.
7) Fix steering gear case to body with rope to avoid the
steering gear case fall off when front suspension
frame is lowered.
8) Remove suspension control arms and disconnect
stabilizer joints.
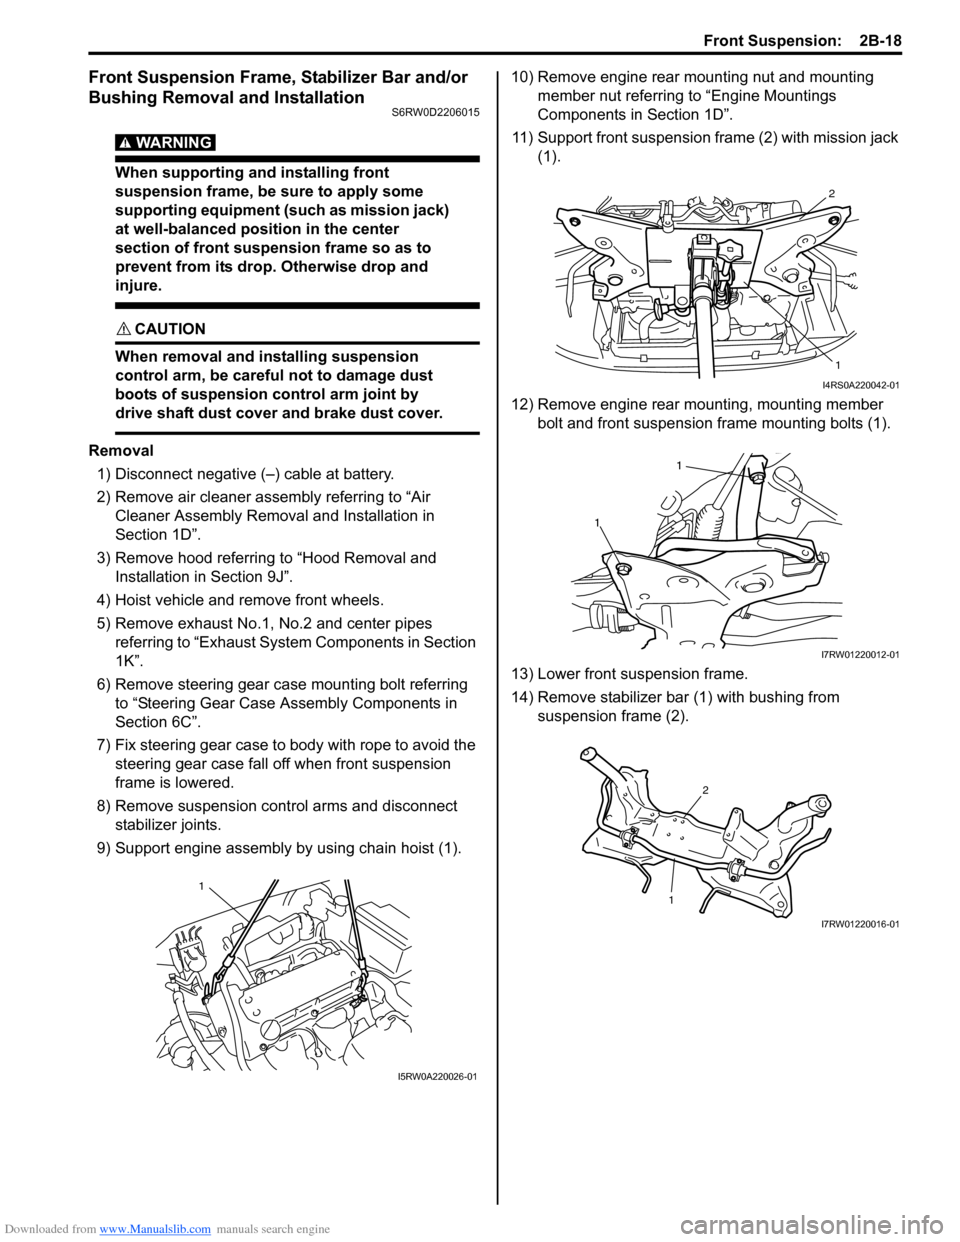
9) Support engine assembly by using chain hoist (1).10) Remove engine rear mounting nut and mounting
member nut referring to “Engine Mountings
Components in Section 1D”.
11) Support front suspension frame (2) with mission jack
(1).
12) Remove engine rear mounting, mounting member
bolt and front suspension frame mounting bolts (1).
13) Lower front suspension frame.
14) Remove stabilizer bar (1) with bushing from
suspension frame (2).
1
I5RW0A220026-01
2
1
I4RS0A220042-01
1
1
I7RW01220012-01
12
I7RW01220016-01
Page 456 of 1556
Downloaded from www.Manualslib.com manuals search engine 2B-19 Front Suspension:
Installation
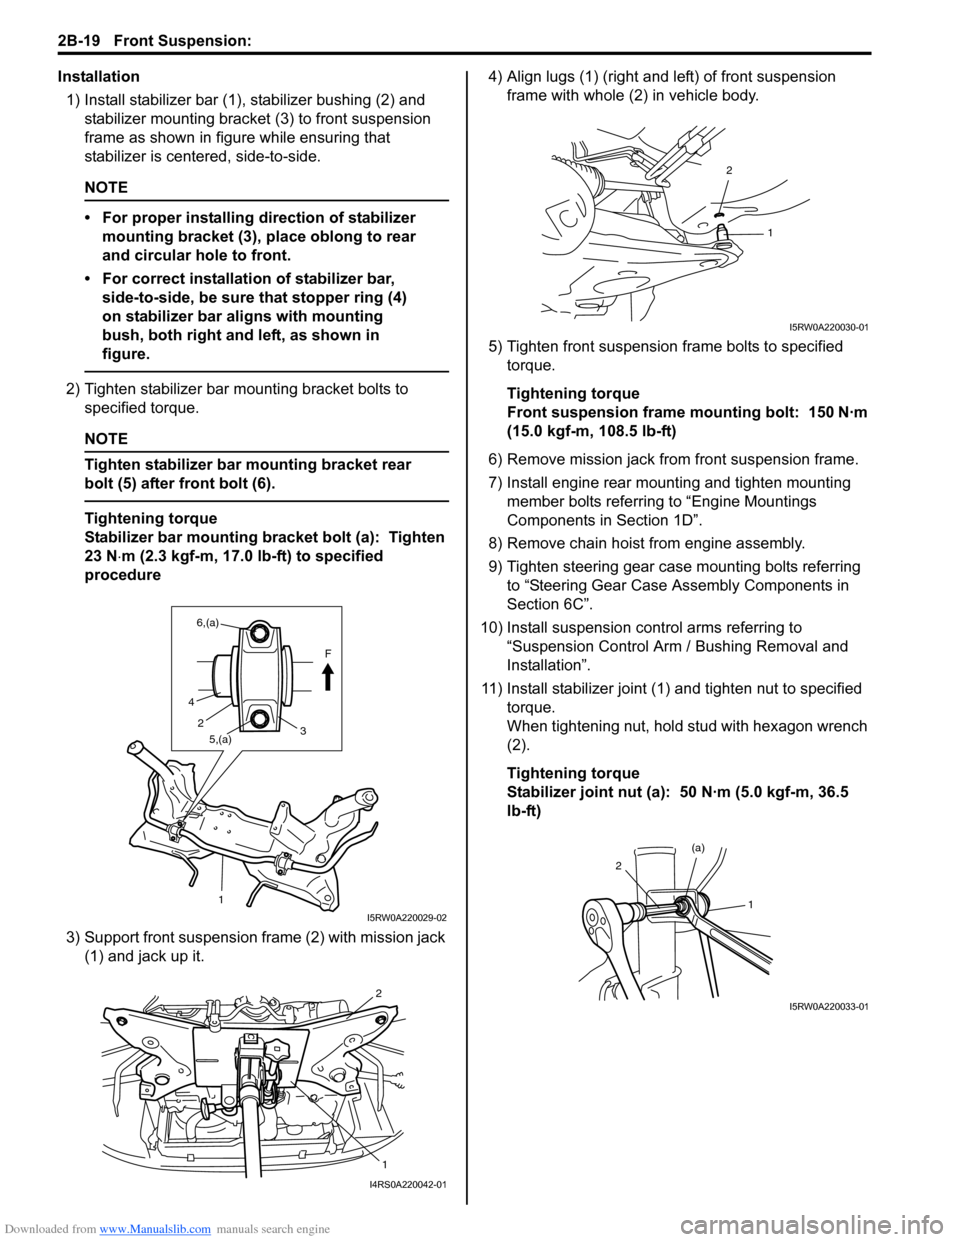
1) Install stabilizer bar (1), stabilizer bushing (2) and
stabilizer mounting bracket (3) to front suspension
frame as shown in figure while ensuring that
stabilizer is centered, side-to-side.
NOTE
• For proper installing direction of stabilizer
mounting bracket (3), place oblong to rear
and circular hole to front.
• For correct installation of stabilizer bar,
side-to-side, be sure that stopper ring (4)
on stabilizer bar aligns with mounting
bush, both right and left, as shown in
figure.
2) Tighten stabilizer bar mounting bracket bolts to
specified torque.
NOTE
Tighten stabilizer bar mounting bracket rear
bolt (5) after front bolt (6).
Tightening torque
Stabilizer bar mounting bracket bolt (a): Tighten
23 N⋅m (2.3 kgf-m, 17.0 lb-ft) to specified
procedure
3) Support front suspension frame (2) with mission jack
(1) and jack up it.4) Align lugs (1) (right and left) of front suspension
frame with whole (2) in vehicle body.
5) Tighten front suspension frame bolts to specified
torque.
Tightening torque
Front suspension frame mounting bolt: 150 N·m
(15.0 kgf-m, 108.5 lb-ft)
6) Remove mission jack from front suspension frame.
7) Install engine rear mounting and tighten mounting
member bolts referring to “Engine Mountings
Components in Section 1D”.
8) Remove chain hoist from engine assembly.
9) Tighten steering gear case mounting bolts referring
to “Steering Gear Case Assembly Components in
Section 6C”.
10) Install suspension control arms referring to
“Suspension Control Arm / Bushing Removal and
Installation”.
11) Install stabilizer joint (1) and tighten nut to specified
torque.
When tightening nut, hold stud with hexagon wrench
(2).
Tightening torque
Stabilizer joint nut (a): 50 N·m (5.0 kgf-m, 36.5
lb-ft)
1
F
3
4
5,(a)
6,(a)
2
I5RW0A220029-02
2
1
I4RS0A220042-01
2
1
I5RW0A220030-01
1 2
(a)
I5RW0A220033-01
Page 457 of 1556
Downloaded from www.Manualslib.com manuals search engine Front Suspension: 2B-20
12) Install exhaust No.1, No.2 and center pipe referring
to “Exhaust System Components in Section 1K”.
13) Install wheel and tighten nut to specified torque.
Tightening torque
Wheel nut: 85 N·m (8.5 kgf-m, 61.5 lb-ft)
14) Install air cleaner assembly referring to “Air Cleaner
Assembly Removal and Installation in Section 1D”.
15) Install hood referring to “Hood Removal and
Installation in Section 9J”.
16) Lower hoist and vehicle in unloaded condition,
tighten suspension control arm bolts to specified
torque.
Tightening torque
Suspension control arm bolt: 95 N·m (9.5 kgf-m,
69.0 lb-ft)
17) Connect negative (–) cable at battery.
18) Confirm front wheel alignment referring to “Front
Wheel Alignment Inspection and Adjustment”.
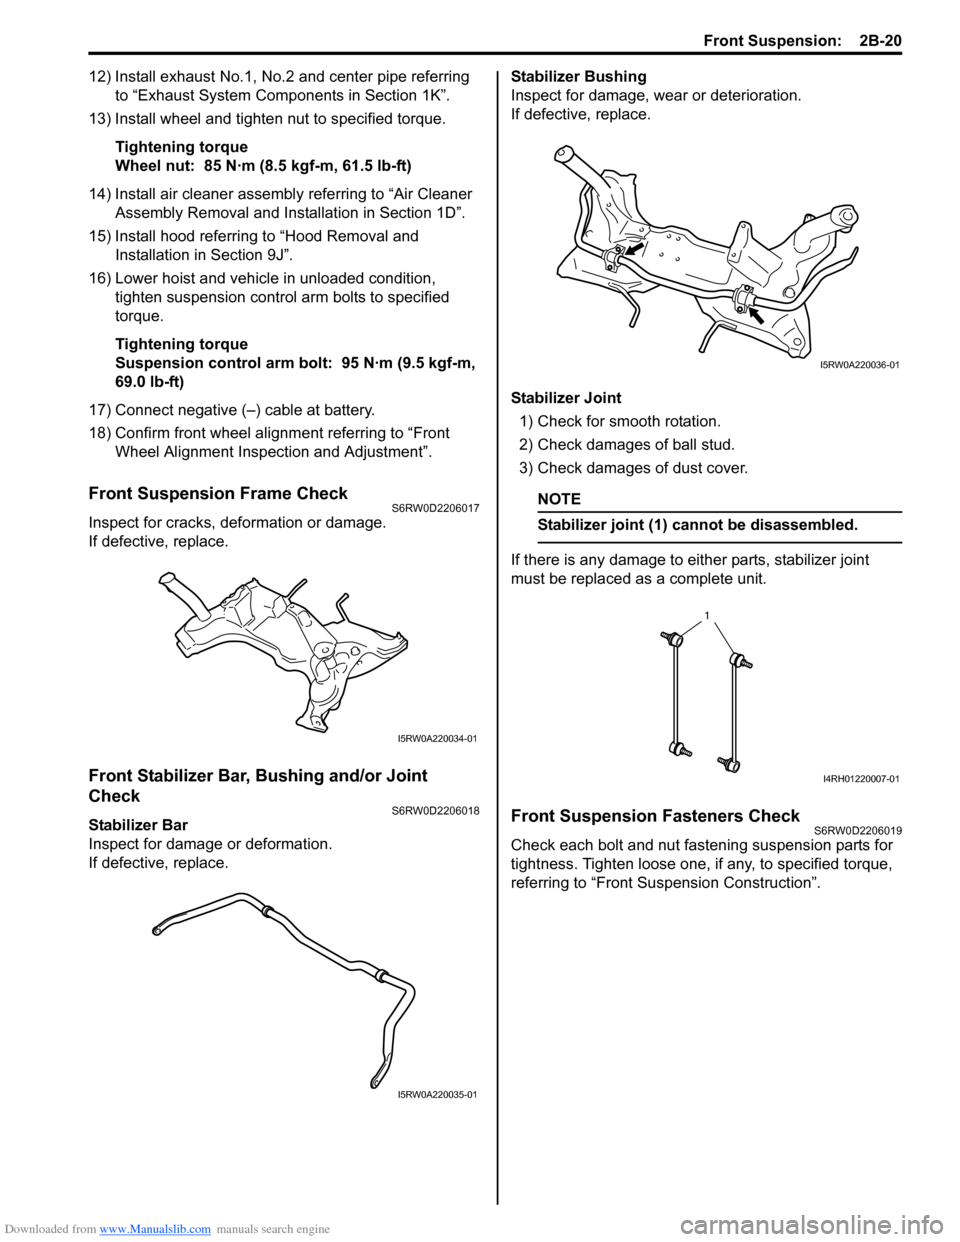
Front Suspension Frame CheckS6RW0D2206017
Inspect for cracks, deformation or damage.
If defective, replace.
Front Stabilizer Bar, Bushing and/or Joint
Check
S6RW0D2206018
Stabilizer Bar
Inspect for damage or deformation.
If defective, replace.Stabilizer Bushing
Inspect for damage, wear or deterioration.
If defective, replace.
Stabilizer Joint
1) Check for smooth rotation.
2) Check damages of ball stud.
3) Check damages of dust cover.
NOTE
Stabilizer joint (1) cannot be disassembled.
If there is any damage to either parts, stabilizer joint
must be replaced as a complete unit.
Front Suspension Fasteners CheckS6RW0D2206019
Check each bolt and nut fastening suspension parts for
tightness. Tighten loose one, if any, to specified torque,
referring to “Front Suspension Construction”.
I5RW0A220034-01
I5RW0A220035-01
I5RW0A220036-01
1
I4RH01220007-01
Page 458 of 1556
Downloaded from www.Manualslib.com manuals search engine 2B-21 Front Suspension:
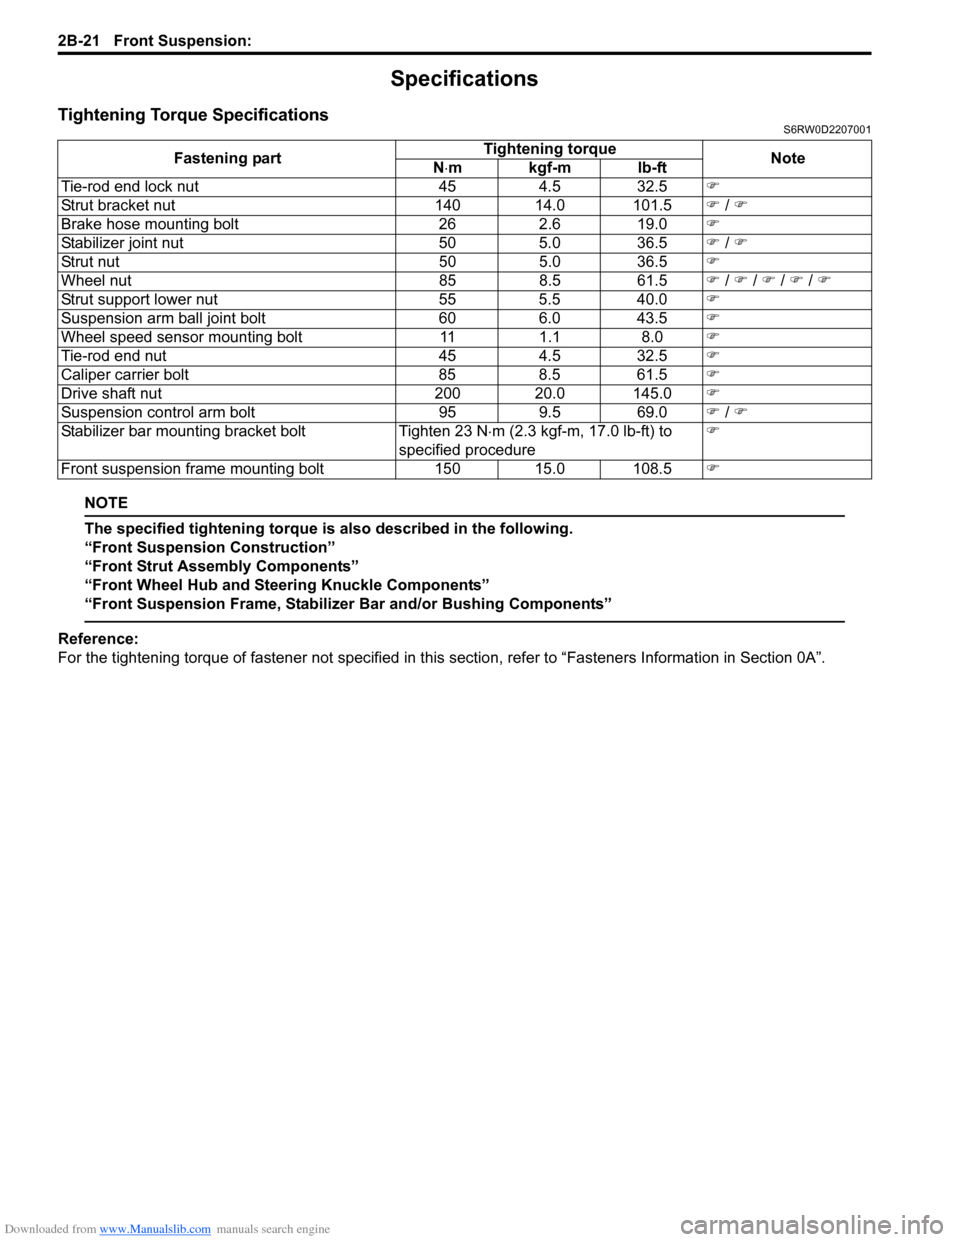
Specifications
Tightening Torque SpecificationsS6RW0D2207001
NOTE
The specified tightening torque is also described in the following.
“Front Suspension Construction”
“Front Strut Assembly Components”
“Front Wheel Hub and Steering Knuckle Components”
“Front Suspension Frame, Stabilizer Bar and/or Bushing Components”
Reference:
For the tightening torque of fastener not specified in this section, refer to “Fasteners Information in Section 0A”. Fastening partTightening torque
Note
N⋅mkgf-mlb-ft
Tie-rod end lock nut 45 4.5 32.5�)
Strut bracket nut 140 14.0 101.5�) / �)
Brake hose mounting bolt 26 2.6 19.0�)
Stabilizer joint nut 50 5.0 36.5�) / �)
Strut nut 50 5.0 36.5�)
Wheel nut 85 8.5 61.5�) / �) / �) / �) / �)
Strut support lower nut 55 5.5 40.0�)
Suspension arm ball joint bolt 60 6.0 43.5�)
Wheel speed sensor mounting bolt 11 1.1 8.0�)
Tie-rod end nut 45 4.5 32.5�)
Caliper carrier bolt 85 8.5 61.5�)
Drive shaft nut 200 20.0 145.0�)
Suspension control arm bolt 95 9.5 69.0�) / �)
Stabilizer bar mounting bracket bolt Tighten 23 N⋅m (2.3 kgf-m, 17.0 lb-ft) to
specified procedure�)
Front suspension frame mounting bolt 150 15.0 108.5�)
Page 463 of 1556
Downloaded from www.Manualslib.com manuals search engine Rear Suspension: 2C-4
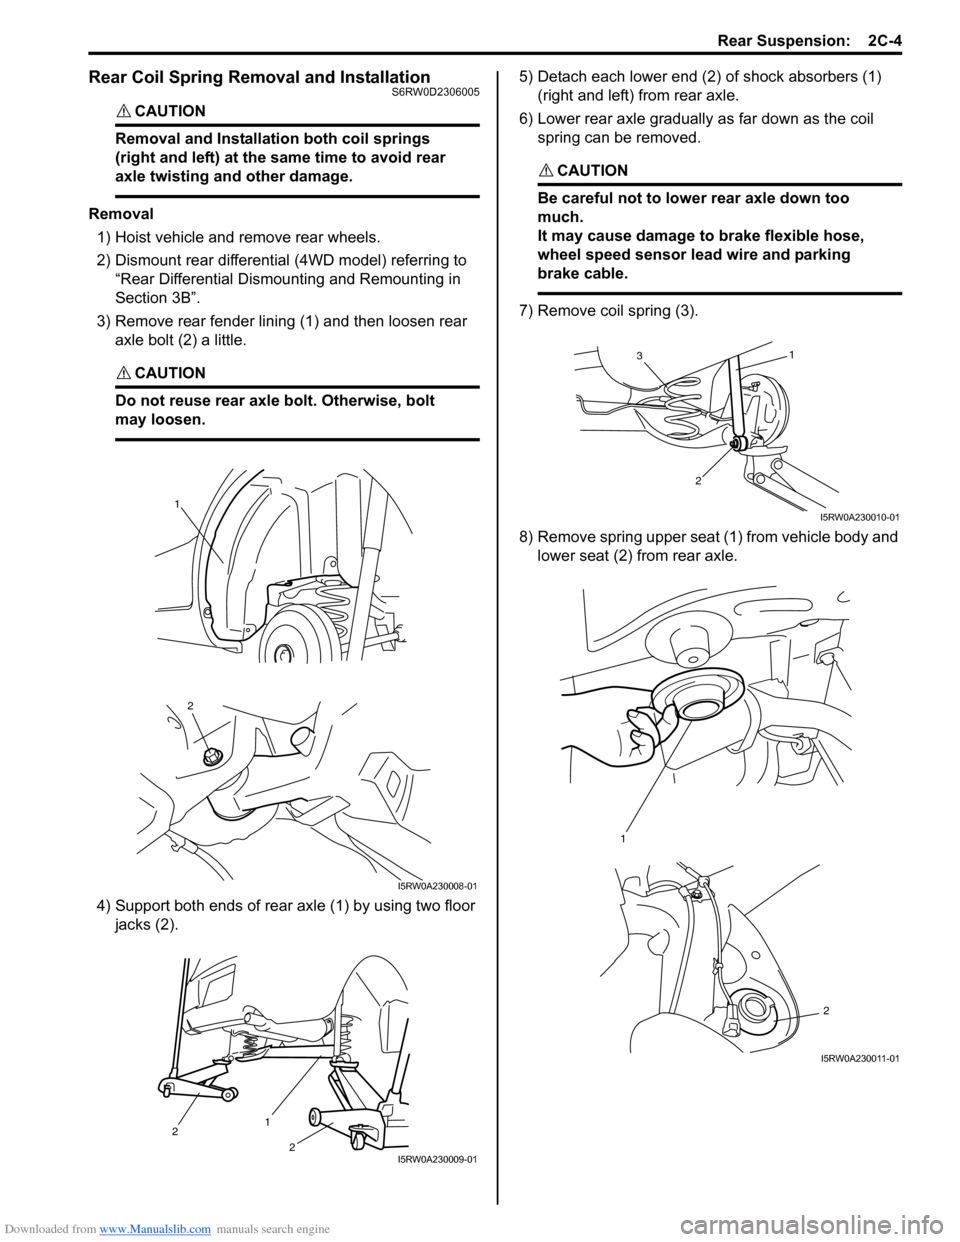
Rear Coil Spring Removal and InstallationS6RW0D2306005
CAUTION!
Removal and Installation both coil springs
(right and left) at the same time to avoid rear
axle twisting and other damage.
Removal
1) Hoist vehicle and remove rear wheels.
2) Dismount rear differential (4WD model) referring to
“Rear Differential Dismounting and Remounting in
Section 3B”.
3) Remove rear fender lining (1) and then loosen rear
axle bolt (2) a little.
CAUTION!
Do not reuse rear axle bolt. Otherwise, bolt
may loosen.
4) Support both ends of rear axle (1) by using two floor
jacks (2).5) Detach each lower end (2) of shock absorbers (1)
(right and left) from rear axle.
6) Lower rear axle gradually as far down as the coil
spring can be removed.
CAUTION!
Be careful not to lower rear axle down too
much.
It may cause damage to brake flexible hose,
wheel speed sensor lead wire and parking
brake cable.
7) Remove coil spring (3).
8) Remove spring upper seat (1) from vehicle body and
lower seat (2) from rear axle.
2
1
I5RW0A230008-01
1
2
2
I5RW0A230009-01
1
2
3
I5RW0A230010-01
1
2
I5RW0A230011-01