generator SUZUKI SX4 2006 1.G Service User Guide
[x] Cancel search | Manufacturer: SUZUKI, Model Year: 2006, Model line: SX4, Model: SUZUKI SX4 2006 1.GPages: 1556, PDF Size: 37.31 MB
Page 217 of 1556
Downloaded from www.Manualslib.com manuals search engine Engine General Information and Diagnosis: 1A-167
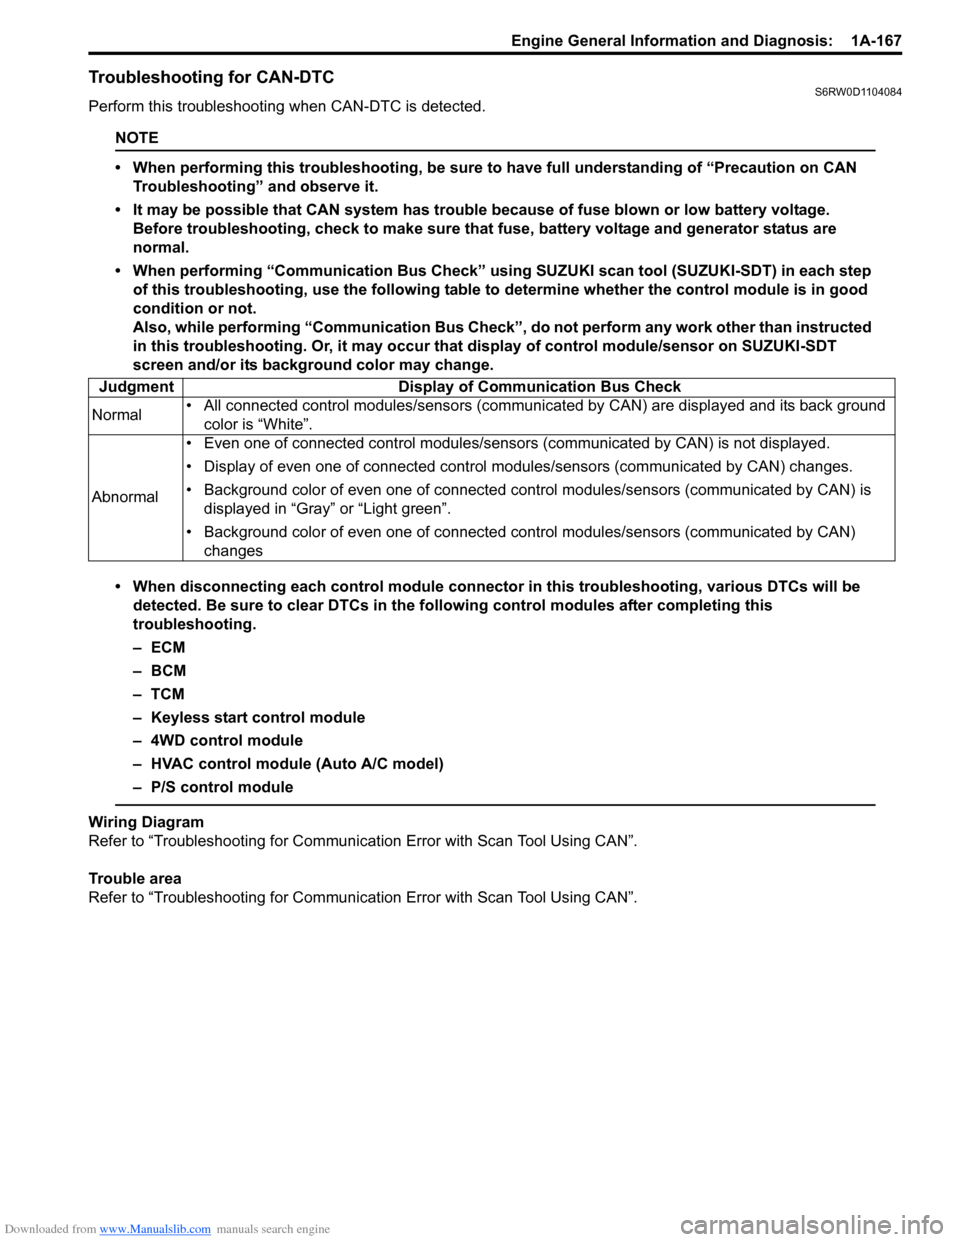
Troubleshooting for CAN-DTCS6RW0D1104084
Perform this troubleshooting when CAN-DTC is detected.
NOTE
• When performing this troubleshooting, be sure to have full understanding of “Precaution on CAN
Troubleshooting” and observe it.
• It may be possible that CAN system has trouble because of fuse blown or low battery voltage.
Before troubleshooting, check to make sure that fuse, battery voltage and generator status are
normal.
• When performing “Communication Bus Check” using SUZUKI scan tool (SUZUKI-SDT) in each step
of this troubleshooting, use the following table to determine whether the control module is in good
condition or not.
Also, while performing “Communication Bus Check”, do not perform any work other than instructed
in this troubleshooting. Or, it may occur that display of control module/sensor on SUZUKI-SDT
screen and/or its background color may change.
• When disconnecting each control module connector in this troubleshooting, various DTCs will be
detected. Be sure to clear DTCs in the following control modules after completing this
troubleshooting.
–ECM
– BCM
–TCM
– Keyless start control module
– 4WD control module
– HVAC control module (Auto A/C model)
– P/S control module
Wiring Diagram
Refer to “Troubleshooting for Communication Error with Scan Tool Using CAN”.
Trouble area
Refer to “Troubleshooting for Communication Error with Scan Tool Using CAN”. Judgment Display of Communication Bus Check
Normal• All connected control modules/sensors (communicated by CAN) are displayed and its back ground
color is “White”.
Abnormal• Even one of connected control modules/sensors (communicated by CAN) is not displayed.
• Display of even one of connected control modules/sensors (communicated by CAN) changes.
• Background color of even one of connected control modules/sensors (communicated by CAN) is
displayed in “Gray” or “Light green”.
• Background color of even one of connected control modules/sensors (communicated by CAN)
changes
Page 278 of 1556
Downloaded from www.Manualslib.com manuals search engine 1C-10 Engine Electrical Devices:
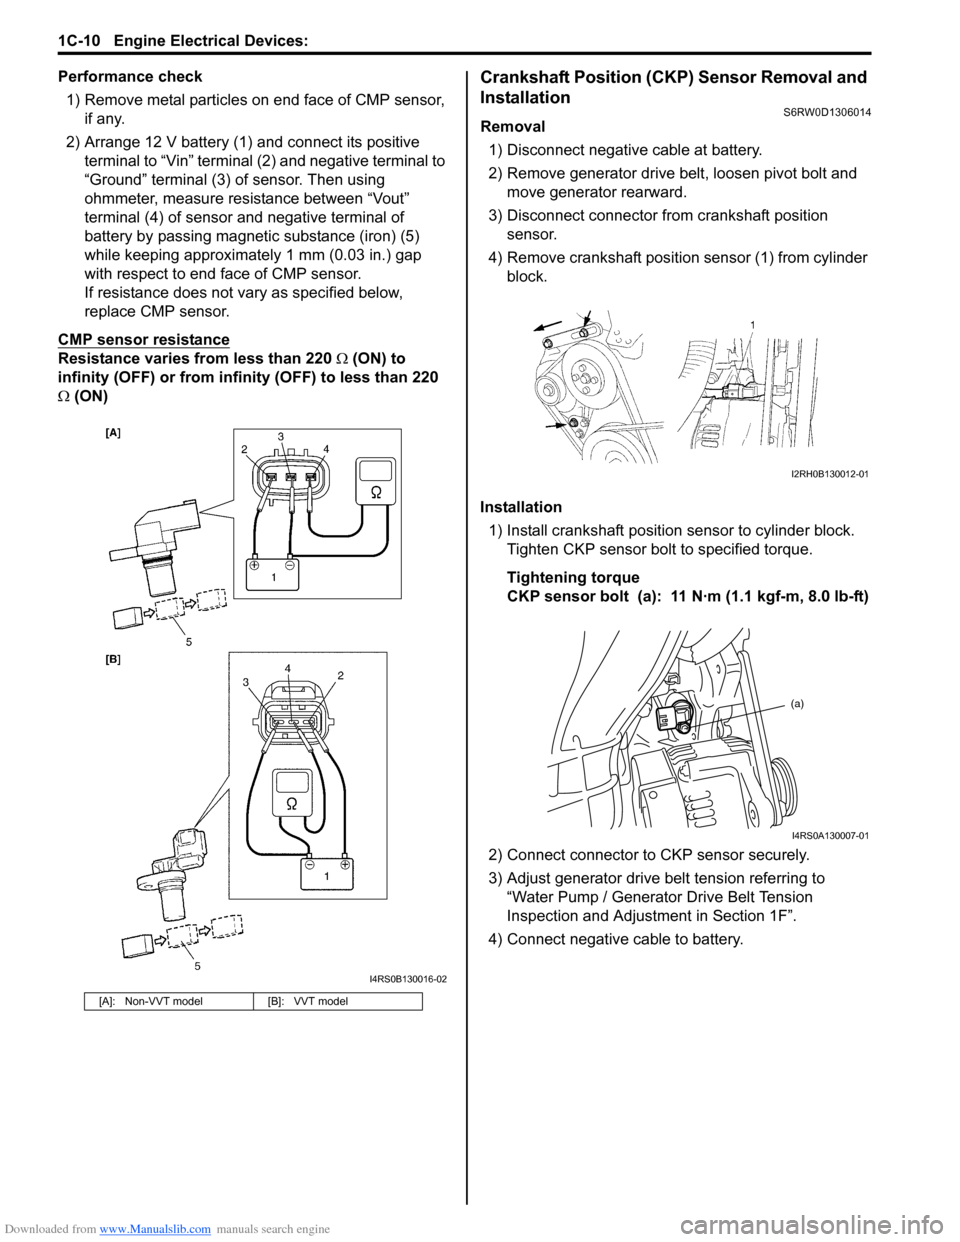
Performance check
1) Remove metal particles on end face of CMP sensor,
if any.
2) Arrange 12 V battery (1) and connect its positive
terminal to “Vin” terminal (2) and negative terminal to
“Ground” terminal (3) of sensor. Then using
ohmmeter, measure resistance between “Vout”
terminal (4) of sensor and negative terminal of
battery by passing magnetic substance (iron) (5)
while keeping approximately 1 mm (0.03 in.) gap
with respect to end face of CMP sensor.
If resistance does not vary as specified below,
replace CMP sensor.
CMP sensor resistance
Resistance varies from less than 220 Ω (ON) to
infinity (OFF) or from infinity (OFF) to less than 220
Ω (ON)
Crankshaft Position (CKP) Sensor Removal and
Installation
S6RW0D1306014
Removal
1) Disconnect negative cable at battery.
2) Remove generator drive belt, loosen pivot bolt and
move generator rearward.
3) Disconnect connector from crankshaft position
sensor.
4) Remove crankshaft position sensor (1) from cylinder
block.
Installation
1) Install crankshaft position sensor to cylinder block.
Tighten CKP sensor bolt to specified torque.
Tightening torque
CKP sensor bolt (a): 11 N·m (1.1 kgf-m, 8.0 lb-ft)
2) Connect connector to CKP sensor securely.
3) Adjust generator drive belt tension referring to
“Water Pump / Generator Drive Belt Tension
Inspection and Adjustment in Section 1F”.
4) Connect negative cable to battery.
[A]: Non-VVT model [B]: VVT model
I4RS0B130016-02
I2RH0B130012-01
(a)
I4RS0A130007-01
Page 299 of 1556
Downloaded from www.Manualslib.com manuals search engine Engine Mechanical: 1D-17
Engine Assembly Removal and InstallationS6RW0D1406013
Removal
1) Relieve fuel pressure according to “Fuel Pressure
Relief Procedure in Section 1G”.
2) Disconnect negative and positive cable at battery.
3) Disconnect ECM connectors.
4) Remove battery and battery tray with ECM.
5) Remove right and left side engine under covers.
6) Remove A/C compressor belt by referring to
“Compressor Drive Belt Removal and Installation in
Section 7B” or “Compressor Drive Belt Removal and
Installation in Section 7B”.
7) Drain engine oil referring to “Engine Oil and Filter
Change in Section 0B”.
8) Drain transaxle oil referring to “Manual Transaxle Oil
Change in Section 5B” or “A/T Fluid Change in
Section 5A”.
9) Drain transfer oil referring to “Transfer Oil Change in
Section 3C”.
10) Drain coolant referring to “Cooling System Draining
in Section 1F”
11) Remove air cleaner assembly referring to “Air
Cleaner Assembly Removal and Installation”.
12) With hose connected, detach A/C compressor from
its bracket referring to “Compressor Assembly
Removal and Installation in Section 7B” or
“Compressor Assembly Removal and Installation in
Section 7B”.
CAUTION!
Suspend removed A/C compressor at a place
where no damage will be caused during
removal and installation of engine assembly.
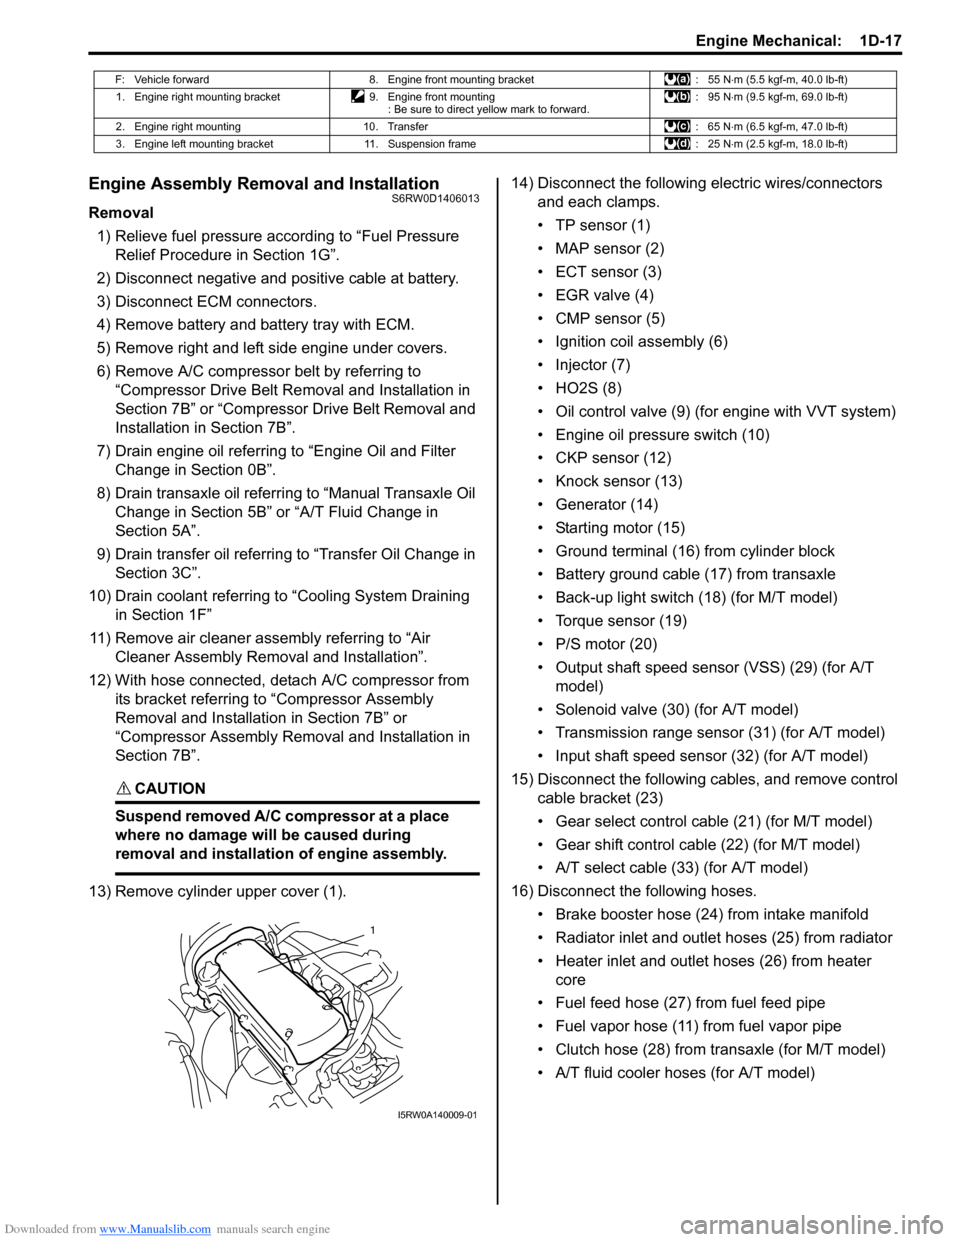
13) Remove cylinder upper cover (1).14) Disconnect the following electric wires/connectors
and each clamps.
• TP sensor (1)
• MAP sensor (2)
• ECT sensor (3)
•EGR valve (4)
• CMP sensor (5)
• Ignition coil assembly (6)
• Injector (7)
•HO2S (8)
• Oil control valve (9) (for engine with VVT system)
• Engine oil pressure switch (10)
• CKP sensor (12)
• Knock sensor (13)
• Generator (14)
• Starting motor (15)
• Ground terminal (16) from cylinder block
• Battery ground cable (17) from transaxle
• Back-up light switch (18) (for M/T model)
• Torque sensor (19)
• P/S motor (20)
• Output shaft speed sensor (VSS) (29) (for A/T
model)
• Solenoid valve (30) (for A/T model)
• Transmission range sensor (31) (for A/T model)
• Input shaft speed sensor (32) (for A/T model)
15) Disconnect the following cables, and remove control
cable bracket (23)
• Gear select control cable (21) (for M/T model)
• Gear shift control cable (22) (for M/T model)
• A/T select cable (33) (for A/T model)
16) Disconnect the following hoses.
• Brake booster hose (24) from intake manifold
• Radiator inlet and outlet hoses (25) from radiator
• Heater inlet and outlet hoses (26) from heater
core
• Fuel feed hose (27) from fuel feed pipe
• Fuel vapor hose (11) from fuel vapor pipe
• Clutch hose (28) from transaxle (for M/T model)
• A/T fluid cooler hoses (for A/T model)
F: Vehicle forward 8. Engine front mounting bracket : 55 N⋅m (5.5 kgf-m, 40.0 lb-ft)
1. Engine right mounting bracket 9. Engine front mounting
: Be sure to direct yellow mark to forward.: 95 N⋅m (9.5 kgf-m, 69.0 lb-ft)
2. Engine right mounting 10. Transfer : 65 N⋅m (6.5 kgf-m, 47.0 lb-ft)
3. Engine left mounting bracket 11. Suspension frame : 25 N⋅m (2.5 kgf-m, 18.0 lb-ft)
1
I5RW0A140009-01
Page 302 of 1556
Downloaded from www.Manualslib.com manuals search engine 1D-20 Engine Mechanical:
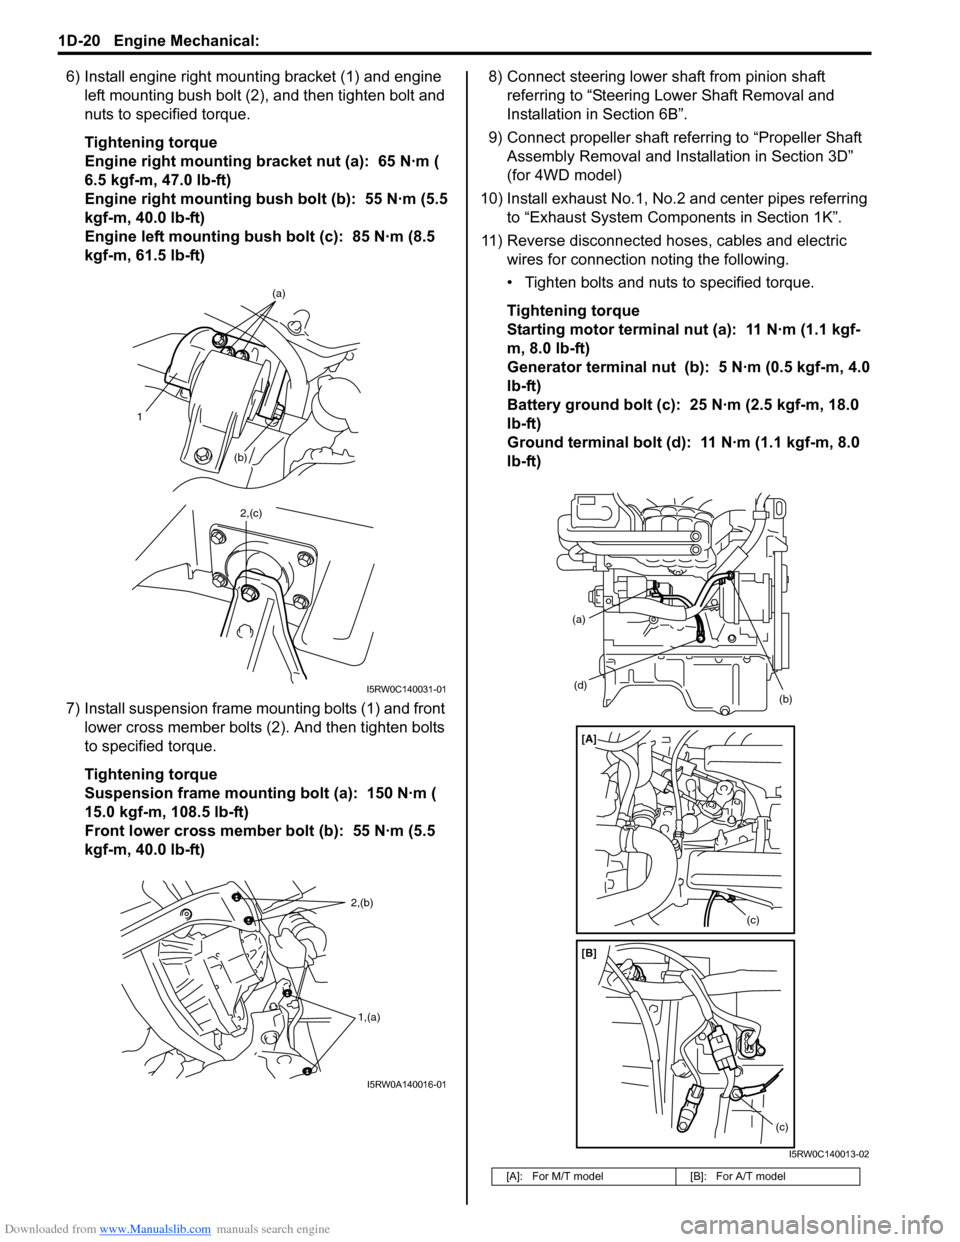
6) Install engine right mounting bracket (1) and engine
left mounting bush bolt (2), and then tighten bolt and
nuts to specified torque.
Tightening torque
Engine right mounting bracket nut (a): 65 N·m (
6.5 kgf-m, 47.0 lb-ft)
Engine right mounting bush bolt (b): 55 N·m (5.5
kgf-m, 40.0 lb-ft)
Engine left mounting bush bolt (c): 85 N·m (8.5
kgf-m, 61.5 lb-ft)
7) Install suspension frame mounting bolts (1) and front
lower cross member bolts (2). And then tighten bolts
to specified torque.
Tightening torque
Suspension frame mounting bolt (a): 150 N·m (
15.0 kgf-m, 108.5 lb-ft)
Front lower cross member bolt (b): 55 N·m (5.5
kgf-m, 40.0 lb-ft)8) Connect steering lower shaft from pinion shaft
referring to “Steering Lower Shaft Removal and
Installation in Section 6B”.
9) Connect propeller shaft referring to “Propeller Shaft
Assembly Removal and Installation in Section 3D”
(for 4WD model)
10) Install exhaust No.1, No.2 and center pipes referring
to “Exhaust System Components in Section 1K”.
11) Reverse disconnected hoses, cables and electric
wires for connection noting the following.
• Tighten bolts and nuts to specified torque.
Tightening torque
Starting motor terminal nut (a): 11 N·m (1.1 kgf-
m, 8.0 lb-ft)
Generator terminal nut (b): 5 N·m (0.5 kgf-m, 4.0
lb-ft)
Battery ground bolt (c): 25 N·m (2.5 kgf-m, 18.0
lb-ft)
Ground terminal bolt (d): 11 N·m (1.1 kgf-m, 8.0
lb-ft)
1
(b)(a)
2,(c)
I5RW0C140031-01
2,(b)
1,(a)
I5RW0A140016-01
[A]: For M/T model [B]: For A/T model
(d)
(a)
(b)
(c)
(c)
[A]
[B]
I5RW0C140013-02
Page 305 of 1556
Downloaded from www.Manualslib.com manuals search engine Engine Mechanical: 1D-23
Timing Chain Cover Removal and InstallationS6RW0D1406015
CAUTION!
• Keep working table, tools and hands clean
while overhauling.
• Use special care to handle aluminum parts
so as not to damage them.
• Do not expose removed parts to dust.
Keep them always clean.
Removal
1) Remove engine assembly from vehicle referring to
“Engine Assembly Removal and Installation”.
2) Remove water pump / generator drive belt referring
to “Water Pump / Generator Drive Belt Removal and
Installation in Section 1F”.
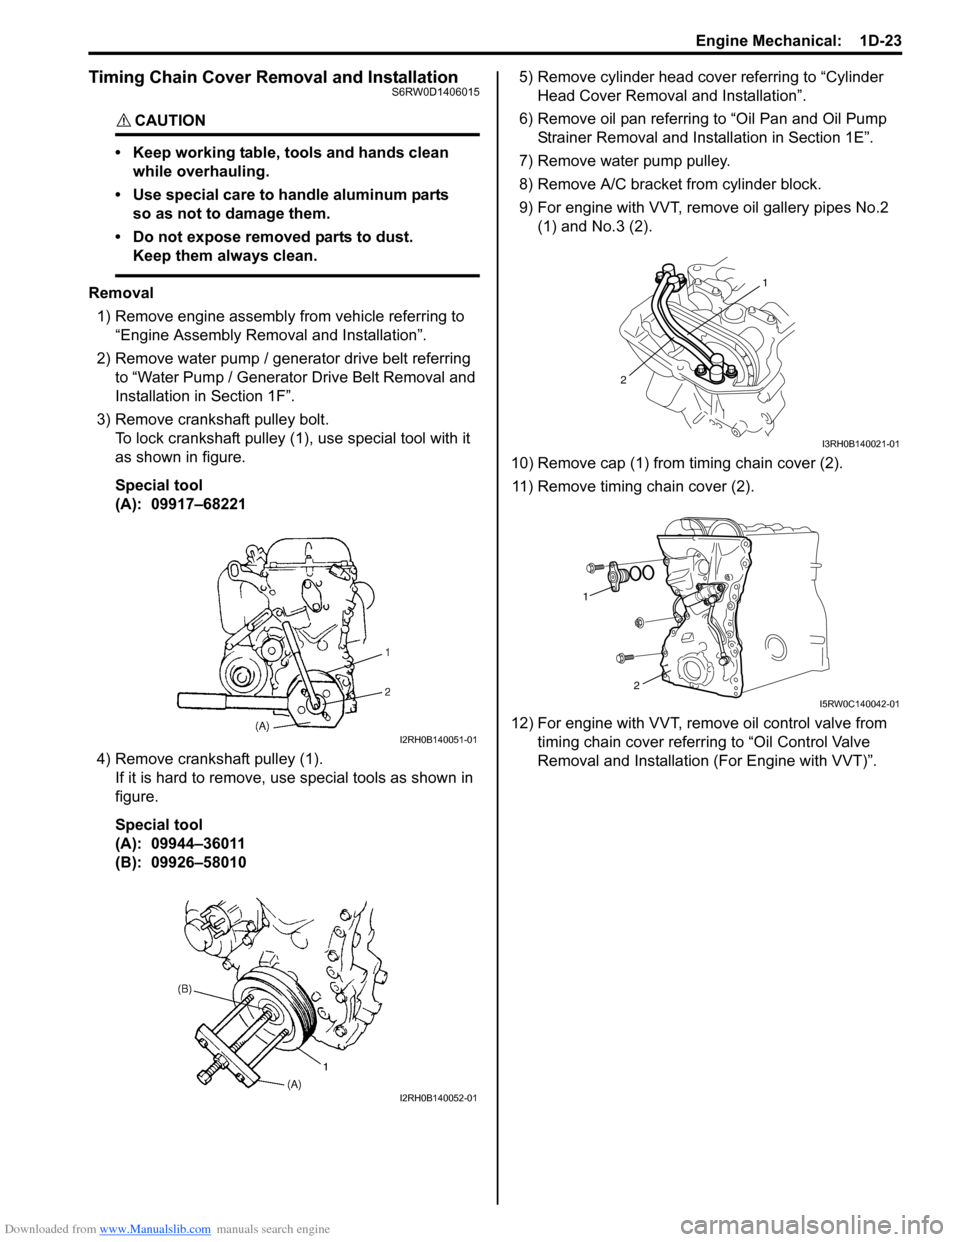
3) Remove crankshaft pulley bolt.
To lock crankshaft pulley (1), use special tool with it
as shown in figure.
Special tool
(A): 09917–68221
4) Remove crankshaft pulley (1).
If it is hard to remove, use special tools as shown in
figure.
Special tool
(A): 09944–36011
(B): 09926–580105) Remove cylinder head cover referring to “Cylinder
Head Cover Removal and Installation”.
6) Remove oil pan referring to “Oil Pan and Oil Pump
Strainer Removal and Installation in Section 1E”.
7) Remove water pump pulley.
8) Remove A/C bracket from cylinder block.
9) For engine with VVT, remove oil gallery pipes No.2
(1) and No.3 (2).
10) Remove cap (1) from timing chain cover (2).
11) Remove timing chain cover (2).
12) For engine with VVT, remove oil control valve from
timing chain cover referring to “Oil Control Valve
Removal and Installation (For Engine with VVT)”.
I2RH0B140051-01
I2RH0B140052-01
1
2
I3RH0B140021-01
1
2
I5RW0C140042-01
Page 353 of 1556
Downloaded from www.Manualslib.com manuals search engine Engine Mechanical: 1D-71
Honing or Reboring Cylinders
1) When any cylinder needs reboring, all other
cylinders must also be rebored at the same time.
2) Select oversized piston according to amount of
cylinder wear.
Oversize piston specification
Oversize 0.50: 78.453 – 78.468 mm (3.0887 –
3.0893 in.)
3) Using micrometer, measure piston diameter.
Measurement position for piston diameter
“a”: 19.5 mm (0.77 in.)4) Rebore and hone cylinder to the following
dimension.
NOTE
Before reboring, install all main bearing caps
in place and tighten to specification to avoid
distortion of bearing bores.
Cylinder bore diameter to be rebored
Oversize 0.50: 78.500 – 78.514 mm (3.0906 –
3.0911 in.)
5) Measure piston clearance after honing.
Piston clearance
0.032 – 0.061 mm (0.0013 – 0.0024 in.)
Specifications
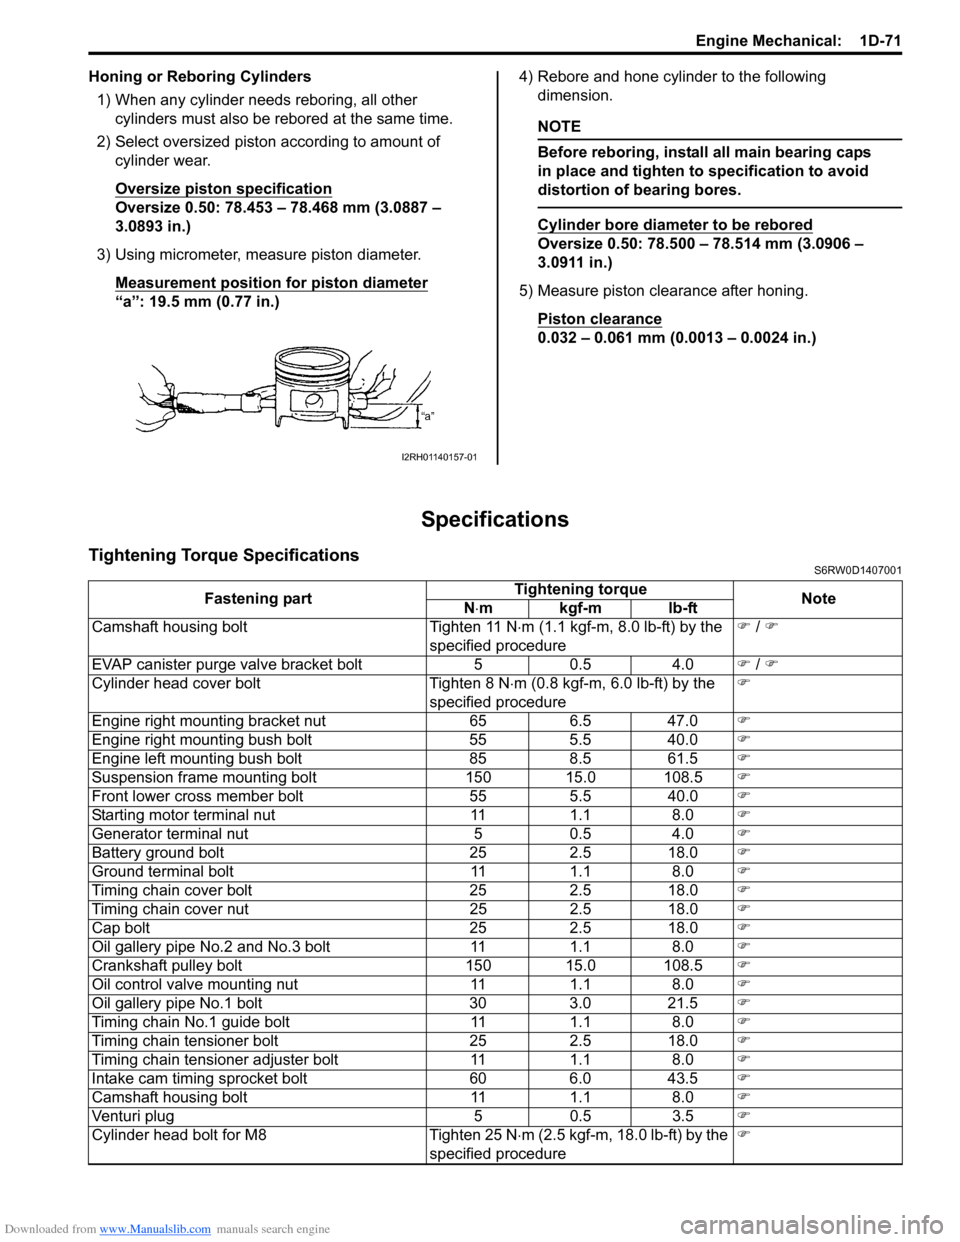
Tightening Torque SpecificationsS6RW0D1407001
I2RH01140157-01
Fastening partTightening torque
Note
N⋅mkgf-mlb-ft
Camshaft housing bolt Tighten 11 N⋅m (1.1 kgf-m, 8.0 lb-ft) by the
specified procedure�) / �)
EVAP canister purge valve bracket bolt 5 0.5 4.0�) / �)
Cylinder head cover bolt Tighten 8 N⋅m (0.8 kgf-m, 6.0 lb-ft) by the
specified procedure�)
Engine right mounting bracket nut 65 6.5 47.0�)
Engine right mounting bush bolt 55 5.5 40.0�)
Engine left mounting bush bolt 85 8.5 61.5�)
Suspension frame mounting bolt 150 15.0 108.5�)
Front lower cross member bolt 55 5.5 40.0�)
Starting motor terminal nut 11 1.1 8.0�)
Generator terminal nut 5 0.5 4.0�)
Battery ground bolt 25 2.5 18.0�)
Ground terminal bolt 11 1.1 8.0�)
Timing chain cover bolt 25 2.5 18.0�)
Timing chain cover nut 25 2.5 18.0�)
Cap bolt 25 2.5 18.0�)
Oil gallery pipe No.2 and No.3 bolt 11 1.1 8.0�)
Crankshaft pulley bolt 150 15.0 108.5�)
Oil control valve mounting nut 11 1.1 8.0�)
Oil gallery pipe No.1 bolt 30 3.0 21.5�)
Timing chain No.1 guide bolt 11 1.1 8.0�)
Timing chain tensioner bolt 25 2.5 18.0�)
Timing chain tensioner adjuster bolt 11 1.1 8.0�)
Intake cam timing sprocket bolt 60 6.0 43.5�)
Camshaft housing bolt 11 1.1 8.0�)
Venturi plug 5 0.5 3.5�)
Cylinder head bolt for M8 Tighten 25 N⋅m (2.5 kgf-m, 18.0 lb-ft) by the
specified procedure�)
Page 368 of 1556
Downloaded from www.Manualslib.com manuals search engine 1F-3 Engine Cooling System:
Diagnostic Information and Procedures
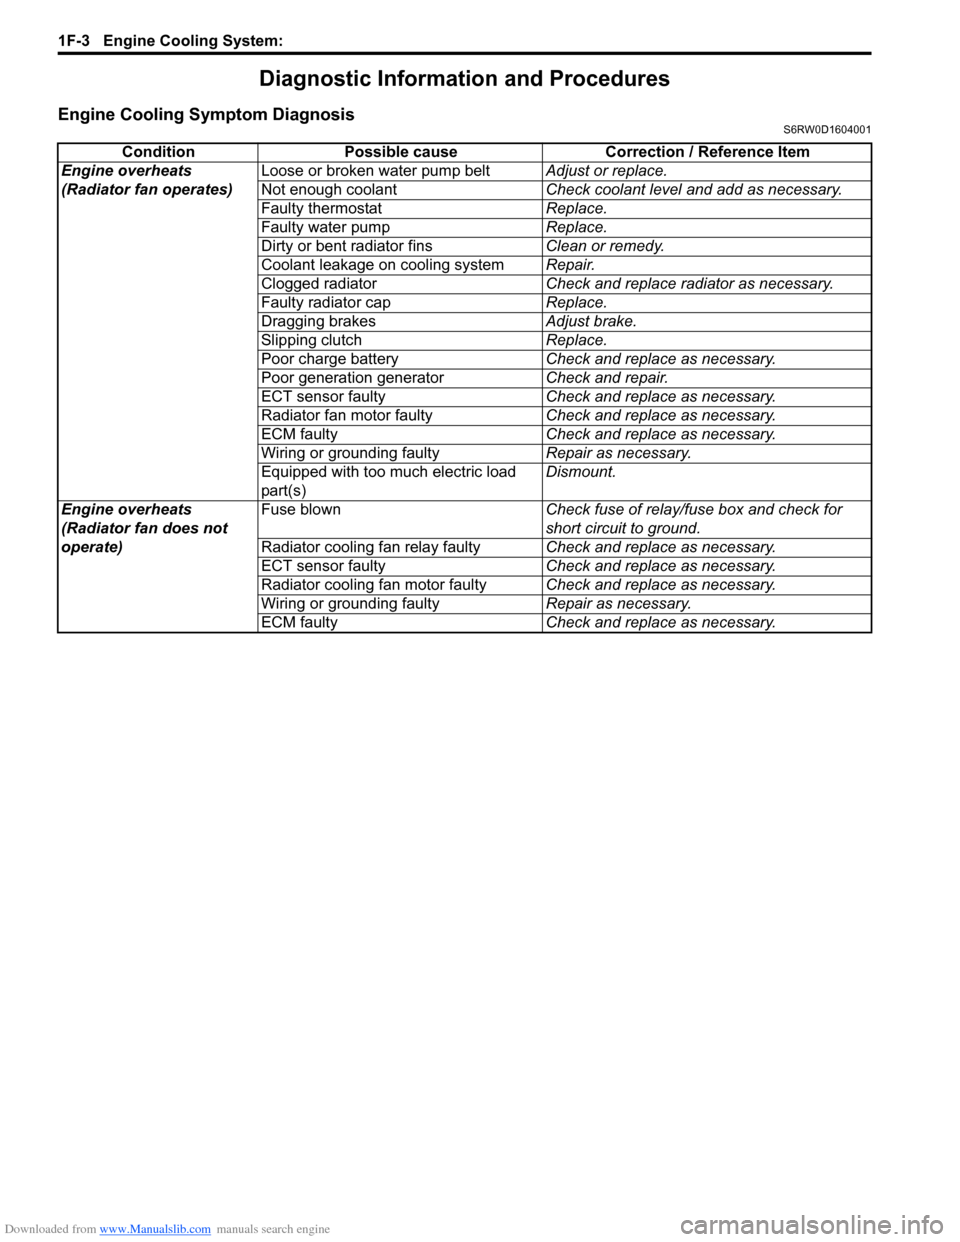
Engine Cooling Symptom DiagnosisS6RW0D1604001
Condition Possible cause Correction / Reference Item
Engine overheats
(Radiator fan operates)Loose or broken water pump beltAdjust or replace.
Not enough coolantCheck coolant level and add as necessary.
Faulty thermostatReplace.
Faulty water pumpReplace.
Dirty or bent radiator finsClean or remedy.
Coolant leakage on cooling systemRepair.
Clogged radiatorCheck and replace radiator as necessary.
Faulty radiator capReplace.
Dragging brakesAdjust brake.
Slipping clutchReplace.
Poor charge batteryCheck and replace as necessary.
Poor generation generatorCheck and repair.
ECT sensor faultyCheck and replace as necessary.
Radiator fan motor faultyCheck and replace as necessary.
ECM faultyCheck and replace as necessary.
Wiring or grounding faultyRepair as necessary.
Equipped with too much electric load
part(s)Dismount.
Engine overheats
(Radiator fan does not
operate)Fuse blownCheck fuse of relay/fuse box and check for
short circuit to ground.
Radiator cooling fan relay faultyCheck and replace as necessary.
ECT sensor faultyCheck and replace as necessary.
Radiator cooling fan motor faultyCheck and replace as necessary.
Wiring or grounding faultyRepair as necessary.
ECM faultyCheck and replace as necessary.
Page 375 of 1556
Downloaded from www.Manualslib.com manuals search engine Engine Cooling System: 1F-10
Water Pump / Generator Drive Belt Tension
Inspection and Adjustment
S6RW0D1606014
WARNING!
• Disconnect negative cable at battery
before checking and adjusting belt
tension.
• To help avoid danger of being burned, do
not remove radiator cap while engine and
radiator are still hot. Scalding fluid and
steam can be blown out under pressure if
cap is taken off too soon.
1) Inspect belt for cracks, cuts, deformation, wear and
cleanliness. If it is necessary to replace belt, refer to
“Water Pump / Generator Drive Belt Removal and
Installation”.
2) Check belt for tension. Belt is in proper tension when
it deflects the following specification under thumb
pressure (about 100 N (10kgf, 22 lbs.).
If belt tension is out of specification, go to next steps.
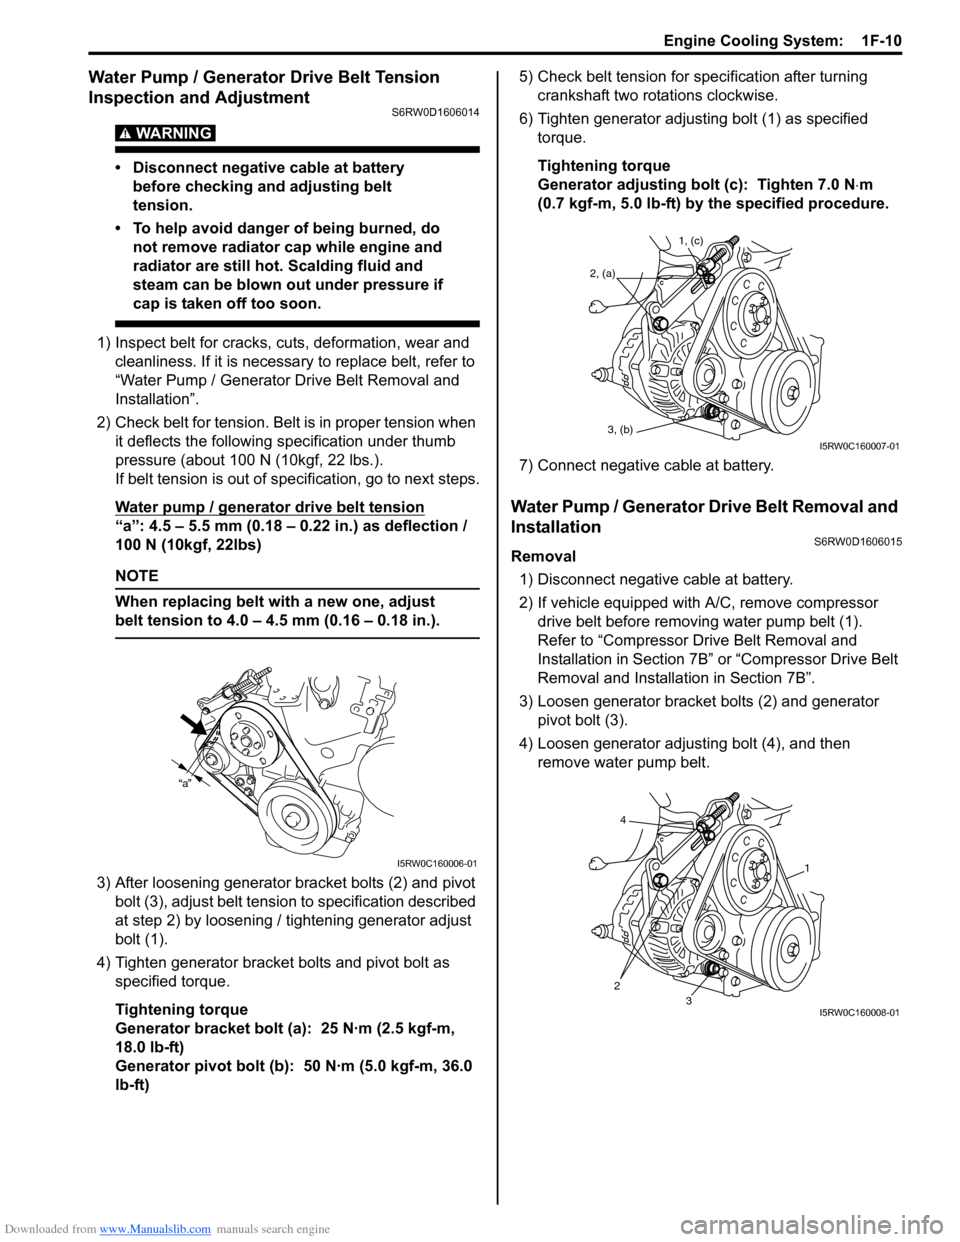
Water pump / generator drive belt tension
“a”: 4.5 – 5.5 mm (0.18 – 0.22 in.) as deflection /
100 N (10kgf, 22lbs)
NOTE
When replacing belt with a new one, adjust
belt tension to 4.0 – 4.5 mm (0.16 – 0.18 in.).
3) After loosening generator bracket bolts (2) and pivot
bolt (3), adjust belt tension to specification described
at step 2) by loosening / tightening generator adjust
bolt (1).
4) Tighten generator bracket bolts and pivot bolt as
specified torque.
Tightening torque
Generator bracket bolt (a): 25 N·m (2.5 kgf-m,
18.0 lb-ft)
Generator pivot bolt (b): 50 N·m (5.0 kgf-m, 36.0
lb-ft)5) Check belt tension for specification after turning
crankshaft two rotations clockwise.
6) Tighten generator adjusting bolt (1) as specified
torque.
Tightening torque
Generator adjusting bolt (c): Tighten 7.0 N⋅m
(0.7 kgf-m, 5.0 lb-ft) by the specified procedure.
7) Connect negative cable at battery.
Water Pump / Generator Drive Belt Removal and
Installation
S6RW0D1606015
Removal
1) Disconnect negative cable at battery.
2) If vehicle equipped with A/C, remove compressor
drive belt before removing water pump belt (1).
Refer to “Compressor Drive Belt Removal and
Installation in Section 7B” or “Compressor Drive Belt
Removal and Installation in Section 7B”.
3) Loosen generator bracket bolts (2) and generator
pivot bolt (3).
4) Loosen generator adjusting bolt (4), and then
remove water pump belt.
a
I5RW0C160006-01
1, (c)
2, (a)
3, (b)
I5RW0C160007-01
4
23
1
I5RW0C160008-01
Page 376 of 1556
Downloaded from www.Manualslib.com manuals search engine 1F-11 Engine Cooling System:
Installation
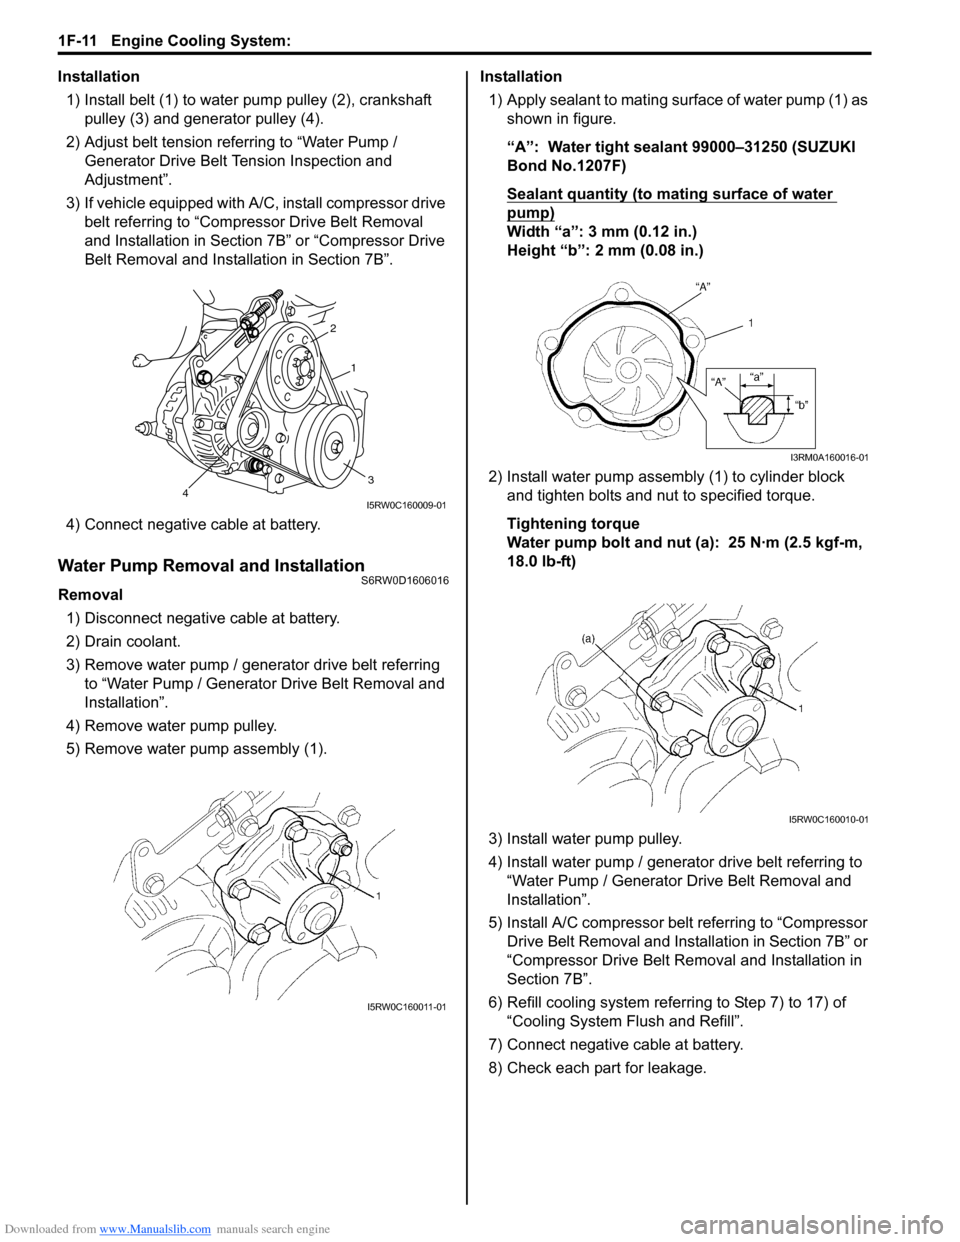
1) Install belt (1) to water pump pulley (2), crankshaft
pulley (3) and generator pulley (4).
2) Adjust belt tension referring to “Water Pump /
Generator Drive Belt Tension Inspection and
Adjustment”.
3) If vehicle equipped with A/C, install compressor drive
belt referring to “Compressor Drive Belt Removal
and Installation in Section 7B” or “Compressor Drive
Belt Removal and Installation in Section 7B”.
4) Connect negative cable at battery.
Water Pump Removal and InstallationS6RW0D1606016
Removal
1) Disconnect negative cable at battery.
2) Drain coolant.
3) Remove water pump / generator drive belt referring
to “Water Pump / Generator Drive Belt Removal and
Installation”.
4) Remove water pump pulley.
5) Remove water pump assembly (1).Installation
1) Apply sealant to mating surface of water pump (1) as
shown in figure.
“A”: Water tight sealant 99000–31250 (SUZUKI
Bond No.1207F)
Sealant quantity (to mating surface of water
pump)
Width “a”: 3 mm (0.12 in.)
Height “b”: 2 mm (0.08 in.)
2) Install water pump assembly (1) to cylinder block
and tighten bolts and nut to specified torque.
Tightening torque
Water pump bolt and nut (a): 25 N·m (2.5 kgf-m,
18.0 lb-ft)
3) Install water pump pulley.
4) Install water pump / generator drive belt referring to
“Water Pump / Generator Drive Belt Removal and
Installation”.
5) Install A/C compressor belt referring to “Compressor
Drive Belt Removal and Installation in Section 7B” or
“Compressor Drive Belt Removal and Installation in
Section 7B”.
6) Refill cooling system referring to Step 7) to 17) of
“Cooling System Flush and Refill”.
7) Connect negative cable at battery.
8) Check each part for leakage.
2
1
34I5RW0C160009-01
I5RW0C160011-01
I3RM0A160016-01
I5RW0C160010-01
Page 377 of 1556
Downloaded from www.Manualslib.com manuals search engine Engine Cooling System: 1F-12
Water Pump InspectionS6RW0D1606017
CAUTION!
Do not disassemble water pump.
If any repair is required on pump, replace it
as assembly.
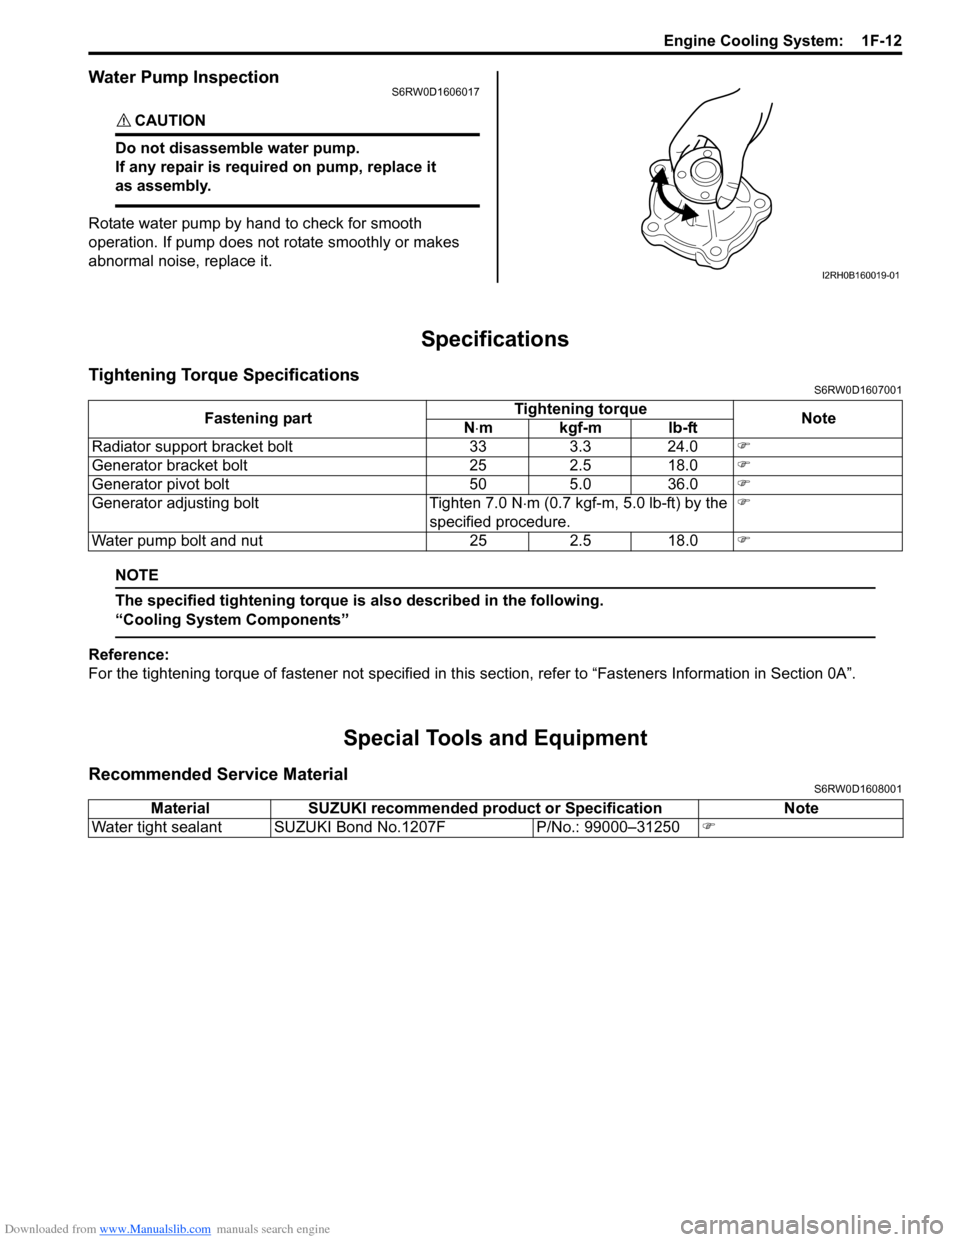
Rotate water pump by hand to check for smooth
operation. If pump does not rotate smoothly or makes
abnormal noise, replace it.
Specifications
Tightening Torque SpecificationsS6RW0D1607001
NOTE
The specified tightening torque is also described in the following.
“Cooling System Components”
Reference:
For the tightening torque of fastener not specified in this section, refer to “Fasteners Information in Section 0A”.
Special Tools and Equipment
Recommended Service MaterialS6RW0D1608001
I2RH0B160019-01
Fastening partTightening torque
Note
N⋅mkgf-mlb-ft
Radiator support bracket bolt 33 3.3 24.0�)
Generator bracket bolt 25 2.5 18.0�)
Generator pivot bolt 50 5.0 36.0�)
Generator adjusting bolt Tighten 7.0 N⋅m (0.7 kgf-m, 5.0 lb-ft) by the
specified procedure.�)
Water pump bolt and nut 25 2.5 18.0�)
Material SUZUKI recommended product or Specification Note
Water tight sealant SUZUKI Bond No.1207F P/No.: 99000–31250�)