sensor SUZUKI SX4 2006 1.G Service Workshop Manual
[x] Cancel search | Manufacturer: SUZUKI, Model Year: 2006, Model line: SX4, Model: SUZUKI SX4 2006 1.GPages: 1556, PDF Size: 37.31 MB
Page 417 of 1556
Downloaded from www.Manualslib.com manuals search engine Charging System: 1J-3
Generator DescriptionS6RW0D1A01002
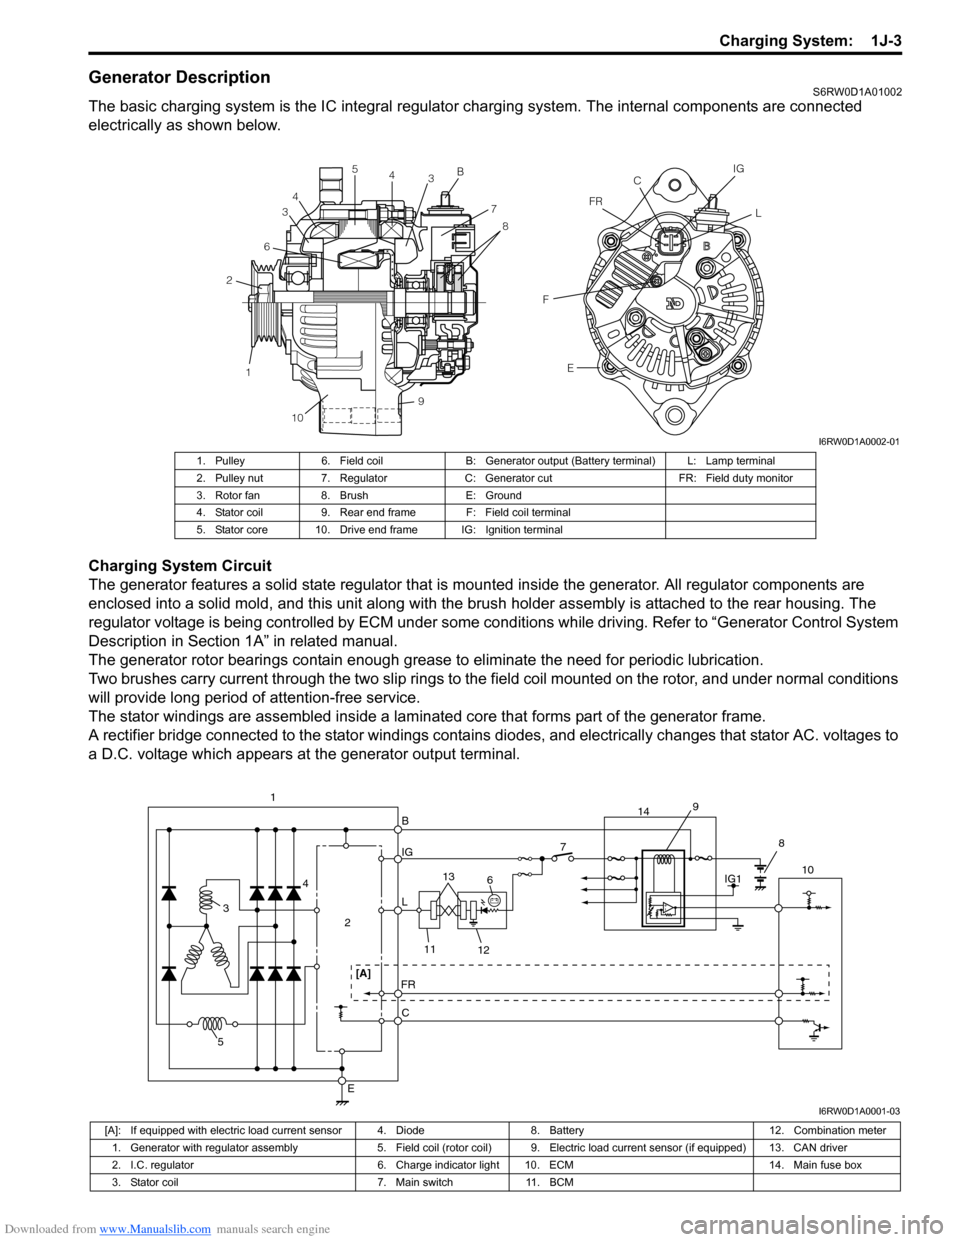
The basic charging system is the IC integral regulator charging system. The internal components are connected
electrically as shown below.
Charging System Circuit
The generator features a solid state regulator that is mounted inside the generator. All regulator components are
enclosed into a solid mold, and this unit along with the brush holder assembly is attached to the rear housing. The
regulator voltage is being controlled by ECM under some conditions while driving. Refer to “Generator Control System
Description in Section 1A” in related manual.
The generator rotor bearings contain enough grease to eliminate the need for periodic lubrication.
Two brushes carry current through the two slip rings to the field coil mounted on the rotor, and under normal conditions
will provide long period of attention-free service.
The stator windings are assembled inside a laminated core that forms part of the generator frame.
A rectifier bridge connected to the stator windings contains diodes, and electrically changes that stator AC. voltages to
a D.C. voltage which appears at the generator output terminal.
1 26345
4
3B
7
8
9
10E FFRCIG
L
I6RW0D1A0002-01
1. Pulley 6. Field coil B: Generator output (Battery terminal) L: Lamp terminal
2. Pulley nut 7. Regulator C: Generator cut FR: Field duty monitor
3. Rotor fan 8. Brush E: Ground
4. Stator coil 9. Rear end frame F: Field coil terminal
5. Stator core 10. Drive end frame IG: Ignition terminal
B
IG
L
C
E
7
2 4
3
5
FR
610
11
12 13 1
[A]
IG1 9
14
8
I6RW0D1A0001-03
[A]: If equipped with electric load current sensor 4. Diode 8. Battery 12. Combination meter
1. Generator with regulator assembly 5. Field coil (rotor coil) 9. Electric load current sensor (if equipped) 13. CAN driver
2. I.C. regulator 6. Charge indicator light 10. ECM 14. Main fuse box
3. Stator coil 7. Main switch 11. BCM
Page 442 of 1556
Downloaded from www.Manualslib.com manuals search engine 2B-5 Front Suspension:
Front Strut Assembly Removal and InstallationS6RW0D2206003
CAUTION!
When rebound stopper and strut assembly
were removed, check strut support lower nut
for specified torque before installing strut
assembly.
Removal
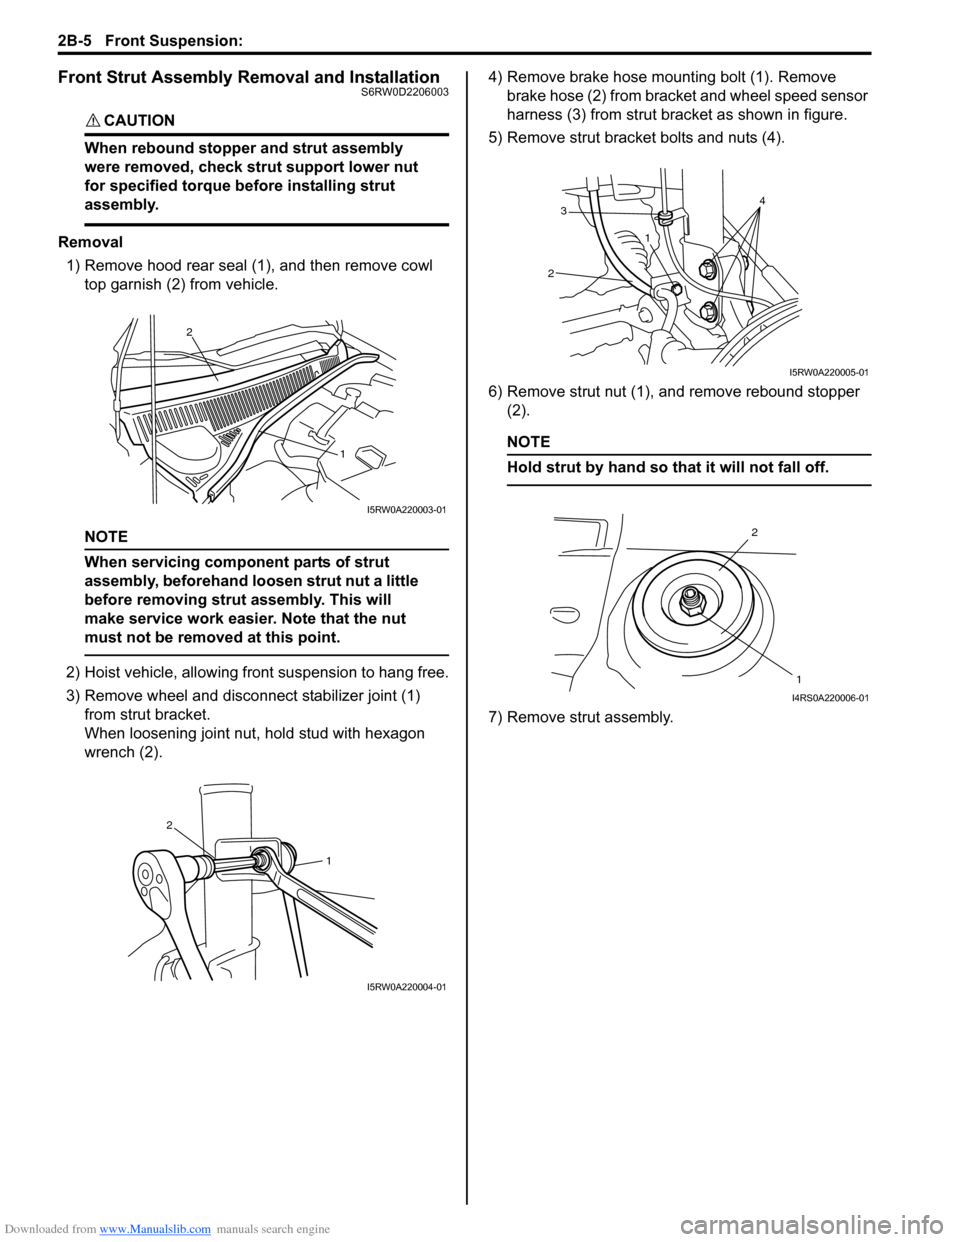
1) Remove hood rear seal (1), and then remove cowl
top garnish (2) from vehicle.
NOTE
When servicing component parts of strut
assembly, beforehand loosen strut nut a little
before removing strut assembly. This will
make service work easier. Note that the nut
must not be removed at this point.
2) Hoist vehicle, allowing front suspension to hang free.
3) Remove wheel and disconnect stabilizer joint (1)
from strut bracket.
When loosening joint nut, hold stud with hexagon
wrench (2).4) Remove brake hose mounting bolt (1). Remove
brake hose (2) from bracket and wheel speed sensor
harness (3) from strut bracket as shown in figure.
5) Remove strut bracket bolts and nuts (4).
6) Remove strut nut (1), and remove rebound stopper
(2).
NOTE
Hold strut by hand so that it will not fall off.
7) Remove strut assembly.
2
1
I5RW0A220003-01
1
2
I5RW0A220004-01
3
214
I5RW0A220005-01
2
1
I4RS0A220006-01
Page 443 of 1556
Downloaded from www.Manualslib.com manuals search engine Front Suspension: 2B-6
Installation
Install strut assembly by reversing removal procedure,
noting the following instructions.
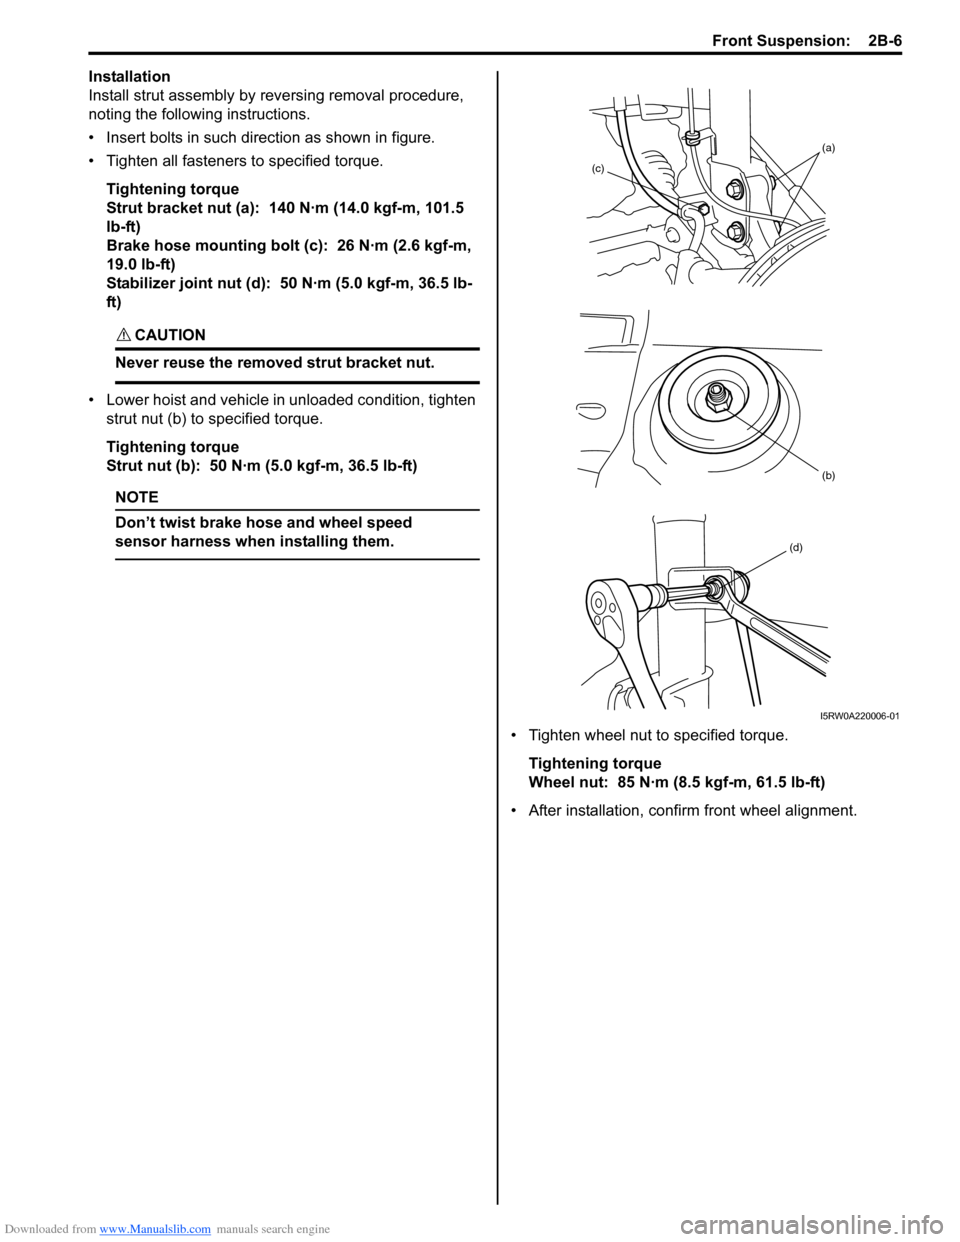
• Insert bolts in such direction as shown in figure.
• Tighten all fasteners to specified torque.
Tightening torque
Strut bracket nut (a): 140 N·m (14.0 kgf-m, 101.5
lb-ft)
Brake hose mounting bolt (c): 26 N·m (2.6 kgf-m,
19.0 lb-ft)
Stabilizer joint nut (d): 50 N·m (5.0 kgf-m, 36.5 lb-
ft)
CAUTION!
Never reuse the removed strut bracket nut.
• Lower hoist and vehicle in unloaded condition, tighten
strut nut (b) to specified torque.
Tightening torque
Strut nut (b): 50 N·m (5.0 kgf-m, 36.5 lb-ft)
NOTE
Don’t twist brake hose and wheel speed
sensor harness when installing them.
• Tighten wheel nut to specified torque.
Tightening torque
Wheel nut: 85 N·m (8.5 kgf-m, 61.5 lb-ft)
• After installation, confirm front wheel alignment.
(b)
(a)
(c)
(d)
I5RW0A220006-01
Page 447 of 1556
Downloaded from www.Manualslib.com manuals search engine Front Suspension: 2B-10
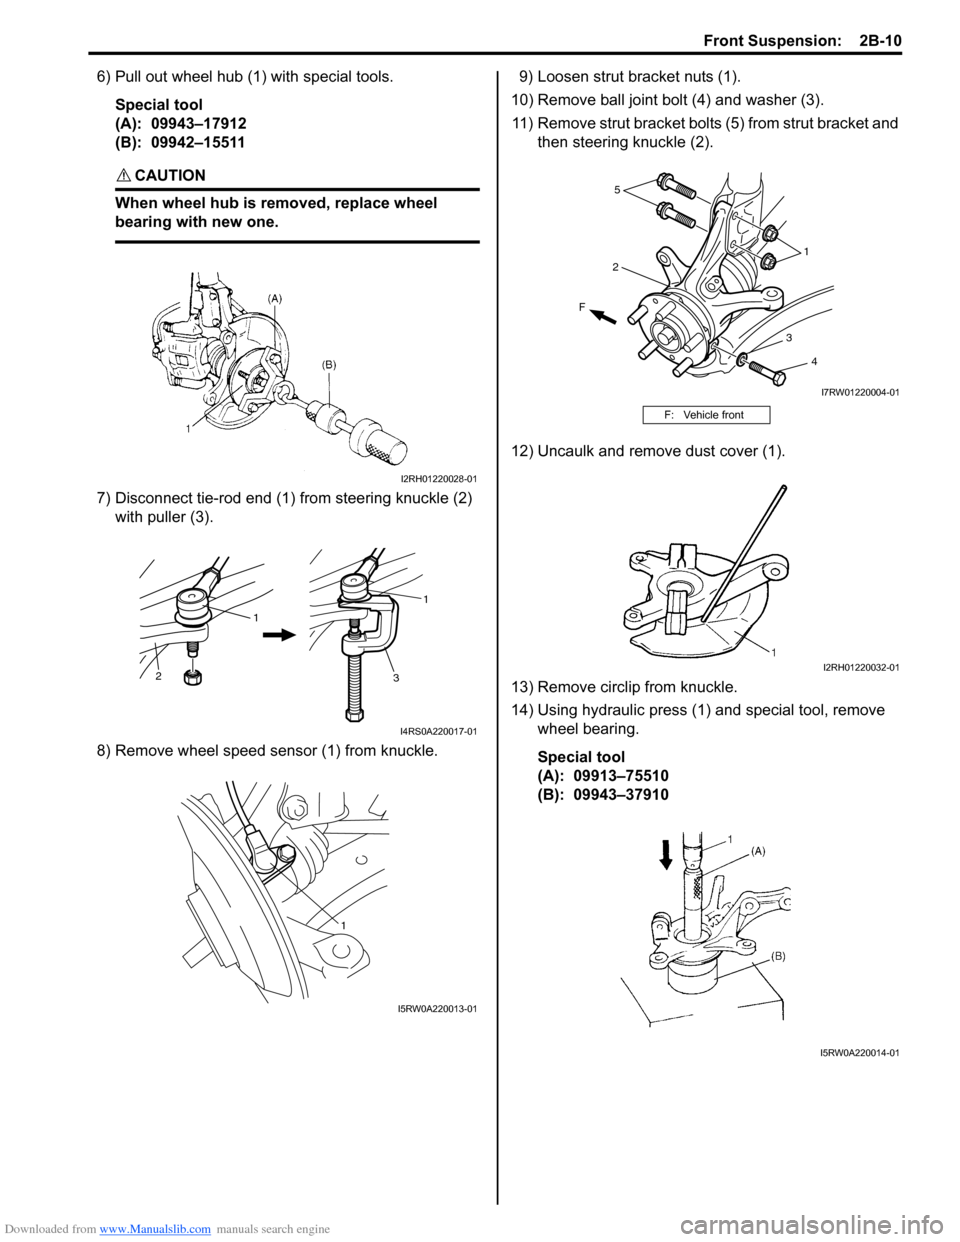
6) Pull out wheel hub (1) with special tools.
Special tool
(A): 09943–17912
(B): 09942–15511
CAUTION!
When wheel hub is removed, replace wheel
bearing with new one.
7) Disconnect tie-rod end (1) from steering knuckle (2)
with puller (3).
8) Remove wheel speed sensor (1) from knuckle.9) Loosen strut bracket nuts (1).
10) Remove ball joint bolt (4) and washer (3).
11) Remove strut bracket bolts (5) from strut bracket and
then steering knuckle (2).
12) Uncaulk and remove dust cover (1).
13) Remove circlip from knuckle.
14) Using hydraulic press (1) and special tool, remove
wheel bearing.
Special tool
(A): 09913–75510
(B): 09943–37910
I2RH01220028-01
1
2
3
1
I4RS0A220017-01
1
I5RW0A220013-01
F: Vehicle front
F
5
21
3
4
I7RW01220004-01
I2RH01220032-01
I5RW0A220014-01
Page 450 of 1556
Downloaded from www.Manualslib.com manuals search engine 2B-13 Front Suspension:
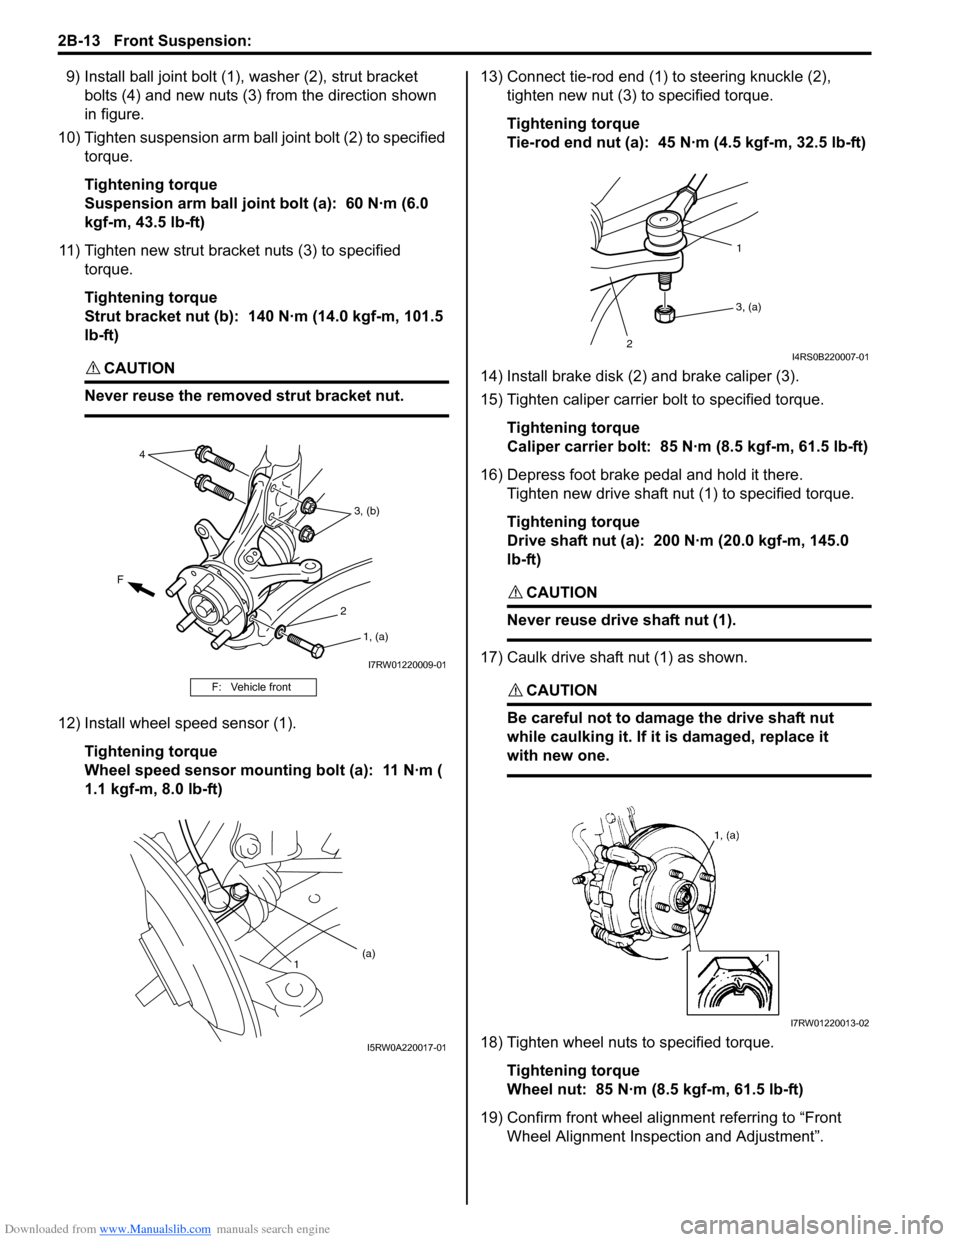
9) Install ball joint bolt (1), washer (2), strut bracket
bolts (4) and new nuts (3) from the direction shown
in figure.
10) Tighten suspension arm ball joint bolt (2) to specified
torque.
Tightening torque
Suspension arm ball joint bolt (a): 60 N·m (6.0
kgf-m, 43.5 lb-ft)
11) Tighten new strut bracket nuts (3) to specified
torque.
Tightening torque
Strut bracket nut (b): 140 N·m (14.0 kgf-m, 101.5
lb-ft)
CAUTION!
Never reuse the removed strut bracket nut.
12) Install wheel speed sensor (1).
Tightening torque
Wheel speed sensor mounting bolt (a): 11 N·m (
1.1 kgf-m, 8.0 lb-ft)13) Connect tie-rod end (1) to steering knuckle (2),
tighten new nut (3) to specified torque.
Tightening torque
Tie-rod end nut (a): 45 N·m (4.5 kgf-m, 32.5 lb-ft)
14) Install brake disk (2) and brake caliper (3).
15) Tighten caliper carrier bolt to specified torque.
Tightening torque
Caliper carrier bolt: 85 N·m (8.5 kgf-m, 61.5 lb-ft)
16) Depress foot brake pedal and hold it there.
Tighten new drive shaft nut (1) to specified torque.
Tightening torque
Drive shaft nut (a): 200 N·m (20.0 kgf-m, 145.0
lb-ft)
CAUTION!
Never reuse drive shaft nut (1).
17) Caulk drive shaft nut (1) as shown.
CAUTION!
Be careful not to damage the drive shaft nut
while caulking it. If it is damaged, replace it
with new one.
18) Tighten wheel nuts to specified torque.
Tightening torque
Wheel nut: 85 N·m (8.5 kgf-m, 61.5 lb-ft)
19) Confirm front wheel alignment referring to “Front
Wheel Alignment Inspection and Adjustment”.
F: Vehicle front
F
4
3, (b)
2
1, (a)
I7RW01220009-01
1(a)
I5RW0A220017-01
1
3, (a)
2I4RS0B220007-01
I7RW01220013-02
Page 458 of 1556
Downloaded from www.Manualslib.com manuals search engine 2B-21 Front Suspension:
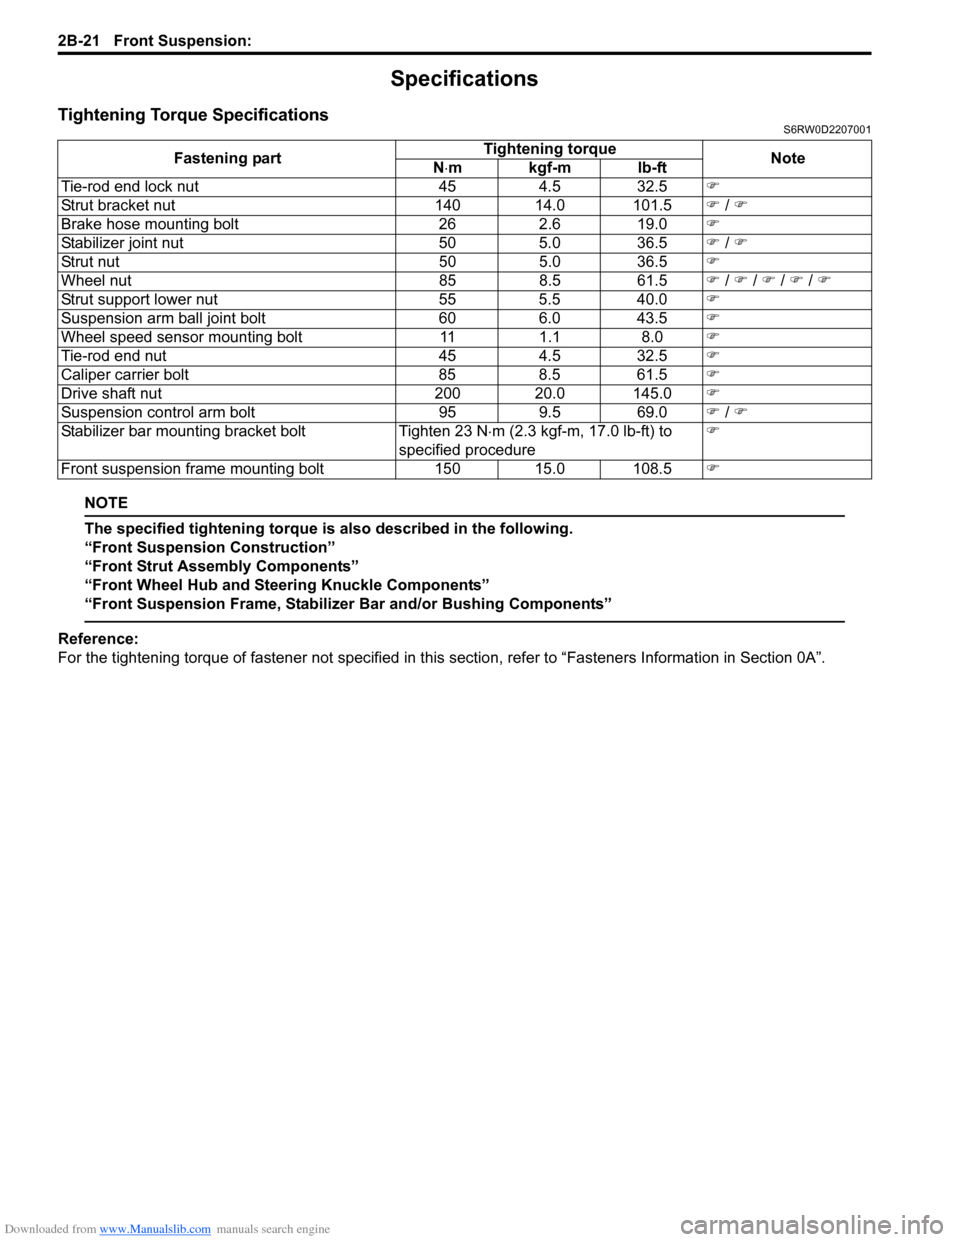
Specifications
Tightening Torque SpecificationsS6RW0D2207001
NOTE
The specified tightening torque is also described in the following.
“Front Suspension Construction”
“Front Strut Assembly Components”
“Front Wheel Hub and Steering Knuckle Components”
“Front Suspension Frame, Stabilizer Bar and/or Bushing Components”
Reference:
For the tightening torque of fastener not specified in this section, refer to “Fasteners Information in Section 0A”. Fastening partTightening torque
Note
N⋅mkgf-mlb-ft
Tie-rod end lock nut 45 4.5 32.5�)
Strut bracket nut 140 14.0 101.5�) / �)
Brake hose mounting bolt 26 2.6 19.0�)
Stabilizer joint nut 50 5.0 36.5�) / �)
Strut nut 50 5.0 36.5�)
Wheel nut 85 8.5 61.5�) / �) / �) / �) / �)
Strut support lower nut 55 5.5 40.0�)
Suspension arm ball joint bolt 60 6.0 43.5�)
Wheel speed sensor mounting bolt 11 1.1 8.0�)
Tie-rod end nut 45 4.5 32.5�)
Caliper carrier bolt 85 8.5 61.5�)
Drive shaft nut 200 20.0 145.0�)
Suspension control arm bolt 95 9.5 69.0�) / �)
Stabilizer bar mounting bracket bolt Tighten 23 N⋅m (2.3 kgf-m, 17.0 lb-ft) to
specified procedure�)
Front suspension frame mounting bolt 150 15.0 108.5�)
Page 463 of 1556
Downloaded from www.Manualslib.com manuals search engine Rear Suspension: 2C-4
Rear Coil Spring Removal and InstallationS6RW0D2306005
CAUTION!
Removal and Installation both coil springs
(right and left) at the same time to avoid rear
axle twisting and other damage.
Removal
1) Hoist vehicle and remove rear wheels.
2) Dismount rear differential (4WD model) referring to
“Rear Differential Dismounting and Remounting in
Section 3B”.
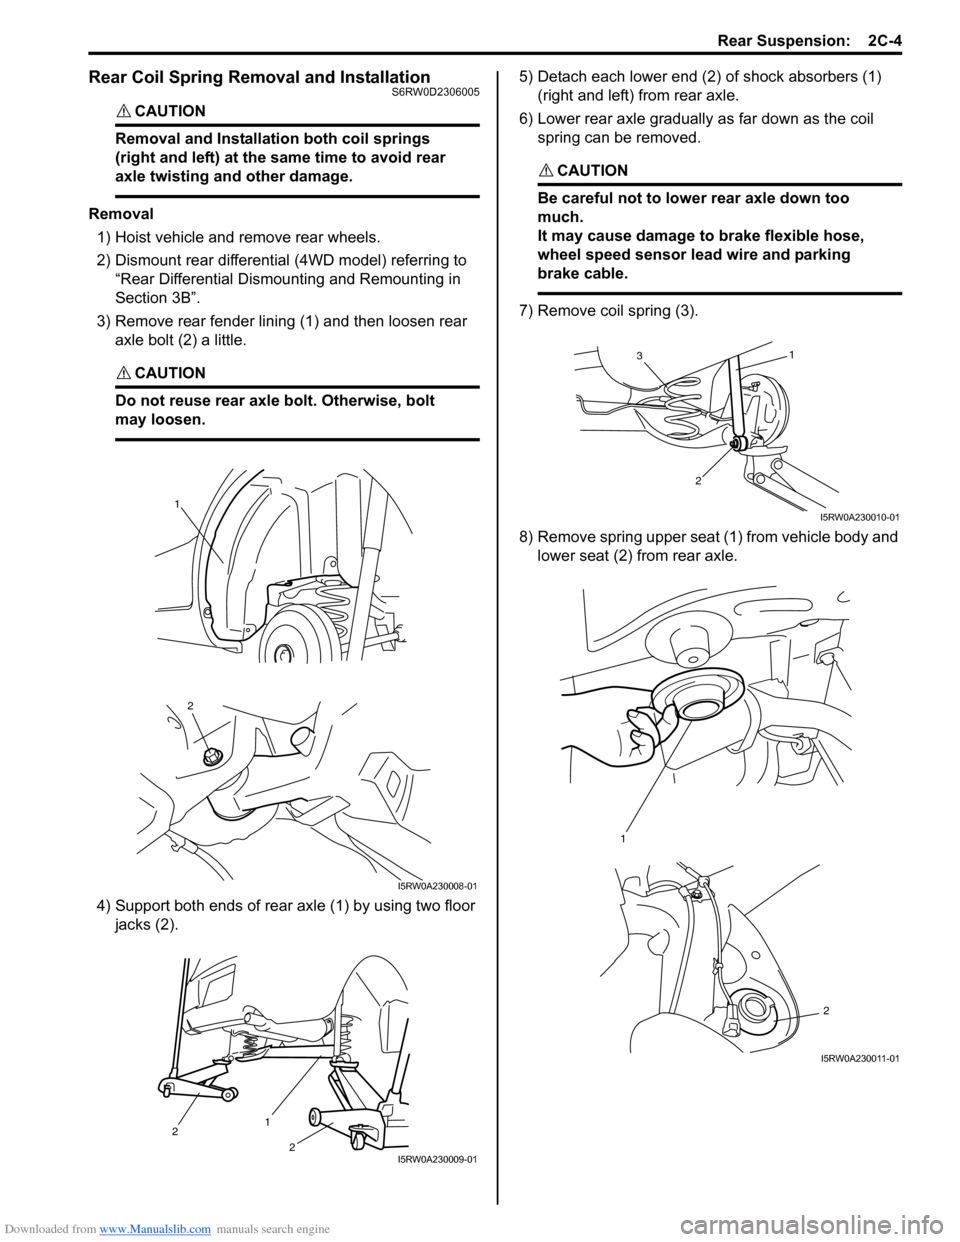
3) Remove rear fender lining (1) and then loosen rear
axle bolt (2) a little.
CAUTION!
Do not reuse rear axle bolt. Otherwise, bolt
may loosen.
4) Support both ends of rear axle (1) by using two floor
jacks (2).5) Detach each lower end (2) of shock absorbers (1)
(right and left) from rear axle.
6) Lower rear axle gradually as far down as the coil
spring can be removed.
CAUTION!
Be careful not to lower rear axle down too
much.
It may cause damage to brake flexible hose,
wheel speed sensor lead wire and parking
brake cable.
7) Remove coil spring (3).
8) Remove spring upper seat (1) from vehicle body and
lower seat (2) from rear axle.
2
1
I5RW0A230008-01
1
2
2
I5RW0A230009-01
1
2
3
I5RW0A230010-01
1
2
I5RW0A230011-01
Page 465 of 1556
Downloaded from www.Manualslib.com manuals search engine Rear Suspension: 2C-6
Rear Axle Removal and InstallationS6RW0D2306007
CAUTION!
Do not drop brake fluid onto painted surface.
Painted surfaces will be damaged.
Removal
1) Hoist vehicle and remove exhaust center pipe and
muffler.
2) Disconnect rear height sensor link (if equipped) from
rear axle referring to “Height Sensor Removal and
Installation (If Equipped) in Section 9B”.
3) Remove rear wheel, rear brake drum and rear wheel
hub referring to “Removal” under “Rear Wheel Hub
Assembly Removal and Installation”.
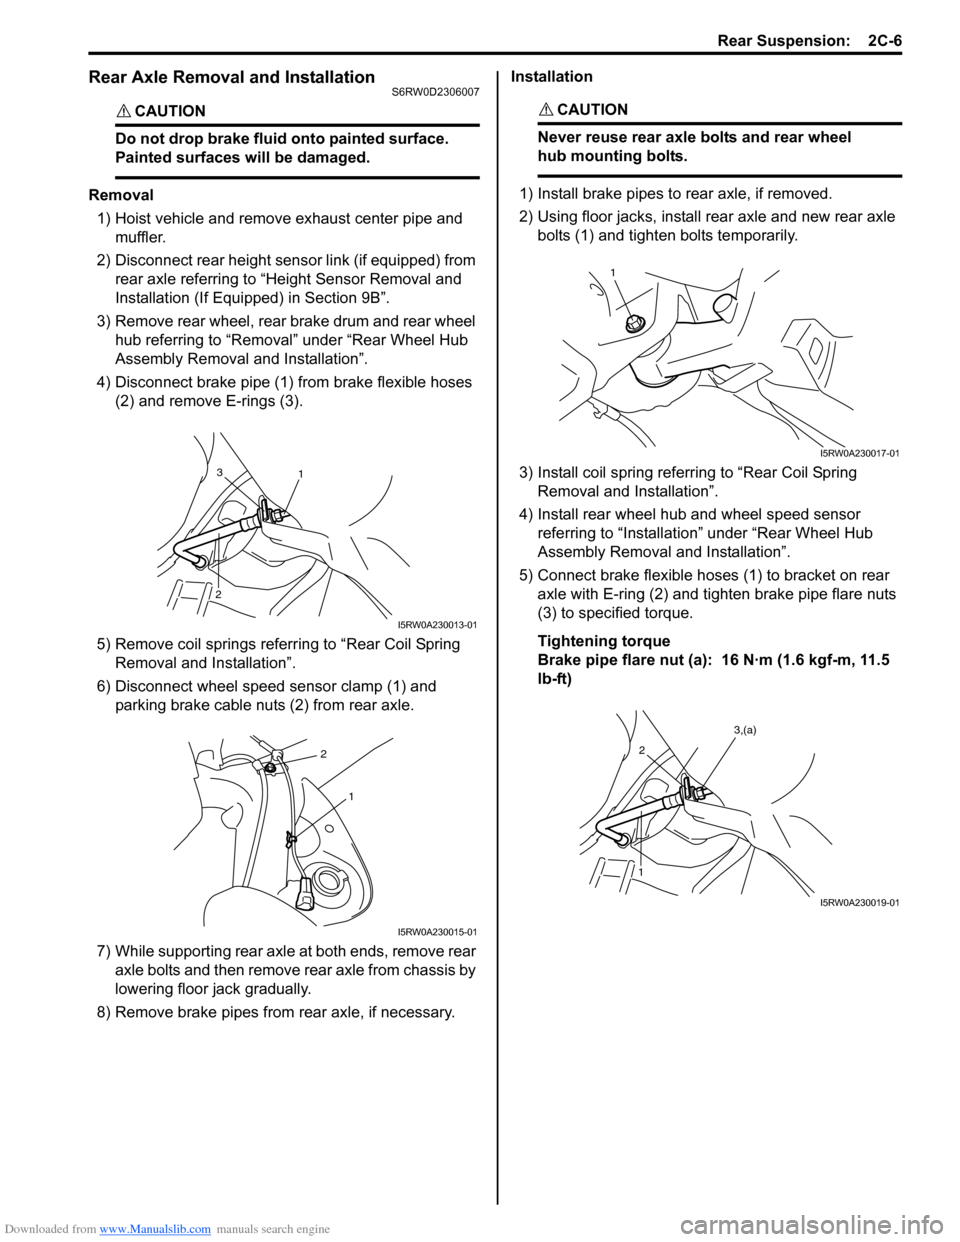
4) Disconnect brake pipe (1) from brake flexible hoses
(2) and remove E-rings (3).
5) Remove coil springs referring to “Rear Coil Spring
Removal and Installation”.
6) Disconnect wheel speed sensor clamp (1) and
parking brake cable nuts (2) from rear axle.
7) While supporting rear axle at both ends, remove rear
axle bolts and then remove rear axle from chassis by
lowering floor jack gradually.
8) Remove brake pipes from rear axle, if necessary.Installation
CAUTION!
Never reuse rear axle bolts and rear wheel
hub mounting bolts.
1) Install brake pipes to rear axle, if removed.
2) Using floor jacks, install rear axle and new rear axle
bolts (1) and tighten bolts temporarily.
3) Install coil spring referring to “Rear Coil Spring
Removal and Installation”.
4) Install rear wheel hub and wheel speed sensor
referring to “Installation” under “Rear Wheel Hub
Assembly Removal and Installation”.
5) Connect brake flexible hoses (1) to bracket on rear
axle with E-ring (2) and tighten brake pipe flare nuts
(3) to specified torque.
Tightening torque
Brake pipe flare nut (a): 16 N·m (1.6 kgf-m, 11.5
lb-ft)
1 3
2
I5RW0A230013-01
2
1
I5RW0A230015-01
1
I5RW0A230017-01
2
1
3,(a)
I5RW0A230019-01
Page 466 of 1556
Downloaded from www.Manualslib.com manuals search engine 2C-7 Rear Suspension:
6) Connect rear height sensor link (if equipped) to rear
axle referring to “Height Sensor Removal and
Installation (If Equipped) in Section 9B”.
7) Install exhaust center pipe and muffler.
8) After installing removed parts, bleed air from brake
system referring to “Air Bleeding of Brake System in
Section 4A”. And then adjust parking brake cable
referring to “Parking Brake Inspection and
Adjustment in Section 4D”.
9) Install wheel and tighten wheel nuts to specified
torque.
Tightening torque
Wheel nut: 85 N·m (8.5 kgf-m, 61.5 lb-ft)
10) Lower hoist and bounce vehicle up and down
several times to stabilize suspension.
11) Tightening shock absorber lower nuts and rear axle
bolts to specified torque.
NOTE
When tightening these nuts and bolts, be
sure that vehicle is not on hoist and in
unloaded condition.
Tightening torque
Rear shock absorber lower nut: 90 N·m (9.0 kgf-
m, 65.0 lb-ft)
Rear axle bolt: 73 N·m (7.3 kgf-m, 53.0 lb-ft)
12) Perform brake test (foot brake and parking brake).
13) Check each installed parts for brake fluid leakage.
Rear Axle and Coil Spring InspectionS6RW0D2306009
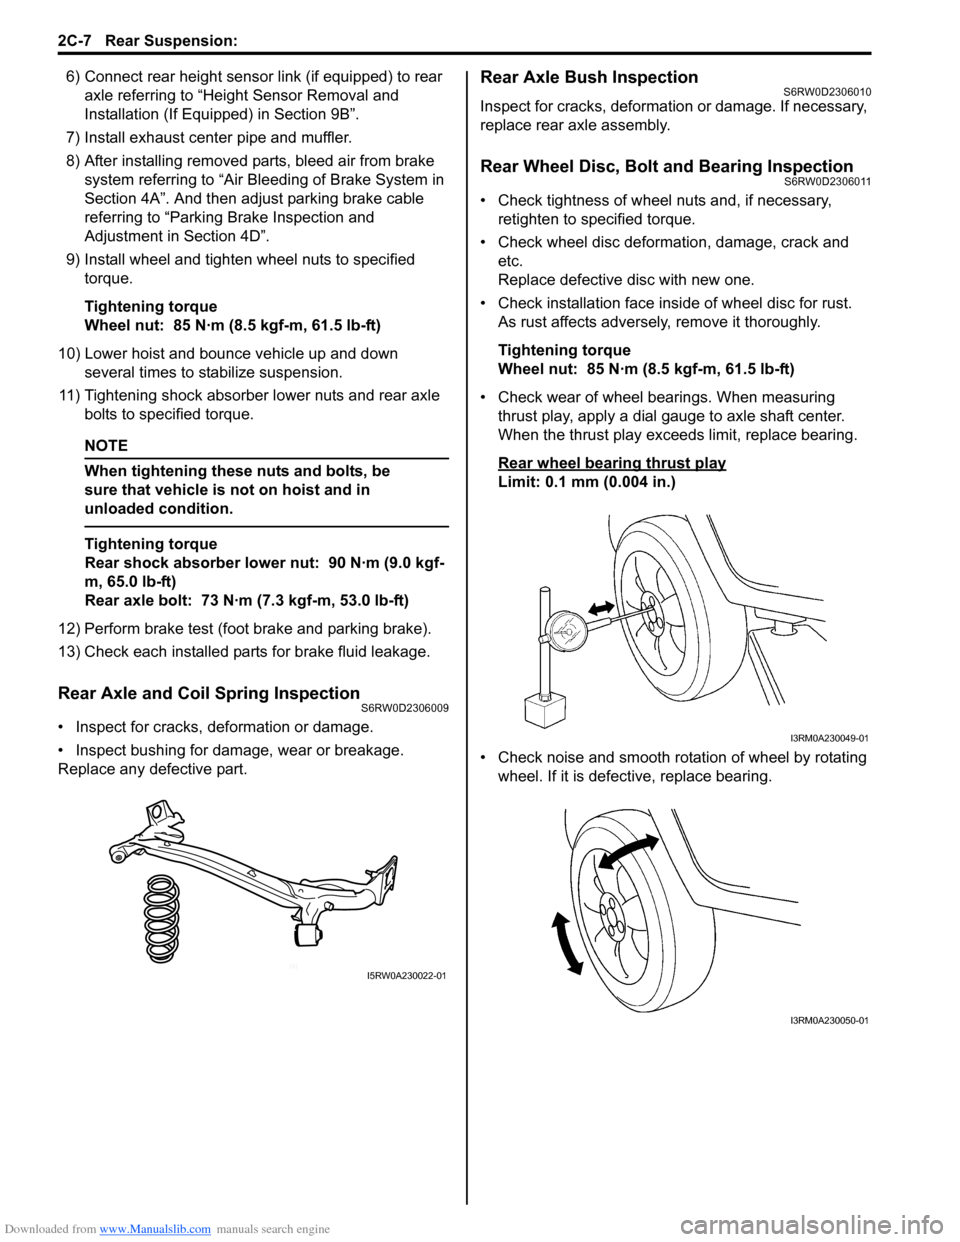
• Inspect for cracks, deformation or damage.
• Inspect bushing for damage, wear or breakage.
Replace any defective part.
Rear Axle Bush InspectionS6RW0D2306010
Inspect for cracks, deformation or damage. If necessary,
replace rear axle assembly.
Rear Wheel Disc, Bolt and Bearing InspectionS6RW0D2306011
• Check tightness of wheel nuts and, if necessary,
retighten to specified torque.
• Check wheel disc deformation, damage, crack and
etc.
Replace defective disc with new one.
• Check installation face inside of wheel disc for rust.
As rust affects adversely, remove it thoroughly.
Tightening torque
Wheel nut: 85 N·m (8.5 kgf-m, 61.5 lb-ft)
• Check wear of wheel bearings. When measuring
thrust play, apply a dial gauge to axle shaft center.
When the thrust play exceeds limit, replace bearing.
Rear wheel bearing thrust play
Limit: 0.1 mm (0.004 in.)
• Check noise and smooth rotation of wheel by rotating
wheel. If it is defective, replace bearing.
(a)I5RW0A230022-01
I3RM0A230049-01
I3RM0A230050-01
Page 467 of 1556
Downloaded from www.Manualslib.com manuals search engine Rear Suspension: 2C-8
Rear Wheel Hub Assembly Removal and
Installation
S6RW0D2306012
CAUTION!
Do not allow brake fluid to get on painted
surfaces. Painted surface will be damaged.
Removal
1) Hoist vehicle. Then remove rear wheel and brake
drum.
2) For 4WD model, remove rear drive shaft referring to
“Rear Drive Shaft Assembly Removal and
Installation in Section 3A”.
3) Remove rear brake shoe.
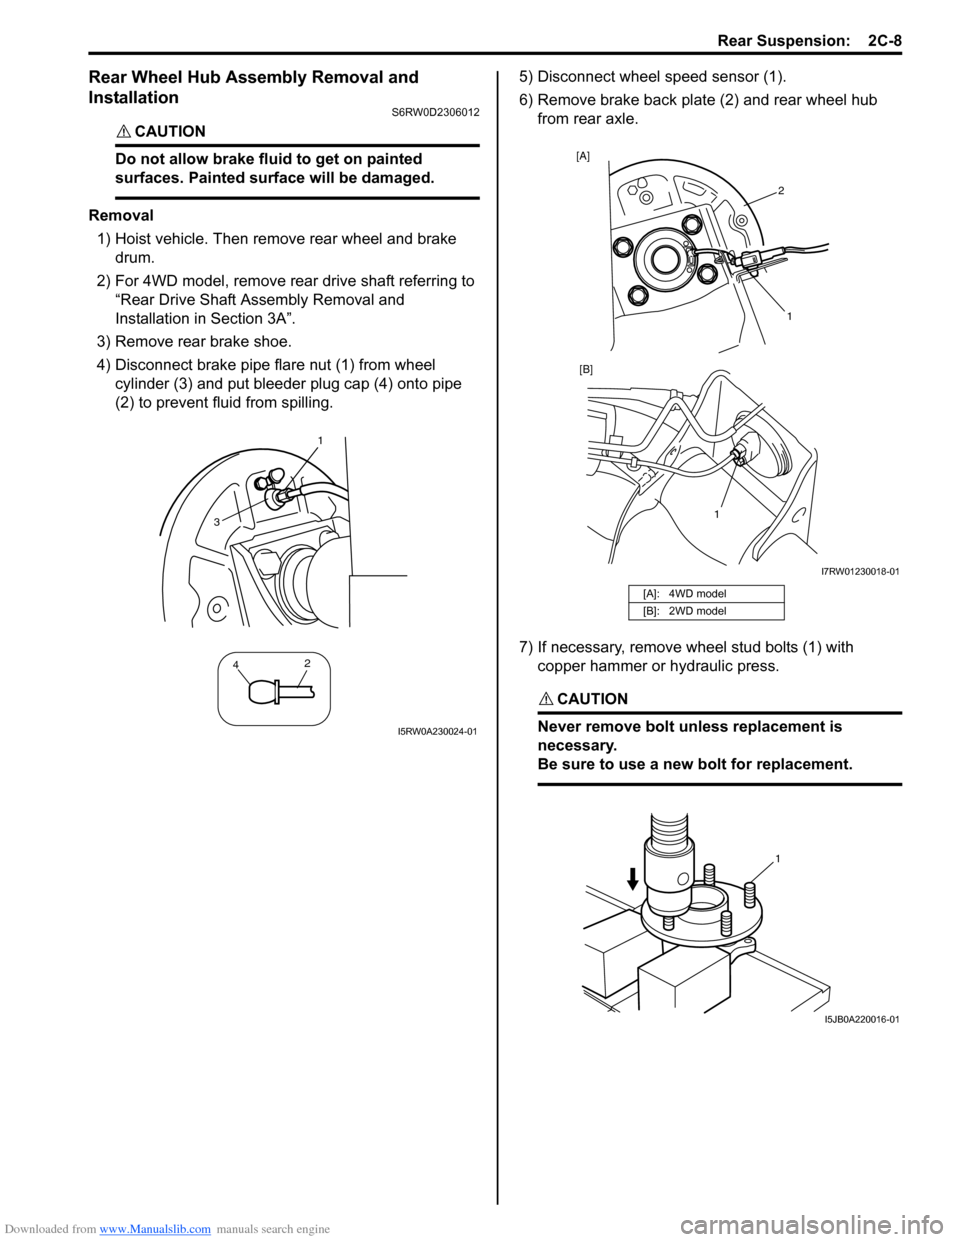
4) Disconnect brake pipe flare nut (1) from wheel
cylinder (3) and put bleeder plug cap (4) onto pipe
(2) to prevent fluid from spilling.5) Disconnect wheel speed sensor (1).
6) Remove brake back plate (2) and rear wheel hub
from rear axle.
7) If necessary, remove wheel stud bolts (1) with
copper hammer or hydraulic press.
CAUTION!
Never remove bolt unless replacement is
necessary.
Be sure to use a new bolt for replacement.
1
42
3
I5RW0A230024-01
[A]: 4WD model
[B]: 2WD model
2 [A]
1 [B]
1
I7RW01230018-01
1
I5JB0A220016-01