sensor SUZUKI SX4 2006 1.G Service Workshop Manual
[x] Cancel search | Manufacturer: SUZUKI, Model Year: 2006, Model line: SX4, Model: SUZUKI SX4 2006 1.GPages: 1556, PDF Size: 37.31 MB
Page 918 of 1556
Downloaded from www.Manualslib.com manuals search engine 6C-38 Power Assisted Steering System:
2) Install steering gear case to vehicle, and then install
front suspension frame referring to “Front
Suspension Frame, Stabilizer Bar and/or Bushing
Removal and Installation in Section 2B”.
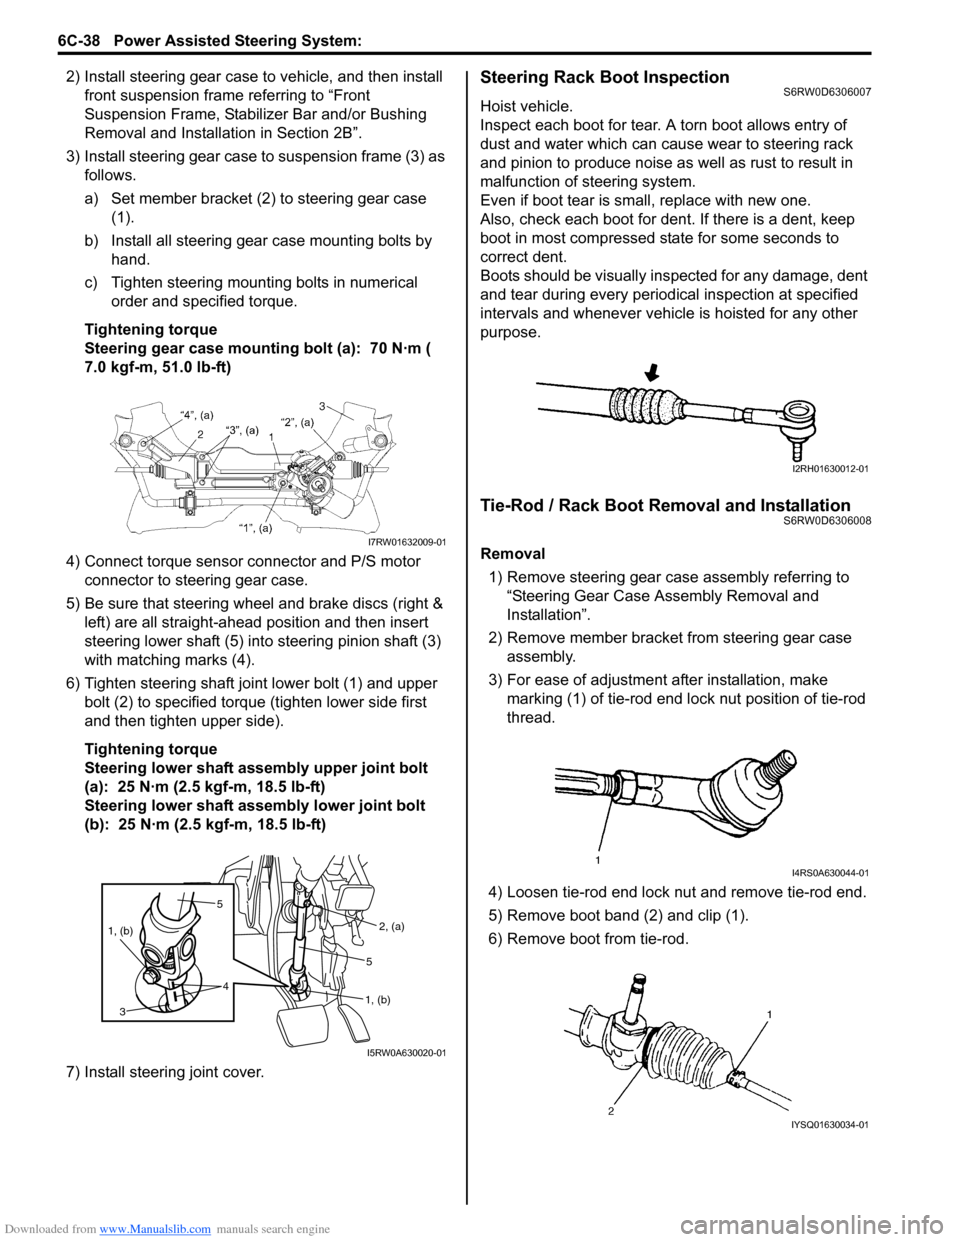
3) Install steering gear case to suspension frame (3) as
follows.
a) Set member bracket (2) to steering gear case
(1).
b) Install all steering gear case mounting bolts by
hand.
c) Tighten steering mounting bolts in numerical
order and specified torque.
Tightening torque
Steering gear case mounting bolt (a): 70 N·m (
7.0 kgf-m, 51.0 lb-ft)
4) Connect torque sensor connector and P/S motor
connector to steering gear case.
5) Be sure that steering wheel and brake discs (right &
left) are all straight-ahead position and then insert
steering lower shaft (5) into steering pinion shaft (3)
with matching marks (4).
6) Tighten steering shaft joint lower bolt (1) and upper
bolt (2) to specified torque (tighten lower side first
and then tighten upper side).
Tightening torque
Steering lower shaft assembly upper joint bolt
(a): 25 N·m (2.5 kgf-m, 18.5 lb-ft)
Steering lower shaft assembly lower joint bolt
(b): 25 N·m (2.5 kgf-m, 18.5 lb-ft)
7) Install steering joint cover.Steering Rack Boot InspectionS6RW0D6306007
Hoist vehicle.
Inspect each boot for tear. A torn boot allows entry of
dust and water which can cause wear to steering rack
and pinion to produce noise as well as rust to result in
malfunction of steering system.
Even if boot tear is small, replace with new one.
Also, check each boot for dent. If there is a dent, keep
boot in most compressed state for some seconds to
correct dent.
Boots should be visually inspected for any damage, dent
and tear during every periodical inspection at specified
intervals and whenever vehicle is hoisted for any other
purpose.
Tie-Rod / Rack Boot Removal and InstallationS6RW0D6306008
Removal
1) Remove steering gear case assembly referring to
“Steering Gear Case Assembly Removal and
Installation”.
2) Remove member bracket from steering gear case
assembly.
3) For ease of adjustment after installation, make
marking (1) of tie-rod end lock nut position of tie-rod
thread.
4) Loosen tie-rod end lock nut and remove tie-rod end.
5) Remove boot band (2) and clip (1).
6) Remove boot from tie-rod.I7RW01632009-01
5
4 1, (b)
3
2, (a)
1, (b)5
I5RW0A630020-01
I2RH01630012-01
I4RS0A630044-01
IYSQ01630034-01
Page 921 of 1556
Downloaded from www.Manualslib.com manuals search engine Power Assisted Steering System: 6C-41
P/S Control Module Removal and InstallationS6RW0D6306011
Removal
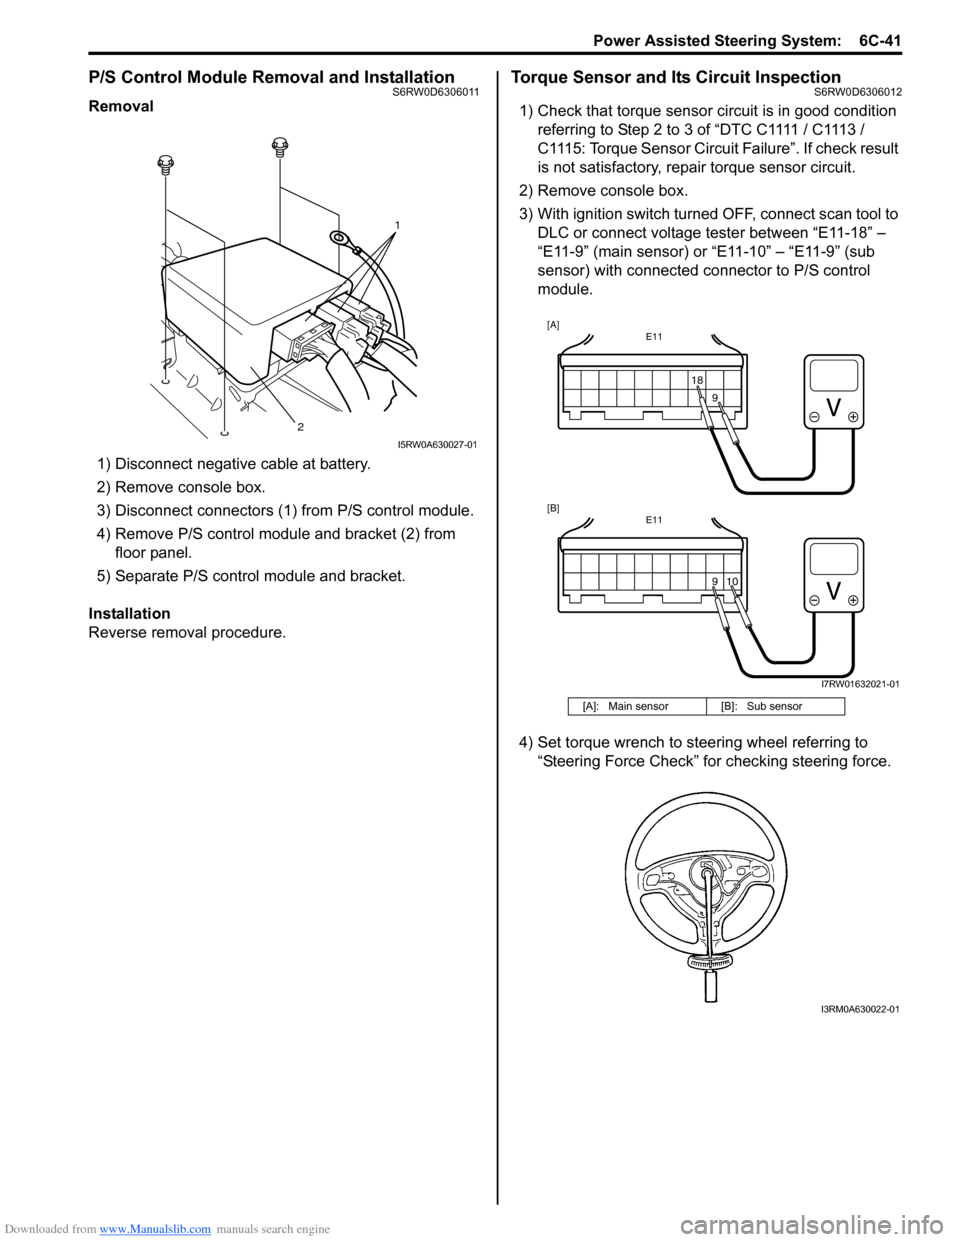
1) Disconnect negative cable at battery.
2) Remove console box.
3) Disconnect connectors (1) from P/S control module.
4) Remove P/S control module and bracket (2) from
floor panel.
5) Separate P/S control module and bracket.
Installation
Reverse removal procedure.
Torque Sensor and Its Circuit InspectionS6RW0D6306012
1) Check that torque sensor circuit is in good condition
referring to Step 2 to 3 of “DTC C1111 / C1113 /
C1115: Torque Sensor Circuit Failure”. If check result
is not satisfactory, repair torque sensor circuit.
2) Remove console box.
3) With ignition switch turned OFF, connect scan tool to
DLC or connect voltage tester between “E11-18” –
“E11-9” (main sensor) or “E11-10” – “E11-9” (sub
sensor) with connected connector to P/S control
module.
4) Set torque wrench to steering wheel referring to
“Steering Force Check” for checking steering force.
1
2
I5RW0A630027-01
[A]: Main sensor [B]: Sub sensor
E11
1818
E11
10
[A]
[B]
9 9
I7RW01632021-01
I3RM0A630022-01
Page 922 of 1556

Downloaded from www.Manualslib.com manuals search engine 6C-42 Power Assisted Steering System:
5) Turn ON ignition switch without engine running and
select scan tool “Data List” mode due to checking
“Sensor (Main) Torque” and “Sensor (Sub) Torque”
displayed on scan tool when steering wheel turned
left and right (if used).
6) Check that characteristic of torque sensor (main and
sub) output voltage or scan tool data and steering
force is as following graph when steering wheel is
turned left and right. If sensor voltage or scan tool
data is out of specified value or does not vary linearly
as the following graph, check EPS control module
and its circuit referring to “Inspection of P/S Control
Module and Its Circuits”.
If they are OK, replace steering gear case assembly.P/S Motor and Its Circuit InspectionS6RW0D6306013
1) Check motor circuit referring to Step 2 to 3 of “DTC
C1141 / C1142 / C1143 / C1145: Motor Circuit
Failure”. If check result is not satisfactory, repair
motor circuit.
2) Disconnect motor connector from steering gear case
assembly with ignition switch turned OFF.
3) Check for resistance between terminals of motor
connector.
If check result is not as specified, check P/S motor
harness for continuity. If it is OK, replace steering
gear case assembly.
Motor circuit resistance
4) Check for insulation between each terminal of motor
connector and body ground.
If check result is not as specified, check P/S motor
harness for insulation. If it is OK, replace steering
gear case assembly.
Motor circuit resistance
5) Hoist vehicle
6) Check that steering wheel turns to left and right
smoothly. If steering wheel does not turn smoothly,
inspect and repair defective steering and suspension
parts.
7) Connect “E12” connector with ignition switch turned
OFF.
[A]: Main sensor
[B]: Sub sensor
[C]: Steering force at left turn
[D]: Steering force at right turn
[E]: Steering wheel at free
[F]: “Sensor (Main) Torque” in “Data List” displayed on scan tool
[G]: “Sensor (Sub) Torque” in “Data List” displayed on scan tool
0
[E][N.m]
MAX
MAX [D] [C]
[E][D] [C]
2.33 - 2.68[V] [F]
[G] [A]
[B]
66
1.65 - 1.9
(1.0 - 1.3)3.0 - 3.4 (3.7 - 4.0)
0 5
2.33 - 2.681.65 - 1.9
(1.0 - 1.3)3.0 - 3.4 (3.7 - 4.0)
0 5
0
[N.m]
MAX
MAX
[V]
6 11.76 11.7611.76 11.766
0 11.5
-12.00 -12.0
11.5
I7RW01632011-02
“E12-1” and “E12-2” (For motor) Approx. 1 Ω
Each terminal and body ground No continuity
[A]: Motor connector “E12” (viewed from harness side)
12
[A]
I6RW0C630012-02
Page 923 of 1556

Downloaded from www.Manualslib.com manuals search engine Power Assisted Steering System: 6C-43
8) Using ammeter (2), check that P/S motor current (1)
is as following table with idling engine. If check result
is not satisfactory, check P/S control module for
torque sensor signal and P/S motor output referring
to “Inspection of P/S Control Module and Its
Circuits”. If they are OK, replace steering gear case
assembly.
NOTE
When P/S motor is cold condition (that is,
armature coil of P/S motor is not heated),
motor current in the following table can be
measured
Motor current at hoisted vehicle (reference
value)
Specifications
Tightening Torque SpecificationsS6RW0D6307001
NOTE
The specified tightening torque is also described in the following.
“Steering Gear Case Assembly Components”
Reference:
For the tightening torque of fastener not specified in this section, refer to “Fasteners Information in Section 0A”. ConditionWhen
steering
wheel is left
at straight
position: [A]When steering
wheel is turned
left or right by
turning speed
with 90° /sec:
[B]When
steering
wheel is
kept fully
turned left
or right
until it
stops.: [C]
Motor
currentApprox. 0 A Approx. 0 – 5 AApprox.
45 – 60 A
3. P/S control module
1
32
E12-1
E12-2
[C][A]
[B] [B]
I7RW01632012-01
Fastening partTightening torque
Note
N⋅mkgf-mlb-ft
Tie-rod end nut 45 4.5 32.5�)
Tie-rod end lock nut 45 4.5 32.5�)
Wheel bolt 85 8.5 61.5�)
Steering gear case mounting bolt 70 7.0 51.0�)
Steering lower shaft assembly upper joint bolt 25 2.5 18.5�)
Steering lower shaft assembly lower joint bolt 25 2.5 18.5�)
Tie-rod 75 7.5 54.5�)
Earth cable bolt 4.0 0.4 2.8�)
Rack damper screw Tighten 25 N⋅m (2.5 kgf-m, 18.0 lb-ft) and
loosen 180° and then tighten 3.9 N⋅m (0.39
kgf-m, 3.0 lb-ft) and turn it back by 10° or
less by the specified procedure.�)
Rotation torque of pinion 2.2 0.22 1.5�)
Steering rack damper lock nut 60 6.0 43.5�)
Page 925 of 1556
Downloaded from www.Manualslib.com manuals search engine Table of Contents 7- i
7
Section 7
CONTENTS
HVAC
Precautions ................................................. 7-1
Precautions............................................................. 7-1
Precautions on HVAC ........................................... 7-1
Heater and Ventilation............................. 7A-1
General Description ............................................. 7A-1
Heater and Ventilation Construction ................... 7A-1
Schematic and Routing Diagram ........................ 7A-2
Heater and Ventilation Wiring Circuit Diagram .... 7A-2
Component Location ........................................... 7A-2
Electronic Control System Components
Location ............................................................ 7A-2
Diagnostic Information and Procedures ............ 7A-3
Heater and Ventilation Symptom Diagnosis........ 7A-3
Repair Instructions .............................................. 7A-4
HVAC Unit Components ..................................... 7A-4
HVAC Unit Removal and Installation (Non-A/
C) ...................................................................... 7A-4
Blower Motor Removal and Installation............... 7A-4
Blower Motor Inspection ..................................... 7A-4
Blower Motor Resistor Removal and
Installation ......................................................... 7A-5
Blower Motor Resistor Inspection ....................... 7A-5
Blower Motor Relay Inspection ........................... 7A-6
HVAC Control Unit Components ......................... 7A-6
HVAC Control Unit Removal and Installation ...... 7A-7
Blower Speed Selector Inspection ...................... 7A-9
Air Intake Selector Inspection ............................. 7A-9
Air Intake Control Actuator Removal and
Installation ......................................................... 7A-9
Air Intake Control Actuator Inspection .............. 7A-10
Center Ventilation Louver Removal and
Installation ....................................................... 7A-11
Side Ventilation Louver Removal and
Installation ....................................................... 7A-11
Rear Duct Removal and Installation (If
Equipped)........................................................ 7A-12
HVAC Air Filter Removal and Installation (If
Equipped)........................................................ 7A-12
HVAC Air Filter Inspection (If Equipped) ........... 7A-12
Air Conditioning System......................... 7B-1
Manual Type ............................................................ 7B-1
Precautions........................................................... 7B-1A/C System Caution ............................................ 7B-1
Precautions on Servicing A/C System ................ 7B-1
General Description .............................................7B-2
Sub-Cool A/C System Description ...................... 7B-2
Manual A/C Electronic Input Output Table .......... 7B-3
A/C Operation Description at ECM ..................... 7B-3
Schematic and Routing Diagram ........................7B-4
A/C System Air Flow Diagram............................. 7B-4
A/C System Wiring Diagram ............................... 7B-5
Component Location ...........................................7B-6
A/C System Major Components Location ........... 7B-6
Electronic Control System Components
Location............................................................. 7B-7
Diagnostic Information and Procedures ............7B-8
A/C System Performance Inspection .................. 7B-8
Trouble Diagnosis for Abnormal Pressure ........ 7B-11
A/C System Inspection at ECM ......................... 7B-12
A/C System Symptom Diagnosis ...................... 7B-13
Abnormal Noise Symptom Diagnosis of A/C
System ............................................................ 7B-15
Repair Instructions ............................................7B-17
Operation Procedure for Refrigerant Charge .... 7B-17
Condenser Cooling Fan Removal and
Installation ....................................................... 7B-22
Condenser Cooling Fan Inspection ................... 7B-23
Condenser Assembly On-Vehicle Inspection .... 7B-23
Condenser Assembly Removal and
Installation ....................................................... 7B-23
Desiccant Removal and Installation .................. 7B-24
HVAC Unit Components ................................... 7B-25
HVAC Unit Removal and Installation ................ 7B-26
Evaporator Inspection ....................................... 7B-27
Evaporator Temperature Sensor Removal
and Installation ................................................ 7B-27
Evaporator Temperature Sensor Inspection ..... 7B-28
Expansion Valve Removal and Installation ....... 7B-28
Expansion Valve Inspection .............................. 7B-28
A/C Refrigerant Pressure Sensor and Its
Circuit Inspection............................................. 7B-29
A/C Refrigerant Pressure Sensor Removal
and Installation ................................................ 7B-29
A/C Switch Inspection ....................................... 7B-29
A/C System Relay Inspection............................ 7B-30
Compressor Drive Belt Inspection and
Adjustment ...................................................... 7B-30
Page 926 of 1556
Downloaded from www.Manualslib.com manuals search engine 7-ii Table of Contents
Compressor Drive Belt Removal and
Installation ....................................................... 7B-31
Compressor Assembly Removal and
Installation ....................................................... 7B-31
Compressor Assembly Components................. 7B-32
Magnet Clutch Inspection.................................. 7B-32
Magnet Clutch Removal and Installation........... 7B-33
Thermal Switch Inspection ................................ 7B-35
Thermal Switch Removal and Installation ......... 7B-35
Relief Valve Inspection...................................... 7B-36
Relief valve Removal and Installation ............... 7B-36
Specifications .....................................................7B-37
Tightening Torque Specifications ...................... 7B-37
Special Tools and Equipment ...........................7B-37
Recommended Service Material ....................... 7B-37
Special Tool ...................................................... 7B-37
Automatic Type .....................................................7B-38
Precautions.........................................................7B-38
A/C System Caution .......................................... 7B-38
Precautions in Diagnosing Trouble ................... 7B-38
Precautions on Servicing A/C System .............. 7B-38
General Description ...........................................7B-39
Auto A/C System Description ............................ 7B-39
HVAC Control Description................................. 7B-40
Sub-Cool A/C System Description .................... 7B-40
On-Board Diagnostic System Description ......... 7B-41
Schematic and Routing Diagram ......................7B-41
A/C System Air Flow Diagram........................... 7B-41
A/C System Wiring Diagram ............................. 7B-42
Component Location .........................................7B-43
A/C System Major Components Location ......... 7B-43
Electronic Control System Components
Location .......................................................... 7B-44
Diagnostic Information and Procedures ..........7B-45
Air Conditioning System Check......................... 7B-45
A/C System Symptom Diagnosis ...................... 7B-47
Abnormal Noise Symptom Diagnosis of A/C
System ............................................................ 7B-49
DTC Check........................................................ 7B-49
DTC Clearance ................................................. 7B-51
DTC Table ......................................................... 7B-52
Fail-Safe Table .................................................. 7B-54
Scan Tool Data ................................................. 7B-55
Visual Inspection ............................................... 7B-57
DTC B1502: Inside Air Temperature Sensor
Circuit Malfunction .......................................... 7B-57
DTC B1503: Evaporator Temperature Sensor
Circuit Malfunction .......................................... 7B-59
DTC B1504: Sunload Sensor Circuit
Malfunction ...................................................... 7B-60
DTC B1511: Temperature Control Actuator
(Position Sensor) and/or Its Circuit
Malfunction ...................................................... 7B-61
DTC B1512: Air flow Control Actuator
(Position Sensor) and/or Its Circuit
Malfunction ...................................................... 7B-63
DTC B1513: Temperature Control Actuator
(Motor) and/or Its Circuit Malfunction .............. 7B-65DTC B1514: Air Flow Control Actuator (Motor)
and/or Its Circuit Malfunction........................... 7B-67
DTC B1520 / B1521 / B1522: Temperature /
Blower Speed / Air Flow Selector
Malfunction ...................................................... 7B-68
DTC B1541: Back-Up Power Supply Circuit
Malfunction ...................................................... 7B-69
DTC B1546: A/C Refrigerant Pressure
Malfunction ...................................................... 7B-70
DTC B1551: Serial Communication Circuit
Malfunction ...................................................... 7B-70
DTC B1552: HVAC Control Module Check
Sum Error ........................................................ 7B-72
DTC B1553: CAN Communication Circuit
Malfunction ...................................................... 7B-72
DTC B1557: VSS Signal Failure ....................... 7B-73
DTC B1561: ECT Signal Failure ....................... 7B-73
DTC B1562: Outside Air Temperature Signal
Failure ............................................................. 7B-74
DTC B1563: A/C Refrigerant Pressure Signal
Failure ............................................................. 7B-74
DTC B1570: Engine Type Signal Failure .......... 7B-75
DTC B1571: Combination Meter Spec Signal
Failure ............................................................. 7B-75
Inspection of HVAC Control Module and Its
Circuit .............................................................. 7B-76
A/C System Inspection at ECM ......................... 7B-79
Repair Instructions ............................................7B-79
Operation Procedure for Refrigerant Charge .... 7B-79
HVAC Unit Components ................................... 7B-80
HVAC Unit Removal and Installation ................ 7B-81
Temperature Control Actuator Removal and
Installation ....................................................... 7B-81
Temperature Control Actuator and Its Circuit
Inspection ........................................................ 7B-81
Air Flow Control Actuator Removal and
Installation ....................................................... 7B-83
Air Flow Control Actuator and Its Circuit
Inspection ........................................................ 7B-83
Air Intake Actuator Removal and Installation .... 7B-84
Air Intake Actuator Inspection ........................... 7B-84
Actuator Linkage Inspection.............................. 7B-84
Blower Motor Controller Removal and
Installation ....................................................... 7B-84
Blower Motor Controller Inspection ................... 7B-85
HVAC Control Module Removal and
Installation ....................................................... 7B-85
Sunload Sensor Removal and Installation ........ 7B-85
Sunload Sensor Inspection ............................... 7B-86
Outside Air Temperature Sensor Removal
and Installation ................................................ 7B-86
Outside Air Temperature Sensor Inspection ..... 7B-86
Inside Air Temperature Sensor Removal and
Installation ....................................................... 7B-86
Inside Air Temperature Sensor Inspection ........ 7B-86
Condenser Cooling Fan Relay Inspection......... 7B-87
Condenser Cooling Fan Removal and
Installation ....................................................... 7B-87
Condenser Cooling Fan Inspection ................... 7B-87
Condenser Assembly On-Vehicle Inspection .... 7B-87
Page 927 of 1556
Downloaded from www.Manualslib.com manuals search engine Table of Contents 7-iii
Condenser Assembly Removal and
Installation ....................................................... 7B-87
Evaporator Inspection ....................................... 7B-87
Evaporator Temperature Sensor Removal
and Installation ................................................ 7B-87
Evaporator Temperature Sensor Inspection ..... 7B-87
Expansion Valve Removal and Installation ....... 7B-87
Expansion Valve Inspection .............................. 7B-87
A/C Refrigerant Pressure Sensor and Its
Circuit Inspection ............................................ 7B-87
A/C Refrigerant Pressure Sensor Removal
and Installation ................................................ 7B-87
Compressor Relay Inspection ........................... 7B-87
Compressor Drive Belt Inspection and
Adjustment ...................................................... 7B-87Compressor Drive Belt Removal and
Installation ....................................................... 7B-87
Compressor Assembly Removal and
Installation ....................................................... 7B-87
Compressor Assembly Components................. 7B-87
Magnet Clutch Removal and Installation........... 7B-87
Magnet Clutch Inspection.................................. 7B-87
Thermal Switch Inspection ................................ 7B-87
Thermal Switch Removal and Installation ......... 7B-87
Relief Valve Inspection...................................... 7B-87
Special Tools and Equipment ...........................7B-88
Recommended Service Material ....................... 7B-88
Special Tool ...................................................... 7B-88
Page 942 of 1556

Downloaded from www.Manualslib.com manuals search engine 7B-2 Air Conditioning System: Manual Type
Refrigerant Recovery
When discharging refrigerant out of A/C system, always recover it by using refrigerant recovery and recycling
equipment because discharging refrigerant HFC-134a (R-134a) into atmosphere would cause adverse effect to
environments referring to “Recovery” in “Operation Procedure for Refrigerant Charge”.
Refrigerant Charge
After performing compressor oil replenishment and evacuation, charge a proper amount of refrigerant to A/C system
referring to “Charge” in “Operation Procedure for Refrigerant Charge”.
General Description
Sub-Cool A/C System DescriptionS6RW0D7211001
In the sub-cool A/C system (condenser integrated with receiver / dryer), the inside of the condenser is divided into the
condensation part and the sub-cooler part, and the receiver / dryer is located between those. In the receiver / dryer,
the refrigerant is separated into the vapor refrigerant and the liquid refrigerant. Only the liquid refrigerant is delivered to
the sub-cooler part of the condenser. The refrigerant is supercooled by the sub-cooler part of the condenser.
I5RW0A721003-02
[A]: Liquid 2. Magnet clutch 6. Expansion valve 10. Desiccant
[B]: Vapor 3. Condenser 7. A/C evaporator 11. Filter
[C]: Superheated vapor 4. Receiver/dryer 8. Condensation part 12. Vapor refrigerant
1. Compressor 5. Refrigerant pressure sensor 9. Sub-cooler part 13. Liquid refrigerant
Page 943 of 1556
Downloaded from www.Manualslib.com manuals search engine Air Conditioning System: Manual Type 7B-3
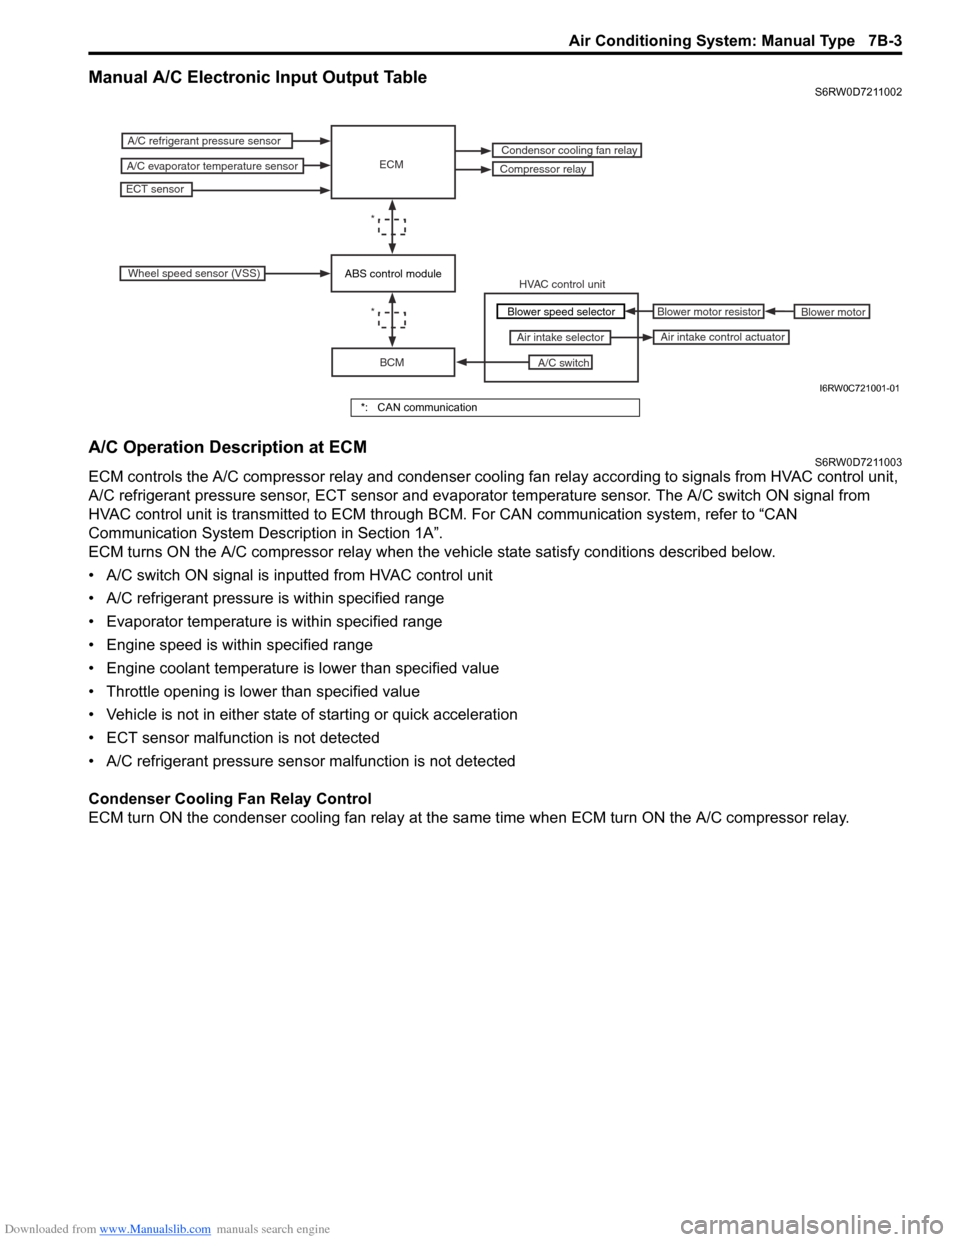
Manual A/C Electronic Input Output TableS6RW0D7211002
A/C Operation Description at ECMS6RW0D7211003
ECM controls the A/C compressor relay and condenser cooling fan relay according to signals from HVAC control unit,
A/C refrigerant pressure sensor, ECT sensor and evaporator temperature sensor. The A/C switch ON signal from
HVAC control unit is transmitted to ECM through BCM. For CAN communication system, refer to “CAN
Communication System Description in Section 1A”.
ECM turns ON the A/C compressor relay when the vehicle state satisfy conditions described below.
• A/C switch ON signal is inputted from HVAC control unit
• A/C refrigerant pressure is within specified range
• Evaporator temperature is within specified range
• Engine speed is within specified range
• Engine coolant temperature is lower than specified value
• Throttle opening is lower than specified value
• Vehicle is not in either state of starting or quick acceleration
• ECT sensor malfunction is not detected
• A/C refrigerant pressure sensor malfunction is not detected
Condenser Cooling Fan Relay Control
ECM turn ON the condenser cooling fan relay at the same time when ECM turn ON the A/C compressor relay.
ECM
BCM
A/C switch Air intake selector
A/C refrigerant pressure sensor
A/C evaporator temperature sensorCompressor relay
ECT sensor
Condensor cooling fan relay
*
Wheel speed sensor (VSS)
HVAC control unit
Blower motor Blower motor resistor
Air intake control actuator
*Blower speed selector
ABS control module
I6RW0C721001-01
*: CAN communication
Page 945 of 1556
![SUZUKI SX4 2006 1.G Service Workshop Manual Downloaded from www.Manualslib.com manuals search engine Air Conditioning System: Manual Type 7B-5
A/C System Wiring DiagramS6RW0D7212002
[A]
7
WHT
GRN5YELBLK
3
G154-3
G154-4
G154-7
G154-8
G154-10
G15 SUZUKI SX4 2006 1.G Service Workshop Manual Downloaded from www.Manualslib.com manuals search engine Air Conditioning System: Manual Type 7B-5
A/C System Wiring DiagramS6RW0D7212002
[A]
7
WHT
GRN5YELBLK
3
G154-3
G154-4
G154-7
G154-8
G154-10
G15](/img/20/7612/w960_7612-944.png)
Downloaded from www.Manualslib.com manuals search engine Air Conditioning System: Manual Type 7B-5
A/C System Wiring DiagramS6RW0D7212002
[A]
7
WHT
GRN5YELBLK
3
G154-3
G154-4
G154-7
G154-8
G154-10
G154-13
G154-5
G154-6
G155-5
G155-2
G155-3
G155-7
G155-6
G155-1
G154-9
G154-14
BLK/WHT
YEL
BLU/WHT
RED
BRN
GRN/WHT
RED/BLK
RED
GRN
GRN/YEL
RED/YEL
RED/BLU
20
21
23 22
BLK/RED
6 2
MBLK/WHTBLK/YEL
M
11
4RED/YEL 1
E01-49
12
E01-16
GRY 13
12V
BLU/WHTE01-3510
E01-48
18
19RED/BLK
BLK/RED
BLK/RED
BRN/WHTE01-60
E01-1
E01-29BLK/WHT
M
BLU/YELBLK/YEL
5V5V 5V
WHT/BLK
9
ORN
14E01-36
C01-12C01-14GRY/REDRED/BLU
E01-41
RED/BLK
RED
WHT
8
BLK
BLK/ORN
BLU IG1
IG2
5V
17
28
29
31
2726 2524
16
16
30
34
33E01-4 E01-19WHTRED
C01-50C01-49WHTRED
32
LT GRN
C01-57
C01-2415
GRY/BLU5V
I6RW0C721002-01
[A]: Illumination control model 9. A/C refrigerant pressure
sensor18. Condenser cooling fan relay 27. Illumination light
1. Ignition switch 10. ECM 19. Condenser cooling fan motor 28. Rear defogger relay
2. Blower motor 11. Air intake control actuator 20. Blower speed selector 29. Rear defogger
3. HVAC control unit 12. Compressor relay 21. A/C switch 30. Main relay
4. Lighting switch 13. Compressor 22. Air intake selector 31. Tail light
5. Blower motor relay 14. Evaporator temperature
sensor23. Rear defogger switch 32. TCM
6. Blower motor resistor 15. ECT sensor 24. “A/C” indicator light 33. To other control module and DLC
7. Junction block assembly 16. To BCM 25. “REC” indicator light 34. ABS control module
8. BCM 17. Main fuse box 26. Rear defogger indicator