fuse diagram SUZUKI SX4 2006 1.G Service Owner's Guide
[x] Cancel search | Manufacturer: SUZUKI, Model Year: 2006, Model line: SX4, Model: SUZUKI SX4 2006 1.GPages: 1556, PDF Size: 37.31 MB
Page 261 of 1556
Downloaded from www.Manualslib.com manuals search engine Engine General Information and Diagnosis: 1A-211
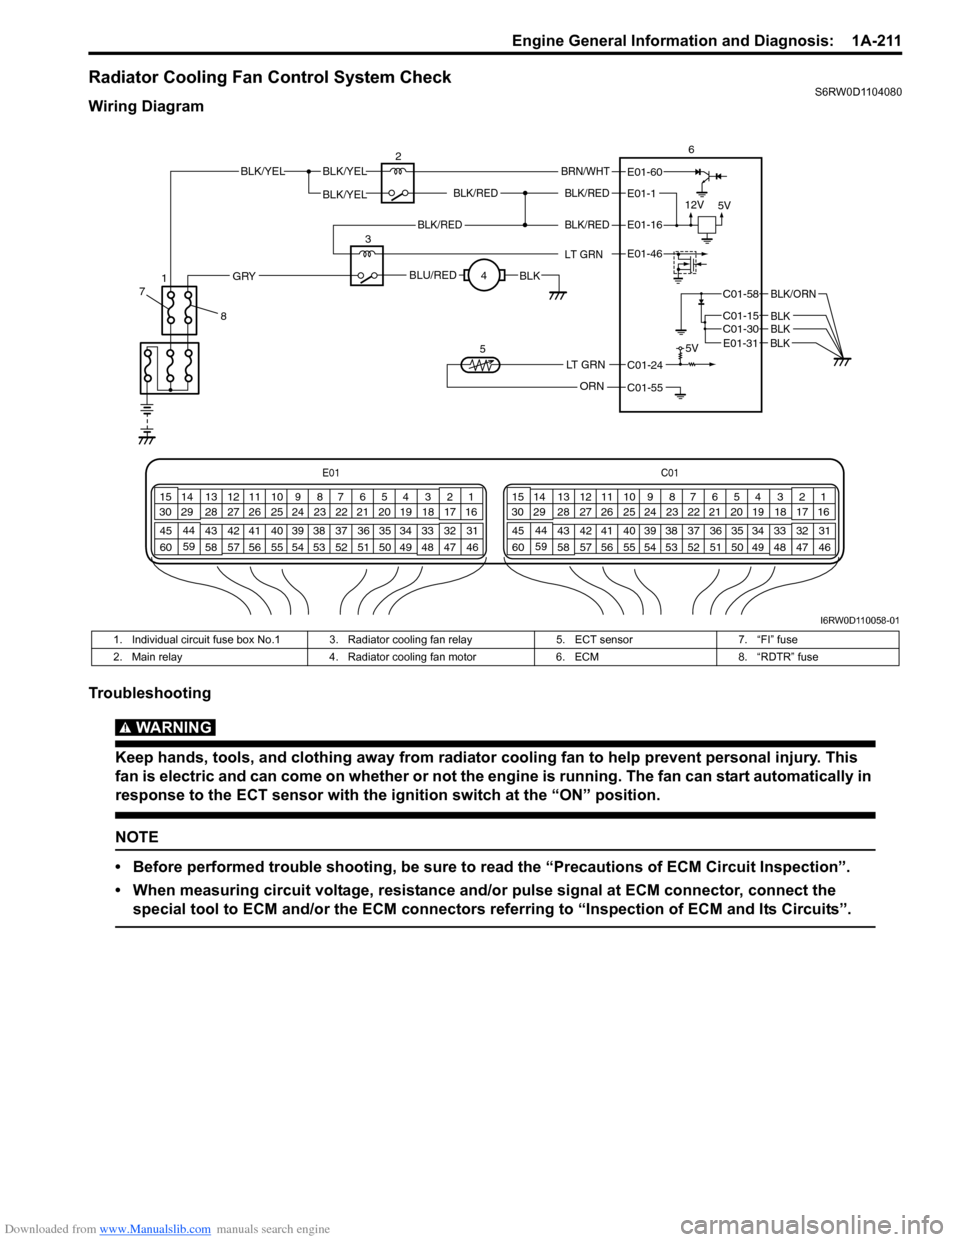
Radiator Cooling Fan Control System CheckS6RW0D1104080
Wiring Diagram
Troubleshooting
WARNING!
Keep hands, tools, and clothing away from radiator cooling fan to help prevent personal injury. This
fan is electric and can come on whether or not the engine is running. The fan can start automatically in
response to the ECT sensor with the ignition switch at the “ON” position.
NOTE
• Before performed trouble shooting, be sure to read the “Precautions of ECM Circuit Inspection”.
• When measuring circuit voltage, resistance and/or pulse signal at ECM connector, connect the
special tool to ECM and/or the ECM connectors referring to “Inspection of ECM and Its Circuits”.
E01C01
3 4
18 19 5 6 7 10 11
17 20
47 46 49 50 51 21 22
5216 259
24 14
29
55 57 54 53 59
60 582
26 27 28 15
30
56 4832 31 34 35 36 37 40 42 39 38 44
45 43 41 331 12 13
238 3 4
18 19 5 6 7 10 11
17 20
47 46 49 50 51 21 22
5216 259
24 14
29
55 57 54 53 59
60 582
26 27 28 15
30
56 4832 31 34 35 36 37 40 42 39 38 44
45 43 41 331 12 13
238
BLK/REDBLK/RED
BLK/YELBLK/YEL
BLK/YEL
BRN/WHT
12V
5V5V
26
E01-1
E01-60
C01-58
C01-15 C01-30
BLK/ORN
BLKBLK
BLK/RED
LT GRN
BLK/REDE01-16
E01-46
BLU/REDBLKGRY
LT GRN
ORN
C01-24
C01-55 3
4
5
E01-31 BLK
8 71
I6RW0D110058-01
1. Individual circuit fuse box No.1 3. Radiator cooling fan relay 5. ECT sensor 7. “FI” fuse
2. Main relay 4. Radiator cooling fan motor 6. ECM 8. “RDTR” fuse
Page 397 of 1556
Downloaded from www.Manualslib.com manuals search engine Ignition System: 1H-2
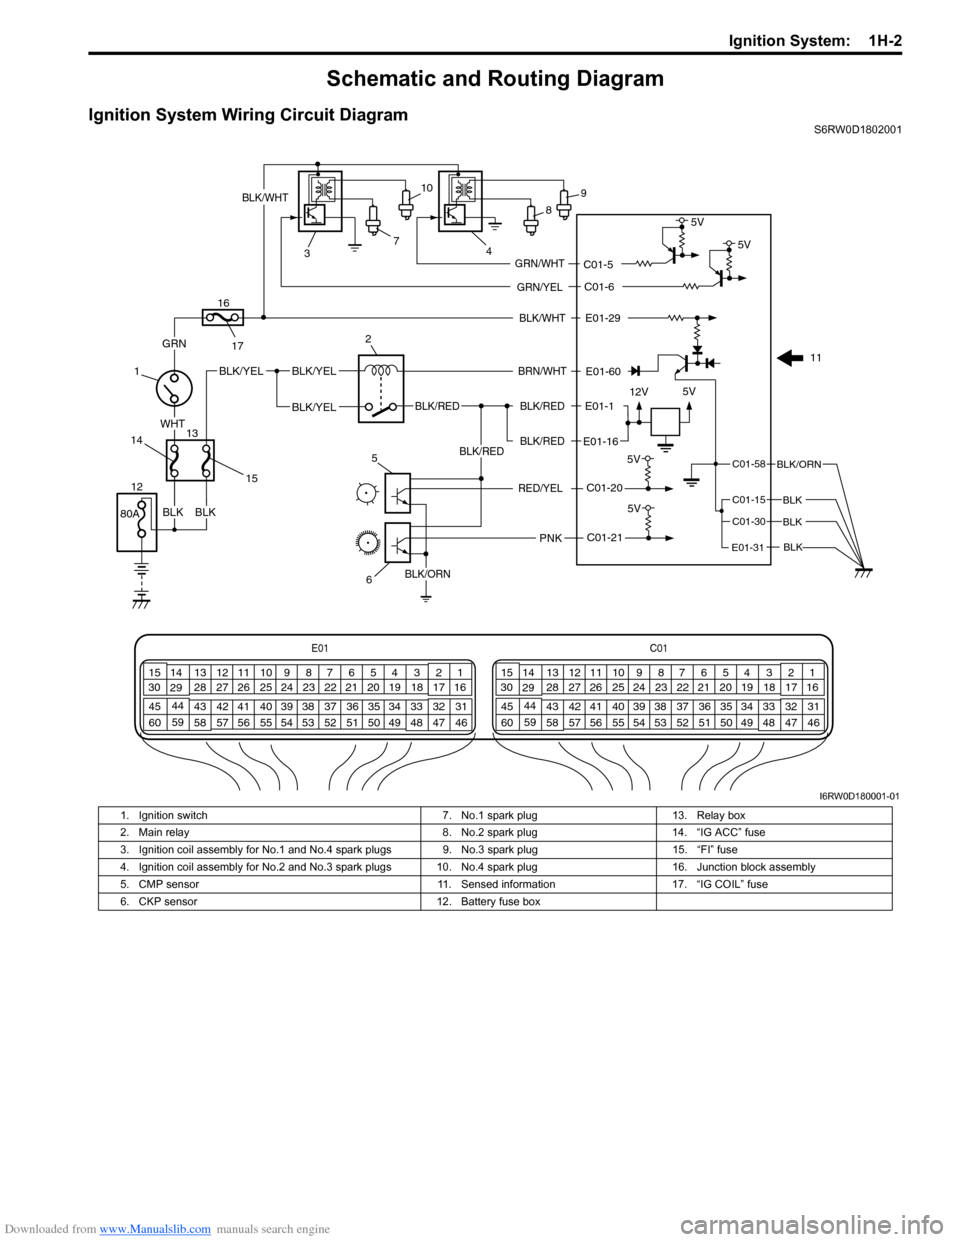
Schematic and Routing Diagram
Ignition System Wiring Circuit DiagramS6RW0D1802001
E01-60
E01-29
12V5V
5V
E01-1
E01-16
BLK/WHT
BLK/RED
BLK/RED
BLK/RED
80A
BLK/YELBLK/YEL
BLK/YEL
GRN
BLK
WHT
BRN/WHT
BLK/ORN
BLK
BLK
BLK
C01-20
BLK/RED
PNK
BLK/ORN
5V
C01-21
BLK/WHT
7
34
1
125
6 2
11 89 10
GRN/YEL
GRN/WHT
C01-6
C01-55V
5V
RED/YEL
C01-58
C01-15
C01-30
E01-31
E01C01
3 4
18 19 5 6 7 10 11
17 20
47 46 49 50 51 21 22
5216 259
24 14
29
55 57 54 53 59
60 582
26 27 28 15
30
56 4832 31 34 35 36 37 40 42 39 38 44
45 43 41 331 12 13
238 3 4
18 19 5 6 7 10 11
17 20
47 46 49 50 51 21 22
5216 259
24 14
29
55 57 54 53 59
60 582
26 27 28 15
30
56 4832 31 34 35 36 37 40 42 39 38 44
45 43 41 331 12 13
238
13
14
15
16
17
BLK
I6RW0D180001-01
1. Ignition switch 7. No.1 spark plug 13. Relay box
2. Main relay 8. No.2 spark plug 14. “IG ACC” fuse
3. Ignition coil assembly for No.1 and No.4 spark plugs 9. No.3 spark plug 15. “FI” fuse
4. Ignition coil assembly for No.2 and No.3 spark plugs 10. No.4 spark plug 16. Junction block assembly
5. CMP sensor 11. Sensed information 17. “IG COIL” fuse
6. CKP sensor 12. Battery fuse box
Page 502 of 1556
Downloaded from www.Manualslib.com manuals search engine 3B-5 Differential:
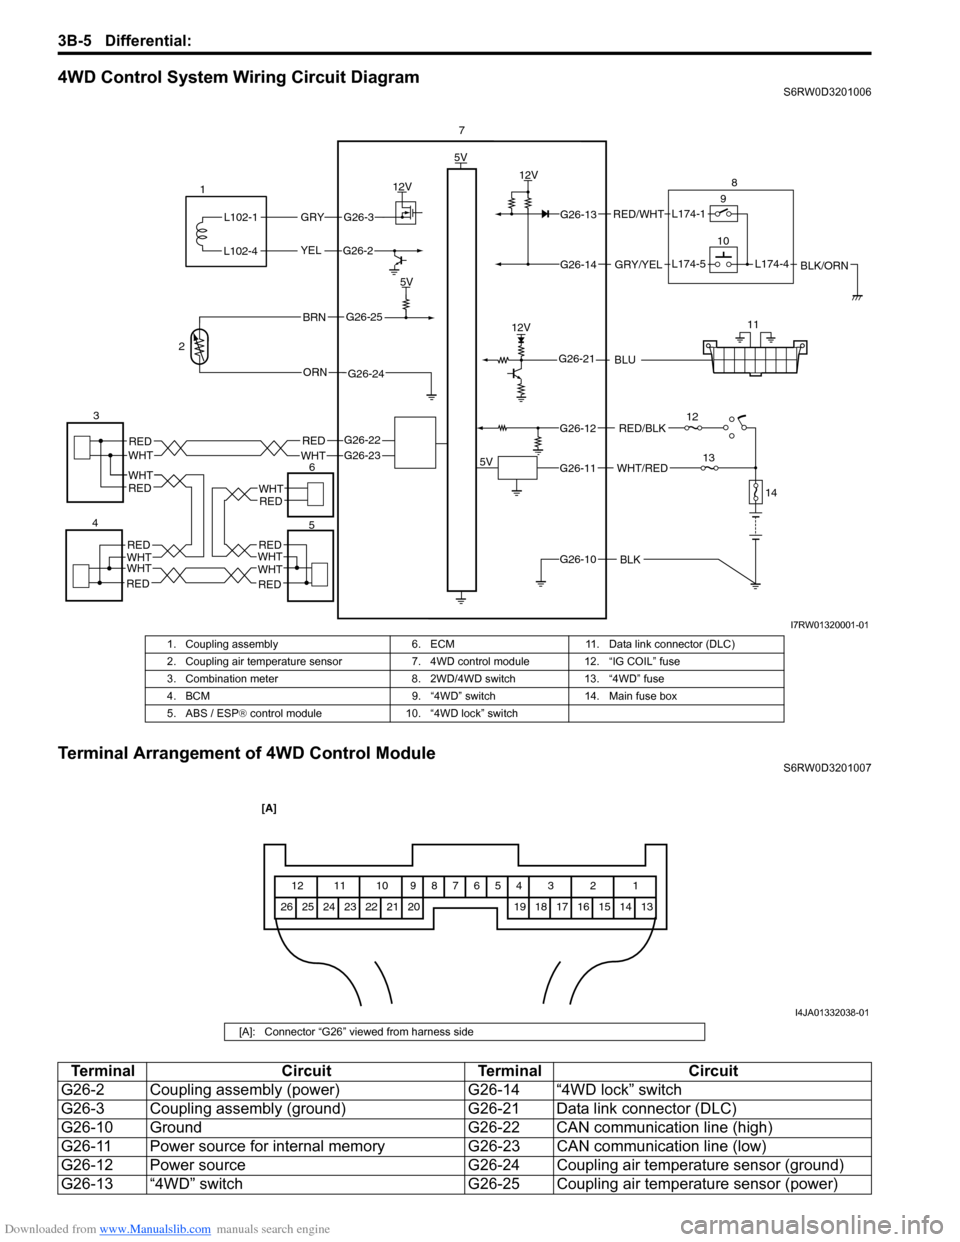
4WD Control System Wiring Circuit DiagramS6RW0D3201006
Terminal Arrangement of 4WD Control ModuleS6RW0D3201007
5V
5V
12V
G26-3
YEL
GRY
G26-2
G26-22G26-23REDWHT
G26-13
G26-14
G26-12
G26-11
G26-10BLK
WHT/RED
RED/BLK
GRY/YEL
RED/WHT
12V
L102-1
L102-4
1
37
9
10
12
13
14
12V
G26-21BLU
G26-25
G26-24ORN
BRN
5V
28
11
WHT
WHT
WHTWHTWHTWHT
WHT
RED
RED
RED
REDRED
RED
RED
46
5
L174-4BLK/ORNL174-5L174-1
I7RW01320001-01
1. Coupling assembly 6. ECM 11. Data link connector (DLC)
2. Coupling air temperature sensor 7. 4WD control module 12. “IG COIL” fuse
3. Combination meter 8. 2WD/4WD switch 13. “4WD” fuse
4. BCM 9. “4WD” switch 14. Main fuse box
5. ABS / ESP® control module 10. “4WD lock” switch
1 2 3 4 5 6 7 8 9 10 11 12
13 14 15 16 17 18 19 20 21 22 23 24 25 26
[A]
I4JA01332038-01
[A]: Connector “G26” viewed from harness side
Te r m i n a l C i r c u i t Te r m i n a l C i r c u i t
G26-2 Coupling assembly (power) G26-14 “4WD lock” switch
G26-3 Coupling assembly (ground) G26-21 Data link connector (DLC)
G26-10 Ground G26-22 CAN communication line (high)
G26-11 Power source for internal memory G26-23 CAN communication line (low)
G26-12 Power source G26-24 Coupling air temperature sensor (ground)
G26-13 “4WD” switch G26-25 Coupling air temperature sensor (power)
Page 512 of 1556
Downloaded from www.Manualslib.com manuals search engine 3B-15 Differential:
4WD Position Indicator Does Not Come ON at Ignition Switch ON but Engine StopsS6RW0D3204013
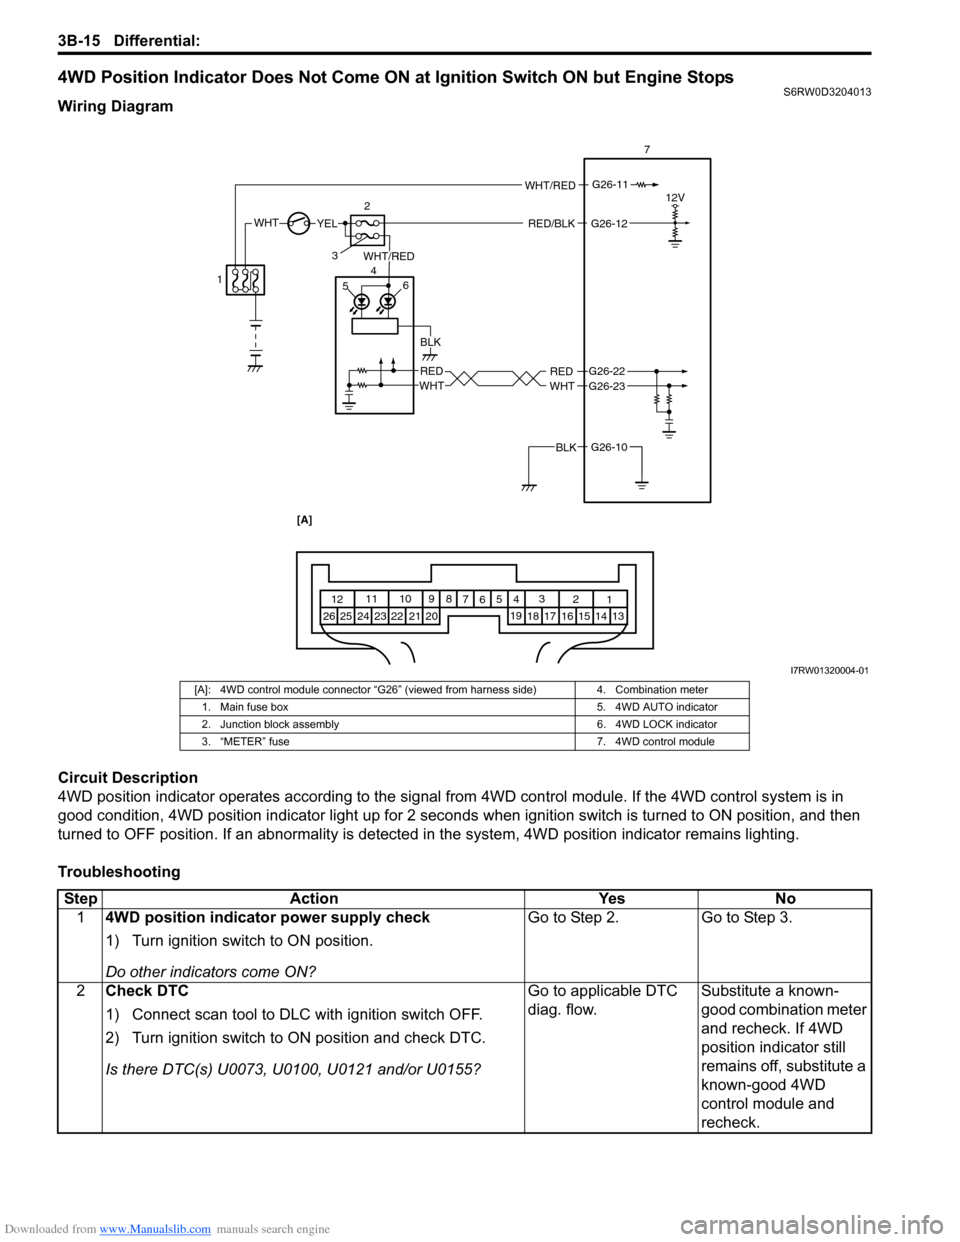
Wiring Diagram
Circuit Description
4WD position indicator operates according to the signal from 4WD control module. If the 4WD control system is in
good condition, 4WD position indicator light up for 2 seconds when ignition switch is turned to ON position, and then
turned to OFF position. If an abnormality is detected in the system, 4WD position indicator remains lighting.
Troubleshooting
WHTYELRED/BLK
12
WHT/RED
WHT/RED
G26-12
G26-11
RED
BLK
WHT 56 47
12V
G26-10BLK
G26-22
G26-23REDWHT
3
1 2 3
4 5
6 7 8 9 10 11
12
13
14 15 16
17 18 19
20
21 22
23
24 25 26
[A]
I7RW01320004-01
[A]: 4WD control module connector “G26” (viewed from harness side) 4. Combination meter
1. Main fuse box 5. 4WD AUTO indicator
2. Junction block assembly 6. 4WD LOCK indicator
3. “METER” fuse 7. 4WD control module
Step Action Yes No
14WD position indicator power supply check
1) Turn ignition switch to ON position.
Do other indicators come ON?Go to Step 2. Go to Step 3.
2Check DTC
1) Connect scan tool to DLC with ignition switch OFF.
2) Turn ignition switch to ON position and check DTC.
Is there DTC(s) U0073, U0100, U0121 and/or U0155?Go to applicable DTC
diag. flow.Substitute a known-
good combination meter
and recheck. If 4WD
position indicator still
remains off, substitute a
known-good 4WD
control module and
recheck.
Page 513 of 1556
Downloaded from www.Manualslib.com manuals search engine Differential: 3B-16
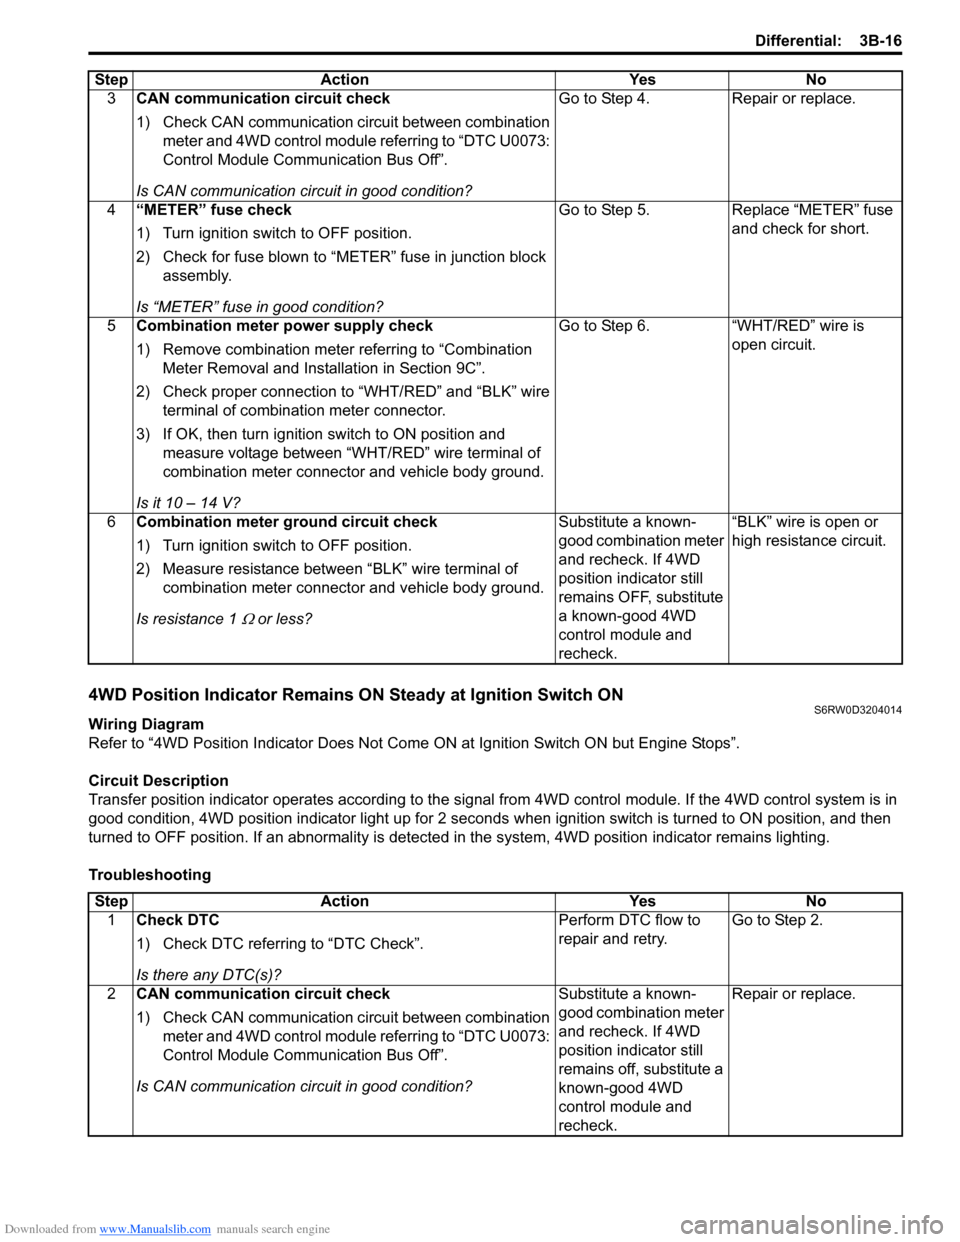
4WD Position Indicator Remains ON Steady at Ignition Switch ONS6RW0D3204014
Wiring Diagram
Refer to “4WD Position Indicator Does Not Come ON at Ignition Switch ON but Engine Stops”.
Circuit Description
Transfer position indicator operates according to the signal from 4WD control module. If the 4WD control system is in
good condition, 4WD position indicator light up for 2 seconds when ignition switch is turned to ON position, and then
turned to OFF position. If an abnormality is detected in the system, 4WD position indicator remains lighting.
Troubleshooting3CAN communication circuit check
1) Check CAN communication circuit between combination
meter and 4WD control module referring to “DTC U0073:
Control Module Communication Bus Off”.
Is CAN communication circuit in good condition?Go to Step 4. Repair or replace.
4“METER” fuse check
1) Turn ignition switch to OFF position.
2) Check for fuse blown to “METER” fuse in junction block
assembly.
Is “METER” fuse in good condition?Go to Step 5. Replace “METER” fuse
and check for short.
5Combination meter power supply check
1) Remove combination meter referring to “Combination
Meter Removal and Installation in Section 9C”.
2) Check proper connection to “WHT/RED” and “BLK” wire
terminal of combination meter connector.
3) If OK, then turn ignition switch to ON position and
measure voltage between “WHT/RED” wire terminal of
combination meter connector and vehicle body ground.
Is it 10 – 14 V?Go to Step 6. “WHT/RED” wire is
open circuit.
6Combination meter ground circuit check
1) Turn ignition switch to OFF position.
2) Measure resistance between “BLK” wire terminal of
combination meter connector and vehicle body ground.
Is resistance 1
Ω or less?Substitute a known-
good combination meter
and recheck. If 4WD
position indicator still
remains OFF, substitute
a known-good 4WD
control module and
recheck.“BLK” wire is open or
high resistance circuit. Step Action Yes No
Step Action Yes No
1Check DTC
1) Check DTC referring to “DTC Check”.
Is there any DTC(s)?Perform DTC flow to
repair and retry.Go to Step 2.
2CAN communication circuit check
1) Check CAN communication circuit between combination
meter and 4WD control module referring to “DTC U0073:
Control Module Communication Bus Off”.
Is CAN communication circuit in good condition?Substitute a known-
good combination meter
and recheck. If 4WD
position indicator still
remains off, substitute a
known-good 4WD
control module and
recheck.Repair or replace.
Page 514 of 1556
Downloaded from www.Manualslib.com manuals search engine 3B-17 Differential:
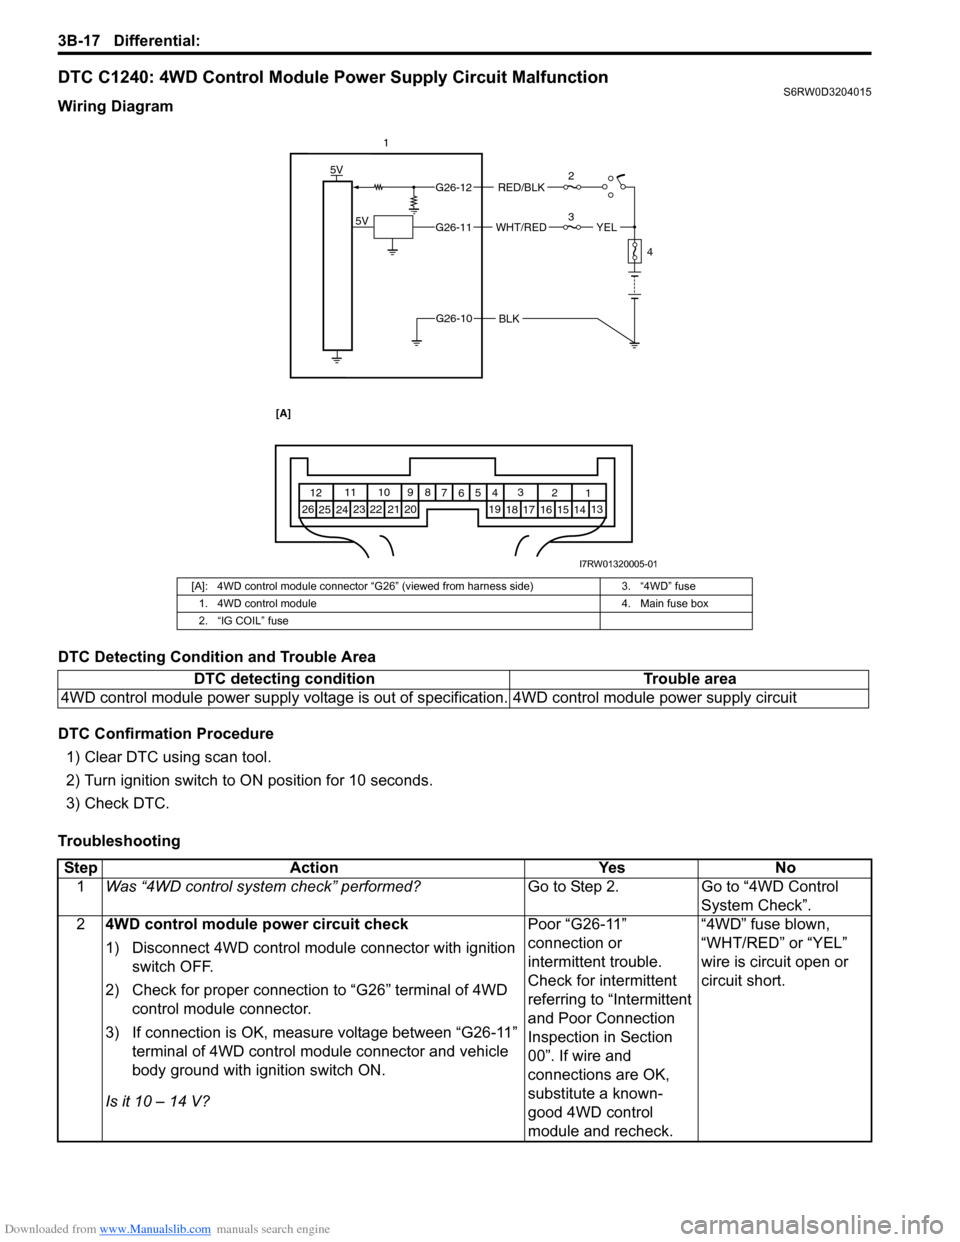
DTC C1240: 4WD Control Module Power Supply Circuit MalfunctionS6RW0D3204015
Wiring Diagram
DTC Detecting Condition and Trouble Area
DTC Confirmation Procedure
1) Clear DTC using scan tool.
2) Turn ignition switch to ON position for 10 seconds.
3) Check DTC.
Troubleshooting
[A]: 4WD control module connector “G26” (viewed from harness side) 3. “4WD” fuse
1. 4WD control module 4. Main fuse box
2. “IG COIL” fuse
DTC detecting condition Trouble area
4WD control module power supply voltage is out of specification. 4WD control module power supply circuit
5V
5V
G26-12
G26-11
G26-10BLK
WHT/RED
RED/BLK
1
2
3
4
YEL
1 2 3
4 5
6 7 8 9 10 11
12
13
14 15 16
17 18 19
20
21 22
23
24 25 26
[A]
I7RW01320005-01
Step Action Yes No
1Was “4WD control system check” performed?Go to Step 2. Go to “4WD Control
System Check”.
24WD control module power circuit check
1) Disconnect 4WD control module connector with ignition
switch OFF.
2) Check for proper connection to “G26” terminal of 4WD
control module connector.
3) If connection is OK, measure voltage between “G26-11”
terminal of 4WD control module connector and vehicle
body ground with ignition switch ON.
Is it 10 – 14 V?Poor “G26-11”
connection or
intermittent trouble.
Check for intermittent
referring to “Intermittent
and Poor Connection
Inspection in Section
00”. If wire and
connections are OK,
substitute a known-
good 4WD control
module and recheck.“4WD” fuse blown,
“WHT/RED” or “YEL”
wire is circuit open or
circuit short.
Page 625 of 1556

Downloaded from www.Manualslib.com manuals search engine ABS: 4E-20
DTC C1013: Control Module MismatchS6RW0D4504012
Wiring Diagram
DTC Detecting Condition and Trouble Area
NOTE
When ABS hydraulic unit / control module assembly for 4WD model is installed to 2WD model, this
DTC is set. Replace to the correct ABS hydraulic unit / control module assembly.
Troubleshooting
WHTGRN
123
4
E08-3 E08-6GRN/BLKGRN/YELGRN/ORN
12V
E08-9GRN/ORN
56[A]E08
1
2
3
4
5
6
7 12
13
14
15
16
17
18
19
20
21
228
9
10
11
23
24
25
26
I7RW01450005-04
[A]: ABS control module connector (viewed from terminal side) 3. Ignition switch 6. ABS hydraulic unit / control module assembly
1. Battery 4. Junction block assembly
2. Main fuse box 5. G sensor (4WD model)
DTC Detecting Condition Trouble Area
Abnormal signal is inputted to a no-used terminal of
control module while running or wrong ABS control
module is installed.• ABS control module
Step Action Yes No
1 1) Disconnect ABS hydraulic unit / control module
connector with ignition switch turned OFF.
2) Turn ignition switch to ON position.
3) Measure voltage between terminal of “E08-6” and
vehicle body ground.
Is it 0.3 V or more?“GRN/YEL” wire short to
power source circuit.Substitute a known-
good ABS hydraulic unit
/ control module
assembly and recheck.
Page 627 of 1556
Downloaded from www.Manualslib.com manuals search engine ABS: 4E-22
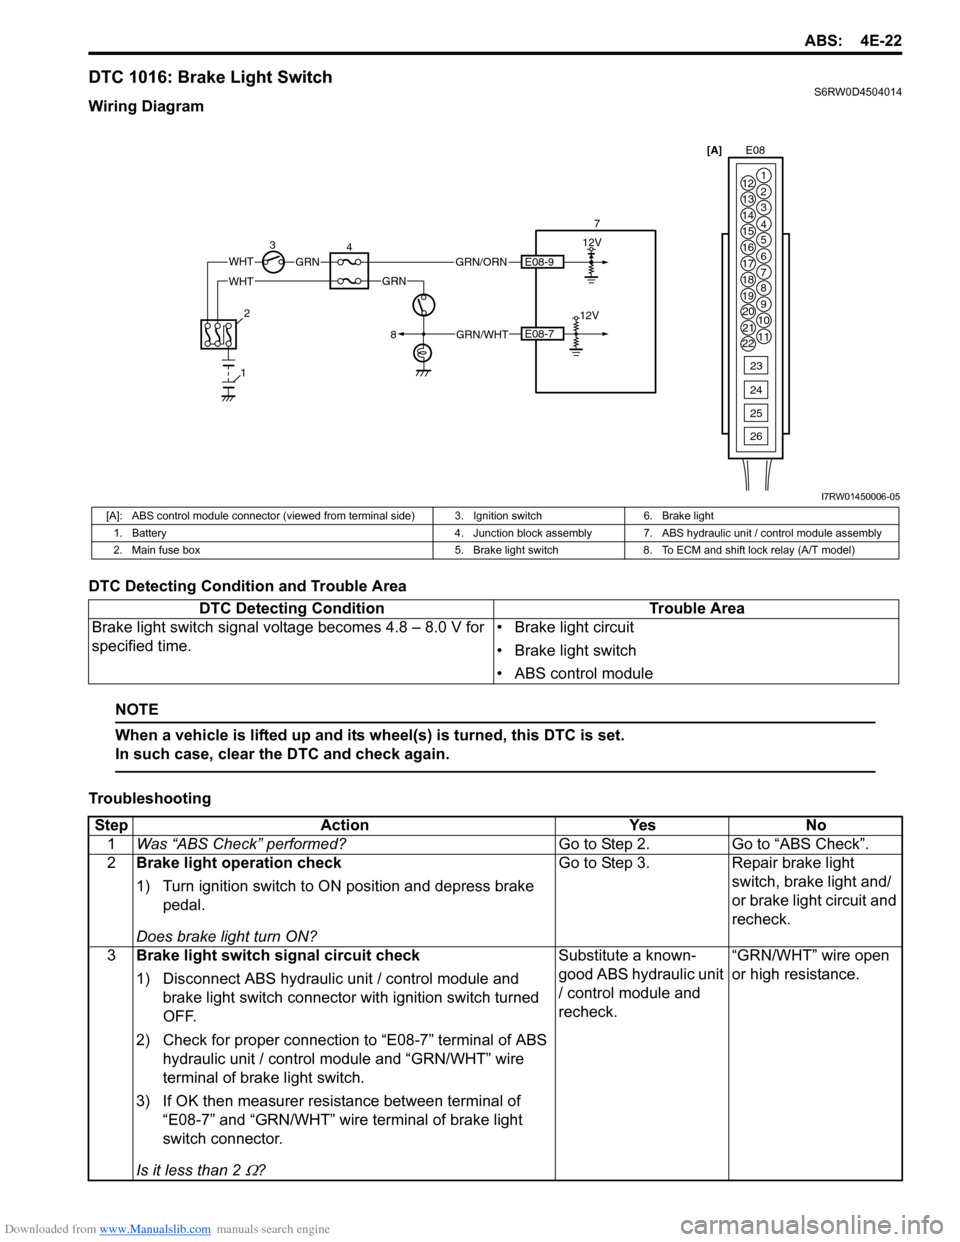
DTC 1016: Brake Light SwitchS6RW0D4504014
Wiring Diagram
DTC Detecting Condition and Trouble Area
NOTE
When a vehicle is lifted up and its wheel(s) is turned, this DTC is set.
In such case, clear the DTC and check again.
Troubleshooting
WHTGRN
34 712V
E08-7
E08-9GRN/ORN
2
8
112V
GRN/WHT
WHTGRN[A]E08
1
2
3
4
5
6
7 12
13
14
15
16
17
18
19
20
21
228
9
10
11
23
24
25
26
I7RW01450006-05
[A]: ABS control module connector (viewed from terminal side) 3. Ignition switch 6. Brake light
1. Battery 4. Junction block assembly 7. ABS hydraulic unit / control module assembly
2. Main fuse box 5. Brake light switch 8. To ECM and shift lock relay (A/T model)
DTC Detecting Condition Trouble Area
Brake light switch signal voltage becomes 4.8 – 8.0 V for
specified time.• Brake light circuit
• Brake light switch
• ABS control module
Step Action Yes No
1Was “ABS Check” performed?Go to Step 2. Go to “ABS Check”.
2Brake light operation check
1) Turn ignition switch to ON position and depress brake
pedal.
Does brake light turn ON?Go to Step 3. Repair brake light
switch, brake light and/
or brake light circuit and
recheck.
3Brake light switch signal circuit check
1) Disconnect ABS hydraulic unit / control module and
brake light switch connector with ignition switch turned
OFF.
2) Check for proper connection to “E08-7” terminal of ABS
hydraulic unit / control module and “GRN/WHT” wire
terminal of brake light switch.
3) If OK then measurer resistance between terminal of
“E08-7” and “GRN/WHT” wire terminal of brake light
switch connector.
Is it less than 2
Ω?Substitute a known-
good ABS hydraulic unit
/ control module and
recheck.“GRN/WHT” wire open
or high resistance.
Page 628 of 1556
Downloaded from www.Manualslib.com manuals search engine 4E-23 ABS:
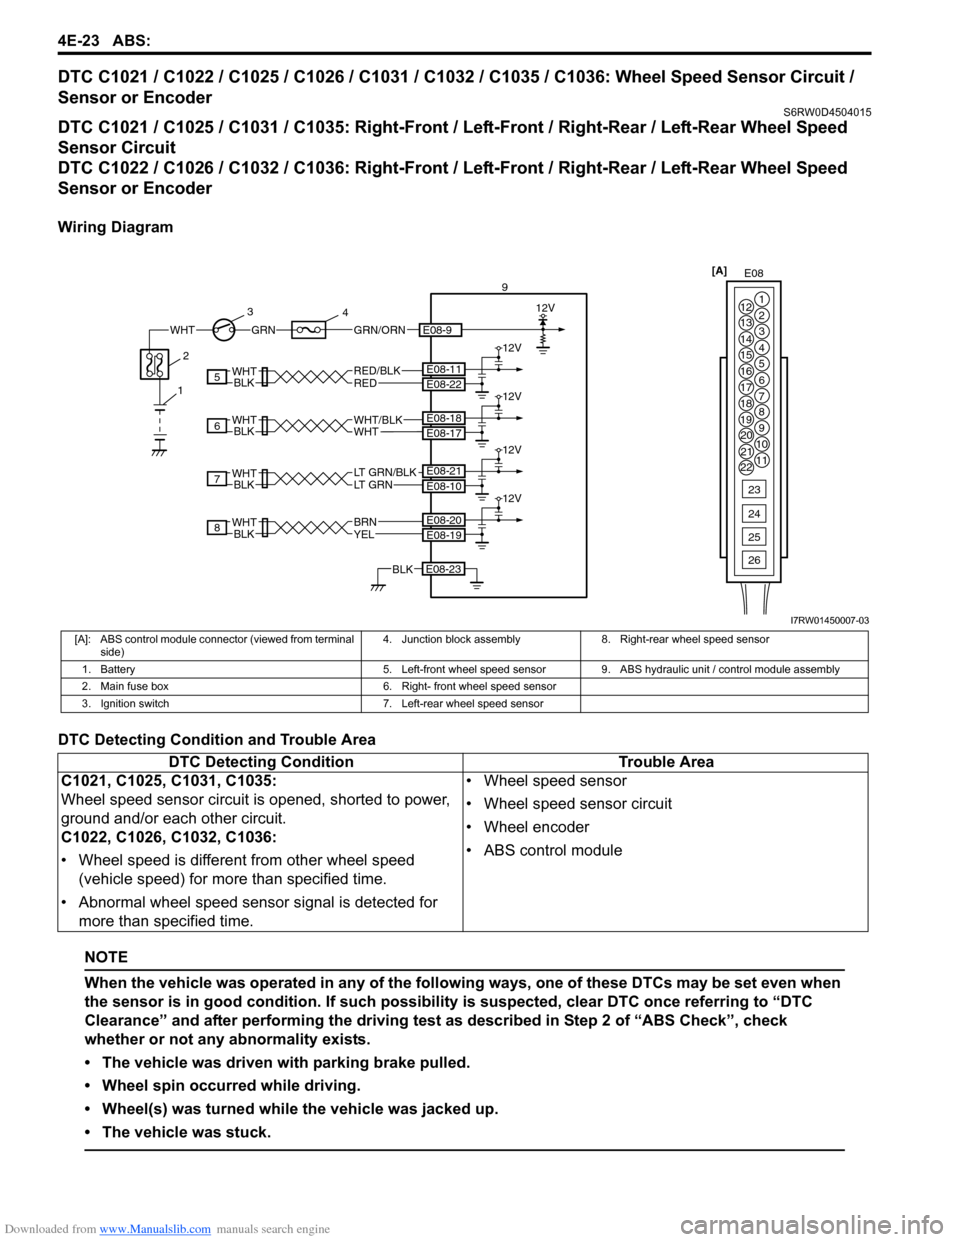
DTC C1021 / C1022 / C1025 / C1026 / C1031 / C1032 / C1035 / C1036: Wheel Speed Sensor Circuit /
Sensor or Encoder
S6RW0D4504015
DTC C1021 / C1025 / C1031 / C1035: Right-Front / Left-Front / Right-Rear / Left-Rear Wheel Speed
Sensor Circuit
DTC C1022 / C1026 / C1032 / C1036: Right-Front / Left-Front / Right-Rear / Left-Rear Wheel Speed
Sensor or Encoder
Wiring Diagram
DTC Detecting Condition and Trouble Area
NOTE
When the vehicle was operated in any of the following ways, one of these DTCs may be set even when
the sensor is in good condition. If such possibility is suspected, clear DTC once referring to “DTC
Clearance” and after performing the driving test as described in Step 2 of “ABS Check”, check
whether or not any abnormality exists.
• The vehicle was driven with parking brake pulled.
• Wheel spin occurred while driving.
• Wheel(s) was turned while the vehicle was jacked up.
• The vehicle was stuck.
E08 [A]
1
2
3
4
5
6
7 12
13
14
15
16
17
18
19
20
21
228
9
10
11
23
24
25
26
WHTGRNGRN/ORN
3
4
E08-9
9
12V
8
7
6
5
BLKWHT
BLKWHT
REDRED/BLK
LT GRN/BLKLT GRN
E08-22 E08-11
E08-10 E08-21
E08-23BLK
12V
12V
12V
12V
BLKWHT
BLKWHTWHTWHT/BLK
E08-17 E08-18
YELBRN
E08-19 E08-20
12
I7RW01450007-03
[A]: ABS control module connector (viewed from terminal
side)4. Junction block assembly 8. Right-rear wheel speed sensor
1. Battery 5. Left-front wheel speed sensor 9. ABS hydraulic unit / control module assembly
2. Main fuse box 6. Right- front wheel speed sensor
3. Ignition switch 7. Left-rear wheel speed sensor
DTC Detecting Condition Trouble Area
C1021, C1025, C1031, C1035:
Wheel speed sensor circuit is opened, shorted to power,
ground and/or each other circuit.
C1022, C1026, C1032, C1036:
• Wheel speed is different from other wheel speed
(vehicle speed) for more than specified time.
• Abnormal wheel speed sensor signal is detected for
more than specified time.• Wheel speed sensor
• Wheel speed sensor circuit
• Wheel encoder
• ABS control module
Page 631 of 1556

Downloaded from www.Manualslib.com manuals search engine ABS: 4E-26
DTC C1041 / C1042 / C1045 / C1046 / C1051 / C1052 / C1055 / C1056: Inlet / Outlet SolenoidS6RW0D4504017
DTC C1041 / C1045 / C1051 / C1055: Right-Front / Left-Front / Right-Rear / Left- Rear Inlet Solenoid
DTC C1042 / C1046 / C1052 / C1056: Right-Front / Left-Front / Right-Rear / Left- Rear Outlet Solenoid
Wiring Diagram
DTC Detecting Condition and Trouble Area
DTC Troubleshooting
WHT/BLU
1 2
5
3
BLK
E08-24
E08-23
6 4
E08 [A]
1
2
3
4
5
6
7 12
13
14
15
16
17
18
19
20
21
228
9
10
11
23
24
25
26
I7RW01450008-02
[A]: ABS control module assembly connector (viewed from terminal side) 4. ABS hydraulic unit / control module assembly
1. Battery5. Solenoid valve power supply driver (transistor)
2. Main fuse box6. Solenoid valve driver
3. Solenoid valve
DTC Detecting Condition Trouble Area
DTC C1041, C1042, C1045, C1046, C1051, C1052,
C1055, C1056:
• Solenoid valve circuit is opened, shorted to power,
ground and/or each valve in ABS hydraulic unit / control
module assembly.
• Mismatching solenoid output and solenoid monitor is
detected.• ABS control module
Step Action Yes No
1Was “ABS Check” performed?Go to Step 2. Go to “ABS Check”.
2ABS hydraulic unit / control module power source
circuit check
1) Turn ignition switch to OFF position.
2) Disconnect ABS hydraulic unit / control module
connector.
3) Check for proper connection to ABS hydraulic unit /
control module connector at terminal “E08-24” and “E08-
23”.
4) If OK, then measure voltage between terminal “E08-24”
of module connector and “E08-23”.
Is it 10 – 14 V?Substitute a known-
good ABS hydraulic unit
/ control module
assembly and recheck.“WHT/BLU” or “BLK”
circuit open or high
resistance.