display SUZUKI SX4 2006 1.G Service Repair Manual
[x] Cancel search | Manufacturer: SUZUKI, Model Year: 2006, Model line: SX4, Model: SUZUKI SX4 2006 1.GPages: 1556, PDF Size: 37.31 MB
Page 693 of 1556

Downloaded from www.Manualslib.com manuals search engine Automatic Transmission/Transaxle: 5A-45
DTC Confirmation Procedure
WARNING!
• When performing a road test, select a place where there is no traffic or possibility of a traffic
accident and be very careful during testing to avoid occurrence of an accident.
• Road test should be carried out with 2 persons, a driver and a tester, on a level road.
1) Connect scan tool to DLC with ignition switch OFF.
2) Clear DTCs in TCM memory by using scan tool.
3) Start engine and shift select lever to “D” range.
4) Start vehicle and increase vehicle speed to 40 km/h (25 mile/h) or more for 1 minutes.
5) Stop vehicle and turn ignition switch OFF.
6) Repeat Step 3) to 4) one time.
7) Stop vehicle and check DTC.
DTC Troubleshooting
Step Action Yes No
1Was “A/T System Check” performed?Go to Step 2. Go to “A/T System
Check”.
2Do you have SUZUKI scan tool?Go to Step 3. Go to Step 4.
3Check transmission range sensor circuit for operation
Check by using SUZUKI scan tool:
1) Connect SUZUKI scan tool to DLC with ignition switch
OFF.
2) Turn ignition switch ON and check transmission range
signal (P, R, N, D, 2 or L) on display when shifting select
lever to each range.
Is applicable range indicated?Intermittent trouble.
Check for intermittent
referring to “Intermittent
and Poor Connection
Inspection in Section
00”.Go to Step 5.
4Check transmission range sensor circuit for operation
Check by not using SUZUKI scan tool:
1) Turn ignition switch ON.
2) Check voltage at terminals “C07-1”, “C07-7”, “C07-8”,
“C07-18”, “C07-19” and “C07-20” respectively with
select lever shifted to each range.
Taking terminal “C07-19” as an example, is battery
voltage indicated only when select lever is shifted to “2”
range and 0 V for other ranges as shown in the following
table.
Check voltage at other terminals likewise, referring to the
following table.
Are check results satisfactory?Intermittent trouble.
Check for intermittent
referring to “Intermittent
and Poor Connection
Inspection in Section
00”.Go to Step 5.
5 1) Check select cable for adjustment referring to “Select
Cable Adjustment”.
Is it adjusted correctly?Go to Step 6. Adjust.
6Check transmission range sensor for installation
position
1) Shift select lever to “N” range.
2) Check that “N” reference line on sensor and needle
direction shaped on lock washer are aligned.
Are they aligned?Go to Step 7. Adjust.
Page 717 of 1556

Downloaded from www.Manualslib.com manuals search engine Automatic Transmission/Transaxle: 5A-69
DTC Troubleshooting
DTC P1878: Torque Converter Clutch ShudderS6RW0D5104041
DTC Detecting Condition and Trouble Area
DTC Confirmation Procedure
WARNING!
• When performing a road test, select a place where there is no traffic or possibility of a traffic
accident and be very careful during testing to avoid occurrence of an accident.
• Road test should be carried out with 2 persons, a driver and tester, on a level road.
1) Connect scan tool to DLC with ignition switch OFF.
2) Clear DTCs in TCM and ECM memories by using scan tool.
3) Start engine and warm it up to normal operating temperature.
4) Drive vehicle with 3rd or 4th gear in “D” range and slip controlled lock-up ON for 20 seconds or longer referring to
“Automatic Gear Shift Table”.
5) Stop vehicle.
6) Check DTC, pending DTC and freeze-frame data.
DTC TroubleshootingStep Action Yes No
1Was “A/T System Check” performed?Go to Step 2. Go to “A/T System
Check”.
2“3” position switch circuit for operation
1) Connect SUZUKI scan tool to DLC with ignition switch
OFF.
2) Turn ignition switch ON and check “3” position switch
signal on scan tool data display when shifting select
lever to each range.
Does indicate “3” position switch condition OFF when
shifting select lever to “P”, “R”, “N” and “L” range?Substitute a known-
good TCM and recheck.Go to Step 3.
3“3” position switch signal inspection
With ignition switch ON, check voltage between “C07-9”
terminal of TCM coupler and ground.
“3” position switch specifications
Shift select lever to “3” or “2” range: Battery voltage
Shift select lever to other above range: 0 V
Is the result as specified?Substitute a known-
good BCM and recheck.Go to Step 4.
4Check “3” position switch operation
Is it in good condition?“YEL” wire shorted to
ground.Replace “3” position
switch.
DTC detecting condition Trouble area
The acceleration slip control function stops when the variation in the
output revolution speed of the specified amplitude and specified cycle
is detected within a specified period of time. When the specified
variation is not detected after the acceleration slip control stops.•Mismatching ATF
• Torque converter clutch malfunction
• Valve body
Step Action Yes No
1Was “A/T System Check” performed?Go to Step 2. Go to “A/T System
Check”.
2 Change A/T fluid referring to “A/T Fluid Change”.
Check DTC after performing “DTC Confirmation Procedure”.
Is DTC P1878 still indicated?Faulty torque converter
clutch.
Replace torque
converter.System is in good
condition.
Page 888 of 1556
Downloaded from www.Manualslib.com manuals search engine 6C-8 Power Assisted Steering System:
Step 8: Steering Symptom Diagnosis and P/S
System Symptom Diagnosis
Perform basic steering system check according to
“Steering Symptom Diagnosis in Section 6A” first. When
the end of the flow has been reached, check the parts of
the system suspected as a possible cause referring to
“P/S System Symptom Diagnosis” and based on
symptoms appearing on the vehicle (symptoms obtained
through steps of customer complaint analysis, trouble
symptom confirmation and/or basic P/S system check)
and repair or replace faulty parts, if any.
Step 9: Troubleshooting for DTC (See each DTC
Diag. Flow)
Based on the DTC indicated in Step 6 or 7 and referring
to the applicable DTC diag. flow, locate the cause of the
trouble, namely in a sensor, switch, wire harness,
connector, actuator, P/S control module or other part and
repair or replace faulty parts.
Step 10: Intermittent Problems Check
Check parts where an intermittent trouble is easy to
occur (e.g., wire harness, connector, etc.), referring to
“Intermittent and Poor Connection Inspection in Section
00” and related circuit of DTC recorded in Step 2.
Step 11: Final Confirmation Test
Confirm that the problem symptom has gone and the P/
S system is free from any abnormal conditions. If what
has been repaired is related to the DTC, clear the DTC
once, perform DTC confirmation procedure and confirm
that no DTC is indicated.
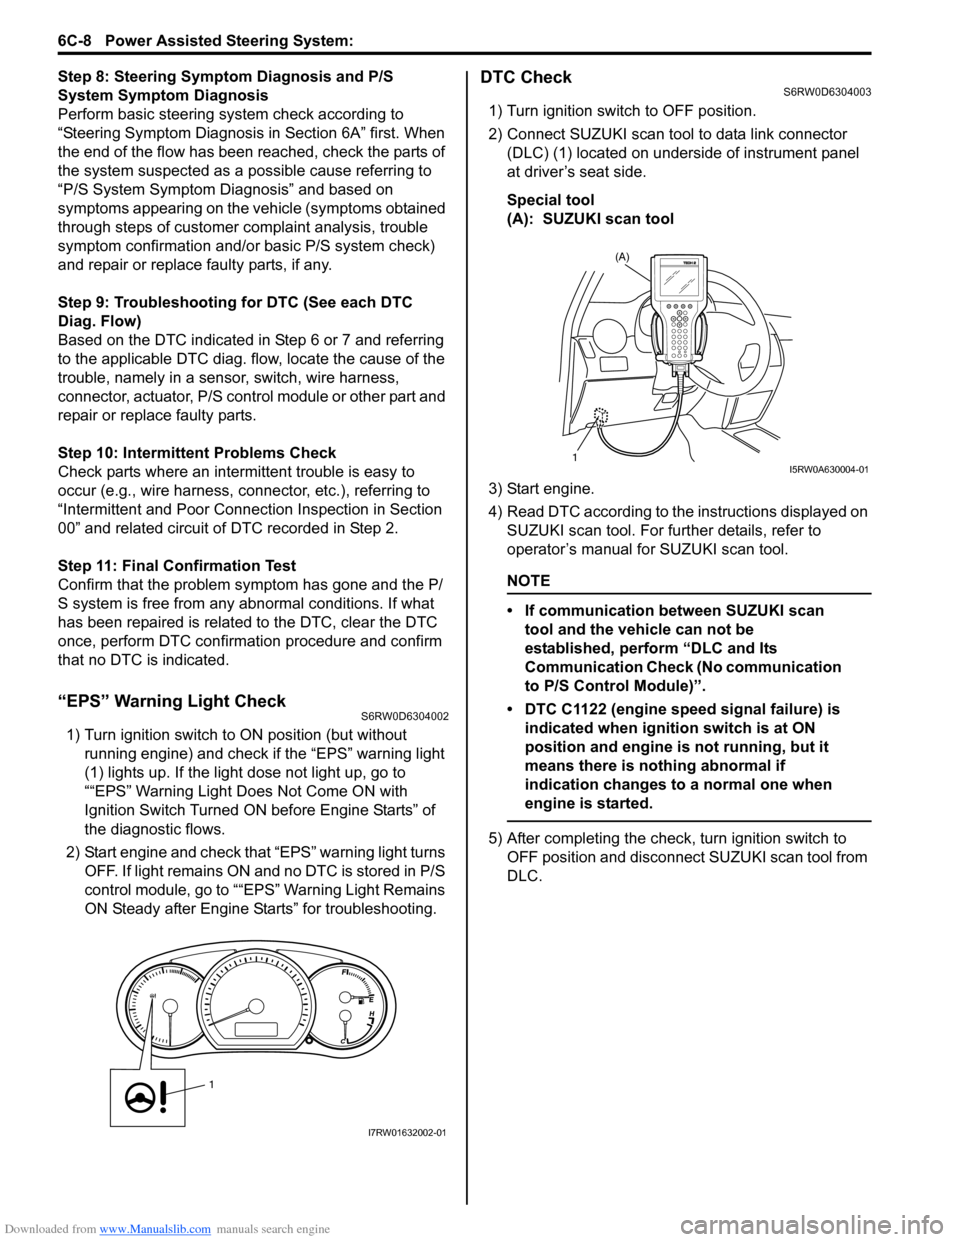
“EPS” Warning Light CheckS6RW0D6304002
1) Turn ignition switch to ON position (but without
running engine) and check if the “EPS” warning light
(1) lights up. If the light dose not light up, go to
““EPS” Warning Light Does Not Come ON with
Ignition Switch Turned ON before Engine Starts” of
the diagnostic flows.
2) Start engine and check that “EPS” warning light turns
OFF. If light remains ON and no DTC is stored in P/S
control module, go to ““EPS” Warning Light Remains
ON Steady after Engine Starts” for troubleshooting.
DTC CheckS6RW0D6304003
1) Turn ignition switch to OFF position.
2) Connect SUZUKI scan tool to data link connector
(DLC) (1) located on underside of instrument panel
at driver’s seat side.
Special tool
(A): SUZUKI scan tool
3) Start engine.
4) Read DTC according to the instructions displayed on
SUZUKI scan tool. For further details, refer to
operator’s manual for SUZUKI scan tool.
NOTE
• If communication between SUZUKI scan
tool and the vehicle can not be
established, perform “DLC and Its
Communication Check (No communication
to P/S Control Module)”.
• DTC C1122 (engine speed signal failure) is
indicated when ignition switch is at ON
position and engine is not running, but it
means there is nothing abnormal if
indication changes to a normal one when
engine is started.
5) After completing the check, turn ignition switch to
OFF position and disconnect SUZUKI scan tool from
DLC.
1
I7RW01632002-01
(A)
1I5RW0A630004-01
Page 889 of 1556
Downloaded from www.Manualslib.com manuals search engine Power Assisted Steering System: 6C-9
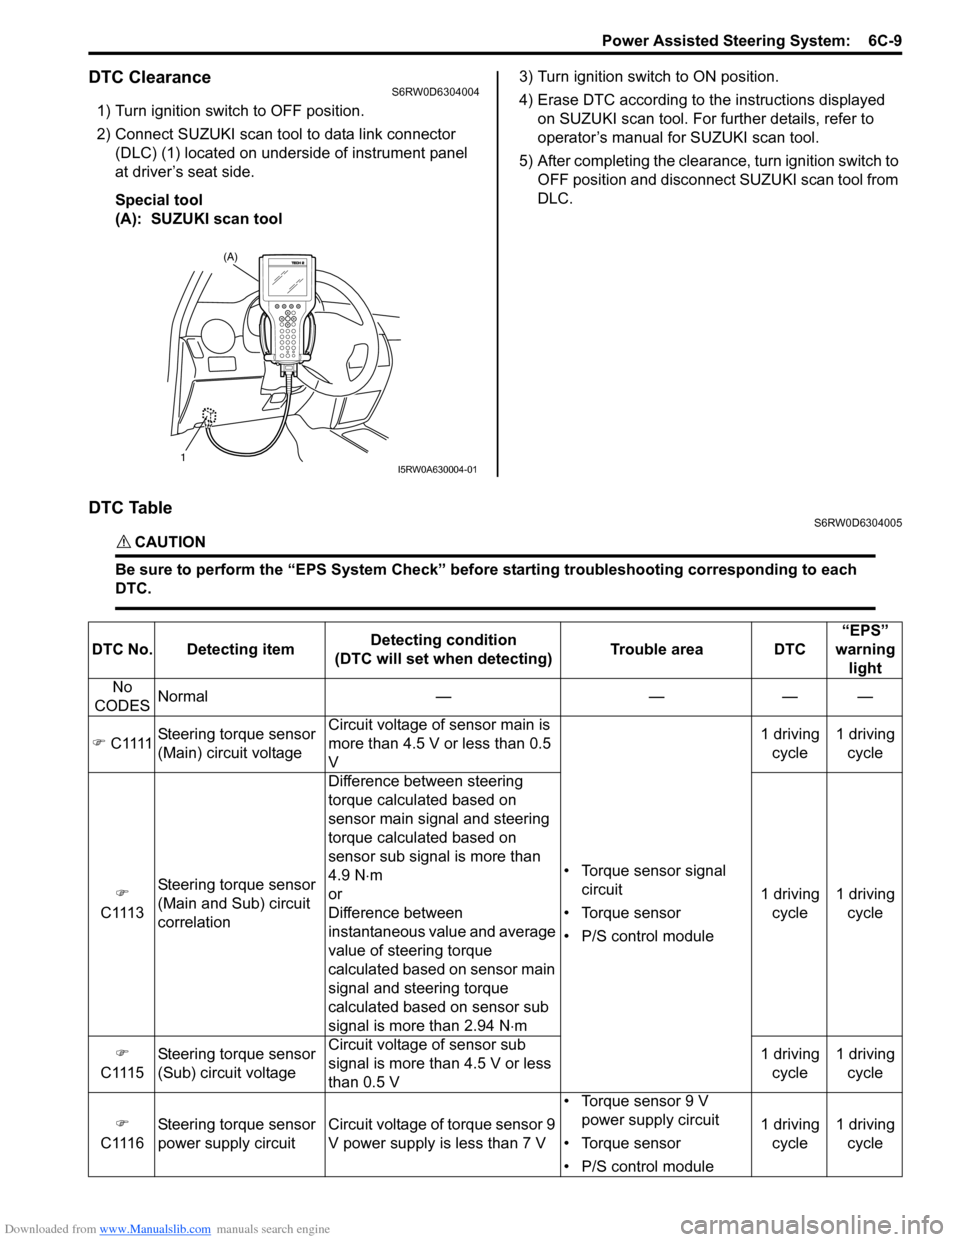
DTC ClearanceS6RW0D6304004
1) Turn ignition switch to OFF position.
2) Connect SUZUKI scan tool to data link connector
(DLC) (1) located on underside of instrument panel
at driver’s seat side.
Special tool
(A): SUZUKI scan tool3) Turn ignition switch to ON position.
4) Erase DTC according to the instructions displayed
on SUZUKI scan tool. For further details, refer to
operator’s manual for SUZUKI scan tool.
5) After completing the clearance, turn ignition switch to
OFF position and disconnect SUZUKI scan tool from
DLC.
DTC TableS6RW0D6304005
CAUTION!
Be sure to perform the “EPS System Check” before starting troubleshooting corresponding to each
DTC.
(A)
1I5RW0A630004-01
DTC No. Detecting itemDetecting condition
(DTC will set when detecting)Trouble area DTC“EPS”
warning
light
No
CODESNormal — — — —
�) C1111Steering torque sensor
(Main) circuit voltageCircuit voltage of sensor main is
more than 4.5 V or less than 0.5
V
• Torque sensor signal
circuit
• Torque sensor
• P/S control module1 driving
cycle1 driving
cycle
�)
C1113Steering torque sensor
(Main and Sub) circuit
correlationDifference between steering
torque calculated based on
sensor main signal and steering
torque calculated based on
sensor sub signal is more than
4.9 N⋅m
or
Difference between
instantaneous value and average
value of steering torque
calculated based on sensor main
signal and steering torque
calculated based on sensor sub
signal is more than 2.94 N⋅m1 driving
cycle1 driving
cycle
�)
C1115Steering torque sensor
(Sub) circuit voltageCircuit voltage of sensor sub
signal is more than 4.5 V or less
than 0.5 V1 driving
cycle1 driving
cycle
�)
C1116Steering torque sensor
power supply circuit Circuit voltage of torque sensor 9
V power supply is less than 7 V• Torque sensor 9 V
power supply circuit
• Torque sensor
• P/S control module1 driving
cycle1 driving
cycle
Page 892 of 1556
Downloaded from www.Manualslib.com manuals search engine 6C-12 Power Assisted Steering System:
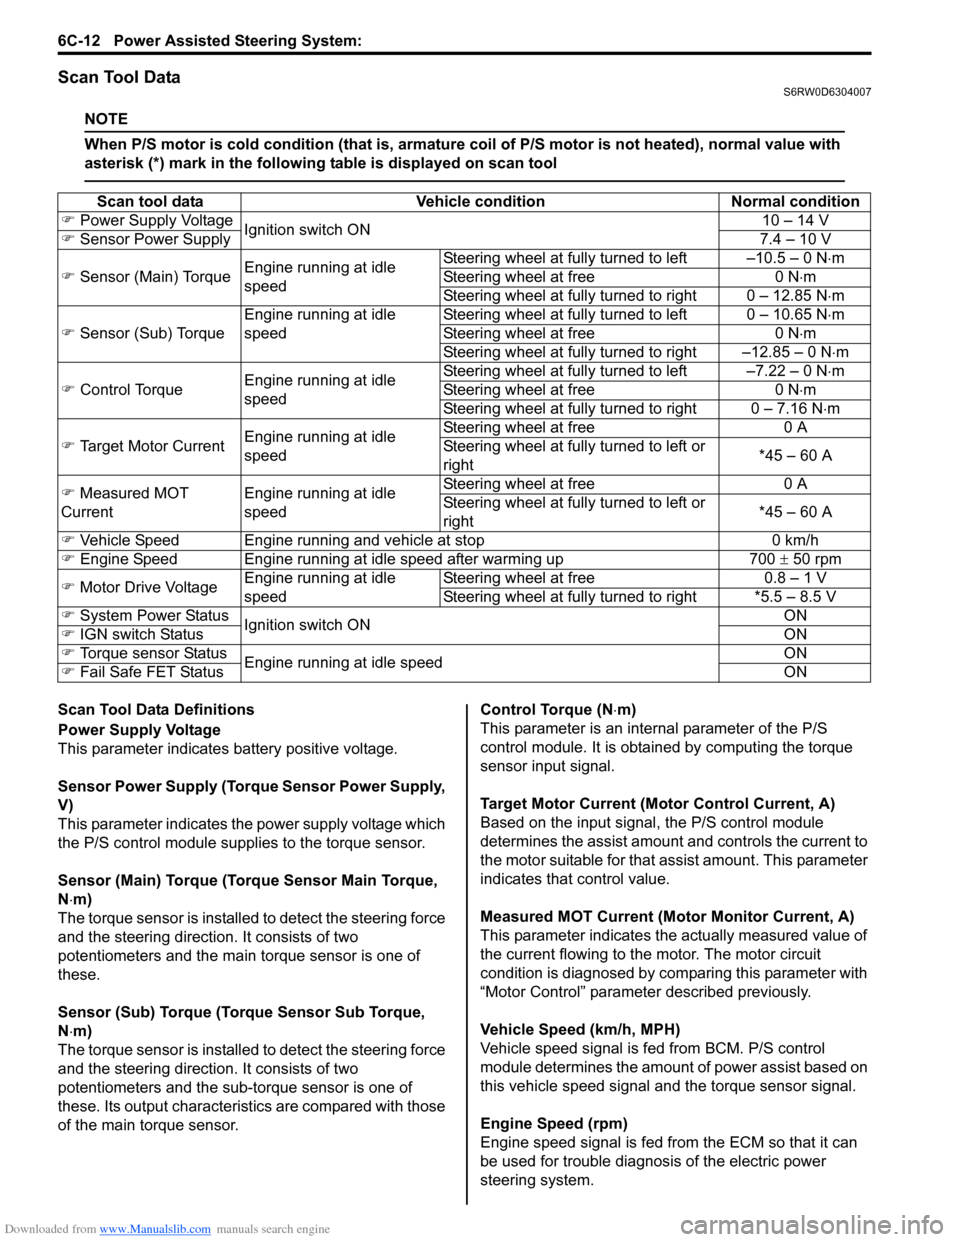
Scan Tool DataS6RW0D6304007
NOTE
When P/S motor is cold condition (that is, armature coil of P/S motor is not heated), normal value with
asterisk (*) mark in the following table is displayed on scan tool
Scan Tool Data Definitions
Power Supply Voltage
This parameter indicates battery positive voltage.
Sensor Power Supply (Torque Sensor Power Supply,
V)
This parameter indicates the power supply voltage which
the P/S control module supplies to the torque sensor.
Sensor (Main) Torque (Torque Sensor Main Torque,
N⋅m)
The torque sensor is installed to detect the steering force
and the steering direction. It consists of two
potentiometers and the main torque sensor is one of
these.
Sensor (Sub) Torque (Torque Sensor Sub Torque,
N⋅m)
The torque sensor is installed to detect the steering force
and the steering direction. It consists of two
potentiometers and the sub-torque sensor is one of
these. Its output characteristics are compared with those
of the main torque sensor.Control Torque (N⋅m)
This parameter is an internal parameter of the P/S
control module. It is obtained by computing the torque
sensor input signal.
Target Motor Current (Motor Control Current, A)
Based on the input signal, the P/S control module
determines the assist amount and controls the current to
the motor suitable for that assist amount. This parameter
indicates that control value.
Measured MOT Current (Motor Monitor Current, A)
This parameter indicates the actually measured value of
the current flowing to the motor. The motor circuit
condition is diagnosed by comparing this parameter with
“Motor Control” parameter described previously.
Vehicle Speed (km/h, MPH)
Vehicle speed signal is fed from BCM. P/S control
module determines the amount of power assist based on
this vehicle speed signal and the torque sensor signal.
Engine Speed (rpm)
Engine speed signal is fed from the ECM so that it can
be used for trouble diagnosis of the electric power
steering system. Scan tool data Vehicle condition Normal condition
�) Power Supply Voltage
Ignition switch ON10 – 14 V
�) Sensor Power Supply7.4 – 10 V
�) Sensor (Main) TorqueEngine running at idle
speedSteering wheel at fully turned to left –10.5 – 0 N⋅m
Steering wheel at free 0 N⋅m
Steering wheel at fully turned to right 0 – 12.85 N⋅m
�) Sensor (Sub) Torque Engine running at idle
speedSteering wheel at fully turned to left 0 – 10.65 N⋅m
Steering wheel at free 0 N⋅m
Steering wheel at fully turned to right –12.85 – 0 N⋅m
�) Control TorqueEngine running at idle
speedSteering wheel at fully turned to left –7.22 – 0 N⋅m
Steering wheel at free 0 N⋅m
Steering wheel at fully turned to right 0 – 7.16 N⋅m
�) Target Motor CurrentEngine running at idle
speedSteering wheel at free 0 A
Steering wheel at fully turned to left or
right*45 – 60 A
�) Measured MOT
Current
Engine running at idle
speedSteering wheel at free 0 A
Steering wheel at fully turned to left or
right*45 – 60 A
�) Vehicle Speed Engine running and vehicle at stop 0 km/h
�) Engine Speed Engine running at idle speed after warming up 700 ± 50 rpm
�) Motor Drive VoltageEngine running at idle
speedSteering wheel at free 0.8 – 1 V
Steering wheel at fully turned to right *5.5 – 8.5 V
�) System Power Status
Ignition switch ONON
�) IGN switch StatusON
�) Torque sensor Status
Engine running at idle speedON
�) Fail Safe FET StatusON
Page 922 of 1556

Downloaded from www.Manualslib.com manuals search engine 6C-42 Power Assisted Steering System:
5) Turn ON ignition switch without engine running and
select scan tool “Data List” mode due to checking
“Sensor (Main) Torque” and “Sensor (Sub) Torque”
displayed on scan tool when steering wheel turned
left and right (if used).
6) Check that characteristic of torque sensor (main and
sub) output voltage or scan tool data and steering
force is as following graph when steering wheel is
turned left and right. If sensor voltage or scan tool
data is out of specified value or does not vary linearly
as the following graph, check EPS control module
and its circuit referring to “Inspection of P/S Control
Module and Its Circuits”.
If they are OK, replace steering gear case assembly.P/S Motor and Its Circuit InspectionS6RW0D6306013
1) Check motor circuit referring to Step 2 to 3 of “DTC
C1141 / C1142 / C1143 / C1145: Motor Circuit
Failure”. If check result is not satisfactory, repair
motor circuit.
2) Disconnect motor connector from steering gear case
assembly with ignition switch turned OFF.
3) Check for resistance between terminals of motor
connector.
If check result is not as specified, check P/S motor
harness for continuity. If it is OK, replace steering
gear case assembly.
Motor circuit resistance
4) Check for insulation between each terminal of motor
connector and body ground.
If check result is not as specified, check P/S motor
harness for insulation. If it is OK, replace steering
gear case assembly.
Motor circuit resistance
5) Hoist vehicle
6) Check that steering wheel turns to left and right
smoothly. If steering wheel does not turn smoothly,
inspect and repair defective steering and suspension
parts.
7) Connect “E12” connector with ignition switch turned
OFF.
[A]: Main sensor
[B]: Sub sensor
[C]: Steering force at left turn
[D]: Steering force at right turn
[E]: Steering wheel at free
[F]: “Sensor (Main) Torque” in “Data List” displayed on scan tool
[G]: “Sensor (Sub) Torque” in “Data List” displayed on scan tool
0
[E][N.m]
MAX
MAX [D] [C]
[E][D] [C]
2.33 - 2.68[V] [F]
[G] [A]
[B]
66
1.65 - 1.9
(1.0 - 1.3)3.0 - 3.4 (3.7 - 4.0)
0 5
2.33 - 2.681.65 - 1.9
(1.0 - 1.3)3.0 - 3.4 (3.7 - 4.0)
0 5
0
[N.m]
MAX
MAX
[V]
6 11.76 11.7611.76 11.766
0 11.5
-12.00 -12.0
11.5
I7RW01632011-02
“E12-1” and “E12-2” (For motor) Approx. 1 Ω
Each terminal and body ground No continuity
[A]: Motor connector “E12” (viewed from harness side)
12
[A]
I6RW0C630012-02
Page 978 of 1556
Downloaded from www.Manualslib.com manuals search engine 7B-38 Air Conditioning System: Automatic Type
Automatic Type
Precautions
A/C System CautionS6RW0D7220001
Refer to “A/C System Caution”.
Precautions in Diagnosing TroubleS6RW0D7220002
• Do not disconnect couplers from HVAC control module, battery cable from battery, HVAC control module ground
wire harness from body or main fuse before confirming diagnostic information (diagnostic trouble code) stored in
HVAC control module memory.
• Diagnostic information (diagnostic trouble code) stored in HVAC control module can be checked by display of HVAC
control module. Also, it can be checked by using SUZUKI scan tool. Before checking diagnostic information
(diagnostic trouble code), read this manual and operator's manual for SUZUKI scan tool to know how to read
diagnostic information (diagnostic trouble code).
• When trouble is diagnosed using diagnostic information (diagnostic trouble code) on display of HVAC control
module, keep in your mind that each diagnostic information (diagnostic trouble code) has priority, and only
diagnostic information (diagnostic trouble code) which has the highest priority is indicated. Therefore, after
troubleshooting the malfunction, make sure if there exists any other diagnostic information (diagnostic trouble
code).
• Be sure to read “Air Bag Warning in Section 00” before inspection.
Precautions on Servicing A/C SystemS6RW0D7220003
Refer to “Precautions on Servicing A/C System”.
Page 983 of 1556
Downloaded from www.Manualslib.com manuals search engine Air Conditioning System: Automatic Type 7B-43
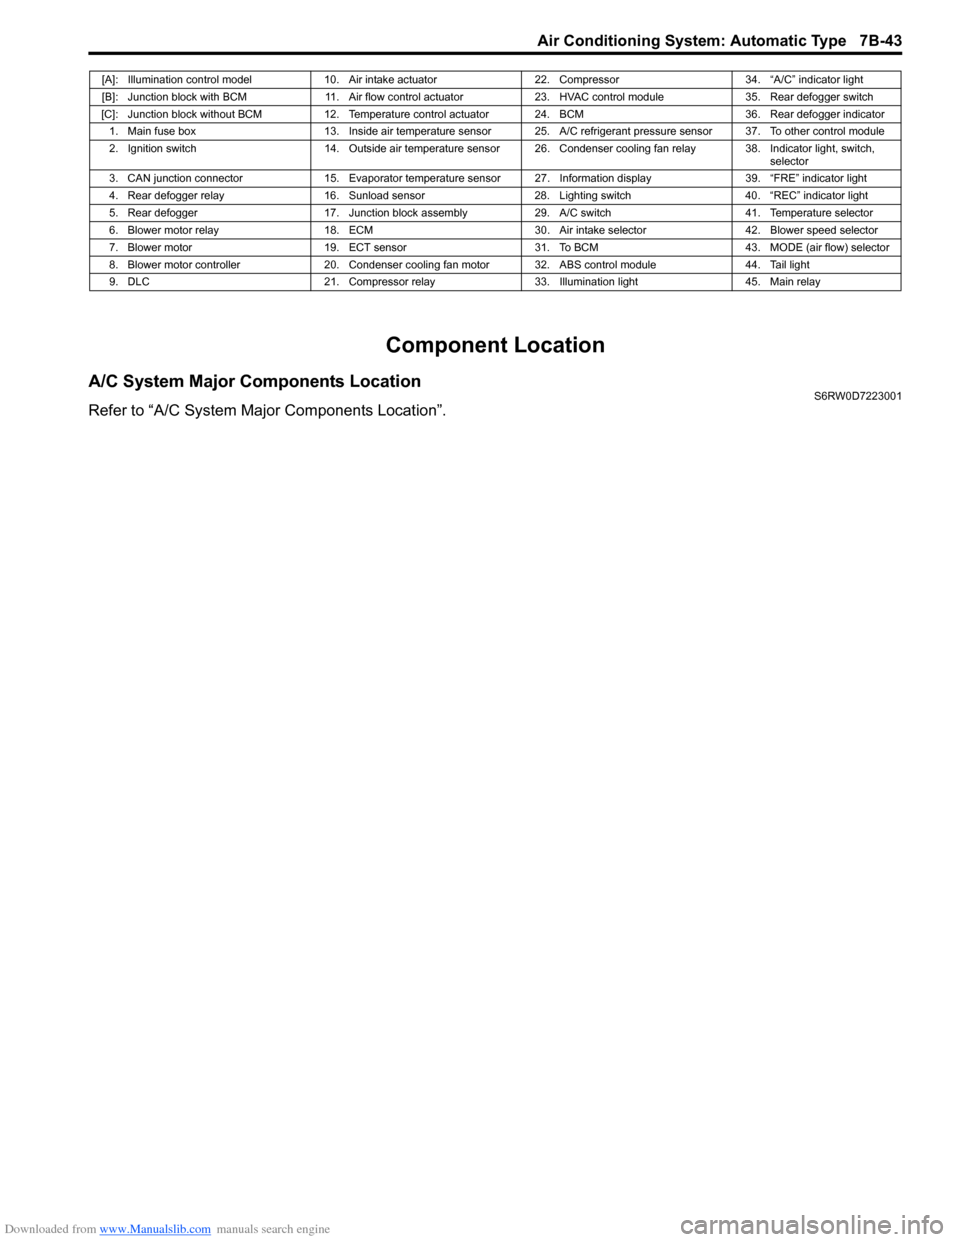
Component Location
A/C System Major Components LocationS6RW0D7223001
Refer to “A/C System Major Components Location”.
[A]: Illumination control model 10. Air intake actuator 22. Compressor 34. “A/C” indicator light
[B]: Junction block with BCM 11. Air flow control actuator 23. HVAC control module 35. Rear defogger switch
[C]: Junction block without BCM 12. Temperature control actuator 24. BCM 36. Rear defogger indicator
1. Main fuse box 13. Inside air temperature sensor 25. A/C refrigerant pressure sensor 37. To other control module
2. Ignition switch 14. Outside air temperature sensor 26. Condenser cooling fan relay 38. Indicator light, switch,
selector
3. CAN junction connector 15. Evaporator temperature sensor 27. Information display 39. “FRE” indicator light
4. Rear defogger relay 16. Sunload sensor 28. Lighting switch 40. “REC” indicator light
5. Rear defogger 17. Junction block assembly 29. A/C switch 41. Temperature selector
6. Blower motor relay 18. ECM 30. Air intake selector 42. Blower speed selector
7. Blower motor 19. ECT sensor 31. To BCM 43. MODE (air flow) selector
8. Blower motor controller 20. Condenser cooling fan motor 32. ABS control module 44. Tail light
9. DLC 21. Compressor relay 33. Illumination light 45. Main relay
Page 989 of 1556
Downloaded from www.Manualslib.com manuals search engine Air Conditioning System: Automatic Type 7B-49
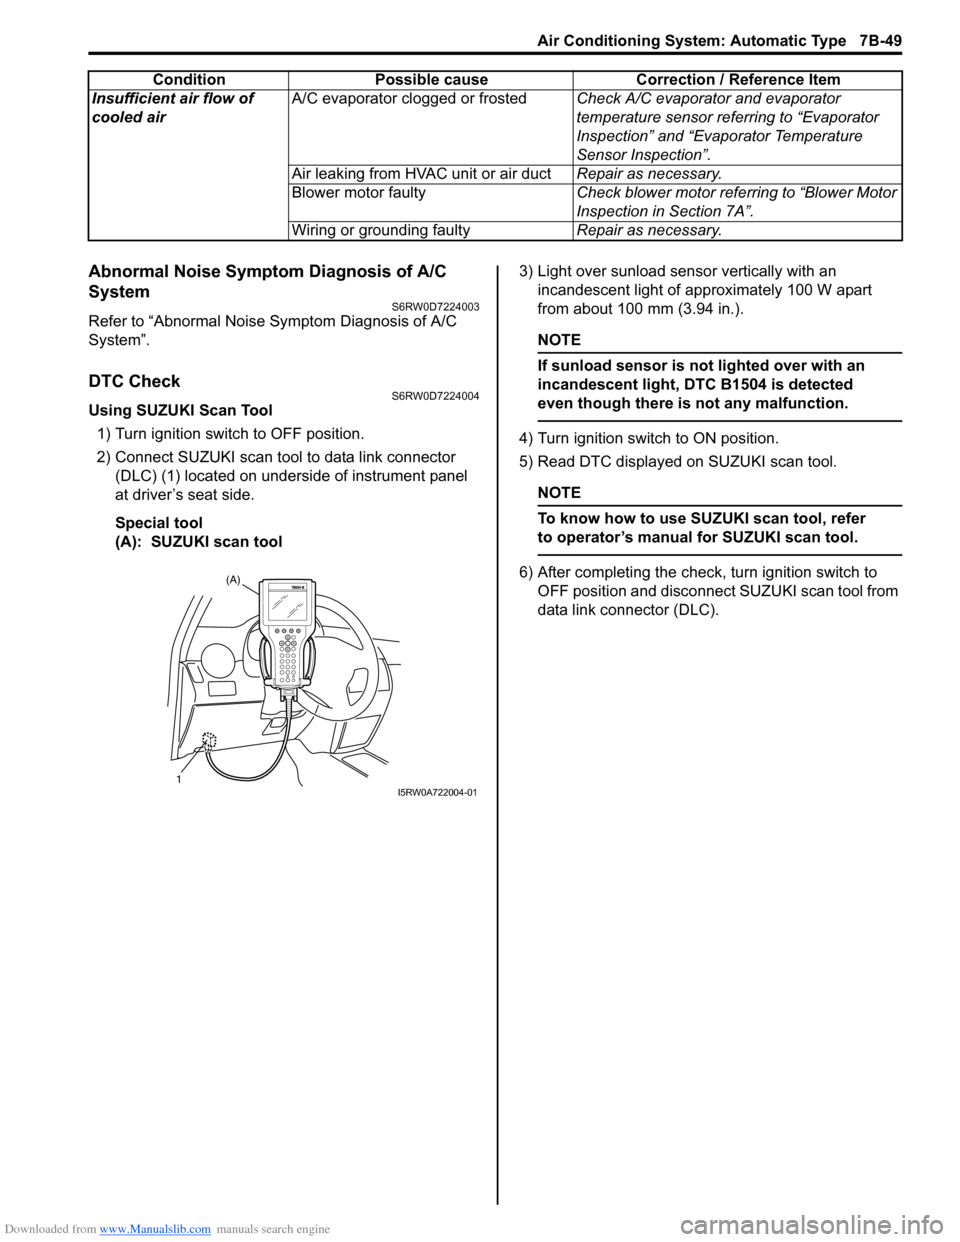
Abnormal Noise Symptom Diagnosis of A/C
System
S6RW0D7224003
Refer to “Abnormal Noise Symptom Diagnosis of A/C
System”.
DTC CheckS6RW0D7224004
Using SUZUKI Scan Tool
1) Turn ignition switch to OFF position.
2) Connect SUZUKI scan tool to data link connector
(DLC) (1) located on underside of instrument panel
at driver’s seat side.
Special tool
(A): SUZUKI scan tool3) Light over sunload sensor vertically with an
incandescent light of approximately 100 W apart
from about 100 mm (3.94 in.).
NOTE
If sunload sensor is not lighted over with an
incandescent light, DTC B1504 is detected
even though there is not any malfunction.
4) Turn ignition switch to ON position.
5) Read DTC displayed on SUZUKI scan tool.
NOTE
To know how to use SUZUKI scan tool, refer
to operator’s manual for SUZUKI scan tool.
6) After completing the check, turn ignition switch to
OFF position and disconnect SUZUKI scan tool from
data link connector (DLC). Insufficient air flow of
cooled airA/C evaporator clogged or frostedCheck A/C evaporator and evaporator
temperature sensor referring to “Evaporator
Inspection” and “Evaporator Temperature
Sensor Inspection”.
Air leaking from HVAC unit or air ductRepair as necessary.
Blower motor faultyCheck blower motor referring to “Blower Motor
Inspection in Section 7A”.
Wiring or grounding faultyRepair as necessary. Condition Possible cause Correction / Reference Item(A)
1I5RW0A722004-01
Page 990 of 1556
Downloaded from www.Manualslib.com manuals search engine 7B-50 Air Conditioning System: Automatic Type
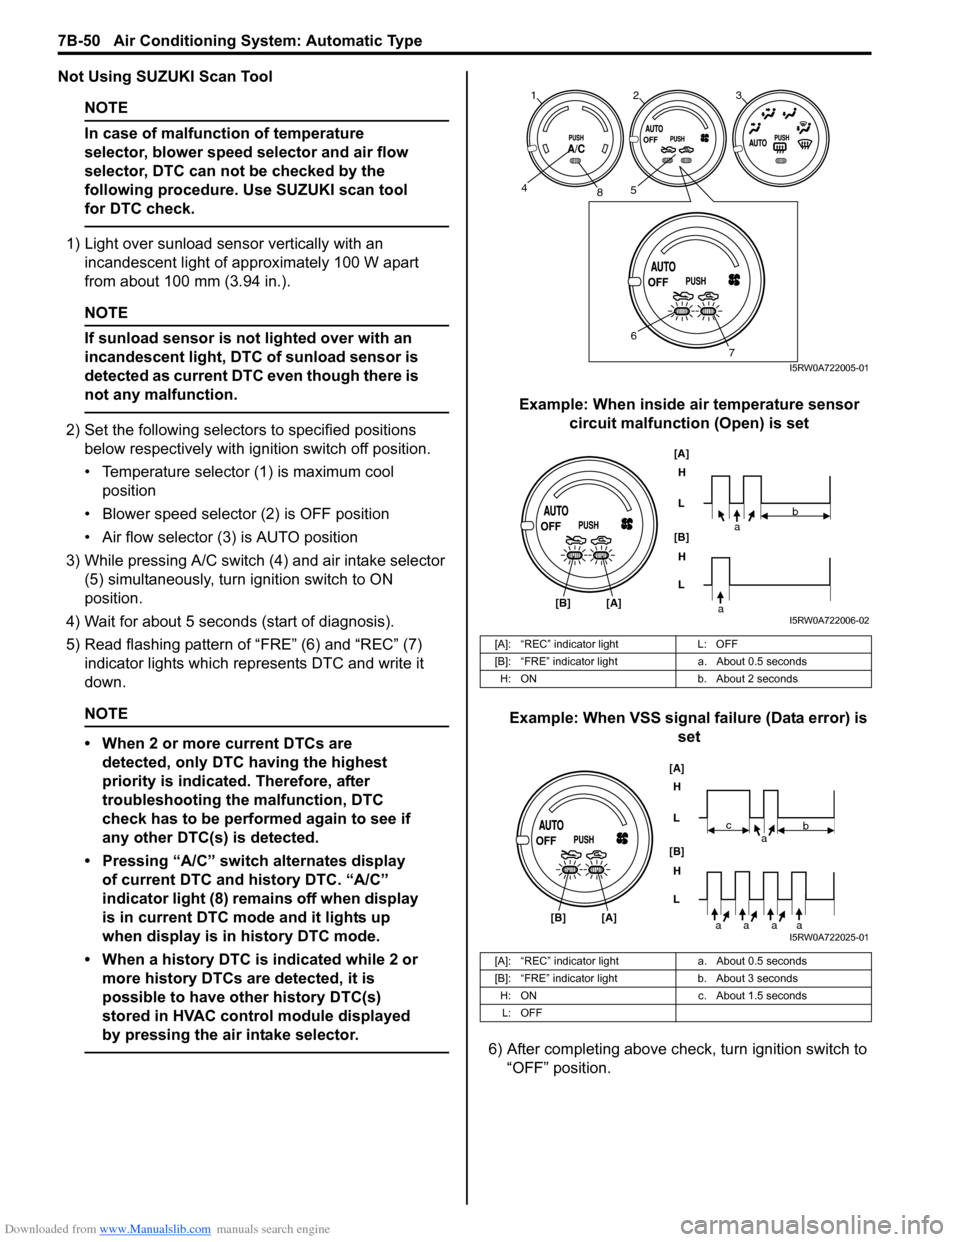
Not Using SUZUKI Scan Tool
NOTE
In case of malfunction of temperature
selector, blower speed selector and air flow
selector, DTC can not be checked by the
following procedure. Use SUZUKI scan tool
for DTC check.
1) Light over sunload sensor vertically with an
incandescent light of approximately 100 W apart
from about 100 mm (3.94 in.).
NOTE
If sunload sensor is not lighted over with an
incandescent light, DTC of sunload sensor is
detected as current DTC even though there is
not any malfunction.
2) Set the following selectors to specified positions
below respectively with ignition switch off position.
• Temperature selector (1) is maximum cool
position
• Blower speed selector (2) is OFF position
• Air flow selector (3) is AUTO position
3) While pressing A/C switch (4) and air intake selector
(5) simultaneously, turn ignition switch to ON
position.
4) Wait for about 5 seconds (start of diagnosis).
5) Read flashing pattern of “FRE” (6) and “REC” (7)
indicator lights which represents DTC and write it
down.
NOTE
• When 2 or more current DTCs are
detected, only DTC having the highest
priority is indicated. Therefore, after
troubleshooting the malfunction, DTC
check has to be performed again to see if
any other DTC(s) is detected.
• Pressing “A/C” switch alternates display
of current DTC and history DTC. “A/C”
indicator light (8) remains off when display
is in current DTC mode and it lights up
when display is in history DTC mode.
• When a history DTC is indicated while 2 or
more history DTCs are detected, it is
possible to have other history DTC(s)
stored in HVAC control module displayed
by pressing the air intake selector.
Example: When inside air temperature sensor
circuit malfunction (Open) is set
Example: When VSS signal failure (Data error) is
set
6) After completing above check, turn ignition switch to
“OFF” position.
[A]: “REC” indicator light L: OFF
[B]: “FRE” indicator light a. About 0.5 seconds
H: ON b. About 2 seconds
[A]: “REC” indicator light a. About 0.5 seconds
[B]: “FRE” indicator light b. About 3 seconds
H: ON c. About 1.5 seconds
L: OFF
123
458
6
7I5RW0A722005-01
[A]
[B]H
L
H
L [B]
[A]
ab
aI5RW0A722006-02
[A]
[B]H
L
H
L [B]
[A]
ab
aaaa
c
I5RW0A722025-01