esp SUZUKI SX4 2006 1.G Service Repair Manual
[x] Cancel search | Manufacturer: SUZUKI, Model Year: 2006, Model line: SX4, Model: SUZUKI SX4 2006 1.GPages: 1556, PDF Size: 37.31 MB
Page 990 of 1556

Downloaded from www.Manualslib.com manuals search engine 7B-50 Air Conditioning System: Automatic Type
Not Using SUZUKI Scan Tool
NOTE
In case of malfunction of temperature
selector, blower speed selector and air flow
selector, DTC can not be checked by the
following procedure. Use SUZUKI scan tool
for DTC check.
1) Light over sunload sensor vertically with an
incandescent light of approximately 100 W apart
from about 100 mm (3.94 in.).
NOTE
If sunload sensor is not lighted over with an
incandescent light, DTC of sunload sensor is
detected as current DTC even though there is
not any malfunction.
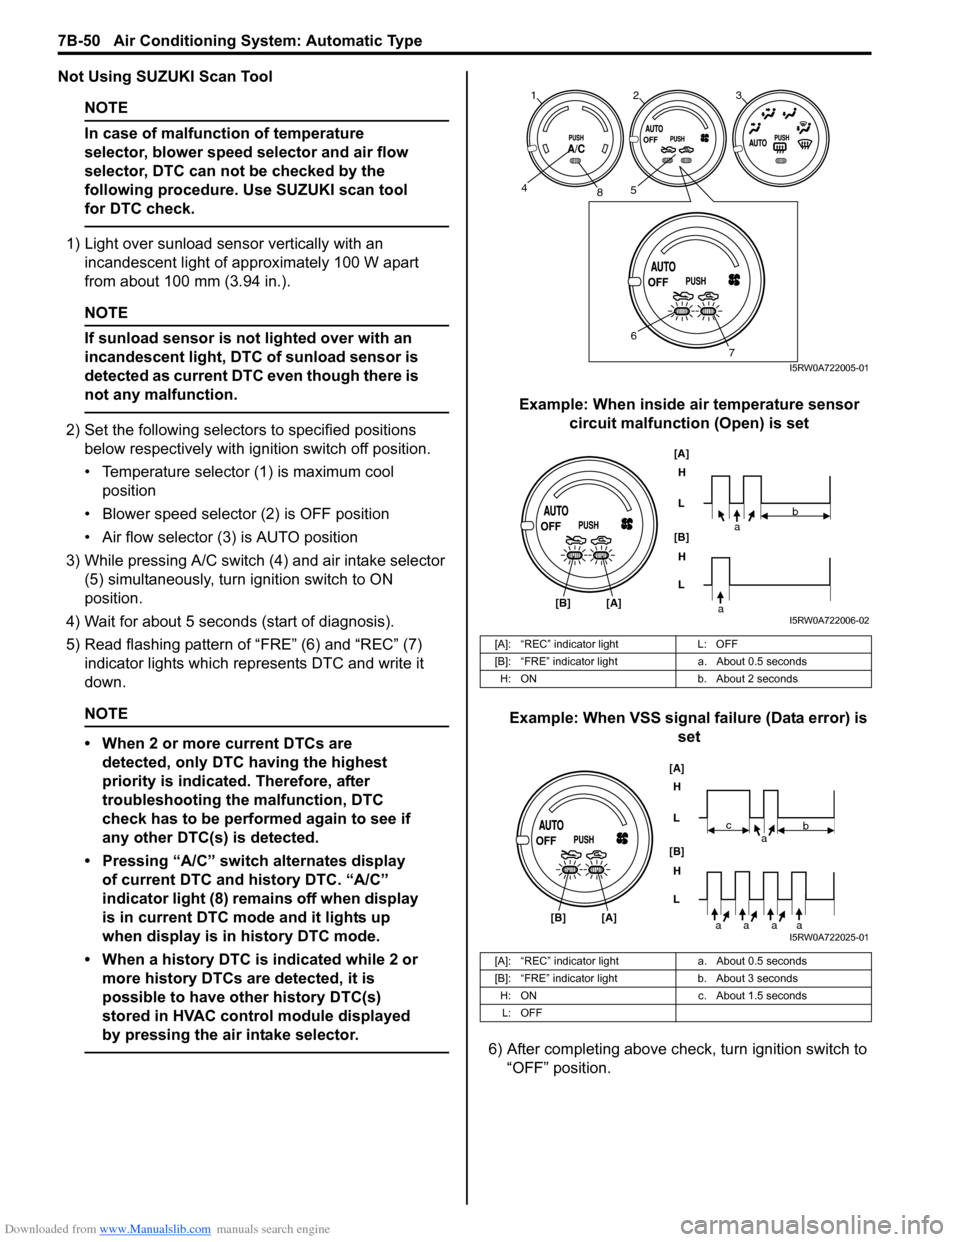
2) Set the following selectors to specified positions
below respectively with ignition switch off position.
• Temperature selector (1) is maximum cool
position
• Blower speed selector (2) is OFF position
• Air flow selector (3) is AUTO position
3) While pressing A/C switch (4) and air intake selector
(5) simultaneously, turn ignition switch to ON
position.
4) Wait for about 5 seconds (start of diagnosis).
5) Read flashing pattern of “FRE” (6) and “REC” (7)
indicator lights which represents DTC and write it
down.
NOTE
• When 2 or more current DTCs are
detected, only DTC having the highest
priority is indicated. Therefore, after
troubleshooting the malfunction, DTC
check has to be performed again to see if
any other DTC(s) is detected.
• Pressing “A/C” switch alternates display
of current DTC and history DTC. “A/C”
indicator light (8) remains off when display
is in current DTC mode and it lights up
when display is in history DTC mode.
• When a history DTC is indicated while 2 or
more history DTCs are detected, it is
possible to have other history DTC(s)
stored in HVAC control module displayed
by pressing the air intake selector.
Example: When inside air temperature sensor
circuit malfunction (Open) is set
Example: When VSS signal failure (Data error) is
set
6) After completing above check, turn ignition switch to
“OFF” position.
[A]: “REC” indicator light L: OFF
[B]: “FRE” indicator light a. About 0.5 seconds
H: ON b. About 2 seconds
[A]: “REC” indicator light a. About 0.5 seconds
[B]: “FRE” indicator light b. About 3 seconds
H: ON c. About 1.5 seconds
L: OFF
123
458
6
7I5RW0A722005-01
[A]
[B]H
L
H
L [B]
[A]
ab
aI5RW0A722006-02
[A]
[B]H
L
H
L [B]
[A]
ab
aaaa
c
I5RW0A722025-01
Page 1030 of 1556

Downloaded from www.Manualslib.com manuals search engine 8-ii Table of Contents
DTC B1062 / B1066: Side-Air Bag Circuit Low
Resistance ...................................................... 8B-59
DTC B1063 / B1067: Side-Air Bag Circuit
Shorted to Ground .......................................... 8B-61
DTC B1064 / B1068: Side-Air Bag Circuit
Shorted to Power Supply ................................ 8B-64
DTC B1071: Driver Forward Impact-Sensor
Communication Data Inconsistent .................. 8B-66
DTC B1072: Driver Forward Impact-Sensor
Communication Data Invalid ........................... 8B-66
DTC B1073: Driver Forward Impact-Sensor
Circuit Shorted to Ground ............................... 8B-67
DTC B1074: Driver Forward Impact-Sensor
Circuit Open .................................................... 8B-68
DTC B1081 / B1091: Side Impact-Sensor No
Response ........................................................ 8B-70
DTC B1082 / B1092: Side Impact-Sensor
Communication DATA Invalid ......................... 8B-70
DTC B1083 / B1093: Side Impact-Sensor
Circuit Shorted to Ground ............................... 8B-71
DTC B1084 / B1094: Side Impact-Sensor
Circuit Open .................................................... 8B-73
DTC B1085 / B1095: Side Impact-Sensor
Communication DATA Inconsistent ................ 8B-74
DTC B1361 / B1365: Curtain-Air Bag Circuit
High Resistance .............................................. 8B-75
DTC B1362 / B1366: Curtain-Air Bag Circuit
Low Resistance ............................................... 8B-79
DTC B1363 / B1367: Curtain-Air Bag Circuit
Shorted to Ground .......................................... 8B-81
DTC B1364 / B1368: Curtain-Air Bag Circuit
Shorted to Power Supply ................................ 8B-83
SDM Power Supply and Ground Circuit
Check .............................................................. 8B-85
Contact Coil Cable and Its Circuit Check .......... 8B-87
Inspection of Intermittent and Poor
Connections .................................................... 8B-89Repair and Inspection Required after
Accident .......................................................... 8B-90
Repair Instructions ............................................8B-93
Disabling Air Bag System.................................. 8B-93
Enabling Air Bag System .................................. 8B-93
SDM Removal and Installation .......................... 8B-94
SDM Inspection ................................................. 8B-95
Driver Air Bag (Inflator) Module Removal and
Installation ....................................................... 8B-95
Driver Air Bag (Inflator) Module Inspection ....... 8B-97
Passenger Air Bag (Inflator) Module Removal
and Installation ................................................ 8B-97
Passenger Air Bag (Inflator) Module
Inspection ........................................................ 8B-99
Side-Air Bag (Inflator) Module Removal and
Installation ....................................................... 8B-99
Side-Air Bag (Inflator) Inspection .................... 8B-101
Side Curtain-Air Bag (Inflator) Module
Removal and Installation ............................... 8B-102
Side Curtain-Air Bag (Inflator) Module
Inspection ...................................................... 8B-103
Forward Impact-Sensor Removal and
Installation ..................................................... 8B-103
Forward Impact-Sensor Inspection ................. 8B-104
Side Impact-Sensor Removal and Installation 8B-105
Side Impact-Sensor Inspection ....................... 8B-105
Passenger Air Bag (Inflator) Module Repair
Harness Installation....................................... 8B-106
Air Bag (Inflator) Module and Seat Belt
Pretensioner Disposal ................................... 8B-107
Deployed Air Bag (Inflator) Module and
Activated Seat Belt Pretensioner Disposal.... 8B-117
Specifications ...................................................8B-118
Tightening Torque Specifications .................... 8B-118
Special Tools and Equipment .........................8B-118
Use of Special Tools ....................................... 8B-118
Special Tool .................................................... 8B-120
Page 1040 of 1556

Downloaded from www.Manualslib.com manuals search engine 8B-1 Air Bag System:
Restraint
Air Bag System
Precautions
Precautions on Service and Diagnosis of Air
Bag System
S6RW0D8200004
WARNING!
• If the air bag system and another vehicle
system both need repair, SUZUKI
recommends that the air bag system be
repaired first, to help avoid unintended air
bag system activation.
• Do not modify the steering wheel,
dashboard, both front seat or any other on
or around air bag system components.
Modifications can adversely affect air bag
system performance and lead to injury.
• Be sure to follow the procedures described
in this section. Failure to follow
procedures could result in possible air bag
system activation, personal injury or
unneeded air bag system repairs.
• WARNING / CAUTION labels are attached on each
part of air bag system components (SDM, air bag
(inflator) modules and seat belt pretensioners). Be
sure to follow the instructions.
• Many of service procedures require disconnection of
“A/B” fuse and air bag (inflator) module(s) (driver
module, passenger module, side modules and curtain
modules) from initiator circuit to avoid an accidental
deployment.
• Do not apply power to the air bag system unless all
components are connected or a diagnostic flow
requests it, as this will set a DTC.
• The “Air Bag Diagnostic System Check” must be the
starting point of any air bag diagnostics. The “Air Bag
Diagnostic System Check” will verify proper “AIR
BAG” warning light operation and will lead you to the
correct flow to diagnose any air bag malfunctions.
Bypassing these procedures may result in extended
diagnostic time, incorrect diagnosis, and incorrect
parts replacements.
• Never use air bag component parts from another
vehicle.
• If the vehicle will be exposed to temperatures over 93
°C (200 °F) (for example, during a paint baking
process), remove the air bag system components
beforehand to avoid component damage or
unintended system activation.• When handling the air bag (inflator) modules (driver
module, passenger module, side modules and curtain
modules), seat belt pretensioners (driver module and
passenger module), SDM, forward impact-sensor or
side impact-sensor be careful not to drop it or apply
an impact to it. If an excessive impact was applied
(e.g., SDM, forward impact-sensor are dropped, air
bag (inflator) module is dropped from a height of 90
cm (3 ft) or more, seat belt pretensioner (retractor
assembly) is dropped from a height of 30 cm (1 ft) or
more), never attempt disassembly or repair but
replace it with a new one.
• When using electric welding, be sure to disconnect air
bag (inflator) module connectors (driver module,
passenger module, side modules and curtain
modules) and seat belt pretensioner connectors
(driver module and passenger module) respectively.
• When applying paint around the air bag system
related parts, use care so that the harness or
connector will not be exposed to the paint mist.
• Never expose air bag system component parts
directly to hot air (drying or baking the vehicle after
painting) or flames.
WARNING!
When performing service on or around air
bag system components or air bag wiring,
follow the procedures listed in “Disabling Air
Bag System” to temporarily disable the air
bag system.
Failure to follow procedures could result in
possible air bag system activation, personal
injury or unneeded air bag system repairs.
Precautions on Handling and Storage of Air Bag
System Components
S6RW0D8200002
SDM
WARNING!
Never power up air bag system when SDM is
not rigidly attached to the vehicle. Otherwise,
personal injury may result.
CAUTION!
After detecting one time of such collision as
to meet deployment conditions, SDM must
not be used. Refer to “Air Bag Diagnostic
System Check” when checking SDM.
Page 1046 of 1556

Downloaded from www.Manualslib.com manuals search engine 8B-7 Air Bag System:
Air Bag System Input / Output TableS6RW0D8201002
Forward inpact-sensor
Driver side inpact-
sensor
Passenger side inpact-
sensor Mecanical longitudinal
G sensor in SDMX-Y G sensor
(longitudinal / lateral
acceleration) in SDM
OUTPUT
(deployment &
activation
device) INPUT
(sensor signal)
Driver & Passenger
air bag inflator
modulesDriver & Passenger
seat belt
pretentionersDriver side-air bag
& driver side
curtain-air bag
inflator modulesPassenger side-air
bag & passenger
side curtain-air bag
inflator modules
I6RW0C820002-01
Page 1055 of 1556

Downloaded from www.Manualslib.com manuals search engine Air Bag System: 8B-16
�) B1057Passenger seat belt
pretensioner circuit shorted to
groundPassenger seat belt pretensioner
circuit has been shorted to
ground for more than 4 sec.• Passenger seat belt
pretensioner circuit
•SDM
�) B1058Passenger seat belt
pretensioner circuit shorted to
power supplyPassenger seat belt pretensioner
circuit has been shorted to power
circuit for more than 4 sec.
�) B1061Driver side-air bag circuit high
resistance Driver side-air bag circuit is more
than 3.7 Ω for more than 4 sec.• Driver side-air bag circuit
• Driver side-air bag module
•SDM �) B1062Driver side-air bag circuit low
resistance Driver side-air bag circuit is less
than 1.0 Ω for more than 4 sec.
�) B1063Driver side-air bag circuit
shorted to groundDriver side-air bag circuit has
been shorted to ground for more
than 4 sec.• Driver side-air bag circuit
•SDM
�) B1064Driver side-air bag circuit
shorted to power supplyDriver side-air bag circuit has
been shorted to power supply for
more than 4 sec.
�) B1065Passenger side-air bag circuit
high resistance Passenger side-air bag circuit is
more than 3.7 Ω for more than 4
sec.• Passenger side-air bag circuit
• Driver side-air bag module
•SDM
�) B1066Passenger side-air bag circuit
low resistance Passenger side-air bag circuit is
less than 1.0 Ω for more than 4
sec.
�) B1067Passenger side-air bag circuit
shorted to groundPassenger side-air bag circuit
has been shorted to ground for
more than 4 sec.• Passenger side-air bag circuit
•SDM
�) B1068Passenger side-air bag circuit
shorted to powerPassenger side-air bag circuit
has been shorted to power circuit
for more than 4 sec.
�) B1071Driver forward impact-sensor
communication data
inconsistent Driver forward impact-sensor
has been communicated with no
response or inconsistent ID code
for more than 4 sec.• Driver forward impact-sensor
• Driver forward impact-sensor
circuit
•SDM
�) B1072Driver forward impact-sensor
communication data invalid Driver forward impact-sensor
has been communicated with
invalid data for more than 4 sec.• Driver forward impact-sensor
•SDM
�)
B1073Driver forward impact-sensor
circuit shorted to groundDriver forward impact-sensor
circuit has been shorted to
ground for more than 4 sec.• Driver forward impact-sensor
• Driver forward impact-sensor
circuit
•SDM �) B1074Driver forward impact-sensor
circuit openDriver forward impact-sensor
circuit has been shorted to power
circuit or opened for more than 4
sec.
�) B1081Driver side impact-sensor no
responseDriver side impact-sensor has
been communicated with no
response for more than 4 sec.• Driver side impact-sensor
circuit
• Driver side impact-sensor
•SDM
�) B1082Driver side impact-sensor
communication data invalidDriver side impact-sensor has
been communicated with invalid
data for more than 4 sec.• Driver side impact-sensor
•SDM
�) B1083Driver side impact-sensor
circuit shorted to groundDriver side impact-sensor circuit
has been shorted to ground for
more than 4 sec.• Driver side impact-sensor
circuit
• Driver side impact-sensor
•SDM �) B1084Driver side impact-sensor
circuit openDriver side impact-sensor circuit
has been shorted to power circuit
or opened for more than 4 sec. DTC No. Detecting itemDetecting condition
(DTC will set when detecting)Trouble area
Page 1056 of 1556

Downloaded from www.Manualslib.com manuals search engine 8B-17 Air Bag System:
�) B1085Driver side impact-sensor
communication data
inconsistent Driver side impact-sensor has
been communicated with
inconsistent ID code for more
than 4 sec.• Driver side impact-sensor
•SDM
�) B1091Passenger side impact-sensor
no responseCommunication with passenger
side impact-sensor has been no
response for more than 4 sec.• Passenger side impact-sensor
circuit
• Passenger side impact-sensor
•SDM
�) B1092Passenger side impact-sensor
communication data invalidPassenger side impact-sensor
has been communicated with
invalid data for more than 4 sec.• Passenger side impact-sensor
circuit
•SDM
�) B1093Passenger side impact-sensor
circuit shorted to groundPassenger side impact-sensor
circuit has been shorted to
ground for more than 4 sec.
• Passenger side impact-sensor
•SDM
�) B1094Passenger side impact-sensor
circuit openPassenger side impact-sensor
circuit has been shorted to power
circuit or opened for more than 4
sec.
�) B1095Passenger side impact-sensor
communication data
inconsistentPassenger side impact-sensor
has been communicated with
inconsistent ID code for more
than 4 sec.• Passenger side impact-sensor
•SDM
�) B1361Driver curtain-air bag circuit
high resistanceDriver curtain-air bag circuit is
more than 3.8 Ω for more than 4
sec. • Driver curtain-air bag circuit
• Driver curtain-air bag module
•SDM
�) B1362Driver curtain-air bag circuit low
resistanceDriver curtain-air bag circuit is
less than 1.0 Ω for more than 4
sec.
�) B1363Driver curtain-air bag circuit
shorted to groundDriver curtain-air bag circuit has
been shorted to ground for more
than 4 sec.• Driver curtain-air bag circuit
•SDM
�) B1364Driver curtain-air bag circuit
shorted to powerDriver curtain-air bag circuit has
been shorted to power circuit for
more than 4 sec.
�) B1365Passenger curtain-air bag
circuit high resistancePassenger curtain-air bag circuit
is more than 3.8 Ω for more than
4 sec.• Passenger curtain-air bag
circuit
• Passenger curtain-air bag
module
•SDM �) B1366Passenger curtain-air bag
circuit low resistancePassenger curtain-air bag circuit
is less than 1.0 Ω for more than 4
sec.
�) B1367Passenger curtain-air bag
circuit shorted to groundPassenger curtain-air bag circuit
has been shorted to ground for
more than 4 sec.• Passenger curtain-air bag
circuit
•SDM
�) B1368Passenger curtain-air bag
circuit shorted to powerPassenger curtain-air bag circuit
has been shorted to power circuit
for more than 4 sec. DTC No. Detecting itemDetecting condition
(DTC will set when detecting)Trouble area
Page 1105 of 1556

Downloaded from www.Manualslib.com manuals search engine Air Bag System: 8B-66
DTC B1071: Driver Forward Impact-Sensor Communication Data InconsistentS6RW0D8204034
DTC Detecting Condition and Trouble Area
DTC Troubleshooting
NOTE
Upon completion of inspection and repair work, perform the following items.
• Reconnect all air bag system components and ensure all components are properly mounted.
• Clear DTCs referring to “DTC Clearance”, if any.
• Repeat “Air Bag Diagnostic System Check” to confirm that the trouble has been corrected.
DTC B1072: Driver Forward Impact-Sensor Communication Data InvalidS6RW0D8204035
DTC Detecting Condition and Trouble Area
DTC Troubleshooting
NOTE
Upon completion of inspection and repair work, perform the following items.
• Reconnect all air bag system components and ensure all components are properly mounted.
• Clear DTCs referring to “DTC Clearance”, if any.
• Repeat “Air Bag Diagnostic System Check” to confirm that the trouble has been corrected.
DTC detecting condition Trouble area
Forward impact-sensor has been communicated with no
response or inconsistent ID code for more than 4 sec.• Forward impact-sensor
• Forward impact-sensor circuit
•SDM
Step Action Yes No
1Was “Air Bag Diagnostic System Check Flow” performed?Go to Step 2. Go to “Air Bag
Diagnostic System
Check Flow”.
2DTC check
1) Connect scan tool to DLC with ignition switch turned
OFF.
2) Turn ON ignition switch and check SDM for DTC.
Are there any DTC(s) B1073, B1074?Go to applicable DTC
diag. flow.Replace defective
forward impact-sensor
and recheck.
If this DTC still detected,
replace SDM.
DTC detecting condition Trouble area
Forward impact-sensor has been communicated with
invalid data for more than 4 sec.• Forward impact-sensor
•SDM
Step Action Yes No
1Was “Air Bag Diagnostic System Check Flow” performed?Go to Step 2. Go to “Air Bag
Diagnostic System
Check Flow”.
2DTC check
1) Connect scan tool to DLC with ignition switch turned
OFF.
2) Turn ON ignition switch and check SDM for DTC.
Are there any DTC(s) B1071, B1073, B1074?Go to applicable DTC
diag. flow.Replace defective
forward impact-sensor
and recheck.
If this DTC still detected,
replace SDM.
Page 1109 of 1556

Downloaded from www.Manualslib.com manuals search engine Air Bag System: 8B-70
DTC B1081 / B1091: Side Impact-Sensor No ResponseS6RW0D8204066
DTC B1081: Driver Side Impact-Sensor No Response
DTC B1091: Passenger Side Impact-Sensor No Response
DTC Detecting Condition and Trouble Area
DTC Troubleshooting
NOTE
Upon completion of inspection and repair work, perform the following items.
• Reconnect all air bag system components and ensure all components are properly mounted.
• Clear DTCs referring to “DTC Clearance”, if any.
• Repeat “Air Bag Diagnostic System Check” to confirm that the trouble has been corrected.
DTC B1082 / B1092: Side Impact-Sensor Communication DATA InvalidS6RW0D8204058
DTC B1082: Driver Side Impact-Sensor Communication DATA Invalid
DTC B1092: Passenger Side Impact-Sensor Communication DATA Invalid
DTC Detecting Condition and Trouble AreaDTC detecting condition Trouble area
DTC B1081:
Driver side impact-sensor has been communicated with
no response for more than 4 sec.
DTC B1091:
Passenger side impact-sensor has been communicated
with no response for more than 4 sec.• Driver / passenger side impact-sensor circuit
• Driver / passenger side impact-sensor
•SDM
Step Action Yes No
1Was “Air Bag Diagnostic System Check Flow” performed?Go to Step 2. Go to “Air Bag
Diagnostic System
Check Flow”.
2DTC check
1) Connect scan tool to DLC with ignition switch turned
OFF.
2) Turn ON ignition switch and check SDM for DTC.
Are there any DTCs B1083, B1084 (for DTC B1081) or
B1093, B1094 (for DTC B1091)?Go to applicable DTC
diag. flow.Replace defective side
impact-sensor and
recheck.
If this DTC still detected,
replace SDM.
DTC detecting condition Trouble area
DTC B1082:
Driver side impact-sensor has been communicated with
invalid data for more than 4 sec.
DTC B1092:
Passenger side impact-sensor has been communicated
with invalid data for more than 4 sec.• Driver / passenger side impact-sensor
•SDM
Page 1129 of 1556

Downloaded from www.Manualslib.com manuals search engine Air Bag System: 8B-90
• Improperly formed or damaged terminals.
Check each connector terminal in problem circuits
carefully to ensure good contact tension by using the
corresponding mating terminal included in the
connector test adapter kit (special tool).
If contact tension is not enough, reform the terminal to
increase contact tension or replace it.
Special tool
(A): 09932–76010 Connector test adapter kit
• Poor terminal-to-wire connection.
Check each wire harness in problem circuits for poor
connection by shaking it by hand lightly. If any
abnormal condition is found, change the wire harness
assembly or component parts with new ones.
• Wire insulation which is rubbed through, causing an
intermittent short as the bare area touches other
wiring or parts of the vehicle.
• Wire broken inside the insulation. This condition could
cause a continuity check to show a good circuit, but if
only 1 or 2 strands of a multi-strand-type wire are
intact, resistance could be far too high.
Repair and Inspection Required after AccidentS6RW0D8204048
CAUTION!
• All air bag system components, including
the electrical harness (component
mounting points), must be inspected after
an accident. If any components are
damaged or bent, they must be replaced
even if air bag system activation did not
occur.
• Never use air bag system parts from
another vehicle.
• Do not attempt to service the parts below.
Service of these parts is by replacement
only.
– Driver / Passenger air bag (inflator)
modules
– Driver / Passenger side-air bag (inflator)
modules
– Driver / Passenger side curtain-air bag
(inflator) modules
– Driver / Passenger seat belt
pretensioners
– Forward impact-sensor
– Driver / Passenger side impact-sensors
–SDM
– Contact coil and combination switch
assembly
– Air bag wire harness in main harness,
instrument panel harness, floor harness,
passenger air bag harness, side-air bag
harness and side curtain-air bag
harness.
• Proper operation of the sensors and air
bag system requires that any repairs to the
vehicle structure return it to its original
production configuration.
(A)
I4RS0A820045-01
IYSQ01010028-01
IYSQ01820025-01
Page 1168 of 1556

Downloaded from www.Manualslib.com manuals search engine 9A-1 Wiring Systems:
Body, Cab and Accessories
Wiring Systems
Precautions
Cautions in Body Electrical System ServicingS6RW0D9100001
When servicing the electric systems, observe the cautions described in “Air Bag Warning in Section 00” to protect
electrical parts and to prevent a fire.
General Description
AbbreviationsS6RW0D9101001
Refer to the “Abbreviations in Section 0A” for the general abbreviations.
ESP
® is a registered trademark of Daimler Chrysler AG.
Wire / Connector Color SymbolsS6RW0D9101002
Refer to “Wire Color Symbols in Section 0A”. Abbreviation Full term Abbreviation Full term
2WD 2 wheel drive vehicles J/B Junction block
4WD 4 wheel drive vehicles J/C Joint connector
A/B Air bag KLS Keyless start system
ACC Accessory L Left
CAN Controller area network LED Light emitting diode
COMB Combination LHD Left hand drive vehicle
DSL Diesel engine LO Low
ELCM EVAP leak check module OCV Oil control valve
ESP
®Electronic stability program P/N Power normal
FWD Forward R Right
HI High RHD Right hand drive vehicle
IF EQPD If equipped ST Starter
IG COIL Ignition coil TPMS Tire pressure monitoring system
ILL Illumination VIM Valiable intake manifold
IND Indicator VSV Vacuum switching valve
INT Intermittent 5 dr 5 door