key SUZUKI SX4 2006 1.G Service Repair Manual
[x] Cancel search | Manufacturer: SUZUKI, Model Year: 2006, Model line: SX4, Model: SUZUKI SX4 2006 1.GPages: 1556, PDF Size: 37.31 MB
Page 1270 of 1556
Downloaded from www.Manualslib.com manuals search engine 9A-103 Wiring Systems:
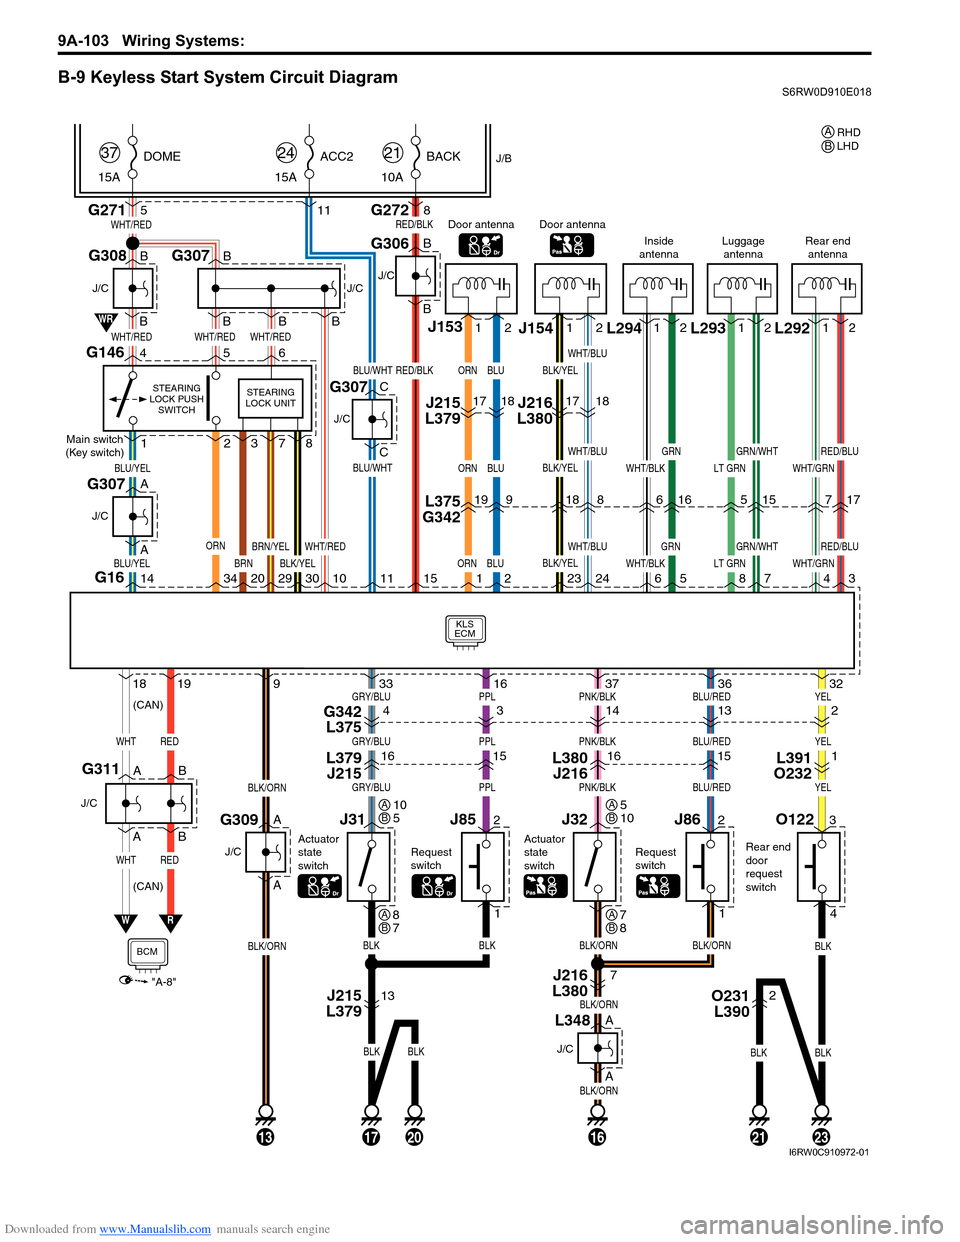
B-9 Keyless Start System Circuit DiagramS6RW0D910E018
G271
KLS
ECM
BCM
WHT/RED
WHT/REDWHT/REDWHT/RED
BLU/YEL
WHTRED
WHTRED
ORN
BLU/YEL
"A-8"
W
WR
R
G1614 3420
1819
BLK/ORN
BLK/ORN
9
5
J/B
15ADOME
37
G2728 10ABACK
21
11 15AACC2
24
B
B
BB
J/C J/C
G308BG307
B
A
A
J/C
BLU/WHT
BLU/WHT
C
C
J/C
G307
Main switch
(Key switch)
STEARING
LOCK PUSH
SWITCH
G146456
1
O1223
4
2
BRN29
BRN/YEL
301011
RED/BLK
RED/BLK
B
B
J/C
Rear end
door
request
switch
G306
15ORN
ORN
ORN
1BLK/YEL
WHT/RED
378
STEARING
LOCK UNIT
Door antenna
L375
G34219
J215
L379J15317
2
L391
O2321 12
BLU
BLU
BLU
2
9
18
WHT/BLK
WHT/BLK6
Inside
antenna
6
12
GRN
GRN
5
16
LT GRN
LT GRN8
Luggage
antenna
5
12
GRN/WHT
GRN/WHT
7
15
BLK/YEL
BLK/YEL
BLK/YEL
23
Door antenna
18
J216
L380J154 L294 L293
WHT/GRN
WHT/GRN4
Rear end
antenna
7
12
RED/BLU
RED/BLU
3
17
L292
1712
WHT/BLU
WHT/BLU
WHT/BLU
24
8
18
G307
A
A
J/C
B
BG311
A
A
J/C
G309
13
YEL
YEL
YEL
BLK
BLKBLK
32
J862
1
Request
switch
13
15
BLU/RED
BLU/RED
BLU/RED
36
2321
J32
Actuator
state
switch
14
L380
J21616
7
PNK/BLK
PNK/BLK
PNK/BLK
BLK/ORNBLK/ORN
BLK/ORN
BLK/ORN
37
16
J216
L380
J852
1
Request
switch
3
15
PPL
PPL
PPL
16
J31
Actuator
state
switch
4
L379
J215 G342
L37516
O231
L390213
GRY/BLU
GRY/BLU
GRY/BLU
BLKBLK
BLK
A
A
J/C
L348
33
17
BLK
20
J215
L379
(CAN)
(CAN)
RHD
LHD AB
10
5AB
8
7AB
5
10AB
7
8AB
I6RW0C910972-01
Page 1272 of 1556
Downloaded from www.Manualslib.com manuals search engine 9A-105 Wiring Systems:
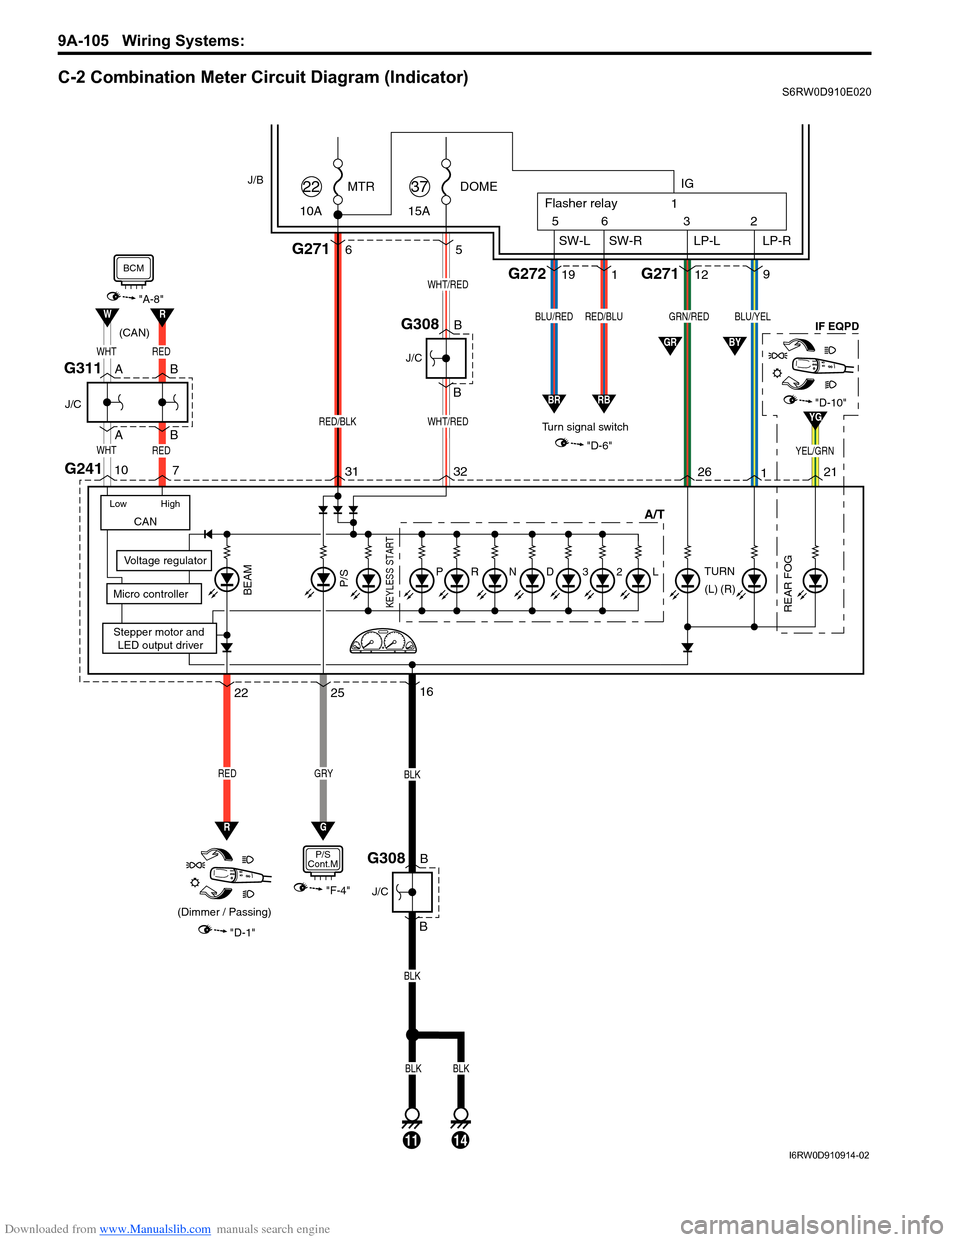
C-2 Combination Meter Circuit Diagram (Indicator)S6RW0D910E020
DOME
15A37MTR
10A22
WHT/RED
WHT/RED
32 315
Stepper motor and
LED output driver
Voltage regulator
Micro controllerKEYLESS START
G2716
RED/BLK
"D-1"
BEAM
22
RED
(Dimmer / Passing)
J/B
16
B
B
BLK
BLK
J/C
G308
11
CAN
Low High
B
B
J/C
G308
R
25
GRY
G
G241
WHTRED
WHTRED
"A-8"RW
10
7
"D-10"YG
BCM
"F-4"
P/S
Cont.M
26 211
"D-6"
TURN
REAR FOG
IF EQPD
(R)GRN/REDBLU/YEL
YEL/GRN
912
3 56
SW-L SW-R LP-LIG
LP-R Flasher relay
2 1
119G272 G271
Turn signal switch
RED/BLUBLU/RED
GR
RBBR
(L)
BY(CAN)
BLKBLK
14
A/T
L23DNRPP/S
A
A
J/C
B
BG311
I6RW0D910914-02
Page 1354 of 1556
Downloaded from www.Manualslib.com manuals search engine 9C-2 Instrumentation / Driver Info. / Horn:
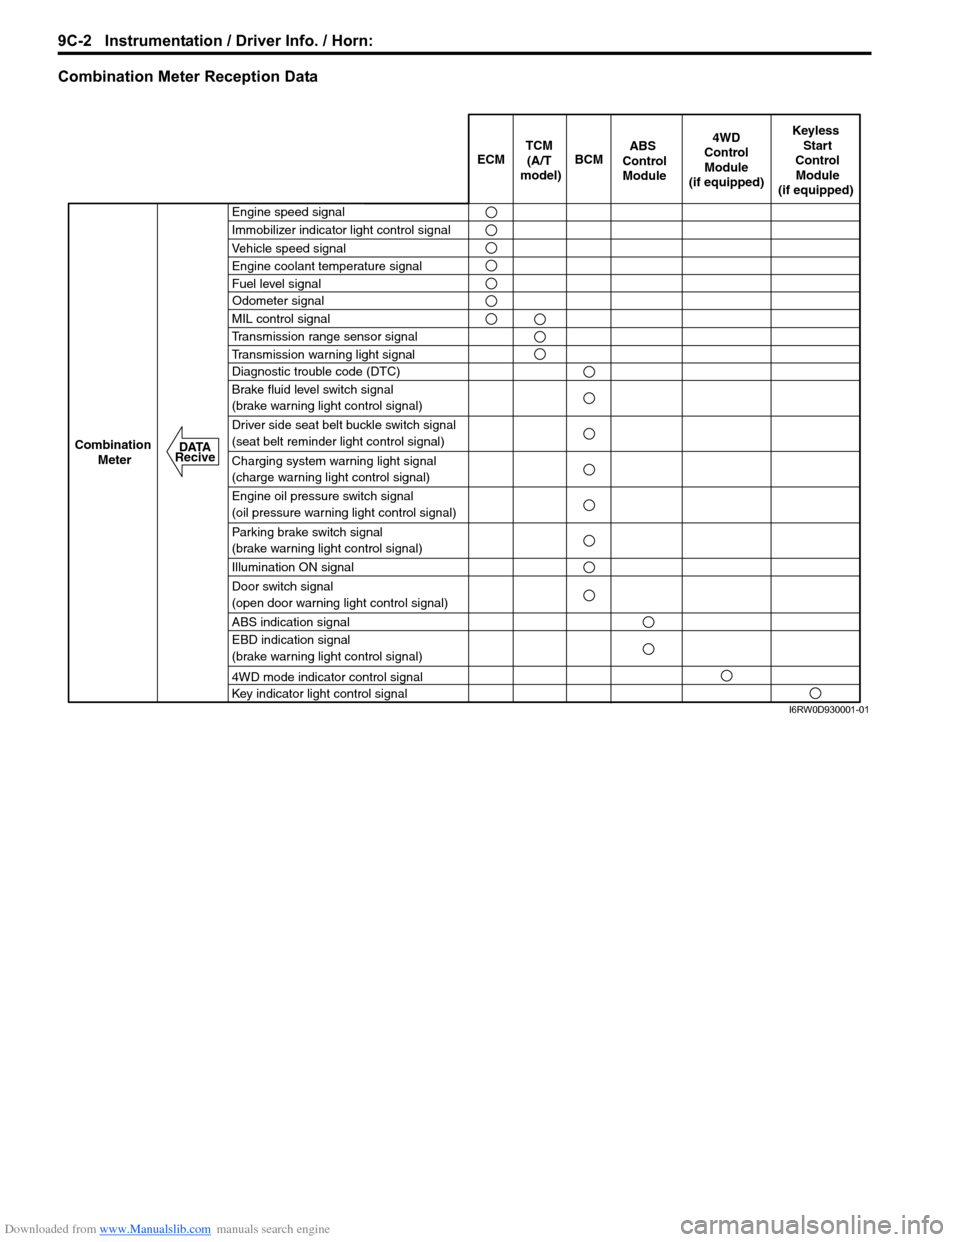
Combination Meter Reception Data
ECM BCM
Keyless
Start
Control
Module
(if equipped)
Combination
Meter4WD
Control
Module
(if equipped)TCM
(A/T
model)
Engine speed signal
Immobilizer indicator light control signal
Vehicle speed signal
Engine coolant temperature signal
Fuel level signal
MIL control signal
Transmission range sensor signal
Transmission warning light signal
Diagnostic trouble code (DTC)
Brake fluid level switch signal
(brake warning light control signal)
Driver side seat belt buckle switch signal
(seat belt reminder light control signal)
Charging system warning light signal
(charge warning light control signal)
Engine oil pressure switch signal
(oil pressure warning light control signal)
Parking brake switch signal
(brake warning light control signal)
Illumination ON signal
Door switch signal
(open door warning light control signal)
ABS indication signal
EBD indication signal
(brake warning light control signal)
4WD mode indicator control signal
Key indicator light control signal
ABS
Control
Module
Odometer signal
DATA
Recive
I6RW0D930001-01
Page 1361 of 1556
Downloaded from www.Manualslib.com manuals search engine Instrumentation / Driver Info. / Horn: 9C-9
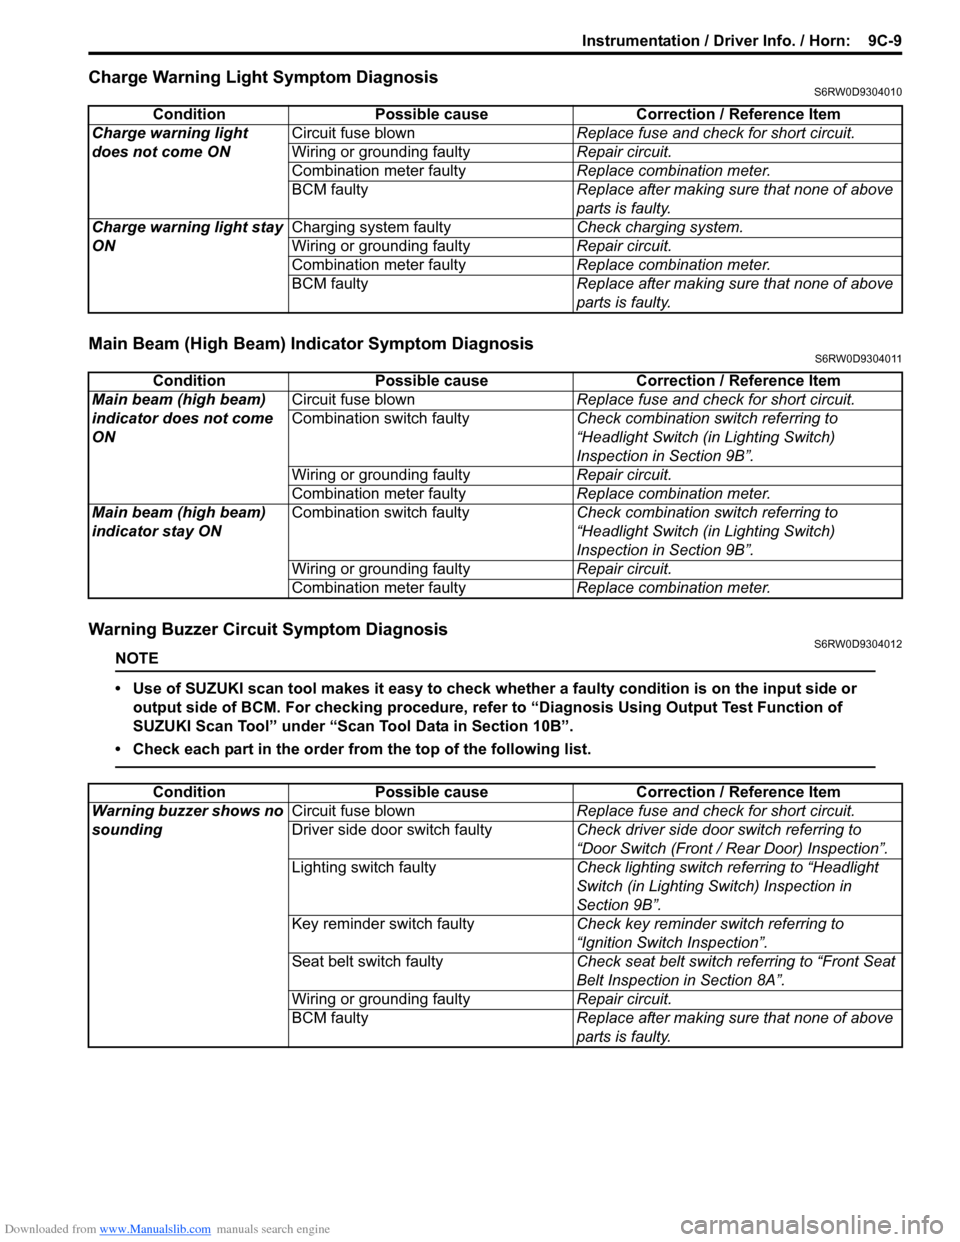
Charge Warning Light Symptom DiagnosisS6RW0D9304010
Main Beam (High Beam) Indicator Symptom DiagnosisS6RW0D9304011
Warning Buzzer Circuit Symptom DiagnosisS6RW0D9304012
NOTE
• Use of SUZUKI scan tool makes it easy to check whether a faulty condition is on the input side or
output side of BCM. For checking procedure, refer to “Diagnosis Using Output Test Function of
SUZUKI Scan Tool” under “Scan Tool Data in Section 10B”.
• Check each part in the order from the top of the following list.
Condition Possible cause Correction / Reference Item
Charge warning light
does not come ONCircuit fuse blownReplace fuse and check for short circuit.
Wiring or grounding faultyRepair circuit.
Combination meter faultyReplace combination meter.
BCM faulty Replace after making sure that none of above
parts is faulty.
Charge warning light stay
ONCharging system faultyCheck charging system.
Wiring or grounding faultyRepair circuit.
Combination meter faultyReplace combination meter.
BCM faulty Replace after making sure that none of above
parts is faulty.
Condition Possible cause Correction / Reference Item
Main beam (high beam)
indicator does not come
ONCircuit fuse blownReplace fuse and check for short circuit.
Combination switch faultyCheck combination switch referring to
“Headlight Switch (in Lighting Switch)
Inspection in Section 9B”.
Wiring or grounding faultyRepair circuit.
Combination meter faultyReplace combination meter.
Main beam (high beam)
indicator stay ONCombination switch faultyCheck combination switch referring to
“Headlight Switch (in Lighting Switch)
Inspection in Section 9B”.
Wiring or grounding faultyRepair circuit.
Combination meter faultyReplace combination meter.
Condition Possible cause Correction / Reference Item
Warning buzzer shows no
soundingCircuit fuse blownReplace fuse and check for short circuit.
Driver side door switch faultyCheck driver side door switch referring to
“Door Switch (Front / Rear Door) Inspection”.
Lighting switch faultyCheck lighting switch referring to “Headlight
Switch (in Lighting Switch) Inspection in
Section 9B”.
Key reminder switch faultyCheck key reminder switch referring to
“Ignition Switch Inspection”.
Seat belt switch faultyCheck seat belt switch referring to “Front Seat
Belt Inspection in Section 8A”.
Wiring or grounding faultyRepair circuit.
BCM faultyReplace after making sure that none of above
parts is faulty.
Page 1366 of 1556
Downloaded from www.Manualslib.com manuals search engine 9C-14 Instrumentation / Driver Info. / Horn:
Repair Instructions
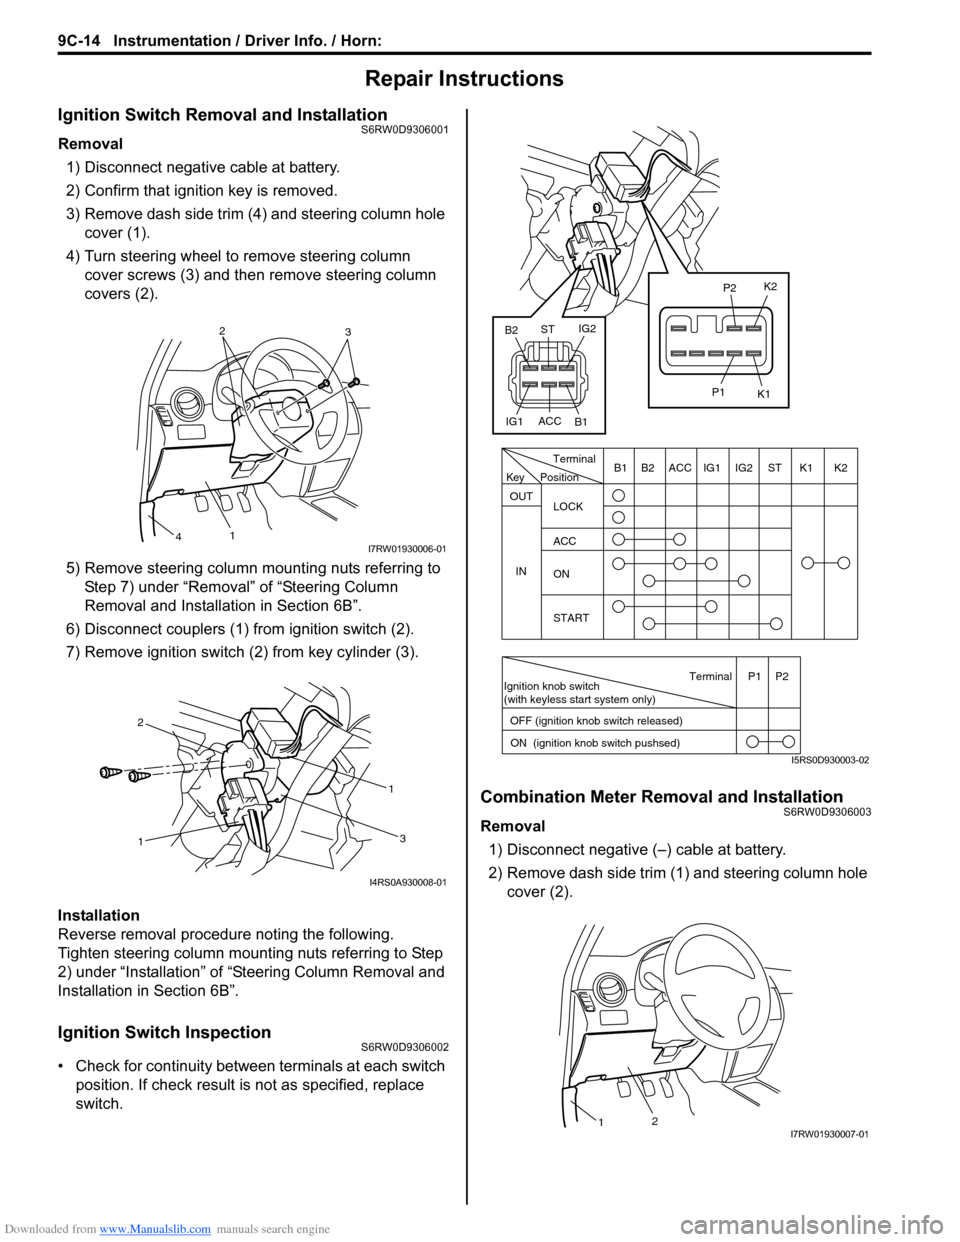
Ignition Switch Removal and InstallationS6RW0D9306001
Removal
1) Disconnect negative cable at battery.
2) Confirm that ignition key is removed.
3) Remove dash side trim (4) and steering column hole
cover (1).
4) Turn steering wheel to remove steering column
cover screws (3) and then remove steering column
covers (2).
5) Remove steering column mounting nuts referring to
Step 7) under “Removal” of “Steering Column
Removal and Installation in Section 6B”.
6) Disconnect couplers (1) from ignition switch (2).
7) Remove ignition switch (2) from key cylinder (3).
Installation
Reverse removal procedure noting the following.
Tighten steering column mounting nuts referring to Step
2) under “Installation” of “Steering Column Removal and
Installation in Section 6B”.
Ignition Switch InspectionS6RW0D9306002
• Check for continuity between terminals at each switch
position. If check result is not as specified, replace
switch.
Combination Meter Removal and InstallationS6RW0D9306003
Removal
1) Disconnect negative (–) cable at battery.
2) Remove dash side trim (1) and steering column hole
cover (2).
2
3
1
4I7RW01930006-01
11
2
3
I4RS0A930008-01
PositionTerminal
LOCK
ACC
ON
START OUT
INK2 K1 ST IG2 IG1 ACC B1 B2
Ignition knob switch
(with keyless start system only)
ACC
IG1IG2
ST
B2
B1K2
K1
P2
P1
Terminal
OFF (ignition knob switch released)
ON (ignition knob switch pushsed)P1 P2
Key
I5RS0D930003-02
21I7RW01930007-01
Page 1412 of 1556
Downloaded from www.Manualslib.com manuals search engine 9F-1 Security and Locks:
Body, Cab and Accessories
Security and Locks
General Description
Key Coding ConstructionS6RW0D9601001
Key Usage and Identification
Key is used for ignition and door lock cylinders. Key is cut on both edges to make them reversible.
Key identification is obtained from five character key code stamped on key code tag. Using this key code, key code
cutting combination can be determined from a code list (available to owners of key cutting equipment from suppliers).
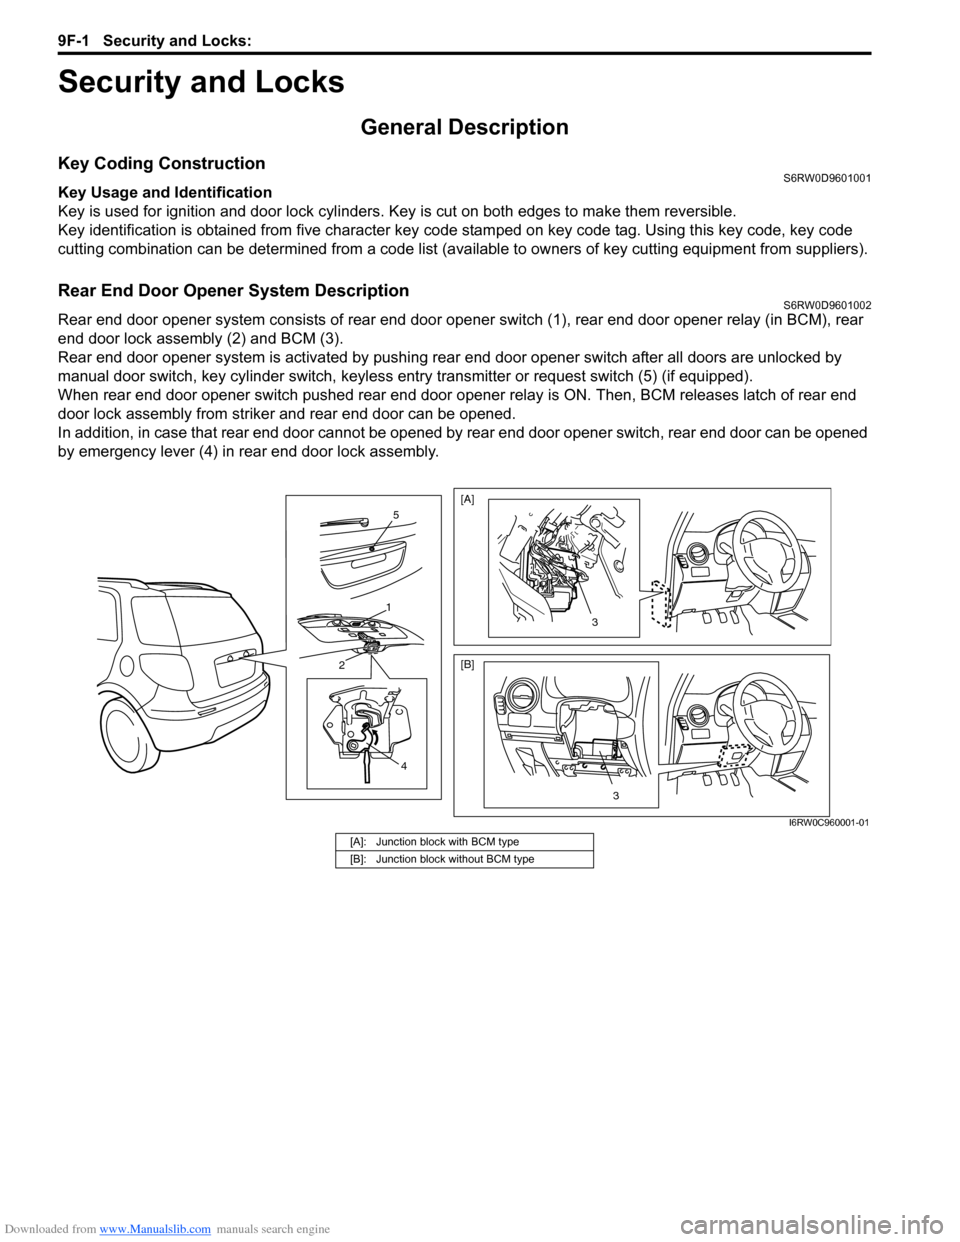
Rear End Door Opener System DescriptionS6RW0D9601002
Rear end door opener system consists of rear end door opener switch (1), rear end door opener relay (in BCM), rear
end door lock assembly (2) and BCM (3).
Rear end door opener system is activated by pushing rear end door opener switch after all doors are unlocked by
manual door switch, key cylinder switch, keyless entry transmitter or request switch (5) (if equipped).
When rear end door opener switch pushed rear end door opener relay is ON. Then, BCM releases latch of rear end
door lock assembly from striker and rear end door can be opened.
In addition, in case that rear end door cannot be opened by rear end door opener switch, rear end door can be opened
by emergency lever (4) in rear end door lock assembly.
4
2
1
5
3
[A]
[B]
3
I6RW0C960001-01
[A]: Junction block with BCM type
[B]: Junction block without BCM type
Page 1413 of 1556
Downloaded from www.Manualslib.com manuals search engine Security and Locks: 9F-2
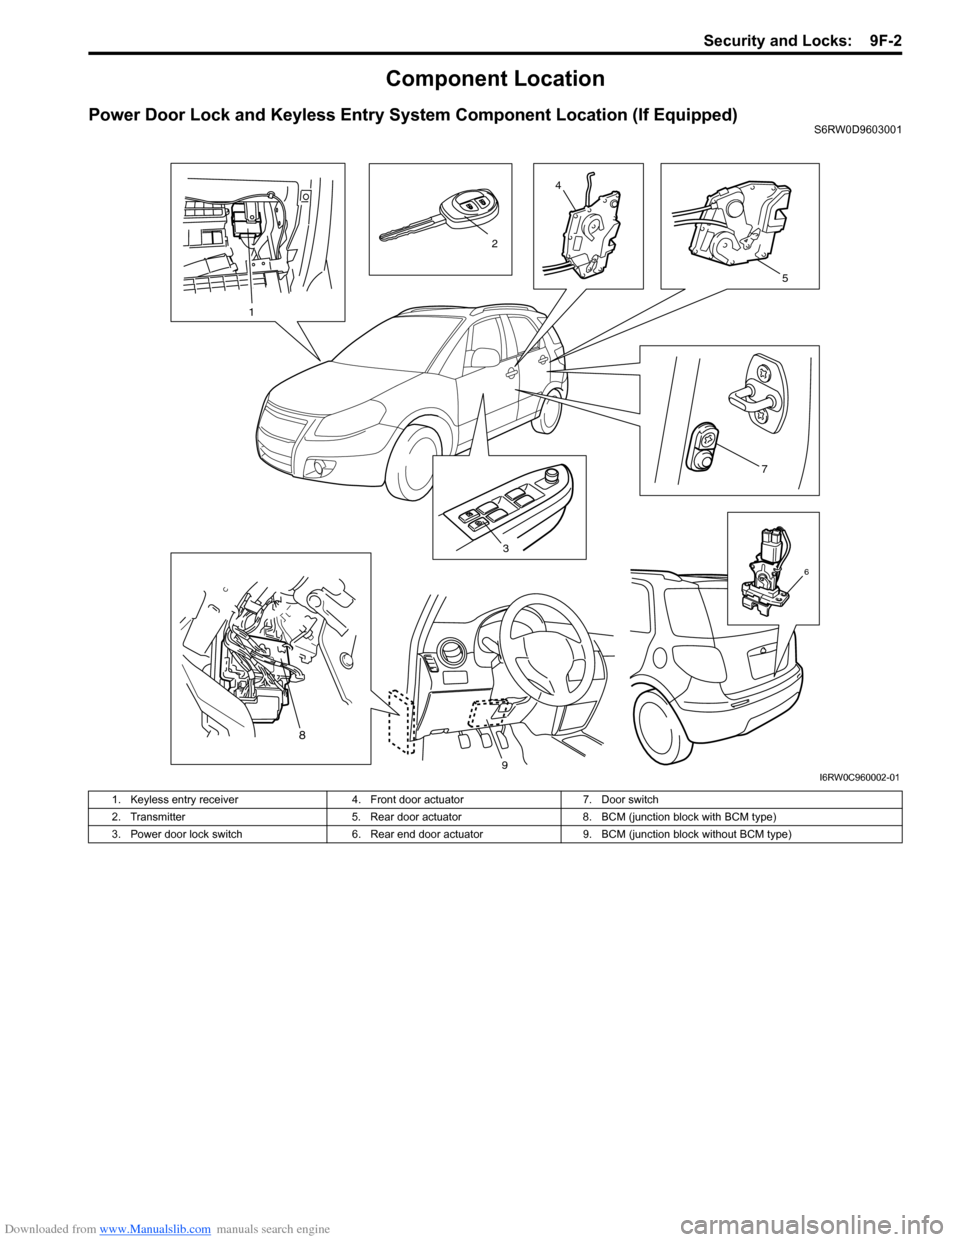
Component Location
Power Door Lock and Keyless Entry System Component Location (If Equipped)S6RW0D9603001
3
7
4
5
6
1
2
8
9I6RW0C960002-01
1. Keyless entry receiver 4. Front door actuator 7. Door switch
2. Transmitter 5. Rear door actuator 8. BCM (junction block with BCM type)
3. Power door lock switch 6. Rear end door actuator 9. BCM (junction block without BCM type)
Page 1414 of 1556

Downloaded from www.Manualslib.com manuals search engine 9F-3 Security and Locks:
Diagnostic Information and Procedures
Power Door Lock System Symptom Diagnosis (If Equipped)S6RW0D9604001
NOTE
• Use of SUZUKI scan tool makes it easy to check whether a faulty condition is on the input side or
output side of BCM. For checking procedure, refer to “Diagnosis Using Output Test Function of
SUZUKI Scan Tool” under “Scan Tool Data in Section 10B”.
• Check each part in the order from the top of the following list.
Power Door Lock System Operation Inspection (If Equipped)S6RW0D9604002
1) Check the following operation:
a) Turn the driver side key cylinder is turned LOCK once, check all doors lock.
b) Turn the driver side door key cylinder is turned UNLOCK position with door key twice, check all doors unlock.
c) With all doors unlocked, insert key in key cylinder of driver side door and turn it to lock side, turn it again to lock
side within 3 seconds and check that no door can be opened even when door lock knob is moved to unlock
side (dead lock function, if equipped).
If malfunction is found, go to “Power Door Lock System Symptom Diagnosis (If Equipped)”. Condition Possible cause Correction / Reference Item
All door can not be locked
/ unlocked by all of
switchesCircuit fuse blownReplace fuse and check for short circuit.
Wiring or grounding faultyRepair circuit.
BCM faultyReplace after making sure that none of above
parts is faulty.
All door can not be locked
/ unlocked by only power
door lock switchCircuit fuse blownReplace fuse and check for short circuit.
Power door lock switch faultyCheck power door lock switch referring to
“Power Door Lock Switch Inspection (If
Equipped)”.
Wiring harness connected to power door
lock switch faultyRepair.
Wiring or grounding faultyRepair circuit.
BCM faultyReplace after making sure that none of above
parts is faulty.
All door can not be locked
/ unlocked by only key
cylinder switchCircuit fuse blownReplace fuse and check for short circuit.
Key cylinder switch faultyCheck key cylinder switch referring to “Door
Key Cylinder Switch Inspection (If Equipped)”.
Wiring or grounding faultyRepair circuit.
BCM faultyReplace after making sure that none of above
parts is faulty.
Only one door can not be
locked / unlockedPower door lock actuator faultyCheck actuator referring to “Power Door Lock
Actuator Inspection (If Equipped)”.
Wiring harness connected to applicable
door lock actuator faultyRepair.
BCM faultyReplace after making sure that none of above
parts is faulty.
Page 1415 of 1556
Downloaded from www.Manualslib.com manuals search engine Security and Locks: 9F-4
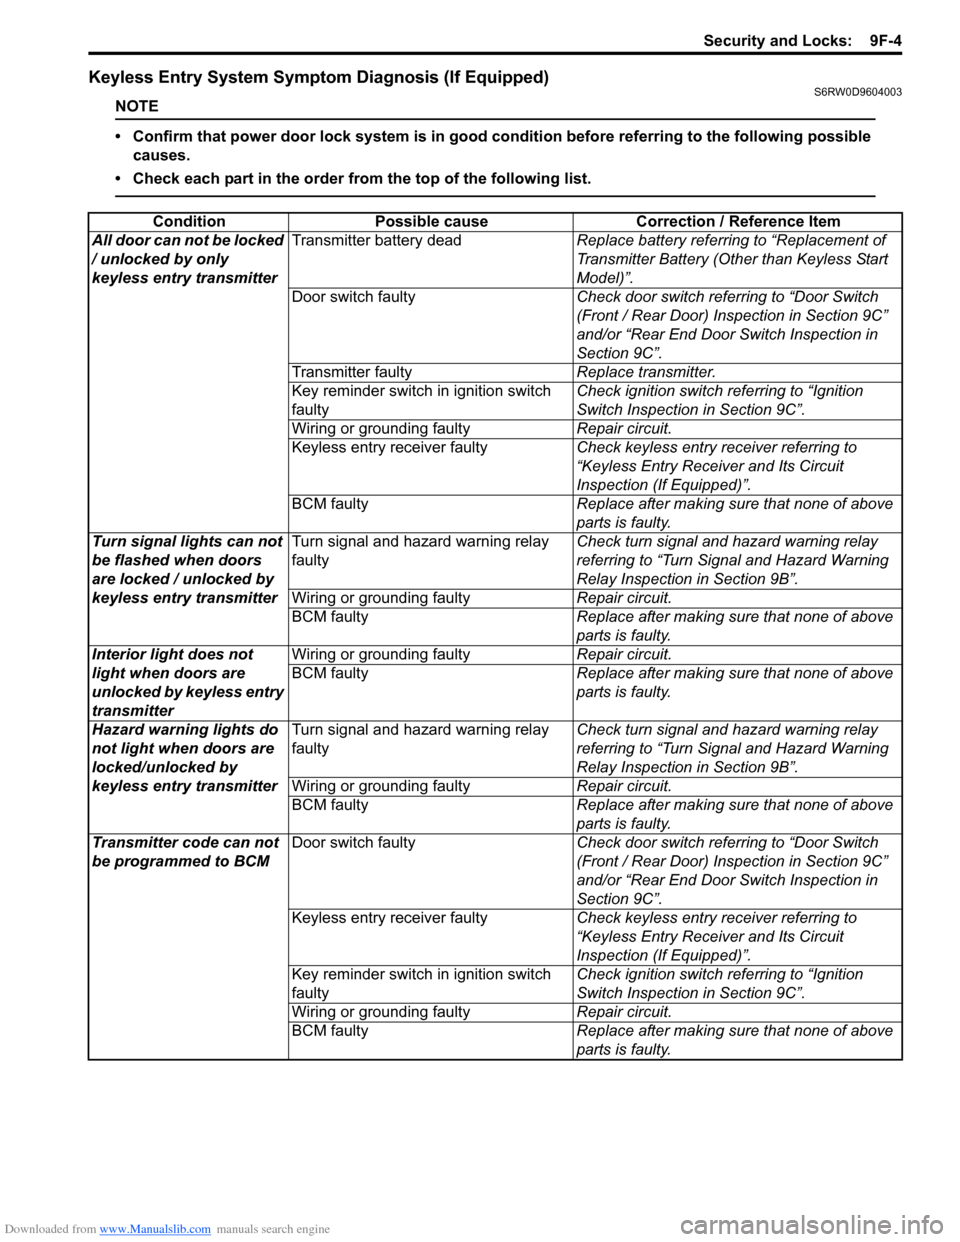
Keyless Entry System Symptom Diagnosis (If Equipped)S6RW0D9604003
NOTE
• Confirm that power door lock system is in good condition before referring to the following possible
causes.
• Check each part in the order from the top of the following list.
Condition Possible cause Correction / Reference Item
All door can not be locked
/ unlocked by only
keyless entry transmitterTransmitter battery deadReplace battery referring to “Replacement of
Transmitter Battery (Other than Keyless Start
Model)”.
Door switch faultyCheck door switch referring to “Door Switch
(Front / Rear Door) Inspection in Section 9C”
and/or “Rear End Door Switch Inspection in
Section 9C”.
Transmitter faultyReplace transmitter.
Key reminder switch in ignition switch
faultyCheck ignition switch referring to “Ignition
Switch Inspection in Section 9C”.
Wiring or grounding faultyRepair circuit.
Keyless entry receiver faultyCheck keyless entry receiver referring to
“Keyless Entry Receiver and Its Circuit
Inspection (If Equipped)”.
BCM faultyReplace after making sure that none of above
parts is faulty.
Turn signal lights can not
be flashed when doors
are locked / unlocked by
keyless entry transmitterTurn signal and hazard warning relay
faultyCheck turn signal and hazard warning relay
referring to “Turn Signal and Hazard Warning
Relay Inspection in Section 9B”.
Wiring or grounding faultyRepair circuit.
BCM faultyReplace after making sure that none of above
parts is faulty.
Interior light does not
light when doors are
unlocked by keyless entry
transmitterWiring or grounding faultyRepair circuit.
BCM faultyReplace after making sure that none of above
parts is faulty.
Hazard warning lights do
not light when doors are
locked/unlocked by
keyless entry transmitterTurn signal and hazard warning relay
faultyCheck turn signal and hazard warning relay
referring to “Turn Signal and Hazard Warning
Relay Inspection in Section 9B”.
Wiring or grounding faultyRepair circuit.
BCM faultyReplace after making sure that none of above
parts is faulty.
Transmitter code can not
be programmed to BCMDoor switch faultyCheck door switch referring to “Door Switch
(Front / Rear Door) Inspection in Section 9C”
and/or “Rear End Door Switch Inspection in
Section 9C”.
Keyless entry receiver faultyCheck keyless entry receiver referring to
“Keyless Entry Receiver and Its Circuit
Inspection (If Equipped)”.
Key reminder switch in ignition switch
faultyCheck ignition switch referring to “Ignition
Switch Inspection in Section 9C”.
Wiring or grounding faultyRepair circuit.
BCM faultyReplace after making sure that none of above
parts is faulty.
Page 1416 of 1556
Downloaded from www.Manualslib.com manuals search engine 9F-5 Security and Locks:
Keyless Entry System Operation Inspection (If
Equipped)
S6RW0D9604004
NOTE
When performing the this inspection, make
sure to have any of the door once opened /
closed after the ignition key has been
removed from the ignition key cylinder.
1) Confirm that power door lock system operates
normally, refer to “Power Door Lock System
Operation Inspection (If Equipped)”.
2) All doors are closed and unlocked.
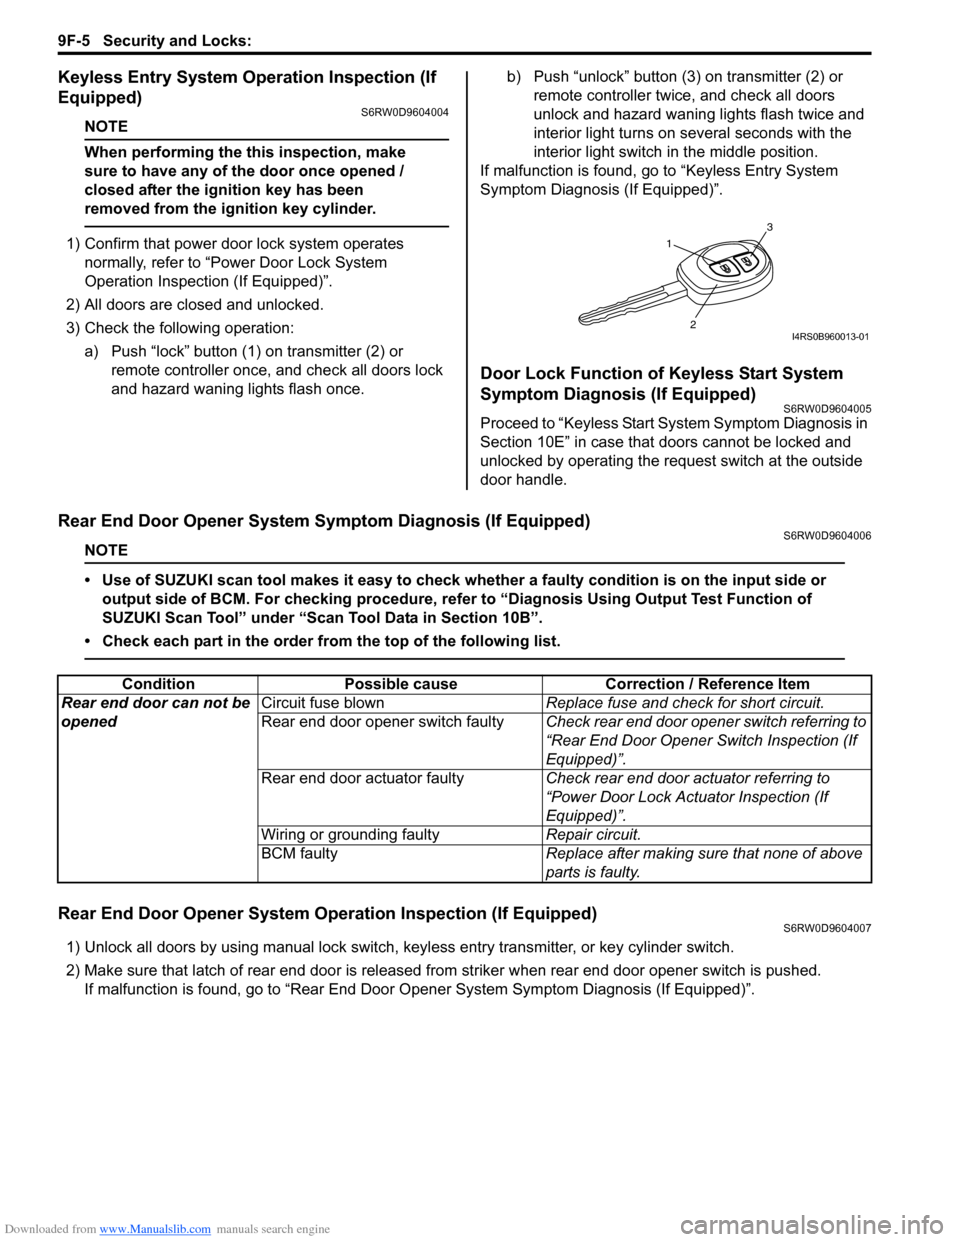
3) Check the following operation:
a) Push “lock” button (1) on transmitter (2) or
remote controller once, and check all doors lock
and hazard waning lights flash once.b) Push “unlock” button (3) on transmitter (2) or
remote controller twice, and check all doors
unlock and hazard waning lights flash twice and
interior light turns on several seconds with the
interior light switch in the middle position.
If malfunction is found, go to “Keyless Entry System
Symptom Diagnosis (If Equipped)”.
Door Lock Function of Keyless Start System
Symptom Diagnosis (If Equipped)
S6RW0D9604005
Proceed to “Keyless Start System Symptom Diagnosis in
Section 10E” in case that doors cannot be locked and
unlocked by operating the request switch at the outside
door handle.
Rear End Door Opener System Symptom Diagnosis (If Equipped)S6RW0D9604006
NOTE
• Use of SUZUKI scan tool makes it easy to check whether a faulty condition is on the input side or
output side of BCM. For checking procedure, refer to “Diagnosis Using Output Test Function of
SUZUKI Scan Tool” under “Scan Tool Data in Section 10B”.
• Check each part in the order from the top of the following list.
Rear End Door Opener System Operation Inspection (If Equipped)S6RW0D9604007
1) Unlock all doors by using manual lock switch, keyless entry transmitter, or key cylinder switch.
2) Make sure that latch of rear end door is released from striker when rear end door opener switch is pushed.
If malfunction is found, go to “Rear End Door Opener System Symptom Diagnosis (If Equipped)”.
1
3
2I4RS0B960013-01
Condition Possible cause Correction / Reference Item
Rear end door can not be
openedCircuit fuse blownReplace fuse and check for short circuit.
Rear end door opener switch faultyCheck rear end door opener switch referring to
“Rear End Door Opener Switch Inspection (If
Equipped)”.
Rear end door actuator faultyCheck rear end door actuator referring to
“Power Door Lock Actuator Inspection (If
Equipped)”.
Wiring or grounding faultyRepair circuit.
BCM faultyReplace after making sure that none of above
parts is faulty.