heating TESLA MODEL 3 2023 Owners Manual
[x] Cancel search | Manufacturer: TESLA, Model Year: 2023, Model line: MODEL 3, Model: TESLA MODEL 3 2023Pages: 296, PDF Size: 9.84 MB
Page 7 of 296
WARNING: Always pay attention to road and traffic conditions when driving. To minimize driver distraction and
ensure the safety of vehicle occupants as well as other road users, avoid using the touchscreen to adjust
settings while the vehicle is in motion.
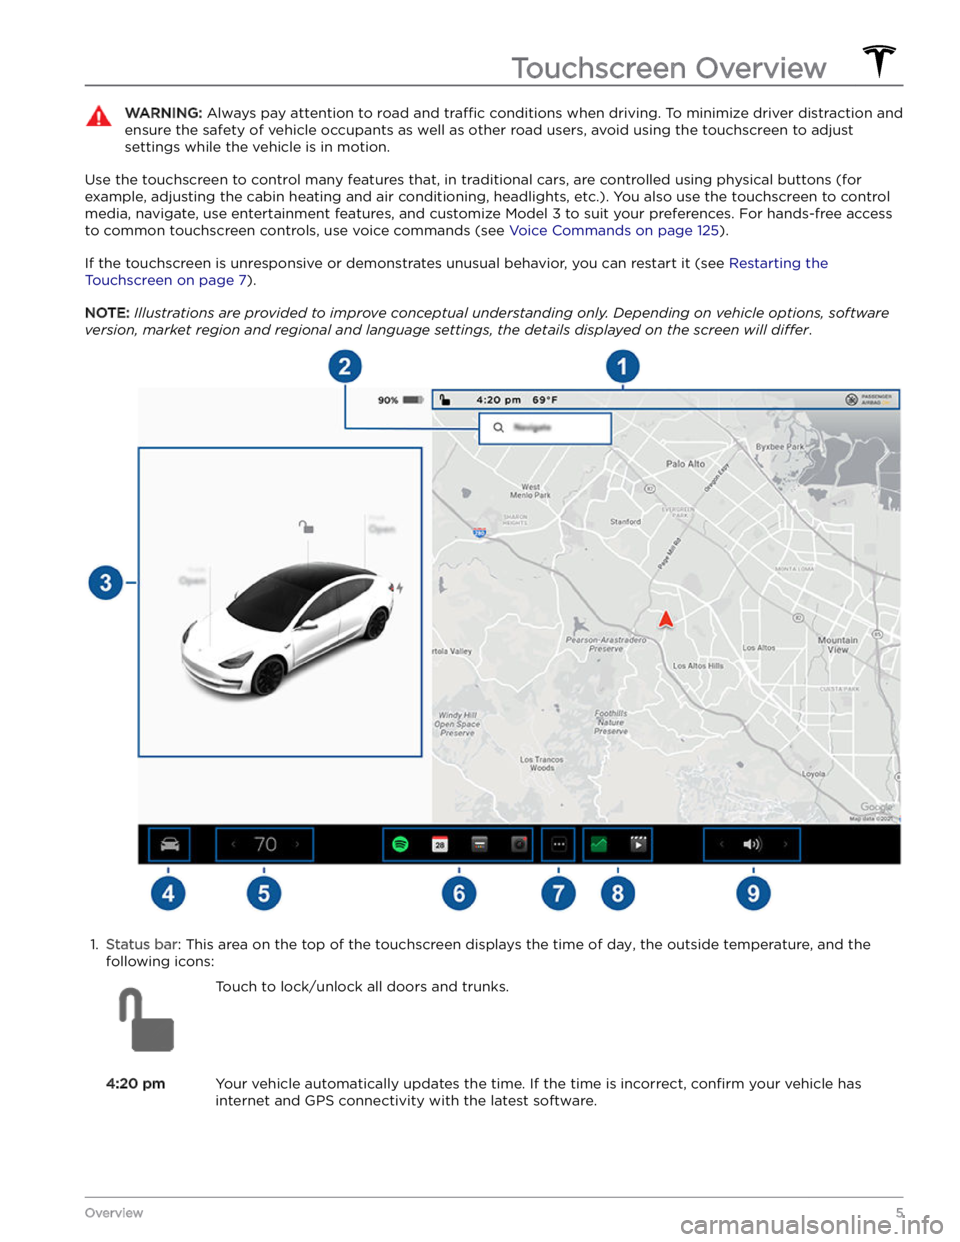
Use the touchscreen to control many features that, in traditional cars, are controlled using physical buttons (for example, adjusting the cabin heating and air conditioning, headlights, etc.). You also use the touchscreen to control
media, navigate, use entertainment features, and customize
Model 3 to suit your preferences. For hands-free access
to common touchscreen controls, use voice commands (see
Voice Commands on page 125).
If the touchscreen is unresponsive or demonstrates unusual behavior, you can restart it (see Restarting the
Touchscreen on page 7).
NOTE: Illustrations are provided to improve conceptual understanding only. Depending on vehicle options, software
version, market region and regional and language settings, the details displayed on the screen will differ.
1.
Status bar: This area on the top of the touchscreen displays the time of day, the outside temperature, and the
following icons:
Touch to lock/unlock all doors and trunks.4:20 pmYour vehicle automatically updates the time. If the time is incorrect, confirm your vehicle has
internet and GPS connectivity with the latest software.
Touchscreen Overview
5Overview
Page 29 of 296
WARNING: To minimize the risk of severe injury or
death in the event of a collision, ensure that head
supports are positioned correctly before sitting in,
or operating, Model 3.
WARNING: When installing a seat belt retained
child safety seat in the center seating position in
the second row, you must lower the associated
head support (described next).
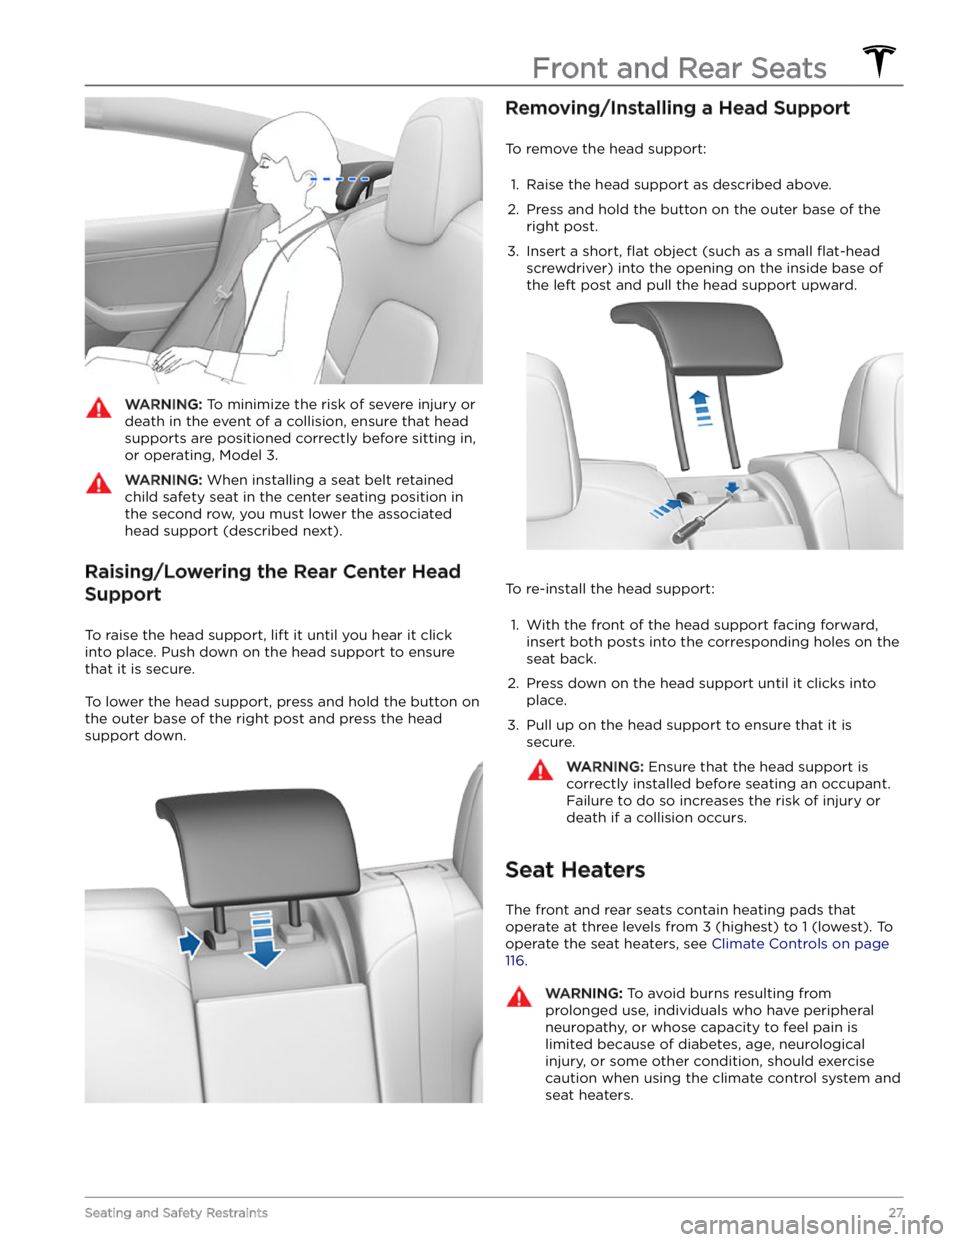
Raising/Lowering the Rear Center Head Support
To raise the head support, lift it until you hear it click
into place. Push down on the head support to ensure that it is secure.
To lower the head support, press and hold the button on the outer base of the right post and press the head support down.
Removing/Installing a Head Support
To remove the head support:
1.
Raise the head support as described above.
2.
Press and hold the button on the outer base of the
right post.
3.
Insert a short, flat object (such as a small flat-head
screwdriver) into the opening on the inside base of
the left post and pull the head support upward.
To re-install the head support:
1.
With the front of the head support facing forward, insert both posts into the corresponding holes on the
seat back.
2.
Press down on the head support until it clicks into place.
3.
Pull up on the head support to ensure that it is secure.
WARNING: Ensure that the head support is
correctly installed before seating an occupant.
Failure to do so increases the risk of injury or
death if a collision occurs.
Seat Heaters
The front and rear seats contain heating pads that
operate at three levels from 3 (highest) to 1 (lowest).
To
operate the seat heaters, see Climate Controls on page
116.
WARNING: To avoid burns resulting from
prolonged use, individuals who have peripheral
neuropathy, or whose capacity to feel pain is
limited because of diabetes, age, neurological
injury, or some other condition, should exercise
caution when using the climate control system and
seat heaters.
Front and Rear Seats
27Seating and Safety Restraints
Page 118 of 296
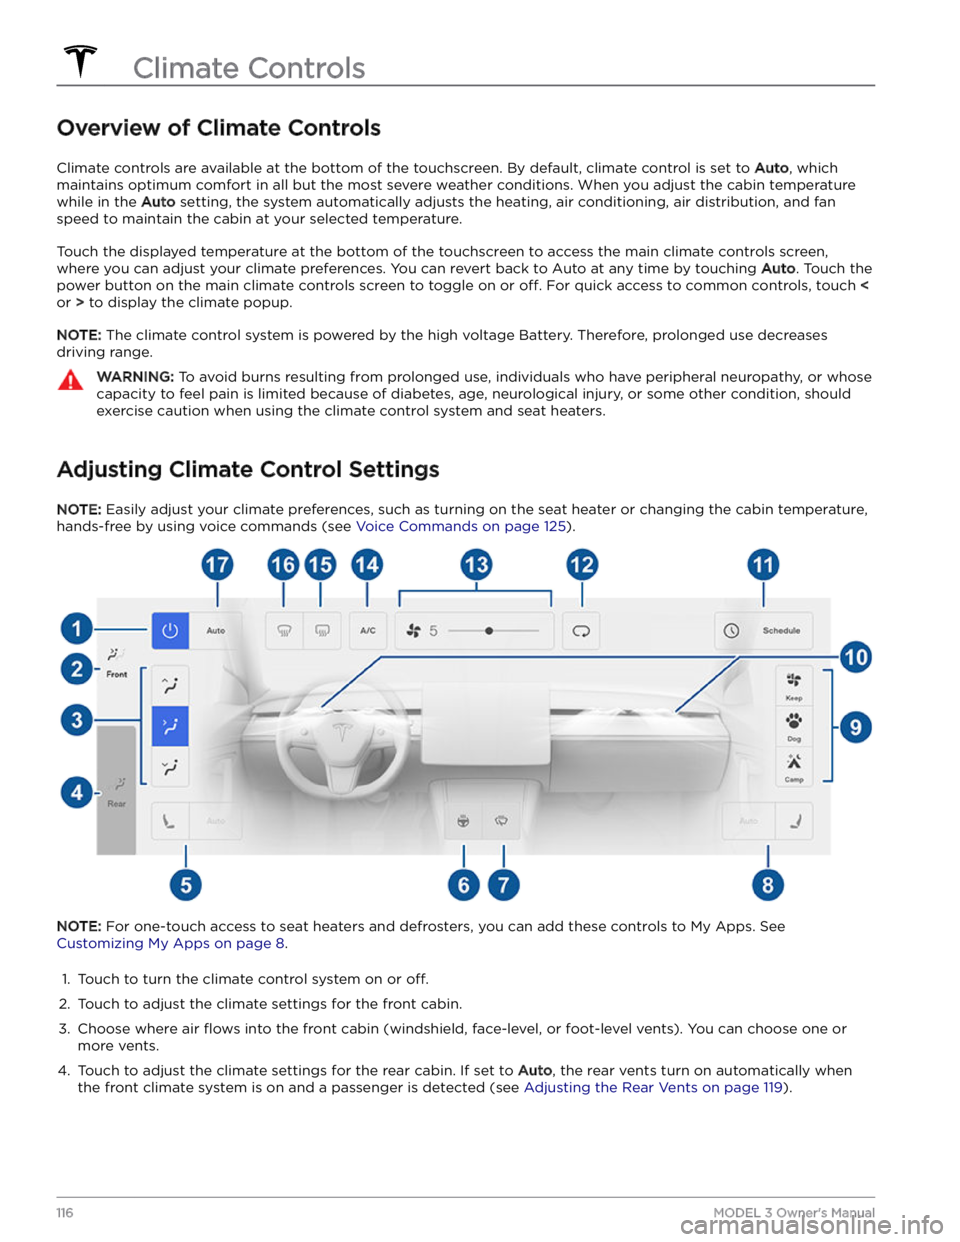
Overview of Climate Controls
Climate controls are available at the bottom of the touchscreen. By default, climate control is set to Auto, which
maintains optimum comfort in all but the most severe weather conditions. When you adjust the cabin temperature
while in the
Auto setting, the system automatically adjusts the heating, air conditioning, air distribution, and fan
speed to maintain the cabin at your selected temperature.
Touch the displayed temperature at the bottom of the touchscreen to access the main climate controls screen, where you can adjust your climate preferences. You can revert back to Auto at any time by touching
Auto. Touch the
power button on the main climate controls screen to toggle on or
off. For quick access to common controls, touch <
or > to display the climate popup.
NOTE: The climate control system is powered by the high voltage Battery. Therefore, prolonged use decreases
driving range.
WARNING: To avoid burns resulting from prolonged use, individuals who have peripheral neuropathy, or whose
capacity to feel pain is limited because of diabetes, age, neurological injury, or some other condition, should
exercise caution when using the climate control system and seat heaters.
Adjusting Climate Control Settings
NOTE: Easily adjust your climate preferences, such as turning on the seat heater or changing the cabin temperature,
hands-free by using voice commands (see
Voice Commands on page 125).
NOTE: For one-touch access to seat heaters and defrosters, you can add these controls to My Apps. See
Customizing My Apps on page 8.
1.
Touch to turn the climate control system on or off.
2.
Touch to adjust the climate settings for the front cabin.
3.
Choose where air flows into the front cabin (windshield, face-level, or foot-level vents). You can choose one or
more vents.
4.
Touch to adjust the climate settings for the rear cabin. If set to Auto, the rear vents turn on automatically when
the front climate system is on and a passenger is detected (see Adjusting the Rear Vents on page 119).
Climate Controls
116MODEL 3 Owner
Page 186 of 296

Cautions for Exterior CleaningCAUTION: Do not wash in direct sunlight.CAUTION: Do not use windshield treatment fluids.
Doing so can interfere with wiper friction and
cause a chattering sound.
CAUTION: Do not use hot water, detergents, or
highly alkaline or caustic cleaning products,
especially those containing hydroxide.
CAUTION: If using a pressure washer, maintain a
distance of at least 12" (30 cm) between the
nozzle and the surface of Model 3. Avoid aiming
the water jet directly at parking sensors (if
equipped). Keep the nozzle moving and do not
concentrate the water jet on any one area.
CAUTION: Do not aim water hoses directly at
windows, door, or hood seals or at electronic
modules or exposed cabling.
CAUTION: To avoid corrosive damage that may
not be covered by the warranty, rinse away any
road salt from the underside of the vehicle, wheel
wells, and brakes. After cleaning the vehicle, dry
the brakes by going on a short drive and applying
the brakes multiple times.
CAUTION: Avoid using tight-napped or rough
cloths, such as washing mitts. A high-quality
microfiber cleaning cloth is recommended.
CAUTION: If washing in an automatic car wash, use
touchless car washes only. These car washes have
no parts (brushes, etc.) that touch the surfaces of
Model 3. Some touchless car washes use caustic
solutions that, over time, can cause discoloration
of decorative exterior trim. Avoid exposure to
soaps and chemicals above pH 13. If unsure, check
the product label or ask the staff at the car wash.
Damage caused by improper washing is not
covered by the warranty.
CAUTION: If washing in an automatic car wash,
make sure the vehicle is locked. In addition, avoid
using controls on the touchscreen that can result
in accidentally opening doors or trunks while the
vehicle is being washed. Any damage caused is
not covered by the warranty.
CAUTION: Ensure the wipers are off before
washing Model 3 to avoid the risk of damaging the
wipers.
CAUTION: Do not use chemical based wheel
cleaners or pre-wash products. These can damage
the finish on the wheels.
WARNING: Never spray liquid at a high velocity
(for example, if using a pressure washer) towards
the charge port while Model 3 is charging. Failure
to follow these instructions can result in serious
injury or damage to the vehicle, charging
equipment, or property.
Cleaning the Interior
Frequently inspect and clean the interior to maintain its
appearance and to prevent premature wear. If possible,
immediately wipe up spills and remove marks. For
general cleaning, wipe interior surfaces using a soft cloth (such as
microfiber) dampened with a mixture of warm
water and mild non-detergent cleaner (test all cleaners on a concealed area before use). To avoid streaks, dry immediately with a soft lint-free cloth.
Interior Glass
Do not scrape, or use any abrasive cleaning fluid on
glass or mirrored surfaces. This can damage the
reflective surface of the mirror and the heating elements
in the rear window.
Airbags
Do not allow any substance to enter an airbag cover. This could
affect correct operation.
Dashboard and Plastic Surfaces
Do not polish the upper surfaces of the dashboard. Polished surfaces are
reflective and could interfere with
your driving view.
Seats
Wipe spills and chemical residues from interior surfaces as soon as possible using a soft cloth moistened with warm water and non-detergent soap. Wipe gently in a circular motion. Then wipe dry using a soft, lint-free cloth.
Although seating surfaces are designed to repel stains, Tesla recommends regular cleaning to maintain
performance and an as-new appearance. Promptly treat
dye transfer from clothing, such as indigo-dyed denim.
Avoid contact with harsh chemicals, including certain cosmetics. Never use cleaners containing alcohol or bleach. Spot-test cleaners on an inconspicuous area
before applying to visible surfaces.
Vacuum cloth seats as needed to remove any loose dirt.
CAUTION: Aftermarket, non-Tesla seat covers may
inhibit the sensitivity of a seat
Page 223 of 296
DO NOT TRANSPORT WITH
WHEELS ON THE GROUND
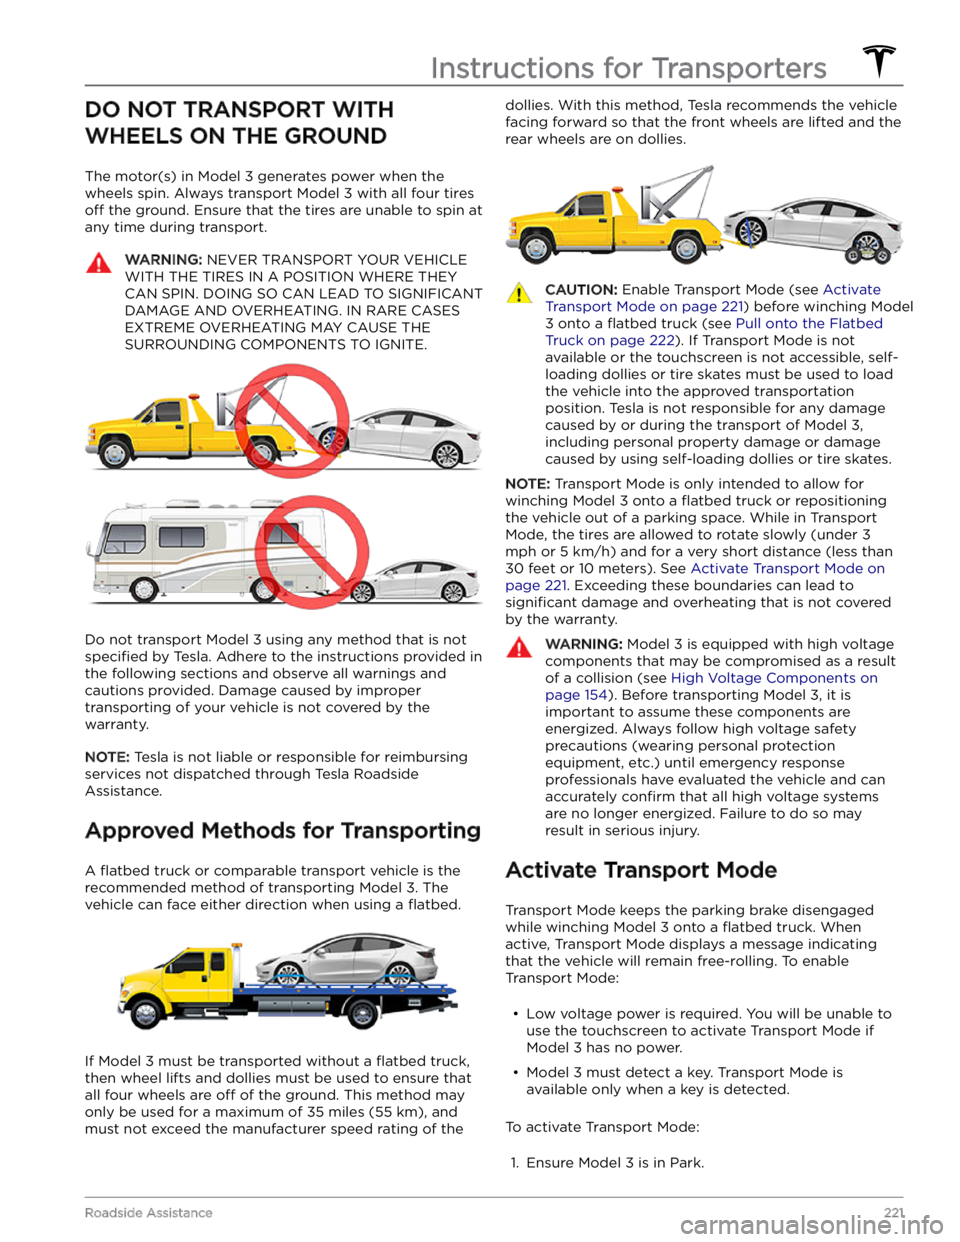
The motor(s) in Model 3 generates power when the
wheels spin. Always transport
Model 3 with all four tires
off the ground. Ensure that the tires are unable to spin at
any time during transport.
WARNING: NEVER TRANSPORT YOUR VEHICLE
WITH THE TIRES IN A POSITION WHERE THEY
CAN SPIN. DOING SO CAN LEAD TO SIGNIFICANT
DAMAGE AND OVERHEATING. IN RARE CASES
EXTREME OVERHEATING MAY CAUSE THE
SURROUNDING COMPONENTS TO IGNITE.
Do not transport Model 3 using any method that is not
specified by Tesla. Adhere to the instructions provided in
the following sections and observe all warnings and
cautions provided. Damage caused by improper
transporting of your vehicle is not covered by the
warranty.
NOTE: Tesla is not liable or responsible for reimbursing
services not dispatched through Tesla Roadside Assistance.
Approved Methods for Transporting
A flatbed truck or comparable transport vehicle is the
recommended method of transporting
Model 3. The
vehicle can face either direction when using a
flatbed.
If Model 3 must be transported without a flatbed truck,
then wheel lifts and dollies must be used to ensure that
all four wheels are
off of the ground. This method may
only be used for a maximum of
35 miles (55 km), and
must not exceed the manufacturer speed rating of the
dollies. With this method, Tesla recommends the vehicle
facing forward so that the front wheels are lifted and the rear wheels are on dollies.CAUTION: Enable Transport Mode (see Activate
Transport Mode on page 221) before winching Model
3 onto a flatbed truck (see Pull onto the Flatbed
Truck on page 222). If Transport Mode is not
available or the touchscreen is not accessible, self-
loading dollies or tire skates must be used to load
the vehicle into the approved transportation
position. Tesla is not responsible for any damage
caused by or during the transport of Model 3,
including personal property damage or damage
caused by using self-loading dollies or tire skates.
NOTE: Transport Mode is only intended to allow for
winching
Model 3 onto a flatbed truck or repositioning
the vehicle out of a parking space. While in Transport Mode, the tires are allowed to rotate slowly (under
3
mph or 5 km/h) and for a very short distance (less than
30 feet or 10 meters). See Activate Transport Mode on
page 221. Exceeding these boundaries can lead to
significant damage and overheating that is not covered
by the warranty.
WARNING: Model 3 is equipped with high voltage
components that may be compromised as a result
of a collision (see High Voltage Components on
page 154). Before transporting Model 3, it is
important to assume these components are
energized. Always follow high voltage safety
precautions (wearing personal protection
equipment, etc.) until emergency response
professionals have evaluated the vehicle and can
accurately confirm that all high voltage systems
are no longer energized. Failure to do so may
result in serious injury.
Activate Transport Mode
Transport Mode keeps the parking brake disengaged
while winching
Model 3 onto a flatbed truck. When
active, Transport Mode displays a message indicating that the vehicle will remain free-rolling. To enable
Transport Mode:
Page 291 of 296
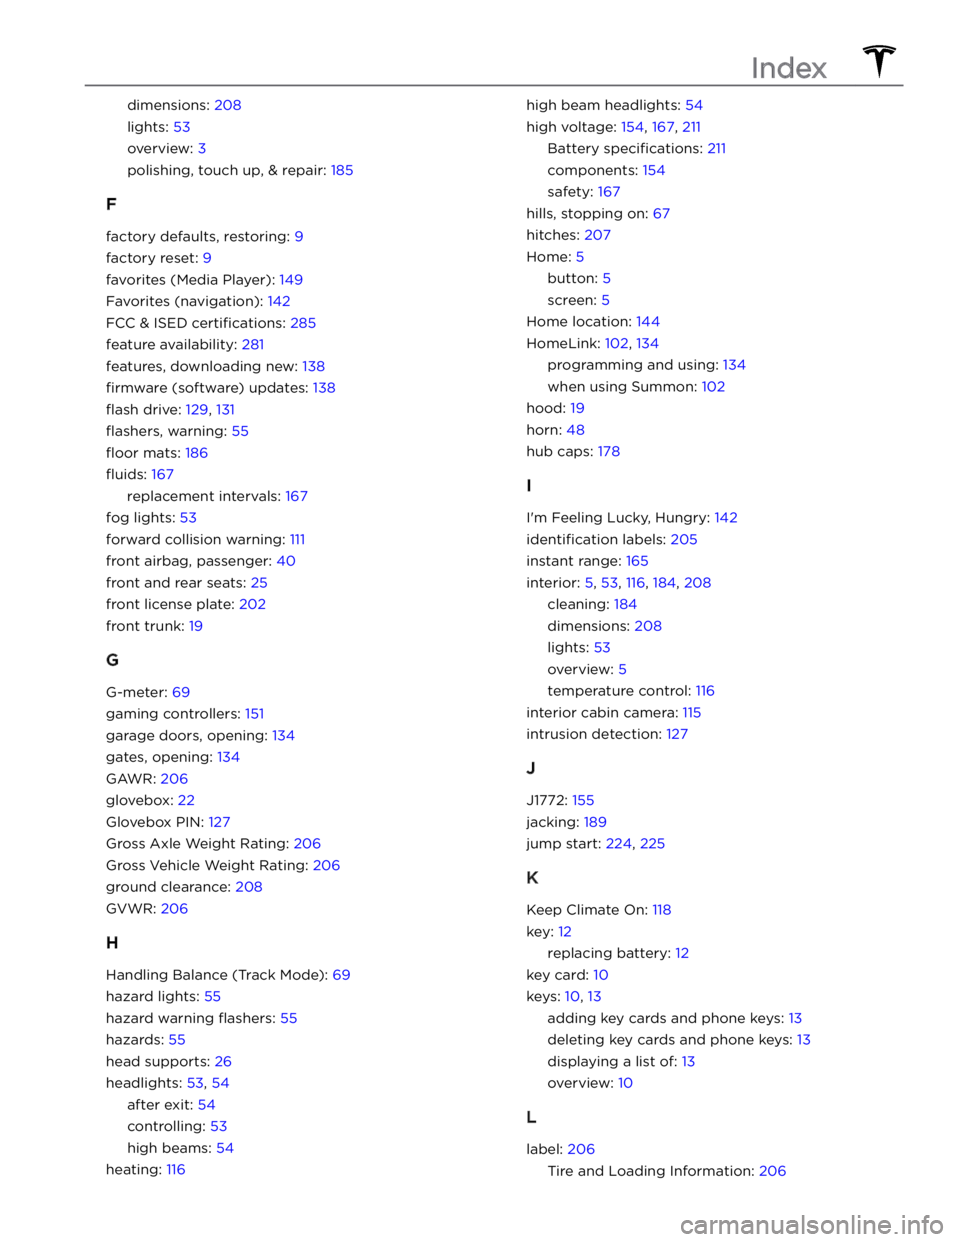
dimensions: 208
lights: 53
overview: 3
polishing, touch up, & repair: 185
F
factory defaults, restoring: 9
factory reset: 9
favorites (Media Player): 149
Favorites (navigation): 142
FCC & ISED certifications: 285
feature availability: 281
features, downloading new: 138
firmware (software) updates: 138
flash drive: 129, 131
flashers, warning: 55
floor mats: 186
fluids: 167
replacement intervals: 167
fog lights: 53
forward collision warning: 111
front airbag, passenger: 40
front and rear seats: 25
front license plate: 202
front trunk: 19
G
G-meter: 69
gaming controllers: 151
garage doors, opening: 134
gates, opening: 134
GAWR: 206
glovebox: 22
Glovebox PIN: 127
Gross Axle Weight Rating: 206
Gross Vehicle Weight Rating: 206
ground clearance: 208
GVWR: 206
H
Handling Balance (Track Mode): 69
hazard lights: 55
hazard warning flashers: 55
hazards: 55
head supports: 26
headlights: 53, 54
after exit: 54
controlling: 53
high beams: 54
heating: 116
high beam headlights: 54
high voltage: 154, 167, 211
Battery specifications: 211
components: 154
safety: 167
hills, stopping on: 67
hitches: 207
Home: 5
button: 5
screen: 5
Home location: 144
HomeLink: 102, 134
programming and using: 134
when using Summon: 102
hood: 19
horn: 48
hub caps: 178
I
I