warning TESLA MODEL S 2014 Owner's manual (Europe)
[x] Cancel search | Manufacturer: TESLA, Model Year: 2014, Model line: MODEL S, Model: TESLA MODEL S 2014Pages: 152, PDF Size: 17.5 MB
Page 6 of 152
Interior OverviewInterior Overview
1.2MODEL S OWNERS MANUAL
OVERVIEW
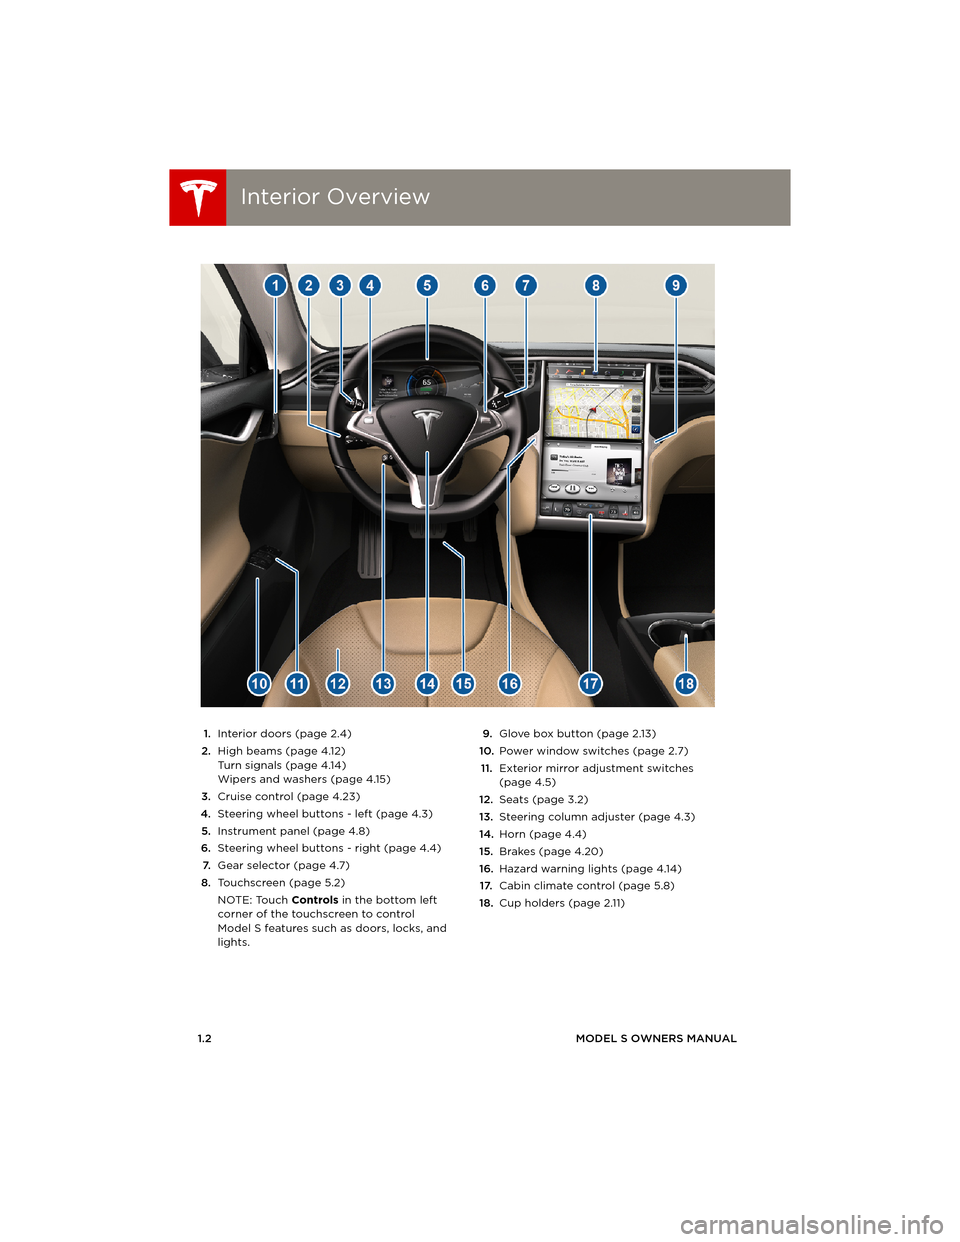
1.Interior doors (page 2.4)
2.High beams (page 4.12)
Turn signals (page 4.14)
Wipers and washers (page 4.15)
3.Cruise control (page 4.23)
4.Steering wheel buttons - left (page 4.3)
5.Instrument panel (page 4.8)
6.Steering wheel buttons - right (page 4.4)
7.Gear selector (page 4.7)
8.Touchscreen (page 5.2)
NOTE: Touch Controls in the bottom left
corner of the touchscreen to control
Model S features such as doors, locks, and
lights.9.Glove box button (page 2.13)
10.Power window switches (page 2.7)
11.Exterior mirror adjustment switches
(page 4.5)
12.Seats (page 3.2)
13.Steering column adjuster (page 4.3)
14.Horn (page 4.4)
15.Brakes (page 4.20)
16.Hazard warning lights (page 4.14)
17.Cabin climate control (page 5.8)
18.Cup holders (page 2.11)
book.book Page 2 Friday, July 19, 2013 12:53 PM
Page 10 of 152
DoorsDoors
2.2MODEL S OWNERS MANUAL
OPENING AND CLOSING
DoorsKeyless Locking and Unlocking
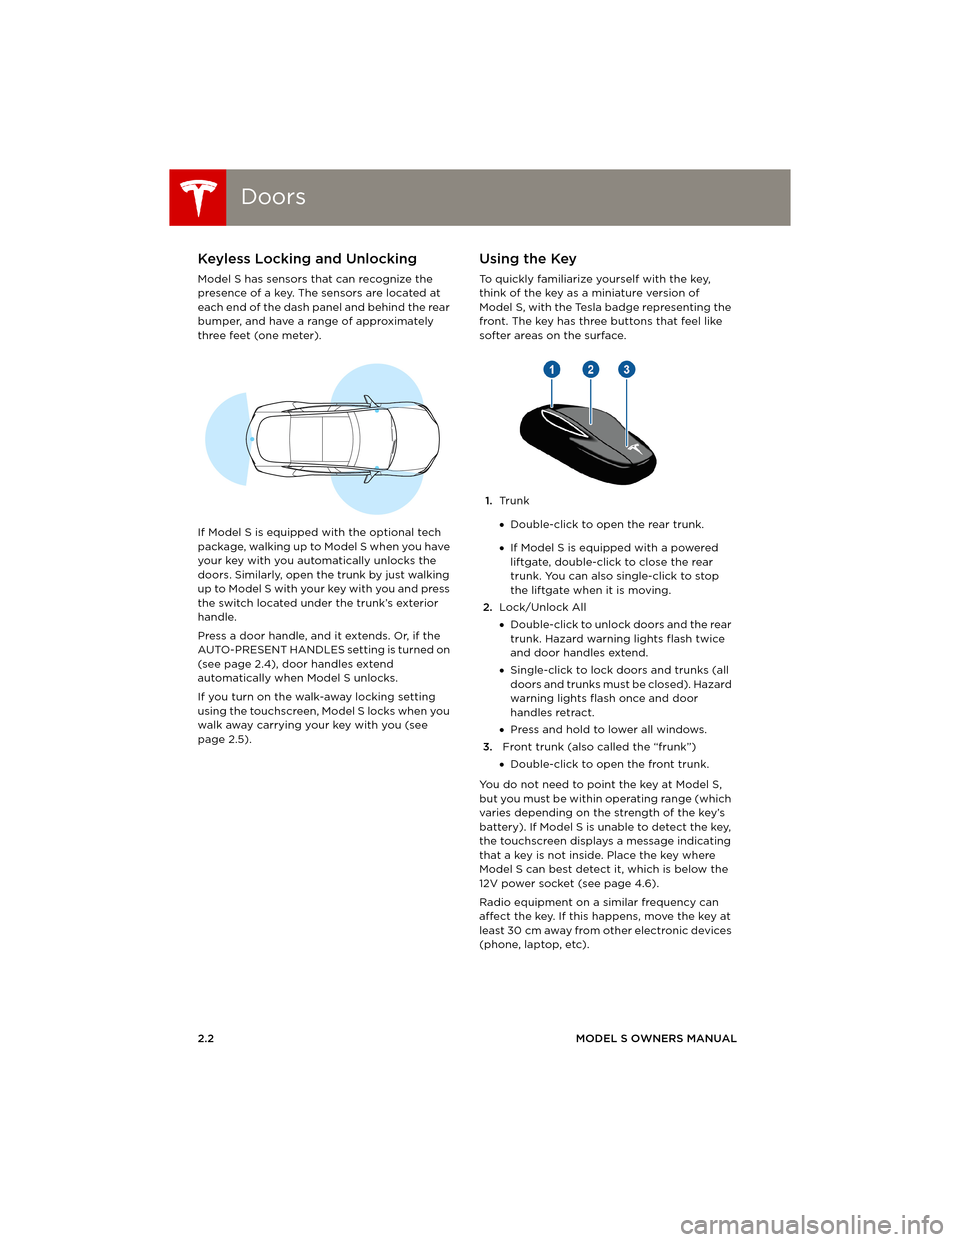
Model S has sensors that can recognize the
presence of a key. The sensors are located at
each end of the dash panel and behind the rear
bumper, and have a range of approximately
three feet (one meter).
If Model S is equipped with the optional tech
package, walking up to Model S when you have
your key with you automatically unlocks the
doors. Similarly, open the trunk by just walking
u p to M o de l S w it h yo ur key w i t h yo u an d p re ss
the switch located under the trunk’s exterior
handle.
Press a door handle, and it extends. Or, if the
AUTO-PRESENT HANDLES setting is turned on
(see page 2.4), door handles extend
automatically when Model S unlocks.
If you turn on the walk-away locking setting
using the touchscreen, Model S locks when you
walk away carrying your key with you (see
page 2.5).
Using the Key
To quickly familiarize yourself with the key,
think of the key as a miniature version of
Model S, with the Tesla badge representing the
front. The key has three buttons that feel like
softer areas on the surface.
1.Tr u n k
•Double-click to open the rear trunk.
•If Model S is equipped with a powered
liftgate, double-click to close the rear
trunk. You can also single-click to stop
the liftgate when it is moving.
2.Lock/Unlock All
•Double-click to unlock doors and the rear
trunk. Hazard warning lights flash twice
and door handles extend.
•Single-click to lock doors and trunks (all
d o o r s a n d t r u n k s m u s t b e c l o s e d ) . H a z a r d
warning lights flash once and door
handles retract.
•Press and hold to lower all windows.
3. Front trunk (also called the “frunk”)
•Double-click to open the front trunk.
You do not need to point the key at Model S,
but you must be within operating range (which
varies depending on the strength of the key’s
battery). If Model S is unable to detect the key,
the touchscreen displays a message indicating
that a key is not inside. Place the key where
Model S can best detect it, which is below the
12V power socket (see page 4.6).
Radio equipment on a similar frequency can
affect the key. If this happens, move the key at
least 30 cm away from other electronic devices
(phone, laptop, etc).
book.book Page 2 Friday, July 19, 2013 12:53 PM
Page 15 of 152
Windows
OPENING AND CLOSING2.7
Wi ndow sOpening from the Exterior
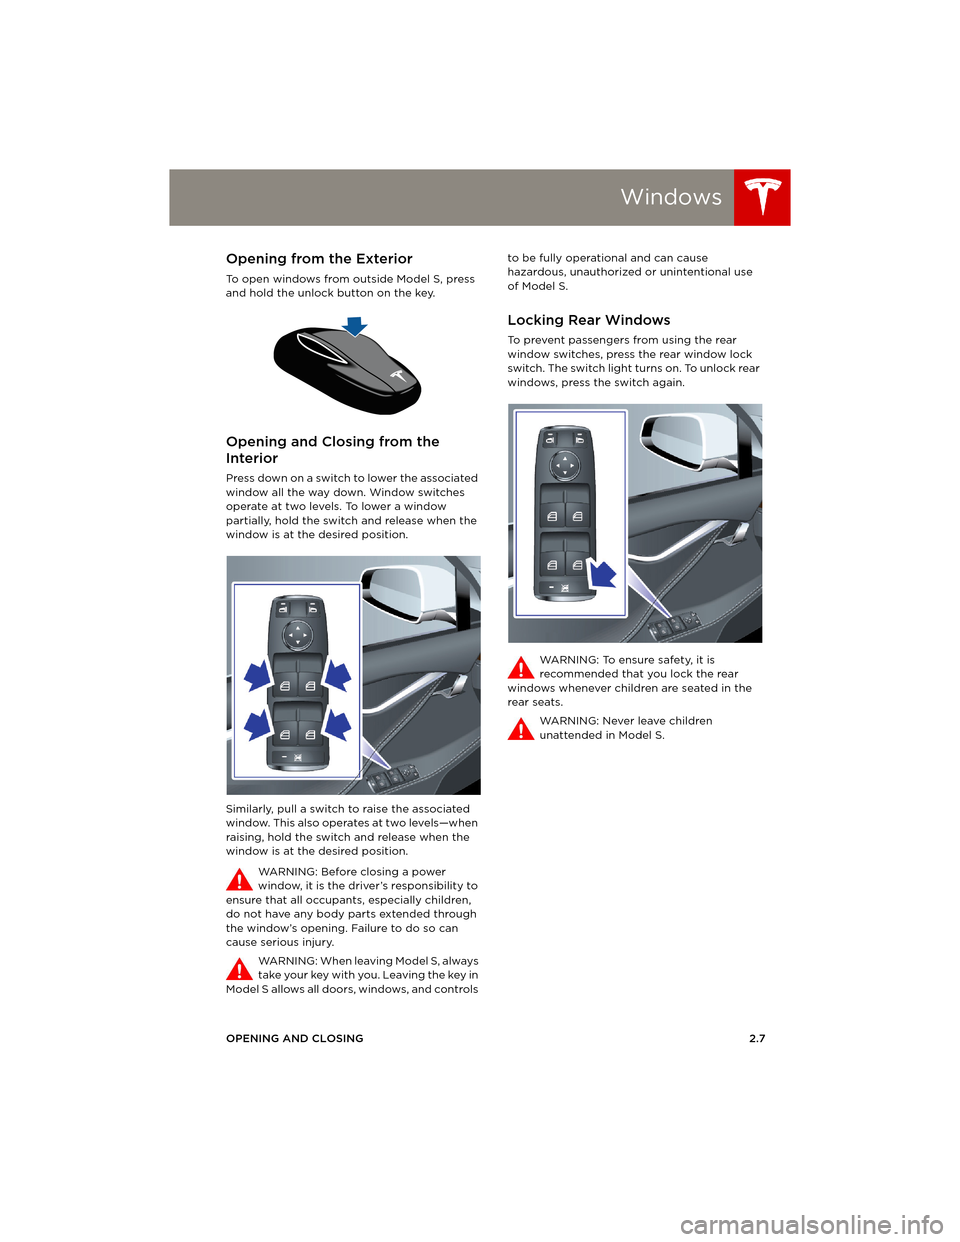
To open windows from outside Model S, press
and hold the unlock button on the key.
Opening and Closing from the
Interior
Press down on a switch to lower the associated
window all the way down. Window switches
operate at two levels. To lower a window
partially, hold the switch and release when the
window is at the desired position.
Similarly, pull a switch to raise the associated
window. This also operates at two levels—when
raising, hold the switch and release when the
window is at the desired position.
WARNING: Before closing a power
window, it is the driver’s responsibility to
ensure that all occupants, especially children,
do not have any body parts extended through
the window’s opening. Failure to do so can
cause serious injury.
WARNING: When leaving Model S, always
take your key with you. Leaving the key in
Model S allows all doors, windows, and controls to be fully operational and can cause
hazardous, unauthorized or unintentional use
of Model S.
Locking Rear Windows
To prevent passengers from using the rear
window switches, press the rear window lock
switch. The switch light turns on. To unlock rear
windows, press the switch again.
WARNING: To ensure safety, it is
recommended that you lock the rear
windows whenever children are seated in the
rear seats.
WARNING: Never leave children
unattended in Model S.
book.book Page 7 Friday, July 19, 2013 12:53 PM
Page 18 of 152
Front TrunkFront Trunk
2.10MODEL S OWNERS MANUAL
Front TrunkOpening
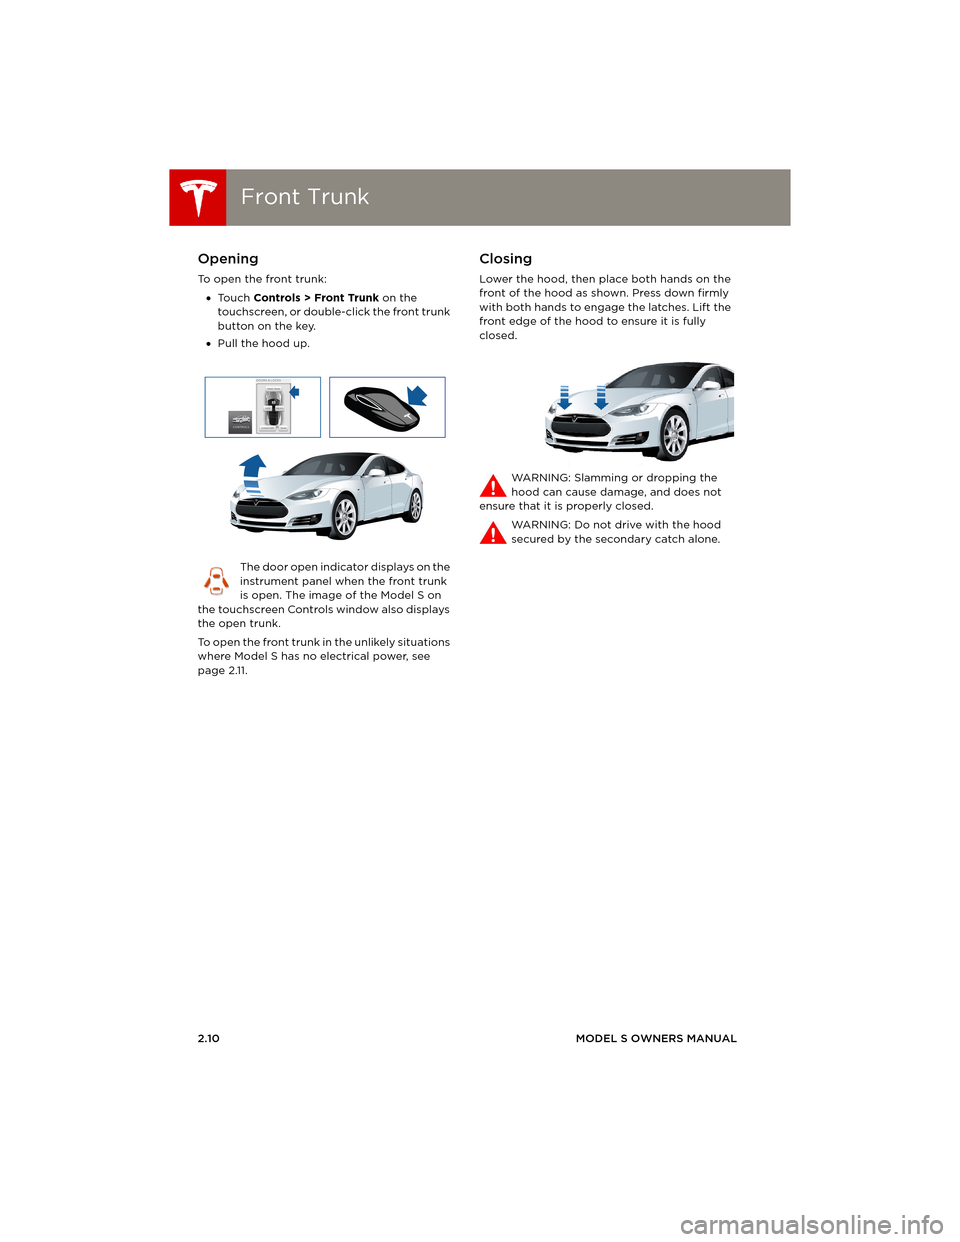
To open the front trunk:
•To u c h Controls > Front Trunk on the
touchscreen, or double-click the front trunk
button on the key.
•Pull the hood up.
The door open indicator displays on the
instrument panel when the front trunk
is open. The image of the Model S on
the touchscreen Controls window also displays
the open trunk.
To open the front trunk in the unlikely situations
where Model S has no electrical power, see
page 2.11.
Closing
Lower the hood, then place both hands on the
front of the hood as shown. Press down firmly
with both hands to engage the latches. Lift the
front edge of the hood to ensure it is fully
closed.
WARNING: Slamming or dropping the
hood can cause damage, and does not
ensure that it is properly closed.
WARNING: Do not drive with the hood
secured by the secondary catch alone.
book.book Page 10 Friday, July 19, 2013 12:53 PM
Page 20 of 152
SunroofSunroof
2.12MODEL S OWNERS MANUAL
SunroofOpening and Closing
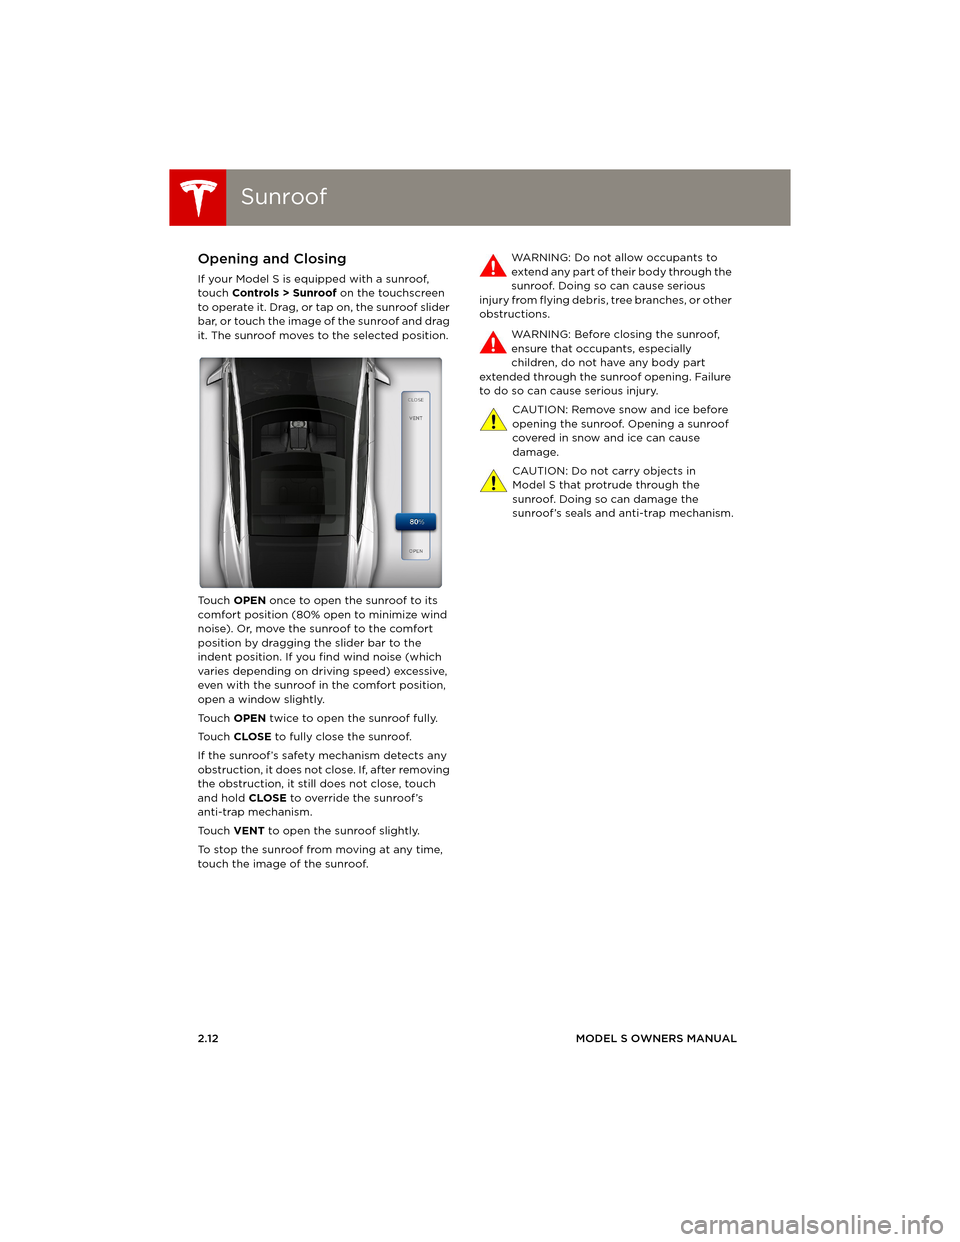
If your Model S is equipped with a sunroof,
touch Controls > Sunroof on the touchscreen
to operate it. Drag, or tap on, the sunroof slider
bar, or touch the image of the sunroof and drag
it. The sunroof moves to the selected position.
To u c h OPEN once to open the sunroof to its
comfort position (80% open to minimize wind
noise). Or, move the sunroof to the comfort
position by dragging the slider bar to the
indent position. If you find wind noise (which
varies depending on driving speed) excessive,
even with the sunroof in the comfort position,
open a window slightly.
To u c h OPEN twice to open the sunroof fully.
To u c h CLOSE to fully close the sunroof.
If the sunroof’s safety mechanism detects any
obstruction, it does not close. If, after removing
the obstruction, it still does not close, touch
and hold CLOSE to override the sunroof’s
anti-trap mechanism.
To u c h VENT to open the sunroof slightly.
To stop the sunroof from moving at any time,
touch the image of the sunroof. WA R N I N G : D o n o t a l l o w o c c u p a n t s t o
extend any part of their body through the
sunroof. Doing so can cause serious
injury from flying debris, tree branches, or other
obstructions.
WARNING: Before closing the sunroof,
ensure that occupants, especially
children, do not have any body part
extended through the sunroof opening. Failure
to do so can cause serious injury.
CAUTION: Remove snow and ice before
opening the sunroof. Opening a sunroof
covered in snow and ice can cause
damage.
CAUTION: Do not carry objects in
Model S that protrude through the
sunroof. Doing so can damage the
sunroof’s seals and anti-trap mechanism.
book.book Page 12 Friday, July 19, 2013 12:53 PM
Page 21 of 152
Glove Box
OPENING AND CLOSING2.13
Glove BoxOpening and Closing
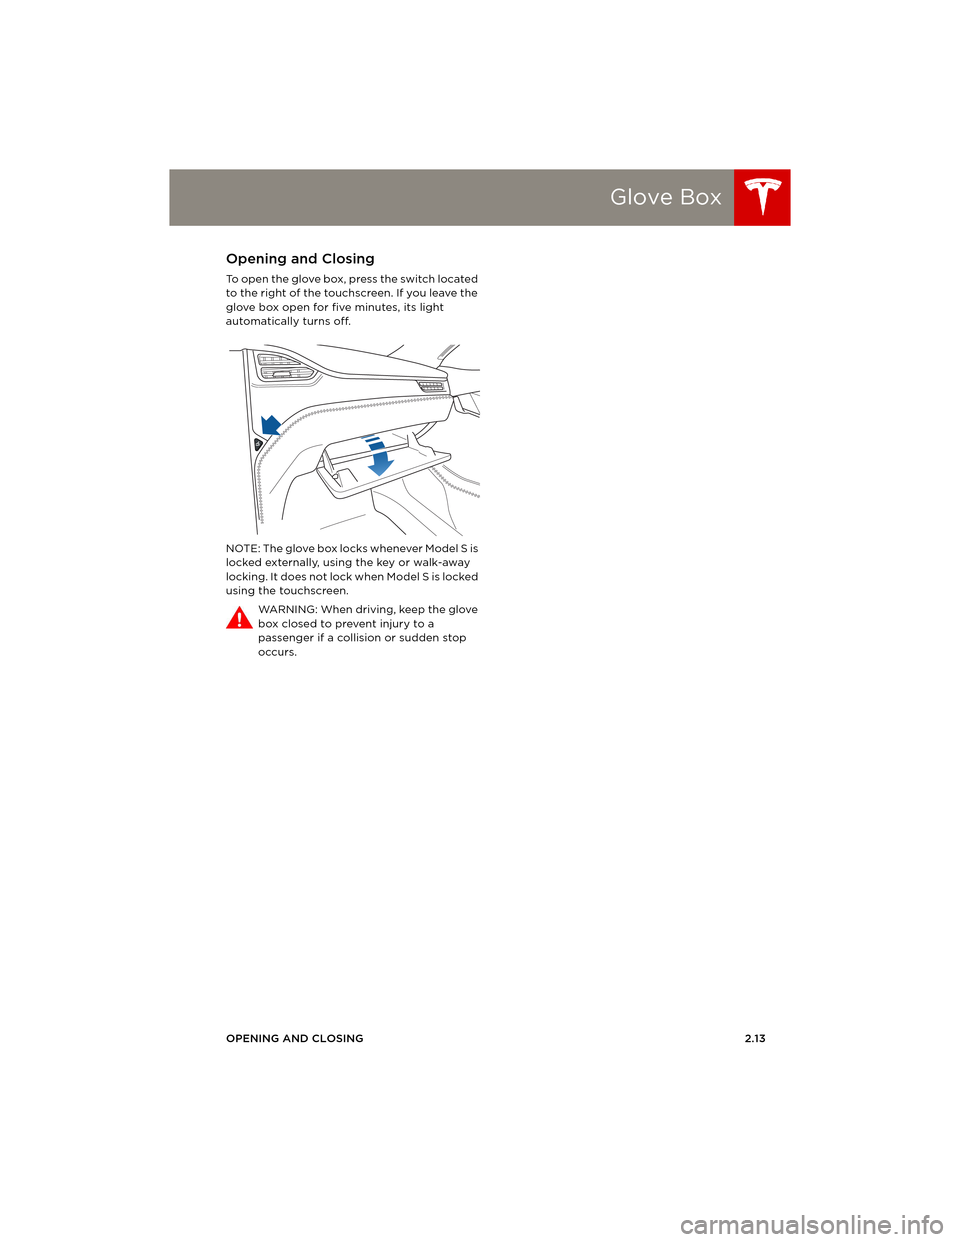
To open the glove box, press the switch located
to the right of the touchscreen. If you leave the
glove box open for five minutes, its light
automatically turns off.
NOTE: The glove box locks whenever Model S is
locked externally, using the key or walk-away
locking. It does not lock when Model S is locked
using the touchscreen.
WARNING: When driving, keep the glove
box closed to prevent injury to a
passenger if a collision or sudden stop
occurs.
book.book Page 13 Friday, July 19, 2013 12:53 PM
Page 23 of 152
3.1
SEATING AND SAFETY RESTRAINTS
Front and Rear Seats
Correct Driving Position ................................ 3.2
Adjusting the Driver’s Seat ........................... 3.2
Folding Rear Seats........................................... 3.3
Raising Rear Seats ........................................... 3.3
Head Supports................................................... 3.3
Seat Covers......................................................... 3.3
Seat Belts
Wearing Seat Belts ......................................... 3.4
Wearing Seat Belts When Pregnant ........ 3.4
Seat Belt Pre-tensioners ................................ 3.5
Testing Seat Belts ............................................ 3.5
Seat Belt Warnings ......................................... 3.6
Child Safety SeatsGuidelines for Seating Children .................. 3.7
Choosing a Child Safety Seat ...................... 3.7
Seating Larger Children ................................. 3.8
Installing Child Safety Seats......................... 3.8
Installing Seat Belt Retained Child Seats 3.8
Installing ISOFIX Child Seats....................... 3.9
Attaching Upper Tether Straps ................ 3.10
Testing a Child Safety Seat ........................ 3.10
Warnings - Child Safety Seats................... 3.10
Tesla Built In Rear Facing Child
Seats
Usage Restrictions .......................................... 3.11
Opening............................................................... 3.11
Folding................................................................ 3.12
Seating a Child ................................................ 3.13
Warnings - Tesla Child Seats ..................... 3.14
Airbags
Location of Airbags ....................................... 3.15
How the Airbags Work................................. 3.16
Types of Airbags ............................................ 3.16
Disabling the Front Passenger Airbag ... 3.17
Inflation Effects ............................................... 3.18
Airbag Warning Indicator ........................... 3.18
Airbag Warnings............................................. 3.18
book.book Page 1 Friday, July 19, 2013 12:53 PM
Page 24 of 152
Front and Rear SeatsFront and Rear Seats
3.2MODEL S OWNERS MANUAL
SEATING AND SAFETY RESTRAINTS
Front and Rear SeatsCorrect Driving Position
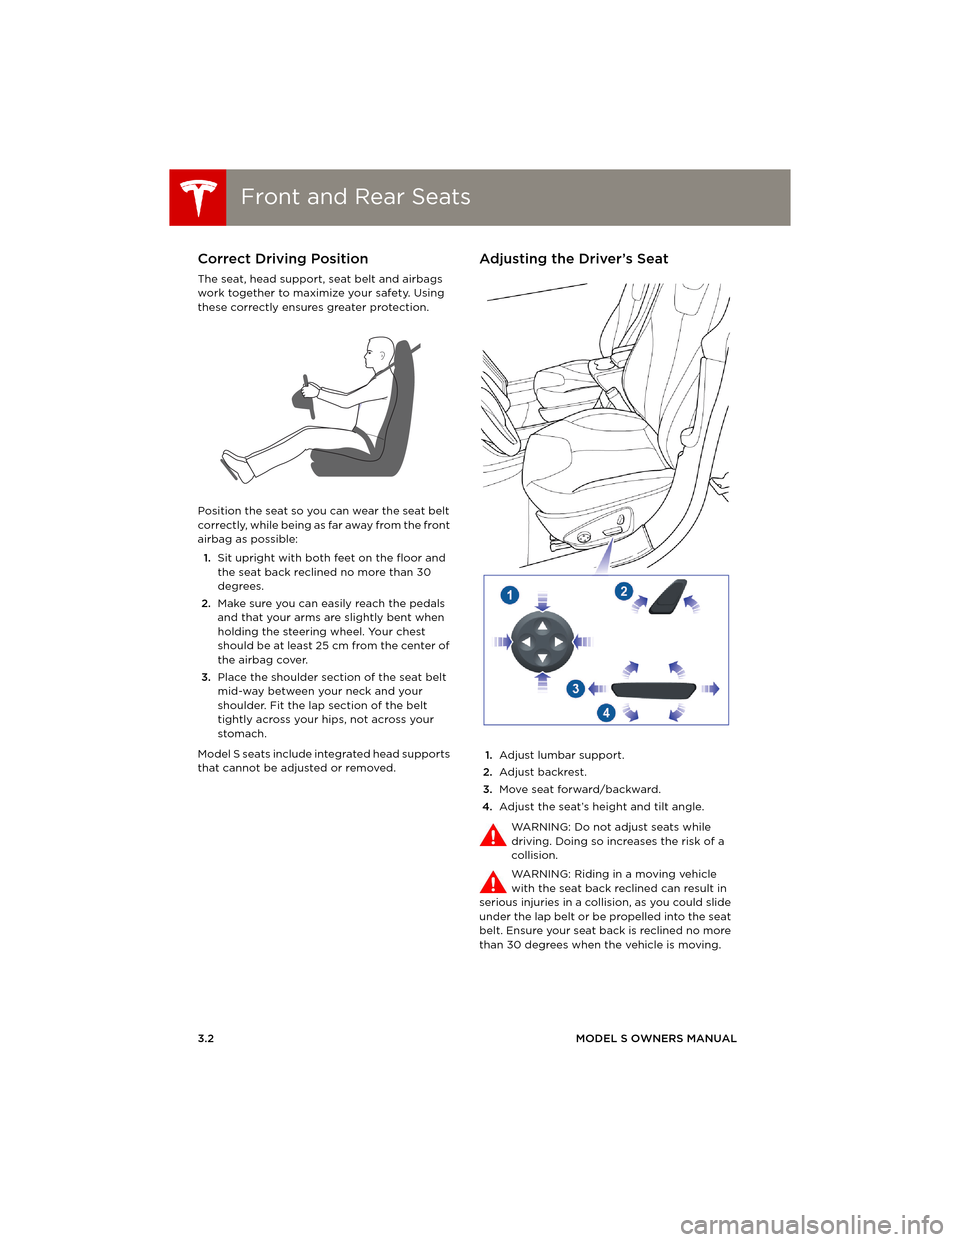
The seat, head support, seat belt and airbags
work together to maximize your safety. Using
these correctly ensures greater protection.
Position the seat so you can wear the seat belt
correctly, while being as far away from the front
airbag as possible:
1.Sit upright with both feet on the floor and
the seat back reclined no more than 30
degrees.
2.Make sure you can easily reach the pedals
and that your arms are slightly bent when
holding the steering wheel. Your chest
should be at least 25 cm from the center of
the airbag cover.
3.Place the shoulder section of the seat belt
mid-way between your neck and your
shoulder. Fit the lap section of the belt
tightly across your hips, not across your
stomach.
Model S seats include integrated head supports
that cannot be adjusted or removed.
Adjusting the Driver’s Seat
1.Adjust lumbar support.
2.Adjust backrest.
3.Move seat forward/backward.
4.Adjust the seat’s height and tilt angle.
WARNING: Do not adjust seats while
driving. Doing so increases the risk of a
collision.
WARNING: Riding in a moving vehicle
with the seat back reclined can result in
serious injuries in a collision, as you could slide
under the lap belt or be propelled into the seat
belt. Ensure your seat back is reclined no more
than 30 degrees when the vehicle is moving.
book.book Page 2 Friday, July 19, 2013 12:53 PM
Page 25 of 152
Front and Rear Seats
SEATING AND SAFETY RESTRAINTS 3.3
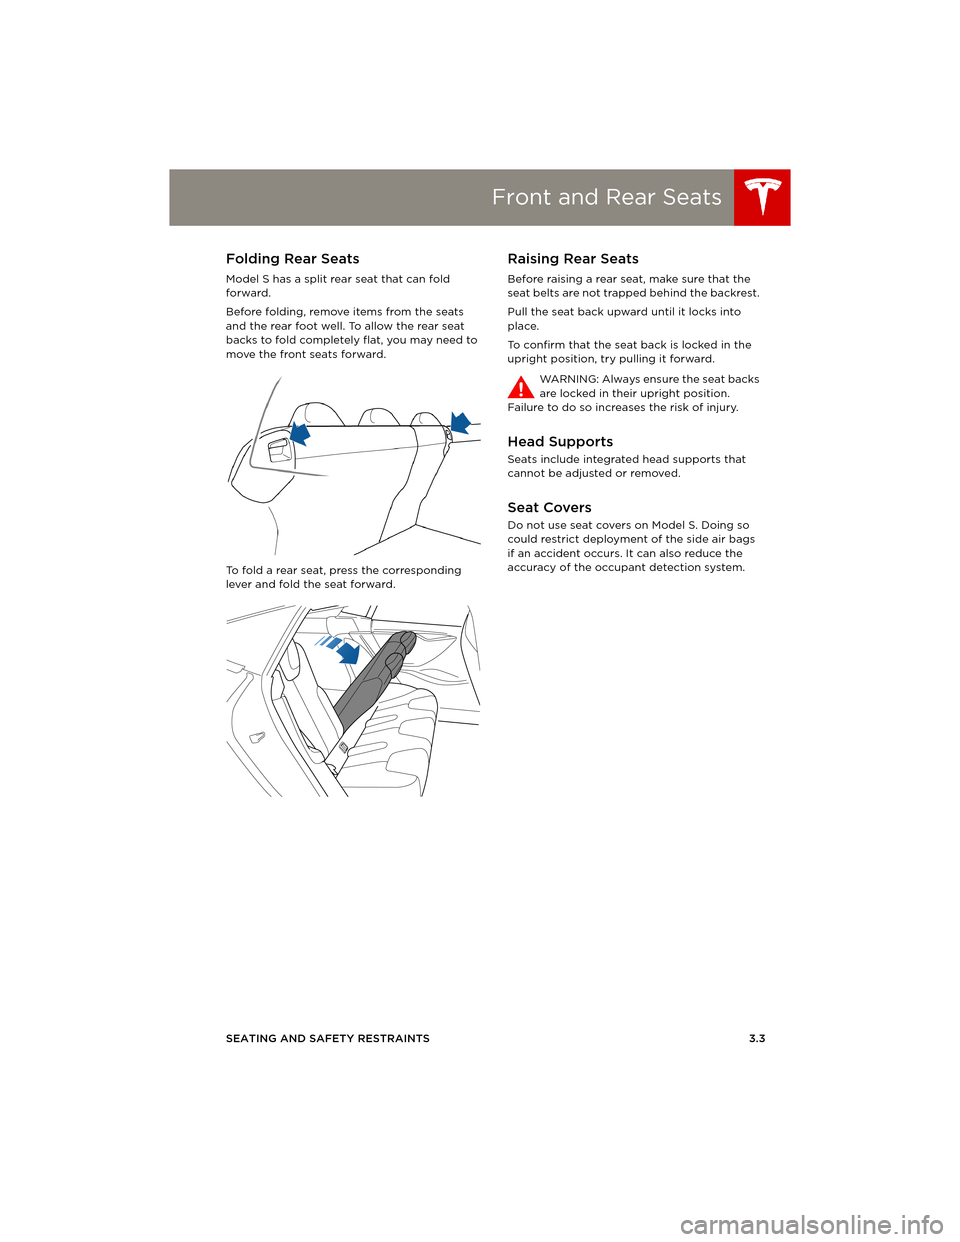
Folding Rear Seats
Model S has a split rear seat that can fold
forward.
Before folding, remove items from the seats
and the rear foot well. To allow the rear seat
backs to fold completely flat, you may need to
move the front seats forward.
To fold a rear seat, press the corresponding
lever and fold the seat forward.
Raising Rear Seats
Before raising a rear seat, make sure that the
seat belts are not trapped behind the backrest.
Pull the seat back upward until it locks into
place.
To confirm that the seat back is locked in the
upright position, try pulling it forward.
WARNING: Always ensure the seat backs
are locked in their upright position.
Failure to do so increases the risk of injury.
Head Supports
Seats include integrated head supports that
cannot be adjusted or removed.
Seat Covers
Do not use seat covers on Model S. Doing so
could restrict deployment of the side air bags
if an accident occurs. It can also reduce the
accuracy of the occupant detection system.
book.book Page 3 Friday, July 19, 2013 12:53 PM
Page 26 of 152
Seat BeltsSeat Belts
3.4MODEL S OWNERS MANUAL
Seat BeltsWearing Seat Belts
Using seat belts and child safety seats is the
most effective way to protect occupants if a
collision occurs. Therefore, wearing a seat belt
is required by law in most jurisdictions.
Both the driver and passenger seats are
equipped with three-point inertia reel seat
belts. Inertia reel belts are automatically
tensioned to allow occupants to move
comfortably during normal driving conditions.
The seat belt reel automatically locks to prevent
movement of occupants if Model S experiences
a force associated with hard acceleration,
braking, cornering, or an impact in a collision.
The seat belt reminder on the
instrument panel alerts you if a seat belt
for an occupied seat is not fastened. If
the belt remains unfastened, the reminder
flashes and an intermittent chime sounds. If all
occupants are buckled up and the reminder
stays on, re-fasten seat belts to ensure they are
correctly latched. Also remove any heavy
object (such as a briefcase) from an
unoccupied seat. If the reminder light continues
to stay on, contact Tesla.
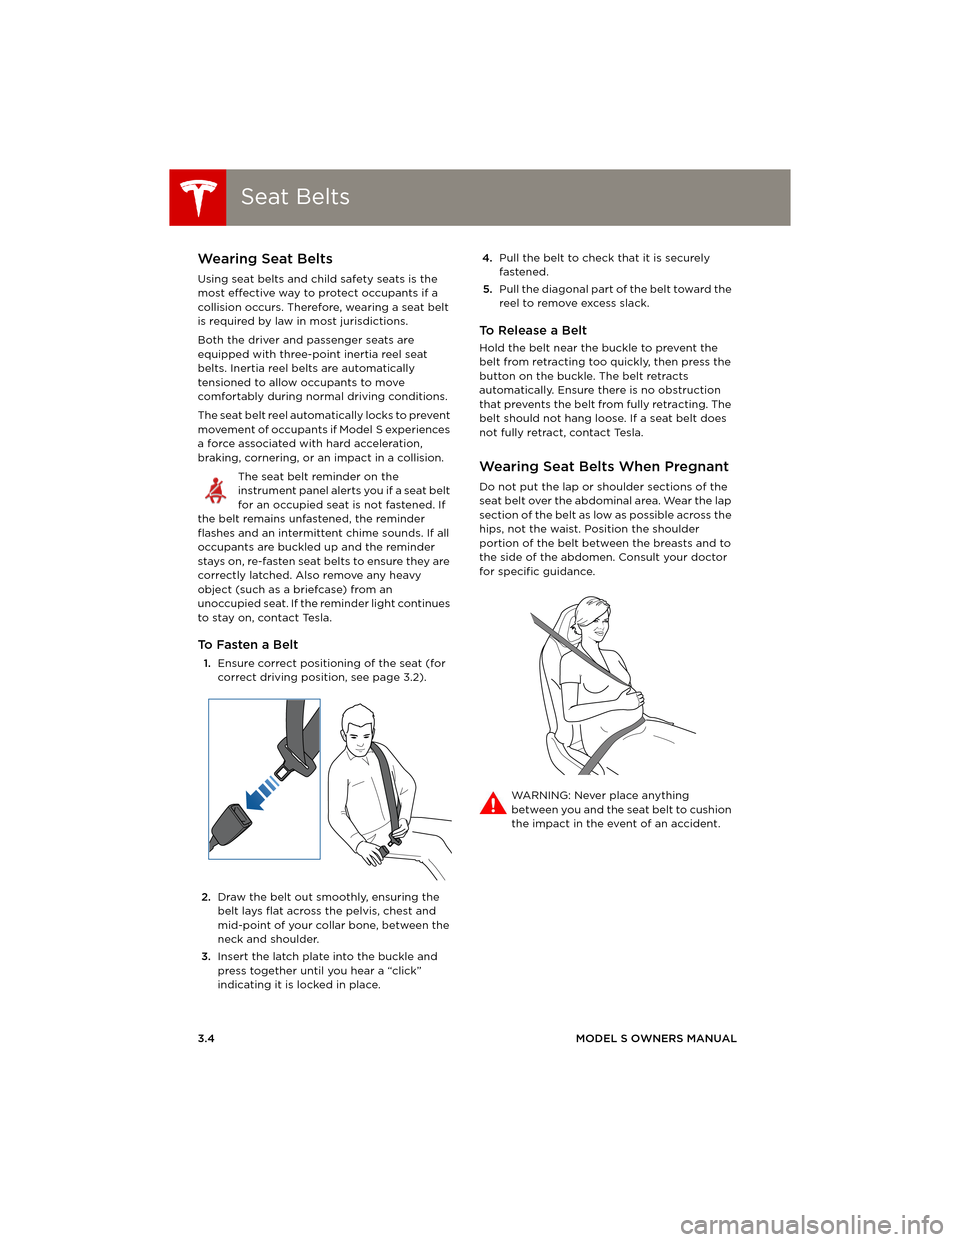
To F a s t e n a B e l t
1.Ensure correct positioning of the seat (for
correct driving position, see page 3.2).
2.Draw the belt out smoothly, ensuring the
belt lays flat across the pelvis, chest and
mid-point of your collar bone, between the
neck and shoulder.
3.Insert the latch plate into the buckle and
press together until you hear a “click”
indicating it is locked in place.4.Pull the belt to check that it is securely
fastened.
5.Pull the diagonal part of the belt toward the
reel to remove excess slack.
To Release a Belt
Hold the belt near the buckle to prevent the
belt from retracting too quickly, then press the
button on the buckle. The belt retracts
automatically. Ensure there is no obstruction
that prevents the belt from fully retracting. The
belt should not hang loose. If a seat belt does
not fully retract, contact Tesla.
Wearing Seat Belts When Pregnant
Do not put the lap or shoulder sections of the
seat belt over the abdominal area. Wear the lap
section of the belt as low as possible across the
hips, not the waist. Position the shoulder
portion of the belt between the breasts and to
the side of the abdomen. Consult your doctor
for specific guidance.
WARNING: Never place anything
between you and the seat belt to cushion
the impact in the event of an accident.
book.book Page 4 Friday, July 19, 2013 12:53 PM