change time TESLA MODEL S 2014 Owner's manual (North America)
[x] Cancel search | Manufacturer: TESLA, Model Year: 2014, Model line: MODEL S, Model: TESLA MODEL S 2014Pages: 159, PDF Size: 6.14 MB
Page 25 of 159
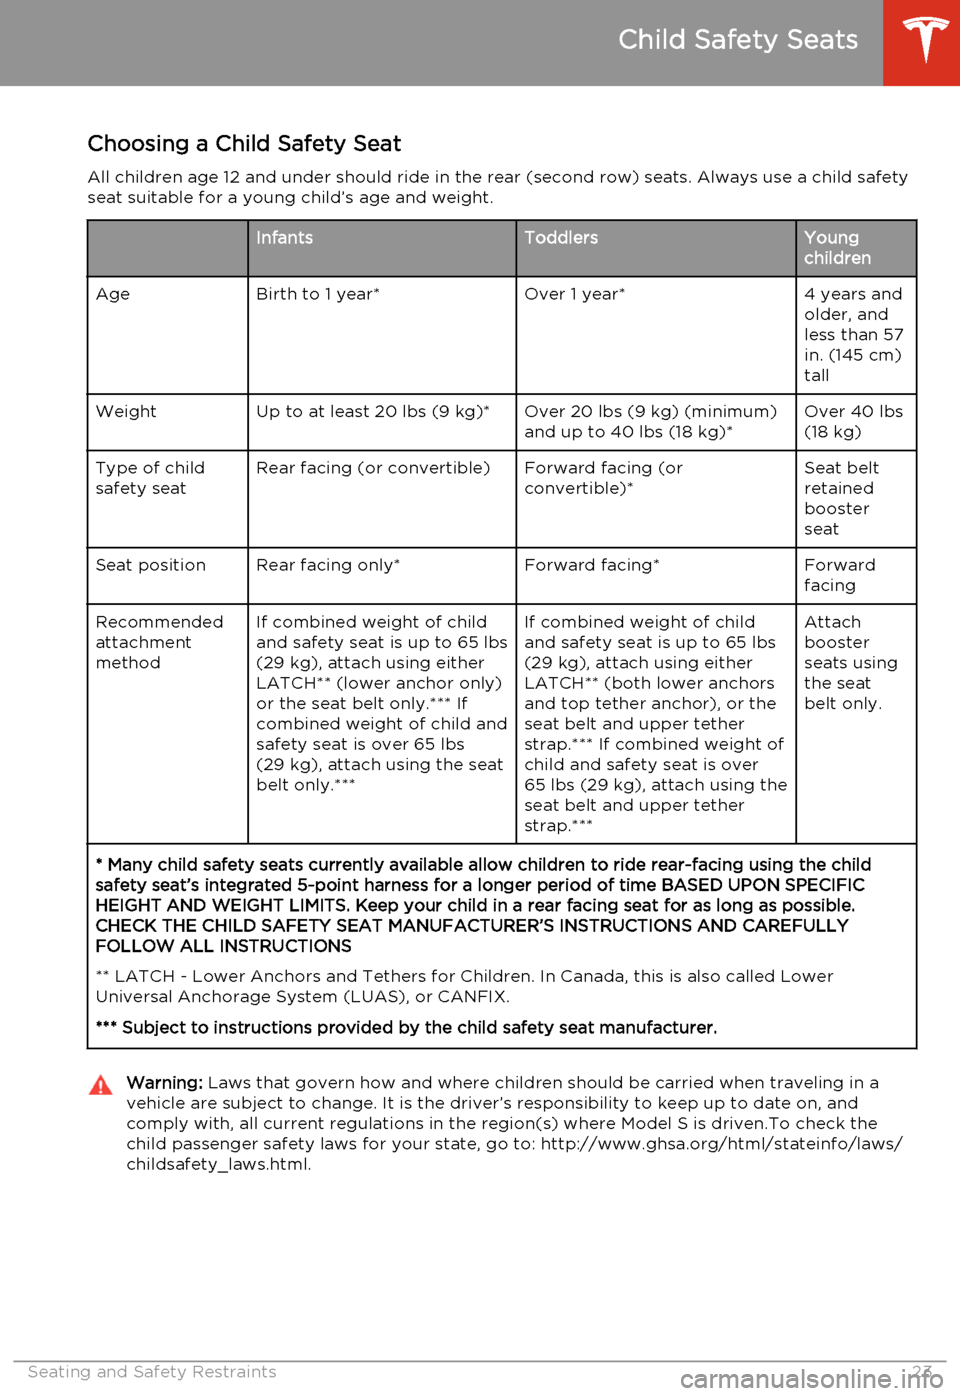
Choosing a Child Safety Seat
All children age 12 and under should ride in the rear (second row) seats. Always use a child safety seat suitable for a young child’s age and weight.InfantsToddlersYoung
childrenAgeBirth to 1 year*Over 1 year*4 years and
older, and
less than 57
in. (145 cm)
tallWeightUp to at least 20 lbs (9 kg)*Over 20 lbs (9 kg) (minimum)
and up to 40 lbs (18 kg)*Over 40 lbs
(18 kg)Type of child
safety seatRear facing (or convertible)Forward facing (or
convertible)*Seat belt
retained
booster
seatSeat positionRear facing only*Forward facing*Forward
facingRecommended
attachment
methodIf combined weight of child
and safety seat is up to 65 lbs
(29 kg), attach using either
LATCH** (lower anchor only)
or the seat belt only.*** If
combined weight of child and
safety seat is over 65 lbs
(29 kg), attach using the seat
belt only.***If combined weight of child
and safety seat is up to 65 lbs
(29 kg), attach using either
LATCH** (both lower anchors
and top tether anchor), or the
seat belt and upper tether
strap.*** If combined weight of
child and safety seat is over
65 lbs (29 kg), attach using the
seat belt and upper tether
strap.***Attach
booster
seats using
the seat
belt only.* Many child safety seats currently available allow children to ride rear-facing using the child
safety seat’s integrated 5-point harness for a longer period of time BASED UPON SPECIFIC HEIGHT AND WEIGHT LIMITS. Keep your child in a rear facing seat for as long as possible.CHECK THE CHILD SAFETY SEAT MANUFACTURER’S INSTRUCTIONS AND CAREFULLYFOLLOW ALL INSTRUCTIONS
** LATCH - Lower Anchors and Tethers for Children. In Canada, this is also called Lower Universal Anchorage System (LUAS), or CANFIX.
*** Subject to instructions provided by the child safety seat manufacturer.Warning: Laws that govern how and where children should be carried when traveling in a
vehicle are subject to change. It is the driver’s responsibility to keep up to date on, and
comply with, all current regulations in the region(s) where Model S is driven.To check the child passenger safety laws for your state, go to: http://www.ghsa.org/html/stateinfo/laws/childsafety_laws.html.
Child Safety Seats
Seating and Safety Restraints23
Page 39 of 159
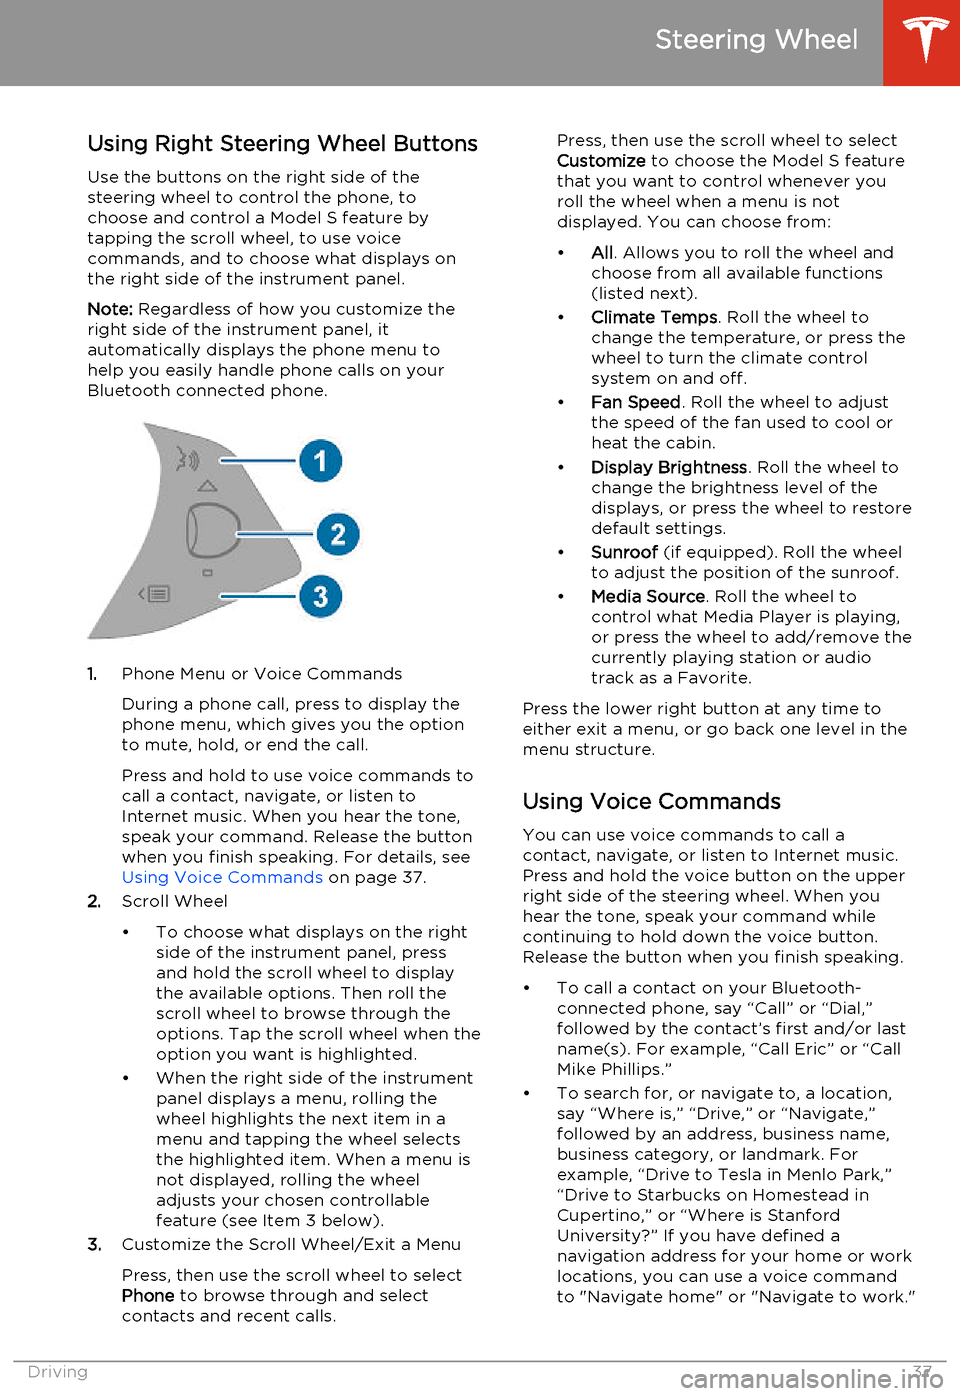
Using Right Steering Wheel Buttons
Use the buttons on the right side of the steering wheel to control the phone, tochoose and control a Model S feature bytapping the scroll wheel, to use voice
commands, and to choose what displays on the right side of the instrument panel.
Note: Regardless of how you customize the
right side of the instrument panel, it automatically displays the phone menu to
help you easily handle phone calls on your
Bluetooth connected phone.
1. Phone Menu or Voice Commands
During a phone call, press to display the phone menu, which gives you the option
to mute, hold, or end the call.
Press and hold to use voice commands to
call a contact, navigate, or listen to
Internet music. When you hear the tone,
speak your command. Release the button
when you finish speaking. For details, see Using Voice Commands on page 37.
2. Scroll Wheel
• To choose what displays on the right side of the instrument panel, pressand hold the scroll wheel to displaythe available options. Then roll the
scroll wheel to browse through the options. Tap the scroll wheel when the
option you want is highlighted.
• When the right side of the instrument panel displays a menu, rolling the
wheel highlights the next item in a
menu and tapping the wheel selects
the highlighted item. When a menu is
not displayed, rolling the wheel
adjusts your chosen controllable
feature (see Item 3 below).
3. Customize the Scroll Wheel/Exit a Menu
Press, then use the scroll wheel to select
Phone to browse through and select
contacts and recent calls.
Press, then use the scroll wheel to select
Customize to choose the Model S feature
that you want to control whenever you
roll the wheel when a menu is not
displayed. You can choose from:
• All. Allows you to roll the wheel and
choose from all available functions
(listed next).
• Climate Temps . Roll the wheel to
change the temperature, or press the
wheel to turn the climate control
system on and off.
• Fan Speed . Roll the wheel to adjust
the speed of the fan used to cool or
heat the cabin.
• Display Brightness . Roll the wheel to
change the brightness level of the
displays, or press the wheel to restore default settings.
• Sunroof (if equipped). Roll the wheel
to adjust the position of the sunroof.
• Media Source . Roll the wheel to
control what Media Player is playing,
or press the wheel to add/remove the
currently playing station or audio track as a Favorite.
Press the lower right button at any time to either exit a menu, or go back one level in the
menu structure.
Using Voice Commands
You can use voice commands to call a
contact, navigate, or listen to Internet music.
Press and hold the voice button on the upper
right side of the steering wheel. When you
hear the tone, speak your command while
continuing to hold down the voice button.
Release the button when you finish speaking.
• To call a contact on your Bluetooth- connected phone, say “Call” or “Dial,”
followed by the contact’s first and/or last name(s). For example, “Call Eric” or “Call
Mike Phillips.”
• To search for, or navigate to, a location, say “Where is,” “Drive,” or “Navigate,”followed by an address, business name,business category, or landmark. Forexample, “Drive to Tesla in Menlo Park,”
“Drive to Starbucks on Homestead in
Cupertino,” or “Where is Stanford
University?” If you have defined a navigation address for your home or work
locations, you can use a voice command to "Navigate home" or "Navigate to work."
Steering Wheel
Driving37
Page 49 of 159
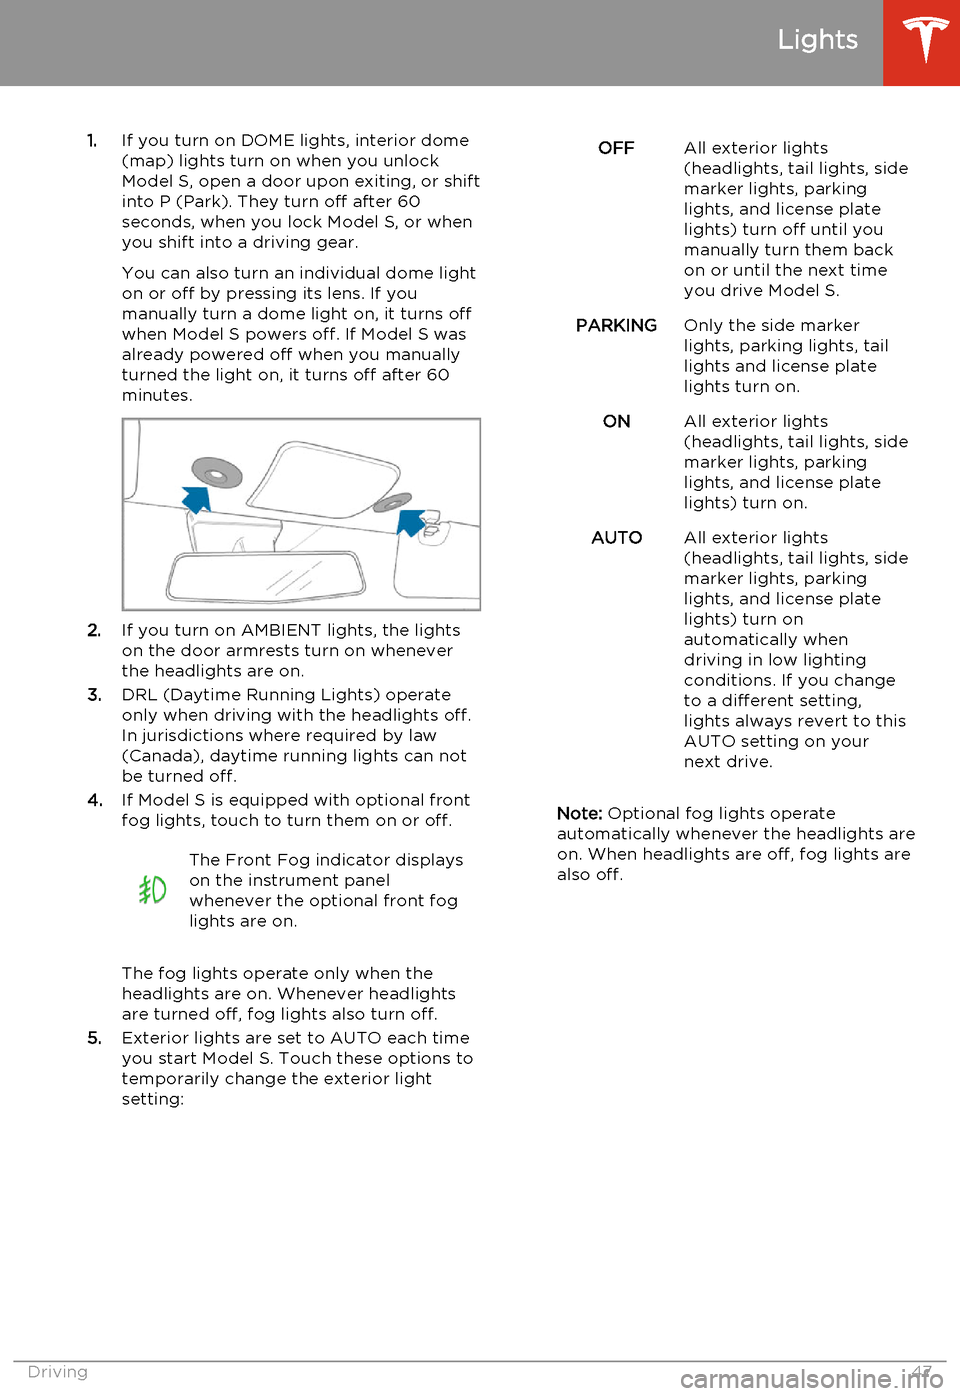
1.If you turn on DOME lights, interior dome
(map) lights turn on when you unlock
Model S, open a door upon exiting, or shift into P (Park). They turn off after 60
seconds, when you lock Model S, or when you shift into a driving gear.
You can also turn an individual dome light
on or off by pressing its lens. If you
manually turn a dome light on, it turns off
when Model S powers off. If Model S was
already powered off when you manually
turned the light on, it turns off after 60
minutes.
2. If you turn on AMBIENT lights, the lights
on the door armrests turn on whenever
the headlights are on.
3. DRL (Daytime Running Lights) operate
only when driving with the headlights off.
In jurisdictions where required by law (Canada), daytime running lights can not
be turned off.
4. If Model S is equipped with optional front
fog lights, touch to turn them on or off.
The Front Fog indicator displays
on the instrument panel
whenever the optional front fog
lights are on.
The fog lights operate only when the
headlights are on. Whenever headlights
are turned off, fog lights also turn off.
5. Exterior lights are set to AUTO each time
you start Model S. Touch these options to
temporarily change the exterior light
setting:
OFFAll exterior lights
(headlights, tail lights, side
marker lights, parking
lights, and license plate
lights) turn off until you
manually turn them back
on or until the next time
you drive Model S.PARKINGOnly the side marker
lights, parking lights, tail
lights and license plate
lights turn on.ONAll exterior lights
(headlights, tail lights, side
marker lights, parking
lights, and license plate
lights) turn on.AUTOAll exterior lights
(headlights, tail lights, side
marker lights, parking
lights, and license plate
lights) turn on
automatically when
driving in low lighting
conditions. If you change
to a different setting,
lights always revert to this
AUTO setting on your
next drive.
Note: Optional fog lights operate
automatically whenever the headlights are
on. When headlights are off, fog lights are
also off.
Lights
Driving47
Page 51 of 159
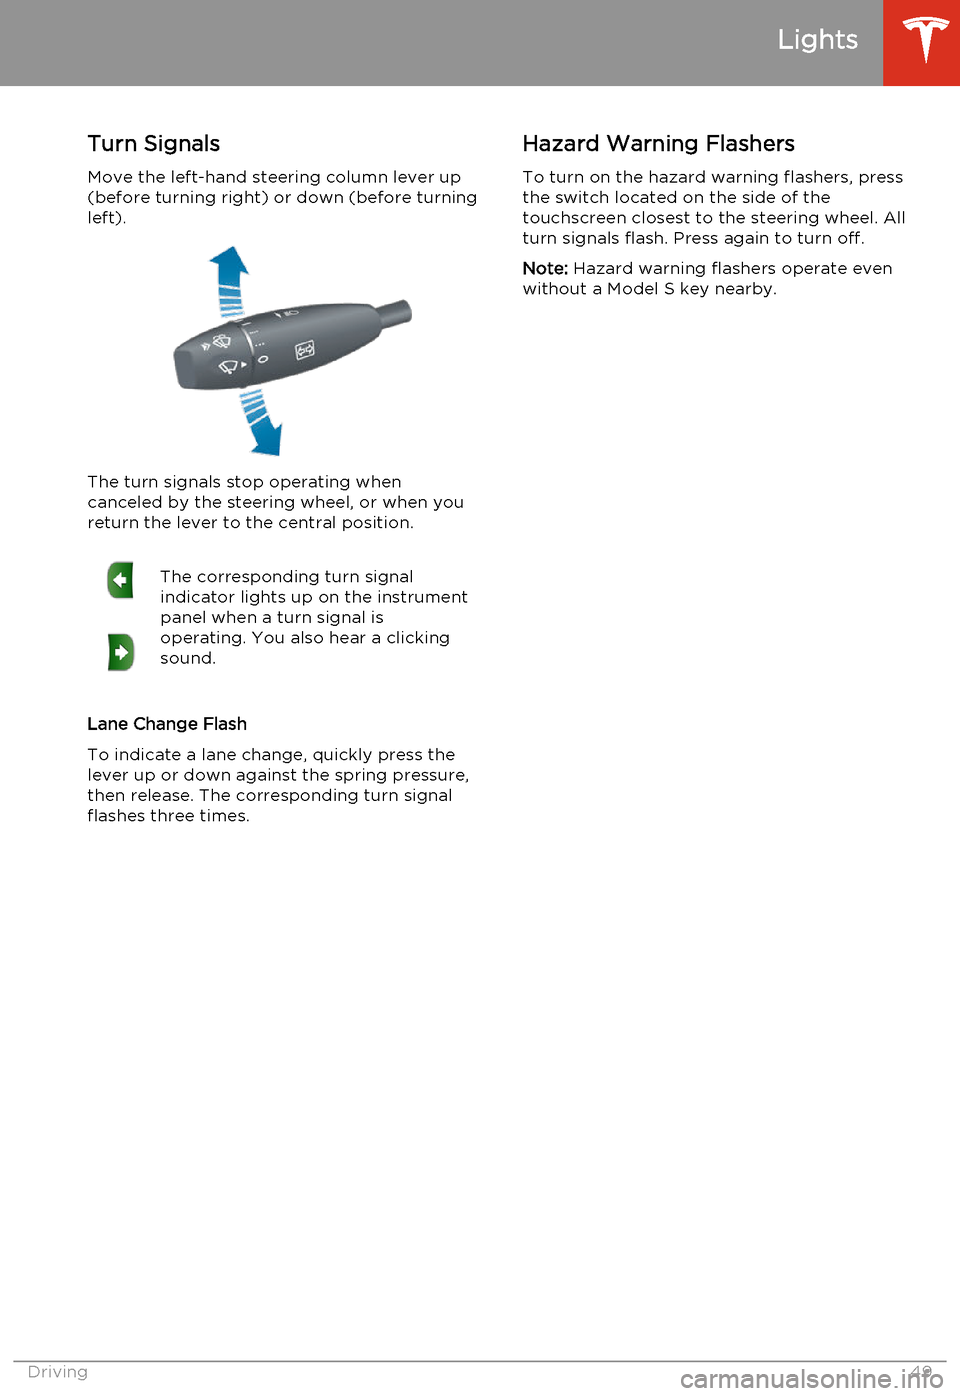
Turn SignalsMove the left-hand steering column lever up(before turning right) or down (before turning
left).
The turn signals stop operating when
canceled by the steering wheel, or when you return the lever to the central position.
The corresponding turn signal
indicator lights up on the instrument
panel when a turn signal is
operating. You also hear a clicking
sound.
Lane Change Flash
To indicate a lane change, quickly press the
lever up or down against the spring pressure, then release. The corresponding turn signal
flashes three times.
Hazard Warning Flashers
To turn on the hazard warning flashers, press
the switch located on the side of the
touchscreen closest to the steering wheel. All
turn signals flash. Press again to turn off.
Note: Hazard warning flashers operate even
without a Model S key nearby.
Lights
Driving49
Page 61 of 159
Regenerative Braking
Whenever Model S is moving and your foot is off the accelerator, regenerative braking slows
down Model S and feeds any surplus energy
back to the Battery.
By anticipating your stops and simply removing your foot from the accelerator to
slow down, you can take advantage of
regenerative braking to increase driving range. Of course, this is no substitute for
regular braking when needed for safety.
Note: If regenerative braking is aggressively
slowing Model S, such as on a steep descent,
brake lights turn on to alert other road users
that you are slowing down.
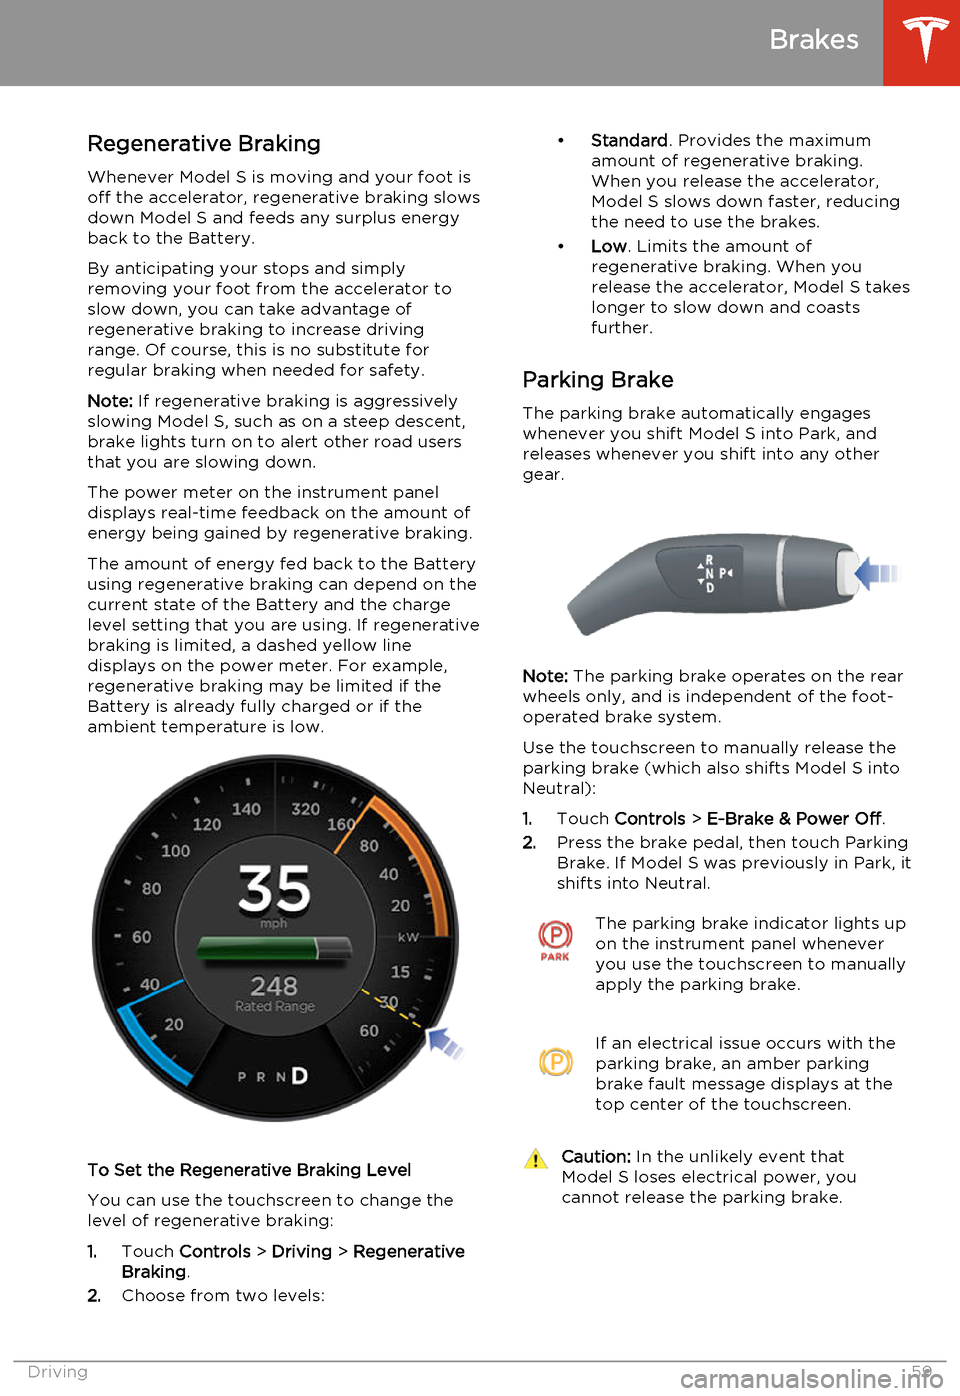
The power meter on the instrument panel displays real-time feedback on the amount of
energy being gained by regenerative braking.
The amount of energy fed back to the Battery
using regenerative braking can depend on the current state of the Battery and the charge
level setting that you are using. If regenerative braking is limited, a dashed yellow line
displays on the power meter. For example,
regenerative braking may be limited if the
Battery is already fully charged or if the
ambient temperature is low.
To Set the Regenerative Braking Level
You can use the touchscreen to change thelevel of regenerative braking:
1. Touch Controls > Driving > Regenerative
Braking .
2. Choose from two levels:
•
Standard . Provides the maximum
amount of regenerative braking. When you release the accelerator,
Model S slows down faster, reducing
the need to use the brakes.
• Low . Limits the amount of
regenerative braking. When you
release the accelerator, Model S takes longer to slow down and coastsfurther.
Parking Brake The parking brake automatically engages
whenever you shift Model S into Park, and
releases whenever you shift into any other
gear.
Note: The parking brake operates on the rear
wheels only, and is independent of the foot-
operated brake system.
Use the touchscreen to manually release the parking brake (which also shifts Model S intoNeutral):
1. Touch Controls > E-Brake & Power Off .
2. Press the brake pedal, then touch Parking
Brake. If Model S was previously in Park, it
shifts into Neutral.
The parking brake indicator lights up on the instrument panel whenever
you use the touchscreen to manually
apply the parking brake.If an electrical issue occurs with the
parking brake, an amber parking
brake fault message displays at the
top center of the touchscreen.Caution: In the unlikely event that
Model S loses electrical power, you
cannot release the parking brake.
Brakes
Driving59
Page 68 of 159
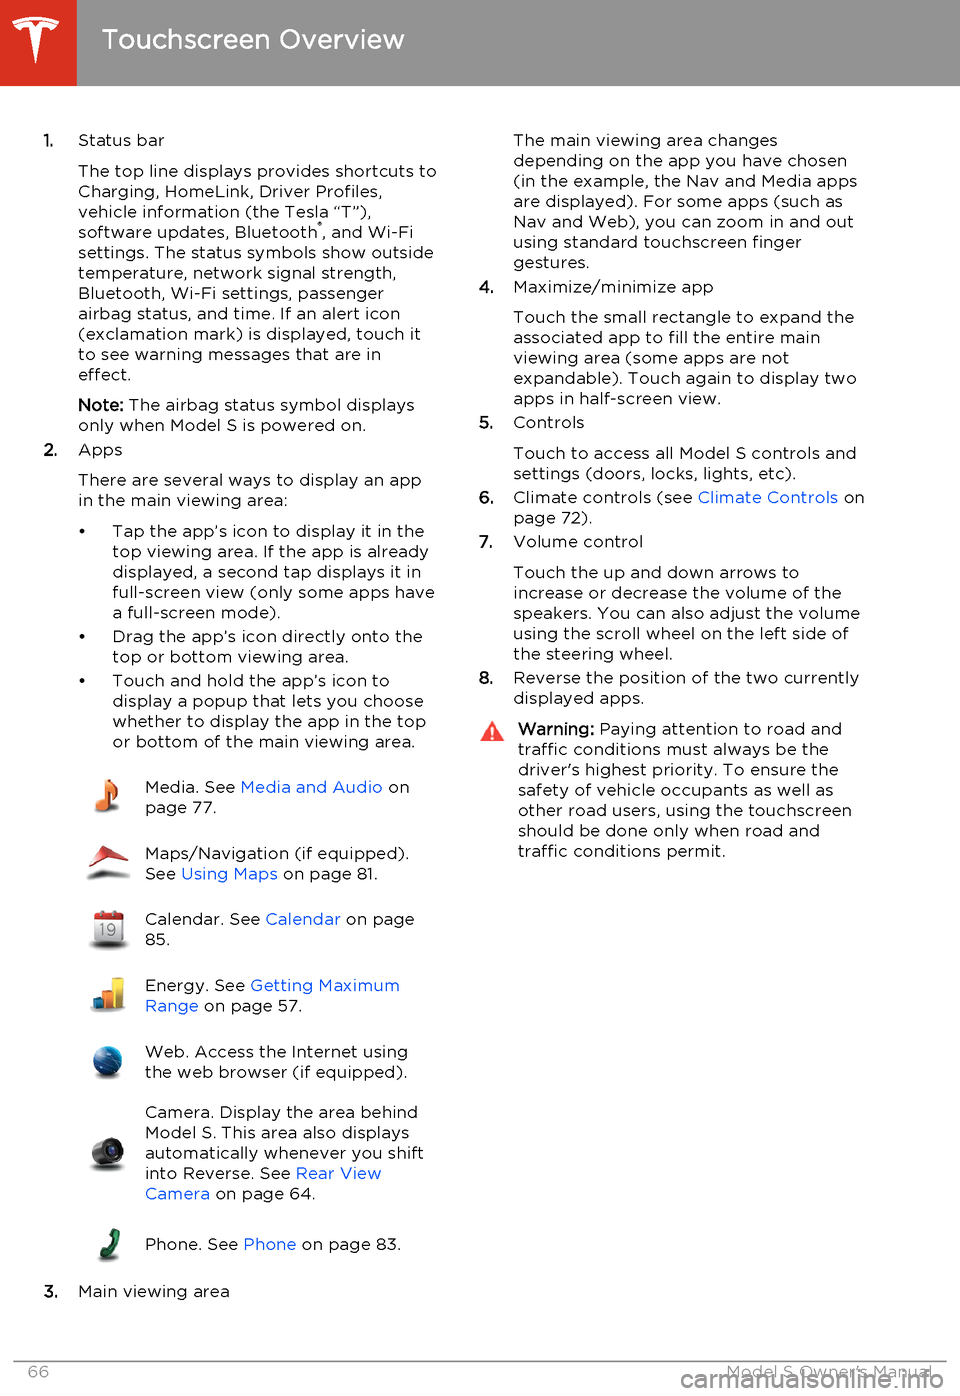
1.Status bar
The top line displays provides shortcuts to
Charging, HomeLink, Driver Profiles,
vehicle information (the Tesla “T”),
software updates, Bluetooth ®
, and Wi-Fi
settings. The status symbols show outside
temperature, network signal strength,
Bluetooth, Wi-Fi settings, passenger
airbag status, and time. If an alert icon
(exclamation mark) is displayed, touch it
to see warning messages that are in
effect.
Note: The airbag status symbol displays
only when Model S is powered on.
2. Apps
There are several ways to display an app
in the main viewing area:
• Tap the app’s icon to display it in the top viewing area. If the app is alreadydisplayed, a second tap displays it infull-screen view (only some apps have a full-screen mode).
• Drag the app’s icon directly onto the top or bottom viewing area.
• Touch and hold the app’s icon to display a popup that lets you choose
whether to display the app in the top or bottom of the main viewing area.Media. See Media and Audio on
page 77.Maps/Navigation (if equipped).
See Using Maps on page 81.Calendar. See Calendar on page
85.Energy. See Getting Maximum
Range on page 57.Web. Access the Internet using
the web browser (if equipped).Camera. Display the area behind
Model S. This area also displays
automatically whenever you shift
into Reverse. See Rear View
Camera on page 64.Phone. See Phone on page 83.
3.Main viewing area
The main viewing area changes
depending on the app you have chosen
(in the example, the Nav and Media apps
are displayed). For some apps (such as
Nav and Web), you can zoom in and out
using standard touchscreen finger
gestures.
4. Maximize/minimize app
Touch the small rectangle to expand the
associated app to fill the entire main
viewing area (some apps are not
expandable). Touch again to display two
apps in half-screen view.
5. Controls
Touch to access all Model S controls and settings (doors, locks, lights, etc).
6. Climate controls (see Climate Controls on
page 72).
7. Volume control
Touch the up and down arrows to
increase or decrease the volume of the
speakers. You can also adjust the volume
using the scroll wheel on the left side of
the steering wheel.
8. Reverse the position of the two currently
displayed apps.Warning: Paying attention to road and
traffic conditions must always be the
driver's highest priority. To ensure the
safety of vehicle occupants as well as other road users, using the touchscreenshould be done only when road andtraffic conditions permit.
Touchscreen Overview
66Model S Owner's Manual
Page 77 of 159
Note: If Model S is equipped with Smart Air
Suspension, you may hear the sound of the compressor when Model S starts, as thesystem’s reservoir fills with air.
Smart Air Suspension has both manual and
automatic modes of operation.
Manual Height AdjustmentsCaution: Before adjusting the suspension
height, ensure Model S is clear of all
obstacles, above and below.
Manually raising the height of Model S is useful when you need extra ground clearance,
such as steep driveways or ramps, deep snow,
speed bumps, etc.
With Model S powered on, or the brake pedal
pressed, use the touchscreen to manually
change the ride height. Touch Controls >
Driving , then choose from:
• Very High . When set to Very High, the
suspension automatically lowers to High
when driving speed reaches 22 mph (35 km/h).
• High . When set to High, the suspension
automatically lowers to Standard when
driving speed reaches 34 mph (55 km/h).
• Standard . The Standard setting ensures
optimum comfort and handling under all
loading conditions.
• Low . Lowering the height can make it
easier to load or unload cargo and
passengers.
Note: Available settings depend on your
driving speed and other conditions. For
example, the suspension does not lower if a
door is open.
Location-Based Suspension Location-Based suspension saves you from
manually having to raise the suspension every
time you arrive at a frequently-used location
where a higher suspension is needed (steep
driveways or ramps, deep snow, speed
bumps, etc).
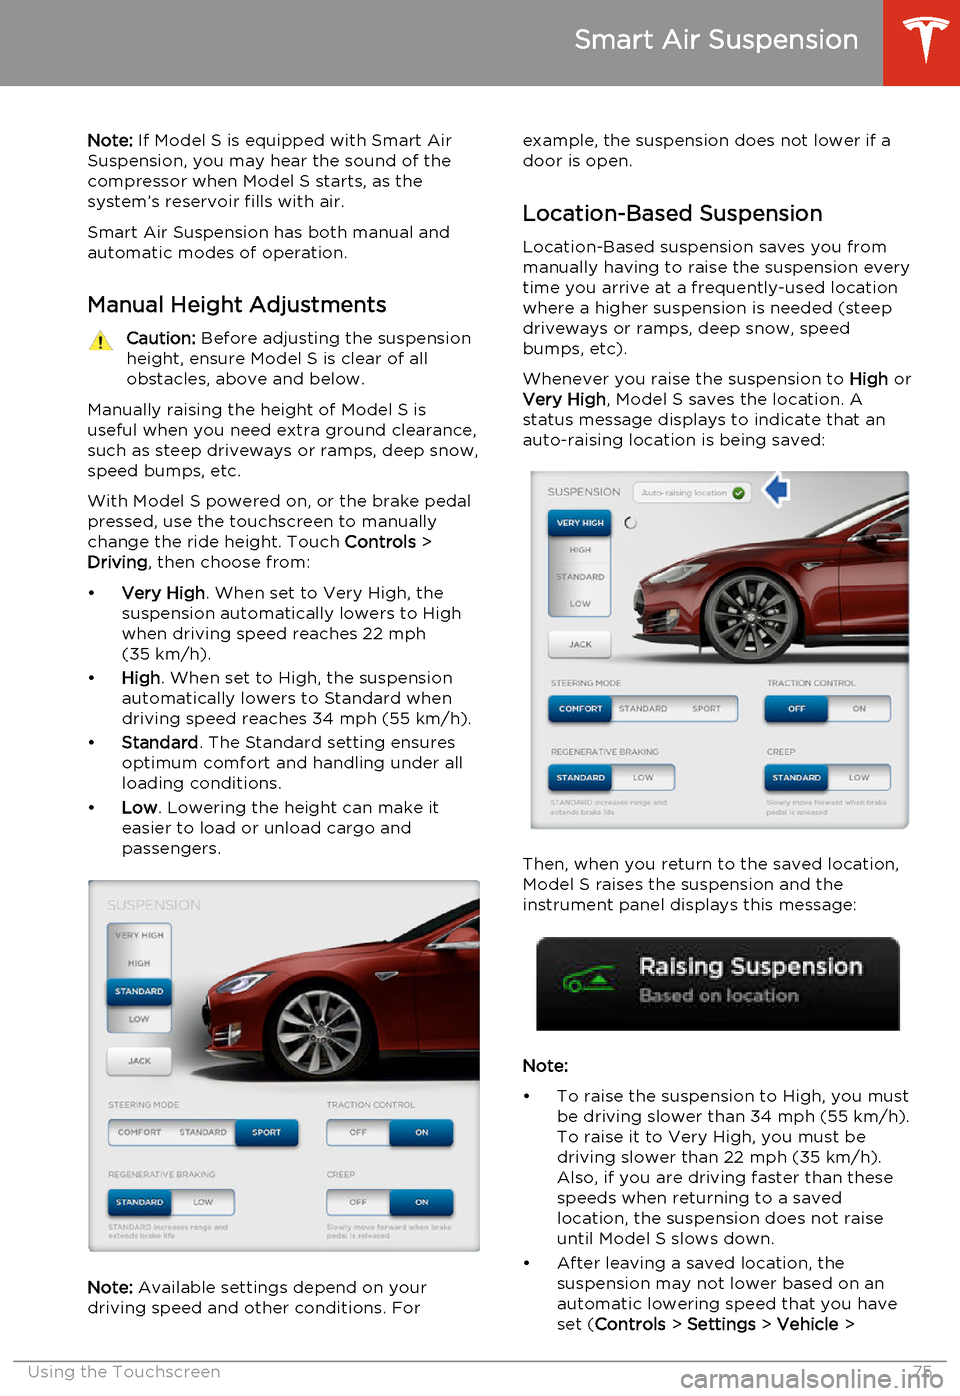
Whenever you raise the suspension to High or
Very High , Model S saves the location. A
status message displays to indicate that an
auto-raising location is being saved:
Then, when you return to the saved location,
Model S raises the suspension and the
instrument panel displays this message:
Note:
• To raise the suspension to High, you must be driving slower than 34 mph (55 km/h).
To raise it to Very High, you must be
driving slower than 22 mph (35 km/h).
Also, if you are driving faster than these
speeds when returning to a saved location, the suspension does not raise
until Model S slows down.
• After leaving a saved location, the suspension may not lower based on anautomatic lowering speed that you have
set ( Controls > Settings > Vehicle >
Smart Air Suspension
Using the Touchscreen75
Page 92 of 159
Loading New Software
Model S updates its software wirelessly,
providing new features throughout your term
of ownership. The first time you enter Model S after an update is made available, a
scheduling window displays on the
touchscreen.
Note: Some software updates can take from
two to three hours to complete. Model S must
be in P (Park) when the new software is being
installed. To ensure the fastest and most
reliable delivery of software updates, leave
the Wi-Fi turned on and connected whenever
possible (see Connecting to Wi-Fi on page
89).
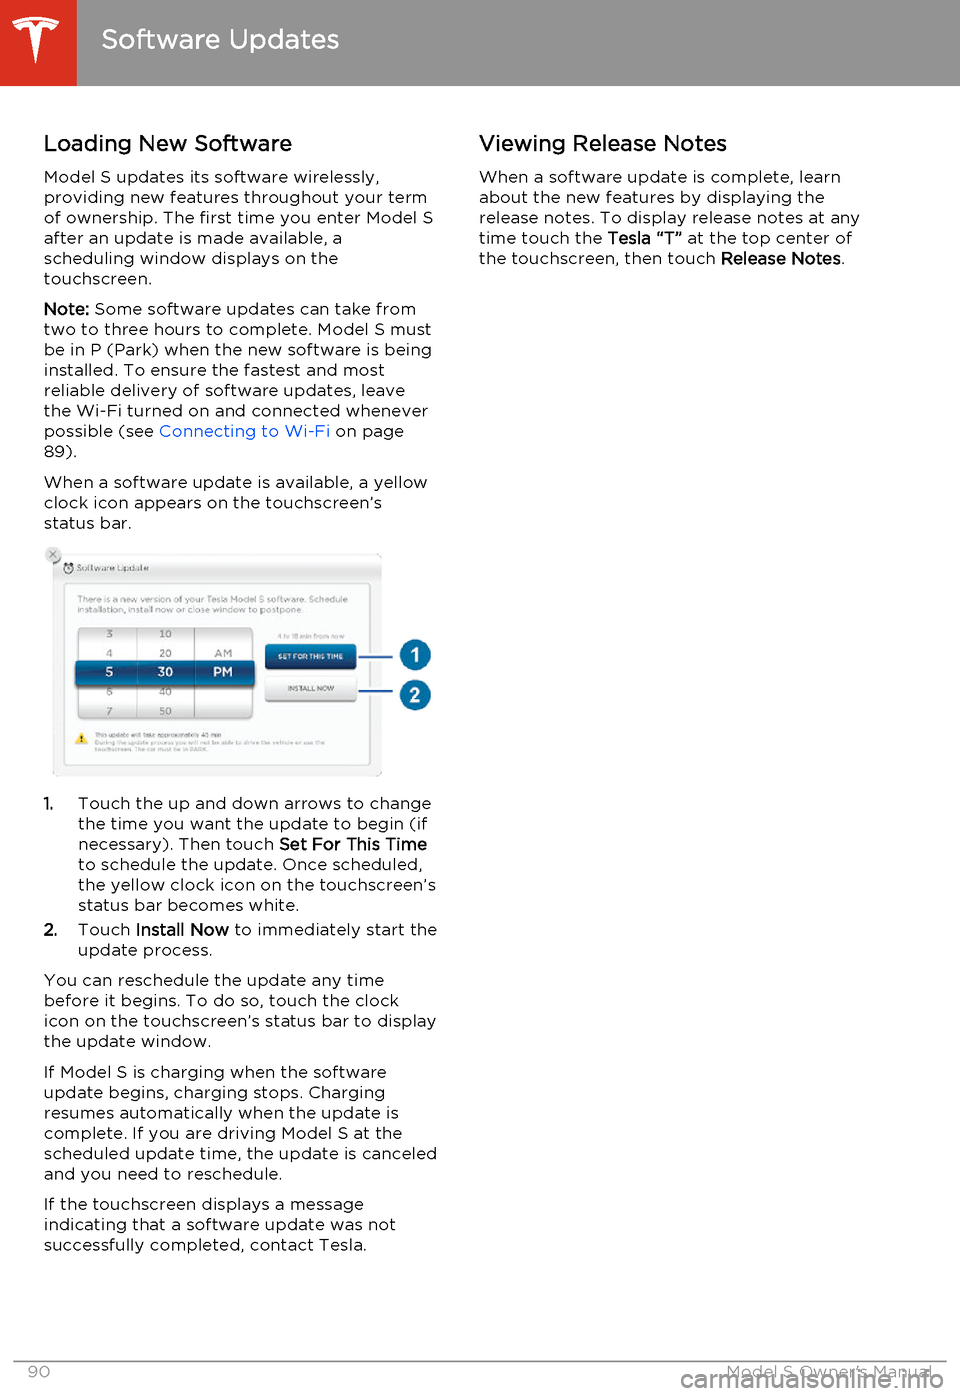
When a software update is available, a yellow clock icon appears on the touchscreen’sstatus bar.
1. Touch the up and down arrows to change
the time you want the update to begin (if
necessary). Then touch Set For This Time
to schedule the update. Once scheduled,
the yellow clock icon on the touchscreen’s
status bar becomes white.
2. Touch Install Now to immediately start the
update process.
You can reschedule the update any time
before it begins. To do so, touch the clock icon on the touchscreen’s status bar to displaythe update window.
If Model S is charging when the software
update begins, charging stops. Charging resumes automatically when the update is
complete. If you are driving Model S at the scheduled update time, the update is canceled
and you need to reschedule.
If the touchscreen displays a message
indicating that a software update was not successfully completed, contact Tesla.
Viewing Release Notes
When a software update is complete, learn
about the new features by displaying the
release notes. To display release notes at any time touch the Tesla “T” at the top center of
the touchscreen, then touch Release Notes.
Software Updates
90Model S Owner's Manual
Page 99 of 159
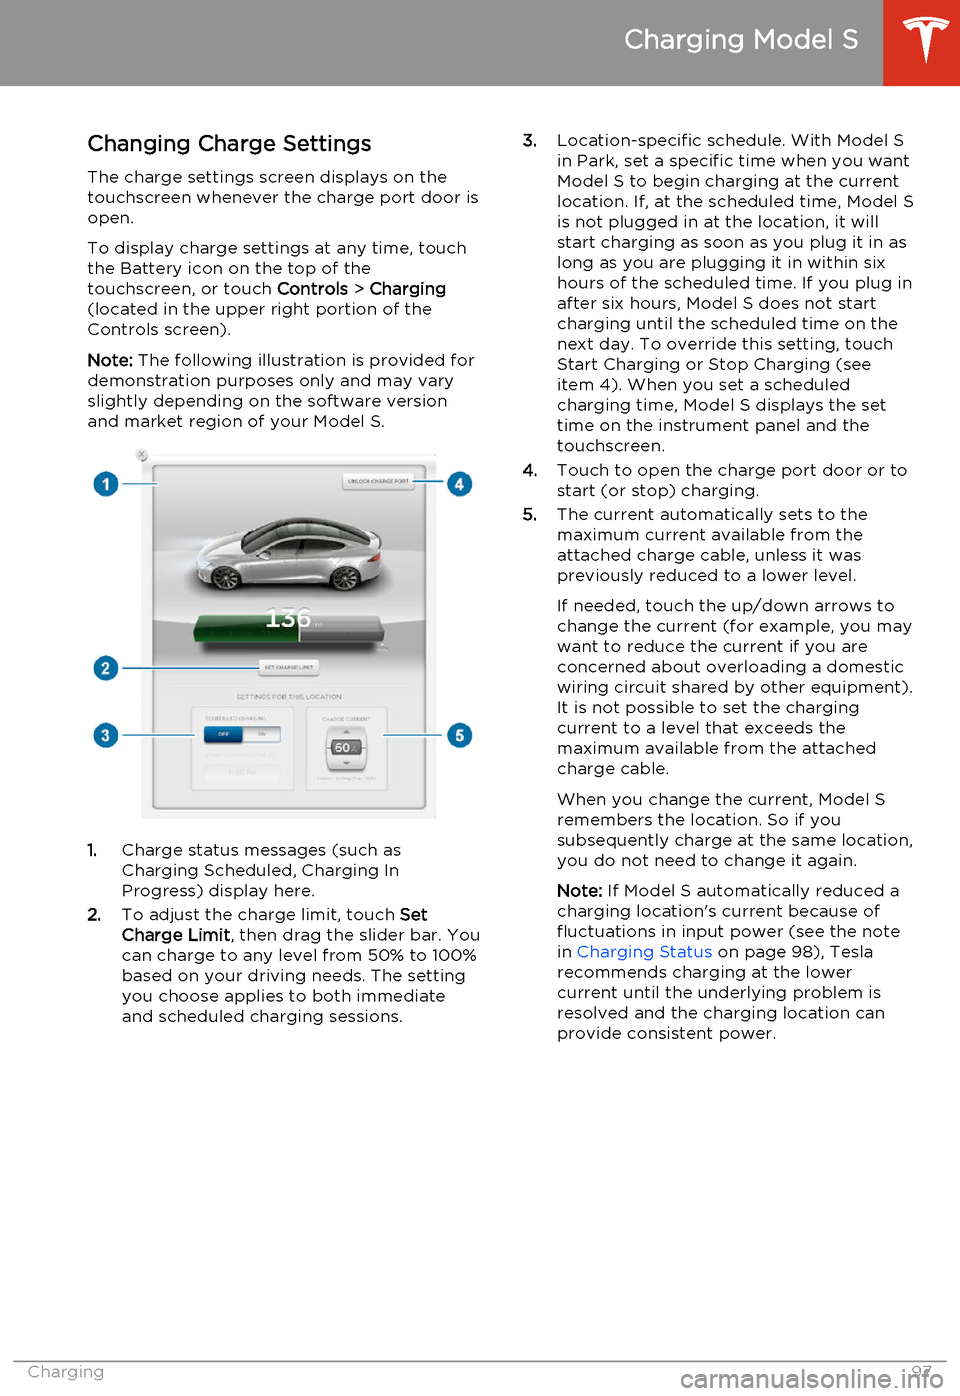
Changing Charge SettingsThe charge settings screen displays on the
touchscreen whenever the charge port door is
open.
To display charge settings at any time, touch
the Battery icon on the top of the
touchscreen, or touch Controls > Charging
(located in the upper right portion of the
Controls screen).
Note: The following illustration is provided for
demonstration purposes only and may vary
slightly depending on the software version
and market region of your Model S.
1. Charge status messages (such as
Charging Scheduled, Charging In
Progress) display here.
2. To adjust the charge limit, touch Set
Charge Limit , then drag the slider bar. You
can charge to any level from 50% to 100%
based on your driving needs. The setting
you choose applies to both immediate
and scheduled charging sessions.
3. Location-specific schedule. With Model S
in Park, set a specific time when you want
Model S to begin charging at the current
location. If, at the scheduled time, Model S
is not plugged in at the location, it will
start charging as soon as you plug it in as
long as you are plugging it in within six hours of the scheduled time. If you plug in
after six hours, Model S does not start
charging until the scheduled time on the next day. To override this setting, touch
Start Charging or Stop Charging (see
item 4). When you set a scheduled
charging time, Model S displays the set time on the instrument panel and the
touchscreen.
4. Touch to open the charge port door or to
start (or stop) charging.
5. The current automatically sets to the
maximum current available from the
attached charge cable, unless it was
previously reduced to a lower level.
If needed, touch the up/down arrows to change the current (for example, you may
want to reduce the current if you are
concerned about overloading a domestic
wiring circuit shared by other equipment).
It is not possible to set the charging
current to a level that exceeds the maximum available from the attached
charge cable.
When you change the current, Model S
remembers the location. So if you
subsequently charge at the same location, you do not need to change it again.
Note: If Model S automatically reduced a
charging location's current because of
fluctuations in input power (see the note
in Charging Status on page 98), Tesla
recommends charging at the lower
current until the underlying problem is
resolved and the charging location can provide consistent power.
Charging Model S
Charging97
Page 100 of 159
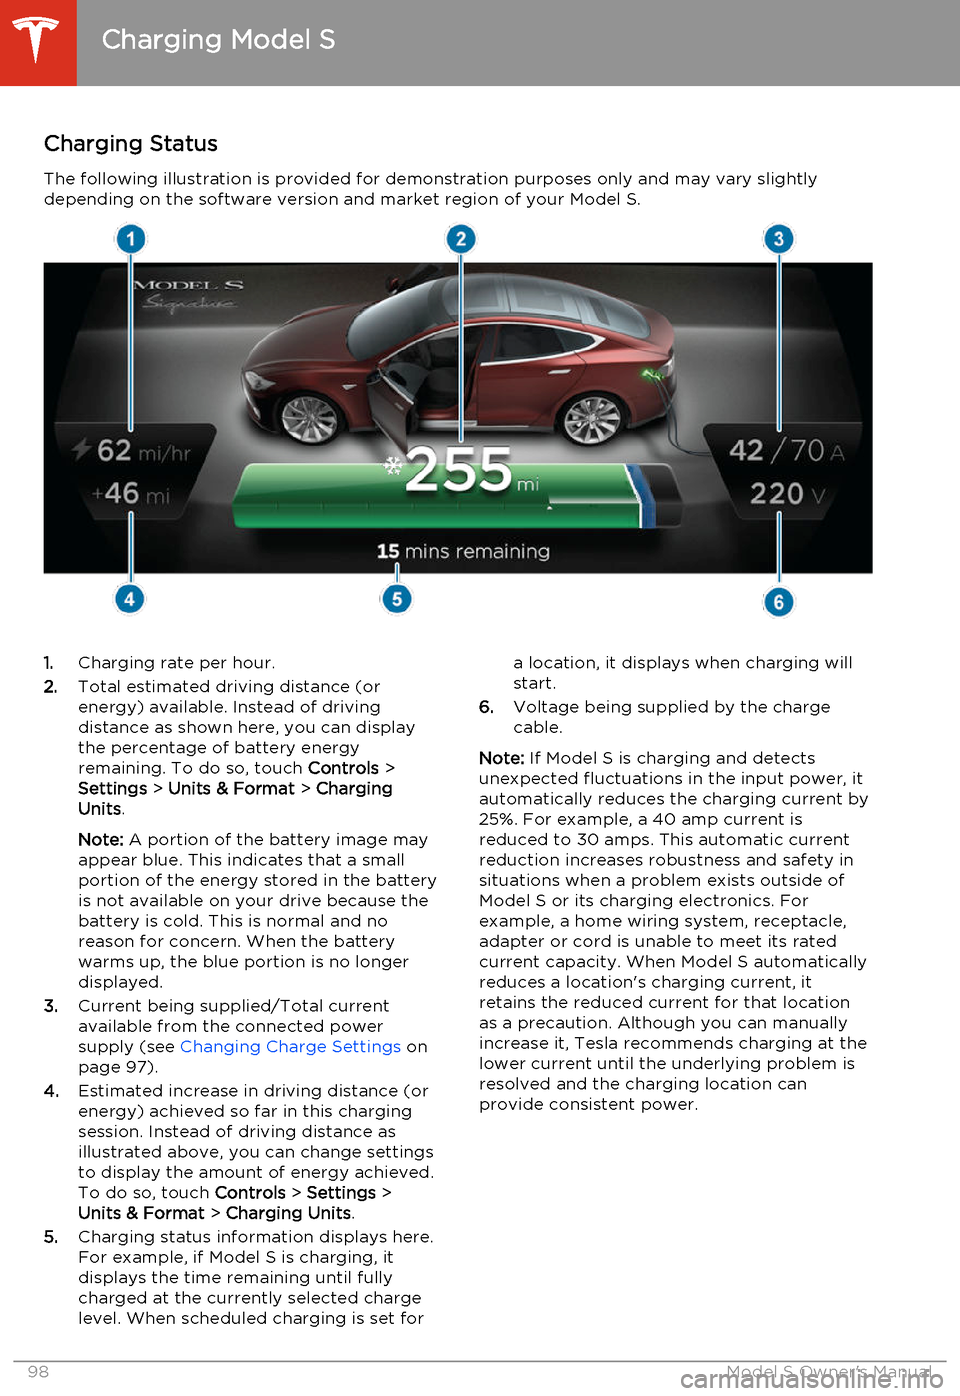
Charging StatusThe following illustration is provided for demonstration purposes only and may vary slightlydepending on the software version and market region of your Model S.1. Charging rate per hour.
2. Total estimated driving distance (or
energy) available. Instead of driving distance as shown here, you can display
the percentage of battery energy
remaining. To do so, touch Controls >
Settings > Units & Format > Charging
Units .
Note: A portion of the battery image may
appear blue. This indicates that a small
portion of the energy stored in the battery
is not available on your drive because the battery is cold. This is normal and no
reason for concern. When the battery warms up, the blue portion is no longer
displayed.
3. Current being supplied/Total current
available from the connected power
supply (see Changing Charge Settings on
page 97).
4. Estimated increase in driving distance (or
energy) achieved so far in this charging session. Instead of driving distance as
illustrated above, you can change settings
to display the amount of energy achieved.
To do so, touch Controls > Settings >
Units & Format > Charging Units .
5. Charging status information displays here.
For example, if Model S is charging, it displays the time remaining until fully
charged at the currently selected charge
level. When scheduled charging is set fora location, it displays when charging will
start.
6. Voltage being supplied by the charge
cable.
Note: If Model S is charging and detects
unexpected fluctuations in the input power, it automatically reduces the charging current by25%. For example, a 40 amp current isreduced to 30 amps. This automatic currentreduction increases robustness and safety in
situations when a problem exists outside of
Model S or its charging electronics. For
example, a home wiring system, receptacle,
adapter or cord is unable to meet its rated
current capacity. When Model S automatically
reduces a location's charging current, it
retains the reduced current for that location
as a precaution. Although you can manually
increase it, Tesla recommends charging at the
lower current until the underlying problem is
resolved and the charging location can
provide consistent power.
Charging Model S
98Model S Owner's Manual