TESLA MODEL S 2015 Owners Manual
Manufacturer: TESLA, Model Year: 2015, Model line: MODEL S, Model: TESLA MODEL S 2015Pages: 164, PDF Size: 4.78 MB
Page 91 of 164
During Navigation
During navigation, the touchscreen displays the navigation route on the map. Dependingon the map’s zoom level, you might not be
able to see the entire route. But as you drive,
the map shows your location on the map.
Whenever a navigation route is active, you
can display an overview of the route by touching the route overview icon:The route overview icon is
available on the right side of the
search bar whenever a navigation
route is active. You can toggle
between North Up, Heading Up
and Route Overview (see Using
Maps on page 90). As you travel
on your navigation route, the zoom
level adjusts to display an overview
of the route between your current
location and your destination.
The touchscreen also displays a turn-by-turn
direction list that includes estimated driving time, arrival time, and an estimate of howmuch energy will remain when you arrive atyour destination (see Predicting Energy Usage
on page 91).
During navigation, the instrument panel also
displays the turn-by-turn directions and you
will hear spoken instructions.
Model S detects real-time traffic conditions
and automatically adjusts the estimated
driving and arrival times based on traffic conditions. In situations where traffic
conditions will delay your estimated time of
arrival and an alternate route is available,
Model S reroutes you to your destination. You
can turn this feature off by touching
Controls > Settings > Apps > Maps &
Navigation > Traffic-Based Routing > Off .
Note: Traffic-based navigation is a BETA
feature in Release 6.0.
When you display the traffic layer on the map,
green traffic lines display under the route line,
whereas yellow and red traffic lines display on
top of the route line to ensure that heavy
traffic areas are easy to identify.
Model S can also monitor traffic to your work
location (on weekday mornings) and to your
home location (on weekday evenings) and
advise you if there is a better route in
situations where traffic conditions will cause a delay. You can set the time savings required
before the advice is given by touching
Controls > Settings > Apps > Maps &
Navigation > Min Improvement for Commute
Advice .
Note: Commute advice is available only if you
have saved a Home and Work Location (see Favorite Destinations on page 92).
Predicting Energy Usage
When navigating to a destination, Model S helps you anticipate your charging needs bycalculating the amount of energy that willremain when you reach your destination. Thecalculation is an estimate based on drivingand environmental factors such as predicted
speed and elevation changes. The
touchscreen displays this calculation in the
lower right corner of the turn-by-turn
direction list.
Throughout your route, Model S monitors
energy usage and updates the calculation as
needed. A popup warning displays above the
calculated amount advising you when:
• A yellow warning displays when you should drive slowly to converse energy.
Model S predicts that you will have very little energy remaining when you reach
your destination. For tips on conserving energy, see Getting Maximum Range on
page 70.
• A red warning displays when you must charge Model S to reach your destination.
Model S also lets you know if you have
enough energy for a round trip. Tap the
battery icon at the bottom of the turn-by-turn
navigation list to determine if Model S has
enough energy to get to your destination and
then return back to your starting point.
When navigating, the energy app displays
real-time energy usage for the current trip.
See Getting Maximum Range on page 70.
Maps and Navigation
Using the Touchscreen91
Page 92 of 164
Favorite DestinationsAdd any destination to your list of
Favorites by either touching its flag
while navigating to it, or by
displaying it on the map then
touching its pin. Then, in the popup
dialog that appears, touch the
Favorites icon. When a destination is
on your Favorites list, the icon is
blue. To remove a favorite
destination, touch the Favorites icon
again.
If you frequently navigate to a destination,
you may want to add it as a Favorite to avoid having to enter the location's name or address
each time. When you add a destination as a
Favorite, you can easily navigate to it by touching PLACES, then selecting it from the
list of Favorites. The Favorites list has placeholders for your Home and Worklocations. In fact, Model S may prompt you to
save a current location as Home or Work
based on your usage pattern.
Updated Maps To receive updated maps, periodically
connect Model S to a Wi-Fi network (see
Connecting to Wi-Fi on page 98). As
updated maps become available, they are sent
to Model S over Wi-Fi only. The touchscreen displays a message informing you when newmaps have been installed.
Maps and Navigation
92Model S Owner's Manual
Page 93 of 164
OverviewNote: Calendar is a BETA feature in Release 6.0.
The Calendar app allows you to view your phone’s (iPhone or Android) calendar for the current and next day. The Calendar app requires that:
• The Tesla Model S mobile app is running and you are logged in. When prompted on your phone, you must grant calendar access to the mobile app. The mobile app can then
periodically (and automatically) send calendar data from your phone to Model S. Also,
whenever you display the mobile app on your phone, updated calendar data is sent to
Model S.
• Your phone is connected to Model S via Bluetooth (for privacy reasons, calendar data displays only from a phone that is connected via Bluetooth).
• Remote access to Model S is turned on (touch Controls > Settings > Safety & Security >
Remote Access > On ).
• Both your phone and Model S have good connectivity.
When you enter Model S, the touchscreen can display a reminder of the day's events. You can
customize if and when your calendar events are displayed by touching Controls > Settings >
Apps > Calendar > Show Calendar Upon Entry .
To view scheduled events for the next 48 hours, choose the Calendar app from the main
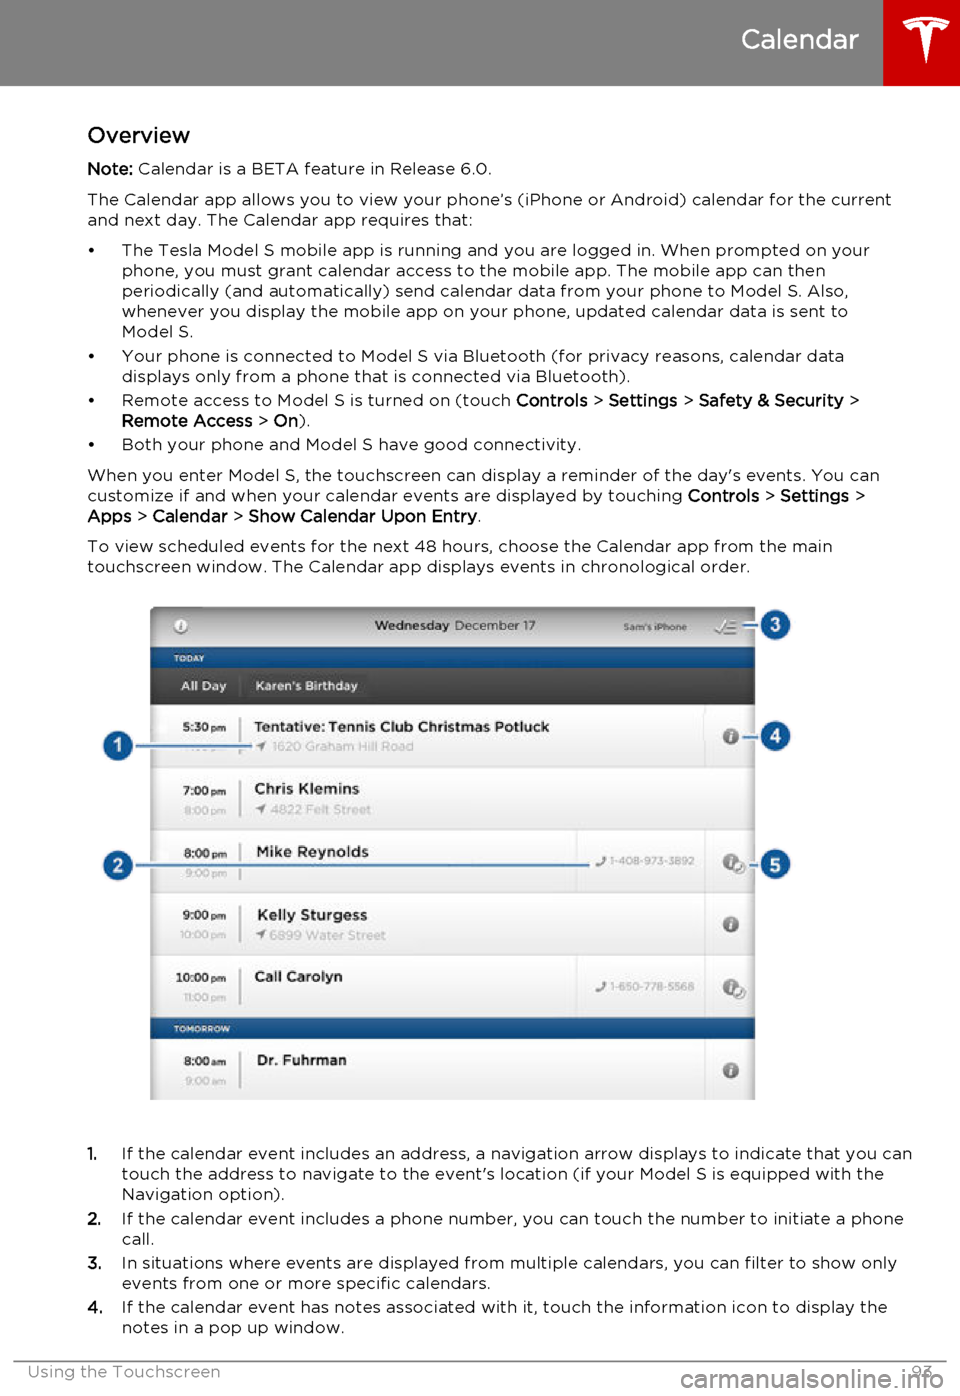
touchscreen window. The Calendar app displays events in chronological order.
1. If the calendar event includes an address, a navigation arrow displays to indicate that you can
touch the address to navigate to the event's location (if your Model S is equipped with the
Navigation option).
2. If the calendar event includes a phone number, you can touch the number to initiate a phone
call.
3. In situations where events are displayed from multiple calendars, you can filter to show only
events from one or more specific calendars.
4. If the calendar event has notes associated with it, touch the information icon to display the
notes in a pop up window.
Calendar
Using the Touchscreen93
Page 94 of 164

5.If an event's notes include one or more phone numbers, a phone symbol displays with the
information icon and the first phone number found in the notes is shown on the event list and
you can use this number to initiate a phone call (as described in item 2 above). But you can
also initiate a call from within the notes pop up window by referencing other numbers that
are included in the notes (this is particularly useful for conference calls). If the notes contain a
web link, you can touch the link to open it in the Web Browser app.
Calendar and Navigation
If Model S is equipped with the navigation feature, and a calendar event has a location specified, you will be given the option to navigate to that location. Also, when an event on your Calendar
takes place within the next hour and has a uniquely specified location, the Model S navigation
system notifies you if there is a better route due to traffic, even if you’re not using navigation.
Calendar
94Model S Owner's Manual
Page 95 of 164

About the Security System
If Model S does not detect a key nearby and a locked door or trunk is opened, an alarmsounds and headlights and turn signals flash.
To deactivate the alarm, press any button on
the key.
To manually enable or disable the alarm
system, touch Controls > Settings > Safety &
Security > Alarm . When set to on, Model S
activates its alarm one minute after the doors
lock and a recognized key is no longer
detected nearby.
Security Settings
Using the Touchscreen95
Page 96 of 164
About HomeLinkIf Model S is equipped with the optional tech
package, you can program the HomeLink ®
Universal Transceiver to operate up to three
garage doors, gates, lights, and security
systems that can transmit Radio Frequency
(RF) signals.
Programming HomeLink
1. Park Model S in front of the device you
want to program, and have the device’s
remote control ready.
2. Touch Controls > Settings > HomeLink on
the touchscreen.
3. Touch Add New HomeLink , then use the
onscreen keyboard to enter a name for
your HomeLink device.
4. Touch Program .
5. Follow the onscreen instructions.
Once programmed, you can operate the device by touching its corresponding
HomeLink icon on the touchscreen’s status bar. HomeLink remembers the location of
your programmed devices. When you approach a known location, the HomeLink
control on the touchscreen automatically
drops down. When you drive away, it
disappears.
Note: For security reasons, erase your
HomeLink settings if you sell Model S.Warning: Your device might open or
close during programming. Before
programming, make sure that the device is clear of any people or objects.Warning: Do not use the HomeLink
Universal Transceiver with a garage door that does not meet safety standards. Agarage door opener that cannot detectan object in its path and then
automatically stop and reverse, does not
meet these standards. Using a garage
door opener without these features
increases the risk of injury or death.
Troubleshooting HomeLink
When programming a HomeLink device, the touchscreen steps you through a two-part
programming process:
• First, Model S records the signal from the remote. The touchscreen instructs you to
stand in front of the car, point the remote
at the front bumper and press and hold
the button until the headlights flash.
When headlights flash, Model S has
learned the remote and you can touch
Continue on the touchscreen . If the
headlights do not flash, refer to the
guidelines below.
• Next, the device's receiver learns Model S. The touchscreen instructs you to press
the LEARN button on the garage door or
gate's receiver. If training the receiver
does not work, refer to the guidelines
below.
NOTE: Only devices that are equipped
with a “rolling code” remote need to learn
Model S. If you have a very old device that
is not equipped with a rolling code
remote, the device does not need to learn
Model S and you can skip this part. You
can also skip this step if your receiver is
Quick-Train compatible. The opener
should work.
Headlights do not flash
• Check the batteries in the remote. It is a good idea to replace the batteries before
you start programming.
• Hold the remote against the nose cone, with the button pressed, about 6 inches to
the left of the Tesla emblem. In some
cases you must hold the remote for up to
three minutes.
• Check compatibility of the remote by contacting the HomeLink manufacturer
( www.homelink.com ).
After programming, the device does not work
• Park Model S with its front bumper as close as possible to the HomeLink device
(garage door, gate, etc).
• Make sure you haven’t reached the device receiver's limit of learned remotes/cars.
Most receivers can learn up to five
remotes/cars. If the receiver's memory is
full, you must clear the memory and
restart the programming process. For
instructions on how to clear the receiver's
memory, refer to the owner
documentation provided with the
HomeLink device.
• Make sure you are pressing the receiver's LEARN button. Most receivers have twobuttons and a LED. One button is a RESET
button and the other is a LEARN button.
Pressing the LEARN button usually causes the LED to flash. For instructions on how
to put the receiver into learning mode, refer to the owner documentation
provided with the HomeLink device.
HomeLink ®
Universal Transceiver
96Model S Owner's Manual
Page 97 of 164

• Most devices stay in learning mode foronly three to five minutes. Immediately
after pressing the device's LEARN button, follow the instructions displayed on the
touchscreen.
HomeLink ®
Universal Transceiver
Using the Touchscreen97
Page 98 of 164
Wi-Fi is available as a data connectionmethod and is often faster than cellular data
networks. Connecting to Wi-Fi is especially
useful in areas with limited or no cellular connectivity. To ensure fast, reliable deliveryof Model S updates (see Software Updates on
page 99), Tesla recommends leaving Wi-Fi
turned on and connected to a Wi-Fi network.
To connect to a Wi-Fi network:
1. Touch the 3G icon in the touchscreen
status bar. Model S will start scanning and
display the Wi-Fi networks that are within range.
2. Select the Wi-Fi network you want to use,
enter the password (if necessary), then
touch Connect .
You can also connect to a hidden network
that isn't shown on the list of scanned
networks. Just touch Wi-Fi Settings and enter
the name of the network in the resulting
dialog box.
Once you have connected to a network,
Model S auto-connects whenever the network
is within range. If more than one previously connected network is within range, Model S
connects to the one most recently used.
Note: You can also use a mobile hotspot or
your phone's Internet connection via Wi-Fi tethering.
Note: At Tesla service centers, Model S
automatically connects to a Tesla Service Wi-
Fi access point.
Connecting to Wi-Fi
98Model S Owner's Manual
Page 99 of 164
Loading New Software
Model S updates its software wirelessly,
providing new features throughout your term
of ownership. The first time you enter Model S after an update is made available, a
scheduling window displays on the
touchscreen.
Note: Some software updates can take from
two to three hours to complete. Model S must
be in P (Park) when the new software is being
installed. To ensure the fastest and most
reliable delivery of software updates, leave
the Wi-Fi turned on and connected whenever
possible (see Connecting to Wi-Fi on page
98).
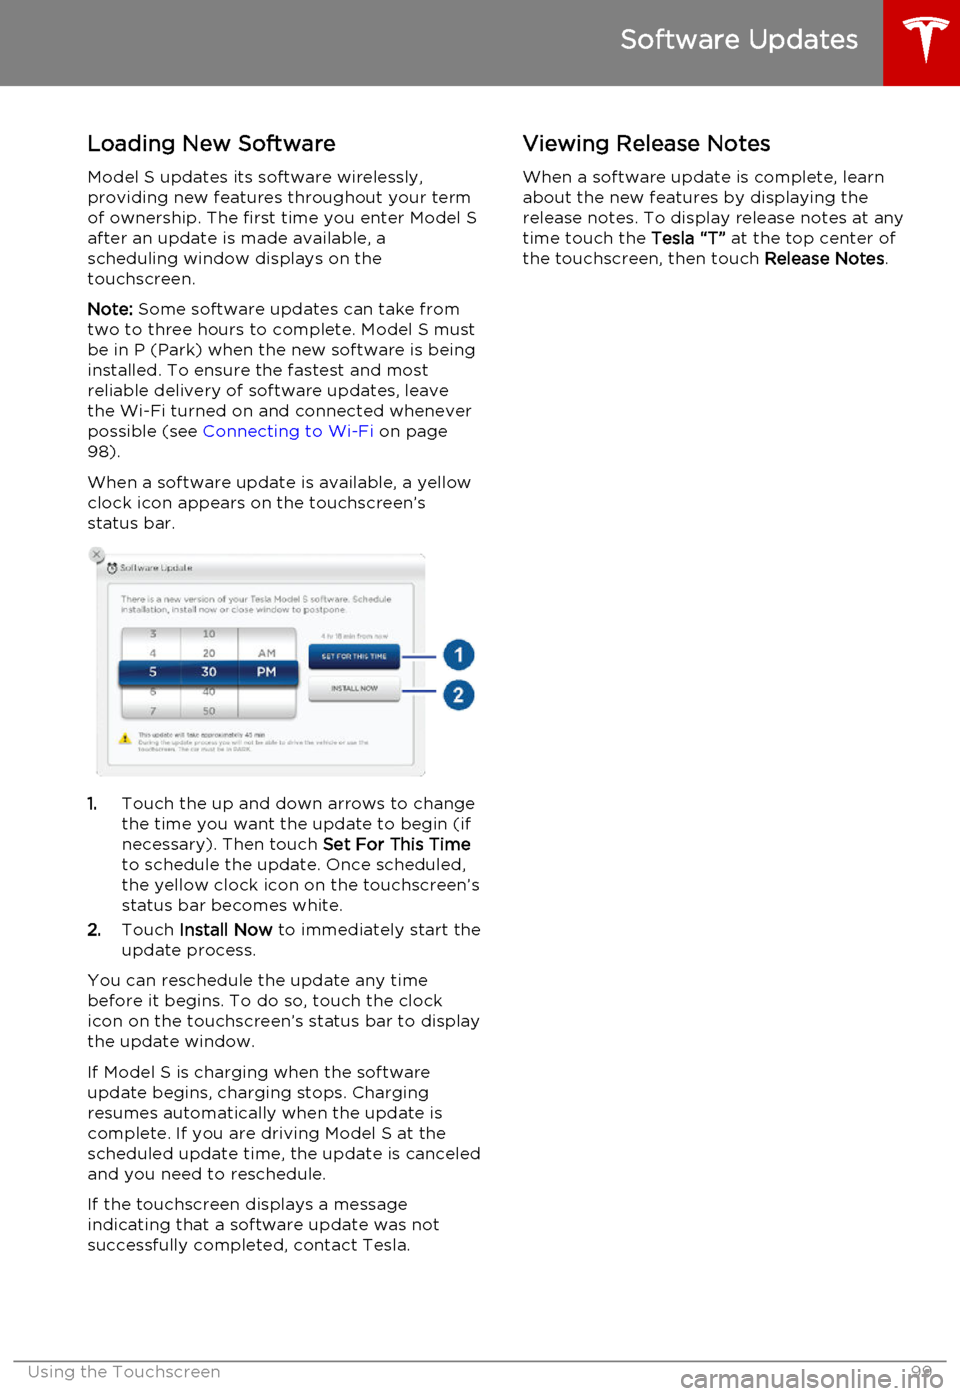
When a software update is available, a yellow clock icon appears on the touchscreen’sstatus bar.
1. Touch the up and down arrows to change
the time you want the update to begin (if
necessary). Then touch Set For This Time
to schedule the update. Once scheduled,
the yellow clock icon on the touchscreen’s
status bar becomes white.
2. Touch Install Now to immediately start the
update process.
You can reschedule the update any time
before it begins. To do so, touch the clock icon on the touchscreen’s status bar to displaythe update window.
If Model S is charging when the software
update begins, charging stops. Charging resumes automatically when the update is
complete. If you are driving Model S at the scheduled update time, the update is canceled
and you need to reschedule.
If the touchscreen displays a message
indicating that a software update was not successfully completed, contact Tesla.
Viewing Release Notes
When a software update is complete, learn
about the new features by displaying the
release notes. To display release notes at any time touch the Tesla “T” at the top center of
the touchscreen, then touch Release Notes.
Software Updates
Using the Touchscreen99
Page 100 of 164
Model S Mobile AppThe Tesla Model S mobile app allows you tocommunicate with Model S remotely using
your iPhone ®
or Android ™
phone. With this app,
you can:
• Check charging progress and receive notifications when charging has started,
has been interrupted, or is complete.
• Heat or cool Model S before driving (even if it's in a garage).
• Locate Model S with directions, or track its movement across a map.
• Flash lights or honk the horn to find Model S when parked.
• Vent or close the sunroof.
• Lock or unlock Model S from afar. • Start Model S.
• Support the Model S Calendar app by allowing the mobile app to send your
phone's calendar data to Model S.
• Receive notifications when the car alarm has been triggered, or a new Model S
software update is available.
Simply download the Tesla Model S mobile
app to your phone and enter your MY TESLA
login credentials. You must also ensure that Model S is ready to communicate with the
mobile app by turning on its remote access
setting. Touch Controls > Settings > Safety &
Security > Remote Access > On (see Settings
on page 77).
Mobile App
100Model S Owner's Manual