TESLA MODEL S 2015 Manual Online
Manufacturer: TESLA, Model Year: 2015, Model line: MODEL S, Model: TESLA MODEL S 2015Pages: 164, PDF Size: 4.78 MB
Page 81 of 164
Customizing Climate ControlThe climate control system is designed to automatically provide optimum comfort in most
situations. All you need to do is set the desired temperature, and the air conditioning, air
recirculation, air distribution, and fan speed automatically maintain your selected temperature.
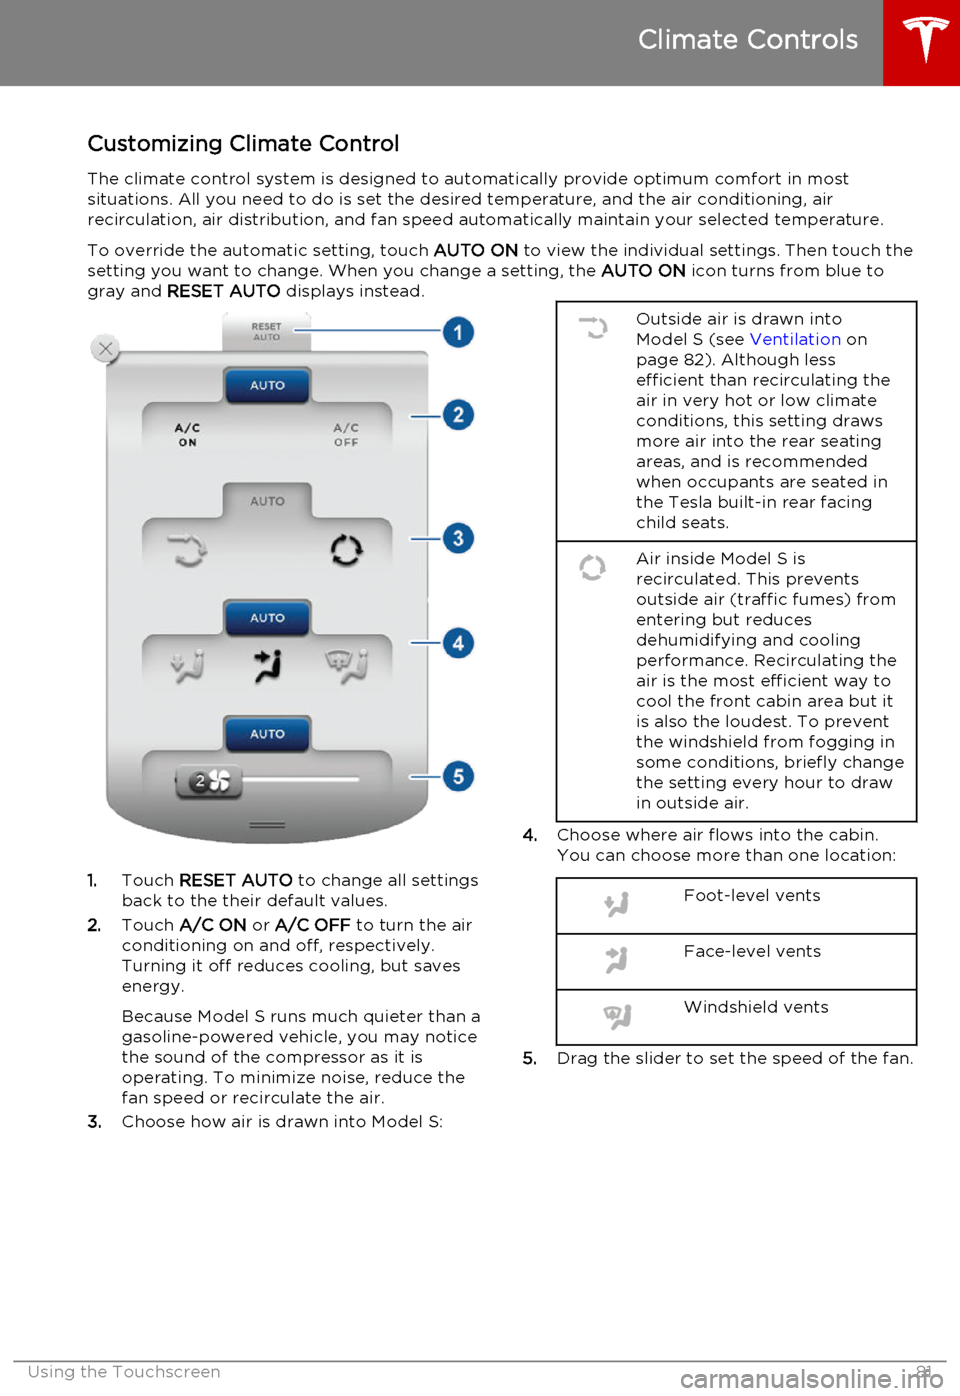
To override the automatic setting, touch AUTO ON to view the individual settings. Then touch the
setting you want to change. When you change a setting, the AUTO ON icon turns from blue to
gray and RESET AUTO displays instead.
1.Touch RESET AUTO to change all settings
back to the their default values.
2. Touch A/C ON or A/C OFF to turn the air
conditioning on and off, respectively. Turning it off reduces cooling, but saves
energy.
Because Model S runs much quieter than a gasoline-powered vehicle, you may notice
the sound of the compressor as it is
operating. To minimize noise, reduce the
fan speed or recirculate the air.
3. Choose how air is drawn into Model S:
Outside air is drawn into
Model S (see Ventilation on
page 82). Although less
efficient than recirculating the
air in very hot or low climate
conditions, this setting draws
more air into the rear seating
areas, and is recommended
when occupants are seated in
the Tesla built-in rear facing
child seats.Air inside Model S is
recirculated. This prevents
outside air (traffic fumes) from
entering but reduces
dehumidifying and cooling
performance. Recirculating the
air is the most efficient way to
cool the front cabin area but it
is also the loudest. To prevent
the windshield from fogging in
some conditions, briefly change
the setting every hour to draw
in outside air.
4. Choose where air flows into the cabin.
You can choose more than one location:
Foot-level ventsFace-level ventsWindshield vents
5. Drag the slider to set the speed of the fan.
Climate Controls
Using the Touchscreen81
Page 82 of 164
Ventilation
Outside air is drawn into Model S through the
grill in front of the windshield. Keep the grill
clear of obstructions such as leaves and snow.
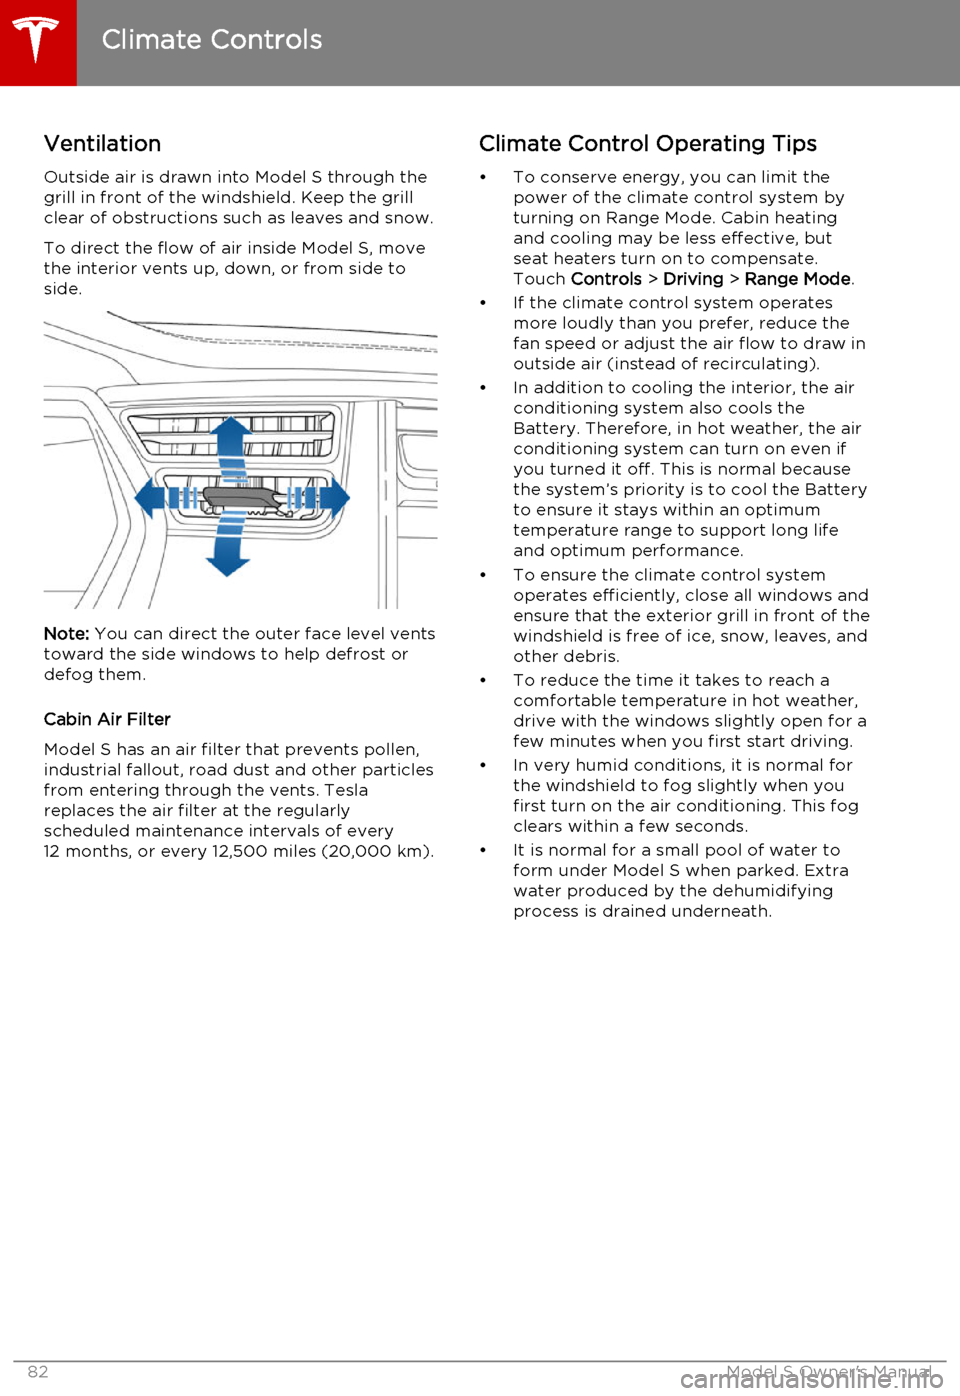
To direct the flow of air inside Model S, move
the interior vents up, down, or from side to
side.
Note: You can direct the outer face level vents
toward the side windows to help defrost or defog them.
Cabin Air Filter
Model S has an air filter that prevents pollen,
industrial fallout, road dust and other particles
from entering through the vents. Tesla replaces the air filter at the regularly
scheduled maintenance intervals of every 12 months, or every 12,500 miles (20,000 km).
Climate Control Operating Tips
• To conserve energy, you can limit the power of the climate control system by
turning on Range Mode. Cabin heating and cooling may be less effective, butseat heaters turn on to compensate.
Touch Controls > Driving > Range Mode .
• If the climate control system operates more loudly than you prefer, reduce thefan speed or adjust the air flow to draw in
outside air (instead of recirculating).
• In addition to cooling the interior, the air conditioning system also cools the
Battery. Therefore, in hot weather, the air
conditioning system can turn on even if
you turned it off. This is normal because the system’s priority is to cool the Battery
to ensure it stays within an optimum
temperature range to support long life and optimum performance.
• To ensure the climate control system operates efficiently, close all windows and
ensure that the exterior grill in front of the
windshield is free of ice, snow, leaves, and
other debris.
• To reduce the time it takes to reach a comfortable temperature in hot weather,
drive with the windows slightly open for a
few minutes when you first start driving.
• In very humid conditions, it is normal for the windshield to fog slightly when you
first turn on the air conditioning. This fog
clears within a few seconds.
• It is normal for a small pool of water to form under Model S when parked. Extra
water produced by the dehumidifying
process is drained underneath.
Climate Controls
82Model S Owner's Manual
Page 83 of 164
Note: If Model S is equipped with Smart Air
Suspension, you may hear the sound of the compressor when Model S starts, as thesystem’s reservoir fills with air.
Smart Air Suspension has both manual and
automatic modes of operation.
Manual Height AdjustmentsCaution: Before adjusting the suspension
height, ensure Model S is clear of all
obstacles, above and below.
Manually raising the height of Model S is useful when you need extra ground clearance,
such as steep driveways or ramps, deep snow,
speed bumps, etc.
With Model S powered on, or the brake pedal
pressed, use the touchscreen to manually
change the ride height. Touch Controls >
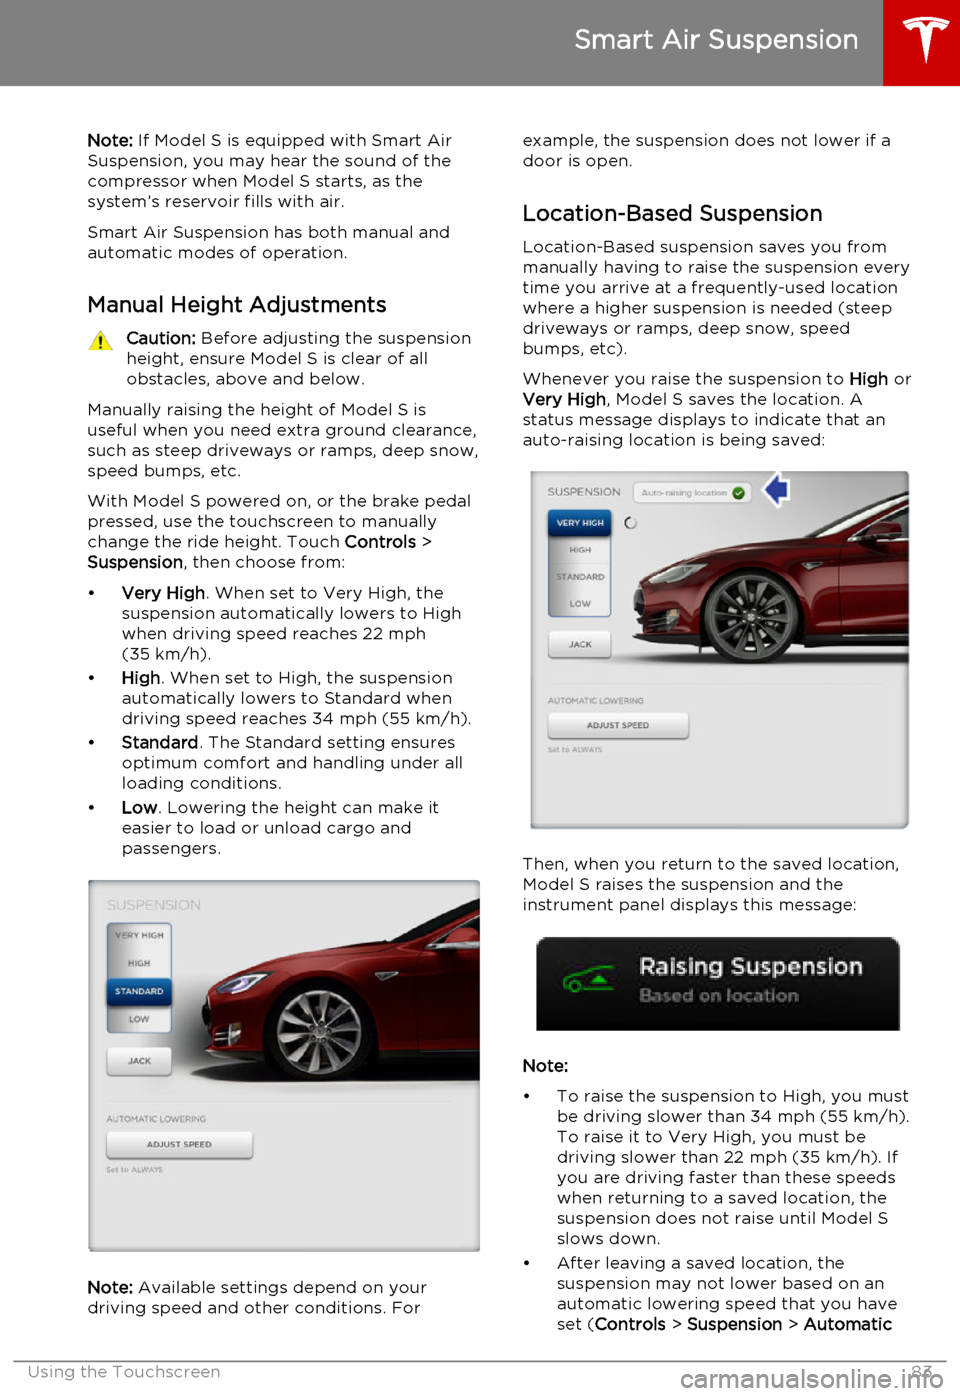
Suspension , then choose from:
• Very High . When set to Very High, the
suspension automatically lowers to High when driving speed reaches 22 mph
(35 km/h).
• High . When set to High, the suspension
automatically lowers to Standard when
driving speed reaches 34 mph (55 km/h).
• Standard . The Standard setting ensures
optimum comfort and handling under all
loading conditions.
• Low . Lowering the height can make it
easier to load or unload cargo and
passengers.
Note: Available settings depend on your
driving speed and other conditions. For
example, the suspension does not lower if a
door is open.
Location-Based Suspension Location-Based suspension saves you from
manually having to raise the suspension every
time you arrive at a frequently-used location
where a higher suspension is needed (steep
driveways or ramps, deep snow, speed
bumps, etc).
Whenever you raise the suspension to High or
Very High , Model S saves the location. A
status message displays to indicate that an
auto-raising location is being saved:
Then, when you return to the saved location,
Model S raises the suspension and the
instrument panel displays this message:
Note:
• To raise the suspension to High, you must be driving slower than 34 mph (55 km/h).
To raise it to Very High, you must be
driving slower than 22 mph (35 km/h). If
you are driving faster than these speeds when returning to a saved location, the
suspension does not raise until Model S
slows down.
• After leaving a saved location, the suspension may not lower based on an
automatic lowering speed that you have
set ( Controls > Suspension > Automatic
Smart Air Suspension
Using the Touchscreen83
Page 84 of 164
Lowering) until you are driving faster than
the auto-raising speed thresholds described above.
• If Model S reaches a saved location and the existing suspension setting is higher
than the level that has been saved for that
location, the suspension is not adjusted.
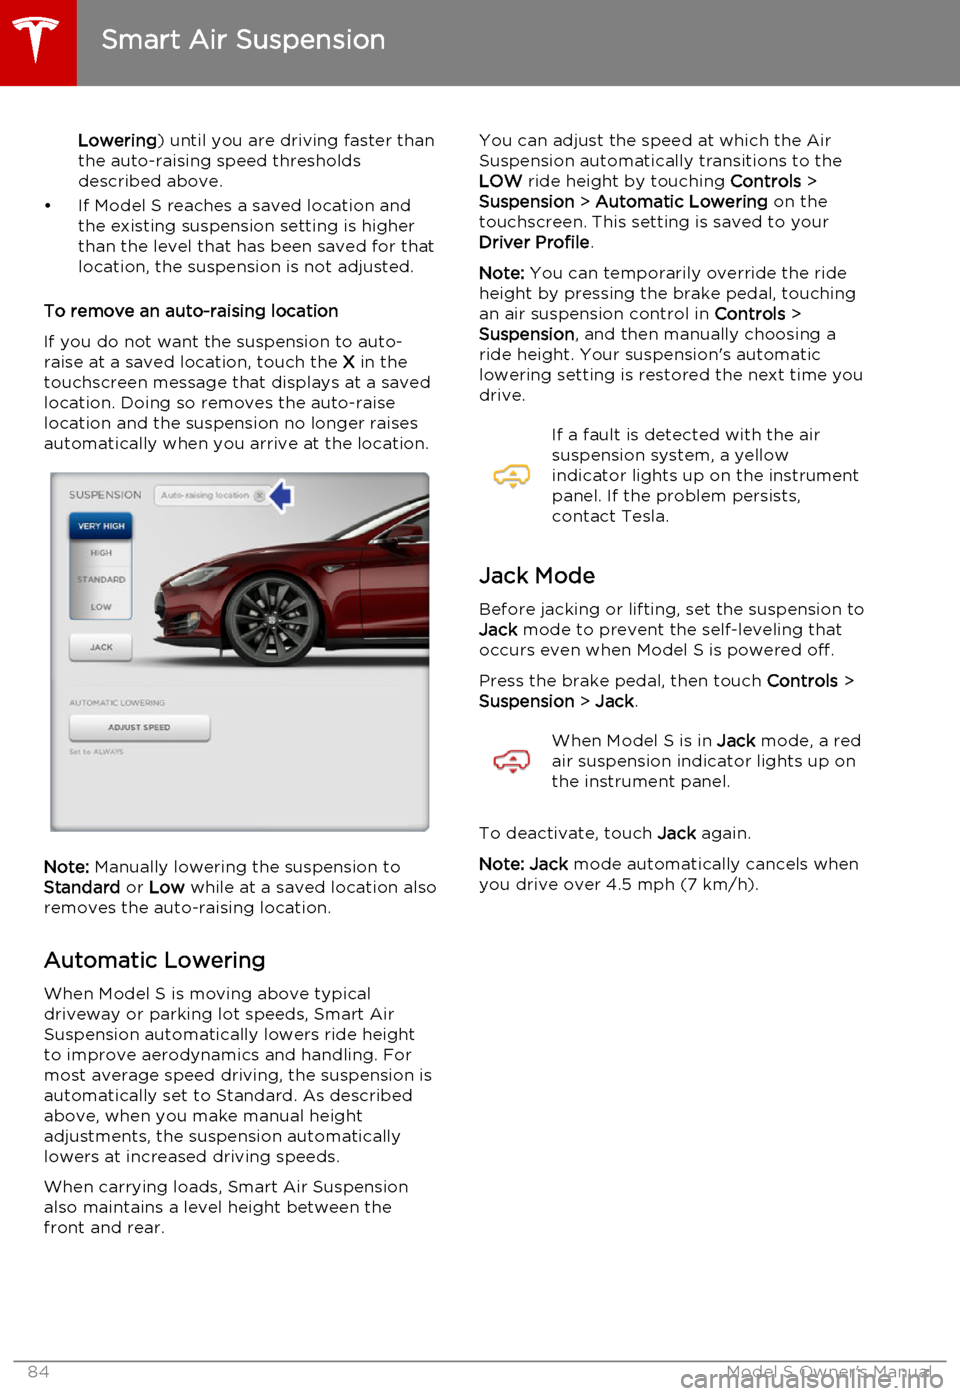
To remove an auto-raising location
If you do not want the suspension to auto-
raise at a saved location, touch the X in the
touchscreen message that displays at a saved
location. Doing so removes the auto-raise
location and the suspension no longer raises automatically when you arrive at the location.
Note: Manually lowering the suspension to
Standard or Low while at a saved location also
removes the auto-raising location.
Automatic Lowering When Model S is moving above typical
driveway or parking lot speeds, Smart Air
Suspension automatically lowers ride height
to improve aerodynamics and handling. For
most average speed driving, the suspension is
automatically set to Standard. As described
above, when you make manual height
adjustments, the suspension automatically lowers at increased driving speeds.
When carrying loads, Smart Air Suspension also maintains a level height between the
front and rear.
You can adjust the speed at which the Air
Suspension automatically transitions to the LOW ride height by touching Controls >
Suspension > Automatic Lowering on the
touchscreen. This setting is saved to your Driver Profile .
Note: You can temporarily override the ride
height by pressing the brake pedal, touching an air suspension control in Controls >
Suspension , and then manually choosing a
ride height. Your suspension's automatic
lowering setting is restored the next time you
drive.If a fault is detected with the air
suspension system, a yellow
indicator lights up on the instrument
panel. If the problem persists,
contact Tesla.
Jack Mode
Before jacking or lifting, set the suspension to
Jack mode to prevent the self-leveling that
occurs even when Model S is powered off.
Press the brake pedal, then touch Controls >
Suspension > Jack .
When Model S is in Jack mode, a red
air suspension indicator lights up on
the instrument panel.
To deactivate, touch Jack again.
Note: Jack mode automatically cancels when
you drive over 4.5 mph (7 km/h).
Smart Air Suspension
84Model S Owner's Manual
Page 85 of 164

OverviewTouch the Media icon to listen to the radio or
play audio files. The touchscreen displays the
Media Player. Media Player has two tabs. Use the Browse tab to select what you want to
play and use the Now Playing tab to view and
control what is currently playing. You can play
AM and FM radio (including HD), and XM
satellite radio (if Model S is equipped with the optional sound package). You can also play
Internet radio (such as TuneIn), and audio files from a Bluetooth-connected device or a USB-
connected flash drive.
To adjust the media volume, roll the scroll
wheel on the left side of the steering wheel up or down. To mute the volume, tap the wheel.
AM and FM Radio
Model S provides AM and FM radio services. These can be selected from the Browse tab orusing the Source Picker, located in the upperright corner of the Media Player window.
You can manually tune the radio to any
frequency by touching and dragging the channel selector bar on the Now Playing
screen. The channel selector bar allows you to move from one available radio station to the
next.
XM Radio If Model S is equipped with the optional sound
studio package, you can listen to XM radio, a
subscription-based satellite radio service. To
receive XM radio channels, you must provide
the radio service provider with the radio ID for
your touchscreen.
To view the radio ID:
1. Select the XM radio source.
2. Tune it to channel 0.
3. The Radio ID displays in the station
information area.
To select an XM radio channel, you can either
manually scroll through the channel numbers,
or you can browse the channels by category.
To browse by category, touch Browse >
Radio > XM Satellite Radio .
Note: On newer models, XM radio is available
only if Model S is equipped with both the optional sound studio package and thepanoramic roof. To optimize aerodynamics,
Model S does not have an external antenna.
The internal antenna is compatible only with the transparent panoramic roof.Internet Radio
Internet radio services are accessed over a
data connection. To use Internet radio, touch
Media > Browse > Internet .
Choose your desired Internet radio service
(for example, TuneIn), then browse through the available categories and/or stations. When
you select a specific station or episode, Media Player starts playing it and displays the NowPlaying screen.
To play the next (and in some cases previous) available station, episode, or track beingprovided by the Internet radio service, touch
the arrows on the Now Playing screen, or use
the buttons on the left side of the steering
wheel (see Using Left Steering Wheel Buttons
on page 37). The exact function of these
controls vary depending on the specific
Internet service you are listening to.
You can also use voice commands to play a
specific song, artist, or album from an Internet
radio service. For details, see Using Voice
Commands on page 38.
Internet Radio Account Registration
Model S provides you with one or more
Internet radio services. To enter your log in
information, touch Controls > Settings >
Apps > Media Player . Enter the email and
password associated with the Internet radio
account(s) you want to use, then touch Log
In .
Slacker
You can use your own Slacker account or the
one that Tesla has already set up for you. To
use your own account, log in as described above.
Note: If you have a Slacker Premium account,
you can shuffle tracks in a playlist or repeat any track using the shuffle/repeat icons
displayed below the album cover art on the
Now Playing tab.
TuneIn
TuneIn does not require an account for it to work. But if you have a TuneIn account (go towww.tunein.com), you can log in as describedabove.
When playing a TuneIn podcast, you can rewind or fast forward to any location in the
podcast by dragging the slider bar on the Now Playing tab.
Media and Audio
Using the Touchscreen85
Page 86 of 164
Media SettingsTo adjust settings for your radio stations, and
to log into your Internet radio account(s),
touch Controls > Settings > Apps > Media
Player .
FavoritesTo add a currently playing radio
station or audio file to your Favorites
list, touch the Favorites icon on the
Now Playing screen. The icon turns
blue to show that it is a favorite. To
remove a favorite, touch the icon
again.
Note: Adding a radio station to your Favorites
list also assigns it to one of the six presets, if an empty preset is available.
Note: To select a favorite radio station or
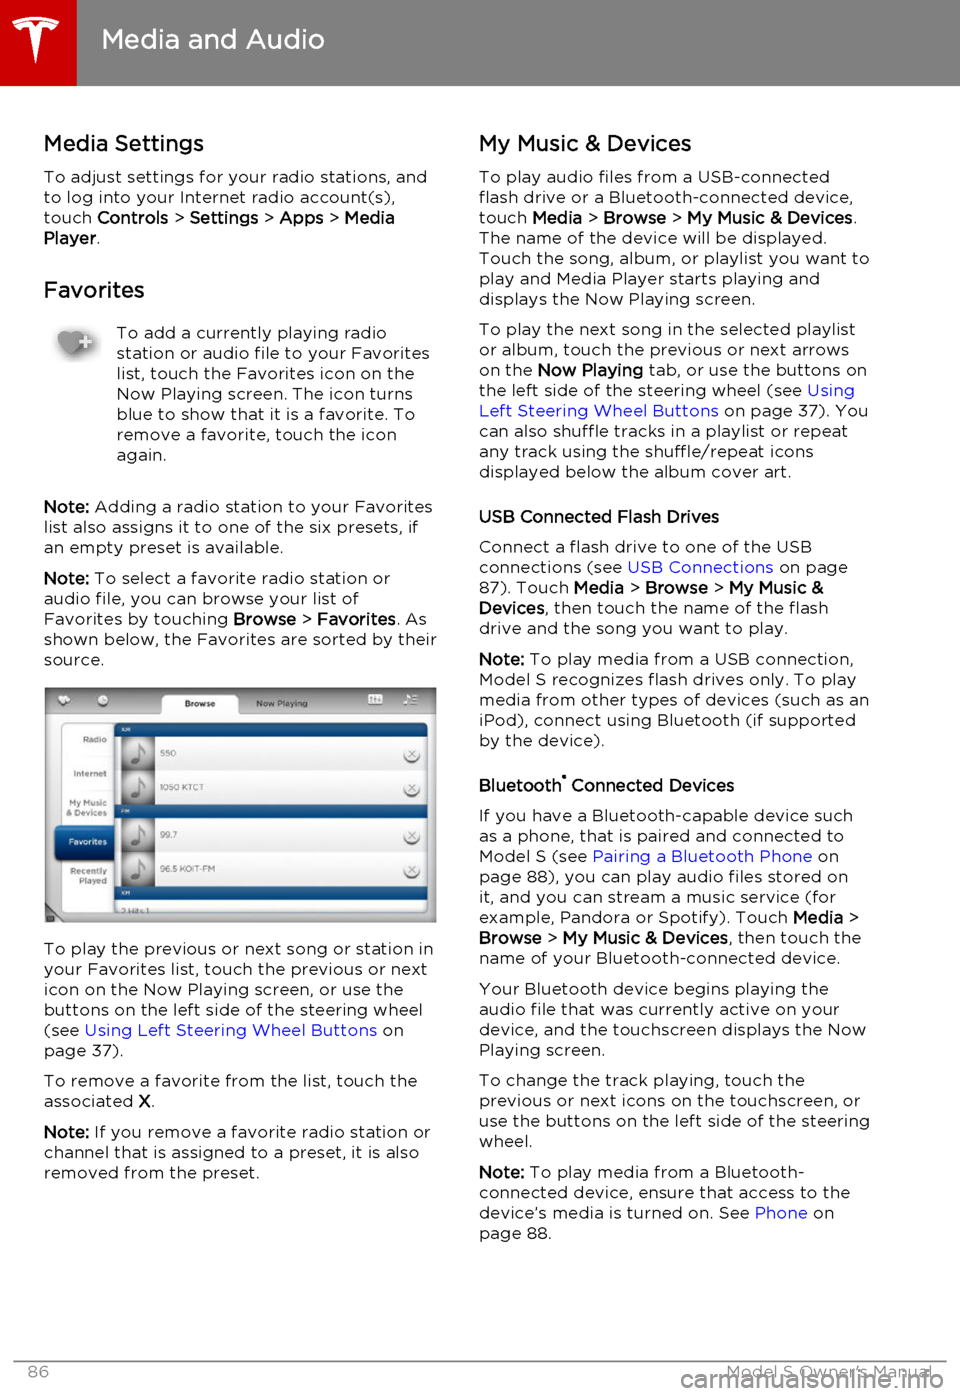
audio file, you can browse your list of Favorites by touching Browse > Favorites . As
shown below, the Favorites are sorted by their
source.
To play the previous or next song or station in
your Favorites list, touch the previous or next icon on the Now Playing screen, or use thebuttons on the left side of the steering wheel(see Using Left Steering Wheel Buttons on
page 37).
To remove a favorite from the list, touch the associated X.
Note: If you remove a favorite radio station or
channel that is assigned to a preset, it is also
removed from the preset.
My Music & Devices
To play audio files from a USB-connected
flash drive or a Bluetooth-connected device,
touch Media > Browse > My Music & Devices .
The name of the device will be displayed. Touch the song, album, or playlist you want to
play and Media Player starts playing and
displays the Now Playing screen.
To play the next song in the selected playlist or album, touch the previous or next arrowson the Now Playing tab, or use the buttons on
the left side of the steering wheel (see Using
Left Steering Wheel Buttons on page 37). You
can also shuffle tracks in a playlist or repeat
any track using the shuffle/repeat icons
displayed below the album cover art.
USB Connected Flash Drives
Connect a flash drive to one of the USB
connections (see USB Connections on page
87). Touch Media > Browse > My Music &
Devices , then touch the name of the flash
drive and the song you want to play.
Note: To play media from a USB connection,
Model S recognizes flash drives only. To play
media from other types of devices (such as an
iPod), connect using Bluetooth (if supported
by the device).
Bluetooth ®
Connected Devices
If you have a Bluetooth-capable device such
as a phone, that is paired and connected to
Model S (see Pairing a Bluetooth Phone on
page 88), you can play audio files stored on
it, and you can stream a music service (for example, Pandora or Spotify). Touch Media >
Browse > My Music & Devices , then touch the
name of your Bluetooth-connected device.
Your Bluetooth device begins playing theaudio file that was currently active on your
device, and the touchscreen displays the Now
Playing screen.
To change the track playing, touch the previous or next icons on the touchscreen, oruse the buttons on the left side of the steering
wheel.
Note: To play media from a Bluetooth-
connected device, ensure that access to the device’s media is turned on. See Phone on
page 88.
Media and Audio
86Model S Owner's Manual
Page 87 of 164
USB Connections
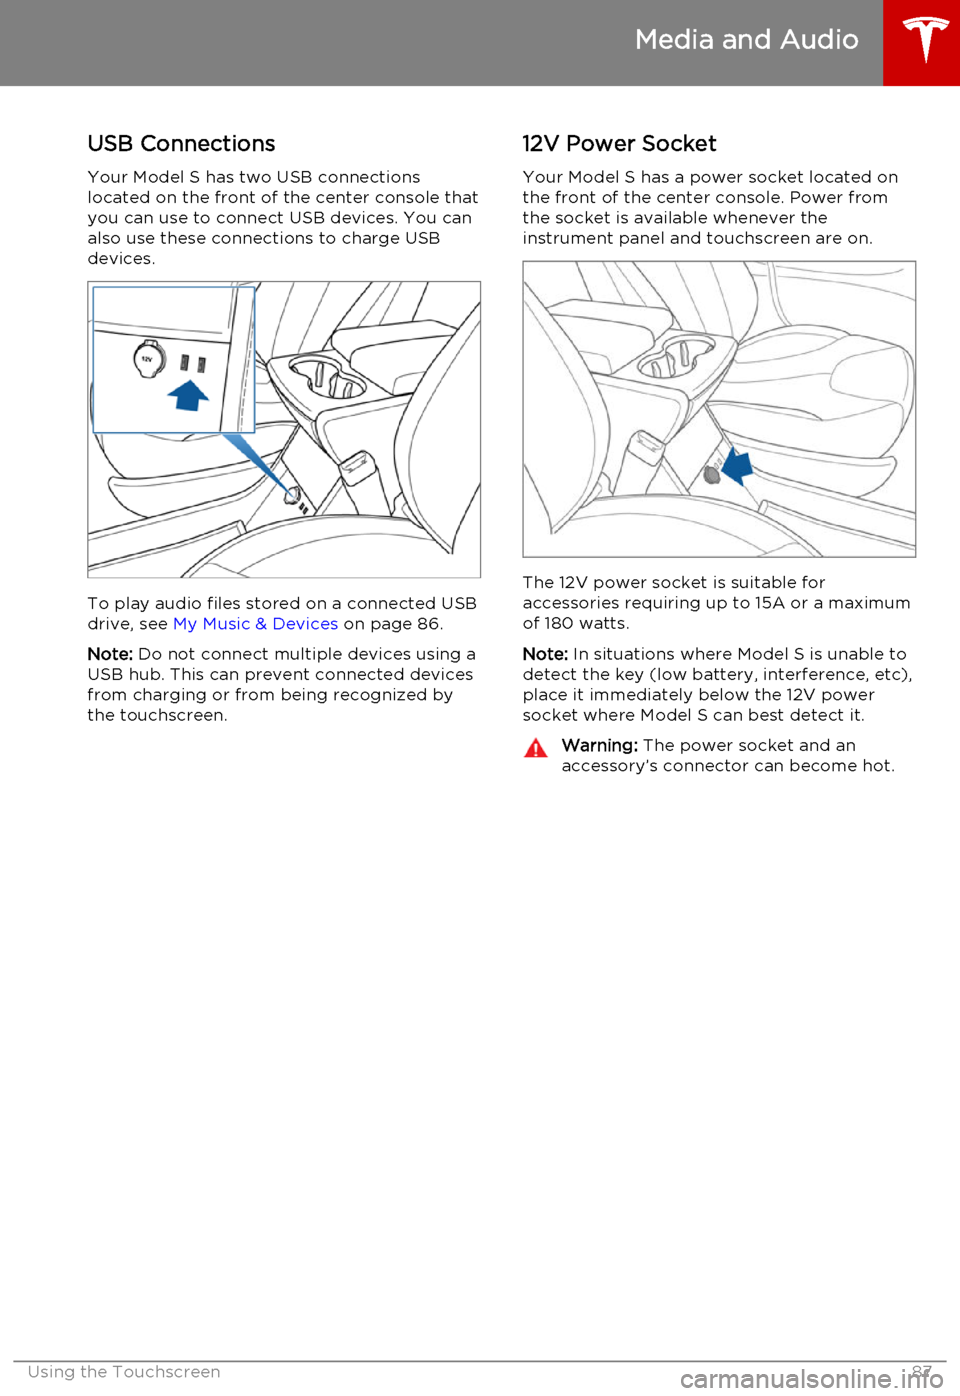
Your Model S has two USB connections
located on the front of the center console that
you can use to connect USB devices. You can
also use these connections to charge USB devices.
To play audio files stored on a connected USBdrive, see My Music & Devices on page 86.
Note: Do not connect multiple devices using a
USB hub. This can prevent connected devices from charging or from being recognized bythe touchscreen.
12V Power Socket
Your Model S has a power socket located on
the front of the center console. Power from
the socket is available whenever the
instrument panel and touchscreen are on.
The 12V power socket is suitable for
accessories requiring up to 15A or a maximum
of 180 watts.
Note: In situations where Model S is unable to
detect the key (low battery, interference, etc), place it immediately below the 12V power
socket where Model S can best detect it.
Warning: The power socket and an
accessory’s connector can become hot.
Media and Audio
Using the Touchscreen87
Page 88 of 164

Bluetooth®
Compatibility
You can use your Bluetooth-capable phone
hands-free in Model S provided your phone is within operating range. Although Bluetooth
typically supports wireless communication
over distances of up to approximately 30 feet
(9 meters), performance can vary based on
the phone you are using.
Before using your phone with Model S, you
must pair it. Pairing sets up Model S to work
with your Bluetooth-capable phone (see Pairing a Bluetooth Phone on page 88).
You can pair up to ten Bluetooth phones.
Model S always automatically connects to the
last phone that was used (provided it is within
range). If you want to connect to a different phone, see Connecting to a Paired Phone on
page 89.
Note: On many phones, Bluetooth turns off if
the phone’s battery is low.
Note: In addition to phones, you can also pair
Bluetooth-enabled devices with Model S. For example, you can pair an iPod Touch or an
iPad or Android tablet to stream music.
Pairing a Bluetooth Phone
Pairing sets up Model S to work with your
Bluetooth-capable phone. Once a phone is paired, Model S can connect to it wheneverthe phone is within range.
To pair a phone, follow these steps while
sitting inside Model S:
1. Ensure both the touchscreen and the
phone are powered on.
2. On the touchscreen’s status bar, touch the
Bluetooth icon.
3. On your phone, enable Bluetooth and set
it to discoverable.
4. On the Model S touchscreen, touch Start
Search. The touchscreen searches then
displays the list of all available Bluetooth devices within operating distance.
5. On the Model S touchscreen, touch the
phone with which you want to pair. Within
a few seconds, the touchscreen displays a
randomly generated number, and your
phone should display the same number.
6. Check that the number displayed on your
phone matches the number displayed on
the touchscreen. Then, on your phone,
confirm that you want to pair.When paired, Model S automatically connects to the phone, and the touchscreen displays
the Bluetooth symbol next to the phone’s name to show that the connection is active.
Importing Contacts
Once paired, you can use the Bluetooth
settings screen to specify whether you want
to allow access to your phone’s contacts and recent calls.
If access is turned on, you can see your list of contacts on the Model S touchscreen. Touch
Phone > Contacts . You can then touch a
contact to dial its phone number or navigate
to its address.
Note: Before contacts can be imported, you
may need to either set your phone to allow syncing, or respond to a popup on your phone
to confirm that it is OK to sync contacts. This
varies depending on the type of phone you are using. For details, refer to the owner
documentation provided with your phone.
If access is turned on, imported information is
displayed when you touch the contacts tab on
the Phone app.
Unpairing a Bluetooth Phone
If you want to disconnect your phone and use it again later, simply touch Disconnect on the
Bluetooth settings screen. If you do not want
to use your phone with Model S again, touch
Forget This Device. Once you forget a device,
you need to pair it again if you want to use it
with Model S (see Pairing a Bluetooth Phone
on page 88).
Note: Your phone automatically disconnects
whenever you leave Model S.
Phone
88Model S Owner's Manual
Page 89 of 164
Connecting to a Paired Phone
Model S automatically connects with the last
phone to which it was connected, provided it is within operating range and has Bluetooth
turned on. If the last phone is not within range,
it attempts to connect with the next phone
that it has been paired with.
To connect to a different phone, touch the
Bluetooth icon on the touchscreen's status
bar. The Bluetooth window displays a list of paired phones. Choose the phone you want to
connect to, then touch Connect. If the phone
you want to connect to is not listed, follow the instructions on Pairing a Bluetooth Phone on
page 88.
When connected, the Model S touchscreen
displays the Bluetooth symbol next to the
phone name to show that the connection is
active.
Making a Phone Call You can make a phone call by:• Speaking a voice command. For details, see Using Voice Commands on page 38.
• Choosing a contact from your contact list (described above).
• Using the Model S on-screen dialer.
To make a phone call using the on-screendialer:
1. Touch the Phone app on the touchscreen,
then touch Dialer.
2. Enter the phone number on the dialer.
3. Touch Call. The touchscreen displays the
call screen and the number you are
calling.
To make a phone call by choosing a contact: 1. Touch the Phone app on the touchscreen,
then touch Contacts.
Note: Ensure that access to the phone’s
contacts is turned on.
2. Touch the name of the contact you want
to call to display details about the
contact.
3. Touch the number you want to dial (there
may be more than one). The touchscreen
displays the call screen and the name of
the contact you are calling.
Note: If it is safe and legal to do so, you can
also initiate a call by dialing the number or
selecting the contact directly from your
phone.Receiving a Phone Call
When your phone receives an incoming call,
both the instrument panel and the
touchscreen display the caller’s number or name (if the caller is in your phone’s contactlist and Model S has access to your contacts).
Touch one of the options on the touchscreen,
or use the scroll wheel on the right side of the
steering wheel to Answer or Ignore the call
(see Using Right Steering Wheel Buttons on
page 38).
In Call Options When a call is in progress, you can display the
call menu on the instrument panel by pressing
the top button on the right side of the
steering wheel. Then use the right scroll wheel
to scroll through and choose an option (see
Using Right Steering Wheel Buttons on page
38).
Phone
Using the Touchscreen89
Page 90 of 164
OverviewTouch the Map (or Nav) icon to view and
search for a location on Google Maps TM
. If
Model S is equipped with the navigation
option, the app is labeled Nav and onboard
maps are available. Onboard maps allow you to navigate to any location, even if a data
connection is not available. When you specify
a location, the touchscreen displays the route and provides turn-by-turn instructions. IfModel S is not equipped with the navigationoption, onboard maps are not available, but ifyou have a data connection, you can find and
display any location.
Using MapsTouch the search field, or speak a voice
command to specify a location (for details on
how to use voice commands, see Using Voice
Commands on page 38). You can enter or
speak an address, landmark, business, etc. You
can also touch PLACES and choose from a list
of recent locations and searches, favorite
destinations, charging locations, and charging
stations you've visited. To mark a destination
as a Favorite , select its “pin” (from search
results or “Recents”), and then touch the heart
icon.
Touch the North/Heading Up icon to the right
of the search bar to center the map on your
car and have the map track your position as
you drive. The icon is blue when the map is tracking your position and by touching the
icon, you can change the orientation of the
map:North Up - North is always at the
top of the screen.Heading Up - The direction you are
heading is always at the top of the
screen. The map rotates when you
change direction.
You can rotate the map in any direction.
When you rotate the map you’ll notice the
icon turn gray, indicating the map is no longer
tracking your position. Touch the icon again to track your position.
Whenever the map is in the
Heading Up orientation (where
North is not at the top), a compass
appears on the map. The arrow on
the compass points North and the
text on the compass indicates the
direction you are driving. You can
touch the compass to switch to
North Up (described above).
Starting Navigation
1. Touch the Nav icon to display the map.
2. Touch the search bar to enter the
destination, then touch GO. You can also
use voice commands to specify the
destination (for details, see Using Voice
Commands on page 38). If you have a
data connection, you can start entering
the destination, then choose one of the
auto-complete entries that appear. For example, you can enter just the street,business name, or category (such as
hotels, coffee, etc). If you don’t have a data connection, you must enter completeand exact location information.
A list of matching destinations appears on
the left, and their corresponding pins
(with letters A, B, C, etc) appear on the
map.
Note: You can also touch PLACES and
choose a location from the list of Recent
locations and searches, Favorite locations, Supercharger locations, or Visited
Chargers.
3. Touch any destination in the list to
immediately start navigation, or touch the
lettered pin on the map to view the
destination popup, which also allows you
to place a phone call to the destination (in
situations where a phone number is
available).
Note: If you have set up your phone's calendar
to work with Model S, and a calendar event
includes a specific location, you are given the
option to navigate to the location (see
Calendar on page 93.
Maps and Navigation
90Model S Owner's Manual