ECU TESLA MODEL S 2015 User Guide
[x] Cancel search | Manufacturer: TESLA, Model Year: 2015, Model line: MODEL S, Model: TESLA MODEL S 2015Pages: 164, PDF Size: 4.78 MB
Page 29 of 164

2.Push the lever to release the head
supports from the seat back, then fold
back onto the seat.
3. Secure the Velcro strap.
4.Pull the strap at the rear of the seat to
fold the seat assembly into the trunk floor.
5. Replace the cover on the trunk floor.
Tesla Built-In Rear Facing Child Seats
Seating and Safety Restraints29
Page 30 of 164
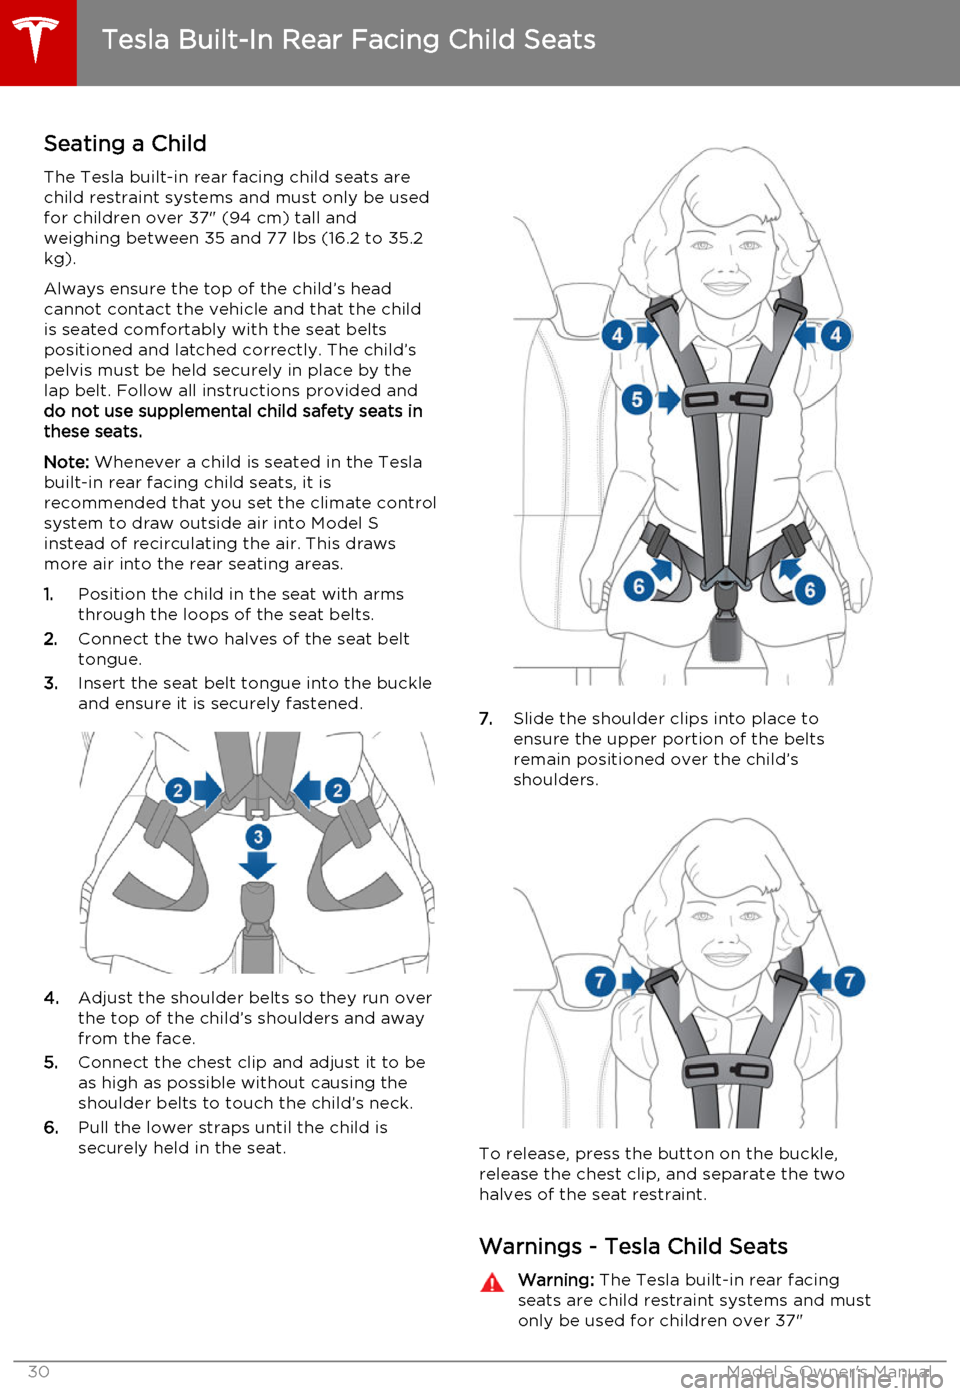
Seating a ChildThe Tesla built-in rear facing child seats arechild restraint systems and must only be used
for children over 37" (94 cm) tall and
weighing between 35 and 77 lbs (16.2 to 35.2
kg).
Always ensure the top of the child’s head
cannot contact the vehicle and that the child
is seated comfortably with the seat belts positioned and latched correctly. The child’spelvis must be held securely in place by thelap belt. Follow all instructions provided anddo not use supplemental child safety seats inthese seats.
Note: Whenever a child is seated in the Tesla
built-in rear facing child seats, it is
recommended that you set the climate control
system to draw outside air into Model S
instead of recirculating the air. This draws
more air into the rear seating areas.
1. Position the child in the seat with arms
through the loops of the seat belts.
2. Connect the two halves of the seat belt
tongue.
3. Insert the seat belt tongue into the buckle
and ensure it is securely fastened.
4. Adjust the shoulder belts so they run over
the top of the child’s shoulders and away
from the face.
5. Connect the chest clip and adjust it to be
as high as possible without causing the
shoulder belts to touch the child’s neck.
6. Pull the lower straps until the child is
securely held in the seat.
7. Slide the shoulder clips into place to
ensure the upper portion of the belts
remain positioned over the child’s
shoulders.
To release, press the button on the buckle,
release the chest clip, and separate the two
halves of the seat restraint.
Warnings - Tesla Child Seats
Warning: The Tesla built-in rear facing
seats are child restraint systems and must
only be used for children over 37"
Tesla Built-In Rear Facing Child Seats
30Model S Owner's Manual
Page 31 of 164
(94 cm) tall and weighing between 35and 77 lbs (16.2 to 35.2 kg).Warning: Do not use supplemental child
restraint systems, including booster seats,
in the Tesla built-in rear facing child seats.Warning: Always ensure that the top of
the child’s head cannot touch the vehicle and that the child is seated comfortablywith the seat belts correctly fastened.Warning: Follow all instructions and heed
all warnings related to the Tesla built-in
rear facing child seats. Failure to do so
can compromise occupant safety.Warning: Read all safety warnings and
labels attached to the seats.Warning: Do not leave children
unattended in Model S, even if the child is secured in a child safety seat or a Tesla
built-in rear facing child seat. In hot
weather, the interior temperature can reach dangerous levels that can result in
dehydration, serious injury or death.Warning: Do not remove or replace the
fabric on a Tesla built-in rear facing child
seat. The covers are an integral part of the restraint’s performance and shouldnot be removed or replaced with any
other type than those supplied by Tesla.Warning: If the Tesla built-in rear facing
child seats have been worn in an
accident, they must be inspected or
replaced by Tesla, even if damage is not
obvious.Warning: Before allowing a child to ride in
the Tesla built-in rear facing child seats, check that the seat is securely held in theupright position by trying to pull the seat
back toward you.Warning: Do not remove the built-in rear
facing child seats for any reason,
including cleaning. To ensure safety of
occupants, removal and installation must
be performed by qualified Tesla service
technicians.Warning: Do not make modifications or
additions that can interfere with the
operation of the Tesla built-in rear facing
child seats.Warning: To prevent injury, ensure all
loose items (bags, luggage, etc.) are
secured. In an accident, or during hard
braking and sharp turns, loose items
could cause injury.
Tesla Built-In Rear Facing Child Seats
Seating and Safety Restraints31
Page 67 of 164
Caution: Keep sensors clean from dirt,
debris, snow, and ice. Avoid using a high
pressure power washer on the sensors
and do not clean a sensor with a sharp or abrasive object that can scratch ordamage its surface.Caution: Do not install accessories or
stickers on or near the parking sensors.
Controlling Audible Feedback
You can use Park Assist with or without
audible feedback. To turn chimes on or off,
touch Controls > Settings > Safety &
Security > Park Assist Chimes .
You can also mute the chimes temporarily by
pressing the scroll wheel on the left side of
the steering wheel or by touching the mute
button in the bottom left corner of the Park
Assist view. The chimes are muted until you
shift into a different gear or drive over 5 mph
(8 km/h).
Limitations and False Warnings
The parking sensors may not function
correctly in these situations:
• One or more of the parking sensors is damaged, dirty, or covered (such as mud,
ice, or snow).
• Object is located below approximately 8 inches (20 cm) (such as a curb or lowbarrier).
• Weather conditions (heavy rain, snow, or fog) are interfering with sensor operation.
• Object is thin (such as a sign post).
• A sensor’s operating range has been exceeded.
• Object is sound-absorbing or soft (such as powder snow).
• Object is sloped (such as a sloped embankment).
• Model S has been parked in, or being driven in, extremely hot or cold
temperatures.
• The sensors are affected by other electrical equipment or devices that
generate ultrasonic waves.
• Object is located too close to the bumper. • A bumper is misaligned or damaged.
• An object that is mounted to Model S is interfering with and/or obstructing the
sensor (such as a bike rack or a bumper
sticker).
Other Parking Aids
In addition to Park Assist, when shifted into
Reverse gear, the backup camera displays a
view of the area behind Model S. See Rear
View Camera on page 71.
Park Assist
Driving67
Page 78 of 164
1.Adjust settings associated with installed
apps (applications). Settings associated with apps that are either unavailable on
your Model , or have no settings that you
can adjust at this time, are grayed out.
2. Manage driver profiles (see Driver Profiles
on page 36).
3. Units & Format
Adjust how Model S displays:
• Distance: Miles or km can be shown on the range display, speedometer,
energy chart, trip meters, Google map searches and navigation routes.
• Time Format: 12 or 24 hour.
• Temperature: o
C or o
F.
• Energy & Charging: Display remaining energy and charging units as either a
percentage of battery energy
remaining, or as an estimate of the
distance that you can drive. When you choose Distance, you can display
mileage based on either:
• Rated - based on EPA testing.
• Ideal - assumes ideal driving conditions based on driving at a
steady speed of 55 mph
(89 km/h) on a flat road, and using no additional energy (seat
heaters, air conditioning, etc).
Note: When anticipating when you
need to charge, use range estimates as a general guideline only.
4. Vehicle
• Drive-away Door Lock: If on, all doors automatically lock whenever you
drive Model S over 5 mph (8 km/h)
(see Drive-away Locking on page 7).
• Walk-away Door Lock: If on, all doors automatically lock when you walkaway from Model S, carrying the key with you (see Walk-away Locking on
page 7). Available only if Model S is
equipped with the optional tech
package.
• Child-Protection Lock: If on, safety locks prevent the rear doors and theliftgate from being opened from
inside Model S.• Auto-Present Handles: If on, door handles extend automatically
whenever you approach Model S carrying a key, whether locked orunlocked (see Using Exterior Door
Handles on page 6). Note that to
preserve battery life, Model is
designed to temporarily disable the
Auto-Present Handles feature when
the key has been out of range for
more than 48 hours, or if the key
remains within range for five minutes
after all doors have been closed.
• Headlights After Exit: If on, headlights stay on for two minutes after you exit,
or until you lock Model S (see
Headlights After Exit on page 50).
• Mirror Auto-Tilt: If on, exterior mirrors tilt downward when reversing (see Mirrors on page 40). Available only if
Model S is equipped with the optional tech package.
• Mirror Auto-Fold: If on, exterior mirrors fold when you lock Model S
with the key or walk-away locking. They extend automatically when you
return to Model S. Available only if
Model S is equipped with both folding mirrors (newer models) and the
optional tech package. For newer
Model S vehicles, you can also fold
mirrors manually by touching the
center mirror control button (see
Mirrors on page 40).
• Ionizer: If on, the air ionizer freshens the air in the cabin.
• Smart Preconditioning: If on, Model S predicts your driving schedule and
adjusts the temperature of the cabin and the Battery so the vehicle is
comfortable and ready to drive. It may take some time for Model S to
learn your driving habits.
5. Safety & Security
Turn various safety and security features
on and off:
• Active safety devices Model S is equipped with, such as Park Assist
Chimes (see Park Assist on page 66).
• Alarm, and security options Model S is equipped with (see Security Settings
on page 95).
• Remote access by Tesla’s mobile applications (see Mobile App on page
100).
6. Displays
Settings
78Model S Owner's Manual
Page 79 of 164
Manually control the touchscreen’s
brightness and control its day (light
background) or night (dark background)
setting. When set to Auto, the
touchscreen automatically changes between Day and Night brightness
depending on the ambient lighting
conditions. To disable the touchscreen
momentarily for cleaning purposes, touch
Clean Mode . You can also put Model S
into an energy saving mode so it consumes less energy when not in use
(see Getting Maximum Range on page
70). Note that the Displays settings can
also be accessed from the Controls
window.
7. HomeLink
If the HomeLink feature is available in your region, use it to control RF-enabled
garage doors, lights, or security systems
(see HomeLink ®
Universal Transceiver on
page 96).
8. Driver Assistance
If your vehicle is equipped with Driver Assistance features, you can control
features that can provide a safer driving experience
• Lane Departure Warning: If on, the steering wheel vibrates if a front
wheel passes over a lane marking and
the associated turn signal is off (see
Lane Departure Warning on page 57).
• Overtake Acceleration: If on when Traffic-Aware Cruise Control is
operating, Model S accelerates when you engage the turn signal to indicate
a move into the passing lane (see Traffic-Aware Cruise Control on page
60).
• Speed Assist: Control how speed limits are determined and how
warnings are issued when you exceed the speed limit (see Speed Assist on
page 55).
• Forward Collision Warning: Control when warnings display on the
instrument panel if Model S detects a
vehicle, bike, or pedestrian ahead and
a collision is considered likely unless
you take immediate corrective action
(see Forward Collision Warning on
page 58).
9. Service & Reset
Turn various service-related features on
and off:• Service Mode: If on, moves wiper blades to the service position to make
them easier to access when replacing
them. Model S must be in Park. See
Wiper Blades and Washer Jets on
page 121.
• Tire Pressure Monitor: Touch Reset
Sensors to reset the TPMS sensors
after replacing a wheel (see Resetting
the TPMS Sensors on page 113).
• Tow Mode: Activate Tow Mode to keep Model S in Neutral (see Leaving
Model S in Neutral - Tow Mode on
page 42).
• Factory Reset: Touch Erase & Reset to
erase all personal data (saved addresses, music favorites, etc.) and
restore all customized settings to
their factory defaults.
10. Manual
Display this owners manual.Warning: Do not read the touchscreen
while driving. Doing so increases the
likelihood of a collision.
Naming Model S
To further personalize your Model S, you can
name it. The name you give your Model S will appear in the mobile app. To name your
Model S, touch the Tesla “T” at the top center
of the touchscreen, then touch Name Your
Vehicle .
When you save, Name Your Vehicle is
replaced by the name you provided. You can
touch the name at any time to rename your
Model S.
Erasing Personal Data
You can erase all personal data (saved
addresses, music favorites, imported contacts,
HomeLink programming, etc.) and restore all
customized settings to their factory defaults.
This is useful when transferring ownership of
Model S. Touch Settings > Service & Reset >
Factory Reset > Erase & Reset . Before erasing,
Model S verifies your credentials by
prompting you to enter the user name and
password associated with your MY TESLA
account.
Settings
Using the Touchscreen79
Page 80 of 164
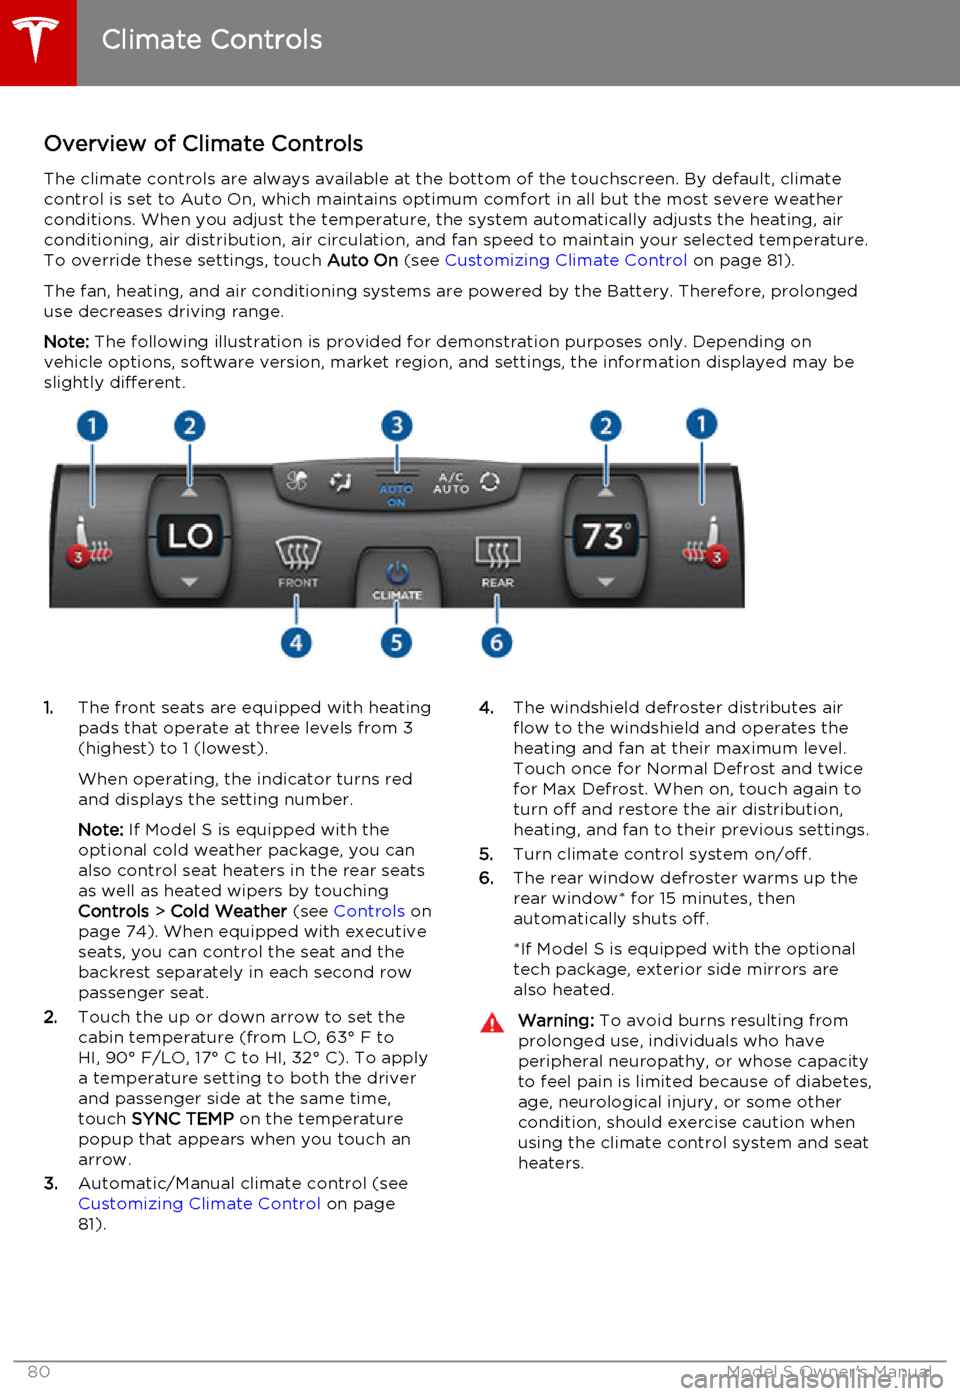
Overview of Climate ControlsThe climate controls are always available at the bottom of the touchscreen. By default, climate
control is set to Auto On, which maintains optimum comfort in all but the most severe weather conditions. When you adjust the temperature, the system automatically adjusts the heating, air
conditioning, air distribution, air circulation, and fan speed to maintain your selected temperature.
To override these settings, touch Auto On (see Customizing Climate Control on page 81).
The fan, heating, and air conditioning systems are powered by the Battery. Therefore, prolonged use decreases driving range.
Note: The following illustration is provided for demonstration purposes only. Depending on
vehicle options, software version, market region, and settings, the information displayed may be
slightly different.1. The front seats are equipped with heating
pads that operate at three levels from 3
(highest) to 1 (lowest).
When operating, the indicator turns red
and displays the setting number.
Note: If Model S is equipped with the
optional cold weather package, you can
also control seat heaters in the rear seats
as well as heated wipers by touching
Controls > Cold Weather (see Controls on
page 74). When equipped with executive seats, you can control the seat and the
backrest separately in each second row
passenger seat.
2. Touch the up or down arrow to set the
cabin temperature (from LO, 63° F to
HI, 90° F/LO, 17° C to HI, 32° C). To apply
a temperature setting to both the driver
and passenger side at the same time,
touch SYNC TEMP on the temperature
popup that appears when you touch an
arrow.
3. Automatic/Manual climate control (see
Customizing Climate Control on page
81).4. The windshield defroster distributes air
flow to the windshield and operates the
heating and fan at their maximum level.
Touch once for Normal Defrost and twice
for Max Defrost. When on, touch again to
turn off and restore the air distribution,
heating, and fan to their previous settings.
5. Turn climate control system on/off.
6. The rear window defroster warms up the
rear window* for 15 minutes, then
automatically shuts off.
*If Model S is equipped with the optional
tech package, exterior side mirrors are
also heated.Warning: To avoid burns resulting from
prolonged use, individuals who have
peripheral neuropathy, or whose capacity to feel pain is limited because of diabetes,
age, neurological injury, or some other
condition, should exercise caution when using the climate control system and seat
heaters.
Climate Controls
80Model S Owner's Manual
Page 93 of 164
OverviewNote: Calendar is a BETA feature in Release 6.0.
The Calendar app allows you to view your phone’s (iPhone or Android) calendar for the current and next day. The Calendar app requires that:
• The Tesla Model S mobile app is running and you are logged in. When prompted on your phone, you must grant calendar access to the mobile app. The mobile app can then
periodically (and automatically) send calendar data from your phone to Model S. Also,
whenever you display the mobile app on your phone, updated calendar data is sent to
Model S.
• Your phone is connected to Model S via Bluetooth (for privacy reasons, calendar data displays only from a phone that is connected via Bluetooth).
• Remote access to Model S is turned on (touch Controls > Settings > Safety & Security >
Remote Access > On ).
• Both your phone and Model S have good connectivity.
When you enter Model S, the touchscreen can display a reminder of the day's events. You can
customize if and when your calendar events are displayed by touching Controls > Settings >
Apps > Calendar > Show Calendar Upon Entry .
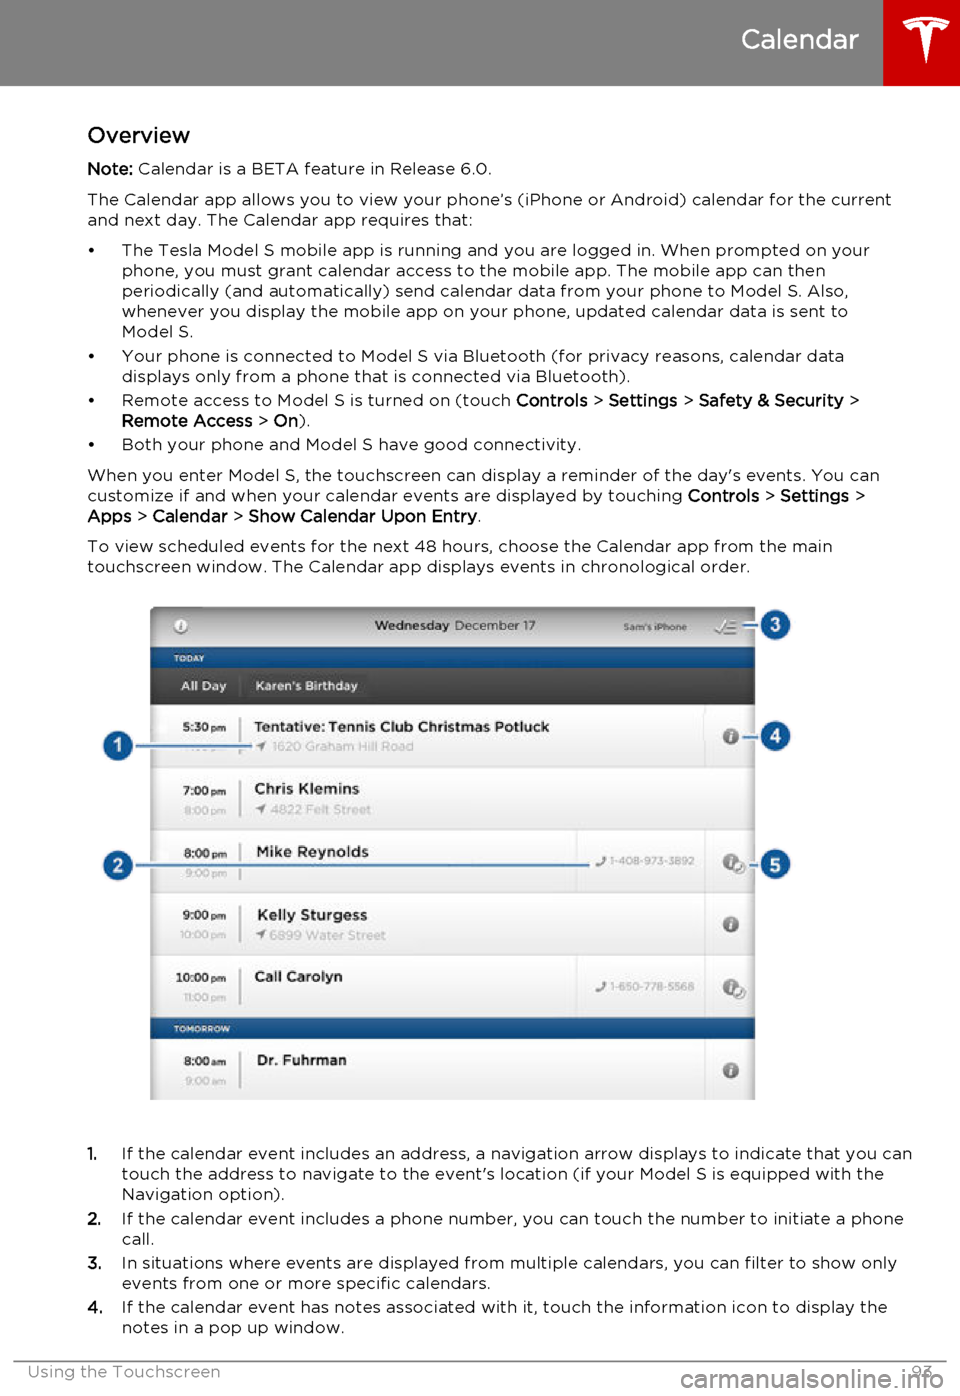
To view scheduled events for the next 48 hours, choose the Calendar app from the main
touchscreen window. The Calendar app displays events in chronological order.
1. If the calendar event includes an address, a navigation arrow displays to indicate that you can
touch the address to navigate to the event's location (if your Model S is equipped with the
Navigation option).
2. If the calendar event includes a phone number, you can touch the number to initiate a phone
call.
3. In situations where events are displayed from multiple calendars, you can filter to show only
events from one or more specific calendars.
4. If the calendar event has notes associated with it, touch the information icon to display the
notes in a pop up window.
Calendar
Using the Touchscreen93
Page 95 of 164

About the Security System
If Model S does not detect a key nearby and a locked door or trunk is opened, an alarmsounds and headlights and turn signals flash.
To deactivate the alarm, press any button on
the key.
To manually enable or disable the alarm
system, touch Controls > Settings > Safety &
Security > Alarm . When set to on, Model S
activates its alarm one minute after the doors
lock and a recognized key is no longer
detected nearby.
Security Settings
Using the Touchscreen95
Page 96 of 164
About HomeLinkIf Model S is equipped with the optional tech
package, you can program the HomeLink ®
Universal Transceiver to operate up to three
garage doors, gates, lights, and security
systems that can transmit Radio Frequency
(RF) signals.
Programming HomeLink
1. Park Model S in front of the device you
want to program, and have the device’s
remote control ready.
2. Touch Controls > Settings > HomeLink on
the touchscreen.
3. Touch Add New HomeLink , then use the
onscreen keyboard to enter a name for
your HomeLink device.
4. Touch Program .
5. Follow the onscreen instructions.
Once programmed, you can operate the device by touching its corresponding
HomeLink icon on the touchscreen’s status bar. HomeLink remembers the location of
your programmed devices. When you approach a known location, the HomeLink
control on the touchscreen automatically
drops down. When you drive away, it
disappears.
Note: For security reasons, erase your
HomeLink settings if you sell Model S.Warning: Your device might open or
close during programming. Before
programming, make sure that the device is clear of any people or objects.Warning: Do not use the HomeLink
Universal Transceiver with a garage door that does not meet safety standards. Agarage door opener that cannot detectan object in its path and then
automatically stop and reverse, does not
meet these standards. Using a garage
door opener without these features
increases the risk of injury or death.
Troubleshooting HomeLink
When programming a HomeLink device, the touchscreen steps you through a two-part
programming process:
• First, Model S records the signal from the remote. The touchscreen instructs you to
stand in front of the car, point the remote
at the front bumper and press and hold
the button until the headlights flash.
When headlights flash, Model S has
learned the remote and you can touch
Continue on the touchscreen . If the
headlights do not flash, refer to the
guidelines below.
• Next, the device's receiver learns Model S. The touchscreen instructs you to press
the LEARN button on the garage door or
gate's receiver. If training the receiver
does not work, refer to the guidelines
below.
NOTE: Only devices that are equipped
with a “rolling code” remote need to learn
Model S. If you have a very old device that
is not equipped with a rolling code
remote, the device does not need to learn
Model S and you can skip this part. You
can also skip this step if your receiver is
Quick-Train compatible. The opener
should work.
Headlights do not flash
• Check the batteries in the remote. It is a good idea to replace the batteries before
you start programming.
• Hold the remote against the nose cone, with the button pressed, about 6 inches to
the left of the Tesla emblem. In some
cases you must hold the remote for up to
three minutes.
• Check compatibility of the remote by contacting the HomeLink manufacturer
( www.homelink.com ).
After programming, the device does not work
• Park Model S with its front bumper as close as possible to the HomeLink device
(garage door, gate, etc).
• Make sure you haven’t reached the device receiver's limit of learned remotes/cars.
Most receivers can learn up to five
remotes/cars. If the receiver's memory is
full, you must clear the memory and
restart the programming process. For
instructions on how to clear the receiver's
memory, refer to the owner
documentation provided with the
HomeLink device.
• Make sure you are pressing the receiver's LEARN button. Most receivers have twobuttons and a LED. One button is a RESET
button and the other is a LEARN button.
Pressing the LEARN button usually causes the LED to flash. For instructions on how
to put the receiver into learning mode, refer to the owner documentation
provided with the HomeLink device.
HomeLink ®
Universal Transceiver
96Model S Owner's Manual