ECU TESLA MODEL S 2015 Owner's Guide
[x] Cancel search | Manufacturer: TESLA, Model Year: 2015, Model line: MODEL S, Model: TESLA MODEL S 2015Pages: 164, PDF Size: 4.78 MB
Page 100 of 164

Model S Mobile AppThe Tesla Model S mobile app allows you tocommunicate with Model S remotely using
your iPhone ®
or Android ™
phone. With this app,
you can:
• Check charging progress and receive notifications when charging has started,
has been interrupted, or is complete.
• Heat or cool Model S before driving (even if it's in a garage).
• Locate Model S with directions, or track its movement across a map.
• Flash lights or honk the horn to find Model S when parked.
• Vent or close the sunroof.
• Lock or unlock Model S from afar. • Start Model S.
• Support the Model S Calendar app by allowing the mobile app to send your
phone's calendar data to Model S.
• Receive notifications when the car alarm has been triggered, or a new Model S
software update is available.
Simply download the Tesla Model S mobile
app to your phone and enter your MY TESLA
login credentials. You must also ensure that Model S is ready to communicate with the
mobile app by turning on its remote access
setting. Touch Controls > Settings > Safety &
Security > Remote Access > On (see Settings
on page 77).
Mobile App
100Model S Owner's Manual
Page 112 of 164

Winter Tires
Your Model S is not originally equipped with
winter tires. In snowy and icy conditions, consider installing winter tires. Winter tires are
designed to increase traction in snowy or icy
conditions. When installing winter tires, always install a complete set of four tires at the sametime. Winter tires must be the same size,brand, construction and tread pattern on allfour wheels. Contact Tesla for winter tire
recommendations.Winter tires can be identified by a
mountain/snowflake symbol on the
tire's sidewall.
When driving with winter tires, you may
experience more road noise, shorter tread life, and less traction on dry roads.
Driving in Low Temperatures Tire performance is reduced in low ambient
temperatures, resulting in reduced grip and an
increased susceptibility to damage from
impacts. Performance tires can temporarily
harden when cold, causing you to hear
rotational noise for the first few miles (kms)
until the tires warm up.
Using Tire Chains Tesla has tested and approved Security Chain
Company (SCC) Model Z-563 chains for use
on the rear wheels. These chains must only be
used if your Model S has 245/45R19 rear tires
installed. Do not use chains on 21 inch tires.
When installing tire chains, follow the
instructions provided by the tire chain
manufacturer. Mount them as tightly as
possible.
When using tire chains:
• Drive slowly. Do not exceed 30 mph (48 km/h).
• Avoid heavily loading Model S (heavy loads can reduce the clearance between
the tires and the body).
• Remove the tire chains as soon as conditions allow.
Note: Tire chains are prohibited in some
jurisdictions. Check local laws before installing
tire chains.
Caution: Using non-recommended tire
chains, or using tire chains on other sized tires, can damage the suspension, body,wheels, and/or brake lines. Damagecaused by using non-recommended tire
chains is not covered by the warranty.Caution: Ensure that tire chains cannot
touch suspension components or brake
lines. If you hear the chains making
unusual noises that would indicate
contact with Model S, stop and
investigate immediately.
Tire Pressure Monitoring
Each tire should be checked monthly when
cold and inflated to the recommended pressures that are printed on the Tire and
Loading Information label located on the
driver’s door pillar (see Maintaining Tire
Pressures on page 109). If your vehicle has
tires of a different size than the size indicated
on the vehicle placard or tire inflation pressure
label, determine the proper tire inflation
pressure for those tires.
As an added safety feature, your vehicle has
been equipped with a tire pressure monitoring
system (TPMS) that displays a tire pressure
telltale (Tire Pressure Warning) on the
instrument panel when one or more of your
tires is significantly under- or over-inflated.
Accordingly, when the Tire Pressure indicator
light displays on the instrument panel alerting
of tire pressure, stop and check your tires as
soon as possible, and inflate them to the
proper pressure (see Maintaining Tire
Pressures on page 109). Driving on a
significantly under-inflated tire causes the tire
to overheat and can lead to tire failure. Under-
inflation also reduces fuel efficiency and tire
tread life, and may affect the vehicle's
handling and stopping ability.
If Model S detects a fault with the
Tire Pressure Monitoring System
(TPMS), this indicator flashes for one
minute whenever you power on
Model S.
Note: Installing accessories that are not
approved by Tesla can interfere with the TPMS system.
Warning: The TPMS is not a substitute for
proper tire maintenance, including
manually checking tire pressures and
regularly inspecting the condition of tires.
It is the driver's responsibility to maintain
correct tire pressure, even if under- or
over-inflation has not reached the level
Tire Care and Maintenance
112Model S Owner's Manual
Page 115 of 164

Inflating with Sealant and AirIf you have a Tesla tire repair kit, follow these
steps to temporarily repair a small tire
puncture (less than 1/4” (6 mm)).
1. Stop Model S in a safe place away from
traffic and ask passengers to wait in a safe area.
2. Turn on the hazard warning flashers to
alert other road users.
3. If possible, position the wheel with the
puncture at the bottom.
4. Detach the power supply connector from
the back of the compressor and plug it
into the 12V power socket located on the front of center console.
5. Release the clear plastic hose from the
tire compressor.
6. Remove the red cap and screw the end of
the hose onto the tire’s valve.
7. Attach the sealant kit’s black air hose to
the sealant valve and press the lever
down to secure it in place.
8. Ensure the compressor is lying on a level
surface with the pressure gauge facing to the side as shown in Step 5.
9. Turn on the compressor.
10. Inflate the tire to the recommended
pressure.
11. Turn off the compressor and disconnect
the hose from the tire’s valve. Wipe any
excess sealant from the tire valve and wheel rim.
12. Immediately drive for 5 miles (8 km) to
distribute the sealant around the tire. Donot exceed 30 mph (48 km/h).
13. Stop and check the tire’s pressure. If
necessary, inflate using the black air hose.
14. Have the tire repaired or replaced as soon
as possible.
15. Replace the tire repair sealant canister
(see Replacing the Sealant Canister on
page 117).
Temporary Tire Repair
Maintenance115
Page 116 of 164

Inflating with Air Only
If you have a Tesla tire repair kit, follow these steps to inflate a tire with air:
1. Detach the power supply connector from
the rear of the compressor and plug it into
the 12V power socket located in Model S
on the front of center console.
2. Release the black air hose from the
compressor.
3. Attach the air hose to the valve and press
the lever down to secure it in place.
4. Ensure the compressor is lying on a level
surface with the pressure gauge facing to the side where you can read it.
5. To add air, turn on the compressor and
inflate until the desired pressure is
reached.
6. To release air, turn off the compressor,
then press and hold the red button until the desired pressure is reached.
Note: For your convenience, the tire repair kit
includes a selection of adapters that allow you to inflate other items. These adapters arelocated in a compartment on the back of thecompressor.
Caution: To avoid overheating, do not use
the compressor continuously for more than eight minutes. Allow the compressorto cool for 15 minutes between uses.Caution: The compressor runs slowly
when overheated from excessive use.
Turn it off and allow it to cool.
Temporary Tire Repair
116Model S Owner's Manual
Page 120 of 164

Polishing, Touch Up, and Body
Repair
To preserve the cosmetic appearance of the
body, you can occasionally treat the paint
surfaces with an approved polish containing:
• Very mild abrasive to remove surface contamination without removing or
damaging the paint.
• Filling compounds that fill scratches and reduce their visibility.
• Wax to provide a protective coating between the paint and environmental
elements.
Regularly inspect the exterior paint for
damage. Treat minor chips and scratches
using a paint touch up pen (available for
purchase from Tesla). Use the touch-up pen
after washing but before polishing or waxing.
Repair rock chips, fractures or scratches. Body
repairs should be performed only by a Tesla approved body shop. Contact Tesla for a listof approved body shops.Caution: Do not use cutting pastes, color
restoration compounds, or polishes
containing harsh abrasives. These can
scour the surface and permanently
damage the paint.Caution: Do not use chrome polish or
other abrasive cleaners.Using a Car Cover
To preserve the cosmetic appearance of the
body when Model S is not being used, use a
genuine Tesla car cover. Car covers can be purchased from Tesla.Caution: Use only a Tesla-approved car
cover when Model S is plugged in. Using
a non-Tesla car cover can prevent the
Battery from being adequately cooled
during charging.
Floor Mats
To extend the life of your carpet and make
them easier to clean, use genuine Tesla floor mats. Maintain mats by cleaning them
regularly and replacing them if they become
excessively worn.
Warning: To avoid potential interference
with a foot pedal, ensure that the driver’s
floor mat is securely fastened, and never place an additional floor mat on top of it.
Cleaning
120Model S Owner's Manual
Page 151 of 164

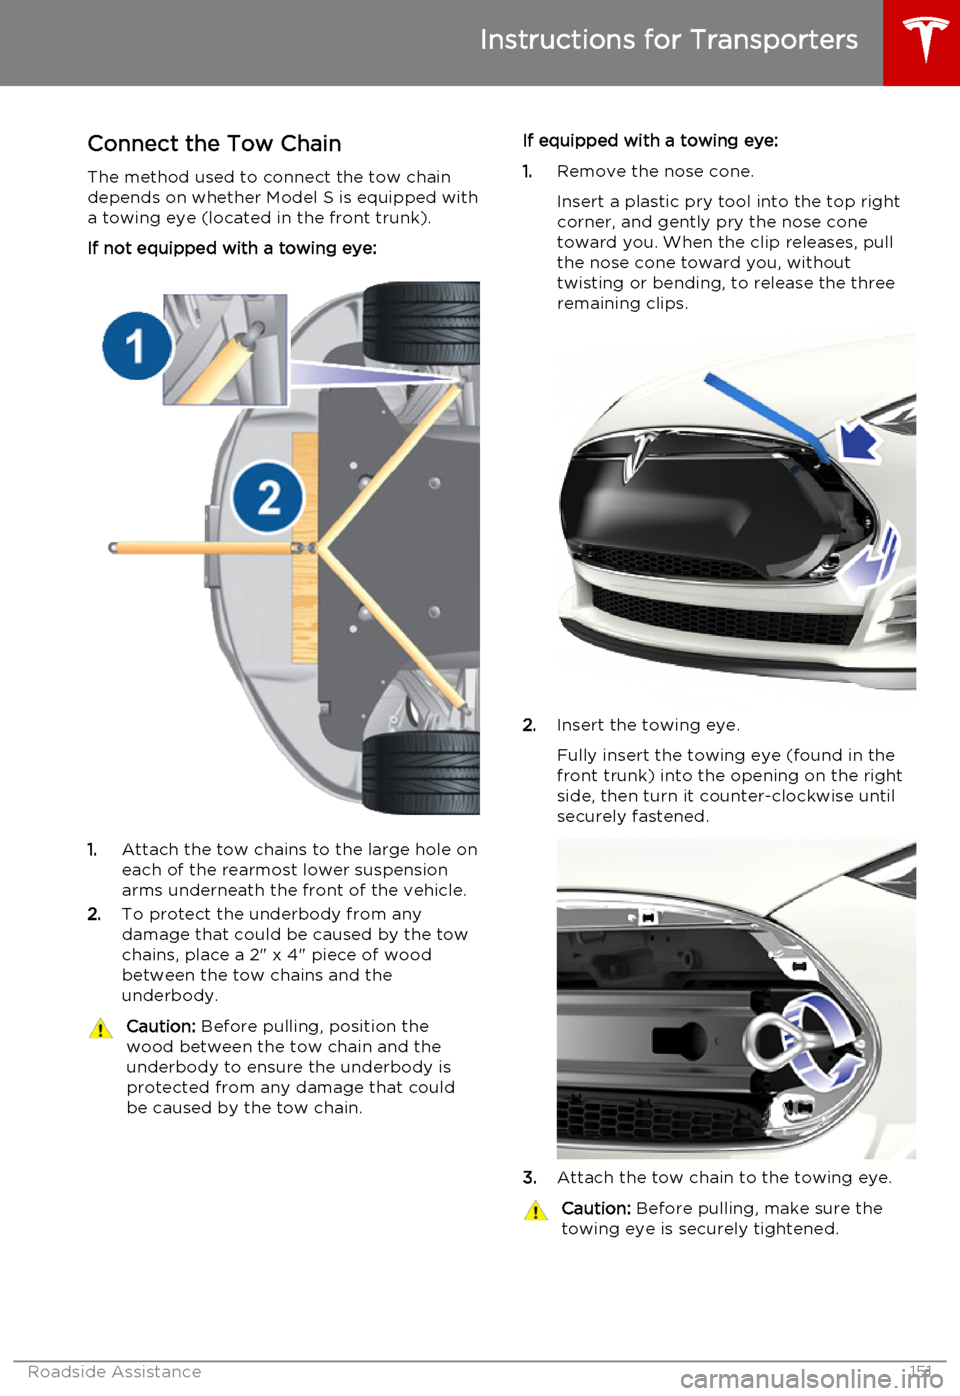
Connect the Tow Chain
The method used to connect the tow chain depends on whether Model S is equipped with
a towing eye (located in the front trunk).
If not equipped with a towing eye:
1. Attach the tow chains to the large hole on
each of the rearmost lower suspension arms underneath the front of the vehicle.
2. To protect the underbody from any
damage that could be caused by the tow
chains, place a 2" x 4" piece of wood
between the tow chains and the
underbody.
Caution: Before pulling, position the
wood between the tow chain and the
underbody to ensure the underbody is protected from any damage that couldbe caused by the tow chain.If equipped with a towing eye:
1. Remove the nose cone.
Insert a plastic pry tool into the top right
corner, and gently pry the nose cone
toward you. When the clip releases, pull
the nose cone toward you, without
twisting or bending, to release the three
remaining clips.
2. Insert the towing eye.
Fully insert the towing eye (found in the
front trunk) into the opening on the right
side, then turn it counter-clockwise until securely fastened.
3. Attach the tow chain to the towing eye.
Caution:
Before pulling, make sure the
towing eye is securely tightened.
Instructions for Transporters
Roadside Assistance151
Page 152 of 164

Pull Onto the Trailer and Secure theWheels
Secure wheels using chocks and tie-down
straps:
• Ensure any metal parts on the tie-down straps do not contact painted surfaces or
the face of the wheels.
• Do not place straps over body panels or through the wheels.Caution: Attaching straps to the chassis,
suspension or other parts of the vehicle's
body may cause damage.Caution: To prevent damage, do not
transport Model S with the tires directly
on the ground.
Instructions for Transporters
152Model S Owner's Manual
Page 158 of 164

Article XIV: The use of low-power radio-
frequency devices shall not influence aircraft security and interfere with legal
communications; interference phenomenon
discovered over time, should be immediately suspended, and improved to no interference
before use can continue. Legal
communications, referring to the provisions of
the Telecommunications Act of radio communications operations. Low-power radiocommunications shall tolerate radio wave
interference from radiated devices, legal or
industrial, scientific and medical.
Device Approval - Australia
Device Approval - Hong Kong
Device Approval - Japan
Tire Pressure Monitoring System FCC IDs: TZSTPMS201, Z9F-201FS43XIC ID: 11852A-201FS4X
The tire pressure monitoring system (TPMS)
complies with Part 15 of the FCC rules and RSS-210 of Industry Canada. Operation issubject to the following two conditions:
1. This device may not cause harmful
interference, and
2. This device must accept any interference
received, including interference that may
cause undesired operation.
Changes or modifications not expressly
approved by Tesla could void the user's
authority to operate the equipment.
Device Approval - Japan
Media Control Unit
Device Approval - Japan
Device Approval - Australia
Declarations of Conformity
158Model S Owner's Manual
Page 163 of 164

PPark Assist 66
Park gear 42
parking brake 53
parts replacement 133
passenger detection 34
passenger front airbag 34
personal data, erasing 79phonesteering wheel controls for 38
using 88
power management 70
power socket 87
power windows 9
powering on and off 41
preferences, setting 77
Proposition 65 155
public charging stations 102
R radio 85
radio frequency, FCC information 159
rain sensor 51
rangedisplayed on instrument panel 43
driving tips to maximize 70
regenerative braking 53
range mode 70
Range Mode 74
Rated range 77
rear seats, folding and raising 18
rear view camera 71
rear window switches, disabling 9
regenerative braking 53
region format 77
release notes 99
Reverse gear 42
roadside assistance 149
roof racks 137
rotating tires 110
S
safety defectsreporting (Canada) 156
reporting (U.S.) 156safety informationairbags 35
child seats 27
rear facing child seats 30
seat belts 21seat beltscleaning 119
in a collision 21
overview of 20
pre-tensioners 21
wearing when pregnant 20
seat covers 19
seat heaters 80
seating capacity 135seatsadjusting 17
heaters 80
Tesla built-in rear facing 28
security settings 95
service data recording 155
service intervals 108
Settings 77
Settings, erasing 79
shifting gears 42
Slacker 85
slip start 54
Smart Preconditioning 77
software reset 79
software updates 99
specificationsdimensions 138
exterior 138
subsystems 140
tires 144
weights 139
wheels 143
stability control 54
starting Model S 41
steering specifications 140
steering wheel 37
summer tires 111
sunroof 15
suspension 84
suspension specifications 141
T
telematics 155
telephonesteering wheel controls for 38
using 88temperatureBattery (high voltage), limits 103
cabin, controls for 80
outside 43
tires 147
tie-down straps 152
tilt detection 95
Tire and Loading Information label 135
tire noise 112
Tire Pressure Monitoring SystemFCC certification 158
overview of 112
tire pressures, checking 109
Index
Index163