display TESLA MODEL S 2015 User Guide
[x] Cancel search | Manufacturer: TESLA, Model Year: 2015, Model line: MODEL S, Model: TESLA MODEL S 2015Pages: 164, PDF Size: 4.78 MB
Page 42 of 164
Shifting GearsWhen Model S is in Park, you must press the
brake to shift to another gear.
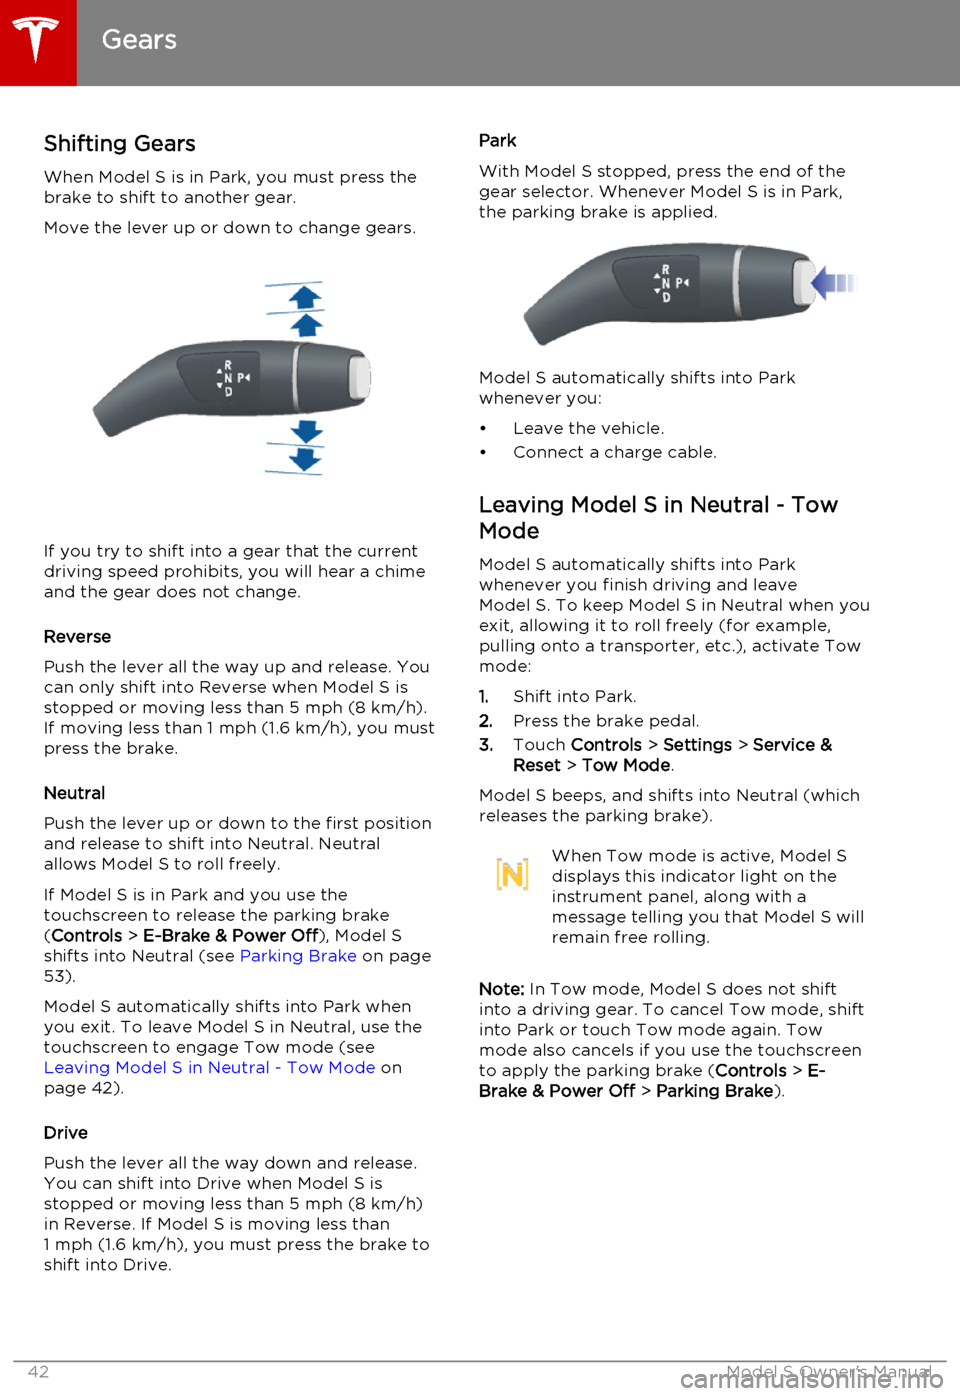
Move the lever up or down to change gears.
If you try to shift into a gear that the current
driving speed prohibits, you will hear a chime
and the gear does not change.
Reverse
Push the lever all the way up and release. You can only shift into Reverse when Model S is
stopped or moving less than 5 mph (8 km/h). If moving less than 1 mph (1.6 km/h), you must
press the brake.
Neutral
Push the lever up or down to the first position
and release to shift into Neutral. Neutral
allows Model S to roll freely.
If Model S is in Park and you use the
touchscreen to release the parking brake ( Controls > E-Brake & Power Off ), Model S
shifts into Neutral (see Parking Brake on page
53).
Model S automatically shifts into Park when you exit. To leave Model S in Neutral, use the
touchscreen to engage Tow mode (see Leaving Model S in Neutral - Tow Mode on
page 42).
Drive
Push the lever all the way down and release. You can shift into Drive when Model S isstopped or moving less than 5 mph (8 km/h)
in Reverse. If Model S is moving less than
1 mph (1.6 km/h), you must press the brake to shift into Drive.
Park
With Model S stopped, press the end of the gear selector. Whenever Model S is in Park,
the parking brake is applied.
Model S automatically shifts into Park
whenever you:
• Leave the vehicle.
• Connect a charge cable.
Leaving Model S in Neutral - Tow
Mode
Model S automatically shifts into Parkwhenever you finish driving and leaveModel S. To keep Model S in Neutral when youexit, allowing it to roll freely (for example,pulling onto a transporter, etc.), activate Tow
mode:
1. Shift into Park.
2. Press the brake pedal.
3. Touch Controls > Settings > Service &
Reset > Tow Mode .
Model S beeps, and shifts into Neutral (which
releases the parking brake).
When Tow mode is active, Model S
displays this indicator light on the
instrument panel, along with a
message telling you that Model S will
remain free rolling.
Note: In Tow mode, Model S does not shift
into a driving gear. To cancel Tow mode, shift into Park or touch Tow mode again. Towmode also cancels if you use the touchscreen
to apply the parking brake ( Controls > E-
Brake & Power Off > Parking Brake ).
Gears
42Model S Owner's Manual
Page 43 of 164
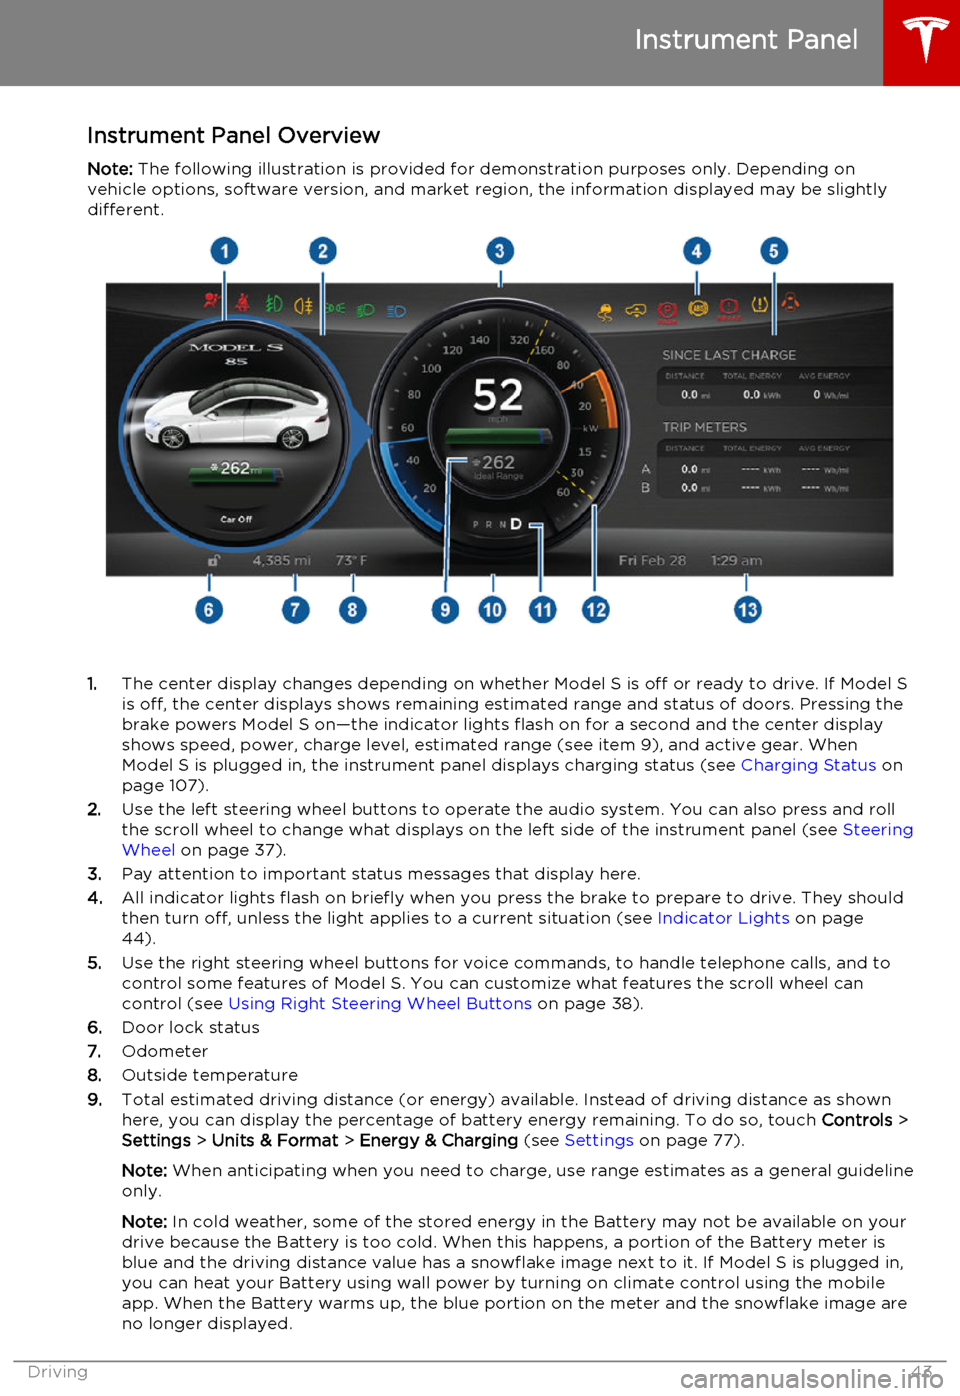
Instrument Panel OverviewNote: The following illustration is provided for demonstration purposes only. Depending on
vehicle options, software version, and market region, the information displayed may be slightly different.
1. The center display changes depending on whether Model S is off or ready to drive. If Model S
is off, the center displays shows remaining estimated range and status of doors. Pressing thebrake powers Model S on—the indicator lights flash on for a second and the center display
shows speed, power, charge level, estimated range (see item 9), and active gear. When
Model S is plugged in, the instrument panel displays charging status (see Charging Status on
page 107).
2. Use the left steering wheel buttons to operate the audio system. You can also press and roll
the scroll wheel to change what displays on the left side of the instrument panel (see Steering
Wheel on page 37).
3. Pay attention to important status messages that display here.
4. All indicator lights flash on briefly when you press the brake to prepare to drive. They should
then turn off, unless the light applies to a current situation (see Indicator Lights on page
44).
5. Use the right steering wheel buttons for voice commands, to handle telephone calls, and to
control some features of Model S. You can customize what features the scroll wheel can control (see Using Right Steering Wheel Buttons on page 38).
6. Door lock status
7. Odometer
8. Outside temperature
9. Total estimated driving distance (or energy) available. Instead of driving distance as shown
here, you can display the percentage of battery energy remaining. To do so, touch Controls >
Settings > Units & Format > Energy & Charging (see Settings on page 77).
Note: When anticipating when you need to charge, use range estimates as a general guideline
only.
Note: In cold weather, some of the stored energy in the Battery may not be available on your
drive because the Battery is too cold. When this happens, a portion of the Battery meter is
blue and the driving distance value has a snowflake image next to it. If Model S is plugged in,
you can heat your Battery using wall power by turning on climate control using the mobile
app. When the Battery warms up, the blue portion on the meter and the snowflake image are
no longer displayed.
Instrument Panel
Driving43
Page 44 of 164
10.Pay attention to alert messages that appear at the bottom center of the instrument panel. If
any alerts are in effect, you can view information about them by touching the alert icon
(exclamation mark) on the touchscreen’s status bar (the topmost area of the touchscreen).
11. Currently selected gear: Park, Reverse, Neutral, or Drive.
12. Dashed lines appear on the power meter if Model S is limiting power. The dashed lines appear
on the top portion when power available for acceleration is being limited, and on the bottom
portion when power that can be gained by regenerative braking is limited. Model S limits
power for many reasons. Here are just a few examples:
• Acceleration may be limited when the Battery is reaching a low state of charge or if the powertrain is hot.
• Both acceleration and regenerative braking may be limited when the ambient temperature is either very high or very low.
• Regenerative braking may be limited when the Battery is fully charged.
13. Date and time
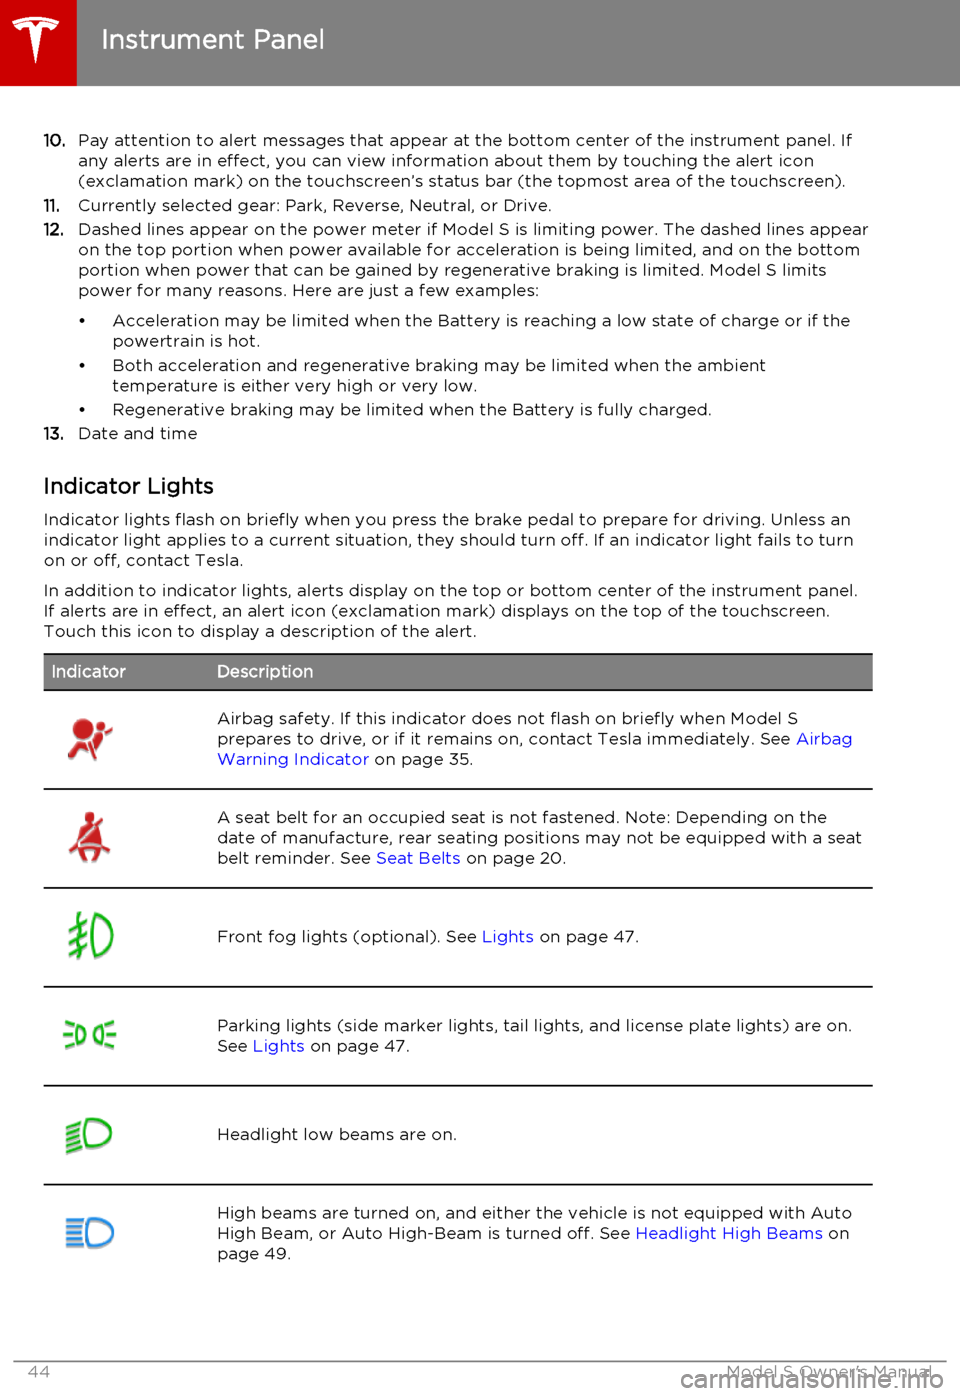
Indicator Lights Indicator lights flash on briefly when you press the brake pedal to prepare for driving. Unless anindicator light applies to a current situation, they should turn off. If an indicator light fails to turnon or off, contact Tesla.
In addition to indicator lights, alerts display on the top or bottom center of the instrument panel.
If alerts are in effect, an alert icon (exclamation mark) displays on the top of the touchscreen.
Touch this icon to display a description of the alert.IndicatorDescriptionAirbag safety. If this indicator does not flash on briefly when Model S
prepares to drive, or if it remains on, contact Tesla immediately. See Airbag
Warning Indicator on page 35.A seat belt for an occupied seat is not fastened. Note: Depending on the
date of manufacture, rear seating positions may not be equipped with a seat
belt reminder. See Seat Belts on page 20.Front fog lights (optional). See Lights on page 47.Parking lights (side marker lights, tail lights, and license plate lights) are on.
See Lights on page 47.Headlight low beams are on.High beams are turned on, and either the vehicle is not equipped with Auto
High Beam, or Auto High-Beam is turned off. See Headlight High Beams on
page 49.
Instrument Panel
44Model S Owner's Manual
Page 48 of 164
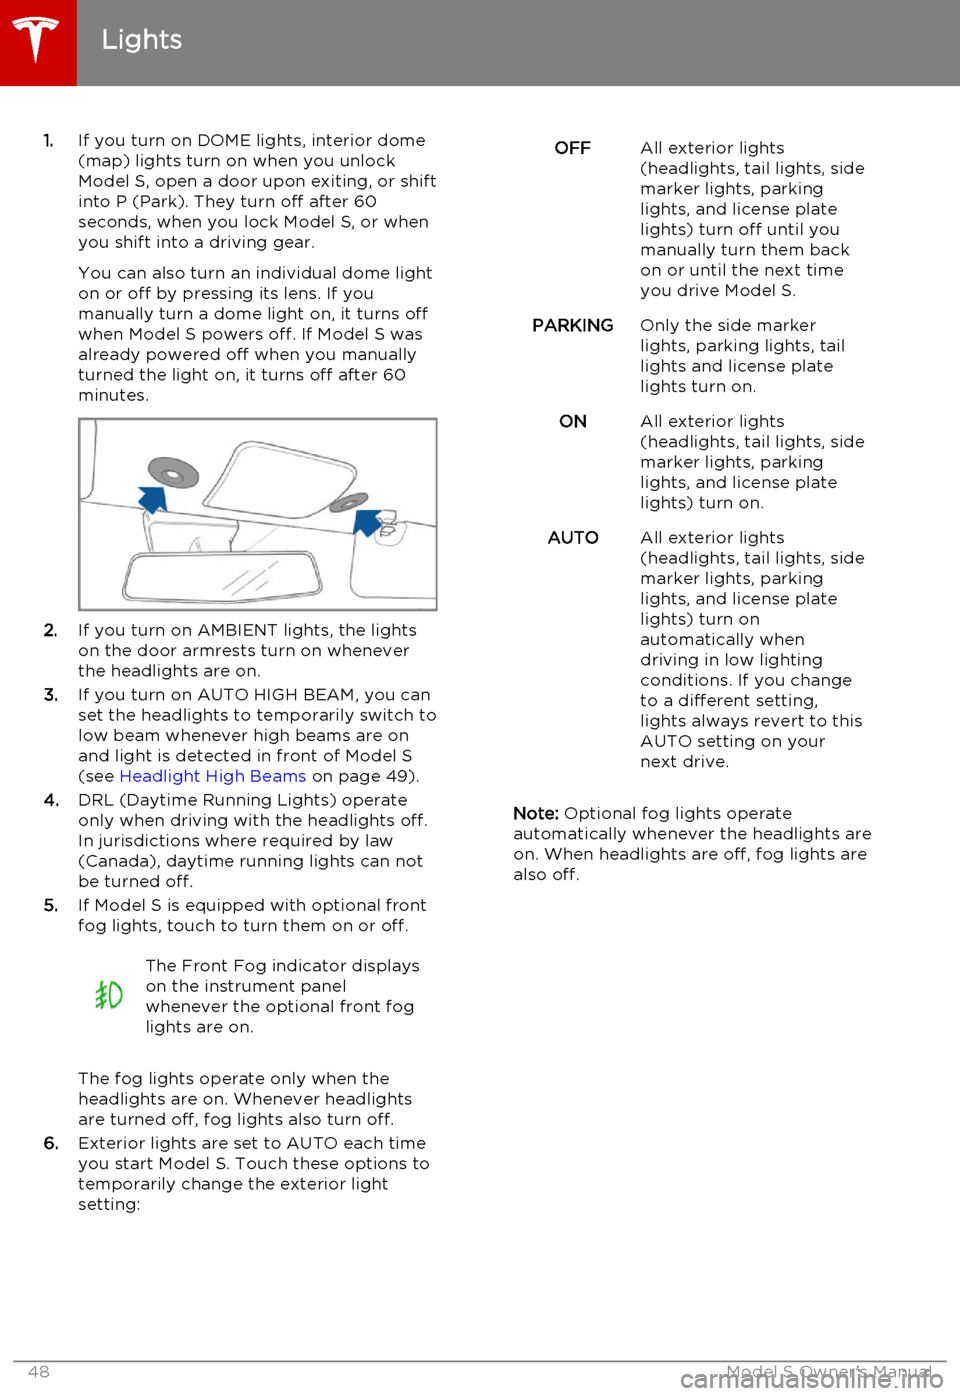
1.If you turn on DOME lights, interior dome
(map) lights turn on when you unlock
Model S, open a door upon exiting, or shift into P (Park). They turn off after 60
seconds, when you lock Model S, or when you shift into a driving gear.
You can also turn an individual dome light
on or off by pressing its lens. If you
manually turn a dome light on, it turns off
when Model S powers off. If Model S was
already powered off when you manually
turned the light on, it turns off after 60
minutes.
2. If you turn on AMBIENT lights, the lights
on the door armrests turn on whenever
the headlights are on.
3. If you turn on AUTO HIGH BEAM, you can
set the headlights to temporarily switch to
low beam whenever high beams are on
and light is detected in front of Model S
(see Headlight High Beams on page 49).
4. DRL (Daytime Running Lights) operate
only when driving with the headlights off.
In jurisdictions where required by law (Canada), daytime running lights can not
be turned off.
5. If Model S is equipped with optional front
fog lights, touch to turn them on or off.
The Front Fog indicator displays
on the instrument panel
whenever the optional front fog
lights are on.
The fog lights operate only when the
headlights are on. Whenever headlights
are turned off, fog lights also turn off.
6. Exterior lights are set to AUTO each time
you start Model S. Touch these options to
temporarily change the exterior light
setting:
OFFAll exterior lights
(headlights, tail lights, side
marker lights, parking
lights, and license plate
lights) turn off until you
manually turn them back
on or until the next time
you drive Model S.PARKINGOnly the side marker
lights, parking lights, tail
lights and license plate
lights turn on.ONAll exterior lights
(headlights, tail lights, side
marker lights, parking
lights, and license plate
lights) turn on.AUTOAll exterior lights
(headlights, tail lights, side
marker lights, parking
lights, and license plate
lights) turn on
automatically when
driving in low lighting
conditions. If you change
to a different setting,
lights always revert to this
AUTO setting on your
next drive.
Note: Optional fog lights operate
automatically whenever the headlights are
on. When headlights are off, fog lights are
also off.
Lights
48Model S Owner's Manual
Page 52 of 164
Braking SystemsModel S has an anti-lock braking system
(ABS) that prevents the wheels from locking
when you apply maximum brake pressure. This improves steering control during heavy
braking in most road conditions.
During emergency braking conditions, the
ABS constantly monitors the speed of each
wheel and varies the brake pressure according
to the grip available.
The alteration of brake pressure can be felt as
a pulsing sensation through the brake pedal.
This demonstrates that the ABS is operating
and is not a cause for concern. Keep firm and
steady pressure on the brake pedal while
experiencing the pulsing.The ABS indicator flashes briefly on
the instrument panel when you first
start Model S. If this indicator lights
up at any other time, an ABS fault
has occurred and the ABS is not
operating. Contact Tesla. The
braking system remains fully
operational and is not affected by an
ABS failure. However, braking
distances may increase.If the instrument panel displays this
indicator at any time other than
displaying briefly when you first start
Model S, a brake system fault is
detected or the brake fluid level is
low. Contact Tesla immediately.Emergency Braking
In an emergency, fully press the brake pedal
and maintain firm pressure, even on low
traction surfaces. The ABS varies the braking pressure to each wheel according to the
amount of traction available. This prevents wheels from locking and ensures that you
stop as safely as possible.Warning: Do not pump the brake pedal.
Doing so interrupts operation of the ABS
and can increase braking distance.Warning: Always maintain a safe distance
from the vehicle in front of you and be aware of hazardous driving conditions.
While the ABS can improve stopping
distance, it cannot overcome the laws of physics. It also does not prevent the
danger of hydroplaning (where a layer of
water prevents direct contact between
the tires and the road).
Brake Wear
Model S brake pads are equipped with wearindicators. A wear indicator is a thin metalstrip attached to the brake pad that squeals as
it rubs against the rotor when the pad wears
down. This squealing sound indicates that the
brake pads have reached the end of their
service life and require replacement. To stop
the squealing, contact Tesla Service.
Warning: Neglecting to replace worn
brake pads results in damage to the
braking system and can create a braking
hazard.
Brakes
52Model S Owner's Manual
Page 53 of 164
Regenerative Braking
Whenever Model S is moving and your foot is off the accelerator, regenerative braking slows
down Model S and feeds any surplus energy
back to the Battery.
By anticipating your stops and simply removing your foot from the accelerator to
slow down, you can take advantage of
regenerative braking to increase driving range. Of course, this is no substitute for
regular braking when needed for safety.
Note: If regenerative braking is aggressively
slowing Model S, such as on a steep descent,
brake lights turn on to alert other road users
that you are slowing down.
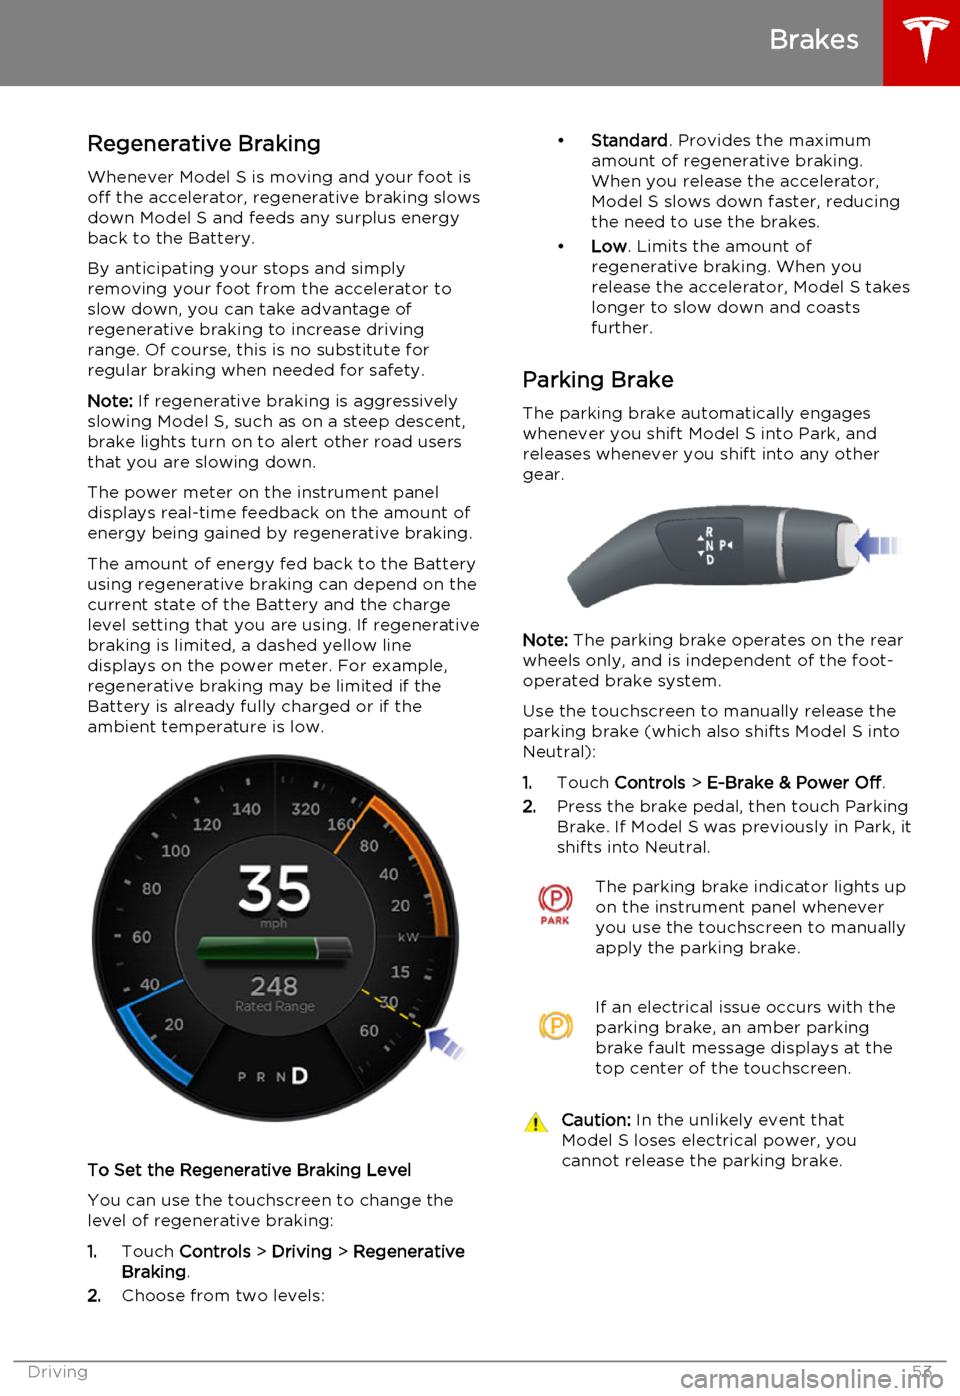
The power meter on the instrument panel displays real-time feedback on the amount of
energy being gained by regenerative braking.
The amount of energy fed back to the Battery
using regenerative braking can depend on the current state of the Battery and the charge
level setting that you are using. If regenerative braking is limited, a dashed yellow line
displays on the power meter. For example,
regenerative braking may be limited if the
Battery is already fully charged or if the
ambient temperature is low.
To Set the Regenerative Braking Level
You can use the touchscreen to change thelevel of regenerative braking:
1. Touch Controls > Driving > Regenerative
Braking .
2. Choose from two levels:
•
Standard . Provides the maximum
amount of regenerative braking. When you release the accelerator,
Model S slows down faster, reducing
the need to use the brakes.
• Low . Limits the amount of
regenerative braking. When you
release the accelerator, Model S takes longer to slow down and coastsfurther.
Parking Brake The parking brake automatically engages
whenever you shift Model S into Park, and
releases whenever you shift into any other
gear.
Note: The parking brake operates on the rear
wheels only, and is independent of the foot-
operated brake system.
Use the touchscreen to manually release the parking brake (which also shifts Model S intoNeutral):
1. Touch Controls > E-Brake & Power Off .
2. Press the brake pedal, then touch Parking
Brake. If Model S was previously in Park, it
shifts into Neutral.
The parking brake indicator lights up on the instrument panel whenever
you use the touchscreen to manually
apply the parking brake.If an electrical issue occurs with the
parking brake, an amber parking
brake fault message displays at the
top center of the touchscreen.Caution: In the unlikely event that
Model S loses electrical power, you
cannot release the parking brake.
Brakes
Driving53
Page 54 of 164
How It WorksThe traction control system constantly
monitors the difference in speed between the
front and rear wheels. If Model S experiences a
loss of traction, the system minimizes wheel
spin by controlling brake pressure and motor
power. By default, the traction control system
is always active. Under normal conditions, it should remain active to ensure maximum
safety.
On standard Model S vehicles, traction control can be turned off at any time. Turn it off only
in circumstances where you deliberately want
the wheels to spin, such as when Model S is
stuck in snow or mud.
On a dual motor Model S, you can enable slip
start to allow the wheels to spin at a limited speed. Slip start can be enabled only whenModel S is moving 20 mph (32 km/h) or
slower. Slip start automatically disables when the speed exceeds 40 mph (64 km/h).This indicator displays on the
instrument panel whenever the
traction control system is actively
controlling brake pressure and
motor power to minimize wheel spin.Warning: Traction control can not
prevent accidents caused by driving dangerously or turning too sharply at
high speeds.
Allowing Wheel Slip
Under normal conditions, the traction control
system should remain enabled. Disable it only in circumstances where you deliberately want
the wheels to spin, such as:
• Starting on a loose surface, such as gravel or snow.
• Driving in deep snow, sand or mud.
• Rocking out of a hole or deep rut.
To allow the wheels to spin on a standard single motor Model S, touch Controls >
Driving > Traction Control > Off .
To allow the wheels to spin on a dual motor
Model S, touch Controls > Driving > Traction
Control > Slip Start .
This indicator displays at the top
center of the touchscreen whenever
the wheels are allowed to spin (i.e.
when the traction control system on
a standard single-motor Model S is
turned off, or when Slip start on a
dual-motor Model S is enabled.
Although the traction control system automatically reactivates the next time you
start Model S, it is strongly recommended that you enable it immediately after thecircumstances that required you to disable it
have passed.
Traction Control
54Model S Owner's Manual
Page 55 of 164
How Speed Assist Works
If Model S is equipped with Driver Assistance
features, a camera mounted on the windshield behind the interior rear view mirror detectsspeed limit signs. The signs are then analyzed
and compared against GPS data to determine
the speed limit at your current driving
location. For routes where no signs are present, speed limits are determined using
GPS data (if available). Instead of determining the speed limit based on signs and GPS data,you can also manually enter an arbitrary
speed limit.
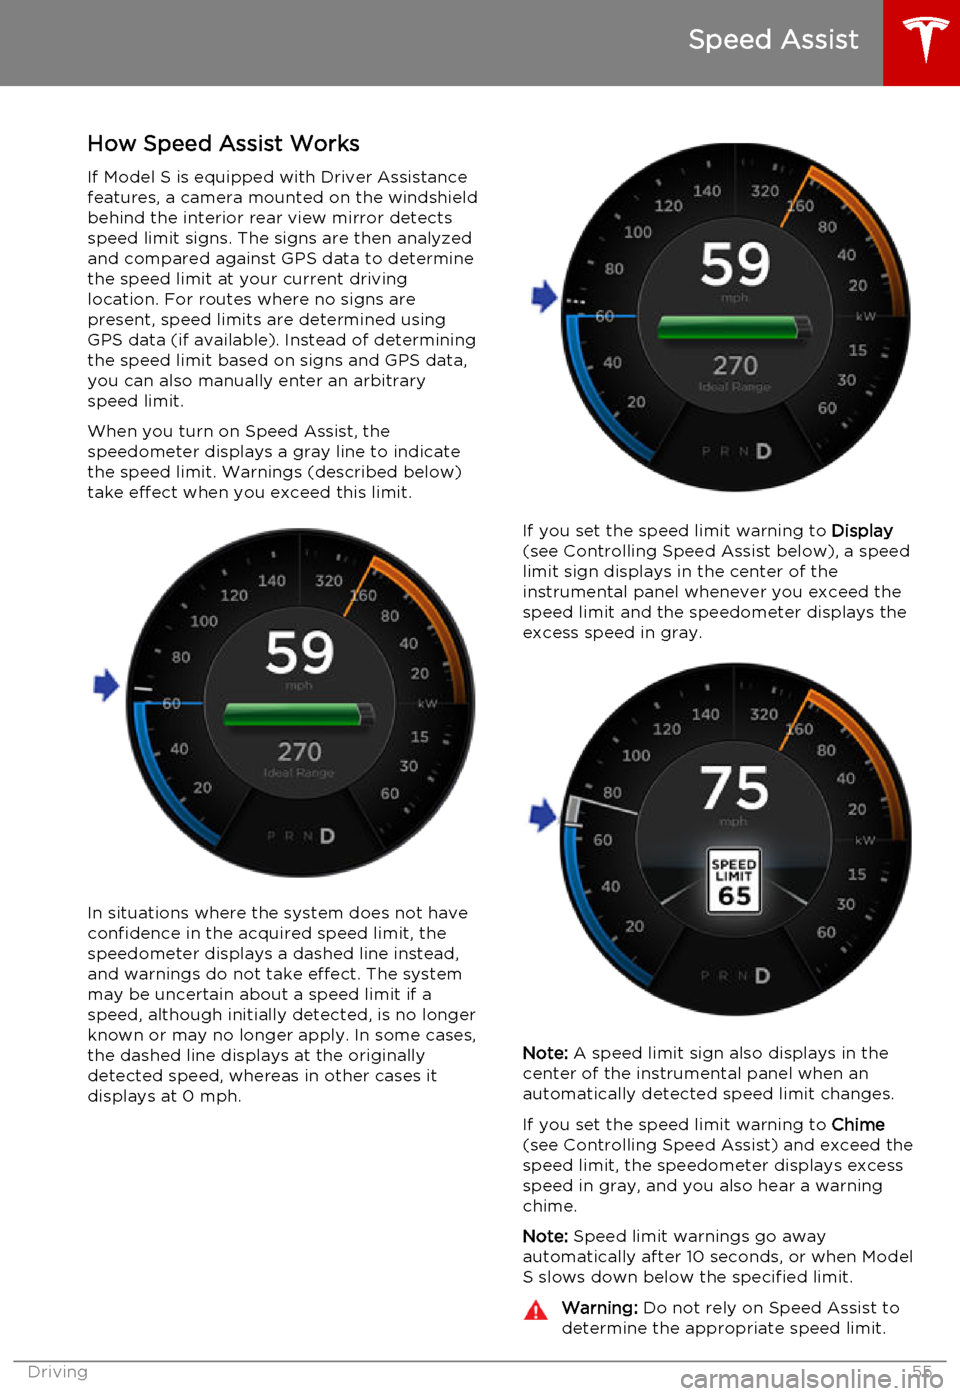
When you turn on Speed Assist, the
speedometer displays a gray line to indicate
the speed limit. Warnings (described below) take effect when you exceed this limit.
In situations where the system does not have
confidence in the acquired speed limit, the speedometer displays a dashed line instead,
and warnings do not take effect. The system
may be uncertain about a speed limit if a
speed, although initially detected, is no longer known or may no longer apply. In some cases,the dashed line displays at the originallydetected speed, whereas in other cases itdisplays at 0 mph.
If you set the speed limit warning to Display
(see Controlling Speed Assist below), a speed
limit sign displays in the center of the
instrumental panel whenever you exceed the speed limit and the speedometer displays the
excess speed in gray.
Note: A speed limit sign also displays in the
center of the instrumental panel when an
automatically detected speed limit changes.
If you set the speed limit warning to Chime
(see Controlling Speed Assist) and exceed the speed limit, the speedometer displays excessspeed in gray, and you also hear a warningchime.
Note: Speed limit warnings go away
automatically after 10 seconds, or when Model
S slows down below the specified limit.
Warning: Do not rely on Speed Assist to
determine the appropriate speed limit.
Speed Assist
Driving55
Page 56 of 164
Always drive at a safe speed based on
traffic and road conditions.Caution: If your Model S is equipped with
Speed Assist, you must take your vehicle to Tesla Service if a windshield
replacement is needed. Failure to do so
can cause Speed Assist to malfunction.
Controlling Speed Assist
To turn Speed Assist on or off, and control
how it works, touch Controls > Settings >
Driver Assistance > Speed Assist , then choose
one of these options:
• Off. The speed limit is not displayed.
• Display . Speed limit information visually
displays on the speedometer and when you exceed the limit, a speed limit sign
displays in the center of the instrument panel, and the speedometer displays theexcess speed in gray.
• Chime . In addition to the visual display, an
audible chime sounds whenever you
exceed the speed limit.
You can also specify how the speed limit is
determined:
• Relative . The speed limit is determined
automatically based on detected traffic
signs and GPS data. If desired, you can set
a speed limit offset (+ or -) if you want to
be alerted only when you exceed the
speed limit by a specified amount. For example, you would increase the offset to+10 mph if you only want to be alerted
when you exceed the speed limit by 10 mph.
• Absolute . Manually specify any speed limit
between 20 and 140 mph (30 and
240 km/h).
Note: GPS data is not always accurate. The
GPS can misjudge the road's location and
provide the speed limit for a directly adjacent
road that may have a different speed limit. For example, The GPS can assume Model S is on a
freeway when it’s actually on a nearby surface
street, and vice versa.
Limitations and Inaccuracies Speed Assist may not be fully functional or
may provide inaccurate information in these
situations:
• Visibility is poor and speed limit signs are not clearly visible (due to heavy rain,
snow, fog, etc.).
• Bright light (oncoming headlights or direct sunlight) is interfering with thecamera's view.
• Model S is being driven very close to a vehicle in front of it which is blocking the
camera's view.
• The windshield area in the camera's field of view is obstructed (fogged over, dirty,
covered by a sticker, etc.).
• Speed limit signs are concealed by objects.
• The speed limits stored in the GPS database are incorrect or outdated.
• Model S is being driven in an area where GPS data is not available.
• Traffic signs do not conform to standard recognizable formats.
• A road or a speed limit has recently changed.
Speed Assist
56Model S Owner's Manual
Page 58 of 164
How Forward Collision Warning
Works
If Model S is equipped with Autopilot, a
camera mounted on the windshield behind the interior rear view mirror and a radar sensor in
the center of the front grill monitor the area in
front of Model S for the presence of a vehicle,
bike or pedestrian. If a collision is considered likely unless you take immediate correctiveaction, Forward Collision Warning is designedto provide visual and audible warnings.
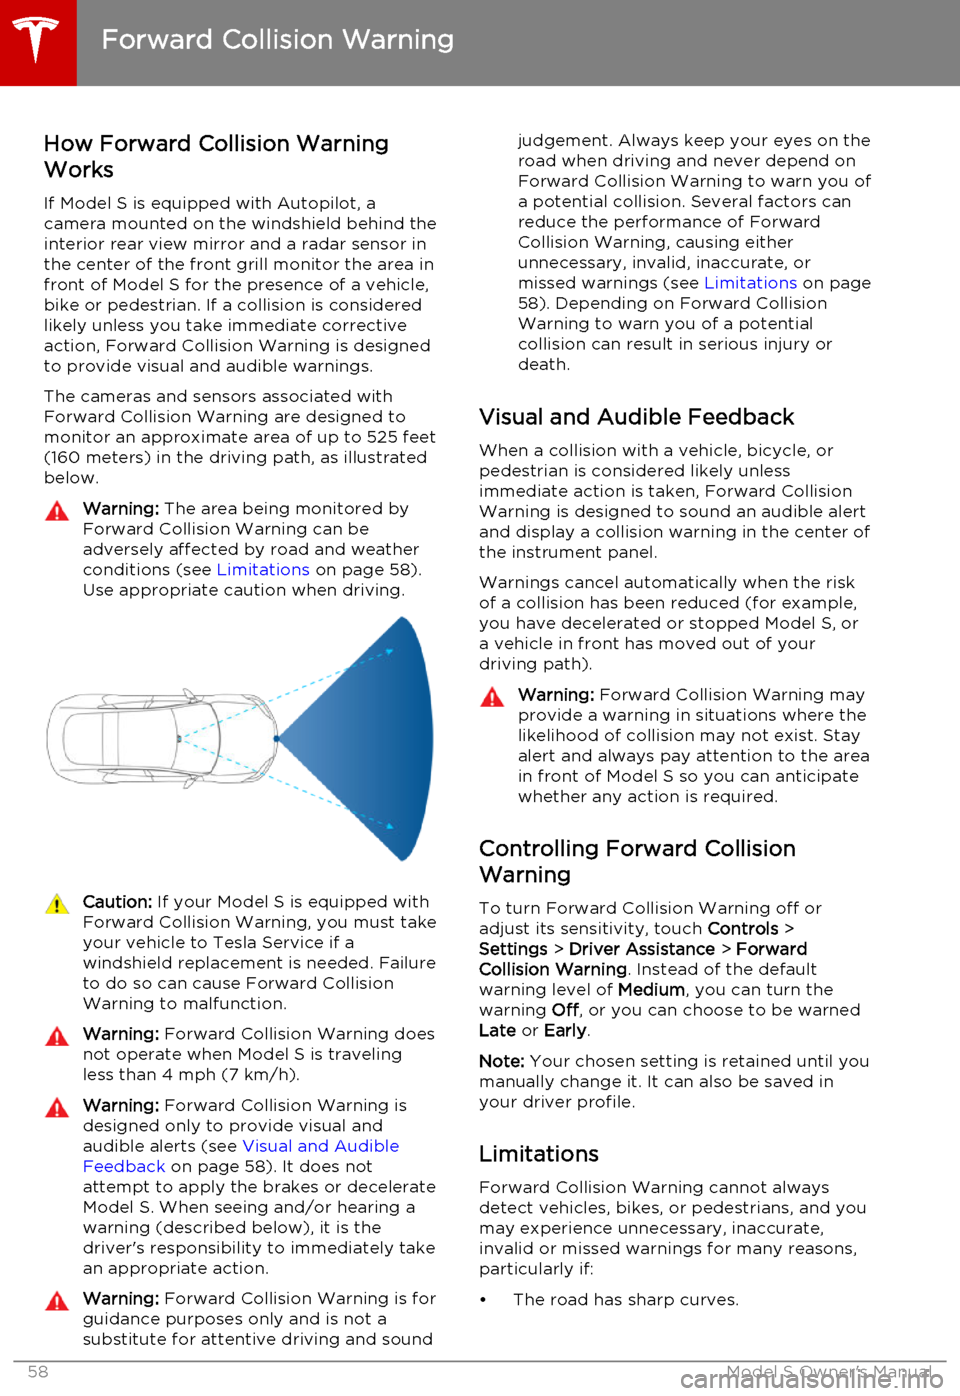
The cameras and sensors associated withForward Collision Warning are designed to
monitor an approximate area of up to 525 feet (160 meters) in the driving path, as illustrated
below.Warning: The area being monitored by
Forward Collision Warning can be adversely affected by road and weatherconditions (see Limitations on page 58).
Use appropriate caution when driving.Caution: If your Model S is equipped with
Forward Collision Warning, you must take
your vehicle to Tesla Service if a
windshield replacement is needed. Failure
to do so can cause Forward Collision
Warning to malfunction.Warning: Forward Collision Warning does
not operate when Model S is traveling less than 4 mph (7 km/h).Warning: Forward Collision Warning is
designed only to provide visual and
audible alerts (see Visual and Audible
Feedback on page 58). It does not
attempt to apply the brakes or decelerate
Model S. When seeing and/or hearing a warning (described below), it is the
driver's responsibility to immediately take an appropriate action.Warning: Forward Collision Warning is for
guidance purposes only and is not a
substitute for attentive driving and soundjudgement. Always keep your eyes on the road when driving and never depend on
Forward Collision Warning to warn you of a potential collision. Several factors canreduce the performance of Forward
Collision Warning, causing either
unnecessary, invalid, inaccurate, or
missed warnings (see Limitations on page
58). Depending on Forward Collision
Warning to warn you of a potential
collision can result in serious injury or
death.
Visual and Audible Feedback
When a collision with a vehicle, bicycle, or
pedestrian is considered likely unless
immediate action is taken, Forward Collision
Warning is designed to sound an audible alert
and display a collision warning in the center of the instrument panel.
Warnings cancel automatically when the risk
of a collision has been reduced (for example,
you have decelerated or stopped Model S, or
a vehicle in front has moved out of your
driving path).
Warning: Forward Collision Warning may
provide a warning in situations where the
likelihood of collision may not exist. Stay
alert and always pay attention to the area
in front of Model S so you can anticipate
whether any action is required.
Controlling Forward Collision
Warning
To turn Forward Collision Warning off or
adjust its sensitivity, touch Controls >
Settings > Driver Assistance > Forward
Collision Warning . Instead of the default
warning level of Medium, you can turn the
warning Off, or you can choose to be warned
Late or Early .
Note: Your chosen setting is retained until you
manually change it. It can also be saved in
your driver profile.
Limitations Forward Collision Warning cannot always
detect vehicles, bikes, or pedestrians, and you may experience unnecessary, inaccurate,
invalid or missed warnings for many reasons, particularly if:
• The road has sharp curves.
Forward Collision Warning
58Model S Owner's Manual