ESP TESLA MODEL S 2015 Owner's Guide
[x] Cancel search | Manufacturer: TESLA, Model Year: 2015, Model line: MODEL S, Model: TESLA MODEL S 2015Pages: 164, PDF Size: 4.78 MB
Page 96 of 164
About HomeLinkIf Model S is equipped with the optional tech
package, you can program the HomeLink ®
Universal Transceiver to operate up to three
garage doors, gates, lights, and security
systems that can transmit Radio Frequency
(RF) signals.
Programming HomeLink
1. Park Model S in front of the device you
want to program, and have the device’s
remote control ready.
2. Touch Controls > Settings > HomeLink on
the touchscreen.
3. Touch Add New HomeLink , then use the
onscreen keyboard to enter a name for
your HomeLink device.
4. Touch Program .
5. Follow the onscreen instructions.
Once programmed, you can operate the device by touching its corresponding
HomeLink icon on the touchscreen’s status bar. HomeLink remembers the location of
your programmed devices. When you approach a known location, the HomeLink
control on the touchscreen automatically
drops down. When you drive away, it
disappears.
Note: For security reasons, erase your
HomeLink settings if you sell Model S.Warning: Your device might open or
close during programming. Before
programming, make sure that the device is clear of any people or objects.Warning: Do not use the HomeLink
Universal Transceiver with a garage door that does not meet safety standards. Agarage door opener that cannot detectan object in its path and then
automatically stop and reverse, does not
meet these standards. Using a garage
door opener without these features
increases the risk of injury or death.
Troubleshooting HomeLink
When programming a HomeLink device, the touchscreen steps you through a two-part
programming process:
• First, Model S records the signal from the remote. The touchscreen instructs you to
stand in front of the car, point the remote
at the front bumper and press and hold
the button until the headlights flash.
When headlights flash, Model S has
learned the remote and you can touch
Continue on the touchscreen . If the
headlights do not flash, refer to the
guidelines below.
• Next, the device's receiver learns Model S. The touchscreen instructs you to press
the LEARN button on the garage door or
gate's receiver. If training the receiver
does not work, refer to the guidelines
below.
NOTE: Only devices that are equipped
with a “rolling code” remote need to learn
Model S. If you have a very old device that
is not equipped with a rolling code
remote, the device does not need to learn
Model S and you can skip this part. You
can also skip this step if your receiver is
Quick-Train compatible. The opener
should work.
Headlights do not flash
• Check the batteries in the remote. It is a good idea to replace the batteries before
you start programming.
• Hold the remote against the nose cone, with the button pressed, about 6 inches to
the left of the Tesla emblem. In some
cases you must hold the remote for up to
three minutes.
• Check compatibility of the remote by contacting the HomeLink manufacturer
( www.homelink.com ).
After programming, the device does not work
• Park Model S with its front bumper as close as possible to the HomeLink device
(garage door, gate, etc).
• Make sure you haven’t reached the device receiver's limit of learned remotes/cars.
Most receivers can learn up to five
remotes/cars. If the receiver's memory is
full, you must clear the memory and
restart the programming process. For
instructions on how to clear the receiver's
memory, refer to the owner
documentation provided with the
HomeLink device.
• Make sure you are pressing the receiver's LEARN button. Most receivers have twobuttons and a LED. One button is a RESET
button and the other is a LEARN button.
Pressing the LEARN button usually causes the LED to flash. For instructions on how
to put the receiver into learning mode, refer to the owner documentation
provided with the HomeLink device.
HomeLink ®
Universal Transceiver
96Model S Owner's Manual
Page 98 of 164
Wi-Fi is available as a data connectionmethod and is often faster than cellular data
networks. Connecting to Wi-Fi is especially
useful in areas with limited or no cellular connectivity. To ensure fast, reliable deliveryof Model S updates (see Software Updates on
page 99), Tesla recommends leaving Wi-Fi
turned on and connected to a Wi-Fi network.
To connect to a Wi-Fi network:
1. Touch the 3G icon in the touchscreen
status bar. Model S will start scanning and
display the Wi-Fi networks that are within range.
2. Select the Wi-Fi network you want to use,
enter the password (if necessary), then
touch Connect .
You can also connect to a hidden network
that isn't shown on the list of scanned
networks. Just touch Wi-Fi Settings and enter
the name of the network in the resulting
dialog box.
Once you have connected to a network,
Model S auto-connects whenever the network
is within range. If more than one previously connected network is within range, Model S
connects to the one most recently used.
Note: You can also use a mobile hotspot or
your phone's Internet connection via Wi-Fi tethering.
Note: At Tesla service centers, Model S
automatically connects to a Tesla Service Wi-
Fi access point.
Connecting to Wi-Fi
98Model S Owner's Manual
Page 101 of 164

High Voltage Components1.Battery
2. DC-DC converter and junction box
3. High voltage cabling (colored orange)
4. 10 kW on-board master charger
5. OPTIONAL: 10 kW on-board charger
6. Charge port
7. Drive unitWarning: The high voltage system has no
user serviceable parts. Do not
disassemble, remove or replace high
voltage components, cables or
connectors. High voltage cables are
colored orange for easy identification.Warning: Read and follow all instructions
provided on the labels that are attached to Model S. These labels are there for
your safetyWarning: In the unlikely event that a fire
occurs, immediately contact your local
fire emergency responders.
Electric Vehicle Components
Charging101
Page 103 of 164
About the Battery
Model S has one of the most sophisticated
battery systems in the world. The most important way to preserve the Battery is to
LEAVE YOUR MODEL S PLUGGED IN when
you are not using it. This is particularly
important if you are not planning to drive
Model S for several weeks. When plugged in,
Model S wakes up when needed to
automatically maintain a charge level that
maximizes the lifetime of the Battery.
There is no advantage to waiting until the
Battery’s level is low before charging. In fact,
the Battery performs best when charged
regularly.
Note: If the Model S Battery becomes
completely discharged in a situation in which
towing is required, the owner is responsible for towing expenses. Discharge-related
towing expenses are not covered under the
Roadside Assistance policy.
Battery Care
Never allow the Battery to fully discharge.
Even when Model S is not being driven, its
Battery discharges very slowly to power the
onboard electronics. On average, the Battery discharges at a rate of 1% per day. Situations
can arise in which you must leave Model S
unplugged for an extended period of time (for
example, at an airport when traveling). In these situations, keep the 1% in mind to ensure
that you leave the Battery with a sufficient
charge level. For example, over a two week
period (14 days), the Battery discharges by
approximately 14%.
Discharging the Battery to 0% may
permanently damage the Battery. To protect against a complete discharge, Model S enters
a low-power consumption mode when the
charge level drops to 5%. In this mode, the
Battery stops supporting the onboard electronics to slow the discharge rate to
approximately 4% per month. Once this low-
power consumption mode is active, it is
important to plug in Model S within two
months to avoid Battery damage.
Note: When the low-power consumption
mode is active, the auxiliary 12V battery is no
longer being charged and can completely
discharge within 12 hours. In the unlikely event
that this occurs, you may need to jump start
or replace the 12V battery before you can
charge. In this situation, contact Tesla.Temperature Limits
For better long-term performance, avoid
exposing Model S to ambient temperatures above 140° F (60° C) or below -22° F (-30° C)
for more than 24 hours at a time.
Energy Saving Feature
Model S has an energy-saving feature that
reduces the amount of energy being consumed when Model S is not in use. Touch
Controls > Displays > Energy Saving . For more
information on maximizing range and saving
energy, see Getting Maximum Range on page
70.
Battery Warnings and CautionsWarning: The Battery has no parts that an
owner or a non-Tesla authorized service technician can service. Under no
circumstances should you open or
tamper with the Battery. Always contact Tesla to arrange for Battery servicing.Caution: If the Battery’s charge level falls
to 0%, you must plug it in. If you leave it
unplugged for an extended period, it may
not be possible to charge Model S or use
the vehicle without jump starting or
replacing the 12V battery. Leaving Model S unplugged for an extendedperiod can also result in permanent
Battery damage. If you are unable to
charge Model S, contact Tesla
immediately.Caution: The Battery requires no owner
maintenance. Do not remove the filler cap
and do not add fluid. If the instrument
panel warns you that the fluid level is low, contact Tesla immediately.
Battery Information
Charging103
Page 108 of 164
Service Intervals
Regular maintenance is the key to ensuring
the continued reliability and efficiency of your
Model S.
Rotate the tires every 5000 miles (8000 km),
maintain the correct tire pressures, and take Model S to Tesla at the regularly scheduledmaintenance intervals of every 12 months, orevery 12,500 miles (20,000 km), whichever
comes first. It is also important to perform the
daily and monthly checks described below.
Model S must be serviced by Tesla-certified
technicians. Damages or failures caused by
maintenance or repairs performed by non-
Tesla certified technicians are not covered by
the warranty.
Daily Checks • Check the Battery’s charge level, displayed on the instrument panel.
• Check that all exterior lights, horn, turn signals, and wipers and washers are
working.
• Check the operation of the brakes, including the parking brake.
• Check the operation of the seat belts (see Seat Belts on page 20).
• Look for fluid deposits underneath Model S that might indicate a leak. It is
normal for a small pool of water to form
(caused by the air conditioning system’s dehumidifying process).
Monthly Checks • Check the mileage to determine if the tires need to be rotated (every
5000 miles/8000 km), and check the
condition and pressure of each tire (see
Tire Care and Maintenance on page 109).
• Check washer fluid level and top up if necessary (see Topping Up Washer Fluid
on page 125).
• Check that the air conditioning system is operating (see Climate Controls on page
80).Warning: Contact Tesla immediately if
you notice any significant or sudden drop in fluid levels or uneven tire wear.Fluid Replacement Intervals
Do not change or top up Battery coolant and
brake fluid yourself. Tesla service technicians replace fluids at the regularly scheduled
service intervals:
• Brake fluid. Every 2 years or 25,000 miles (40,000 km), whichever comes first.
• Battery coolant. Every 5 years or 62,500 miles (100,000 km), whichever
comes first.
Note: Any damage from opening the Battery
coolant reservoir is excluded from the warranty.
High Voltage Safety Your Model S has been designed and built
with safety as a priority. However, be aware of these precautions to protect yourself from the
risk of injury inherent in all high-voltage
systems:
• Read and follow all instructions provided on the labels that are attached to Model S.These labels are there for your safety.
• The high voltage system has no user- serviceable parts. Do not disassemble,
remove or replace high voltage components, cables or connectors. High
voltage cables are colored orange for
easy identification.
• If an accident occurs, do not touch any high voltage wiring, connectors, or
components connected to the wiring.
• In the unlikely event that a fire occurs, immediately contact your local fire
emergency responders.Warning: Always disconnect the charge
cable before working underneath Model S, even if charging is not in
progress.Warning: Keep your hands and clothing
away from cooling fans. Some fans
operate even when Model S is powered
off.Caution: Some fluids (battery acid,
Battery coolant, brake fluid, windshield
washer additives, etc.) used in motor
vehicles are poisonous and should not be
inhaled, swallowed, or brought into contact with open wounds. For your
safety, always read and follow
instructions printed on fluid containers.
Maintenance Schedule
108Model S Owner's Manual
Page 112 of 164

Winter Tires
Your Model S is not originally equipped with
winter tires. In snowy and icy conditions, consider installing winter tires. Winter tires are
designed to increase traction in snowy or icy
conditions. When installing winter tires, always install a complete set of four tires at the sametime. Winter tires must be the same size,brand, construction and tread pattern on allfour wheels. Contact Tesla for winter tire
recommendations.Winter tires can be identified by a
mountain/snowflake symbol on the
tire's sidewall.
When driving with winter tires, you may
experience more road noise, shorter tread life, and less traction on dry roads.
Driving in Low Temperatures Tire performance is reduced in low ambient
temperatures, resulting in reduced grip and an
increased susceptibility to damage from
impacts. Performance tires can temporarily
harden when cold, causing you to hear
rotational noise for the first few miles (kms)
until the tires warm up.
Using Tire Chains Tesla has tested and approved Security Chain
Company (SCC) Model Z-563 chains for use
on the rear wheels. These chains must only be
used if your Model S has 245/45R19 rear tires
installed. Do not use chains on 21 inch tires.
When installing tire chains, follow the
instructions provided by the tire chain
manufacturer. Mount them as tightly as
possible.
When using tire chains:
• Drive slowly. Do not exceed 30 mph (48 km/h).
• Avoid heavily loading Model S (heavy loads can reduce the clearance between
the tires and the body).
• Remove the tire chains as soon as conditions allow.
Note: Tire chains are prohibited in some
jurisdictions. Check local laws before installing
tire chains.
Caution: Using non-recommended tire
chains, or using tire chains on other sized tires, can damage the suspension, body,wheels, and/or brake lines. Damagecaused by using non-recommended tire
chains is not covered by the warranty.Caution: Ensure that tire chains cannot
touch suspension components or brake
lines. If you hear the chains making
unusual noises that would indicate
contact with Model S, stop and
investigate immediately.
Tire Pressure Monitoring
Each tire should be checked monthly when
cold and inflated to the recommended pressures that are printed on the Tire and
Loading Information label located on the
driver’s door pillar (see Maintaining Tire
Pressures on page 109). If your vehicle has
tires of a different size than the size indicated
on the vehicle placard or tire inflation pressure
label, determine the proper tire inflation
pressure for those tires.
As an added safety feature, your vehicle has
been equipped with a tire pressure monitoring
system (TPMS) that displays a tire pressure
telltale (Tire Pressure Warning) on the
instrument panel when one or more of your
tires is significantly under- or over-inflated.
Accordingly, when the Tire Pressure indicator
light displays on the instrument panel alerting
of tire pressure, stop and check your tires as
soon as possible, and inflate them to the
proper pressure (see Maintaining Tire
Pressures on page 109). Driving on a
significantly under-inflated tire causes the tire
to overheat and can lead to tire failure. Under-
inflation also reduces fuel efficiency and tire
tread life, and may affect the vehicle's
handling and stopping ability.
If Model S detects a fault with the
Tire Pressure Monitoring System
(TPMS), this indicator flashes for one
minute whenever you power on
Model S.
Note: Installing accessories that are not
approved by Tesla can interfere with the TPMS system.
Warning: The TPMS is not a substitute for
proper tire maintenance, including
manually checking tire pressures and
regularly inspecting the condition of tires.
It is the driver's responsibility to maintain
correct tire pressure, even if under- or
over-inflation has not reached the level
Tire Care and Maintenance
112Model S Owner's Manual
Page 133 of 164

Parts, Accessories, and
Modifications
Use only genuine Tesla parts and accessories.Tesla performs rigorous testing on parts to
ensure their suitability, safety, and reliability. Purchase these parts from Tesla, where they
are professionally installed and where you can receive expert advice about modifications toModel S.
Tesla is unable to assess parts manufactured by other distributors and therefore accepts no
responsibility if you use non-Tesla parts on
Model S.Warning: Installing non-approved parts
and accessories, or performing non-
approved modifications, can affect the performance of Model S and the safety of
its occupants. Any damage caused by using or installing non-approved parts, orby performing non-approved
modifications, is not covered by the
warranty.Warning: Tesla does not accept liability
for death, personal injury or damage that
occurs if you use or install non-approved accessories or make non-approvedmodifications.
Body Repairs
If Model S is in a collision, contact Tesla to
ensure that it is repaired with genuine Tesla
parts. Tesla has selected and approved body
shops that meet strict requirements for
training, equipment, quality, and customer
satisfaction.
Some repair shops and insurance companies
might suggest using non-original equipment
or salvaged parts to save money. However,
these parts do not meet Tesla's high
standards for quality, fit and corrosion
resistance. In addition, non-original equipment and salvaged parts (and any damage or
failures they might cause) are not covered by
the warranty.
Parts and Accessories
Maintenance133
Page 136 of 164
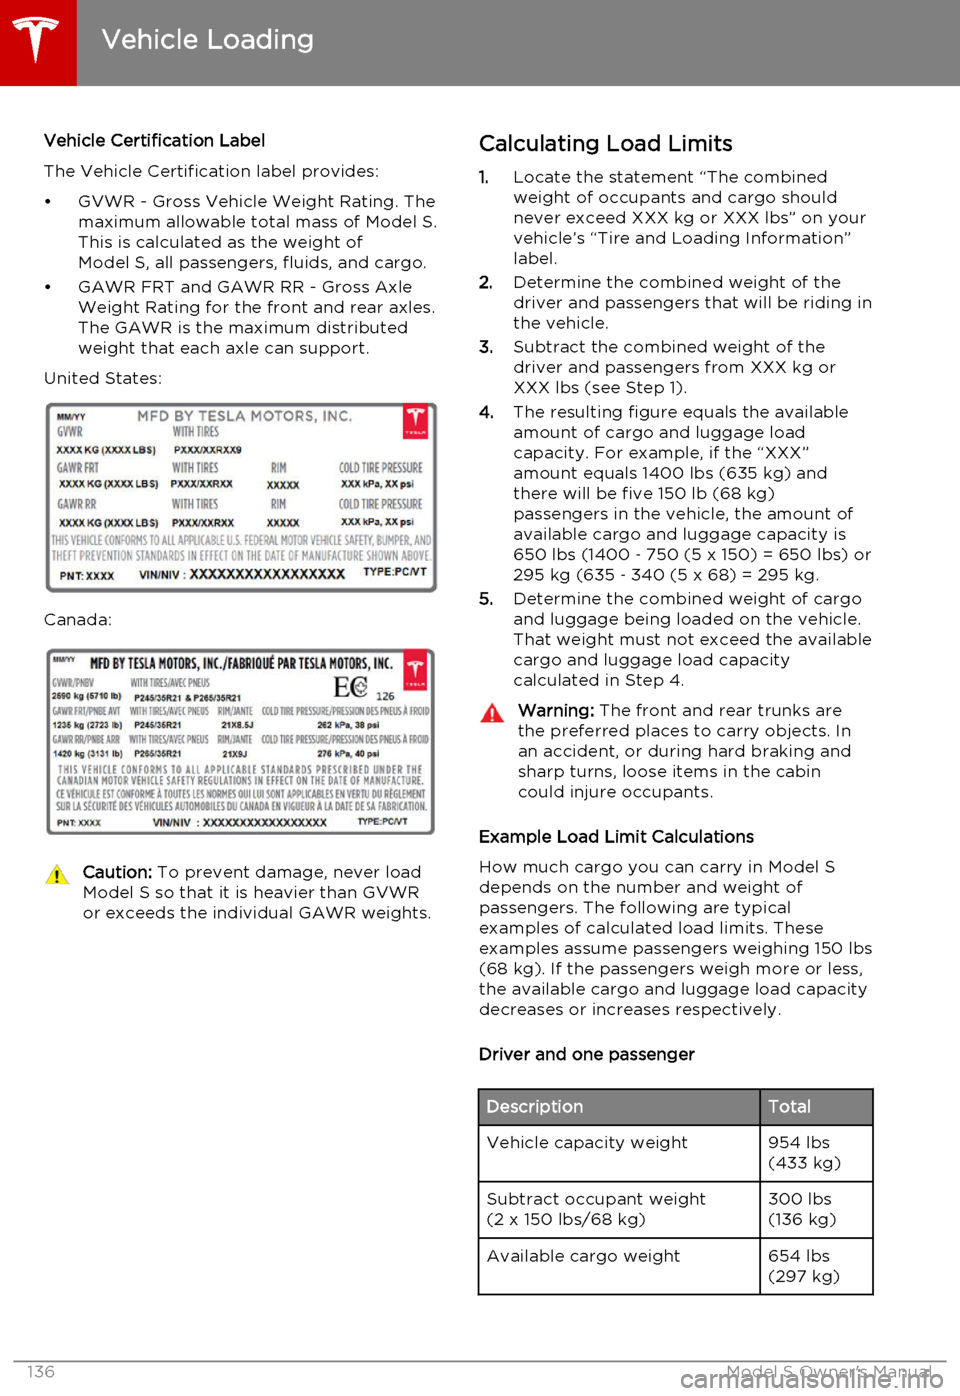
Vehicle Certification Label
The Vehicle Certification label provides:
• GVWR - Gross Vehicle Weight Rating. The maximum allowable total mass of Model S.
This is calculated as the weight of Model S, all passengers, fluids, and cargo.
• GAWR FRT and GAWR RR - Gross Axle Weight Rating for the front and rear axles.
The GAWR is the maximum distributed
weight that each axle can support.
United States:
Canada:
Caution: To prevent damage, never load
Model S so that it is heavier than GVWR
or exceeds the individual GAWR weights.Calculating Load Limits
1. Locate the statement “The combined
weight of occupants and cargo should
never exceed XXX kg or XXX lbs” on your
vehicle’s “Tire and Loading Information”
label.
2. Determine the combined weight of the
driver and passengers that will be riding in
the vehicle.
3. Subtract the combined weight of the
driver and passengers from XXX kg or
XXX lbs (see Step 1).
4. The resulting figure equals the available
amount of cargo and luggage load
capacity. For example, if the “XXX”
amount equals 1400 lbs (635 kg) and
there will be five 150 lb (68 kg)
passengers in the vehicle, the amount of
available cargo and luggage capacity is
650 lbs (1400 ‑ 750 (5 x 150) = 650 lbs) or
295 kg (635 ‑ 340 (5 x 68) = 295 kg.
5. Determine the combined weight of cargo
and luggage being loaded on the vehicle.
That weight must not exceed the available
cargo and luggage load capacity
calculated in Step 4.Warning: The front and rear trunks are
the preferred places to carry objects. In
an accident, or during hard braking and sharp turns, loose items in the cabin
could injure occupants.
Example Load Limit Calculations
How much cargo you can carry in Model S
depends on the number and weight of
passengers. The following are typical
examples of calculated load limits. These
examples assume passengers weighing 150 lbs (68 kg). If the passengers weigh more or less,
the available cargo and luggage load capacity decreases or increases respectively.
Driver and one passenger
DescriptionTotalVehicle capacity weight954 lbs
(433 kg)Subtract occupant weight
(2 x 150 lbs/68 kg)300 lbs
(136 kg)Available cargo weight654 lbs
(297 kg)
Vehicle Loading
136Model S Owner's Manual
Page 144 of 164

Tire SpecificationsTire TypeLocationSize19" wheels (85 kWh vehicles): MichelinAllP245/45R1919" wheels (60 kWh vehicles):
Standard - Goodyear
Optional - MichelinAllP245/45R1921" wheels: ContinentalAllP245/35R2121" wheels on Performance Plus vehicles: MichelinFront
RearP245/35R21P265/35R21Tire pressures vary depending on the type of tires fitted on Model S. Refer to the tire pressuresprinted on the Tire and Loading Information label. This label is located on the driver’s door pillar
and is visible when the driver’s door is open (see Maintaining Tire Pressures on page 109).Winter tires (Pirelli P245/45R19) can be purchased from a Tesla store.
Wheels and Tires
144Model S Owner's Manual
Page 147 of 164

Uniform Tire Quality Grading
The following information relates to the tire
grading system developed by the National
Highway Traffic Safety Administration
(NHTSA), which grades tires by tread wear,
traction and temperature performance. Tires
that have deep tread, and winter tires, are
exempt from these marking requirements.
Where applicable, quality grades are found on
the tire’s sidewall between the tread shoulder and maximum section width. For example:
• TREADWEAR 180
• TRACTION AA
• TEMPERATURE A
The quality grades are described next. Note: In addition to the marking requirements,
passenger car tires must conform to Federal Safety Requirements.
Treadwear
The treadwear grade is a comparative rating
based on the wear rate of the tire when tested
under controlled conditions on a specified government test course.
For example, a tire graded 150 wears one and
a half times better on a government test
course than a tire graded 100. The relative
performance of tires depends on the actual
conditions of their use, however, and can depart significantly from the norm due to
variations in driving habits, service practices, road characteristics, and climate.
Traction
The traction grades, from highest to lowest,
are: AA, A, B, and C. These grades represent a
tire’s ability to stop on wet pavement as
measured under controlled conditions on test
surfaces of asphalt and concrete. A tire
marked C might have poor traction performance.Warning: Defective tires are dangerous.
Do not drive if a tire is damaged,
excessively worn, or is inflated to an
incorrect pressure. The safety of the
vehicle and occupants can be adversely
affected. Check tires regularly for wear
and to ensure there are no cuts, bulges or
exposure of the ply/cord structure.Warning: The traction grade assigned to
the tire is based on straight-ahead
braking tests, and doesn’t include:acceleration, cornering, hydroplaning or
peak traction characteristics.
Temperature
The temperature grades are A (the highest), B, and C, representing the tire’s resistance tothe generation of heat and its ability to
dissipate heat when tested under controlled
conditions on a specified indoor laboratory test wheel. Sustained high temperature cancause the tire to degenerate and reduce tirelife, and excessive temperature can lead to
sudden tire failure.
The grade C corresponds to the minimum
level of performance that all passenger car
tires must meet under the Federal Motor Safety Standard No. 109. Grades B and A
represent levels of performance on the
laboratory test wheel that exceed the
minimum requirements.
Warning: A tire’s temperature grade is
established for a tire that is properly
inflated and not overloaded. Excessive
speed, under-inflation, or excessive
loading, either separately or in
combination, can cause heat buildup and
possible tire failure.
Wheels and Tires
Specifications147