service indicator TESLA MODEL S 2015 Owner's Manual
[x] Cancel search | Manufacturer: TESLA, Model Year: 2015, Model line: MODEL S, Model: TESLA MODEL S 2015Pages: 164, PDF Size: 4.78 MB
Page 1 of 164

Overview........................................................................................ 2Interior Overview........................................................................ 2Exterior Overview....................................................................... 3
Opening and Closing................................................................. 4Doors............................................................................................... 4
Keyless Locking and Unlocking 4Using the Key 4Using Exterior Door Handles 6Using Interior Door Handles 6Interior Locking and Unlocking 6Child-protection Lock 7Drive-away Locking 7Walk-away Locking 7Unlocking When the Key Doesn't Work 7Opening Interior Doors with No Power 8
Windows........................................................................................ 9
Opening and Closing 9Locking Rear Windows 9
Rear Trunk................................................................................... 10
Opening 10Closing 10Adjusting the Opening Height 10Interior Release 11Opening with No Power 11
Front Trunk.................................................................................. 12
Opening 12Closing 12Interior Emergency Release 13Opening with No Power 13
Glove Box..................................................................................... 14
Opening and Closing 14
Sunroof.......................................................................................... 15
Opening and Closing 15
Cup Holders................................................................................. 16
Opening and Closing 16
Seating and Safety Restraints.............................................. 17Front and Rear Seats............................................................... 17
Correct Driving Position 17Adjusting the Driver’s Seat 17Seat Heaters 18Folding Rear Seats 18Raising Rear Seats 19Head Supports 19Seat Covers 19
Seat Belts.................................................................................... 20
Wearing Seat Belts 20Wearing Seat Belts When Pregnant 20Seat Belt Pre-tensioners 21Testing Seat Belts 21Seat Belt Warnings 21
Child Safety Seats.................................................................... 23
Guidelines for Seating Children 23Choosing a Child Safety Seat 24Seating Larger Children 25Installing Child Safety Seats 25Installing Seat Belt Retained Child Seats 25Installing LATCHChild Seats 26Attaching Upper Tether Straps 26Testing a Child Safety Seat 27Warnings - Child Safety Seats 27
Tesla Built-In Rear Facing Child Seats............................. 28
Usage Restrictions 28Opening 28Folding 28Seating a Child 30Warnings - Tesla Child Seats 30
Airbags......................................................................................... 32
Location of Airbags 32How the Airbags Work 33Types of Airbags 33Passenger Front Airbag 34Inflation Effects 35Airbag Warning Indicator 35Airbag Warnings 35
Driving.......................................................................................... 36Driver Profiles............................................................................ 36
Creating a Driver Profile 36Restoring a Driver’s Profile 36Saved Driver Settings 36
Steering Wheel.......................................................................... 37
Adjusting Position 37Adjusting Sensitivity 37Using Left Steering Wheel Buttons 37Using Right Steering Wheel Buttons 38Using Voice Commands 38Heated Steering Wheel 39Horn 39
Mirrors.......................................................................................... 40
Adjusting Exterior Side Mirrors 40Rear View Mirror 40
Starting and Powering Off.....................................................41
Starting Model S 41Powering Off 41
Gears............................................................................................. 42
Shifting Gears 42Leaving Model S in Neutral - Tow Mode 42
Instrument Panel...................................................................... 43
Instrument Panel Overview 43Indicator Lights 44
Lights............................................................................................ 47
Controlling Lights 47Headlight High Beams 49Headlights After Exit 50Cornering Lights 50Turn Signals 50Hazard Warning Flashers 50
Wipers and Washers................................................................ 51
Wipers 51Washers 51
Brakes........................................................................................... 52
Braking Systems 52Brake Wear 52Regenerative Braking 53Parking Brake 53
Traction Control........................................................................54
How It Works 54
Speed Assist............................................................................... 55
How Speed Assist Works 55Controlling Speed Assist 56Limitations and Inaccuracies 56
Lane Departure Warning....................................................... 57
How Lane Departure Warning Works 57Controlling Lane Departure Warning 57Limitations and Inaccuracies 57
Forward Collision Warning................................................... 58
How Forward Collision Warning Works 58Visual and Audible Feedback 58Controlling Forward Collision Warning 58Limitations 58
Traffic-Aware Cruise Control.............................................. 60
Operating Traffic Aware Cruise Control 60Instrument Panel Indicator Lights 62Changing the Set Speed 62Overtake Acceleration 63Canceling and Resuming 64Limitations 64
Park Assist.................................................................................. 66
How Park Assist Works 66Visual and Audio Feedback 66Controlling Audible Feedback 67Limitations and False Warnings 67Other Parking Aids 67
Hill Start Assist.......................................................................... 68
Trip Information........................................................................ 69
Displaying Trip Information 69
Getting Maximum Range...................................................... 70
Driving Tips to Maximize Range 70Energy App 70Saving Energy 70
Rear View Camera.....................................................................71
Camera Location 71
Using the Touchscreen........................................................... 72Touchscreen Overview...........................................................72
The Big Picture 72
Controls........................................................................................74
Controlling Model S Features 74
Settings.........................................................................................77
Customizing Model S 77Erasing Personal Data 79
Climate Controls.......................................................................80
Overview of Climate Controls 80Customizing Climate Control 81Ventilation 82Climate Control Operating Tips 82
Smart Air Suspension............................................................. 83
Manual Height Adjustments 83Location-Based Suspension 83Automatic Lowering 84Jack Mode 84
Media and Audio.......................................................................85
Overview 85AM and FM Radio 85XM Radio 85Internet Radio 85Media Settings 86Favorites 86My Music & Devices 86USB Connections 8712V Power Socket 87
Phone............................................................................................ 88
Bluetooth®Compatibility 88Pairing a Bluetooth Phone 88Importing Contacts 88Unpairing a Bluetooth Phone 88Connecting to a Paired Phone 89Making a Phone Call 89Receiving a Phone Call 89In Call Options 89
Maps and Navigation.............................................................. 90
Overview 90Using Maps 90Starting Navigation 90During Navigation 91Favorite Destinations 92Updated Maps 92
Calendar....................................................................................... 93
Overview 93Calendar and Navigation 94
Security Settings...................................................................... 95
About the Security System 95
HomeLink ®
Universal Transceiver.......................................96
About HomeLink 96Programming HomeLink 96Troubleshooting HomeLink 96
Connecting to Wi-Fi................................................................ 98
Software Updates.................................................................... 99
Loading New Software 99Viewing Release Notes 99
Mobile App............................................................................... 100
Model S Mobile App 100
Charging......................................................................................101Electric Vehicle Components..............................................101
High Voltage Components 101Charging Equipment 102
Battery Information............................................................... 103
About the Battery 103Battery Care 103
Charging Model S................................................................... 104
Opening the Charge Port 104Plugging In 104During Charging 105Stopping Charging 105Charge Port Light 105Changing Charge Settings 106Charging Status 107
Maintenance............................................................................. 108Maintenance Schedule..........................................................108
Service Intervals 108Daily Checks 108Monthly Checks 108Fluid Replacement Intervals 108High Voltage Safety 108
Tire Care and Maintenance................................................. 109
Maintaining Tire Pressures 109Inspecting and Maintaining Tires 110Replacing Tires and Wheels 111Tire Types 111Driving in Low Temperatures 112Using Tire Chains 112Tire Pressure Monitoring 112
Temporary Tire Repair...........................................................114
Tire Repair Kit 114Inflating with Sealant and Air 115Inflating with Air Only 116Replacing the Sealant Canister 117
Cleaning....................................................................................... 118
Cleaning the Exterior 118Cleaning the Interior 119Polishing, Touch Up, and Body Repair 120Using a Car Cover 120Floor Mats 120
Wiper Blades and Washer Jets.......................................... 121
Checking and Replacing Wiper Blades 121Cleaning Washer Jets 121Fluid Reservoirs....................................................................... 123
Removing the Maintenance Panel 123Checking Battery Coolant 123Checking Brake Fluid 124Topping Up Washer Fluid 125
Fuses............................................................................................ 126
Fuse Box Locations 126Replacing a Fuse 126Fuse Box 1 127Fuse Box 2 129Fuse Box 3 131
Jacking and Lifting................................................................. 132
Jacking Procedure 132
Parts and Accessories........................................................... 133
Parts, Accessories, and Modifications 133Body Repairs 133
Specifications........................................................................... 134Identification Labels.............................................................. 134
Vehicle Identification Number 134Emission Control Label 134
Vehicle Loading....................................................................... 135
Load Capacity Labeling 135Calculating Load Limits 136Towing a Trailer 137Roof Racks 137
Dimensions and Weights..................................................... 138
Exterior Dimensions 138Weights 139
Subsystems...............................................................................140
Motor 140Transmission 140Steering 140Brakes 141Suspension 141Battery - 12V 141Battery - High Voltage 142
Wheels and Tires.....................................................................143
Wheel Specifications 143Wheel Alignment Values 143Tire Specifications 144Understanding Tire Markings 145Uniform Tire Quality Grading 147Wheels and Tires Glossary 148
Roadside Assistance............................................................. 149Contacting Roadside Assistance...................................... 149Instructions for Transporters............................................. 150
Use a Flatbed Only 150Disable Self-Leveling (air suspension vehicles only) 150Activate Tow Mode 150Connect the Tow Chain 151Pull Onto the Trailer and Secure the Wheels 152
Consumer Information.......................................................... 153About this Owner Information........................................... 153
Illustrations 153Errors or Inaccuracies 153Location of Components 153Document Applicability 153Copyrights and Trademarks 154
Disclaimers................................................................................ 155
Vehicle Telematics/Data Recorders 155Quality Control 155California Proposition 65 155
Reporting Concerns............................................................... 156
Contacting Tesla 156Reporting Safety Defects - US 156Reporting Safety Defects - Canada 156
Declarations of Conformity................................................. 157
Key and Passive Unlocking System 157Tire Pressure Monitoring System 158Media Control Unit 158HomeLink 159Radio Frequency Information 159
Contents
Page 42 of 164
Shifting GearsWhen Model S is in Park, you must press the
brake to shift to another gear.
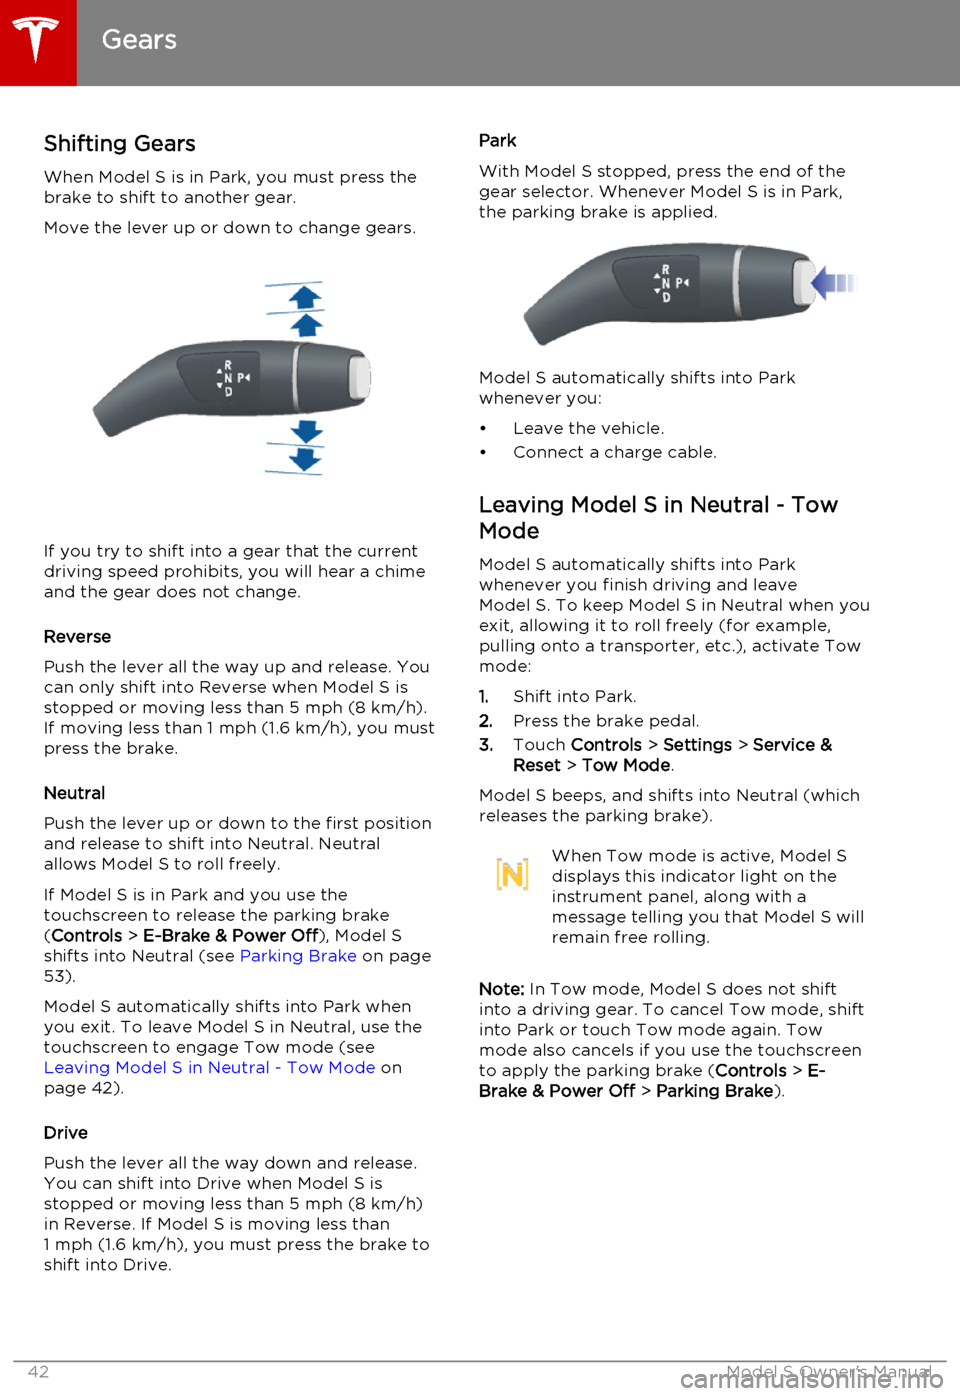
Move the lever up or down to change gears.
If you try to shift into a gear that the current
driving speed prohibits, you will hear a chime
and the gear does not change.
Reverse
Push the lever all the way up and release. You can only shift into Reverse when Model S is
stopped or moving less than 5 mph (8 km/h). If moving less than 1 mph (1.6 km/h), you must
press the brake.
Neutral
Push the lever up or down to the first position
and release to shift into Neutral. Neutral
allows Model S to roll freely.
If Model S is in Park and you use the
touchscreen to release the parking brake ( Controls > E-Brake & Power Off ), Model S
shifts into Neutral (see Parking Brake on page
53).
Model S automatically shifts into Park when you exit. To leave Model S in Neutral, use the
touchscreen to engage Tow mode (see Leaving Model S in Neutral - Tow Mode on
page 42).
Drive
Push the lever all the way down and release. You can shift into Drive when Model S isstopped or moving less than 5 mph (8 km/h)
in Reverse. If Model S is moving less than
1 mph (1.6 km/h), you must press the brake to shift into Drive.
Park
With Model S stopped, press the end of the gear selector. Whenever Model S is in Park,
the parking brake is applied.
Model S automatically shifts into Park
whenever you:
• Leave the vehicle.
• Connect a charge cable.
Leaving Model S in Neutral - Tow
Mode
Model S automatically shifts into Parkwhenever you finish driving and leaveModel S. To keep Model S in Neutral when youexit, allowing it to roll freely (for example,pulling onto a transporter, etc.), activate Tow
mode:
1. Shift into Park.
2. Press the brake pedal.
3. Touch Controls > Settings > Service &
Reset > Tow Mode .
Model S beeps, and shifts into Neutral (which
releases the parking brake).
When Tow mode is active, Model S
displays this indicator light on the
instrument panel, along with a
message telling you that Model S will
remain free rolling.
Note: In Tow mode, Model S does not shift
into a driving gear. To cancel Tow mode, shift into Park or touch Tow mode again. Towmode also cancels if you use the touchscreen
to apply the parking brake ( Controls > E-
Brake & Power Off > Parking Brake ).
Gears
42Model S Owner's Manual
Page 52 of 164
Braking SystemsModel S has an anti-lock braking system
(ABS) that prevents the wheels from locking
when you apply maximum brake pressure. This improves steering control during heavy
braking in most road conditions.
During emergency braking conditions, the
ABS constantly monitors the speed of each
wheel and varies the brake pressure according
to the grip available.
The alteration of brake pressure can be felt as
a pulsing sensation through the brake pedal.
This demonstrates that the ABS is operating
and is not a cause for concern. Keep firm and
steady pressure on the brake pedal while
experiencing the pulsing.The ABS indicator flashes briefly on
the instrument panel when you first
start Model S. If this indicator lights
up at any other time, an ABS fault
has occurred and the ABS is not
operating. Contact Tesla. The
braking system remains fully
operational and is not affected by an
ABS failure. However, braking
distances may increase.If the instrument panel displays this
indicator at any time other than
displaying briefly when you first start
Model S, a brake system fault is
detected or the brake fluid level is
low. Contact Tesla immediately.Emergency Braking
In an emergency, fully press the brake pedal
and maintain firm pressure, even on low
traction surfaces. The ABS varies the braking pressure to each wheel according to the
amount of traction available. This prevents wheels from locking and ensures that you
stop as safely as possible.Warning: Do not pump the brake pedal.
Doing so interrupts operation of the ABS
and can increase braking distance.Warning: Always maintain a safe distance
from the vehicle in front of you and be aware of hazardous driving conditions.
While the ABS can improve stopping
distance, it cannot overcome the laws of physics. It also does not prevent the
danger of hydroplaning (where a layer of
water prevents direct contact between
the tires and the road).
Brake Wear
Model S brake pads are equipped with wearindicators. A wear indicator is a thin metalstrip attached to the brake pad that squeals as
it rubs against the rotor when the pad wears
down. This squealing sound indicates that the
brake pads have reached the end of their
service life and require replacement. To stop
the squealing, contact Tesla Service.
Warning: Neglecting to replace worn
brake pads results in damage to the
braking system and can create a braking
hazard.
Brakes
52Model S Owner's Manual
Page 110 of 164
Inspecting and Maintaining Tires
Regularly inspect the tread and side walls for
any sign of distortion (bulges), cuts or wear.Warning: Do not drive Model S if a tire is
damaged, excessively worn, or inflated to
an incorrect pressure. Check tires
regularly for wear, and ensure there are
no cuts, bulges or exposure of the ply/
cord structure.
Tire Wear
Adequate tread depth is important for proper tire performance. Tires with a tread depth less
than 4/32” (3 mm) are more likely tohydroplane in wet conditions and should notbe used. Tires with a tread depth less than5/32” (4 mm) do not perform well in snow
and slush and should not be used when
driving in winter conditions.
Model S is originally fitted with tires that have
wear indicators molded into the tread pattern.
When the tread has been worn down to 2/32”
(1.6 mm), the indicators start to appear at the surface of the tread pattern, producing the
effect of a continuous band of rubber across
the width of the tire. For optimal performance and safety, Tesla recommends replacing tires
before the wear indicators are visible.
Tire Rotation, Balance, and Wheel Alignment
Tesla recommends rotating the tires every 5000 miles (8000 km).
Unbalanced wheels (sometimes noticeable as
vibration through the steering wheel) affect
vehicle handling and tire life. Even with
regular use, wheels can get out of balance.
Therefore, they should be balanced as
required.
If tire wear is uneven (on one side of the tire
only) or becomes abnormally excessive, check
the alignment of wheels.
Note: When replacing only two tires, always
install the new tires on the rear.
Punctured Tires
A puncture eventually causes the tire to lose
pressure, which is why it is important to check tire pressures frequently. Permanently repair
or replace punctured or damaged tires as
soon as possible. Do not drive with a
punctured tire, even if the puncture has not caused the tire to deflate. A punctured tire
can deflate suddenly at any time.
Your tubeless tires may not leak when
penetrated, provided the object remains in the
tire. If, however, you feel a sudden vibration or
ride disturbance while driving, or you suspect
a tire is damaged, immediately reduce your
speed. Drive slowly, while avoiding heavy
braking or sharp steering and, when safe to do
so, stop the vehicle. Arrange to have Model S
transported to a Tesla service center, or to a
nearby tire repair center.
Note: In some cases, you can temporarily
repair small tire punctures (under 1/4”/6 mm)
using an optional tire repair kit available from
Tesla. This allows you to slowly drive Model S to Tesla or to a nearby tire repair facility.Warning: Do not drive Model S with a
punctured tire. Even if the punctured tire has not deflated, it can suddenly deflate
at any time.
Flat Spots
If Model S is stationary for a long period in
high temperatures, tires can form flat spots. When Model S is driven, these flat spots causea vibration which gradually disappears as thetires warm up and regain their original shape.
To minimize the flat spots during storage,
inflate tires to the maximum pressure
indicated on the tire wall. Then, before driving, release air to adjust tire pressure to the
recommended levels.
Improving Tire Mileage
To improve the mileage you get from your
tires, maintain tires at the recommended tire
pressures, observe speed limits and advisory
speeds, and avoid:
• Pulling away quickly, or hard acceleration.
• Fast turns and heavy braking. • Potholes and objects in the road.
• Hitting curbs when parking.
• Contaminating tires with fluids that can cause damage.
Tire Care and Maintenance
110Model S Owner's Manual
Page 113 of 164
for the TPMS to trigger the Tire PressureWarning on the instrument panel.
Resetting the TPMS Sensors
After replacing one or more wheels, the TPMS sensors must be reset to ensure tire pressurewarnings are accurate. However, note that theTPMS sensors do not need to be reset after
replacing a tire or rotating wheels.
Note: When changing to 21" wheels
(Performance Plus models), the TPMS may
generate false tire pressure warnings. Bring
Model S to a Tesla Service center for further
adjustment.
Note: Do not reset the TPMS sensors in an
attempt to clear tire pressure warnings.
To reset TPMS sensors:
1. Inflate all tires to their recommend
pressures, as indicated on the Tire and Loading Information label located on the
driver’s door pillar.
2. Get ready to drive for ten minutes, then,
on the Model S touchscreen, touch
Controls > Settings > Service & Reset >
Tire Pressure Monitor > Reset Sensors .
3. Follow the onscreen instructions.
Replacing a Tire Sensor
If the Tire Pressure warning indicator displays frequently, contact Tesla to determine if a tiresensor needs to be replaced. Tire sensors
must be replaced by a Tesla service technician
who can perform a brief setup procedure. If a non-Tesla service center repairs or replaces atire, the tire sensor will not work until Tesla
performs the setup procedure.
TPMS Malfunction
Model S has also been equipped with a TPMS
malfunction indicator to indicate when the
system is not operating properly.
The TPMS malfunction indicator is
combined with the tire pressure
indicator light. When the system
detects a malfunction, the indicator
flashes for approximately one
minute after Model S powers on, and
then remains continuously lit. This
sequence continues upon
subsequent vehicle start-ups as long
as the malfunction exists. When the
TPMS malfunction indicator is on,
the system might not be able to
detect or signal under- and over-
inflated tires as intended.
TPMS malfunctions can occur for a variety of reasons, including installing replacement oralternate tires or wheels that prevent theTPMS from functioning properly. Alwayscheck the TPMS malfunction indicator light
after replacing one or more tires or wheels on
your vehicle to ensure that the replacement
tires or wheels allow the TPMS to continue to
function properly.
Note: If a tire has been replaced or repaired
using a different tire sealant than the one
available from Tesla, and a low tire pressure is
detected, it is possible that the tire sensor has
been damaged. Contact Tesla to have the
fault repaired as soon as possible.
Tire Care and Maintenance
Maintenance113
Page 124 of 164

Checking Brake FluidWarning: Contact Tesla immediately if
you notice increased movement of the
brake pedal or a significant loss of brake
fluid. Driving under these conditions can result in extended stopping distances orcomplete brake failure.The Brake indicator on the
instrument panel alerts you if the
quantity of fluid in the brake
reservoir drops below the
recommended level. If it displays
while driving, stop as soon as safety
permits by gently applying the
brakes. Do not continue driving.
Contact Tesla immediately.
Fluid Level Check
Tesla checks the brake fluid level at the
regularly scheduled maintenance intervals. To check it yourself, park Model S on level
ground. When Model S is cool, remove the maintenance panel (see Removing the
Maintenance Panel on page 123).
Check the fluid level visually by looking at the
outside marks on the side of the reservoir
without removing the filler cap.
The brake fluid level should always be
between the MIN and the MAX marks.
Note: Although brake fluid level drops slightly
during normal use as a result of brake pad wear, it should not drop below the MIN mark.
Topping Up the Brake Fluid
Do not top up your brake fluid. Tesla service does this when you bring Model S in for
regular servicing. The following instructions are provided for information purposes andfuture reference only:
1. Clean the filler cap before removing to
prevent dirt from entering the reservoir.
2. Unscrew the cap and remove.
3. Top up the reservoir to the MAX mark
using brake fluid meeting DOT3 or DOT4 specifications.
4. Replace the filler cap.Warning: Only use new fluid from a
sealed air-tight container. Never use previously used fluid or fluid from apreviously opened container—fluid
absorbs moisture which decreases
braking performance.Warning: Brake fluid is highly toxic. Keep
containers sealed and out of the reach of children. In the event of accidentalconsumption, seek medical attention
immediately.Caution: Brake fluid damages painted
surfaces. Immediately soak up any spills
with an absorbent cloth and wash the
area with a mixture of car shampoo and
water.
Fluid Reservoirs
124Model S Owner's Manual
Page 150 of 164
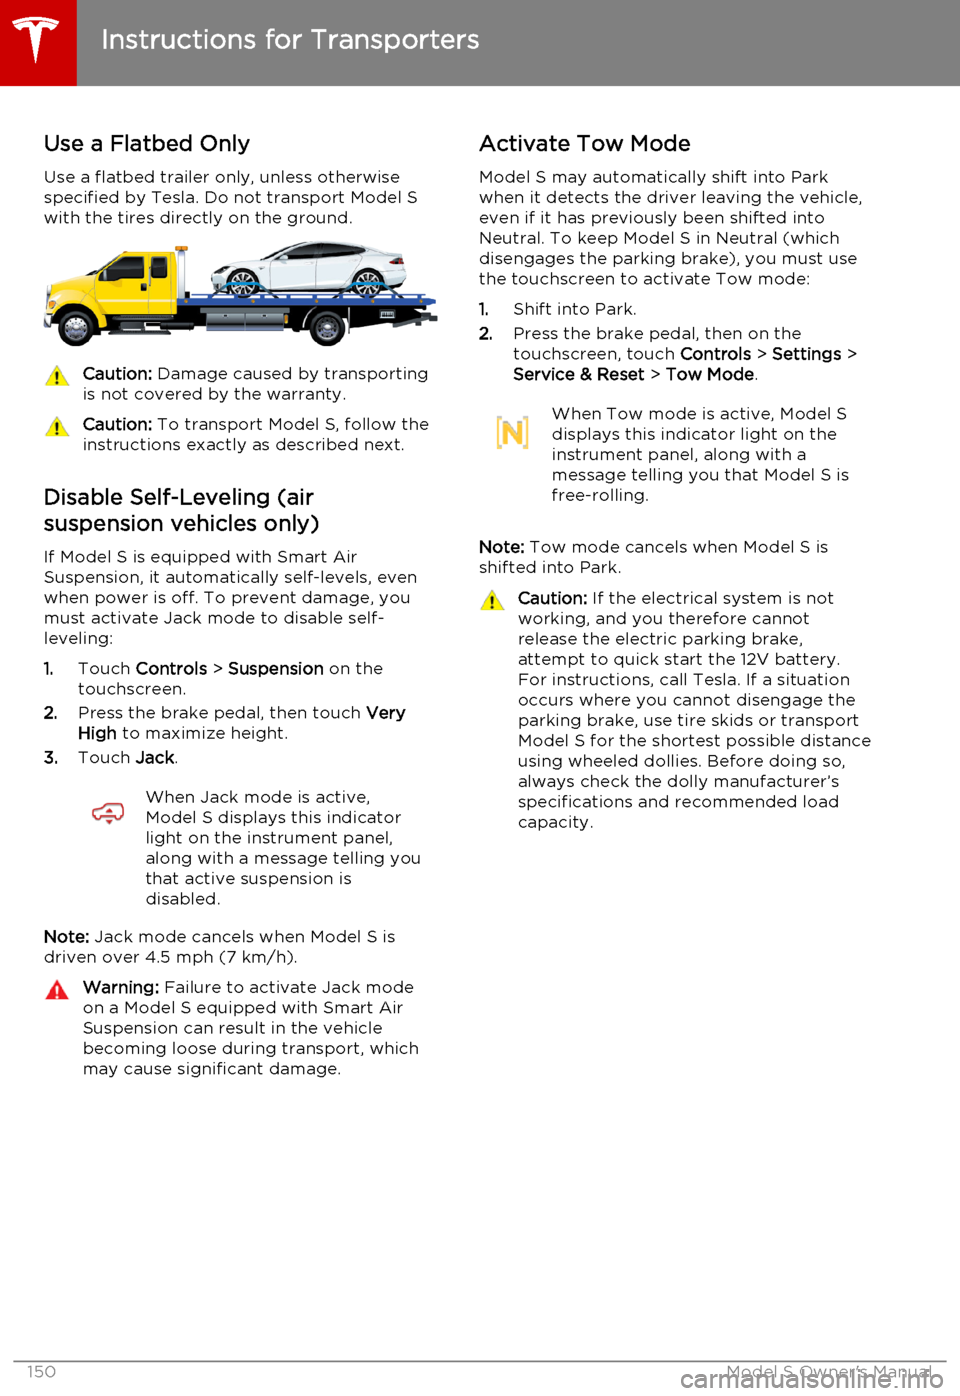
Use a Flatbed Only
Use a flatbed trailer only, unless otherwise
specified by Tesla. Do not transport Model S with the tires directly on the ground.Caution: Damage caused by transporting
is not covered by the warranty.Caution: To transport Model S, follow the
instructions exactly as described next.
Disable Self-Leveling (air
suspension vehicles only)
If Model S is equipped with Smart Air
Suspension, it automatically self-levels, even when power is off. To prevent damage, you
must activate Jack mode to disable self- leveling:
1. Touch Controls > Suspension on the
touchscreen.
2. Press the brake pedal, then touch Very
High to maximize height.
3. Touch Jack.
When Jack mode is active,
Model S displays this indicator
light on the instrument panel,
along with a message telling you
that active suspension is
disabled.
Note: Jack mode cancels when Model S is
driven over 4.5 mph (7 km/h).
Warning: Failure to activate Jack mode
on a Model S equipped with Smart Air
Suspension can result in the vehicle becoming loose during transport, which
may cause significant damage.Activate Tow Mode
Model S may automatically shift into Park
when it detects the driver leaving the vehicle, even if it has previously been shifted into
Neutral. To keep Model S in Neutral (which disengages the parking brake), you must use
the touchscreen to activate Tow mode:
1. Shift into Park.
2. Press the brake pedal, then on the
touchscreen, touch Controls > Settings >
Service & Reset > Tow Mode .When Tow mode is active, Model S
displays this indicator light on the
instrument panel, along with a
message telling you that Model S is
free-rolling.
Note: Tow mode cancels when Model S is
shifted into Park.
Caution: If the electrical system is not
working, and you therefore cannot
release the electric parking brake,
attempt to quick start the 12V battery.
For instructions, call Tesla. If a situation
occurs where you cannot disengage the
parking brake, use tire skids or transport
Model S for the shortest possible distance
using wheeled dollies. Before doing so,
always check the dolly manufacturer’s specifications and recommended load
capacity.
Instructions for Transporters
150Model S Owner's Manual
Page 162 of 164
FCC certification 159
programming and using 96
hood 12
horn 39
I IC certifications 157
Ideal range 77
identification labels 134
indicator lights, summary of 44
Insane setting (dual motor) 74instrument panelcharging status 107
cleaning 119
overview of 43interiorcleaning 119
lights 47
overview 2
temperature control 80
Internet radio 85
intrusion detection 95
ionizer 77
J
J1772 102
Jack mode 84
jacking Model S 132
K
keyFCC and IC certifications 157
how to use 4
key not inside 41
ordering extras 5
replacing battery 5
keyless entry 4
L
labelTire and Loading Information 135
vehicle certification 136
lane assist 57
lane change flash 50
lane departure warning 57
language setting 77
LATCH child seats, installing 26
liftgateadjust opening height 10
opening 10
lifting Model S 132
lightscornering lights 50
hazard warning 50
headlights after exit 50
turn signals 50
load limits 135
location-based suspension 83
lock/unlock status 43
locking and unlocking doors 4
lumbar support 17
M
maintenancebrake fluid, checking 124
cleaning 118
daily and monthly checks 108
fluid replacement intervals 108
panel, removing 123
replacing fuses 126
replacing wiper blades 121
service intervals 108
tires 109
washer fluid, topping up 125
washer jets, cleaning 121
maps 90
mats 120
media 85
mileage upon delivery 155
mirrors 40
mobile app 100
Mobile Connectordescription 102
using 104
modifications 133
motor specifications 140
N
naming Model S 79
navigation 90
NCC certifications 157
Neutral gear 42
NHTSA, contacting 156
night mode 77
O occupancy sensor 34
odometeron instrument panel 43
resetting trip odometer 69
overhang dimensions 138
overtake acceleration 60
Owner Information, about 153, 154
Index
162Model S Owner's Manual