sensor TESLA MODEL S 2021 Owner´s Manual
[x] Cancel search | Manufacturer: TESLA, Model Year: 2021, Model line: MODEL S, Model: TESLA MODEL S 2021Pages: 281, PDF Size: 7.63 MB
Page 5 of 281
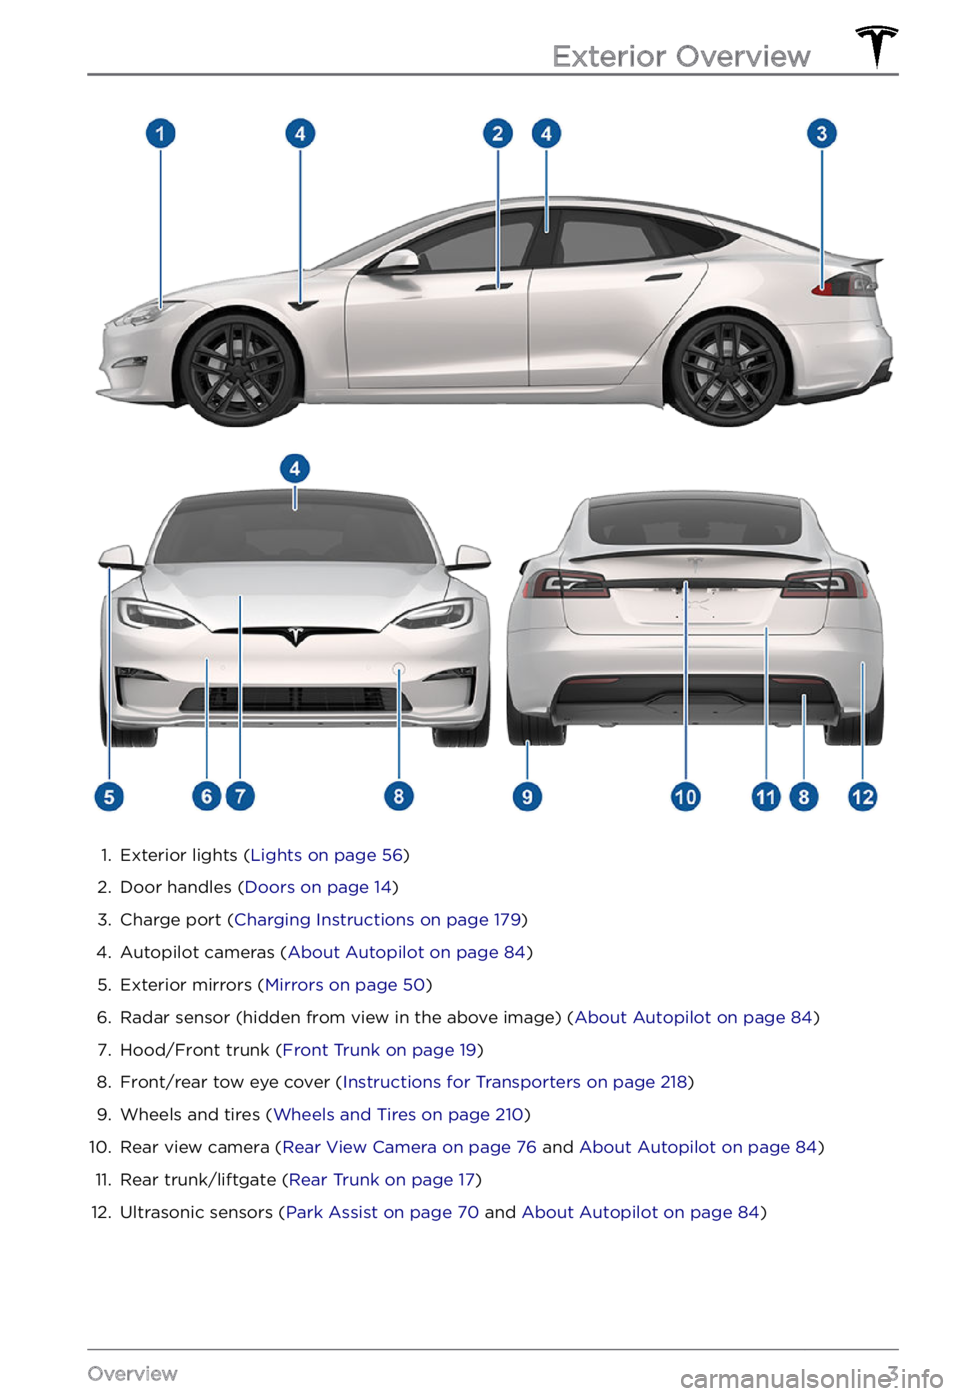
1.
Exterior lights (Lights on page 56)
2.
Door handles (Doors on page 14)
3.
Charge port (Charging Instructions on page 179)
4.
Autopilot cameras (About Autopilot on page 84)
5.
Exterior mirrors (Mirrors on page 50)
6.
Radar sensor (hidden from view in the above image) (About Autopilot on page 84)
7.
Hood/Front trunk (Front Trunk on page 19)
8.
Front/rear tow eye cover (Instructions for Transporters on page 218)
9.
Wheels and tires (Wheels and Tires on page 210)
10.
Rear view camera (Rear View Camera on page 76 and About Autopilot on page 84)
11.
Rear trunk/liftgate (Rear Trunk on page 17)
12.
Ultrasonic sensors (Park Assist on page 70 and About Autopilot on page 84)
Exterior Overview
3Overview
Page 41 of 281
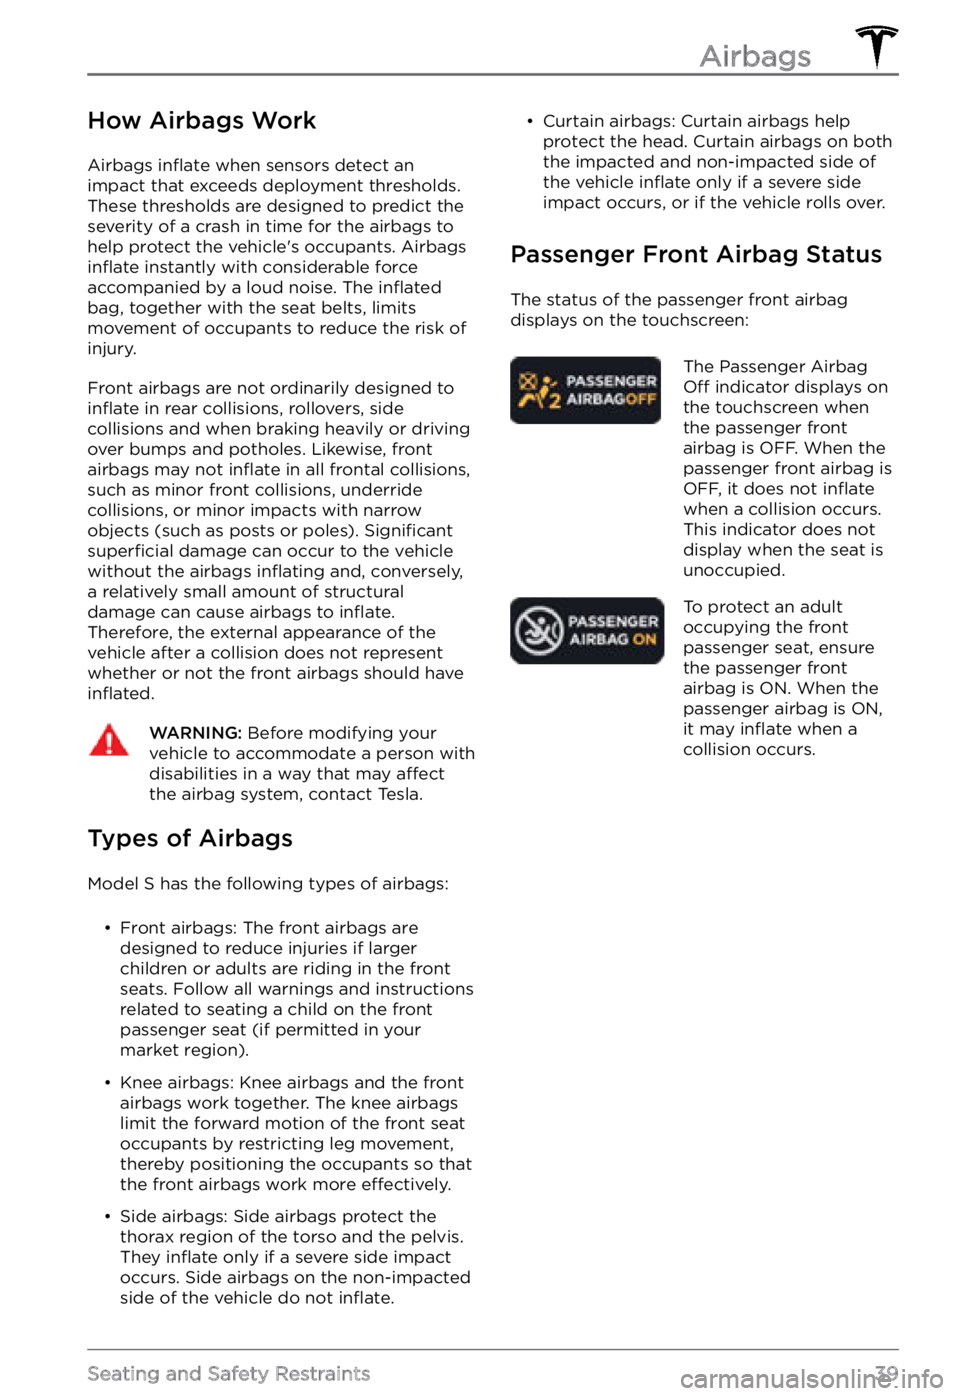
How Airbags Work
Airbags inflate when sensors detect an
impact that exceeds deployment thresholds. These thresholds are designed to predict the
severity of a crash in time for the airbags to help protect the vehicle
Page 42 of 281
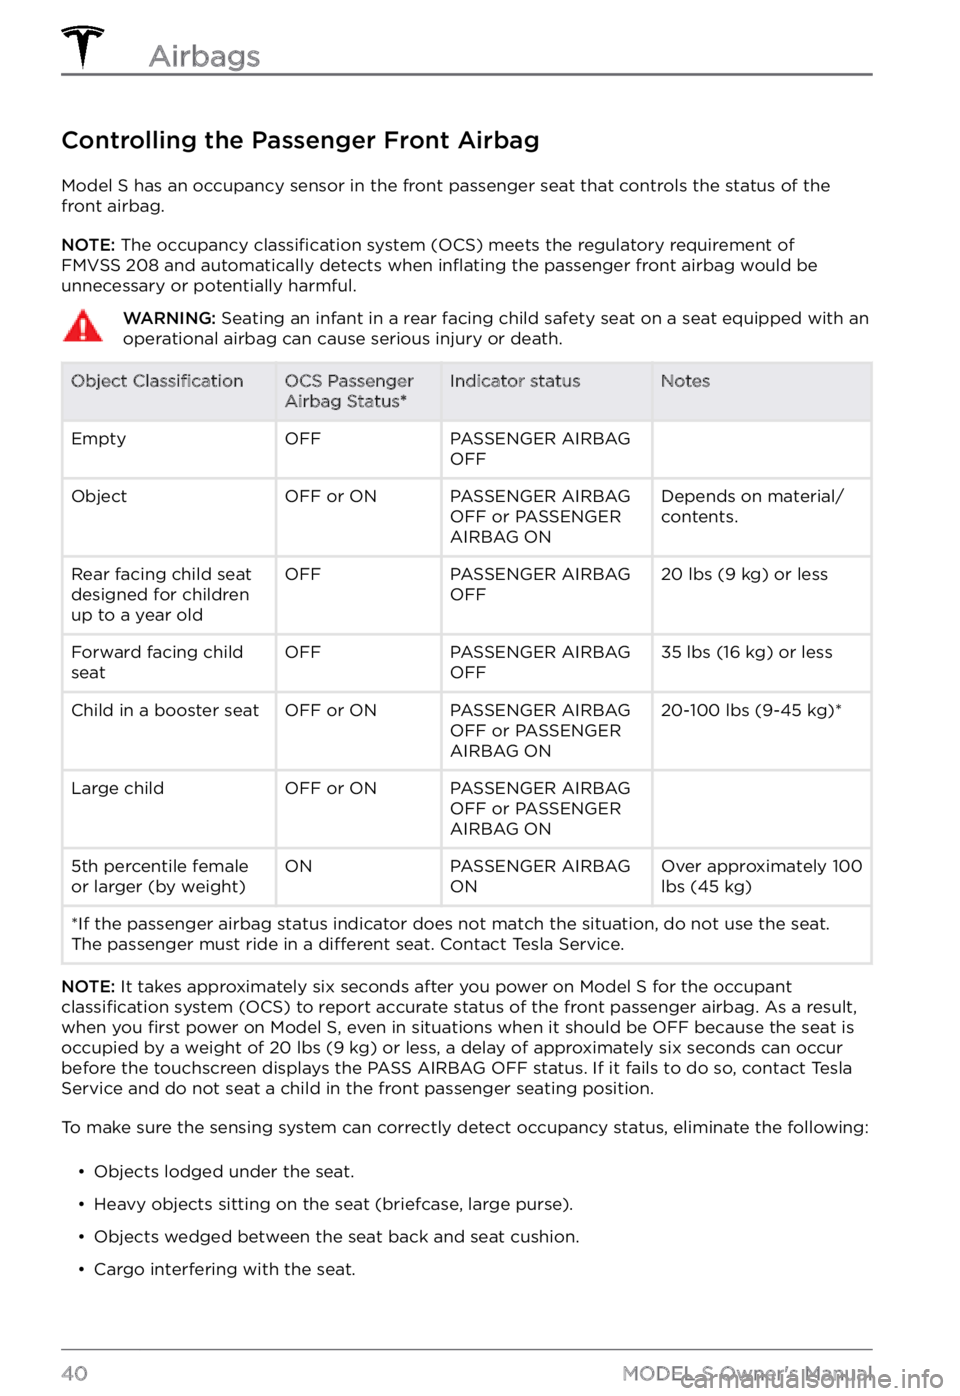
Controlling the Passenger Front Airbag
Model S has an occupancy sensor in the front passenger seat that controls the status of the
front airbag.
NOTE: The occupancy classification system (OCS) meets the regulatory requirement of
FMVSS 208 and automatically detects when inflating the passenger front airbag would be
unnecessary or potentially harmful.
WARNING: Seating an infant in a rear facing child safety seat on a seat equipped with an operational airbag can cause serious injury or death.Object ClassificationOCS Passenger
Airbag Status*Indicator statusNotesEmptyOFFPASSENGER AIRBAG
OFF ObjectOFF or ONPASSENGER AIRBAG
OFF or PASSENGER
AIRBAG ONDepends on material/
contents.Rear facing child seat
designed for children
up to a year oldOFFPASSENGER AIRBAG
OFF20 lbs (9 kg) or lessForward facing child
seatOFFPASSENGER AIRBAG
OFF35 lbs (16 kg) or lessChild in a booster seatOFF or ONPASSENGER AIRBAG
OFF or PASSENGER
AIRBAG ON20-100 lbs (9-45 kg)*Large childOFF or ONPASSENGER AIRBAG
OFF or PASSENGER
AIRBAG ON 5th percentile female
or larger (by weight)ONPASSENGER AIRBAG
ONOver approximately 100 lbs (45 kg)*If the passenger airbag status indicator does not match the situation, do not use the seat. The passenger must ride in a different seat. Contact Tesla Service.
NOTE: It takes approximately six seconds after you power on Model S for the occupant classification system (OCS) to report accurate status of the front passenger airbag. As a result,
when you first power on Model S, even in situations when it should be OFF because the seat is
occupied by a weight of 20 lbs (9 kg) or less, a delay of approximately six seconds can occur
before the touchscreen displays the PASS AIRBAG OFF status. If it fails to do so, contact Tesla
Service and do not seat a child in the front passenger seating position.
To make sure the sensing system can correctly detect occupancy status, eliminate the following:
Page 55 of 281
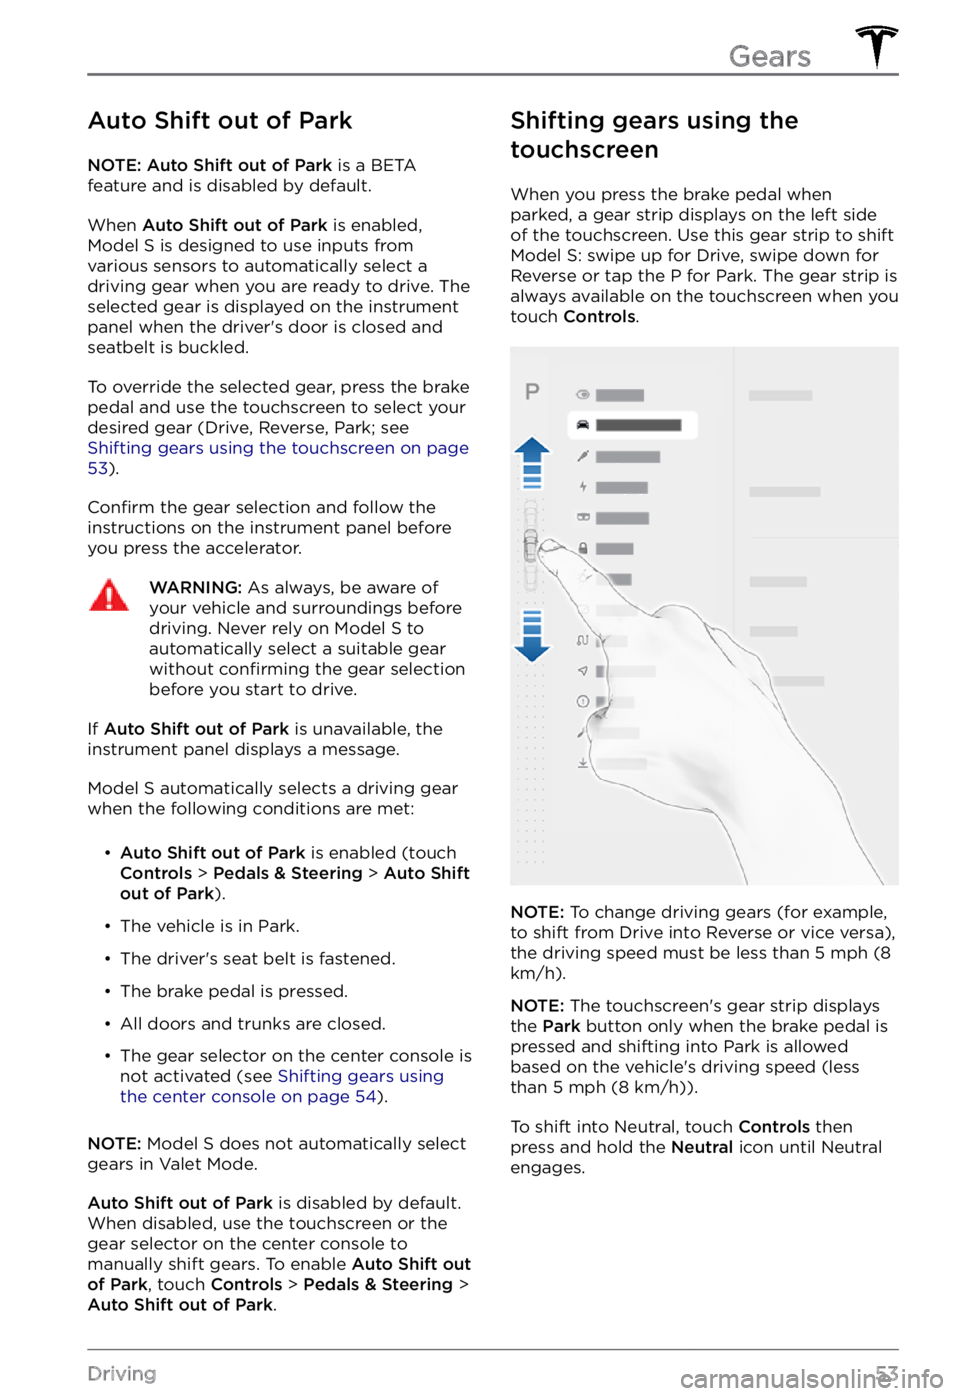
Auto Shift out of Park
NOTE: Auto Shift out of Park is a BETA
feature and is disabled by default.
When Auto Shift out of Park is enabled, Model S is designed to use inputs from
various sensors to automatically select a driving gear when you are ready to drive. The
selected gear is displayed on the instrument
panel when the driver
Page 72 of 281
How Park Assist Works
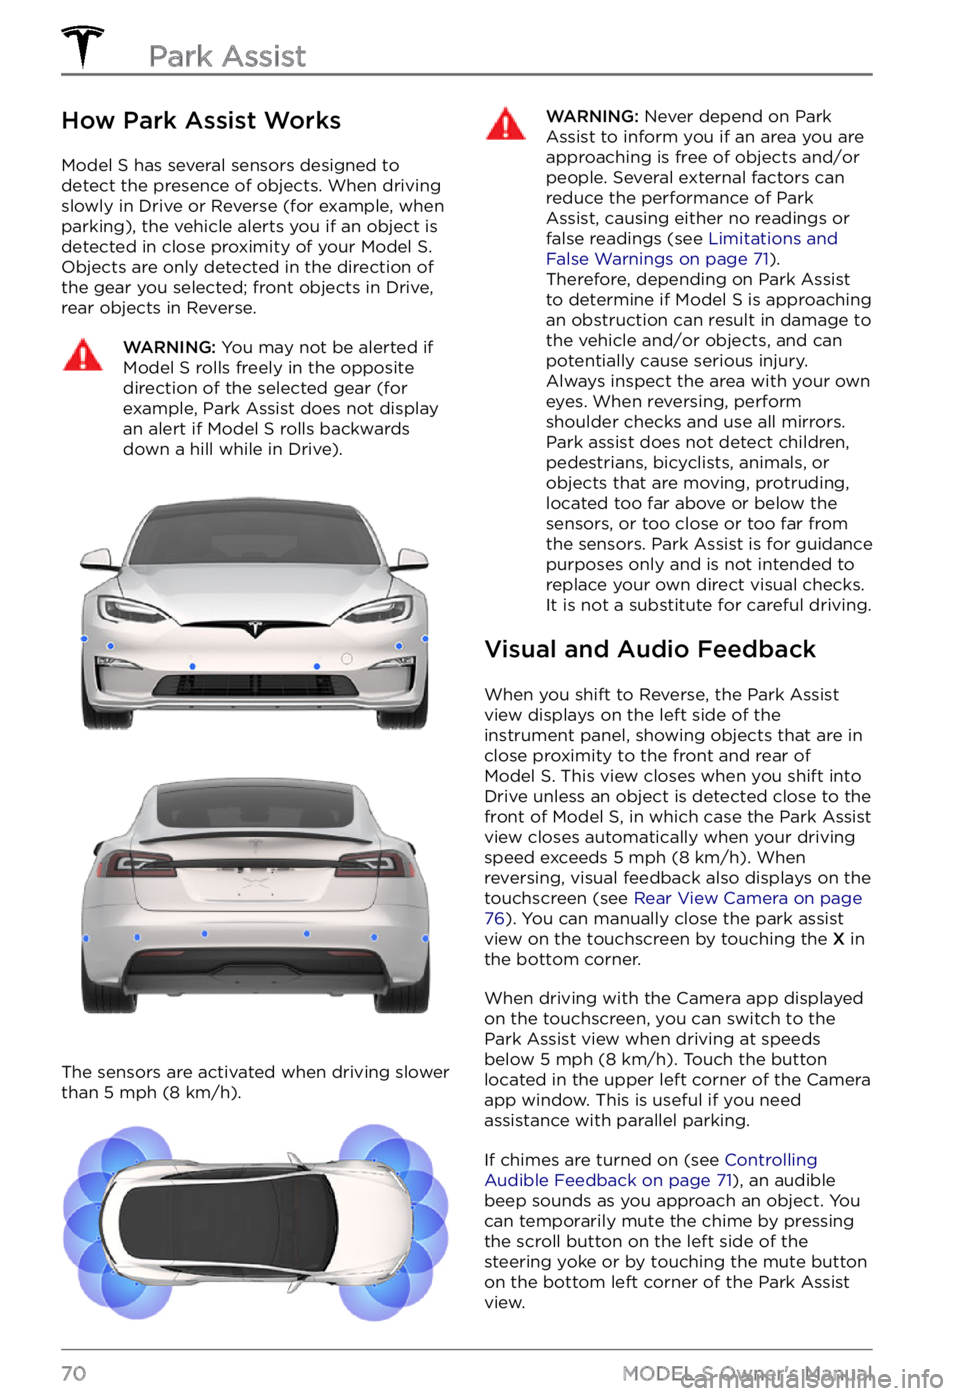
Model S has several sensors designed to
detect the presence of objects. When driving slowly in Drive or Reverse (for example, when
parking), the vehicle alerts you if an object is
detected in close proximity of your
Model S.
Objects are only detected in the direction of
the gear you selected; front objects in Drive,
rear objects in Reverse.
WARNING: You may not be alerted if Model S rolls freely in the opposite direction of the selected gear (for example, Park Assist does not display an alert if Model S rolls backwards down a hill while in Drive).
The sensors are activated when driving slower
than 5 mph (8 km/h).
WARNING: Never depend on Park Assist to inform you if an area you are approaching is free of objects and/or people. Several external factors can reduce the performance of Park Assist, causing either no readings or false readings (see Limitations and False Warnings on page 71). Therefore, depending on Park Assist to determine if Model S is approaching an obstruction can result in damage to the vehicle and/or objects, and can potentially cause serious injury. Always inspect the area with your own eyes. When reversing, perform shoulder checks and use all mirrors. Park assist does not detect children, pedestrians, bicyclists, animals, or objects that are moving, protruding, located too far above or below the sensors, or too close or too far from the sensors. Park Assist is for guidance purposes only and is not intended to replace your own direct visual checks. It is not a substitute for careful driving.
Visual and Audio Feedback
When you shift to Reverse, the Park Assist
view displays on the left side of the instrument panel, showing objects that are in
close proximity to the front and rear of
Model S. This view closes when you shift into
Drive unless an object is detected close to the
front of
Model S, in which case the Park Assist
view closes automatically when your driving
speed exceeds
5 mph (8 km/h). When
reversing, visual feedback also displays on the
touchscreen (see
Rear View Camera on page 76). You can manually close the park assist
view on the touchscreen by touching the X in
the bottom corner.
When driving with the Camera app displayed
on the touchscreen, you can switch to the
Park Assist view when driving at speeds
below
5 mph (8 km/h). Touch the button
located in the upper left corner of the Camera
app window. This is useful if you need
assistance with parallel parking.
If chimes are turned on (see Controlling Audible Feedback on page 71), an audible
beep sounds as you approach an object. You
can temporarily mute the chime by pressing
the scroll button on the left side of the
steering yoke or by touching the mute button
on the bottom left corner of the Park Assist
view.
Park Assist
70MODEL S Owner
Page 73 of 281
NOTE: If a sensor is unable to provide
feedback, the instrument panel displays an
alert message.CAUTION: Keep sensors clean from dirt, debris, snow, and ice. Avoid using a high pressure power washer on the sensors and do not clean a sensor with a sharp or abrasive object that can scratch or damage its surface.
CAUTION: Do not install accessories or stickers on or near the parking sensors.
Controlling Audible Feedback
You can use Park Assist with or without
audible feedback. To turn chimes on or off,
touch Controls > Safety > Park Assist Chimes.
To mute the chimes temporarily, touch the
mute button in the corner of the Park Assist
view. The chimes are muted until you shift
into a
different gear or drive over 5 mph (8 km/h).
Limitations and False Warnings
The parking sensors may not function
correctly in these situations:
Page 78 of 281
Camera Location
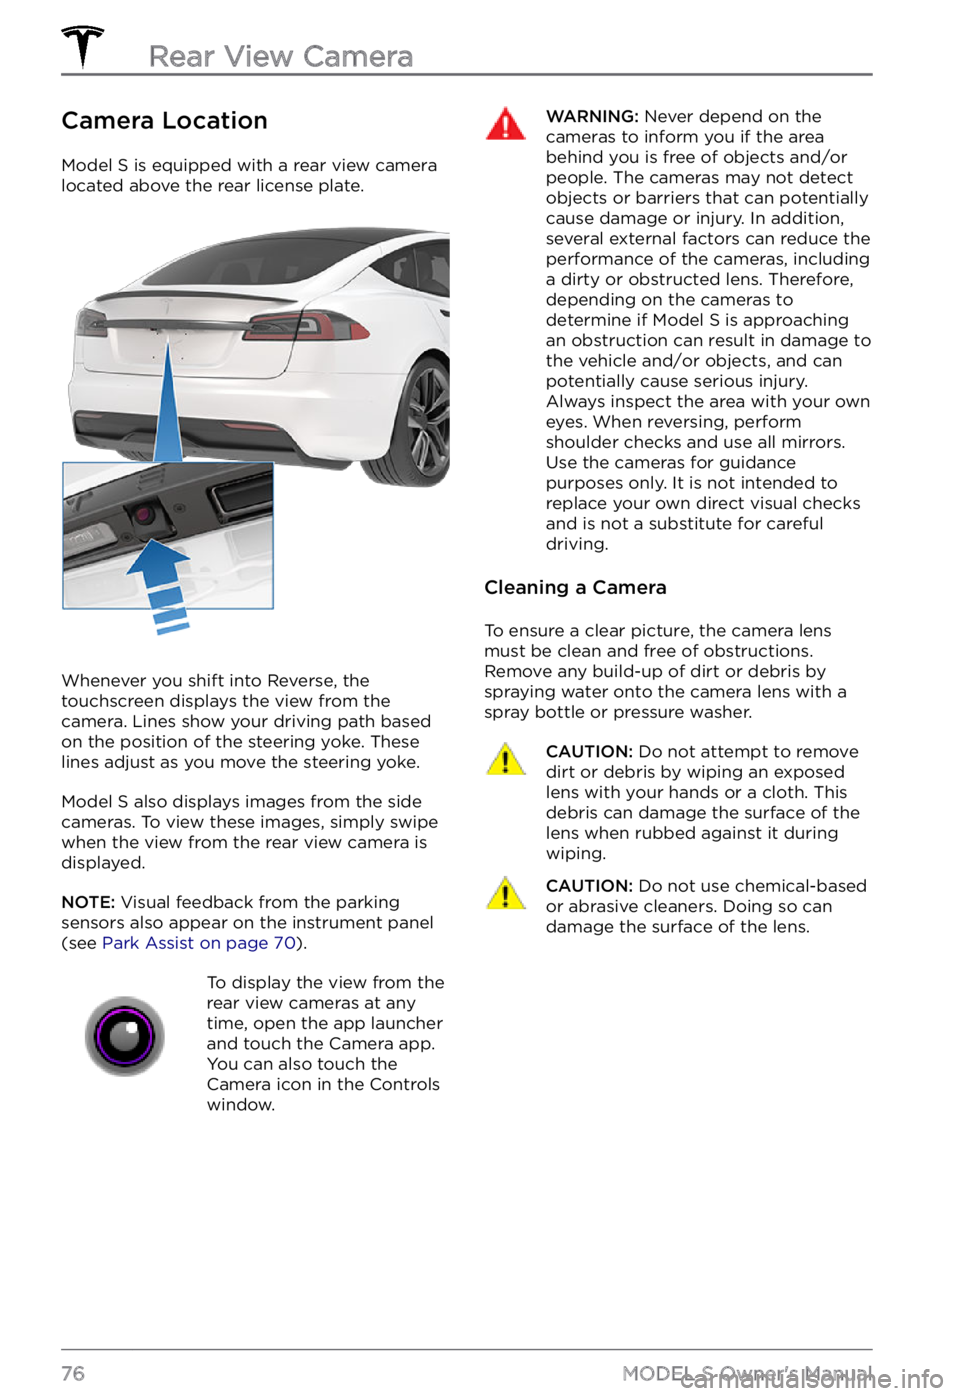
Model S is equipped with a rear view camera
located above the rear license plate.
Whenever you shift into Reverse, the
touchscreen displays the view from the
camera. Lines show your driving path based
on the position of the
steering yoke. These
lines adjust as you move the steering yoke.
Model S also displays images from the side
cameras. To view these images, simply swipe
when the view from the rear view camera is displayed.
NOTE: Visual feedback from the parking
sensors also appear on the instrument panel (see Park Assist on page 70).
To display the view from the
rear view cameras at any
time, open the app launcher
and touch the Camera app.
You can also touch the
Camera icon in the Controls
window.WARNING: Never depend on the cameras to inform you if the area behind you is free of objects and/or people. The cameras may not detect objects or barriers that can potentially cause damage or injury. In addition, several external factors can reduce the performance of the cameras, including a dirty or obstructed lens. Therefore, depending on the cameras to determine if Model S is approaching an obstruction can result in damage to the vehicle and/or objects, and can potentially cause serious injury. Always inspect the area with your own eyes. When reversing, perform shoulder checks and use all mirrors. Use the cameras for guidance purposes only. It is not intended to replace your own direct visual checks and is not a substitute for careful driving.
Cleaning a Camera
To ensure a clear picture, the camera lens
must be clean and free of obstructions.
Remove any build-up of dirt or debris by
spraying water onto the camera lens with a
spray bottle or pressure washer.
CAUTION: Do not attempt to remove dirt or debris by wiping an exposed lens with your hands or a cloth. This debris can damage the surface of the lens when rubbed against it during wiping.
CAUTION: Do not use chemical-based or abrasive cleaners. Doing so can damage the surface of the lens.Rear View Camera
76MODEL S Owner
Page 86 of 281
How It Works
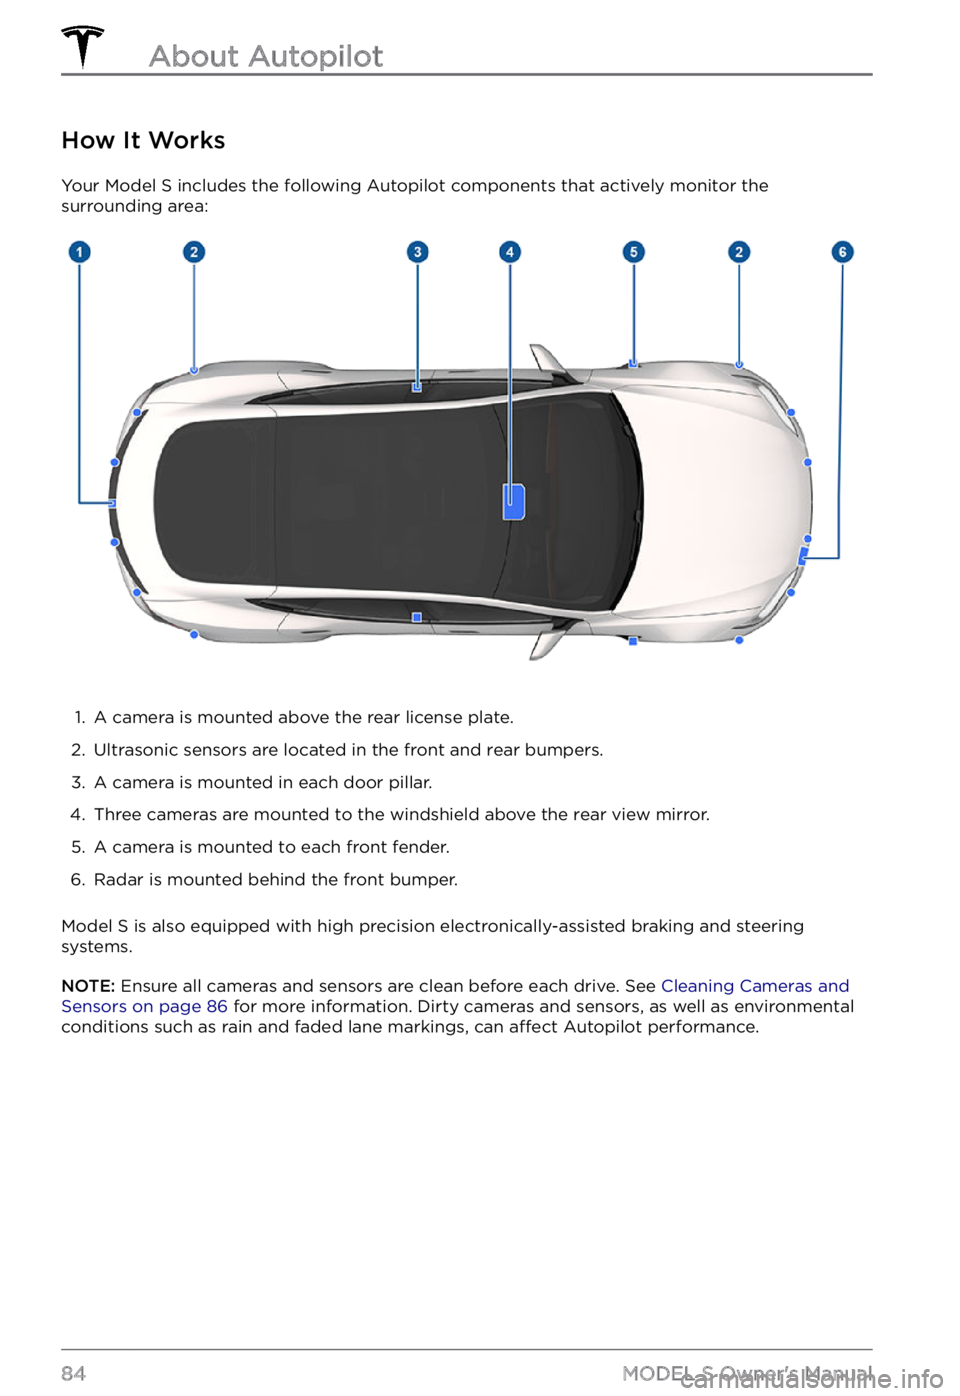
Your Model S includes the following Autopilot components that actively monitor the
surrounding area:
1.
A camera is mounted above the rear license plate.
2.
Ultrasonic sensors are located in the front and rear bumpers.
3.
A camera is mounted in each door pillar.
4.
Three cameras are mounted to the windshield above the rear view mirror.
5.
A camera is mounted to each front fender.
6.
Radar is mounted behind the front bumper.
Model S is also equipped with high precision electronically-assisted braking and steering
systems.
NOTE: Ensure all cameras and sensors are clean before each drive. See Cleaning Cameras and Sensors on page 86 for more information. Dirty cameras and sensors, as well as environmental
conditions such as rain and faded lane markings, can affect Autopilot performance.
About Autopilot
84MODEL S Owner
Page 95 of 281
NOTE: Depending on market region, vehicle configuration, options purchased, and software version, your vehicle may not be equipped with Autosteer, or the feature may not operate exactly as described.
NOTE: Autosteer is a BETA feature.
Autosteer builds upon Traffic-Aware Cruise
Control (see Traffic-Aware Cruise Control on page 87), intelligently keeping Model S in its
driving lane when cruising at a set speed.
Autosteer also allows you to use the turn signals to move Model S into an adjacent lane (see Auto Lane Change on page 95). Autosteer detects lane markings and the
presence of vehicles and objects to steer Model S.
NOTE: To display more details about the
roadway and its surroundings, such as road markings, stop lights, objects (such as trash cans and poles), etc., touch
Controls > Autopilot > Full Self-Driving Visualization Preview (if equipped).
CAUTION: Ensure all cameras and sensors are clean. Dirty cameras and sensors, as well as environmental conditions such as rain and faded lane markings, affect performance.
WARNING: Autosteer is a hands-on feature. You must keep your hands on the steering yoke at all times.
WARNING: Autosteer is intended for use on highways and limited-access roads with a fully attentive driver. When using Autosteer, hold the steering yoke and be mindful of road conditions and surrounding traffic. Do not use Autosteer on city streets, in construction zones, or in areas where bicyclists or pedestrians may be present. Never depend on Autosteer to determine an appropriate driving path. Always be prepared to take immediate action. Failure to follow these instructions could cause damage, serious injury or death.
Operating Autosteer
Before you can operate Autosteer, you must
enable it by touching Controls > Autopilot > Autosteer (Beta).
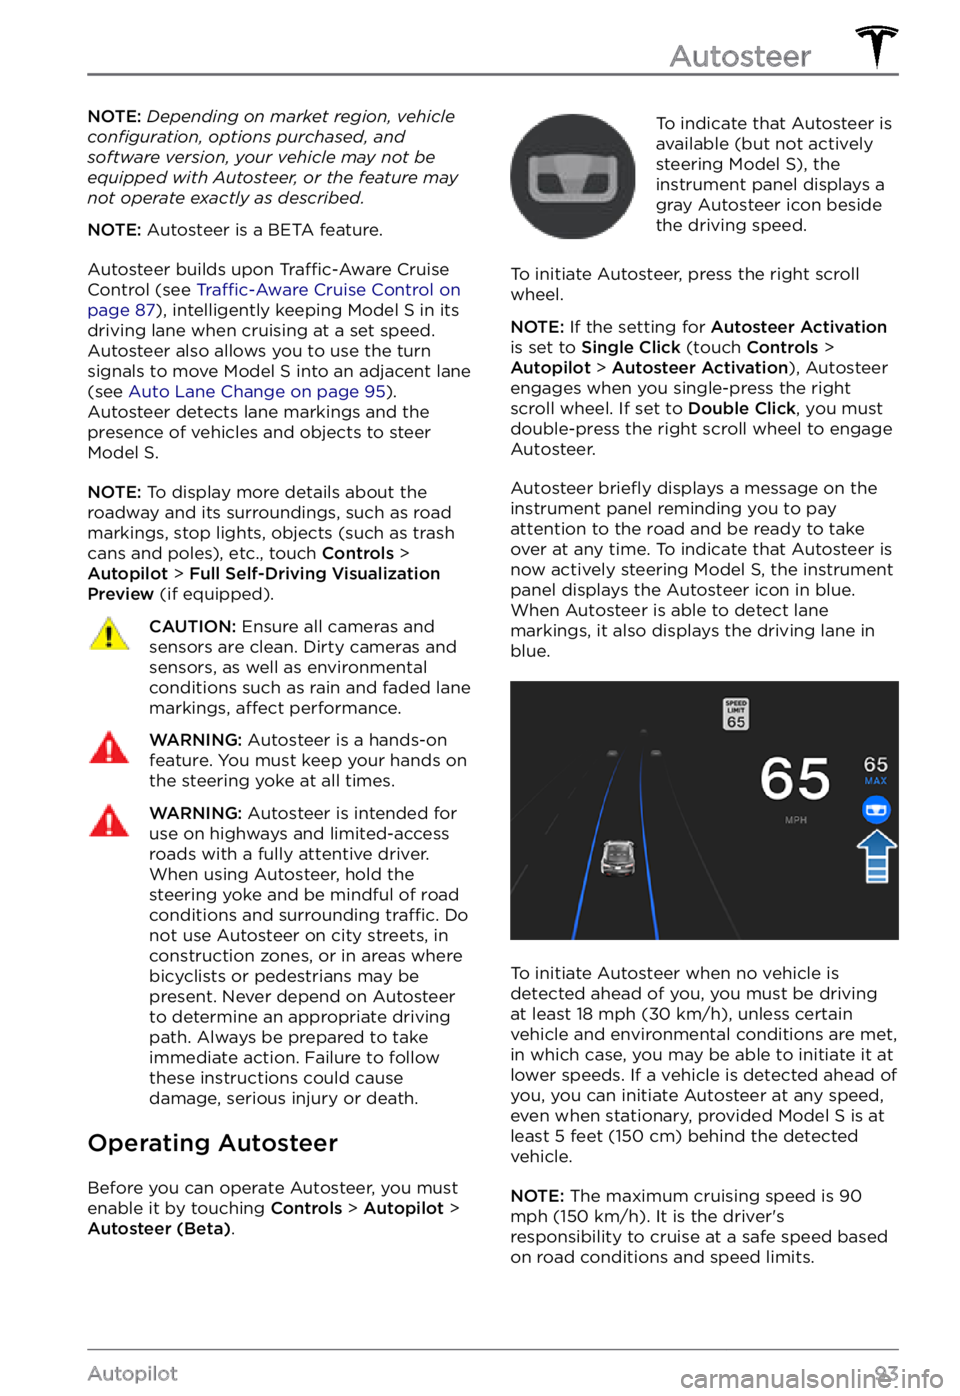
To indicate that Autosteer is
available (but not actively
steering
Model S), the instrument panel displays a
gray Autosteer icon beside the driving speed.
To initiate Autosteer, press the right scroll wheel.
NOTE: If the setting for Autosteer Activation is set to Single Click (touch Controls > Autopilot > Autosteer Activation), Autosteer
engages when you single-press the right
scroll wheel. If set to
Double Click, you must
double-press the right scroll wheel to engage
Autosteer.
Autosteer briefly displays a message on the instrument panel reminding you to pay
attention to the road and be ready to take over at any time. To indicate that Autosteer is
now actively steering Model S, the instrument panel displays the Autosteer icon in blue.
When Autosteer is able to detect lane markings, it also displays the driving lane in blue.
To initiate Autosteer when no vehicle is
detected ahead of you, you must be driving
at least
18 mph (30 km/h), unless certain
vehicle and environmental conditions are met,
in which case, you may be able to initiate it at
lower speeds. If a vehicle is detected ahead of you, you can initiate Autosteer at any speed,
even when stationary, provided
Model S is at
least 5 feet (150 cm) behind the detected
vehicle.
NOTE: The maximum cruising speed is 90 mph (150 km/h). It is the driver
Page 96 of 281

The instrument panel displays a message
indicating that Autosteer is temporarily
unavailable if you attempted to engage
Autosteer when driving at a speed that is not
within the speed required for Autosteer to
operate. Autosteer may also be unavailable if it is not receiving adequate data from the
camera(s) or sensors.
If Autosteer is unable to detect lane markings,
the driving lane is determined based on the
vehicle you are following.
In most cases, Autosteer attempts to center Model S in the driving lane. However, if an
obstacle (such as a vehicle or guard rail) is detected, Autosteer may steer
Model S in a
driving path that is offset from the center of
the lane.
WARNING: Autosteer is not designed to, and will not, steer Model S around objects partially or completely in the driving lane. Always watch the road in front of you and stay prepared to take immediate action. It is the driver