TESLA MODEL X 2017 Owner's Manual (UK)
MODEL X 2017
TESLA
TESLA
https://www.carmanualsonline.info/img/26/9279/w960_9279-0.png
TESLA MODEL X 2017 Owner's Manual (UK)
Trending: winter tires, CD player, mirror controls, ad blue, oil type, run flat, gas mileage
Page 141 of 202
Loading New Software
Model X updates its software wirelessly,
providing new features throughout your term of ownership. Tesla recommends that you
install software update as soon as they are
available. The
first time you enter Model X
after an update is made available, a scheduling
window displays on the touchscreen. The
scheduling window displays again at the end
of your
first driving session.
Note: Some software updates can take from
two to three hours to complete. Model X must be in P (Park) when the new software is being
installed. To ensure the fastest and most
reliable delivery of software updates, leave the
Wi-Fi turned on and connected whenever
possible (see Connecting to Wi-Fi on page
139).
When a software update is available, a yellow
clock icon appears on the touchscreen
Page 142 of 202
Model X Mobile App
The Tesla Model X mobile app allows you to
communicate with Model X remotely using
your iPhone
Page 143 of 202
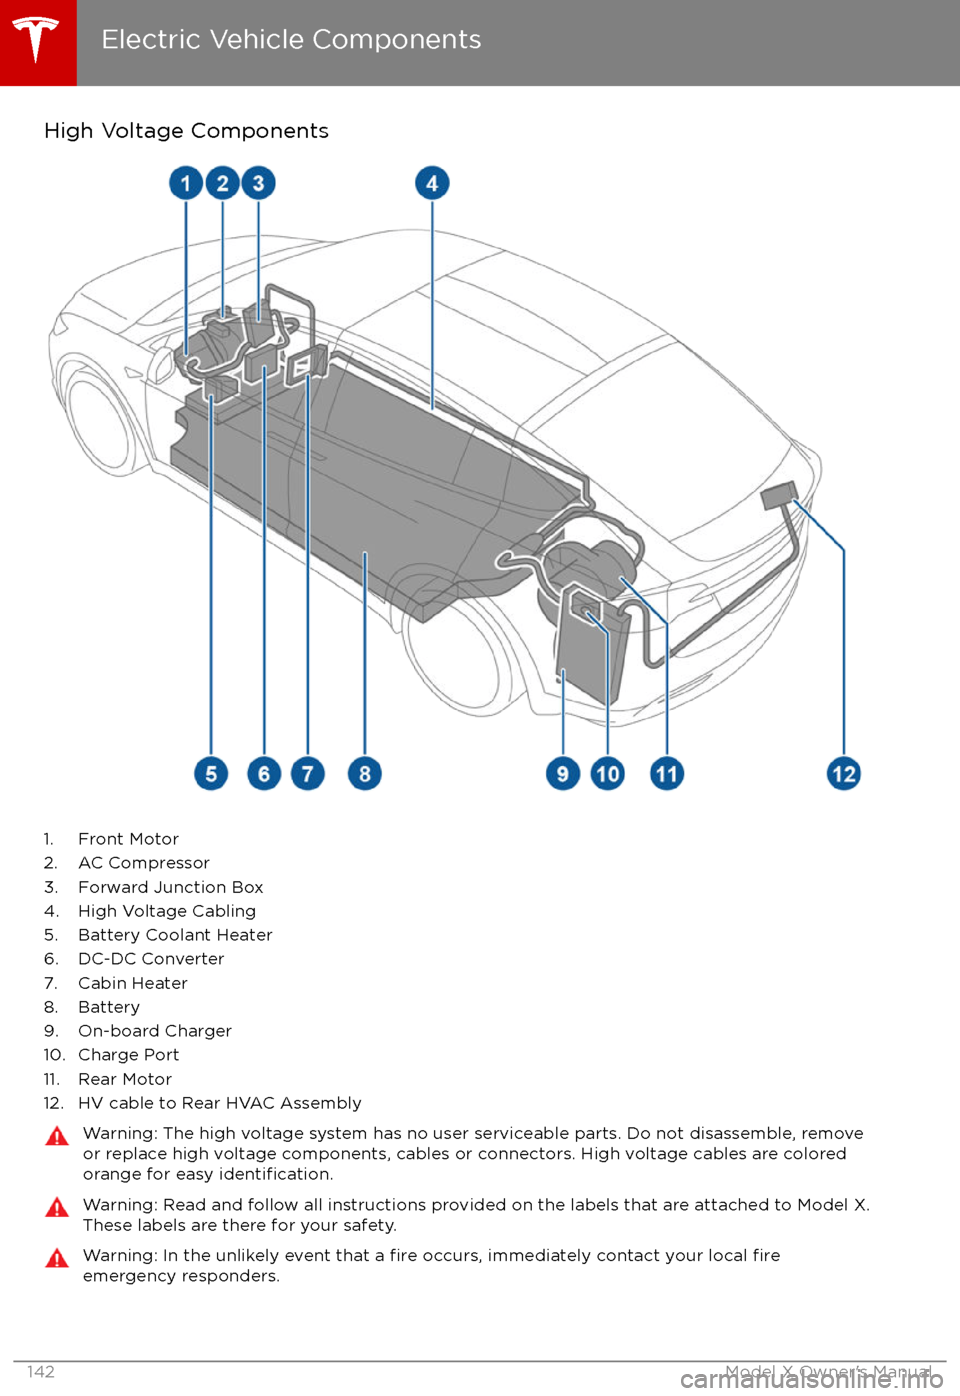
High Voltage Components
1. Front Motor
2. AC Compressor
3. Forward Junction Box
4. High Voltage Cabling
5. Battery Coolant Heater
6. DC-DC Converter
7. Cabin Heater
8. Battery
9. On-board Charger
10. Charge Port
11. Rear Motor
12. HV cable to Rear HVAC Assembly
Warning: The high voltage system has no user serviceable parts. Do not disassemble, remove or replace high voltage components, cables or connectors. High voltage cables are coloredorange for easy
identification.
Warning: Read and follow all instructions provided on the labels that are attached to Model X.
These labels are there for your safety.Warning: In the unlikely event that a fire occurs, immediately contact your local fireemergency responders.
Electric Vehicle Components
142Model X Owner
Page 144 of 202
Charging Equipment
Charging equipment designed
specifically to
charge your Model X is available from Tesla. A
Tesla Wall Connector, which installs in your
garage, is the fastest way to charge Model X
at home.
In several market regions, Model X is equipped
with a Mobile Connector and the adapter(s)
you need to plug into commonly used power
outlets. When using the Mobile Connector,
first plug the Mobile Connector into the power
outlet, then plug in Model X. For more
information about your Mobile Connector, see
the Mobile Connector Owner
Page 145 of 202
About the Battery
Model X has one of the most sophisticated
battery systems in the world. The most
important way to preserve the Battery is to LEAVE YOUR Model X PLUGGED IN when you
are not using it. This is particularly important if you are not planning to drive Model X for
several weeks. When plugged in, Model X wakes up when needed to automatically
maintain a charge level that maximizes the
lifetime of the Battery.
There is no advantage to waiting until the
Battery
Page 146 of 202
Opening the Charge PortThe charge port is located on the driver
Page 147 of 202
During ChargingDuring charging, the charge port pulses green and charging status displays on the instrument
panel. The frequency at which the charge port
Page 148 of 202
Page 149 of 202

Changing Charge SettingsThe charge settings screen displays on the touchscreen whenever the charge port door is open.
To display charge settings at any time, touch the Battery icon on the top of the touchscreen, or touch Controls > Charging (located in the upper right portion of the Controls screen).
Note: The following illustration is provided for demonstration purposes only and may vary slightly
depending on the software version and market region of your Model X.
1. Charge status messages (such as Charging Scheduled, Charging In Progress) display here.
2. To adjust the charge limit, touch Set Charge Limit, then touch the arrows to move the charge limit setting in 10% increments for daily driving, and 2% increments for trips. The setting youchoose applies to both immediate and scheduled charging sessions.
3.
Location-specific schedule. With Model X in Park, set a specific time when you want Model X
to begin charging at the current location. If, at the scheduled time, Model X is not plugged in
at the location, it will start charging as soon as you plug it in as long as you are plugging it in
within six hours of the scheduled time. If you plug in after six hours, Model X does not start charging until the scheduled time on the next day. To override this setting, touch Start
Charging or Stop Charging (see item 4). When you set a scheduled charging time, Model X displays the set time on the instrument panel and the touchscreen.
4. Touch to open the charge port door or to start (or stop) charging.
5. The current automatically sets to the maximum current available from the attached charge cable, unless it was previously reduced to a lower level.
For 3-phase charging, the available current represents the current per phase (up to 32 amps).
During charging, the right status
flag displays the 3-phase symbol in front of the displayed
current.
If needed, touch the up/down arrows to change the current (for example, you may want to
reduce the current if you are concerned about overloading a domestic wiring circuit shared by other equipment). It is not possible to set the charging current to a level that exceeds themaximum available from the attached charge cable.
When you change the current, Model X remembers the location. So if you subsequently charge at the same location, you do not need to change it again.
Note: If Model X automatically reduced a charging location
Page 150 of 202

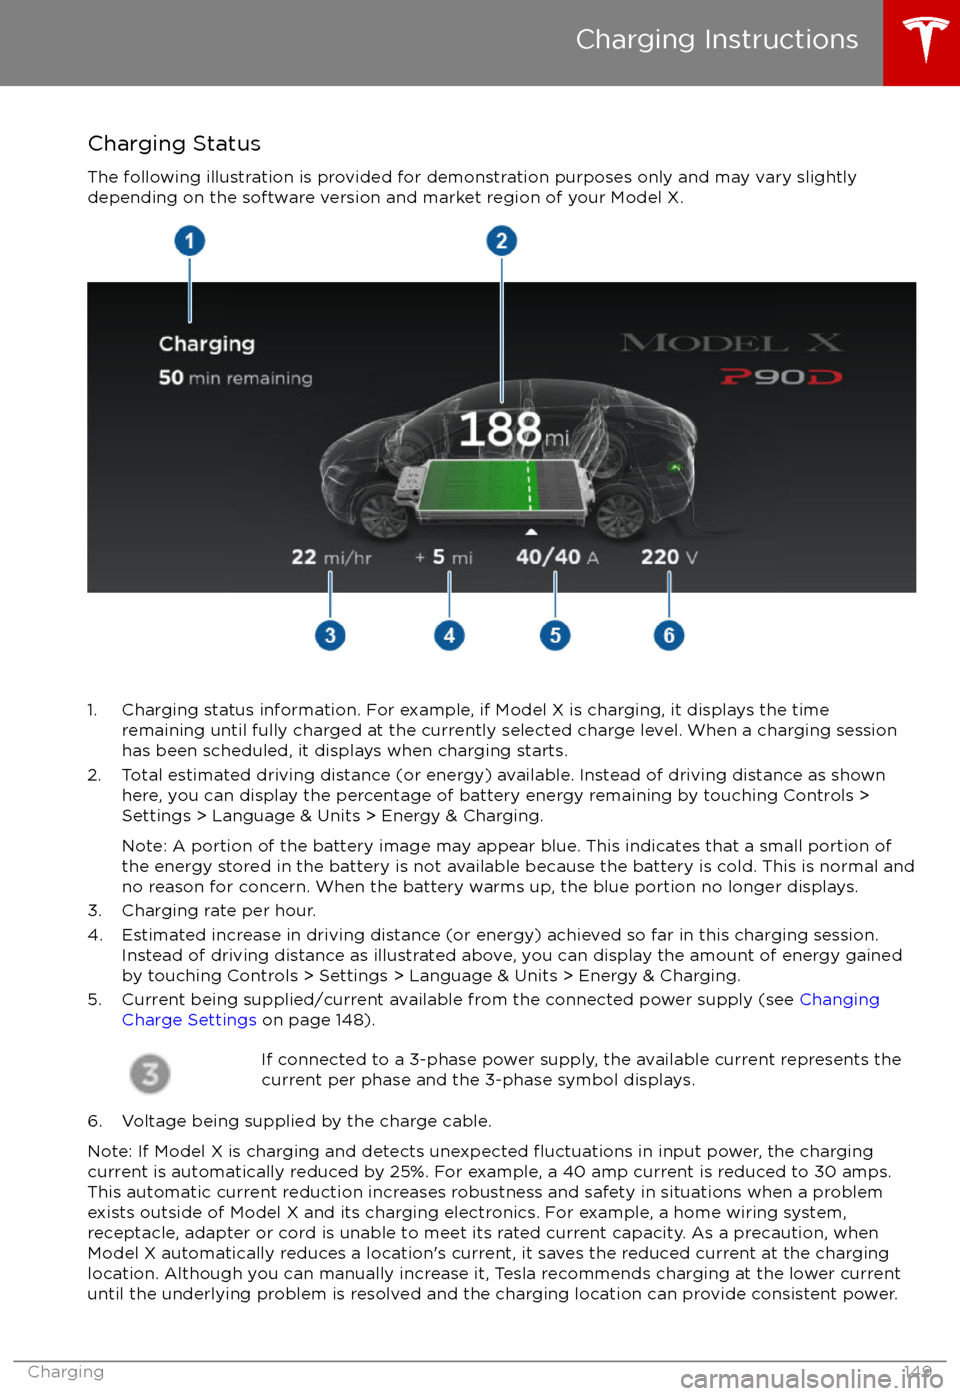
Charging Status
The following illustration is provided for demonstration purposes only and may vary slightly
depending on the software version and market region of your Model X.
1. Charging status information. For example, if Model X is charging, it displays the time remaining until fully charged at the currently selected charge level. When a charging session
has been scheduled, it displays when charging starts.
2. Total estimated driving distance (or energy) available. Instead of driving distance as shown here, you can display the percentage of battery energy remaining by touching Controls >
Settings > Language & Units > Energy & Charging.
Note: A portion of the battery image may appear blue. This indicates that a small portion of
the energy stored in the battery is not available because the battery is cold. This is normal and
no reason for concern. When the battery warms up, the blue portion no longer displays.
3. Charging rate per hour.
4. Estimated increase in driving distance (or energy) achieved so far in this charging session. Instead of driving distance as illustrated above, you can display the amount of energy gained
by touching Controls > Settings > Language & Units > Energy & Charging.
5. Current being supplied/current available from the connected power supply (see Changing
Charge Settings on page 148).
If connected to a 3-phase power supply, the available current represents the
current per phase and the 3-phase symbol displays.
6. Voltage being supplied by the charge cable.
Note: If Model X is charging and detects unexpected
Trending: change time, turn signal, belt, open hood, fog light, lights, instrument panel


