TESLA MODEL X 2020 Owner's Manual
MODEL X 2020
TESLA
TESLA
https://www.carmanualsonline.info/img/26/9240/w960_9240-0.png
TESLA MODEL X 2020 Owner's Manual
Trending: steering wheel adjustment, high beam, steering wheel, Seat, service indicator, front, airbag disable
Page 101 of 247
Note: Always remove the ball mount before
installing or removing the hitch receiver from
the vehicle (see Attaching and Removing the
Ball Mount on page 102).Warning: You must use the Model X trailer
hitch when towing a trailer. Never attempt
to attach a different type of trailer hitch.
Note: Always attach safety chains when
towing. Cross the chains under the trailer
tongue and attach to the trailer eyelets to
ensure the security of the trailer load.
To install the trailer hitch receiver:
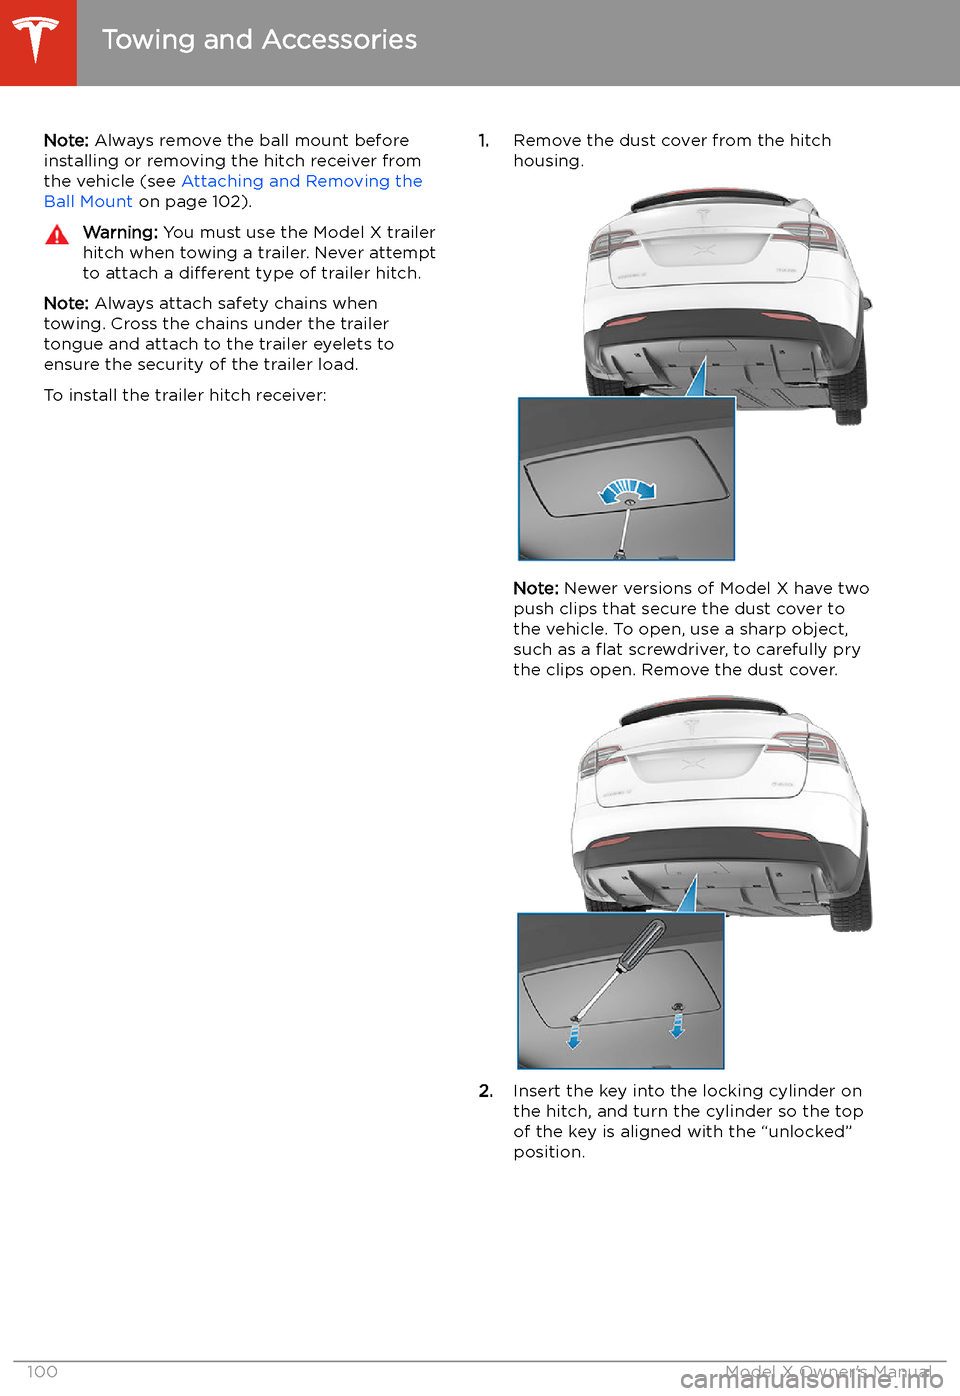
1. Remove the dust cover from the hitch
housing.
Note: Newer versions of Model X have two
push clips that secure the dust cover to
the vehicle. To open, use a sharp object,
such as a
Page 102 of 247
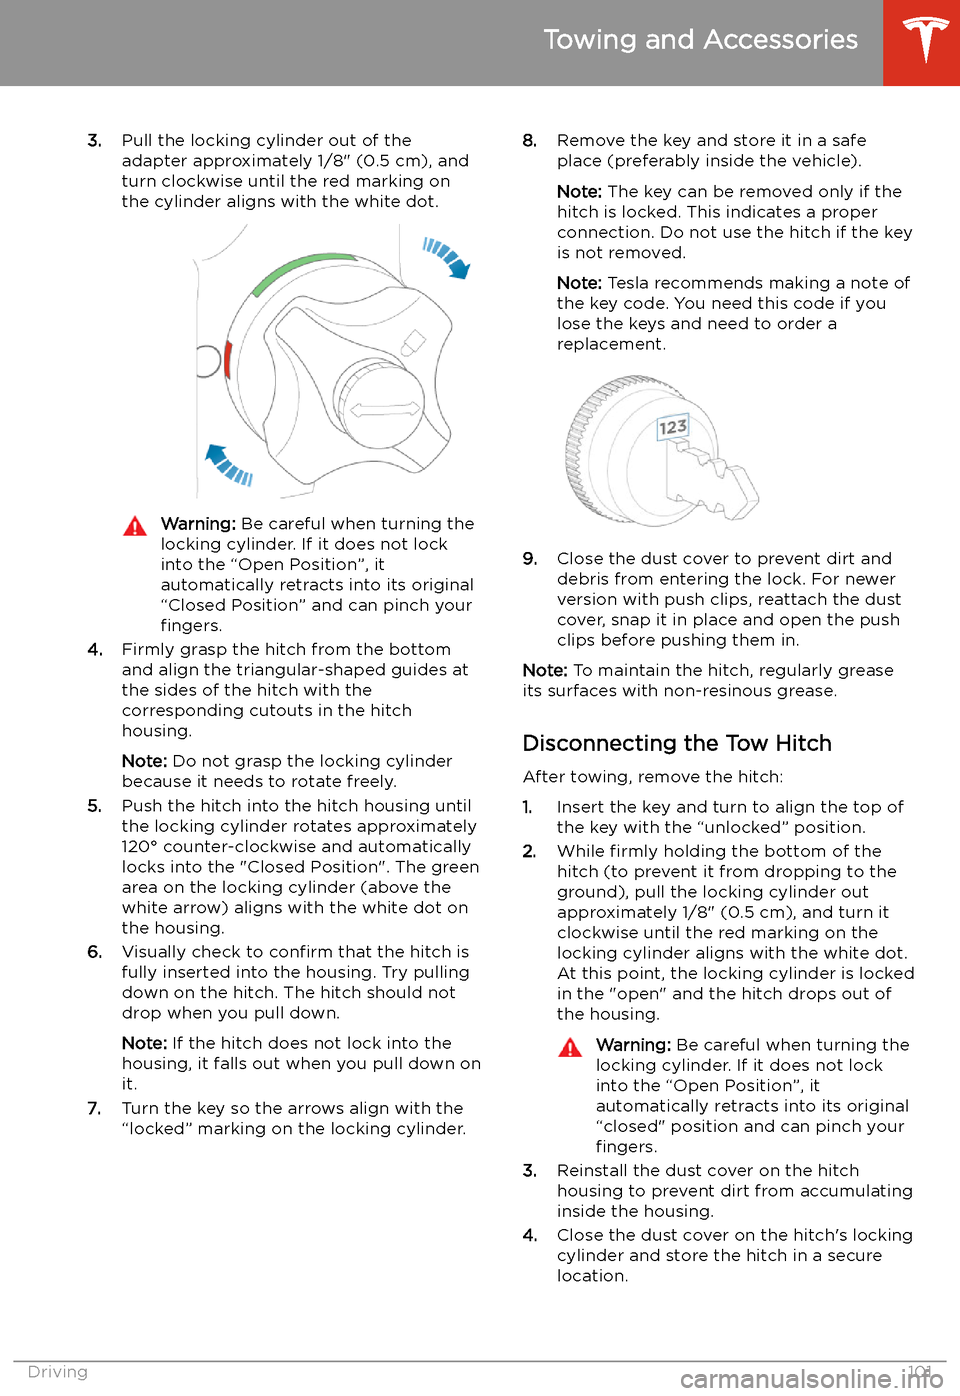
3.Pull the locking cylinder out of the
adapter approximately 1/8" (0.5 cm), and
turn clockwise until the red marking on
the cylinder aligns with the white dot.Warning: Be careful when turning the
locking cylinder. If it does not lock
into the “Open Position”, it
automatically retracts into its original
“Closed Position” and can pinch your fingers.
4. Firmly grasp the hitch from the bottom
and align the triangular-shaped guides at
the sides of the hitch with the
corresponding cutouts in the hitch
housing.
Note: Do not grasp the locking cylinder
because it needs to rotate freely.
5. Push the hitch into the hitch housing until
the locking cylinder rotates approximately
120
Page 103 of 247
Attaching and Removing the Ball
Mount
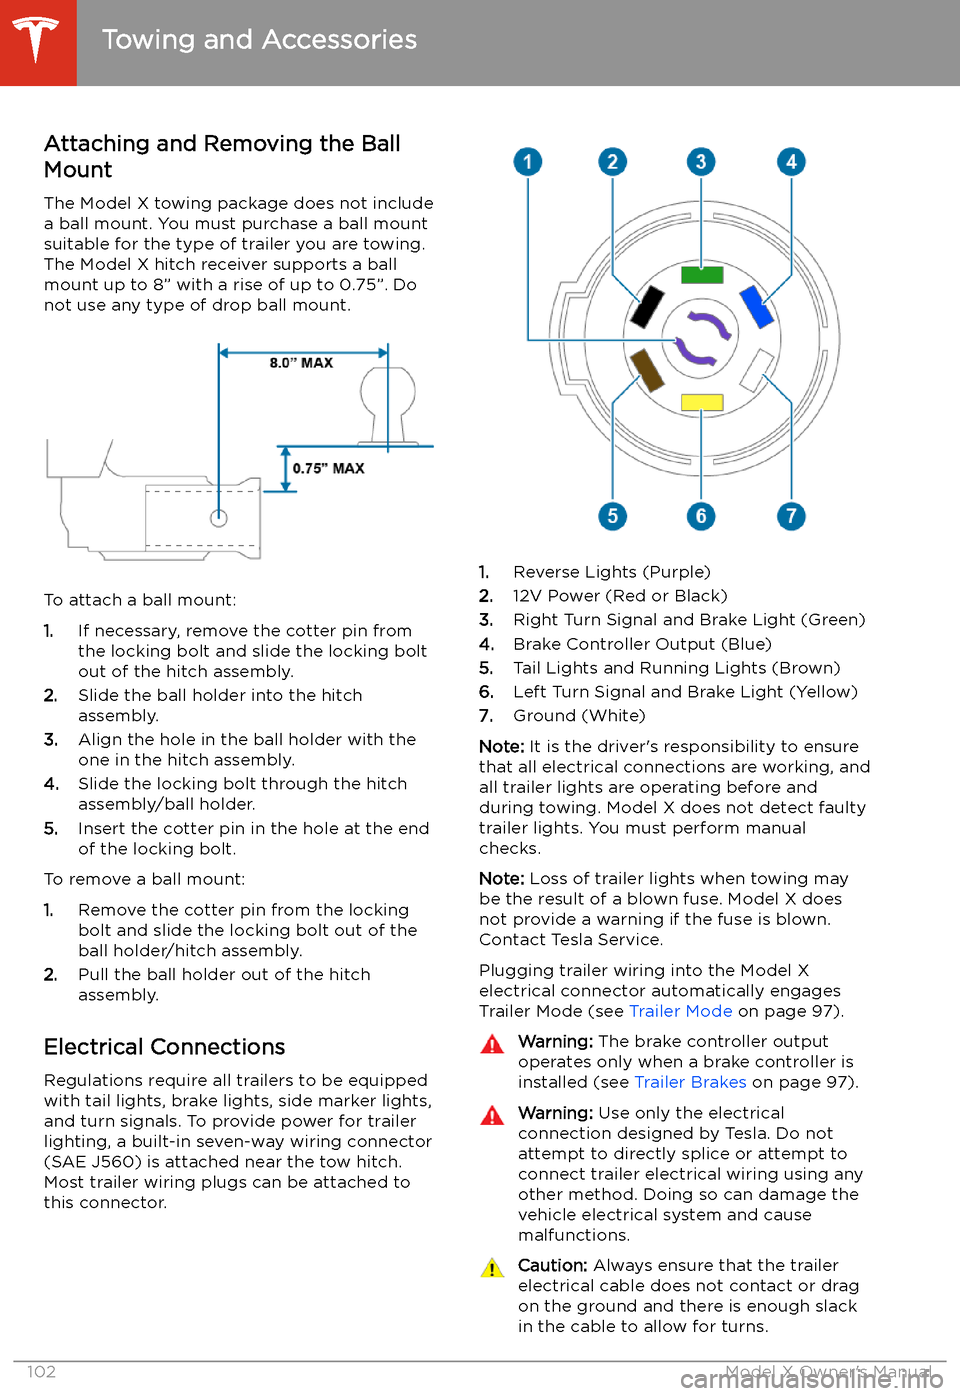
The Model X towing package does not include
a ball mount. You must purchase a ball mount
suitable for the type of trailer you are towing. The Model X hitch receiver supports a ballmount up to 8” with a rise of up to 0.75”. Do
not use any type of drop ball mount.
To attach a ball mount:
1. If necessary, remove the cotter pin from
the locking bolt and slide the locking bolt out of the hitch assembly.
2. Slide the ball holder into the hitch
assembly.
3. Align the hole in the ball holder with the
one in the hitch assembly.
4. Slide the locking bolt through the hitch
assembly/ball holder.
5. Insert the cotter pin in the hole at the end
of the locking bolt.
To remove a ball mount:
1. Remove the cotter pin from the locking
bolt and slide the locking bolt out of the
ball holder/hitch assembly.
2. Pull the ball holder out of the hitch
assembly.
Electrical Connections
Regulations require all trailers to be equipped
with tail lights, brake lights, side marker lights,
and turn signals. To provide power for trailer
lighting, a built-in seven-way wiring connector (SAE J560) is attached near the tow hitch.Most trailer wiring plugs can be attached tothis connector.
1. Reverse Lights (Purple)
2. 12V Power (Red or Black)
3. Right Turn Signal and Brake Light (Green)
4. Brake Controller Output (Blue)
5. Tail Lights and Running Lights (Brown)
6. Left Turn Signal and Brake Light (Yellow)
7. Ground (White)
Note: It is the driver
Page 104 of 247
Impact on RangeTowing a trailer and carrying accessories
increases vehicle weight and drag. As a result,
driving range can decrease significantly.
Although Trip Planner attempts to adjust
estimates based on Trailer Mode, actual
energy consumption may vary. Plan trip length
and charging destinations accordingly.
Towing and Accessories
Driving103
Page 105 of 247
The following best practices can help ensure
that you have the best ownership experience
possible in harsh cold weather conditions.
Before Driving Warm the cabin and Battery ahead of
departure for maximum range and
performance. There are several ways to
precondition your vehicle:
Page 106 of 247
Regenerative Braking
Regenerative braking may be limited if the Battery is too cold. As you continue to drive,
the Battery warms up and regenerative power
increases (see Regenerative Braking on page
77).
Note: Limited regenerative braking can be
avoided if you allow enough time to precondition your vehicle or use scheduleddeparture before your drive, as mentioned
previously.
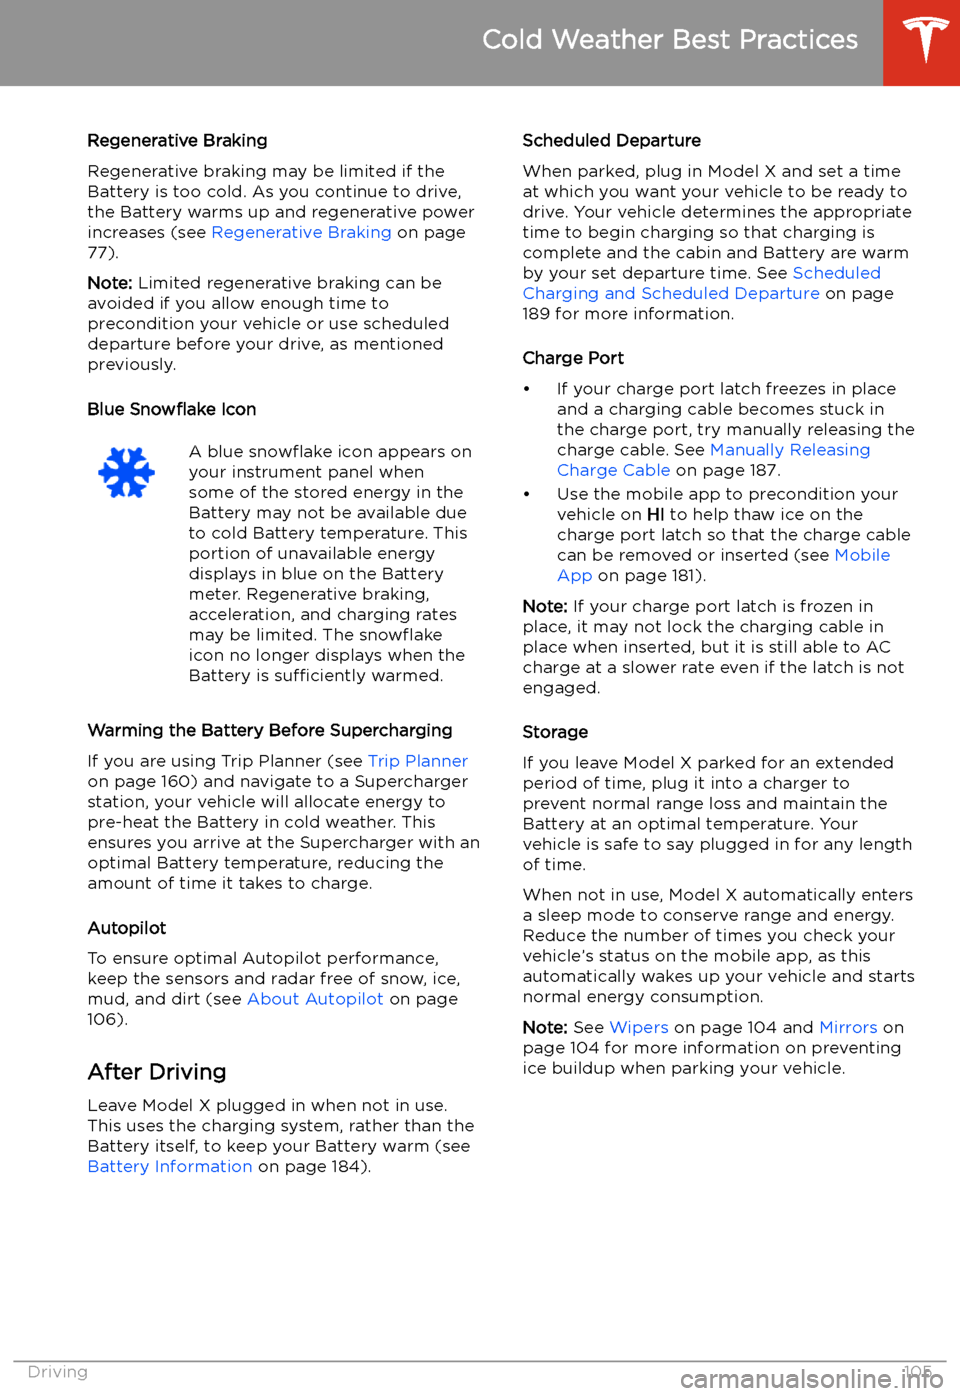
Blue Snow
Page 107 of 247
Autopilot
About Autopilot
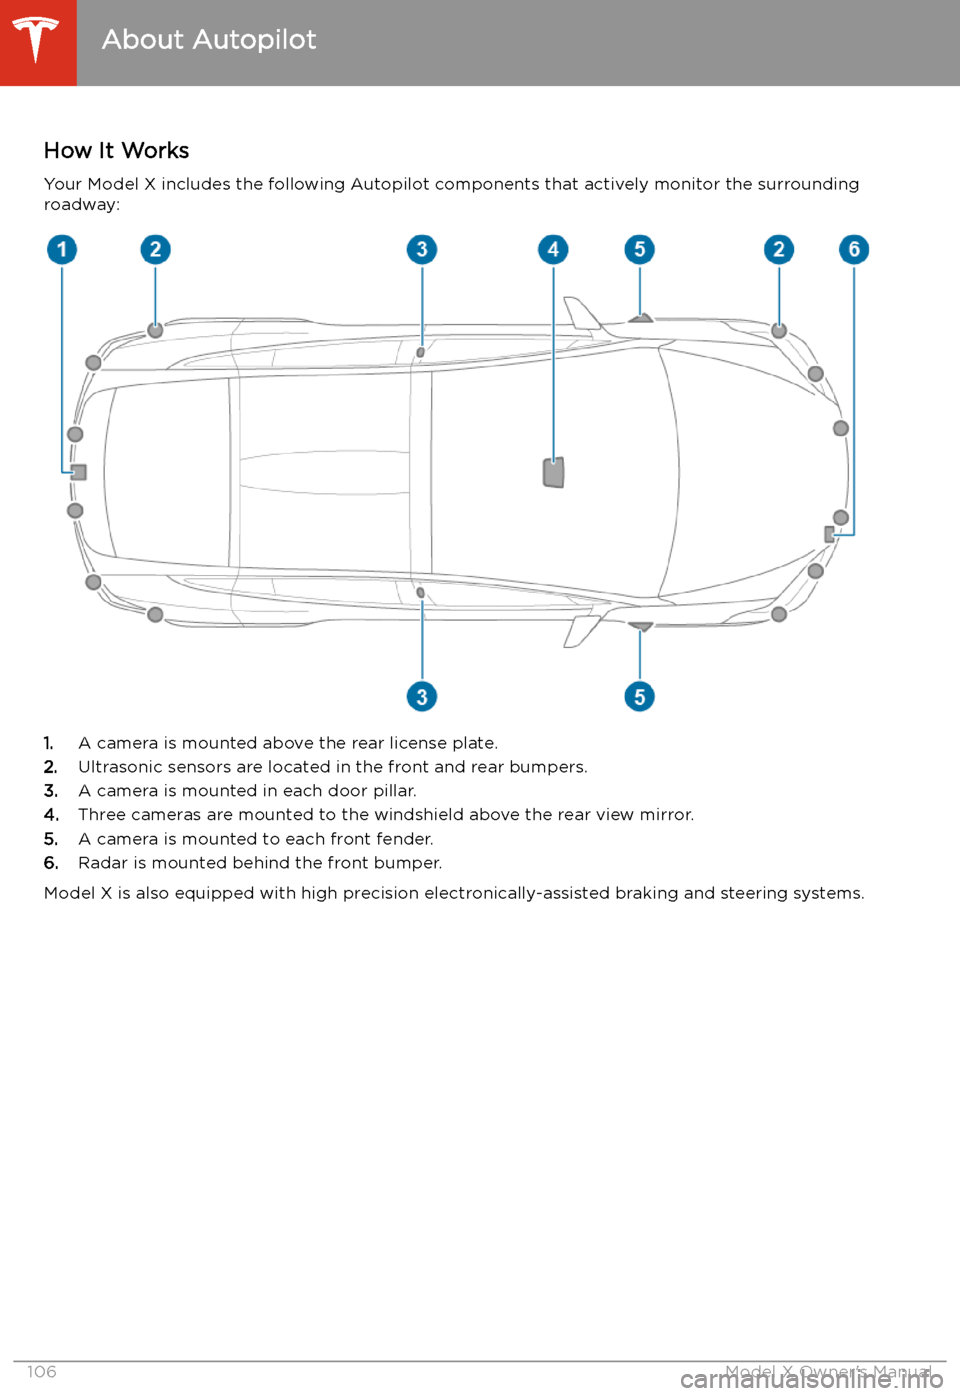
How It Works Your Model X includes the following Autopilot components that actively monitor the surrounding
roadway:
1. A camera is mounted above the rear license plate.
2. Ultrasonic sensors are located in the front and rear bumpers.
3. A camera is mounted in each door pillar.
4. Three cameras are mounted to the windshield above the rear view mirror.
5. A camera is mounted to each front fender.
6. Radar is mounted behind the front bumper.
Model X is also equipped with high precision electronically-assisted braking and steering systems.
About Autopilot
106Model X Owner
Page 108 of 247
Features
These safety features are available on all
Model X vehicles:
Page 109 of 247
This will ensure appropriate handling and
mounting of the camera(s). Failure to do
so can cause one or more Autopilot
features to malfunction.
Cleaning Cameras and Sensors
To ensure the various Autopilot components
can provide information that is as accurate as
possible, keep them clean and free of
obstructions or damage. Occasionally remove
any buildup of dirt by wiping the components
with a soft cloth dampened with warm water.
Caution: Do not use chemical-based or
abrasive cleaners. Doing so can damage
surfaces.Caution: Avoid using a high-pressure
power washer.Caution: Do not clean an ultrasonic sensor
or camera lens with a sharp or abrasive
object that can scratch or damage its
surface.
About Autopilot
108Model X Owner
Page 110 of 247
Traffic-Aware
Cruise Control
Note: Traffic-Aware Cruise Control is a BETA
feature.
Note: If your vehicle is not equipped with an
optional Autopilot package, refer to the owner
Trending: climate control, coolant, steering wheel adjustment, language, check oil, fog lights, bluetooth
