set TESLA MODEL X 2021 Owner´s Manual
[x] Cancel search | Manufacturer: TESLA, Model Year: 2021, Model line: MODEL X, Model: TESLA MODEL X 2021Pages: 212, PDF Size: 5.07 MB
Page 122 of 212

1.Adjust settings associated with installed apps (applications). Settings associated with apps
that are either unavailable on Model X, or have no settings that you can adjust at this time, are
grayed out.
2. Manage driver profiles (see Driver Profiles on page 44).
3. Language & Units
Adjust how Model X displays:
Page 126 of 212
Climate Controls
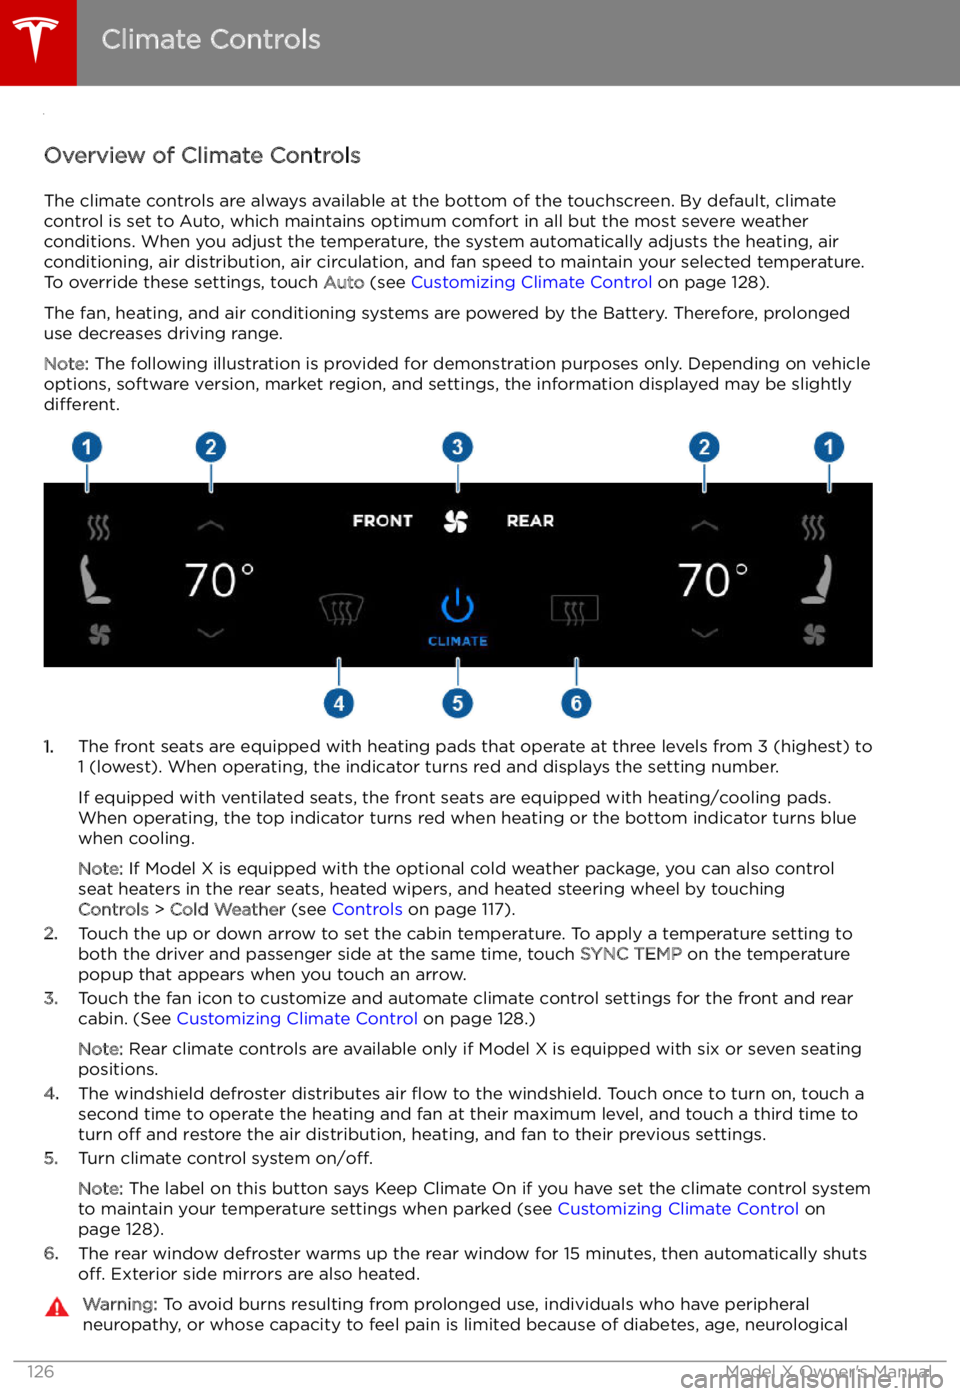
Overview of Climate Controls
The climate controls are always available at the bottom of the touchscreen. By default, climate control is set to Auto, which maintains optimum comfort in all but the most severe weather conditions. When you adjust the temperature, the system automatically adjusts the heating, air
conditioning, air distribution, air circulation, and fan speed to maintain your selected temperature.
To override these settings, touch Auto (see Customizing Climate Control on page 128).
The fan, heating, and air conditioning systems are powered by the Battery. Therefore, prolonged
use decreases driving range.
Note: The following illustration is provided for demonstration purposes only. Depending on vehicle
options, software version, market region, and settings, the information displayed may be slightly
different.
1. The front seats are equipped with heating pads that operate at three levels from 3 (highest) to
1 (lowest). When operating, the indicator turns red and displays the setting number.
If equipped with ventilated seats, the front seats are equipped with heating/cooling pads.
When operating, the top indicator turns red when heating or the bottom indicator turns blue
when cooling.
Note: If Model X is equipped with the optional cold weather package, you can also control
seat heaters in the rear seats, heated wipers, and heated steering wheel by touching Controls > Cold Weather (see Controls on page 117).
2. Touch the up or down arrow to set the cabin temperature. To apply a temperature setting to
both the driver and passenger side at the same time, touch SYNC TEMP on the temperature
popup that appears when you touch an arrow.
3. Touch the fan icon to customize and automate climate control settings for the front and rear
cabin. (See Customizing Climate Control on page 128.)
Note: Rear climate controls are available only if Model X is equipped with six or seven seating
positions.
4. The windshield defroster distributes air
Page 128 of 212
Customizing Climate ControlThe climate control system is designed to automatically provide optimum comfort in most
situations. All you need to do is set the desired temperature, and the air conditioning, air
recirculation, air distribution, and fan speed automatically maintain your selected temperature. You can even keep the climate control system on while you are away from the vehicle so that the
selected temperature is maintained.
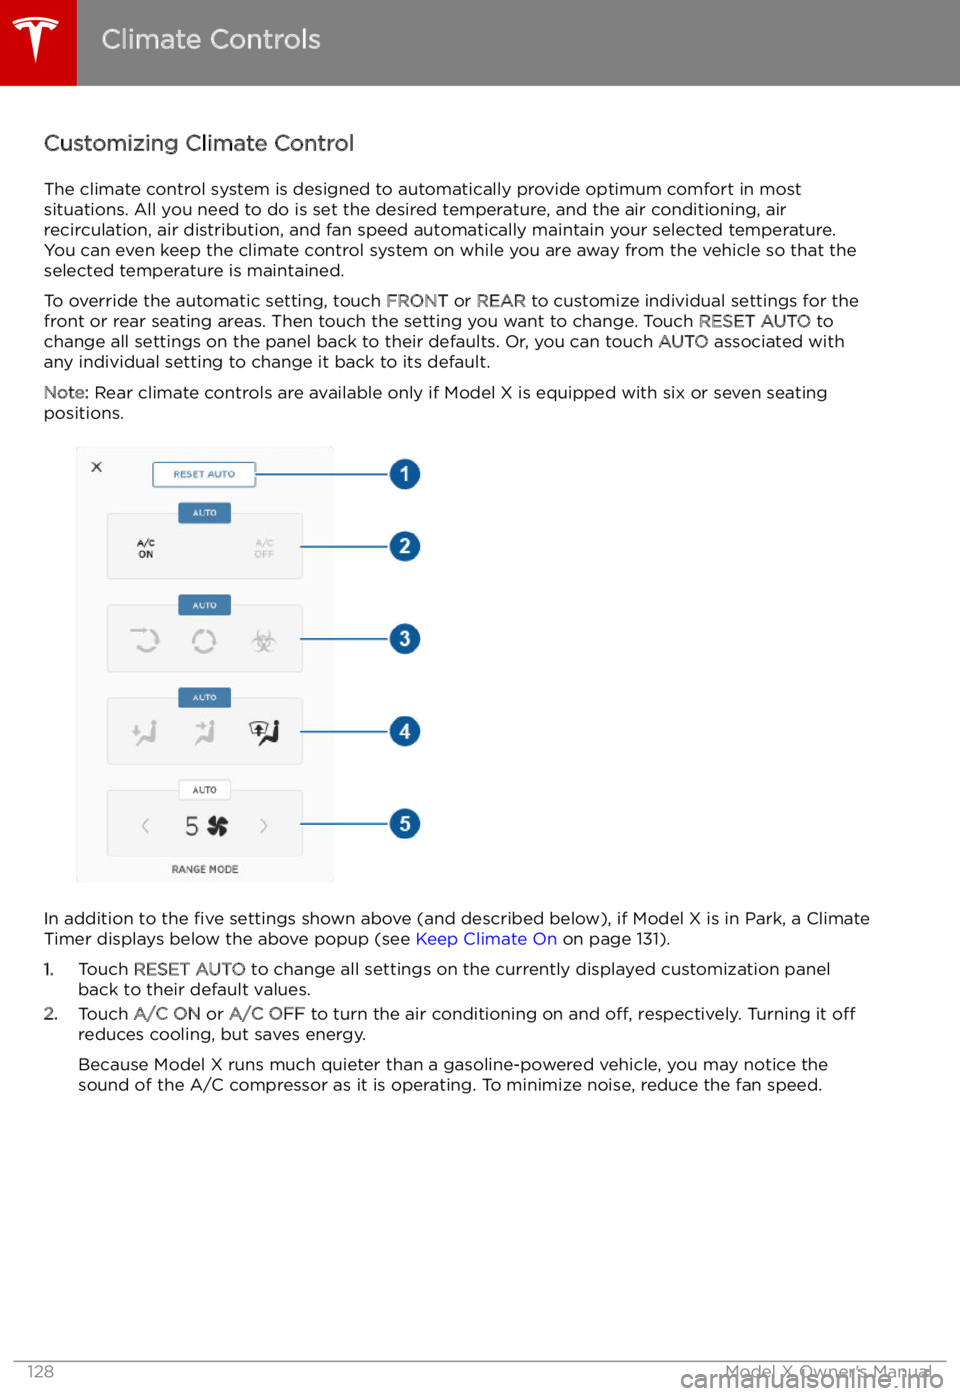
To override the automatic setting, touch FRONT or REAR to customize individual settings for the
front or rear seating areas. Then touch the setting you want to change. Touch RESET AUTO to
change all settings on the panel back to their defaults. Or, you can touch AUTO associated with
any individual setting to change it back to its default.
Note: Rear climate controls are available only if Model X is equipped with six or seven seating
positions.
In addition to the five settings shown above (and described below), if Model X is in Park, a Climate
Timer displays below the above popup (see Keep Climate On on page 131).
1. Touch RESET AUTO to change all settings on the currently displayed customization panel
back to their default values.
2. Touch A/C ON or A/C OFF to turn the air conditioning on and off, respectively. Turning it off
reduces cooling, but saves energy.
Because Model X runs much quieter than a gasoline-powered vehicle, you may notice the
sound of the A/C compressor as it is operating. To minimize noise, reduce the fan speed.
Climate Controls
128Model X Owner
Page 130 of 212
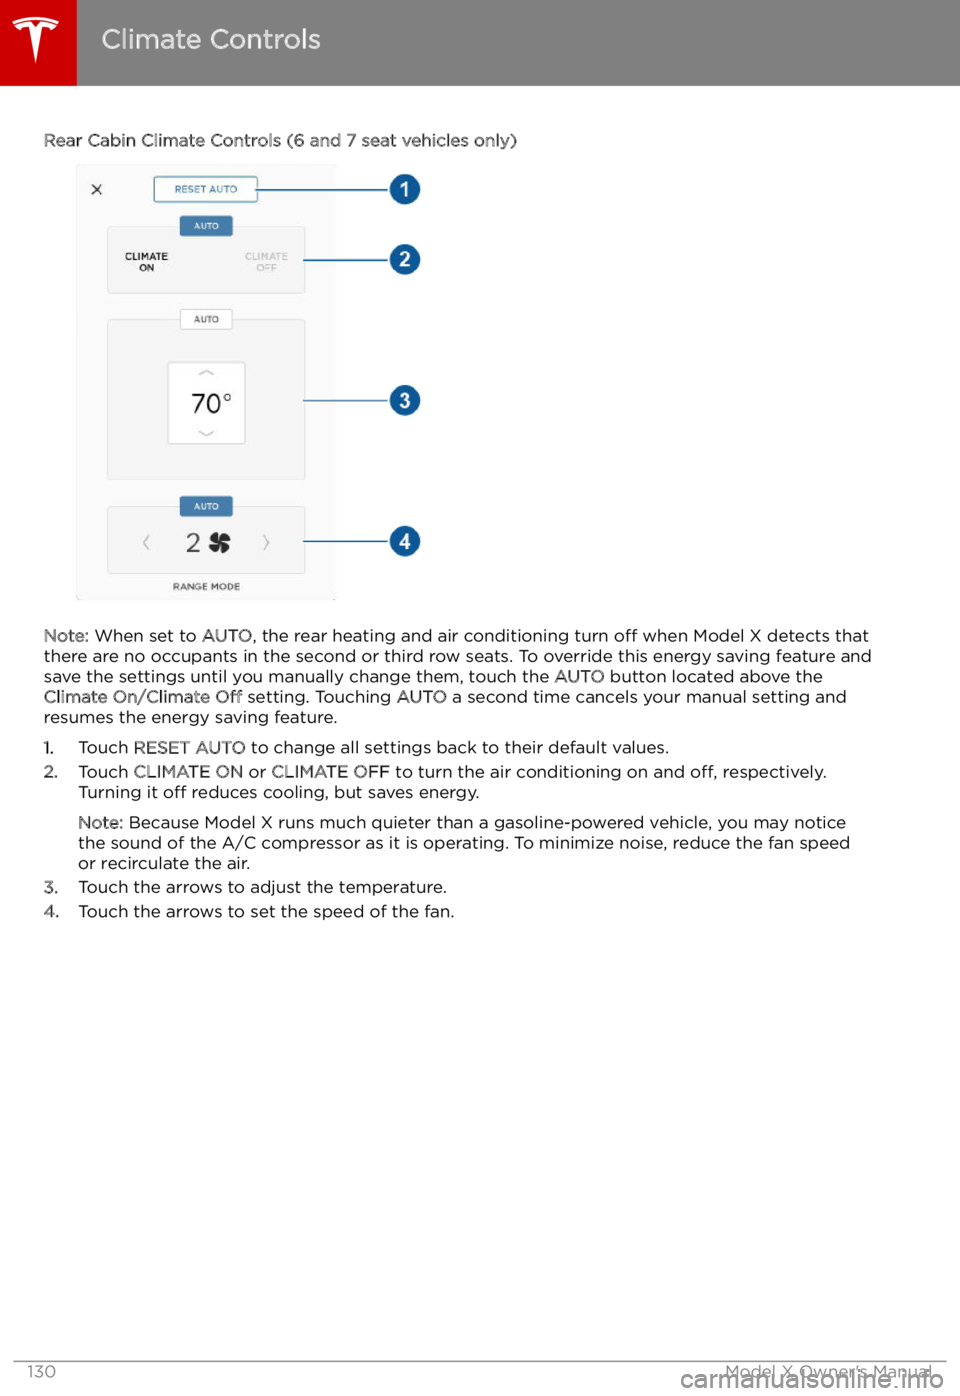
Rear Cabin Climate Controls (6 and 7 seat vehicles only)
Note: When set to AUTO, the rear heating and air conditioning turn off when Model X detects that
there are no occupants in the second or third row seats. To override this energy saving feature and
save the settings until you manually change them, touch the AUTO button located above the
Climate On/Climate Off setting. Touching AUTO a second time cancels your manual setting and
resumes the energy saving feature.
1. Touch RESET AUTO to change all settings back to their default values.
2. Touch CLIMATE ON or CLIMATE OFF to turn the air conditioning on and off, respectively.
Turning it off reduces cooling, but saves energy.
Note: Because Model X runs much quieter than a gasoline-powered vehicle, you may notice
the sound of the A/C compressor as it is operating. To minimize noise, reduce the fan speed
or recirculate the air.
3. Touch the arrows to adjust the temperature.
4. Touch the arrows to set the speed of the fan.
Climate Controls
130Model X Owner
Page 131 of 212

Keep Climate OnThe Keep Climate On settings allows you to
keep your climate control system running as long as the vehicle is in Park, even after you
Page 148 of 212

Security Settings
About the Security System
If Model X does not detect a key nearby and a
locked door or trunk is opened, an alarm sounds and the headlights and turn signals
Page 159 of 212
If the charge port light turns red while
charging, a fault is detected. Check the instrument panel or touchscreen for a
message describing the fault. A fault can
occur due to something as common as a power outage. If a power outage occurs,
charging resumes automatically when power
is restored.
Note: When charging, particularly at high
currents, the refrigerant compressor and fan
operate as needed to keep the Battery cool.
Therefore, it is normal to hear sounds during charging.
Note: Air conditioning performance is
generally not affected by charging. However,
under certain circumstances (for example, you
are charging at high currents during a
particularly warm day), the air coming from
the vents may not be as cool as expected and
a message displays on the instrument panel.
This is normal behavior and ensures that the Battery stays within an optimum temperature
range while charging to support longevity and
optimum performance.Warning: Never spray liquid at a high
velocity (for example, if using a pressure
washer) towards the charge port while
charging. Failure to follow these
instructions can result in serious injury or
damage to the vehicle, charging
equipment, or property.
Stopping Charging
Stop charging at any time by disconnecting
the charge cable or touching Stop Charging
on the touchscreen.
Note: To prevent unauthorized unplugging of
the charge cable, Model X must be unlocked
or able to recognize your key before you can
disconnect the charge cable.
To disconnect the charge cable:
1. Press and hold the button on a Tesla
connector to release the latch. You can
also touch Stop Charging on the charging
screen (see Changing Charge Settings on
page 159).
2. Pull the connector from the charge port.
3. Push the charge port door closed.
Note: If Model X is equipped with a motorized
charge port door, it automatically closes when
you remove the charge cable.
Caution: Tesla strongly recommends
leaving Model X plugged in when not inuse. This maintains the Battery at the
optimum level of charge.
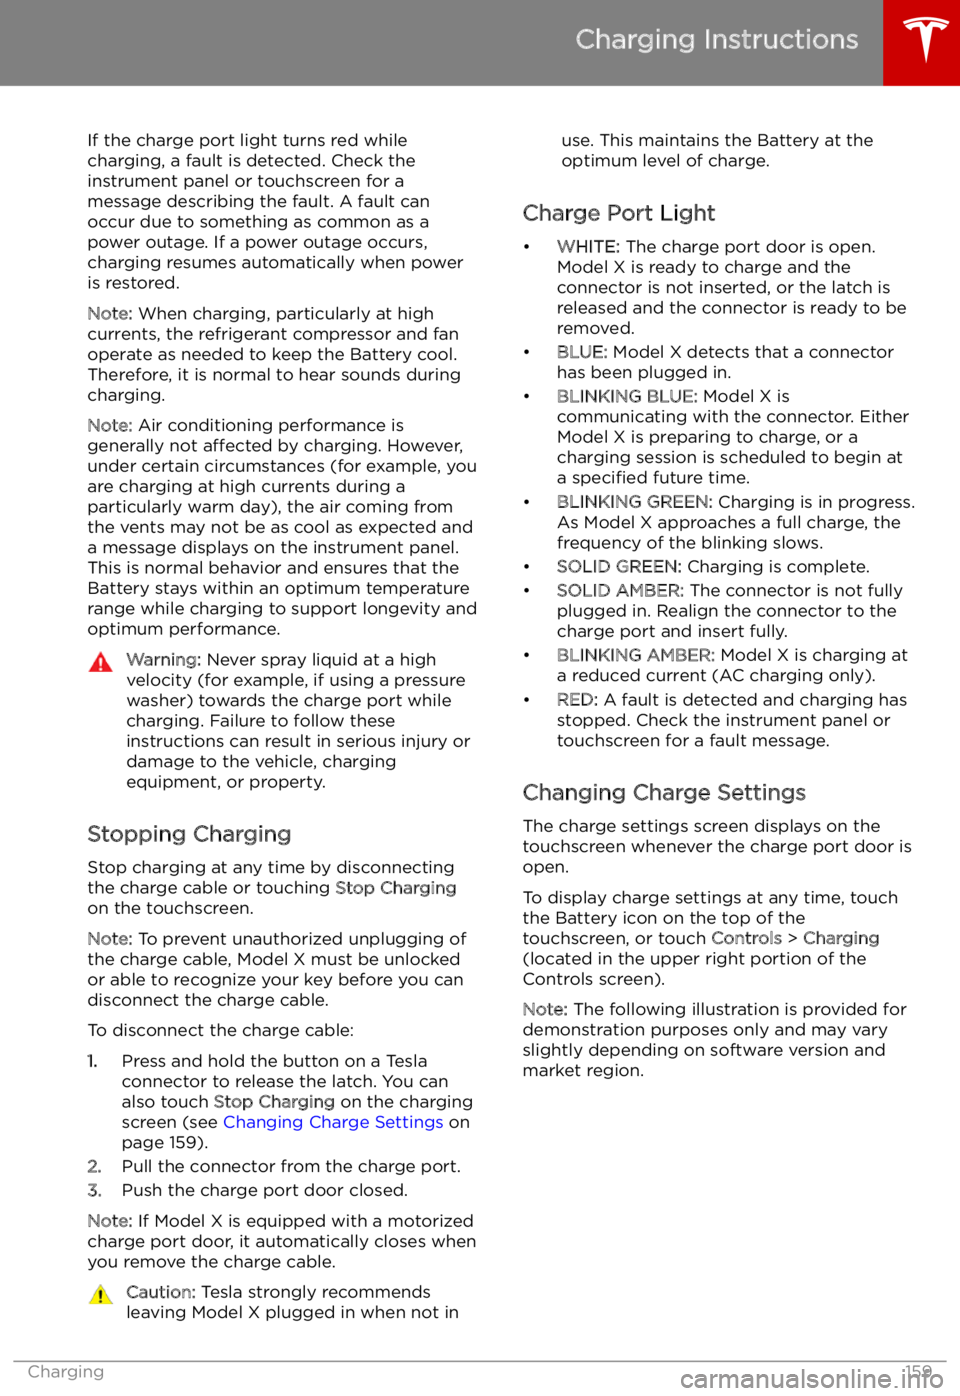
Charge Port Light
Page 160 of 212
Note: If charging at a Tesla Supercharger, and
paid supercharging is potentially in effect, the
charging screen also displays information
about your previous or current Supercharger
session (see Supercharger Usage Fees and
Idle Fees on page 162).
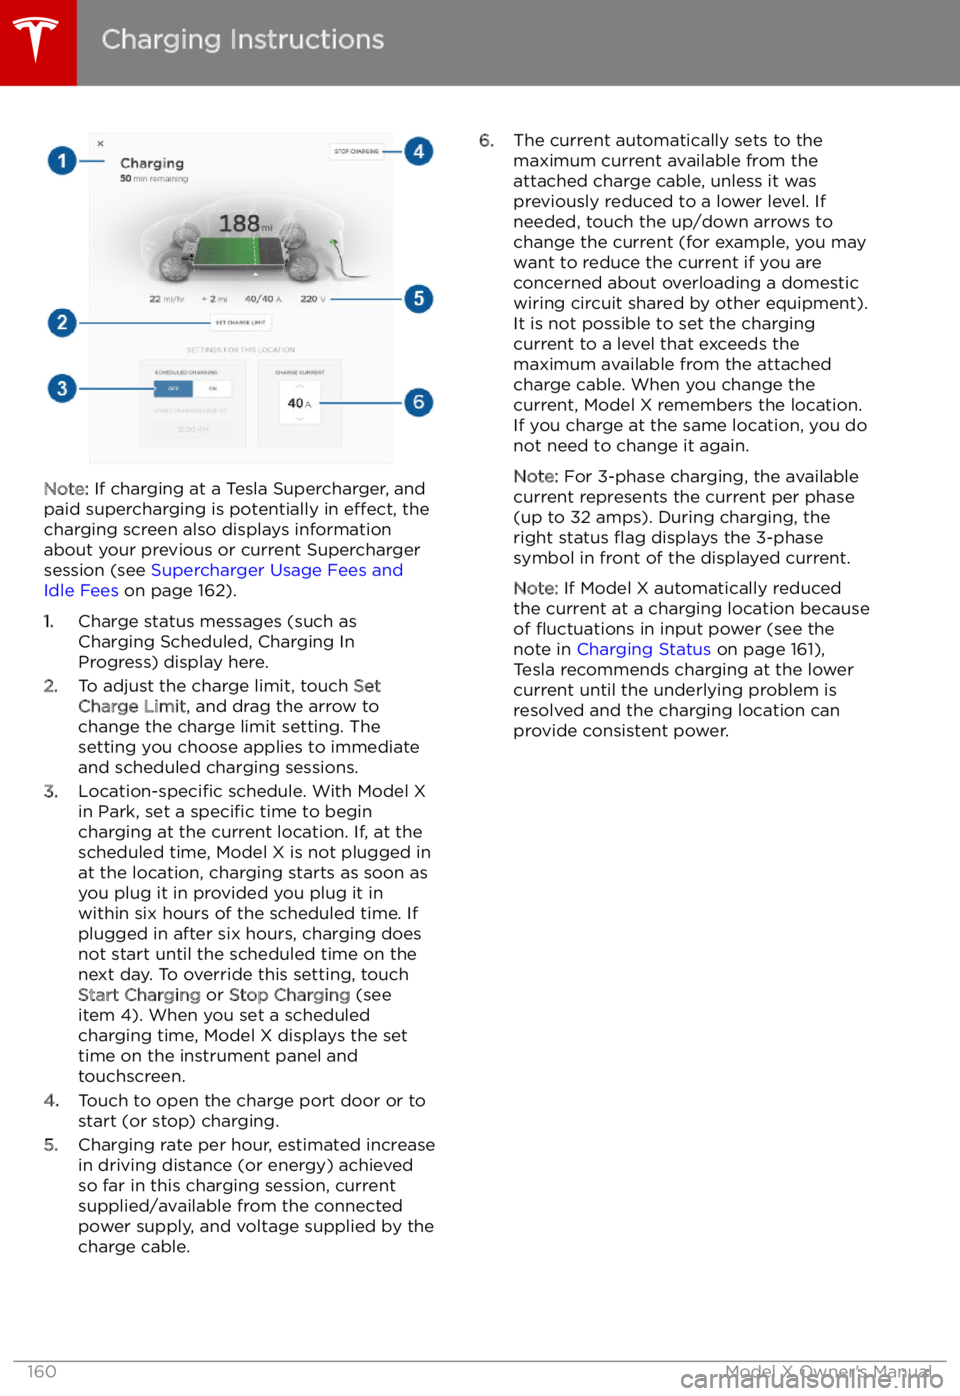
1. Charge status messages (such as
Charging Scheduled, Charging In
Progress) display here.
2. To adjust the charge limit, touch Set
Charge Limit , and drag the arrow to
change the charge limit setting. The
setting you choose applies to immediate
and scheduled charging sessions.
3. Location-specific schedule. With Model X
in Park, set a specific time to begin
charging at the current location. If, at the
scheduled time, Model X is not plugged in
at the location, charging starts as soon as
you plug it in provided you plug it in
within six hours of the scheduled time. If
plugged in after six hours, charging does
not start until the scheduled time on the
next day. To override this setting, touch Start Charging or Stop Charging (see
item 4). When you set a scheduled
charging time, Model X displays the set
time on the instrument panel and
touchscreen.
4. Touch to open the charge port door or to
start (or stop) charging.
5. Charging rate per hour, estimated increase
in driving distance (or energy) achieved
so far in this charging session, current
supplied/available from the connected
power supply, and voltage supplied by the
charge cable.
6. The current automatically sets to the
maximum current available from the
attached charge cable, unless it was
previously reduced to a lower level. If
needed, touch the up/down arrows to
change the current (for example, you may
want to reduce the current if you are
concerned about overloading a domestic
wiring circuit shared by other equipment).
It is not possible to set the charging
current to a level that exceeds the
maximum available from the attached charge cable. When you change the
current, Model X remembers the location.
If you charge at the same location, you do
not need to change it again.
Note: For 3-phase charging, the available
current represents the current per phase
(up to 32 amps). During charging, the
right status
Page 161 of 212
Charging Status
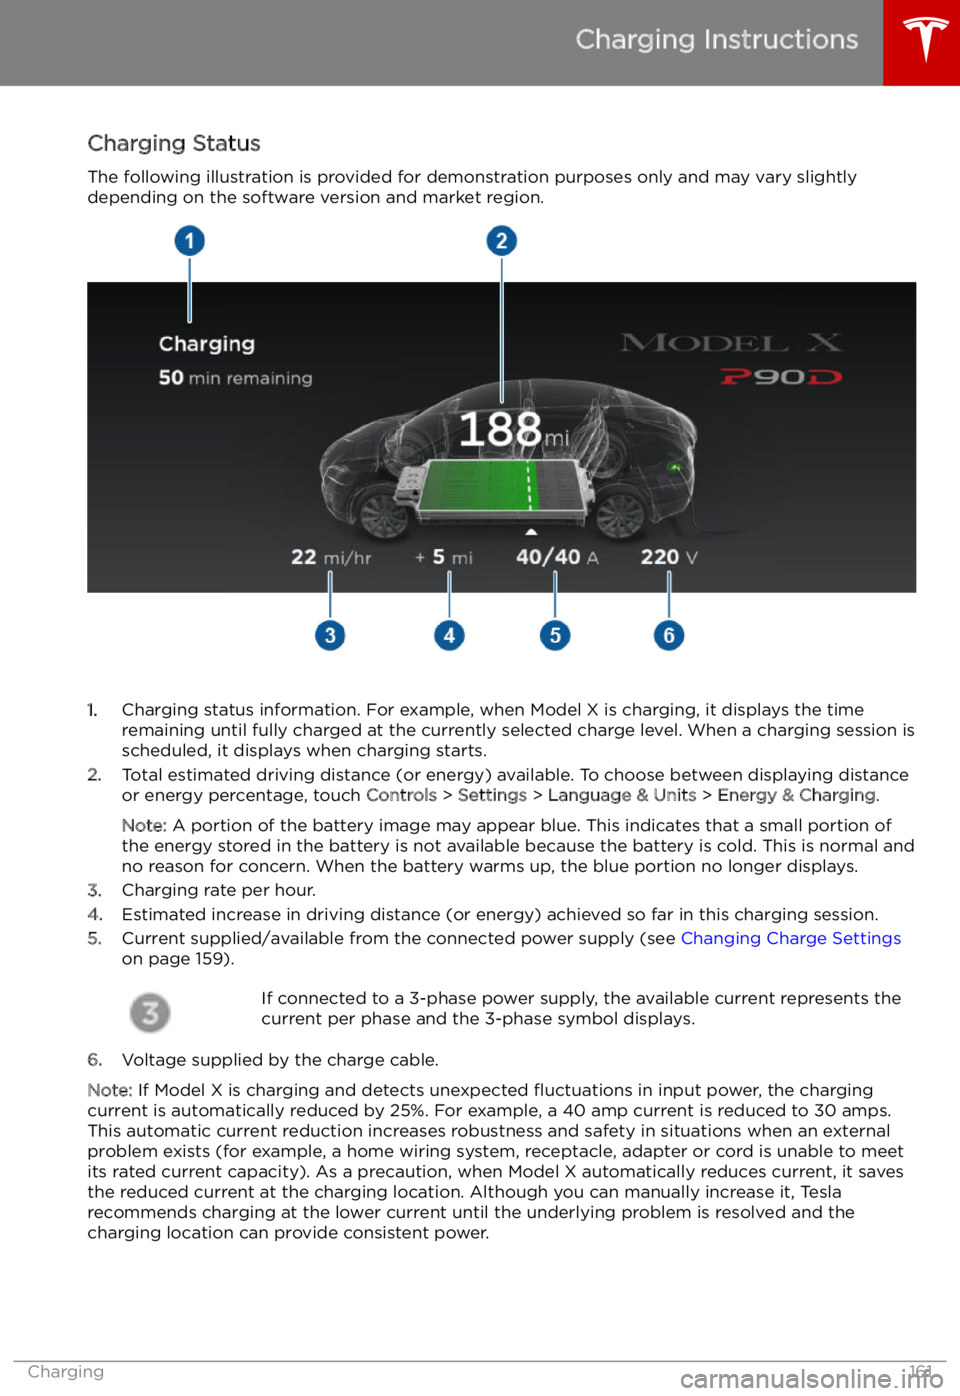
The following illustration is provided for demonstration purposes only and may vary slightly
depending on the software version and market region.
1. Charging status information. For example, when Model X is charging, it displays the time
remaining until fully charged at the currently selected charge level. When a charging session is
scheduled, it displays when charging starts.
2. Total estimated driving distance (or energy) available. To choose between displaying distance
or energy percentage, touch Controls > Settings > Language & Units > Energy & Charging .
Note: A portion of the battery image may appear blue. This indicates that a small portion of
the energy stored in the battery is not available because the battery is cold. This is normal and
no reason for concern. When the battery warms up, the blue portion no longer displays.
3. Charging rate per hour.
4. Estimated increase in driving distance (or energy) achieved so far in this charging session.
5. Current supplied/available from the connected power supply (see Changing Charge Settings
on page 159).
If connected to a 3-phase power supply, the available current represents the
current per phase and the 3-phase symbol displays.
6. Voltage supplied by the charge cable.
Note: If Model X is charging and detects unexpected
Page 162 of 212

Supercharger Usage Fees and Idle
Fees
When charging using a Tesla supercharger,
PAID SUPERCHARGING information displays at the bottom of the charging screen. This
information includes the location, the time
that charging started, and an estimate of how
much the session will cost. When you stop
charging, the final cost displays until a new
Supercharging session begins. If free charging
is applicable, the cost displays as zero.
When charging at a Tesla supercharger, you
are subject to idle fees. Idle fees are designed
to encourage drivers to move their vehiclefrom the Supercharger when charging iscomplete and are in effect whenever at least
half of the Superchargers at a site are
occupied. The Tesla mobile app notifies you
when charging nears completion, and again
when charging is complete. Additional
notifications are sent if idle fees are incurred.
Idle fees are waived if you move your vehicle
within five minutes of charging completion.
Log into your Tesla Account to view fees and
details about Supercharger sessions, track the
remaining balance of free credits, set up a payment method, and make payments. Once a
payment method is saved, fees are
automatically paid from your account.
Charging Instructions
162Model X Owner