ECO mode TESLA MODEL Y 2020 Owner´s Manual
[x] Cancel search | Manufacturer: TESLA, Model Year: 2020, Model line: MODEL Y, Model: TESLA MODEL Y 2020Pages: 232, PDF Size: 7.68 MB
Page 53 of 232

Shifting Gears
When Model Y is in Park, you must press the brake to
shift to another gear.
Move the drive stalk up or down to change gears.
If you try to shift into a gear that the current driving
speed prohibits, a chime sounds and the gear does not
change.
Reverse
Push the drive stalk all the way up and release. You can only shift into Reverse when
Model Y is stopped or
moving less than
5 mph (8 km/h).
Neutral
Push the drive stalk up or down to the first position and
hold it there for more than 1 second to shift into
Neutral. Neutral allows
Model Y to roll freely when you
are not pressing the brake pedal.
NOTE: You must press the brake pedal to shift out of
Neutral if driving slower than approximately
5 mph (8
km/h).
Model Y automatically shifts into Park when you leave
the driver
Page 54 of 232

To make it convenient to pick up passengers, you can also unlock all doors at any time by shifting into Park then pressing the Park button a second time.
Gears
52MODEL Y OWNER
Page 56 of 232

5. If you turn on Auto High Beam, your vehicle
automatically switches from high beam headlights to low beam headlights when light is detected in front of
Model Y. See High Beam Headlights on page 54.
6.
If you turn on Headlights after Exit, the exterior
lights remain on for a short period of time after you stop driving and park
Model Y in low lighting
conditions. See
Headlights After Exit on page 54.
7.
If you turn on Steering Wheel Lights, the arrows
associated with the scroll buttons are backlit in low ambient lighting conditions.
Reading Lights
There are two reading lights in the second row seating
area, both above the door and next to the coat hangers (see
Coat Hangers on page 23). Turn an individual
reading light on or
off by pressing its lens. The reading
light will automatically turn
off when Model Y powers
off.
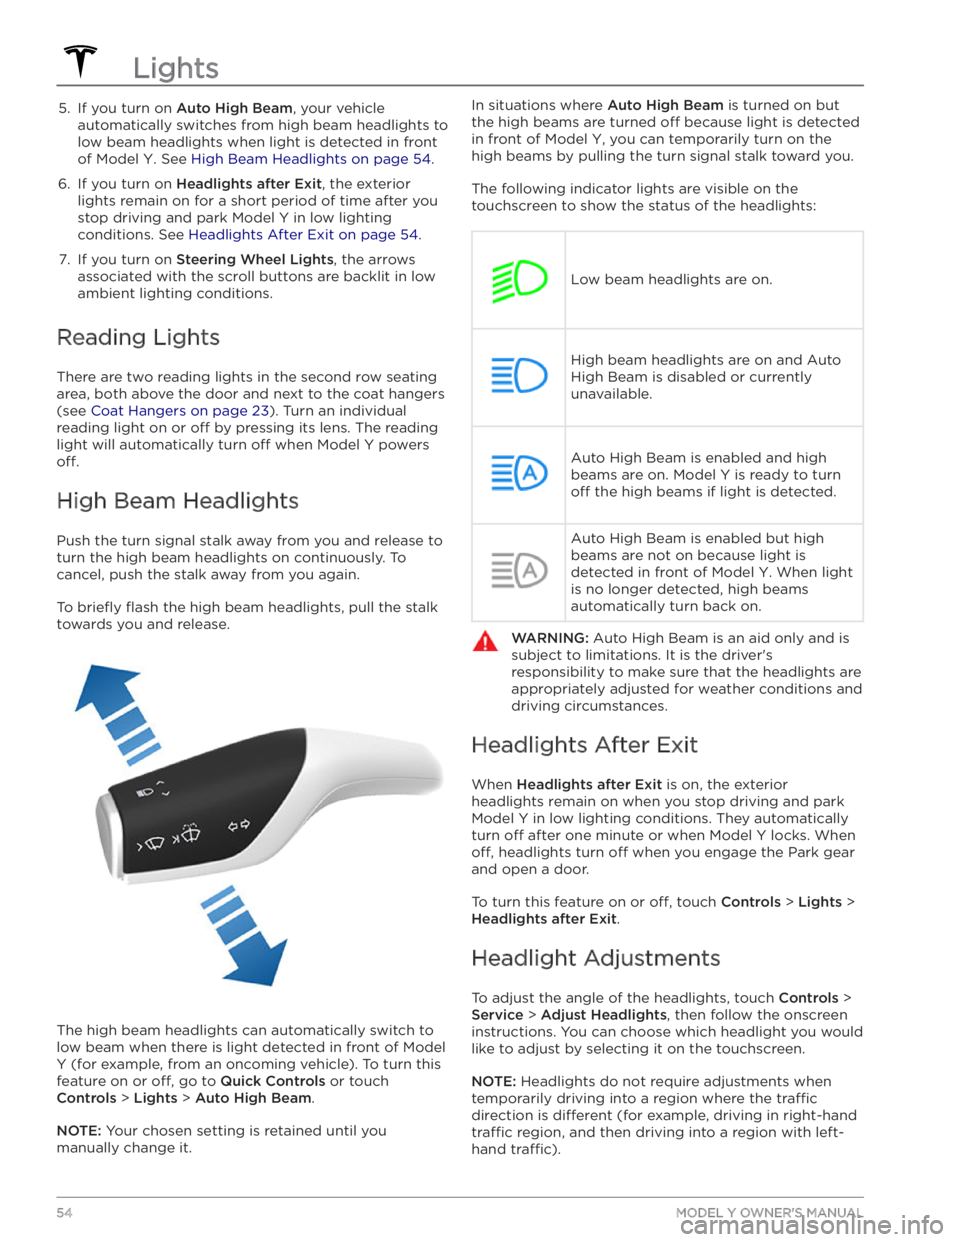
High Beam Headlights
Push the turn signal stalk away from you and release to turn the high beam headlights on continuously. To cancel, push the stalk away from you again.
To briefly flash the high beam headlights, pull the stalk
towards you and release.
The high beam headlights can automatically switch to low beam when there is light detected in front of
Model
Y (for example, from an oncoming vehicle). To turn this
feature on or
off, go to Quick Controls or touch
Controls > Lights > Auto High Beam.
NOTE: Your chosen setting is retained until you
manually change it.
In situations where Auto High Beam is turned on but
the high beams are turned
off because light is detected
in front of
Model Y, you can temporarily turn on the
high beams by pulling the turn signal stalk toward you.
The following indicator lights are visible on the touchscreen to show the status of the headlights:
Low beam headlights are on.
High beam headlights are on and Auto
High Beam is disabled or currently
unavailable.Auto High Beam is enabled and high
beams are on.
Model Y is ready to turn
off the high beams if light is detected.
Auto High Beam is enabled but high beams are not on because light is
detected in front of
Model Y. When light
is no longer detected, high beams
automatically turn back on.
WARNING: Auto High Beam is an aid only and is
subject to limitations. It is the driver
Page 57 of 232

WARNING: Proceed with caution when adjusting
headlights. Tesla has carefully calibrated the
position of the headlights to be in an optimum
position for most driving scenarios. Tesla
recommends that you do not adjust headlights
unless you are familiar with how headlights should
be adjusted. Once adjusted, you will be unable to
automatically restore them to their originally
calibrated position. Contact Tesla for assistance
when adjusting headlights.
Turn Signals
The turn signals flash three times or continuously,
depending on how far up or down you move the stalk.
Lightly push the turn signal stalk up or down for a
three-
flash sequence. For a continuous signal, push the stalk
fully up or down.
The turn signals stop operating when canceled by the steering wheel, by moving the stalk in the opposite direction, or lightly pushing the stalk in the same
direction once more.
The corresponding turn signal indicator
lights up on the touchscreen when a turn
signal is operating.
Model Y also emits a
clicking sound.
WARNING: If you have purchased an optional
Autopilot package and Tra
Page 72 of 232

About Dashcam
NOTE: Dashcam is a BETA feature.
In addition to supporting Autopilot features, the cameras can record and store video footage of the
surrounding roadway on a USB
flash drive. This can be
convenient in situations where you want a video recording of a particular incident, such as a collision.
You can pause, resume, or save video recordings directly from your vehicle’s touchscreen.
NOTE: Dashcam only works when Model Y is powered
on (see
Starting and Powering Off on page 49).
Dashcam does not record video when your vehicle is
powered
off.
Using Dashcam
Dashcam requires the use of a properly formatted USB
flash drive to store and retrieve footage (see USB Flash
Drive Requirements for Videos and Recording on page
144). Once a properly formatted USB flash drive has
been inserted into one of your vehicle
Page 75 of 232

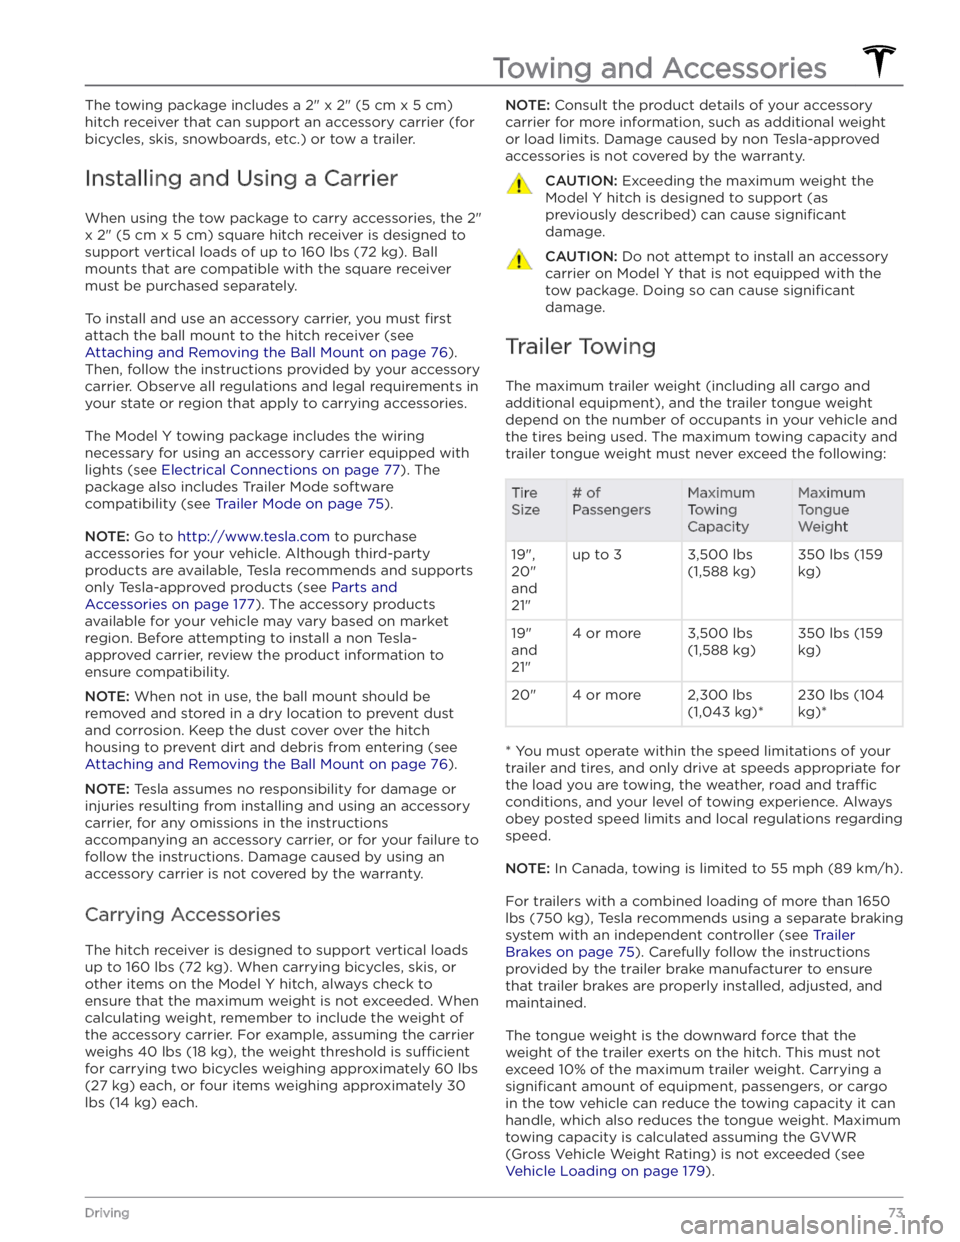
The towing package includes a 2" x 2" (5 cm x 5 cm)
hitch receiver that can support an accessory carrier (for bicycles, skis, snowboards, etc.) or tow a trailer.
Installing and Using a Carrier
When using the tow package to carry accessories, the 2"
x 2" (5 cm x 5 cm) square hitch receiver is designed to
support vertical loads of up to
160 lbs (72 kg). Ball
mounts that are compatible with the square receiver
must be purchased separately.
To install and use an accessory carrier, you must first
attach the ball mount to the hitch receiver (see
Attaching and Removing the Ball Mount on page 76).
Then, follow the instructions provided by your accessory
carrier. Observe all regulations and legal requirements in your state or region that apply to carrying accessories.
The Model Y towing package includes the wiring
necessary for using an accessory carrier equipped with lights (see
Electrical Connections on page 77). The
package also includes Trailer Mode software compatibility (see
Trailer Mode on page 75).
NOTE: Go to http://www.tesla.com to purchase
accessories for your vehicle. Although third-party products are available, Tesla recommends and supports
only Tesla-approved products (see
Parts and
Accessories on page 177). The accessory products
available for your vehicle may vary based on market
region. Before attempting to install a non Tesla-
approved carrier, review the product information to ensure compatibility.
NOTE: When not in use, the ball mount should be
removed and stored in a dry location to prevent dust and corrosion. Keep the dust cover over the hitch housing to prevent dirt and debris from entering (see
Attaching and Removing the Ball Mount on page 76).
NOTE: Tesla assumes no responsibility for damage or
injuries resulting from installing and using an accessory carrier, for any omissions in the instructions accompanying an accessory carrier, or for your failure to follow the instructions. Damage caused by using an accessory carrier is not covered by the warranty.
Carrying Accessories
The hitch receiver is designed to support vertical loads
up to
160 lbs (72 kg). When carrying bicycles, skis, or
other items on the
Model Y hitch, always check to
ensure that the maximum weight is not exceeded. When calculating weight, remember to include the weight of
the accessory carrier.
For example, assuming the carrier
weighs 40 lbs (18 kg), the weight threshold is su
Page 94 of 232

Stop Light and Stop Sign Warning
NOTE: Depending on market region, vehicle
configuration, options purchased, and software version,
your vehicle may not be equipped with Stop Light and
Stop Sign Warning.
While Autosteer is in use, Model Y displays a warning
on the
touchscreen and sounds a chime if it detects
that you are likely to run through a red stop light or stop sign. If this happens,
TAKE IMMEDIATE
CORRECTIVE ACTION!
The visual and audible warnings cancel after a few seconds, or when you press the brake pedal, whichever
comes
first.
Stop Light and Stop Sign Warning provides warnings
only. It makes no attempt to slow down or stop
Model Y
at red tra
Page 95 of 232

NOTE: Navigate on Autopilot is a BETA feature and is
not available in all market regions.
When using Autosteer on a controlled-access road (such as a highway or freeway), Navigate on Autopilot guides
Model Y to off-ramps and interchanges based
on your navigation route. Along the highway portion of a navigation route, Navigate on Autopilot also changes lanes to prepare for exits and to minimize the driving time to your destination.
WARNING: Navigate on Autopilot does not make
driving autonomous. You must pay attention to
the road, keep your hands on the steering wheel
at all times, and remain aware of your navigation
route.
WARNING: As is the case with normal driving, be
extra careful around blind corners, highway
interchanges, and exits because obstacles can
appear quickly and at any time.
WARNING: Navigate on Autopilot may not
recognize or detect oncoming vehicles, stationary
objects, and special-use lanes such as those used
exclusively for bikes, carpools, emergency
vehicles, etc. Remain alert at all times and be
prepared to take immediate action. Failure to do
so can cause damage, injury or death.
Enabling and Customizing Navigate
on Autopilot
To enable Navigate on Autopilot, touch Controls >
Autopilot > Navigate on Autopilot (Beta). Then, to
customize how you want Navigate on Autopilot to operate, touch
CUSTOMIZE NAVIGATE ON AUTOPILOT:
Page 119 of 232

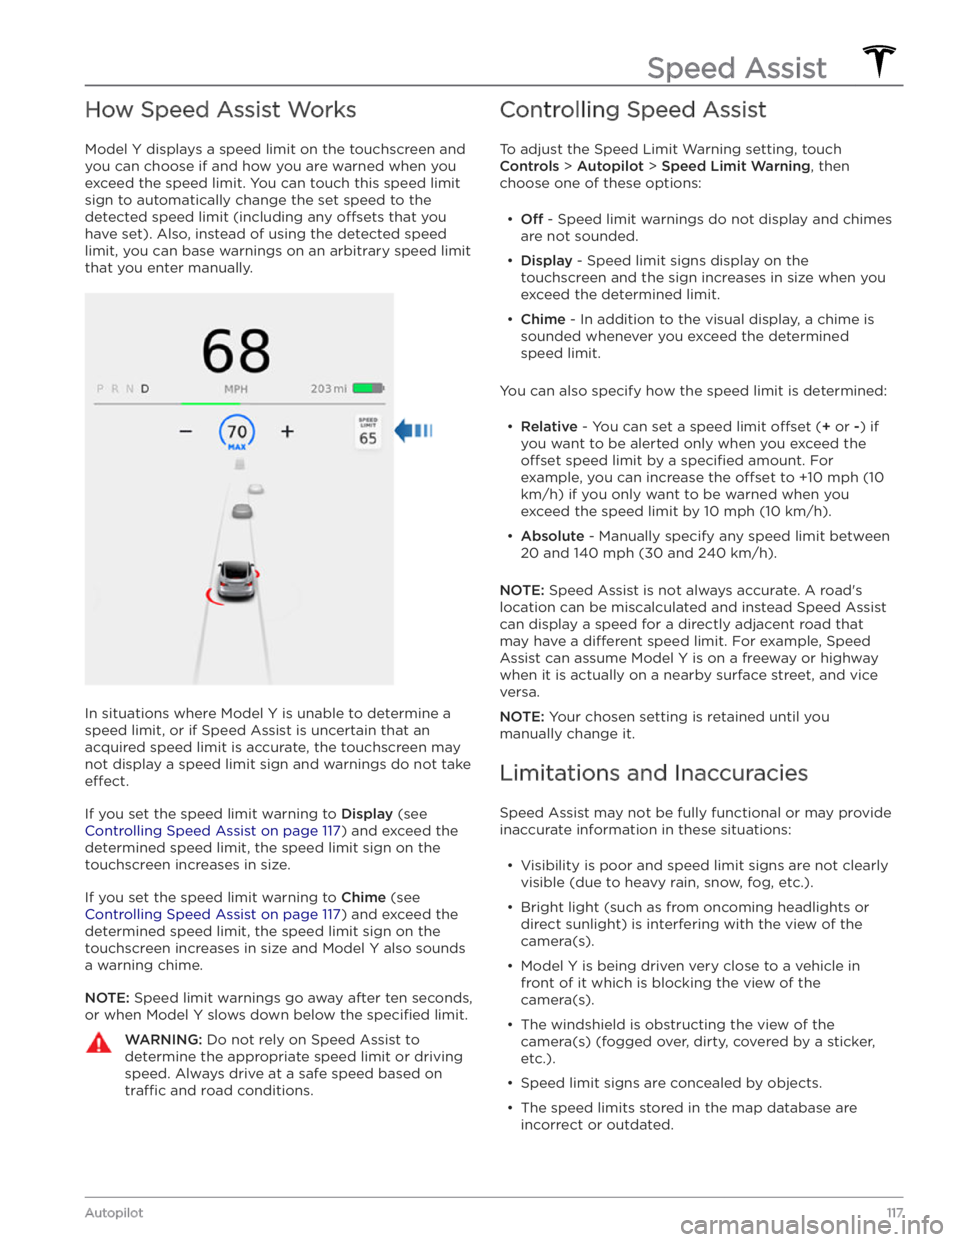
How Speed Assist Works
Model Y displays a speed limit on the touchscreen and
you can choose if and how you are warned when you exceed the speed limit.
You can touch this speed limit
sign to automatically change the set speed to the
detected speed limit (including any offsets that you
have set). Also, instead of using the detected speed
limit, you can base warnings on an arbitrary speed limit that you enter manually.
In situations where Model Y is unable to determine a
speed limit, or if Speed Assist is uncertain that an acquired speed limit is accurate, the
touchscreen may
not display a speed limit sign and warnings do not take
effect.
If you set the speed limit warning to Display (see
Controlling Speed Assist on page 117) and exceed the
determined speed limit, the speed limit sign on the
touchscreen increases in size.
If you set the speed limit warning to Chime (see
Controlling Speed Assist on page 117) and exceed the
determined speed limit, the speed limit sign on the
touchscreen increases in size and Model Y also sounds
a warning chime.
NOTE: Speed limit warnings go away after ten seconds,
or when
Model Y slows down below the specified limit.
WARNING: Do not rely on Speed Assist to
determine the appropriate speed limit or driving
speed. Always drive at a safe speed based on
tra
Page 150 of 232

Wi-Fi is available as a data connection method and is often faster than cellular data networks. Connecting to Wi-Fi is especially useful in areas with limited or no
cellular connectivity. To ensure fast, reliable delivery of software and map updates, Tesla recommends leaving your vehicle connected to a Wi-Fi network whenever
possible (for example, if parked in your garage
overnight).
To connect to a Wi-Fi network:
1.
Touch the cellular icon (usually LTE or 3G) on the top
corner of your touchscreen.
Model Y will start
scanning and display the detected Wi-Fi networks
that are within range.
2.
Select the Wi-Fi network you want to use, enter the password (if necessary), then touch
Confirm.
3.
Your vehicle connects to the Wi-Fi network and will automatically connect to it whenever the network is
within range.
You can also connect to a hidden network that isn