TOYOTA 4RUNNER 2021 Owners Manual (in English)
Manufacturer: TOYOTA, Model Year: 2021, Model line: 4RUNNER, Model: TOYOTA 4RUNNER 2021Pages: 592, PDF Size: 13.3 MB
Page 491 of 592

4917-2. Steps to take in an emergency
7
When trouble arises
4RUNNER (U)
WARNING
■Using the tire jack
Improper use of the tire jack may cause the vehicle to suddenly fall off
the jack, leading to death or serious injury.
●Do not use the tire jack for any purpose other than replacing t ires or
installing and removing tire chains.
●Only use the tire jack that comes with this vehicle for replacing a flat
tire.
Do not use it on other vehicles, and do not use other tire jack s for
replacing tires on this vehicle.
●Always check that the tire jack is securely set to the jack poi nt.
●Do not put any part of your body under the vehicle while it is supported
by the jack.
●Do not start or run the engine while your vehicle is supported by the
jack.
●Do not raise the vehicle w hile someone is inside.
●When raising the vehicle, do not put an object on or under the jack.
●Do not raise the vehicle to a height greater than that required to
replace the tire.
●Use a jack stand if it is nece ssary to get under the vehicle.
Vehicles with Automatic running boards
●Observe the following precautions. Failure to do so may result in seri-
ous injury:
• When jacking up the vehicle, always turn the Automatic running boards switch off.
• When jacking up the vehicle, do not use an Automatic running b oard
as a jack point. The Automatic running board may break, causing
injuries.
Take particular care when lowering the vehicle to ensure that n o one
working on or near the vehicle may be injured.
■Using the jack handle
Tighten all the jack handle bol ts securely using a Phillips-hea d screw-
driver, to prevent the extension parts from coming apart unexpe ctedly.
Page 492 of 592
4927-2. Steps to take in an emergency
4RUNNER (U)
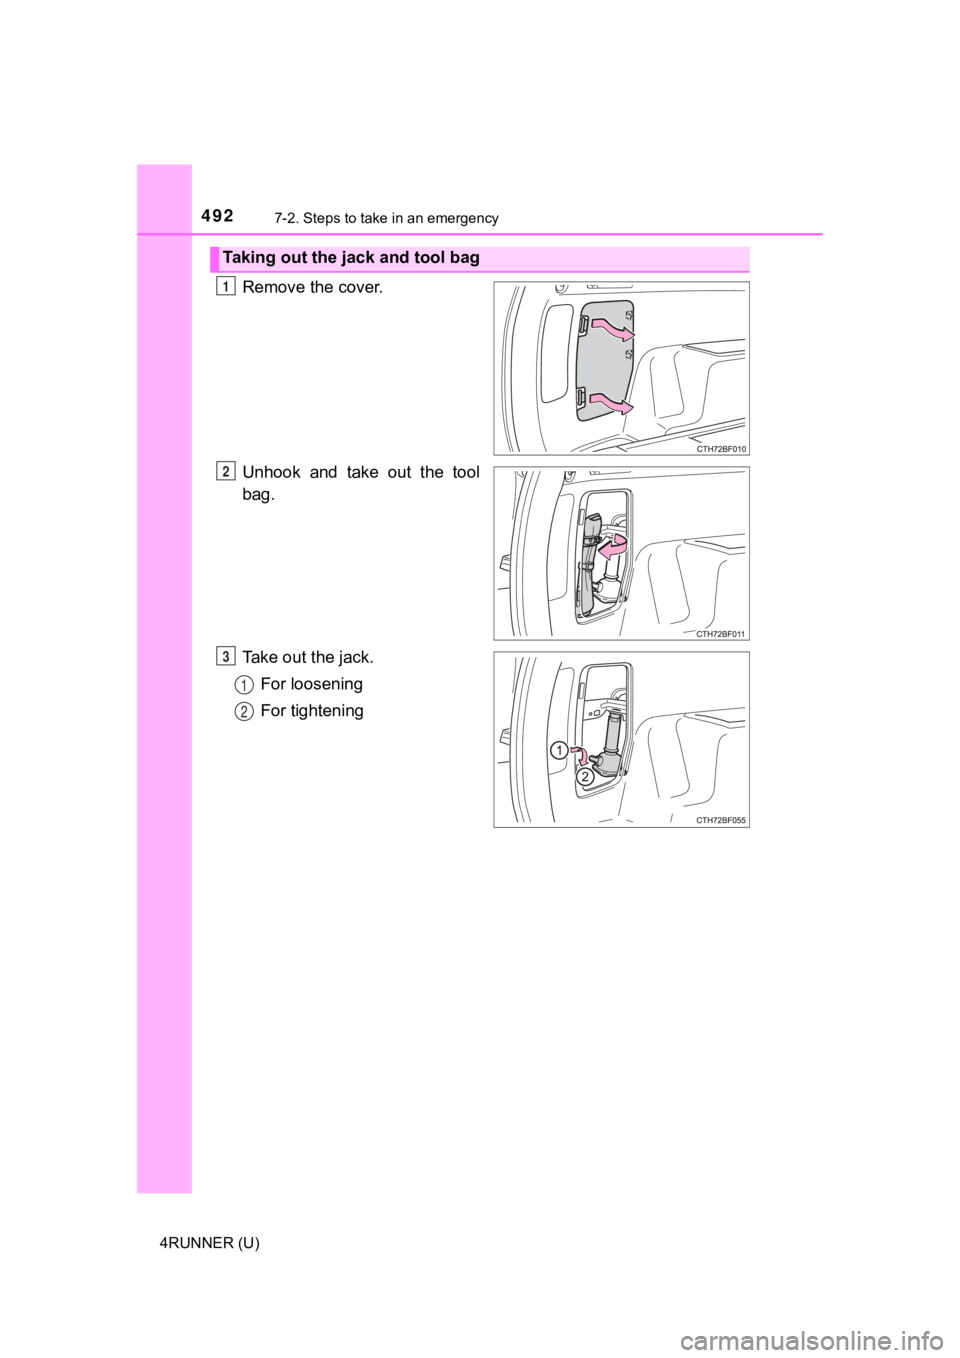
Remove the cover.
Unhook and take out the tool
bag.
Take out the jack.For loosening
For tightening
Taking out the jack and tool bag
1
2
3
1
2
Page 493 of 592
4937-2. Steps to take in an emergency
7
When trouble arises
4RUNNER (U)
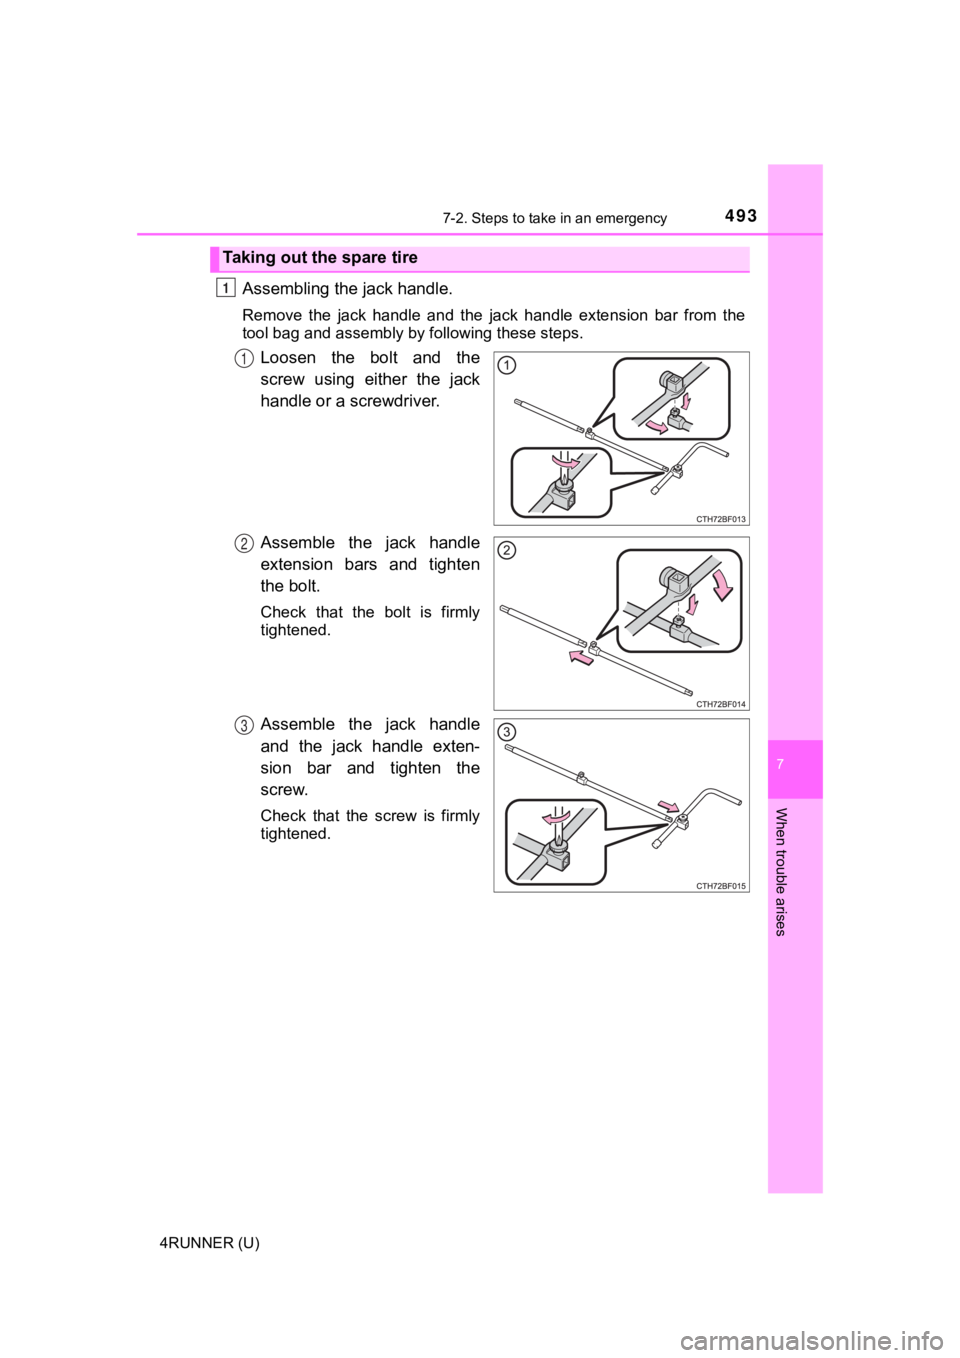
Assembling the jack handle.
Remove the jack handle and the jack handle extension bar from the
tool bag and assembly by following these steps.
Loosen the bolt and the
screw using either the jack
handle or a screwdriver.
Assemble the jack handle
extension bars and tighten
the bolt.
Check that the bolt is firmly
tightened.
Assemble the jack handle
and the jack handle exten-
sion bar and tighten the
screw.
Check that the screw is firmly
tightened.
Taking out the spare tire
1
1
2
3
Page 494 of 592
4947-2. Steps to take in an emergency
4RUNNER (U)
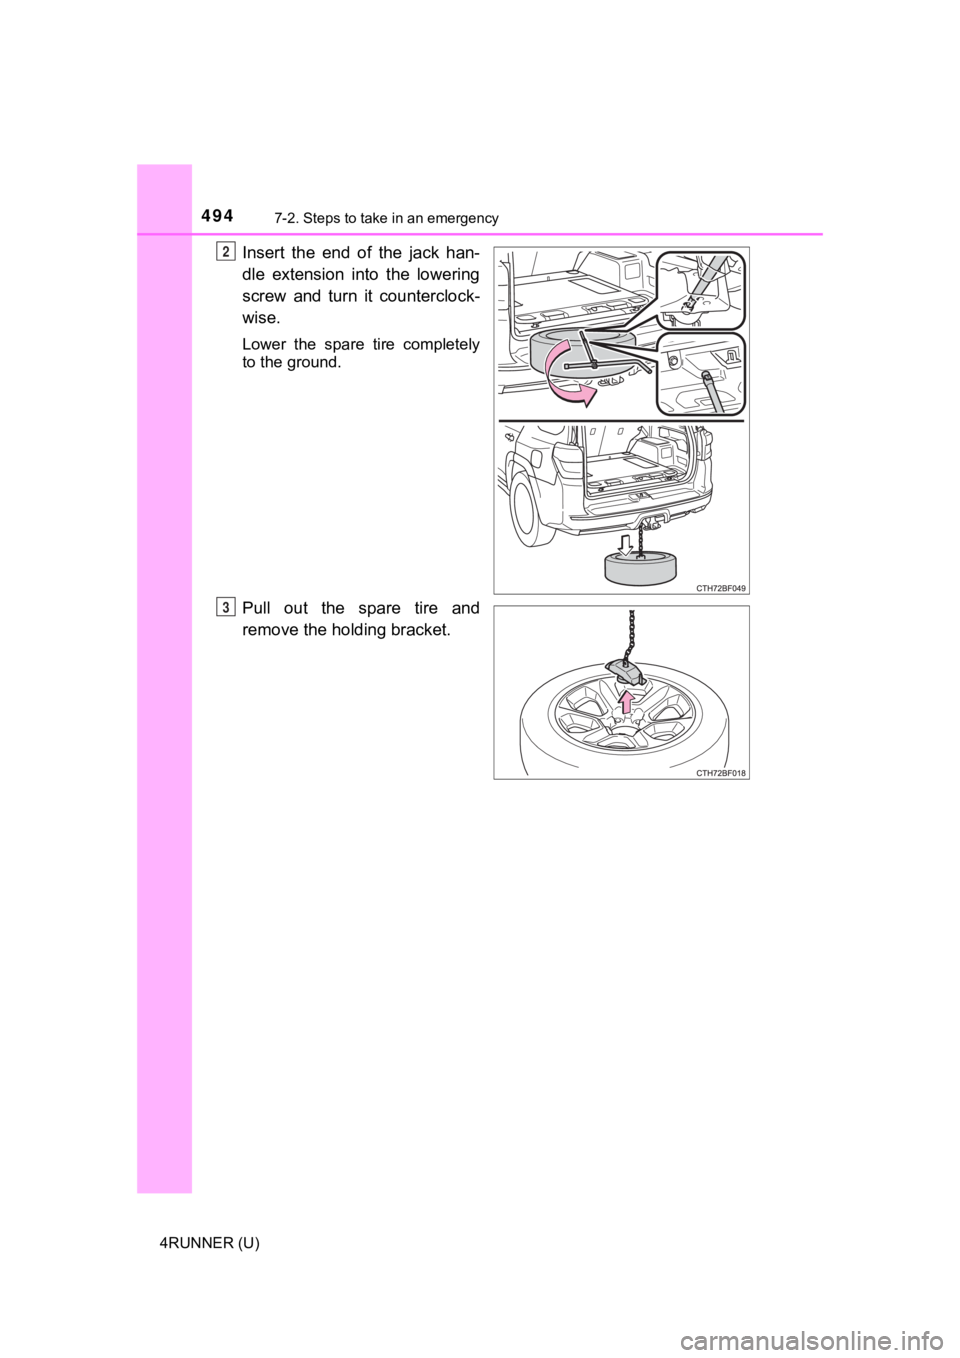
Insert the end of the jack han-
dle extension into the lowering
screw and turn it counterclock-
wise.
Lower the spare tire completely
to the ground.
Pull out the spare tire and
remove the holding bracket.
2
3
Page 495 of 592
4957-2. Steps to take in an emergency
7
When trouble arises
4RUNNER (U)
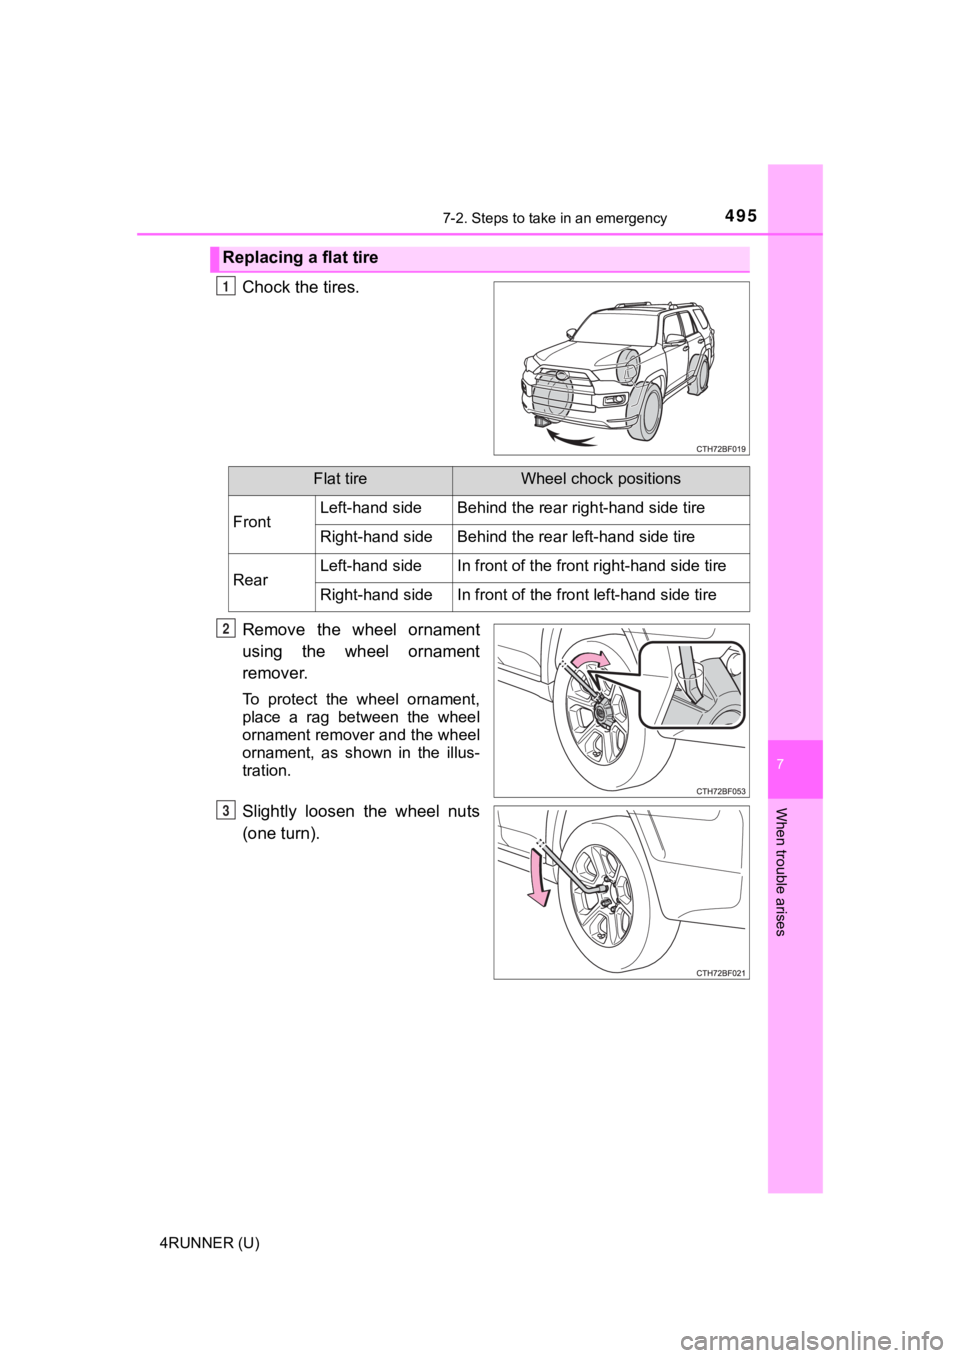
Chock the tires.
Remove the wheel ornament
using the wheel ornament
remover.
To protect the wheel ornament,
place a rag between the wheel
ornament remover and the wheel
ornament, as shown in the illus-
tration.
Slightly loosen the wheel nuts
(one turn).
Replacing a flat tire
1
Flat tireWheel chock positions
FrontLeft-hand sideBehind the rear right-hand side tire
Right-hand sideBehind the rear left-hand side tire
RearLeft-hand sideIn front of the front right-hand side tire
Right-hand sideIn front of the front left-hand side tire
2
3
Page 496 of 592
4967-2. Steps to take in an emergency
4RUNNER (U)
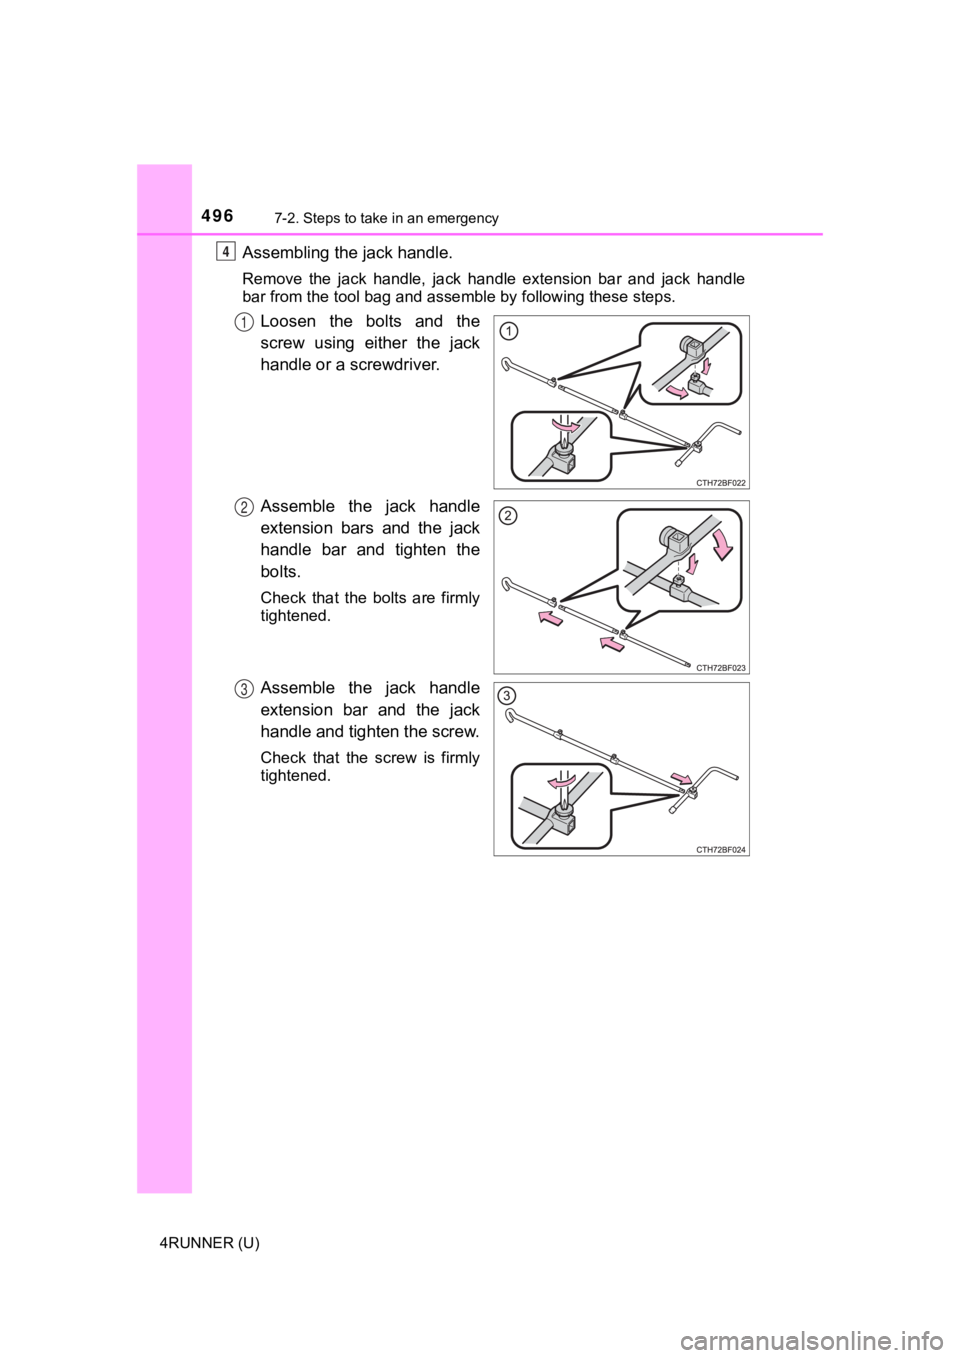
Assembling the jack handle.
Remove the jack handle, jack handle extension bar and jack handle
bar from the tool bag and ass emble by following these steps.
Loosen the bolts and the
screw using either the jack
handle or a screwdriver.
Assemble the jack handle
extension bars and the jack
handle bar and tighten the
bolts.
Check that the bolts are firmly
tightened.
Assemble the jack handle
extension bar and the jack
handle and tighten the screw.
Check that the screw is firmly
tightened.
4
1
2
3
Page 497 of 592
4977-2. Steps to take in an emergency
7
When trouble arises
4RUNNER (U)
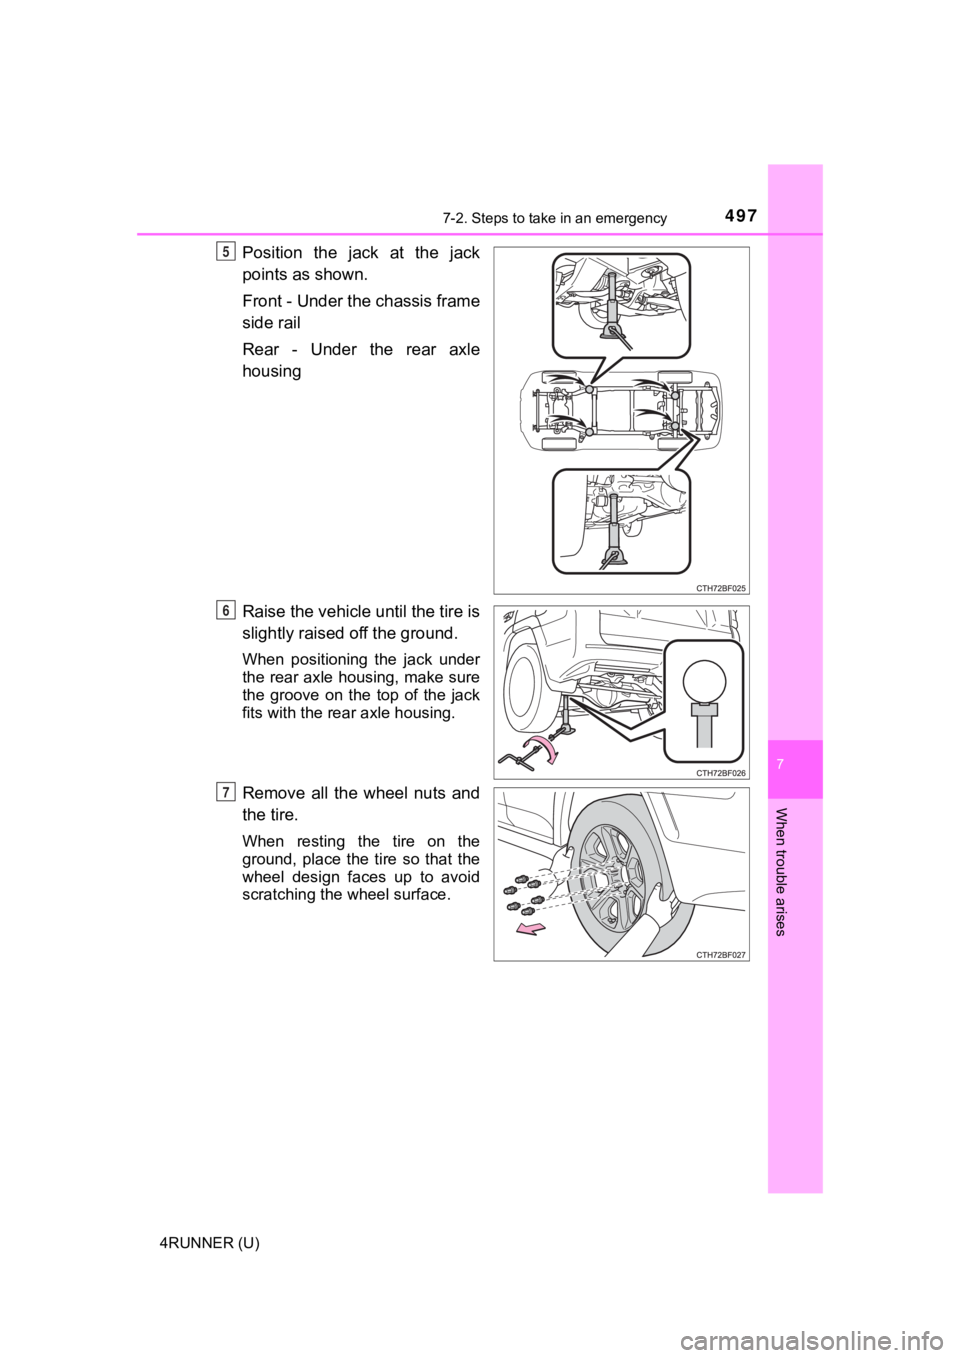
Position the jack at the jack
points as shown.
Front - Under the chassis frame
side rail
Rear - Under the rear axle
housing
Raise the vehicle until the tire is
slightly raised off the ground.
When positioning the jack under
the rear axle housing, make sure
the groove on the top of the jack
fits with the rear axle housing.
Remove all the wheel nuts and
the tire.
When resting the tire on the
ground, place the tire so that the
wheel design faces up to avoid
scratching the wheel surface.
5
6
7
Page 498 of 592

4987-2. Steps to take in an emergency
4RUNNER (U)
WARNING
■Replacing a flat tire
●Observe the following precautions.
Failure to do so may result in serious injury:
• Lower the spare tire completely to the ground before removing it
from under the vehicle.
• Do not try to remove the wheel ornament by hand. Take due care in
handling the ornament to avoi d unexpected personal injury.
• Do not attach a heavily damaged wheel ornament, as it may fly off
the wheel while the vehicle is moving.
• Do not touch the disc wheels or the area around the brakes imm edi-
ately after the vehicle has been driven.
After the vehicle has been driven the disc wheels and the area
around the brakes will be extreme ly hot. Touching these areas with
hands, feet or other body parts while changing a tire, etc. may result
in burns.
●Failure to follow these precautions could cause the wheel nuts to
loosen and the t ire to fall off, resulting in death or serious injury.
• Have the wheel nuts tightened with a torque wrench to 83 ft•lbf (112
N•m, 11.4 kgf•m) steel wheels, 7 6 ft•lbf (103 N•m, 10.5 kgf•m) alumi-
num wheels, as soon as possi ble after changing wheels.
• When installing a tire, only use wheel nuts that have been spe cifi-
cally designed for that wheel.
• If there are any cracks or deformations in the bolt screws, nu t
threads or bolt holes of the wheel, have the vehicle inspected by
your Toyota dealer.
• When installing the wheel nuts, b e sure to install them with the
tapered ends facing inward.
Page 499 of 592
4997-2. Steps to take in an emergency
7
When trouble arises
4RUNNER (U)
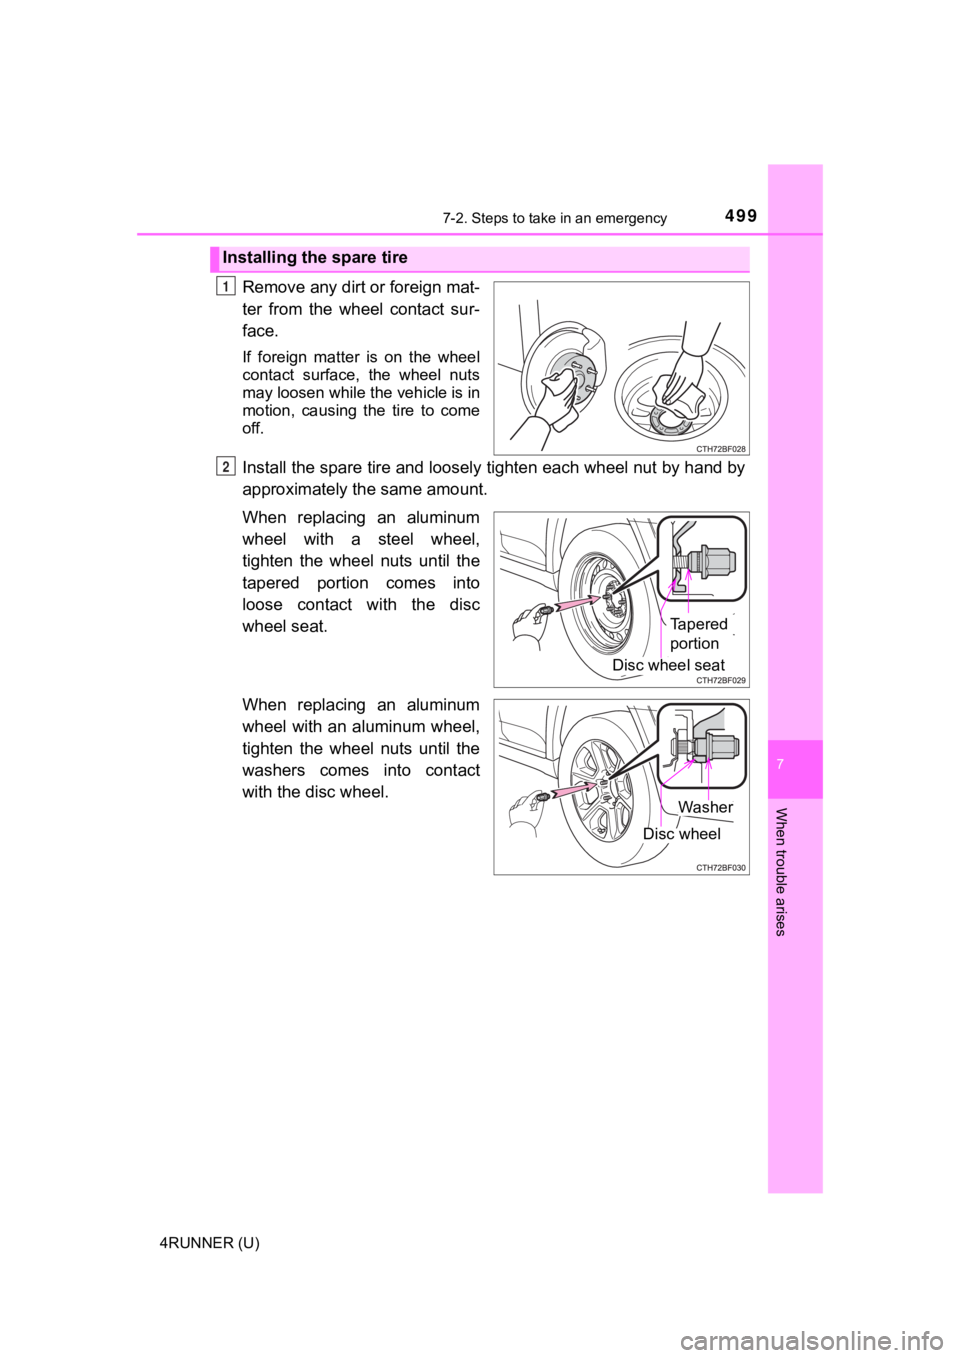
Remove any dirt or foreign mat-
ter from the wheel contact sur-
face.
If foreign matter is on the wheel
contact surface, the wheel nuts
may loosen while the vehicle is in
motion, causing the tire to come
off.
Install the spare tire and loosely tighten each wheel nut by hand by
approximately the same amount.
When replacing an aluminum
wheel with a steel wheel,
tighten the wheel nuts until the
tapered portion comes into
loose contact with the disc
wheel seat.
When replacing an aluminum
wheel with an aluminum wheel,
tighten the wheel nuts until the
washers comes into contact
with the disc wheel.
Installing the spare tire
1
2
Tapered
portion
Disc wheel seat
Washer
Disc wheel
Page 500 of 592
5007-2. Steps to take in an emergency
4RUNNER (U)
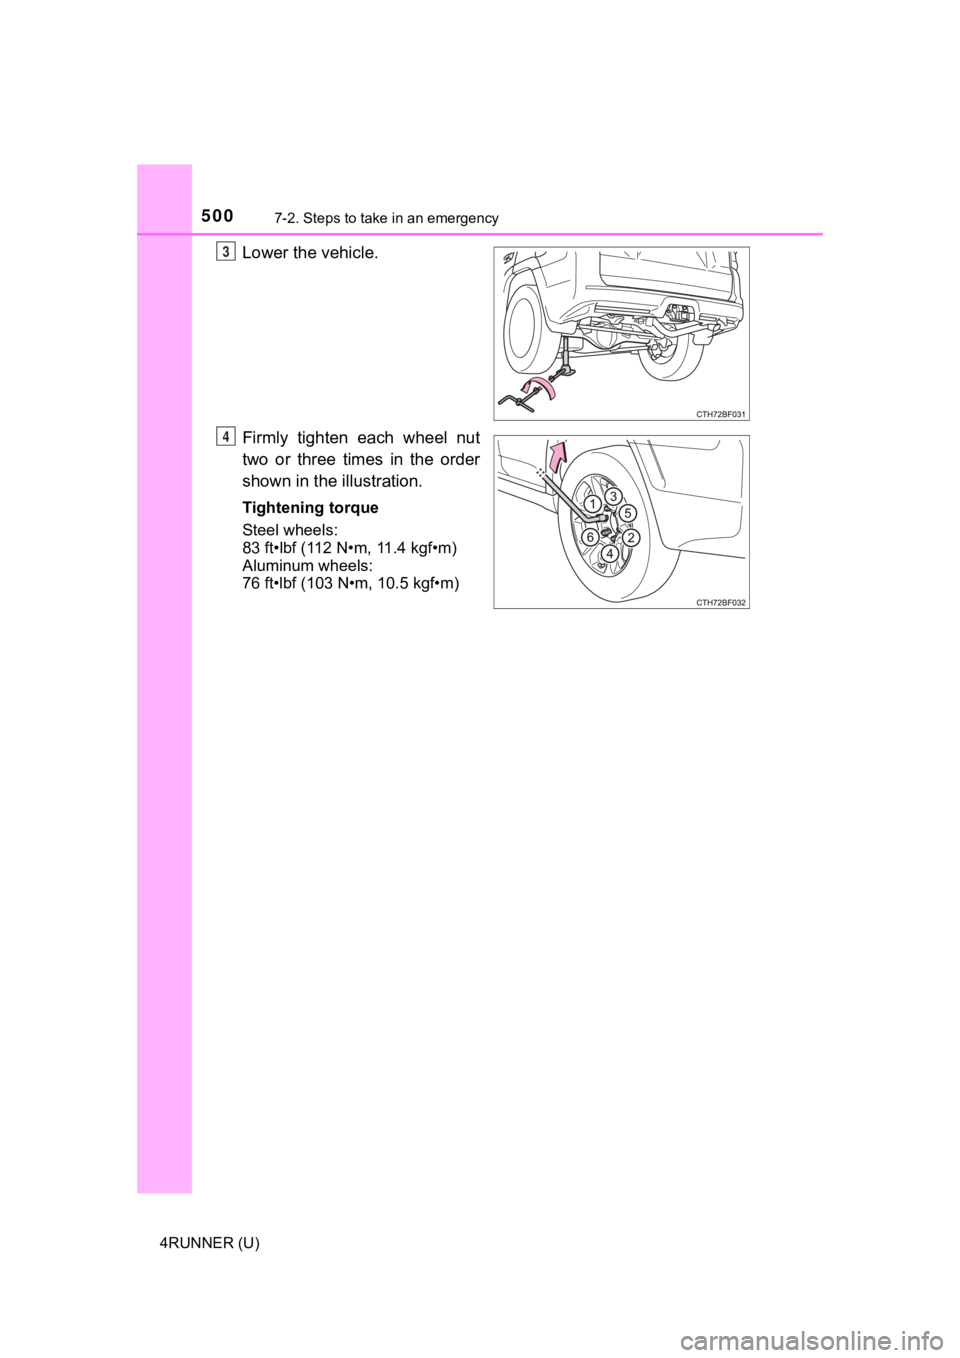
Lower the vehicle.
Firmly tighten each wheel nut
two or three times in the order
shown in the illustration.
Tightening torque
Steel wheels:
83 ft•lbf (112 N•m, 11.4 kgf•m)
Aluminum wheels:
76 ft•lbf (103 N•m, 10.5 kgf•m)
3
4