check engine TOYOTA 86 2019 Owner's Guide
[x] Cancel search | Manufacturer: TOYOTA, Model Year: 2019, Model line: 86, Model: TOYOTA 86 2019Pages: 532, PDF Size: 6.89 MB
Page 230 of 532
2302-3. Operating the lights and windshield wipers
■ The windshield wipers and w asher can be operated when
Vehicles without a smart key system
The engine switch is in the “ON” position.
Vehicles with a smart key system
The “ENGINE START STOP” switch is in IGNITION ON mode.
■ If no windshield washer fluid sprays
Check that the washer nozzles are not blocked if there is washe r fluid in the
windshield washer fluid tank.
WARNING■ Caution regarding the use of washer fluid
When it is cold, do not use the washer fluid until the windshield becomes
warm. The fluid may freeze on the windshield and cause low visi bility. This
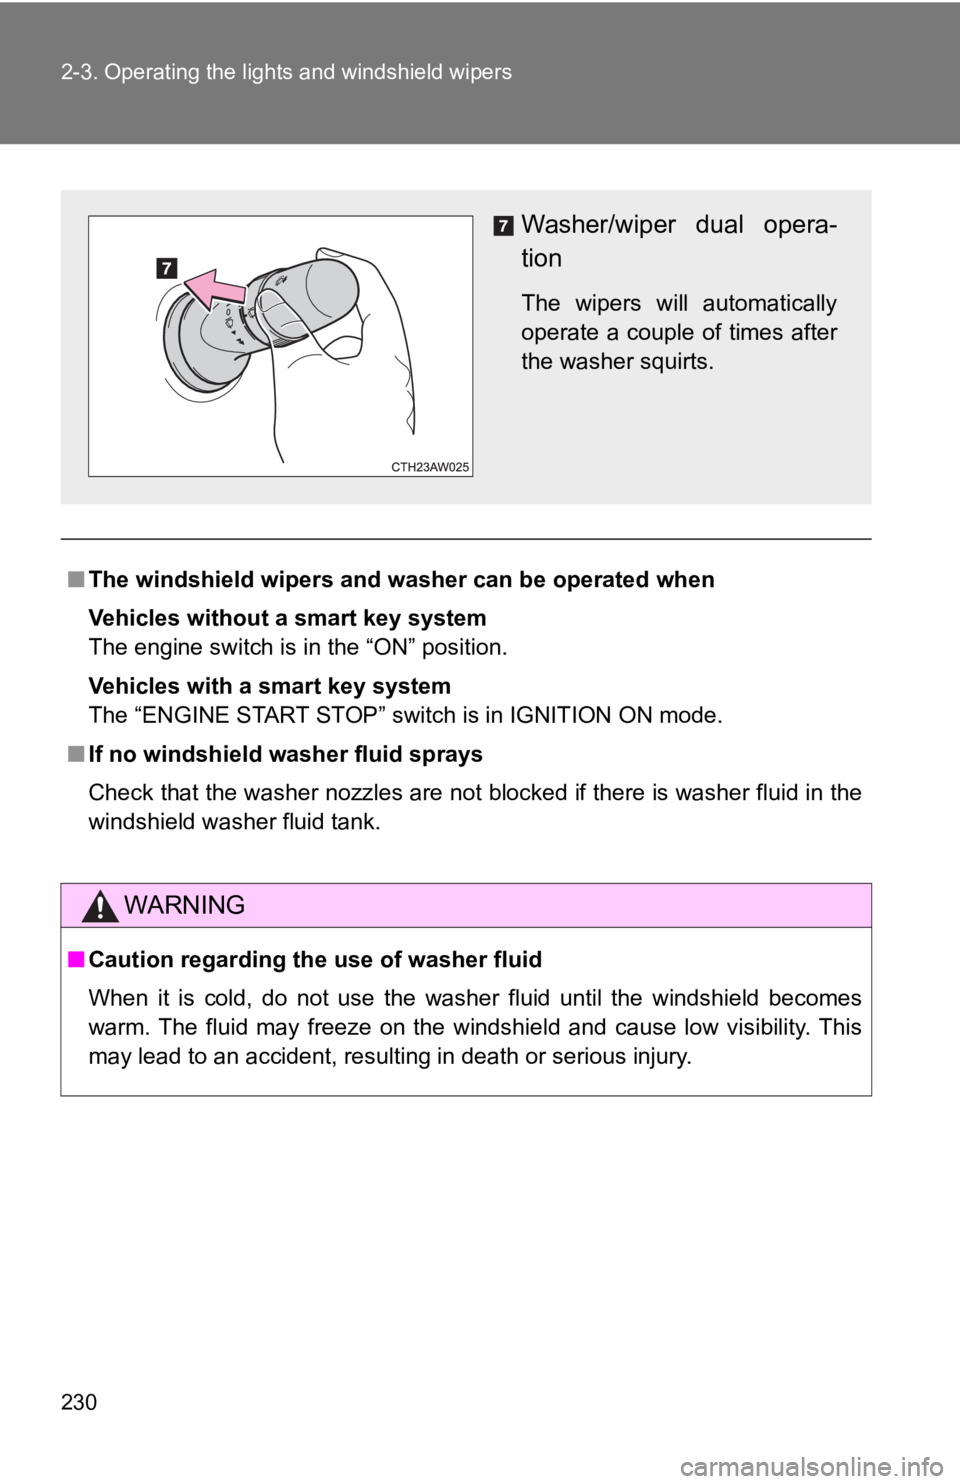
may lead to an accident, resulting in death or serious injury. Washer/wiper dual opera-
tion The wipers will automatically
operate a couple of times after
the washer squirts.
Page 252 of 532
2522-4. Using other driving systems
Hill-start assist control Hill-start assist control helps to maintain braking force to as sist
starting off forward while facing uphill or starting off backwa rd while
facing downhill. As hill-start assist control is initially disa bled,
enable the system to make it operable. The enabled/disabled set ting
will be maintained the next time the engine is started.
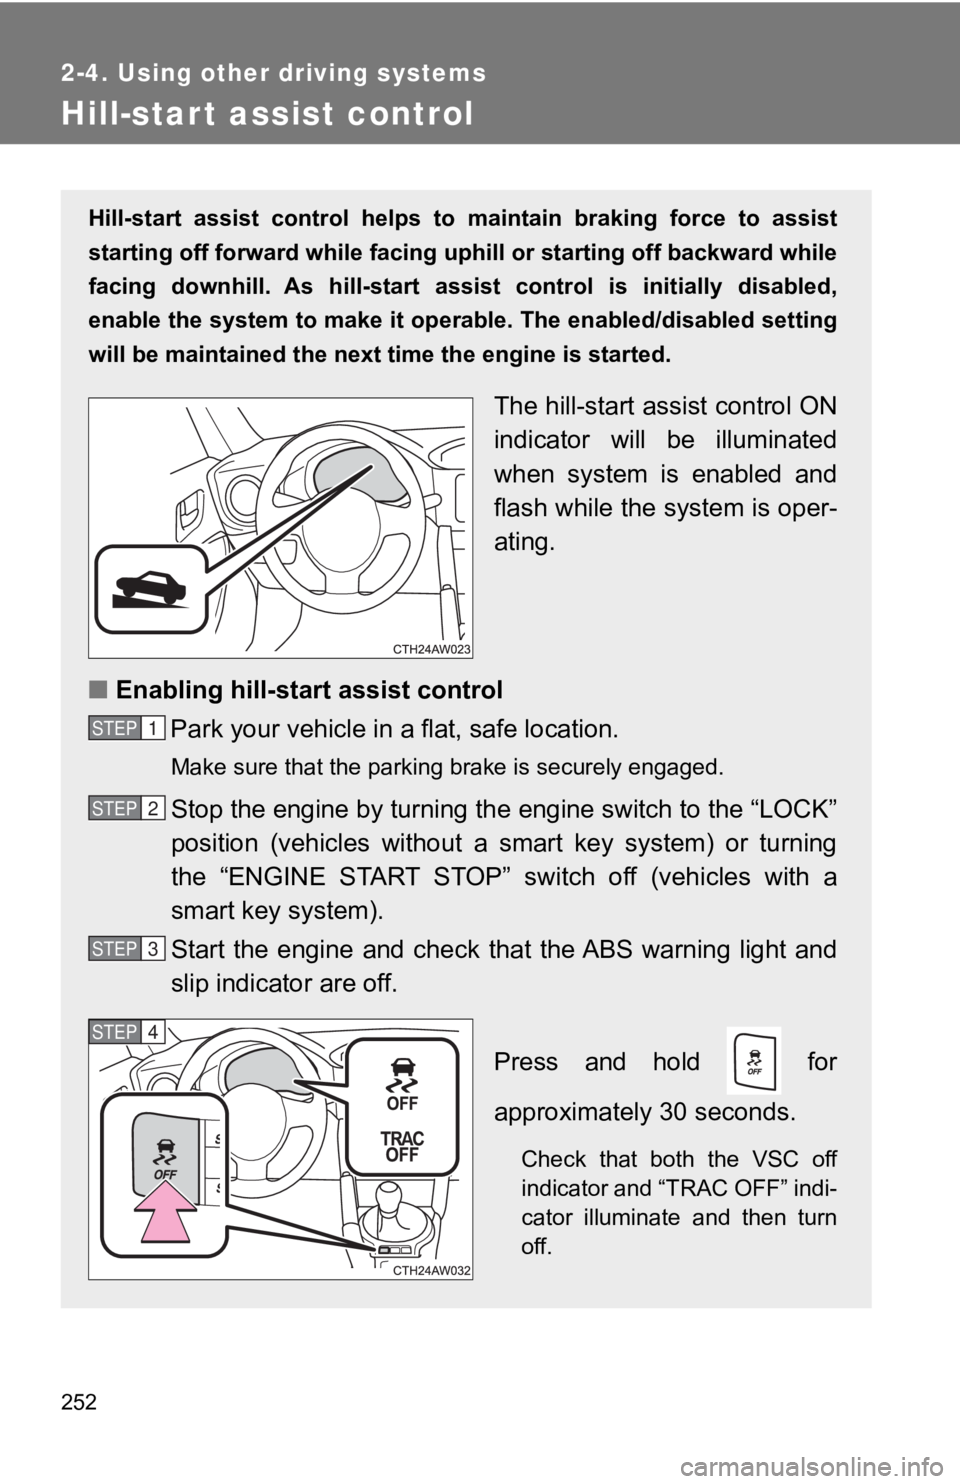
The hill-start assist control ON
indicator will be illuminated
when system is enabled and
flash while the system is oper-
ating.
■ Enabling hill-start assist control
Park your vehicle in a flat, safe location. Make sure that the parking brake is securely engaged.
Stop the engine by turning the engine switch to the “LOCK”
position (vehicles without a smart key system) or turning
the “ENGINE START STOP” switch off (vehicles with a
smart key system).
Start the engine and check t hat the ABS warning light and
slip indicator are off.
Press and hold for
approximately 30 seconds.
Check that both the VSC off
indicator and “TRAC OFF” indi-
cator illuminate and then turn
off.STEP 1
STEP 2
STEP 3
STEP 4
Page 253 of 532
2532-4. Using other driving systems
2
When driving
■ When enabling the hill-start assist control
● If the hill-start assist control ON indicator does not illumina te or if an
incorrect operation is performed, turn the engine switch to the “LOCK”
position (vehicles without a smart key system) or turn the “ENG INE
START STOP” switch off (vehicles with a smart key system) and t hen
restart the enabling procedure from .
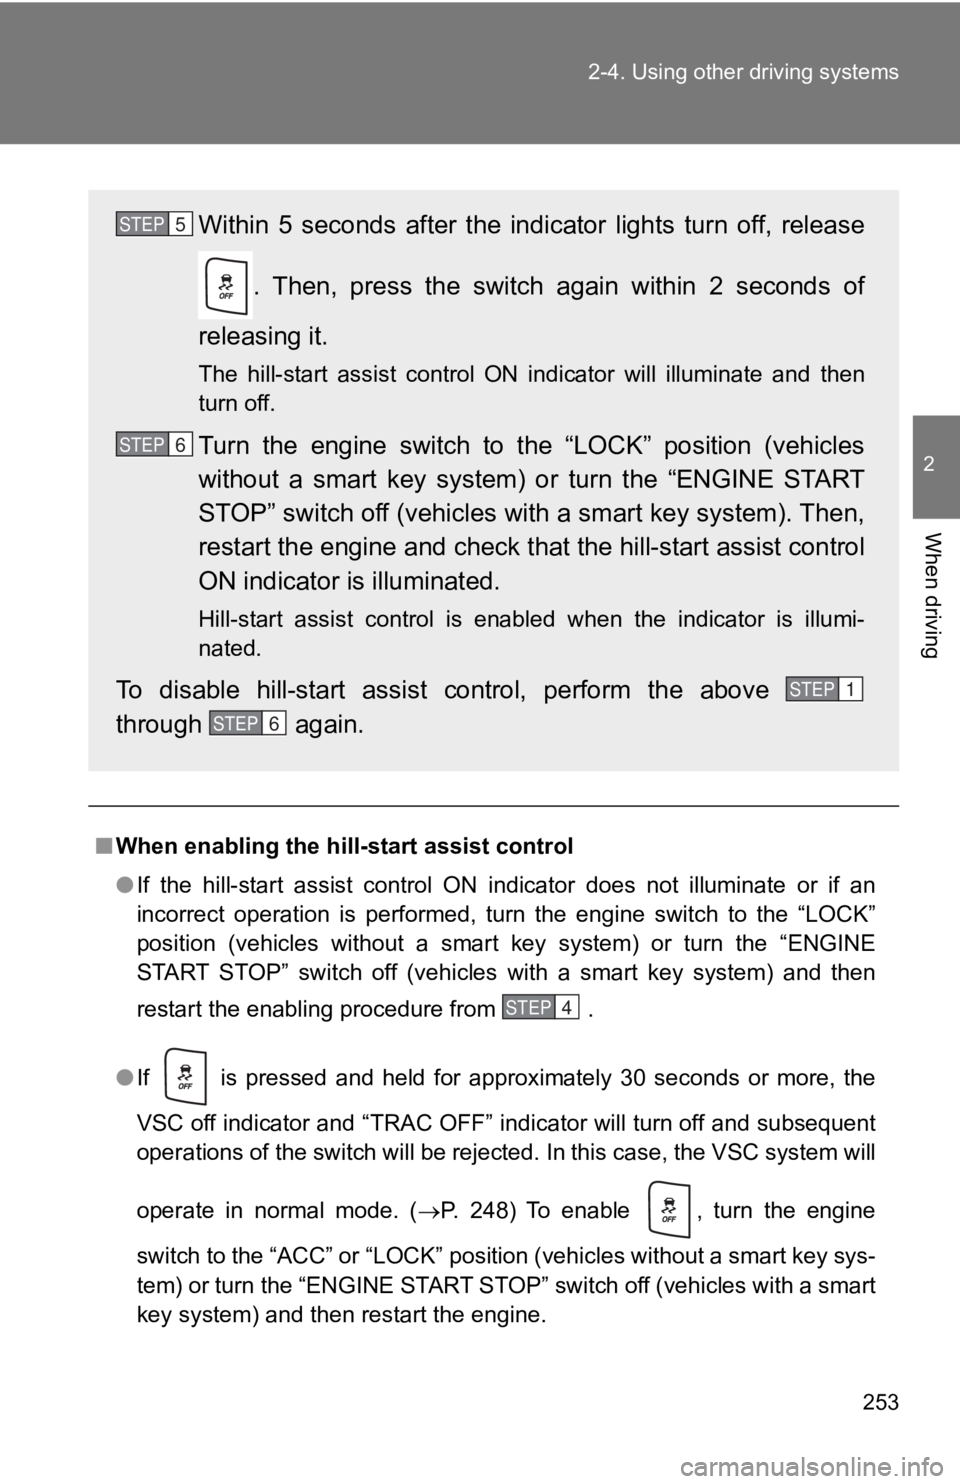
● If is pressed and held for approximately 30 seconds or more, t he
VSC off indicator and “TRAC OFF” indicator will turn off and su bsequent
operations of the switch will be rejected. In this case, the VSC system will
operate in normal mode. ( P. 248) To enable , turn the engine
switch to the “ACC” or “LOCK” position (vehicles without a smar t key sys-
tem) or turn the “ENGINE START STOP” switch off (vehicles with a smart
key system) and then restart the engine. Within 5 seconds after the indicator lights turn off, release
. Then, press the switch again within 2 seconds of
releasing it. The hill-start assist control ON indicator will illuminate and then
turn off.
Turn the engine switch to the “LOCK” position (vehicles
without a smart key system) or turn the “ENGINE START
STOP” switch off (vehicles with a smart key system). Then,
restart the engine and check that the hill-start assist control
ON indicator is illuminated. Hill-start assist control is enabled when the indicator is illu mi-
nated.
To disable hill-start assist control, perform the above
through again. STEP 5
STEP 6
STEP 1
STEP 6
STEP 4
Page 261 of 532
2612-5. Driving information
2
When driving
Winter driving tips Carry out the necessary preparatio ns and inspections before dri ving
the vehicle in winter. Always drive the vehicle in a manner app ropri-
ate to the prevailing weather conditions.
■ Pre-winter preparations
● Use fluids that are appropriate t o the prevailing outside tem-
peratures.
• Engine oil
• Washer fluid
● Have a service technician inspec t the condition of the battery.
● Have the vehicle fitted with four snow tires.
Make sure to install 4 tires that are of the specified size, an d that
all 4 tires are the same size, same maker, same brand and tread
pattern.
■ Before driving the vehicle
Perform the following accordi ng to the driving conditions.
● Do not try to forcibly open a window or move a wiper that is
frozen. Pour warm water over the frozen area to melt the ice.
Wipe away the water immediately to prevent it from freezing.
● To ensure proper operation of the climate control system fan,
remove any snow that has accumulated on the air inlet vents
in front of th e windshield.
● Check for and remove any excess ice or snow that may have
accumulated on the exterior lig hts, vehicle's roof, chassis,
around the tires or on the brakes.
● Remove any snow or mud from the bottom of your shoes
before getting in the vehicle.
Page 304 of 532
3043-5. Other interior features
WARNINGObserve the following precautions.
Failure to do so may cause the driver's floor mat to slip, possibly interfering
with the pedals while driving. An unexpectedly high speed may r esult or it may
become difficult to stop the vehicle. This could lead to an acc ident, resulting in
death or serious injury.
■ When installing a floor mat
● Do not use floor mats designed for other models or different mo del year
vehicles, even if they are Toyota Genuine floor mats.
● Driver’s seat floor mat: Only use floor mats designed for the d river's seat.
● Front: Always install the floor mat securely using the retaining hooks (clips)
provided.
● Do not use two or more floor mats on top of each other.
● Do not place the floor mat bottom-side up or upside-down.
■ Before driving
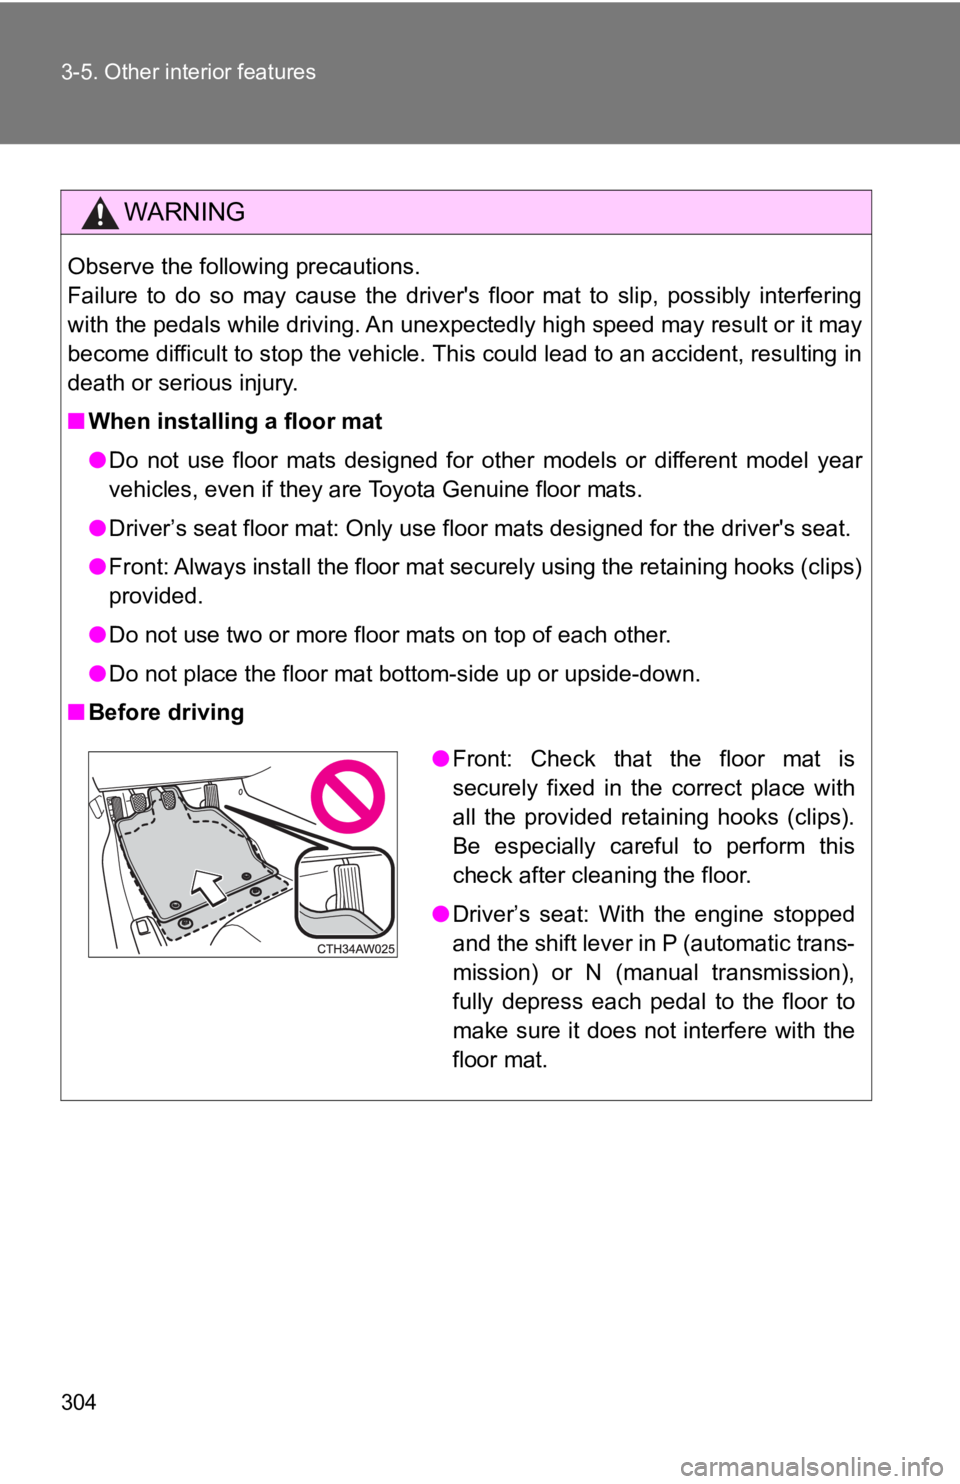
● Front: Check that the floor mat is
securely fixed in the correct place with
all the provided retaining hooks (clips).
Be especially careful to perform this
check after cleaning the floor.
● Driver’s seat: With the engine stopped
and the shift lever in P (automatic trans-
mission) or N (manual transmission),
fully depress each pedal to the floor to
make sure it does not interfere with the
floor mat.
Page 307 of 532
Maintenance and care
4
3074-1. Maintenance and care
Cleaning and protecting
the vehicle exterior......... 308
Cleaning and protecting
the vehicle interior.......... 312
Cleaning and protecting
the Alcantara ®
area ....... 316
4-2. Maintenance
Maintenance
requirements .................. 318
General maintenance....... 320
Emission inspection and
maintenance (I/M)
programs........................ 323 4-3. Do-it-yourself
maintenance
Do-it-yourself service
precautions .................... 324
Hood ................................ 327
Positioning a floor jack ..... 329
Engine compartment ........ 331
Tires ................................. 345
Tire inflation pressure ...... 353
Wheels ............................. 357
Air conditioning filter......... 360
Wireless remote control/
electronic key battery ..... 363
Checking and replacing
fuses .............................. 367
Light bulbs........................ 375
Page 320 of 532
3204-2. Maintenance
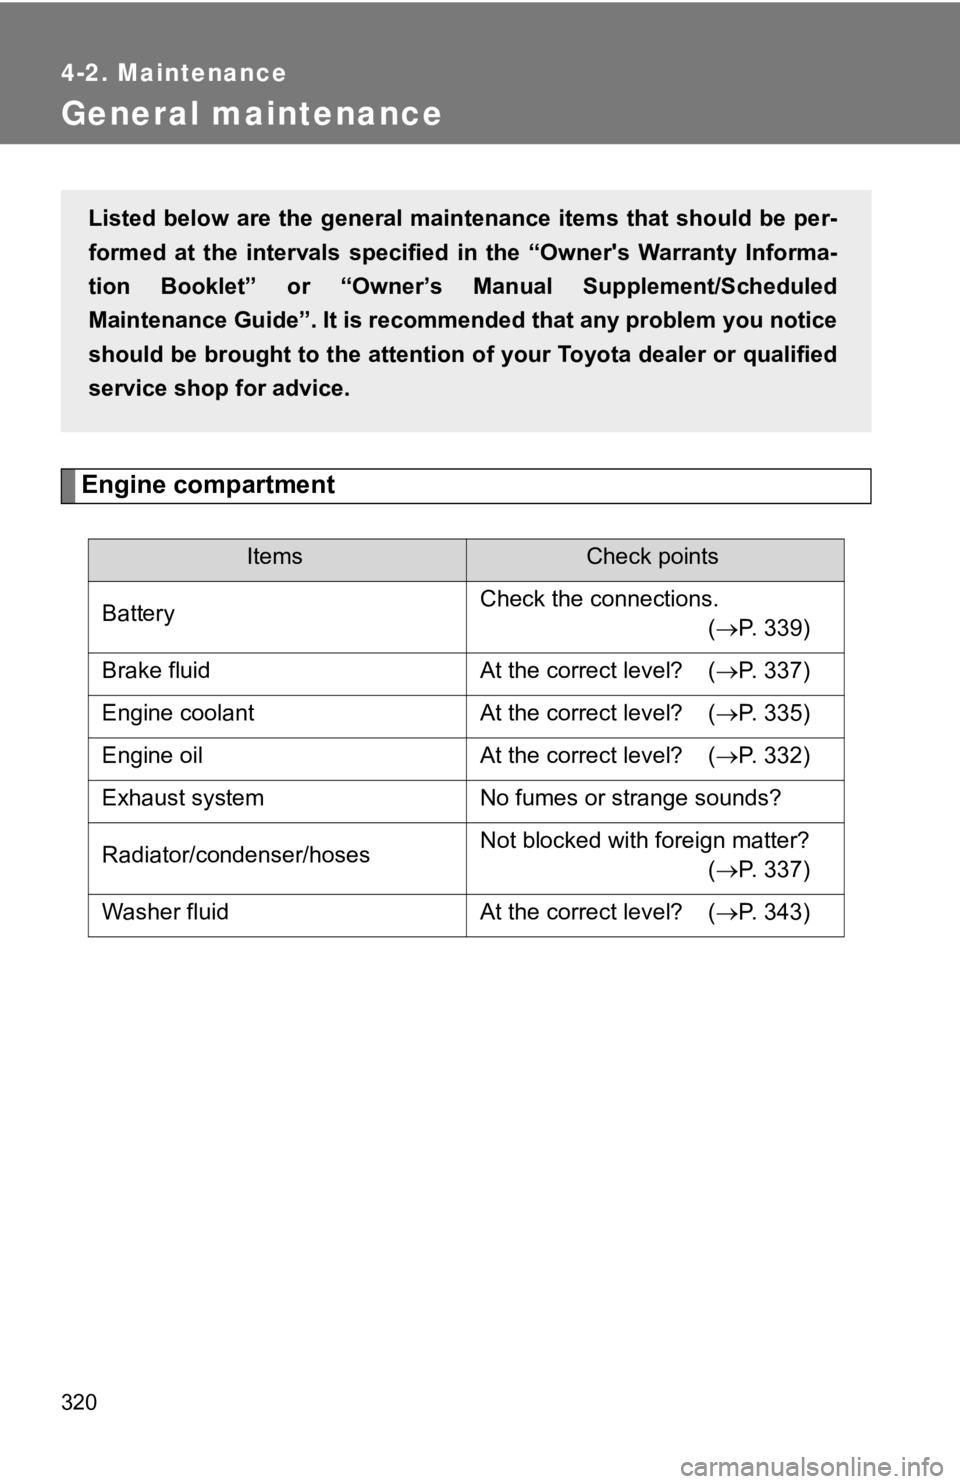
General maintenance
Engine compartment Items Check points
Battery Check the connections.
( P. 339)
Brake fluid At the correct level? ( P. 337)
Engine coolant At the correct level? ( P. 335)
Engine oil At the correct level? ( P. 332)
Exhaust system No fumes or strange sounds?
Radiator/condenser/hoses Not blocked with foreign matter?
( P. 337)
Washer fluid At the correct level? ( P. 343)Listed below are the general maintenance items that should be p er-
formed at the intervals specifie d in the “Owner's Warranty Info rma-
tion Booklet” or “Owner’s Manual Supplement/Scheduled
Maintenance Guide”. It is recomme nded that any problem you noti ce
should be brought to the attention of your Toyota dealer or qua lified
service shop for advice.
Page 322 of 532
3224-2. Maintenance
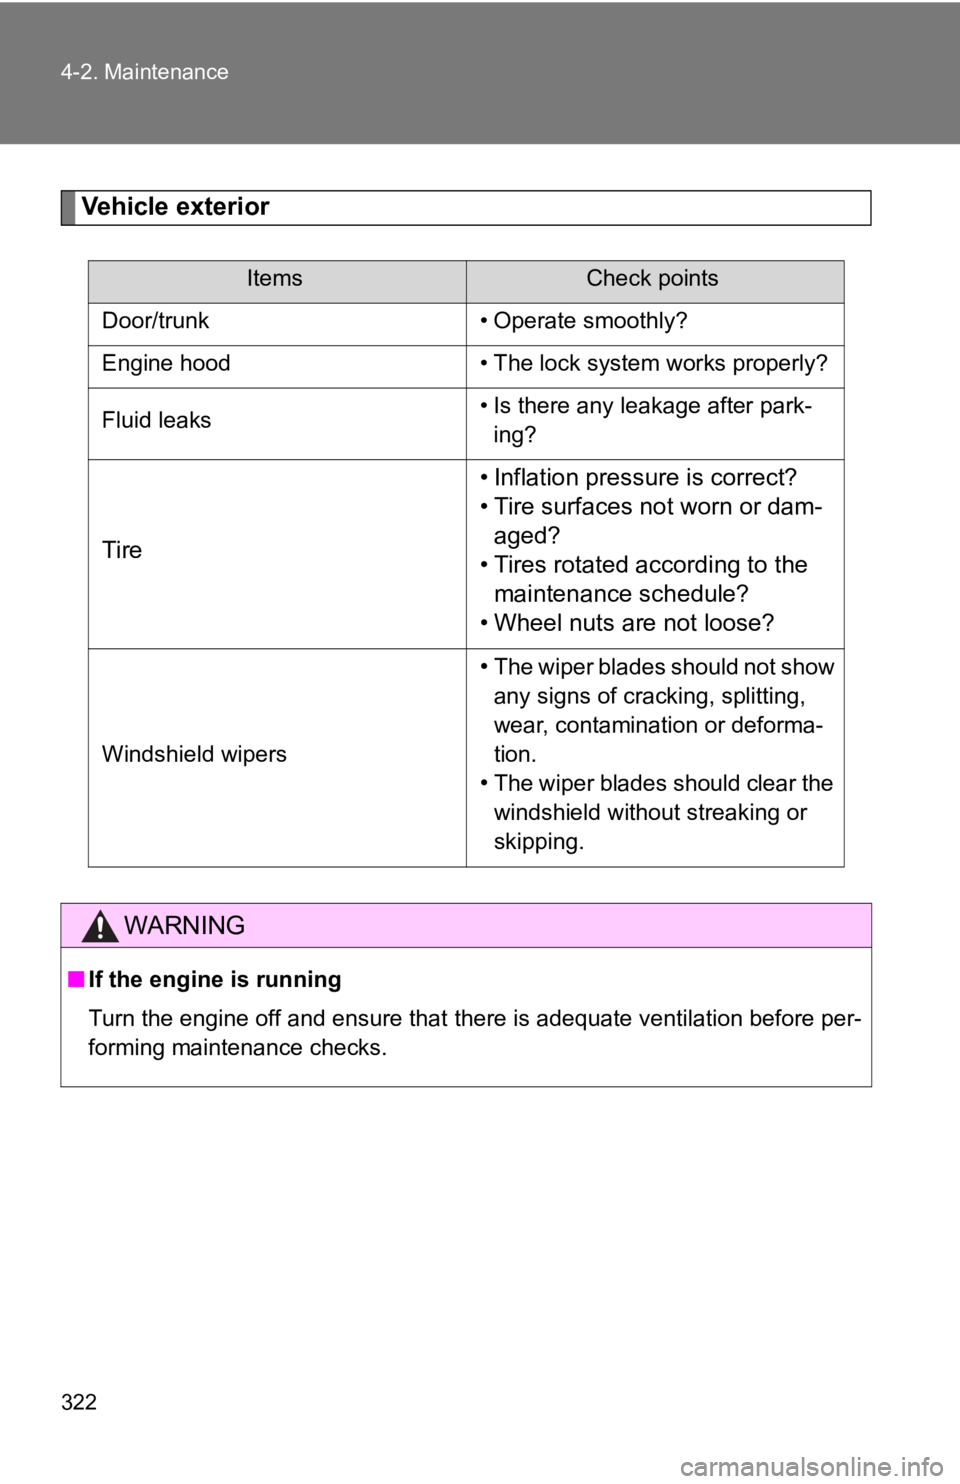
Vehicle exterior Items Check points
Door/trunk • Operate smoothly?
Engine hood • The lock system works properly?
Fluid leaks • Is there any leakage after park-
ing?
Tire • Inflation pressure is correct?
• Tire surfaces not worn or dam-
aged?
• Tires rotated according to the
maintenance schedule?
• Wheel nuts are not loose?
Windshield wipers • The wiper blades should not show
any signs of cracking, splitting,
wear, contamination or deforma-
tion.
• The wiper blades should clear the
windshield without streaking or
skipping.
WARNING■ If the engine is running
Turn the engine off and ensure that there is adequate ventilati on before per-
forming maintenance checks.
Page 332 of 532
3324-3. Do-it-yourself maintenance
Engine oil
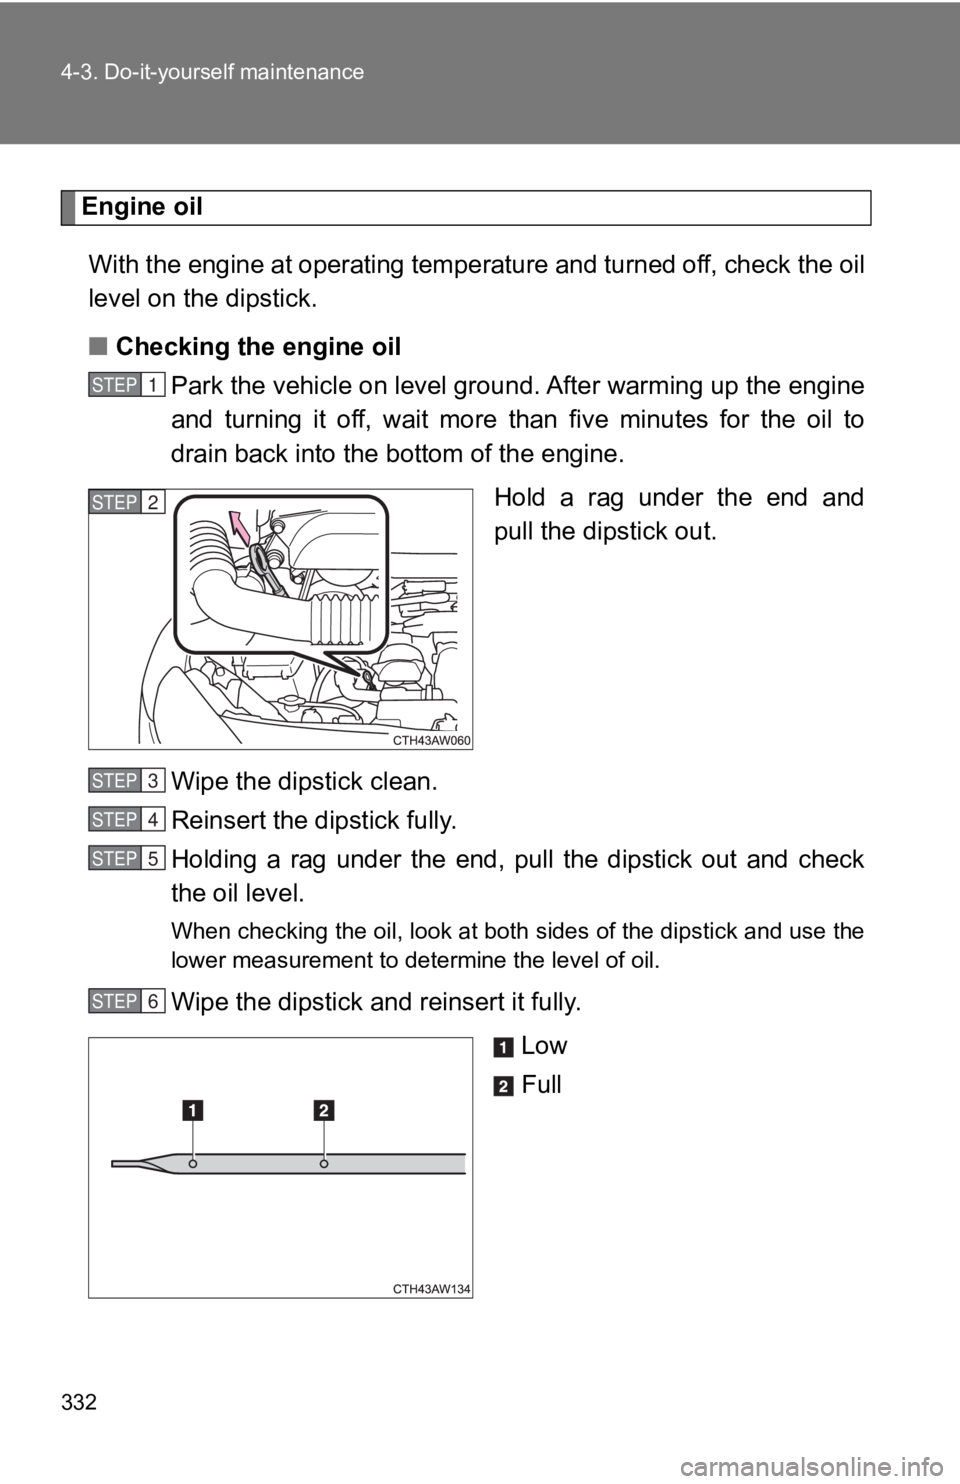
With the engine at operating temperature and turned off, check the oil
level on the dipstick.
■ Checking the engine oil
Park the vehicle on level groun d. After warming up the engine
and turning it off, wait more than five minutes for the oil to
drain back into the b ottom of the engine.
Hold a rag under the end and
pull the dipstick out.
Wipe the dipstick clean.
Reinsert the dipstick fully.
Holding a rag under the end, pull the dipstick out and check
the oil level. When checking the oil, look at both sides of the dipstick and u se the
lower measurement to determine the level of oil.
Wipe the dipstick and reinsert it fully.
Low
FullSTEP 1
STEP 2
STEP 3
STEP 4
STEP 5
STEP 6
Page 333 of 532
3334-3. Do-it-yourself maintenance
4
Maintenance and care ■ Adding engine oil
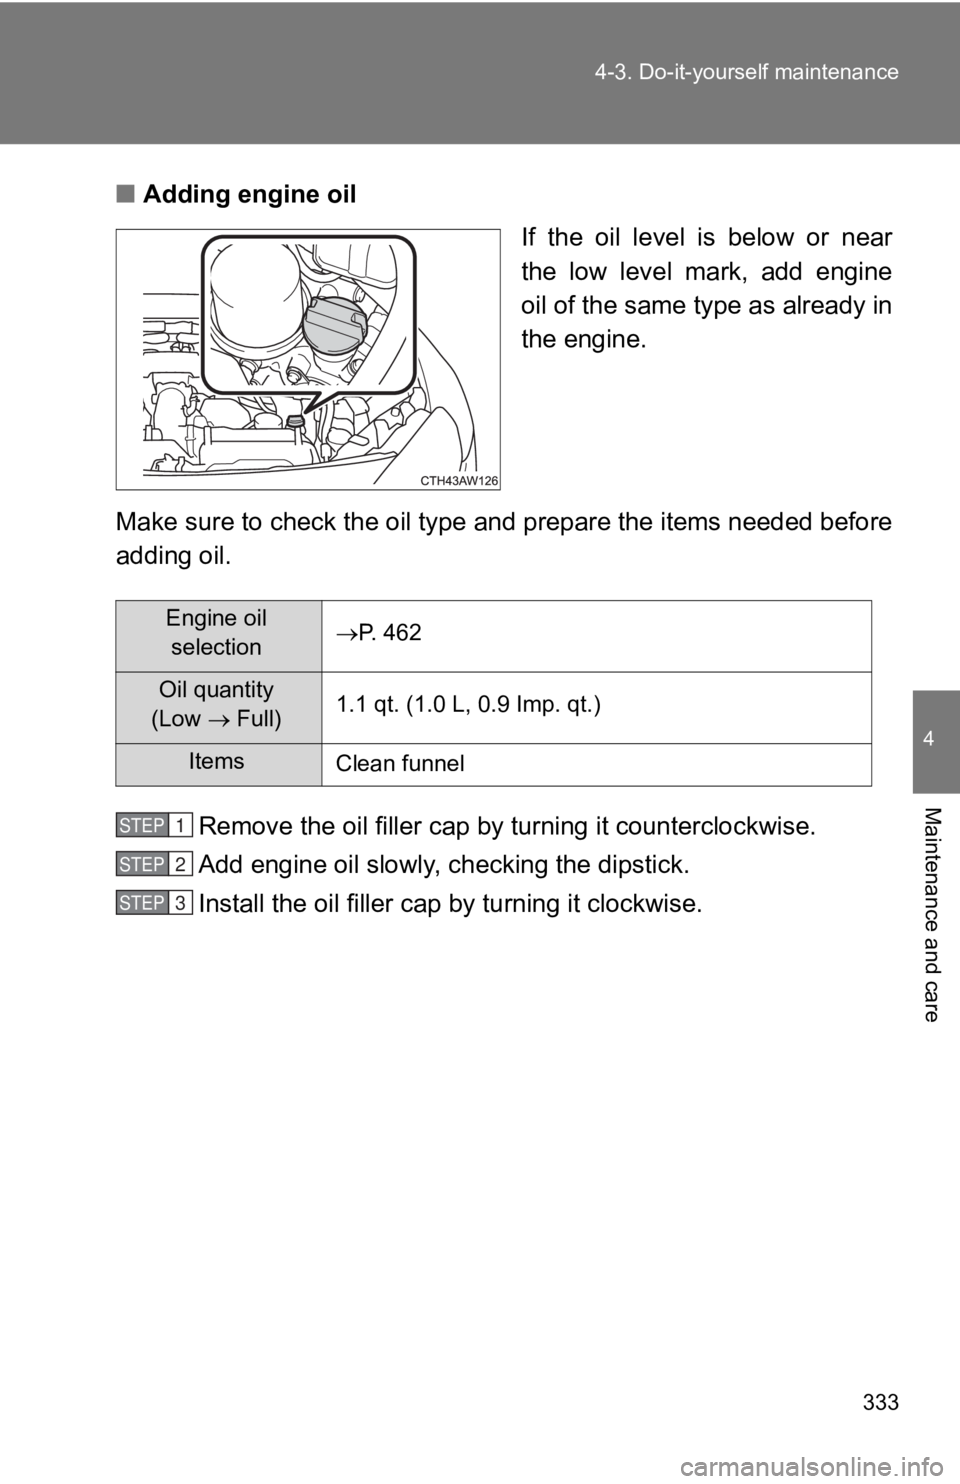
If the oil level is below or near
the low level mark, add engine
oil of the same type as already in
the engine.
Make sure to check the oil type and prepare the items needed be fore
adding oil.
Remove the oil filler cap by tu rning it count erclockwise.
Add engine oil slowly, checking the dipstick.
Install the oil filler cap by turning it clockwise.Engine oil
selection P. 462
Oil quantity
(Low Full) 1.1 qt. (1.0 L, 0.9 Imp. qt.)
Items
Clean funnelSTEP 1
STEP 2
STEP 3