TOYOTA 86 2022 Owners Manual
Manufacturer: TOYOTA, Model Year: 2022, Model line: 86, Model: TOYOTA 86 2022Pages: 449, PDF Size: 8.5 MB
Page 161 of 449
1614-3. Operating the lights and wipers
4
Driving
*: If equipped
The SRH (Steering Responsive
Headlights) is a function which,
according to the steering wheel
operation and vehicle speed
when the vehicle is being driven
forward, automatically adjusts
the angle of the headlights to
illuminate intersections and cor-
ners, improving visibility.
This function operates when the
vehicle speed is 8 km/h or higher.
■Tu r n i n g S R H o f f
The SRH can be turned off
through a setting on the meter.
( P.400)
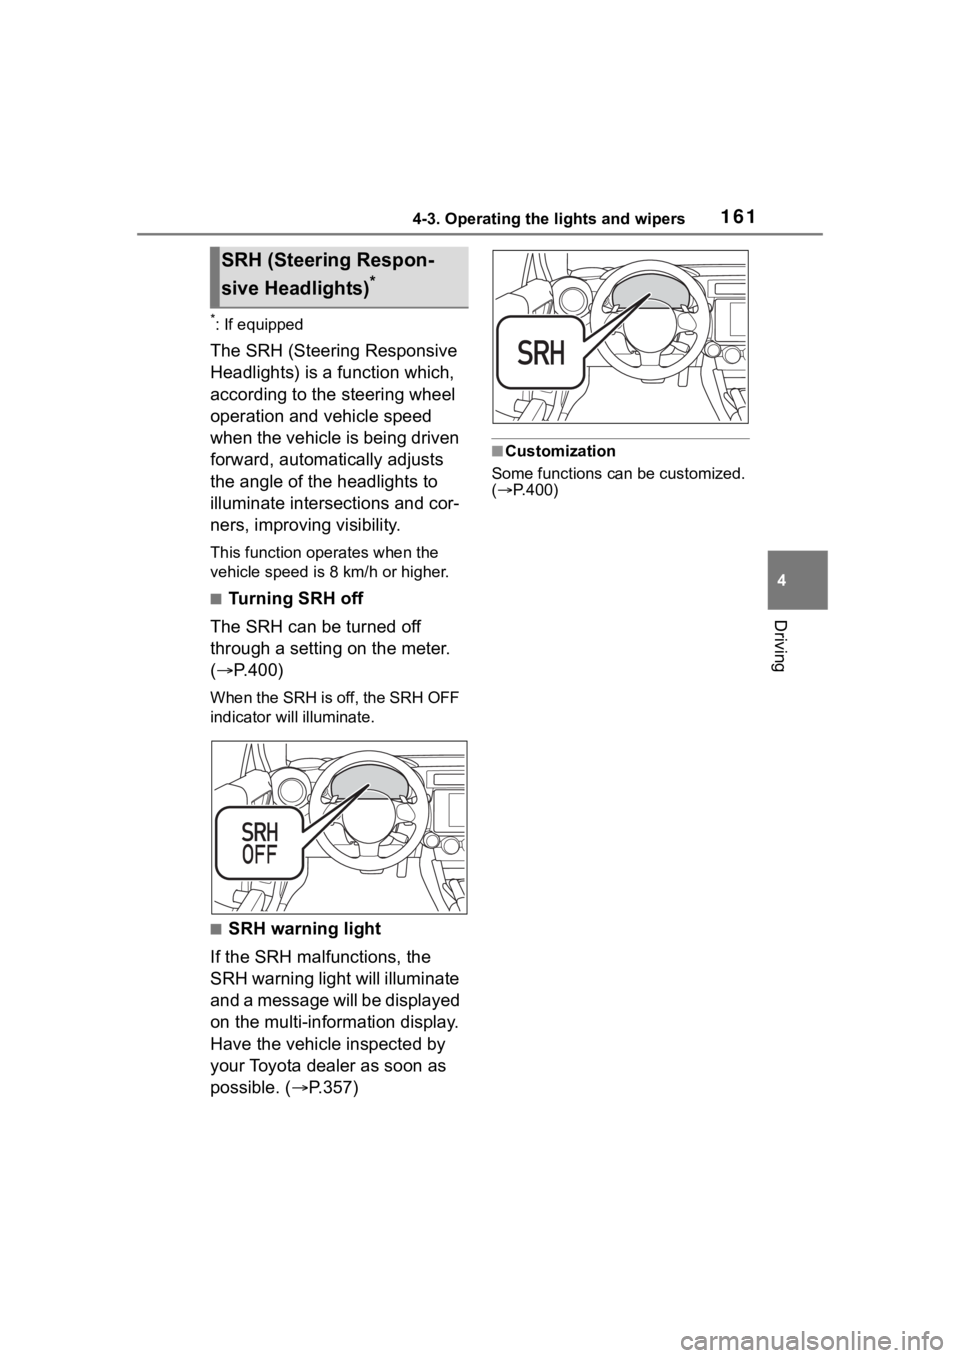
When the SRH is off, the SRH OFF
indicator will illuminate.
■SRH warning light
If the SRH malfunctions, the
SRH warning light will illuminate
and a message will be displayed
on the multi-information display.
Have the vehicle inspected by
your Toyota dealer as soon as
possible. ( P.357)
■Customization
Some functions can be customized.
( P.400)
SRH (Steer ing Respon-
sive Headlights)
*
Page 162 of 449
1624-3. Operating the lights and wipers
*: If equipped
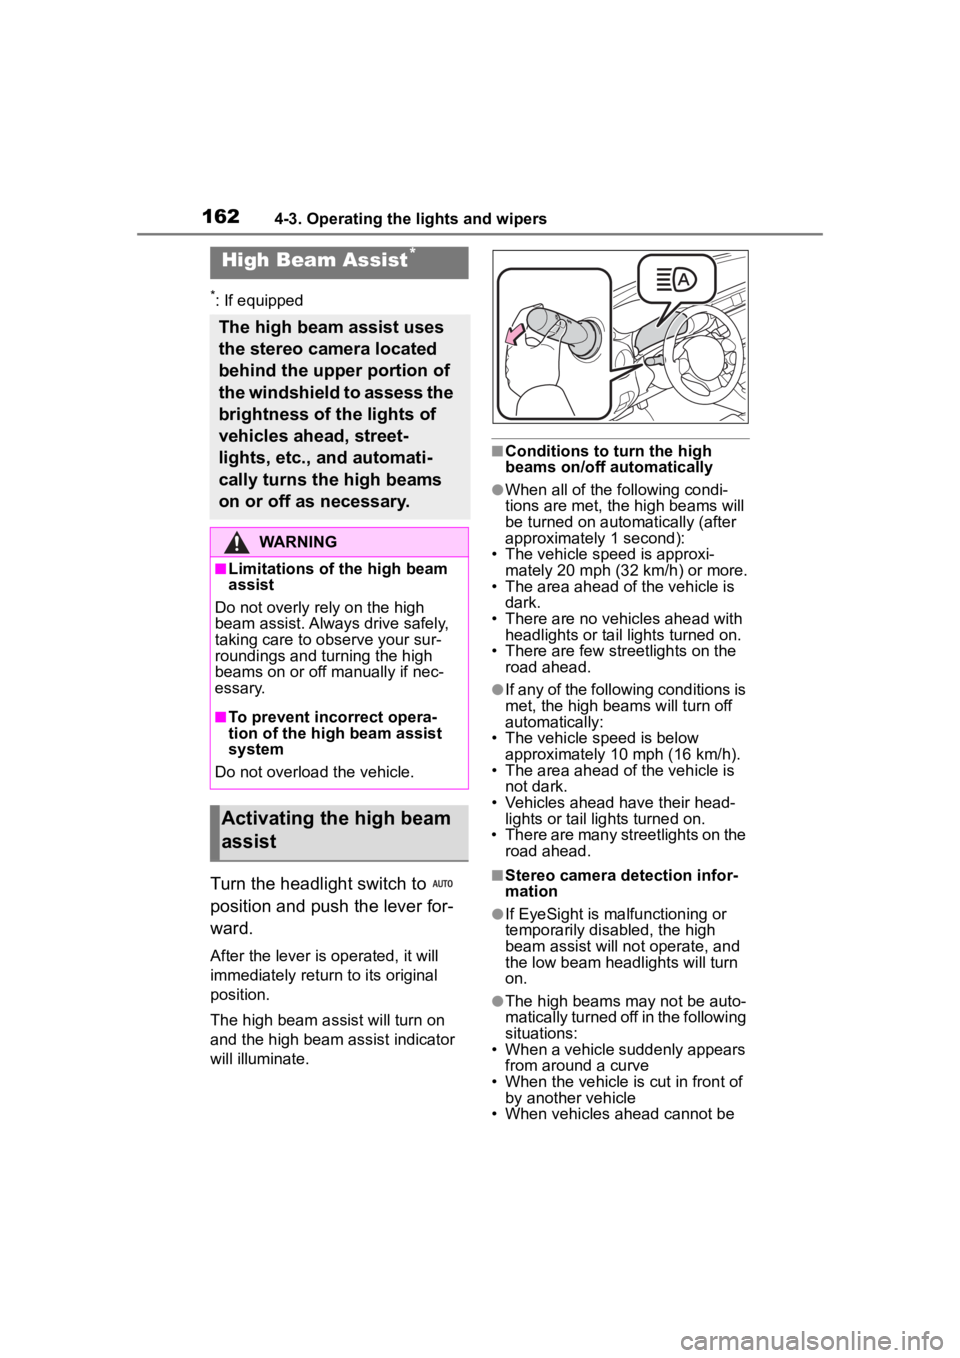
Turn the headlight switch to
position and push the lever for-
ward.
After the lever is operated, it will
immediately return to its original
position.
The high beam ass ist will turn on
and the high beam assist indicator
will illuminate.
■Conditions to turn the high
beams on/off automatically
●When all of the following condi-
tions are met, the high beams will
be turned on autom atically (after
approximately 1 second):
• The vehicle speed is approxi-
mately 20 mph (32 km/h) or more.
• The area ahead of the vehicle is dark.
• There are no vehicles ahead with headlights or tail lights turned on.
• There are few str eetlights on the
road ahead.
●If any of the following conditions is
met, the high beams will turn off
automatically:
• The vehicle speed is below
approximately 10 mph (16 km/h).
• The area ahead of the vehicle is not dark.
• Vehicles ahead have their head- lights or tail lights turned on.
• There are many streetlights on the
road ahead.
■Stereo camera detection infor-
mation
●If EyeSight is malfunctioning or
temporarily disabled, the high
beam assist will no t operate, and
the low beam headlights will turn
on.
●The high beams m ay not be auto-
matically turned off in the following
situations:
• When a vehicle suddenly appears
from around a curve
• When the vehicle is cut in front of by another vehicle
• When vehicles ahead cannot be
High Beam Assist*
The high beam assist uses
the stereo camera located
behind the upper portion of
the windshield to assess the
brightness of the lights of
vehicles ahead, street-
lights, etc., and automati-
cally turns the high beams
on or off as necessary.
WARNING
■Limitations of the high beam
assist
Do not overly rely on the high
beam assist. Always drive safely,
taking care to o bserve your sur-
roundings and turning the high
beams on or off manually if nec-
essary.
■To prevent incorrect opera-
tion of the high beam assist
system
Do not overload the vehicle.
Activating the high beam
assist
Page 163 of 449
1634-3. Operating the lights and wipers
4
Driving
detected due to repeated curves,
road dividers or roadside trees
• When vehicles ahead appear in a
faraway lane on a wide road
• When the lights of vehicles ahead are not on
●The high beams may be turned off
if a vehicle ahead that is using fog
lights without its headlights turned
on is detected.
●House lights, street lights, traffic
signals, and illumi nated billboards
or signs and other reflective
objects may cause the high
beams to change to the low
beams, or the low beams to
remain on.
●The following factors may affect
the amount of time taken for the
high beams to turn on or off:
• The brightness of the headlights,
fog lights, and ta il lights of vehi-
cles ahead
• The movement and direction of
vehicles ahead
• When a vehicle ahead only has operational lights on one side
• When a vehicle ahead is a two-wheeled vehicle
• The condition of the road (gradi-
ent, curve, condi tion of the road
surface, etc.)
• The number of passengers and
amount of luggage in the vehicle
• When there is a lag in response due to the limitat ions of the detec-
tion range of the stereo camera
●The high beams may turn on or off
unexpectedly.
●Bicycles or similar vehicles may
not be detected.
●In the following situations the sys-
tem may not be abl e to correctly
detect the surrounding brightness
level. This may cause the low
beams to remain on or the high
beams to flash or dazzle pedestri-
ans or vehicles ahead. In such a
case, it is necess ary to manually
switch between the high and low
beams.
• When driving in inclement weather (heavy rain, snow, fog, sand-
storms, etc.)
• When the windshi eld is obscured
by fog, mist, ice, dirt, etc.
• When the windshield is cracked or damaged
• When the stereo camera is deformed or dirty
• When the temperature of the ste-
reo camera is extremely high
• When the surrounding brightness level is equal to that of headlights,
tail lights or fog lights
• When headlights or tail lights of vehicles ahead are turned off,
dirty, changing color, or not aimed
properly
• When the vehicle is hit by water,
snow, dust, etc. from a preceding
vehicle
• When driving through an area of
intermittently changing brightness
and darkness
• When frequently and repeatedly
driving ascending/descending
roads, or roads with rough, bumpy
or uneven surfaces (such as
stone-paved roads, gravel roads,
etc.)
• When frequently and repeatedly
taking curves or driving on a wind-
ing road
• When there is a h ighly reflective
object ahead of the vehicle, such
as a sign or mirror
• When the back of a preceding
vehicle is highly reflective, such as
a container on a truck
• When the vehicle’s headlights are
damaged or dirty, or are not aimed
properly
• When the vehicle is listing or titling
due to a flat tire, a trailer being
towed, etc.
• Immediately after the engine is
started
• When the headlights are changed between the high beams and low
beams repeatedly in an abnormal
manner
• When the driver believes that the high beams may be flashing or
dazzling pedestrians or other driv-
ers
Page 164 of 449
1644-3. Operating the lights and wipers
The sensitivity of the high beam
assist function can be lowered
by using the following opera-
tions.
1After turning the engine
switch to ON, turn the head-
light switch to position
and push the lever forward.
2 After the high beam assist
indicator on the meter will
illuminate, turn the engine
switch off.
3 Turn the engine switch to ON
and within approximately 15
seconds, press the switch
more than 10 times consecu-
tively.
When the sensitivity of the high
beam assist function is lowered, the
high beam assist i ndicator on the
meter will flash.
■The sensitivity of the high beam
assist function
●The sensitivity of the high beam
assist function cannot be lowered
in the following conditions:
• Adaptive Cruise Control or Con- ventional Cruise Control indicator
is illuminated.
• The EyeSight warning light is illu- minated.
●The sensitivity of the high beam
assist function re turns to normal
level the next time the engine
switch is turned off and the engine
is restarted.
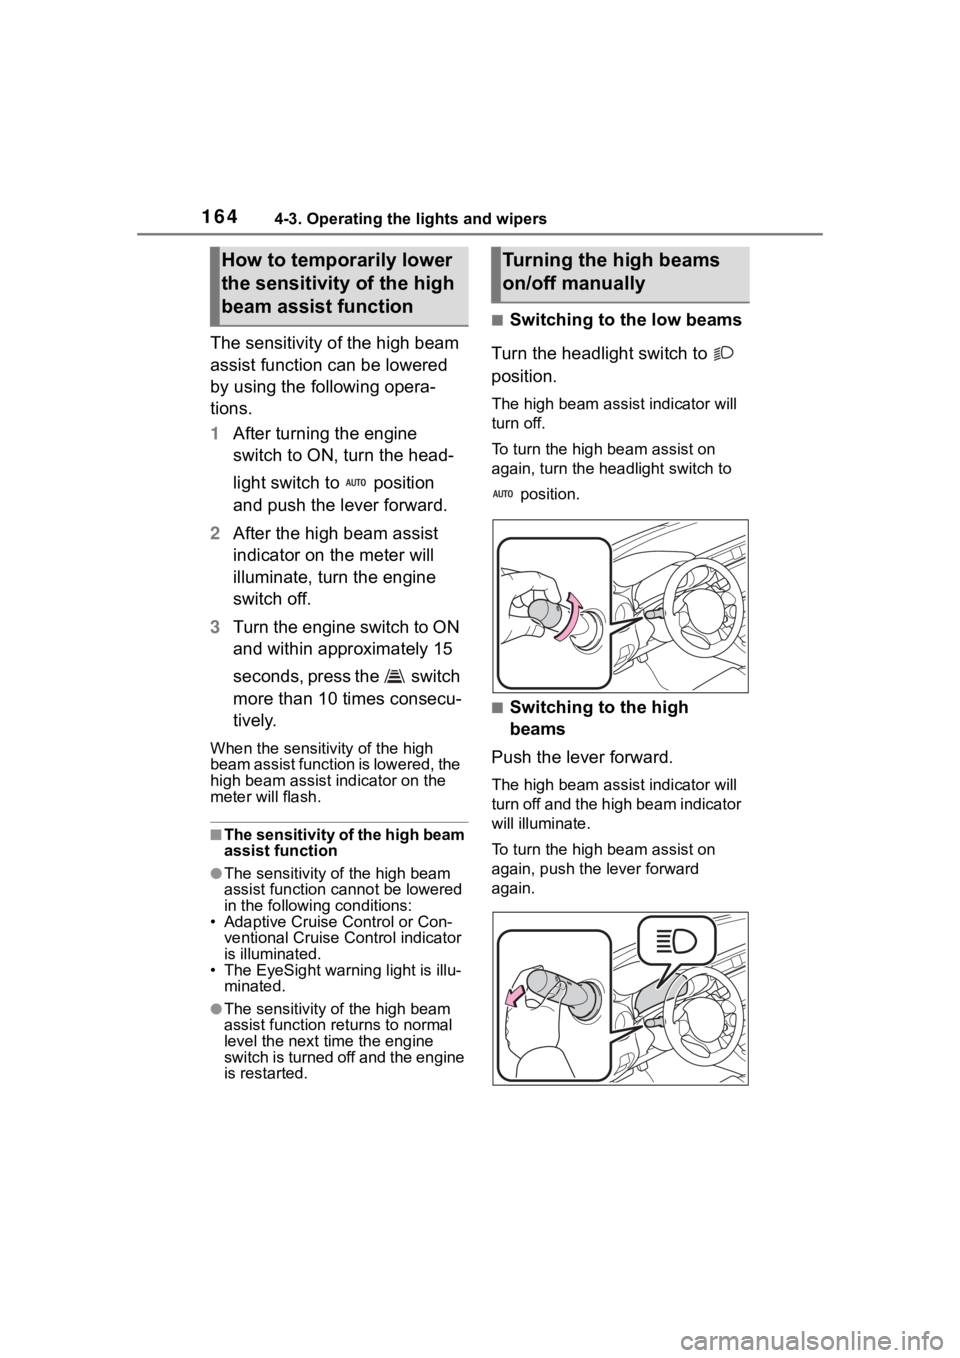
■Switching to the low beams
Turn the headlight switch to
position.
The high bea m assist indicator will
turn off.
To turn the high beam assist on
again, turn the headlight switch to
position.
■Switching to the high
beams
Push the lever forward.
The high bea m assist indicator will
turn off and the high beam indicator
will illuminate.
To turn the high beam assist on
again, push the lever forward
again.
How to temporarily lower
the sensitivity of the high
beam assist functionTurning the high beams
on/off manually
Page 165 of 449
1654-3. Operating the lights and wipers
4
Driving
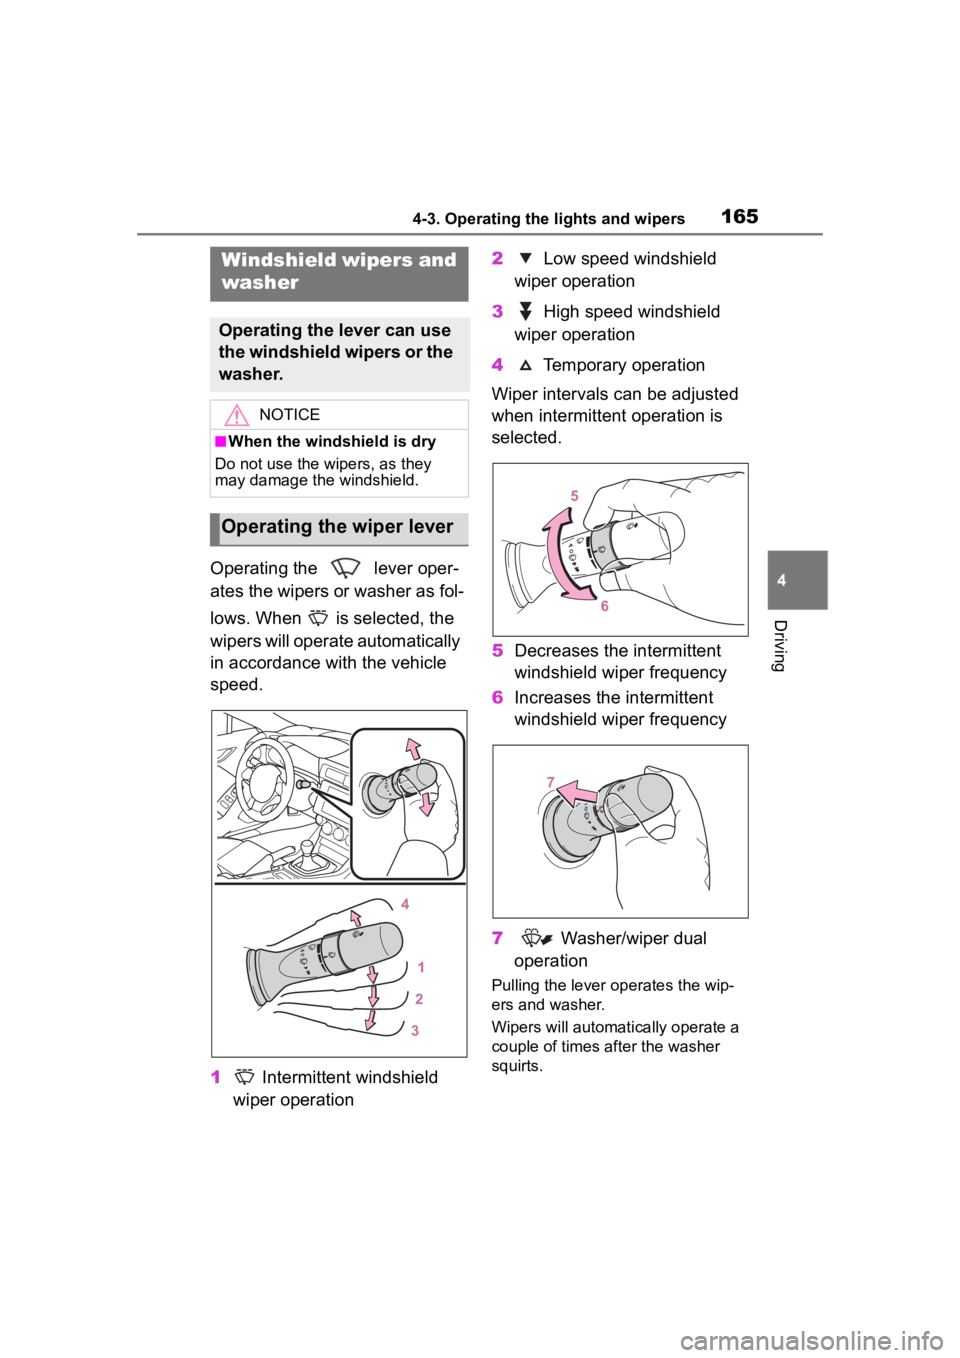
Operating the lever oper-
ates the wipers or washer as fol-
lows. When is selected, the
wipers will operate automatically
in accordance with the vehicle
speed.
1 Intermittent windshield
wiper operation 2
Low speed windshield
wiper operation
3 High speed windshield
wiper operation
4 Temporary operation
Wiper intervals can be adjusted
when intermittent operation is
selected.
5 Decreases the intermittent
windshield wiper frequency
6 Increases the intermittent
windshield wiper frequency
7 Washer/wiper dual
operation
Pulling the lever operates the wip-
ers and washer.
Wipers will automatically operate a
couple of times after the washer
squirts.
Windshield wipers and
washer
Operating the lever can use
the windshield wipers or the
washer.
NOTICE
■When the windshield is dry
Do not use the wipers, as they
may damage the windshield.
Operating the wiper lever
Page 166 of 449
1664-3. Operating the lights and wipers
■The windshield wiper and
washer can be operated when
The engine switch is in ON.
■If no windshield washer fluid
sprays
Check that the wash er nozzles are
not blocked if there is washer fluid in
the windshield washer fluid reser-
v oi r.
WARNING
■Caution regarding the use of
washer fluid
When it is cold, do not use the
washer fluid until the windshield
becomes warm. The fluid may
freeze on the windshield and
cause low visibility. This may lead
to an accident, resulting in death
or serious injury.
NOTICE
■When the washer fluid tank is
empty
Do not operate the switch continu-
ally as the washer fluid pump may
overheat.
■When a nozzle becomes
blocked
In this case, contact your Toyota
dealer. Do not try to clear it with a
pin or other object. The nozzle will
be damaged.
Page 167 of 449
1674-4. Refueling
4
Driving
4-4.Refueling
Close both side doors and
windows, and turn the engine
switch off.
Confirm the type of fuel.
■Fuel types
P. 3 8 8
■Fuel tank opening for unleaded
gasoline
To help prevent incorrect fueling,
your vehicle has a fuel tank opening
that only accommodates the spe-
cial nozzle on unle aded fuel pumps.
■If the malfunction indicator
lamp illuminates
The malfunction indicator lamp may
illuminate erroneous ly if refueling is
performed repeatedly when the fuel
tank is nearly full.
Opening the fuel tank
cap
Perform the following steps
to open the fuel tank cap:
Before refueling the vehi-
cle
WARNING
■When refueling the vehicle
Observe the following precautions
while refueling the vehicle. Failure
to do so may result in death or
serious injury.
●Do not handle fuel indoors.
●After exiting the vehicle and
before opening the fuel door,
touch an unpainted metal sur-
face to discharge any static
electricity. It is important to dis-
charge static electricity before
refueling because sparks result-
ing from static electricity can
cause fuel vapors to ignite while
refueling.
●Always hold the grips on the
fuel tank cap and turn it slowly
to remove it.
A whooshing sound may be
heard when the f uel tank cap is
loosened. Wait until the sound
cannot be heard before fully
removing the cap. In hot
weather, pressurized fuel may
spray out the filler neck and
cause injury.
●Do not allow anyone that has
not discharged static electricity
from their body to come close to
an open fuel tank.
●Do not allow anyone to
approach the area of the vehicle
near the fuel f iller pipe while
refueling is in progress.
●Do not inhale vaporized fuel.
Fuel contains substances that
are harmful if inhaled.
●Do not smoke while refueling
the vehicle.
Doing so may cause the fuel to
ignite and cause a fire.
●Do not return to the vehicle or
touch any person or object that
is statically charged.
This may cause static electricity
to build up, resulting in a possi-
ble ignition hazard.
■When refueling
Observe the following precautions
to prevent fuel overflowing from
the fuel tank:
Page 168 of 449
1684-4. Refueling
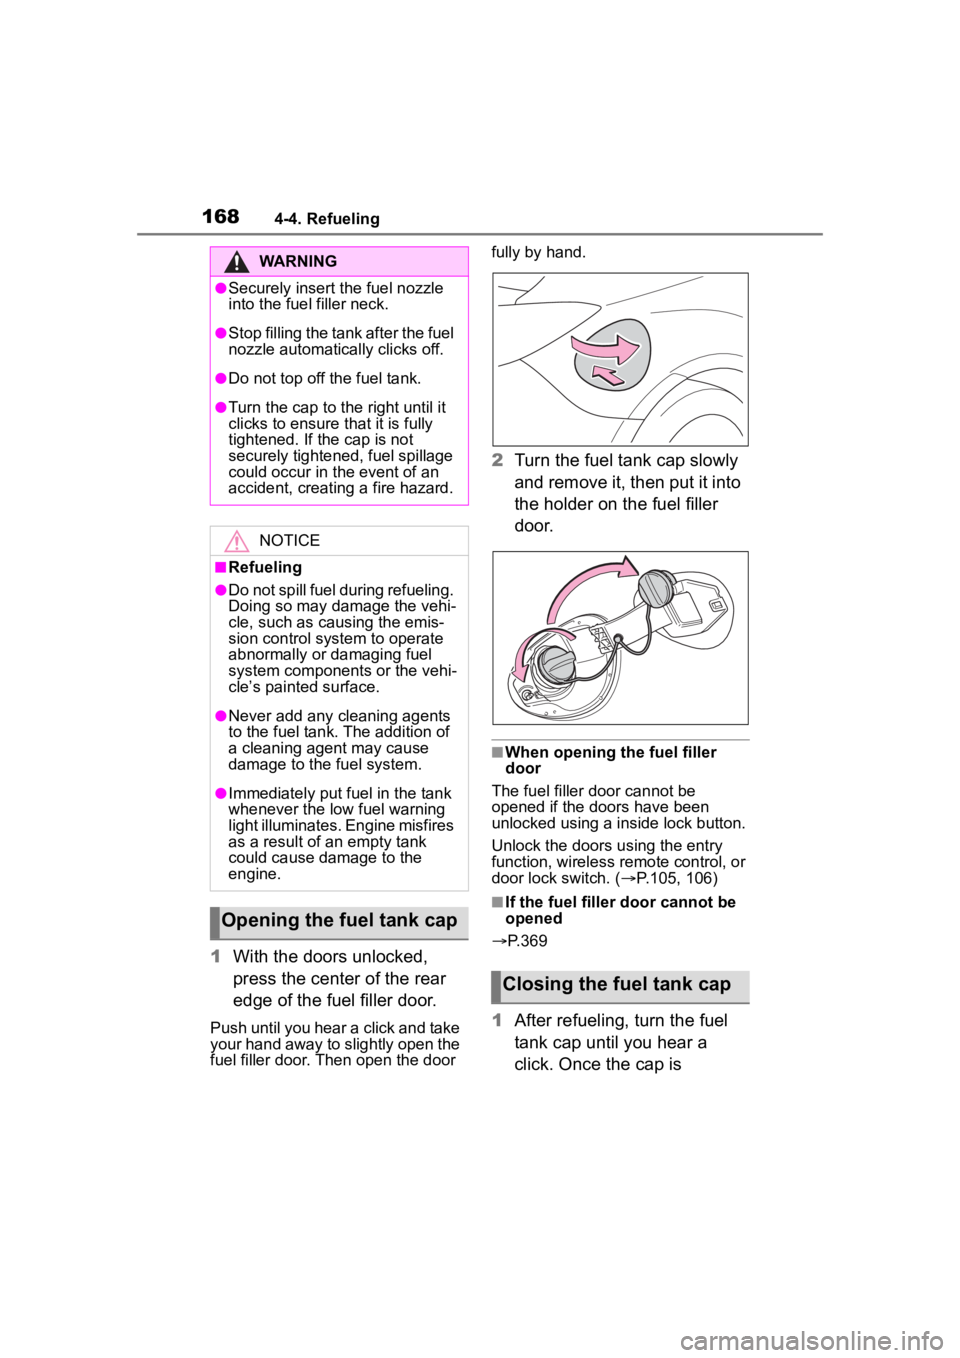
1With the doors unlocked,
press the center of the rear
edge of the fuel filler door.
Push until you hear a click and take
your hand away to slightly open the
fuel filler door. Then open the door fully by hand.
2
Turn the fuel tank cap slowly
and remove it, then put it into
the holder on the fuel filler
door.
■When opening the fuel filler
door
The fuel filler door cannot be
opened if the doo rs have been
unlocked using a inside lock button.
Unlock the doors u sing the entry
function, wireless remote control, or
door lock switch. ( P.105, 106)
■If the fuel filler door cannot be
opened
P.369
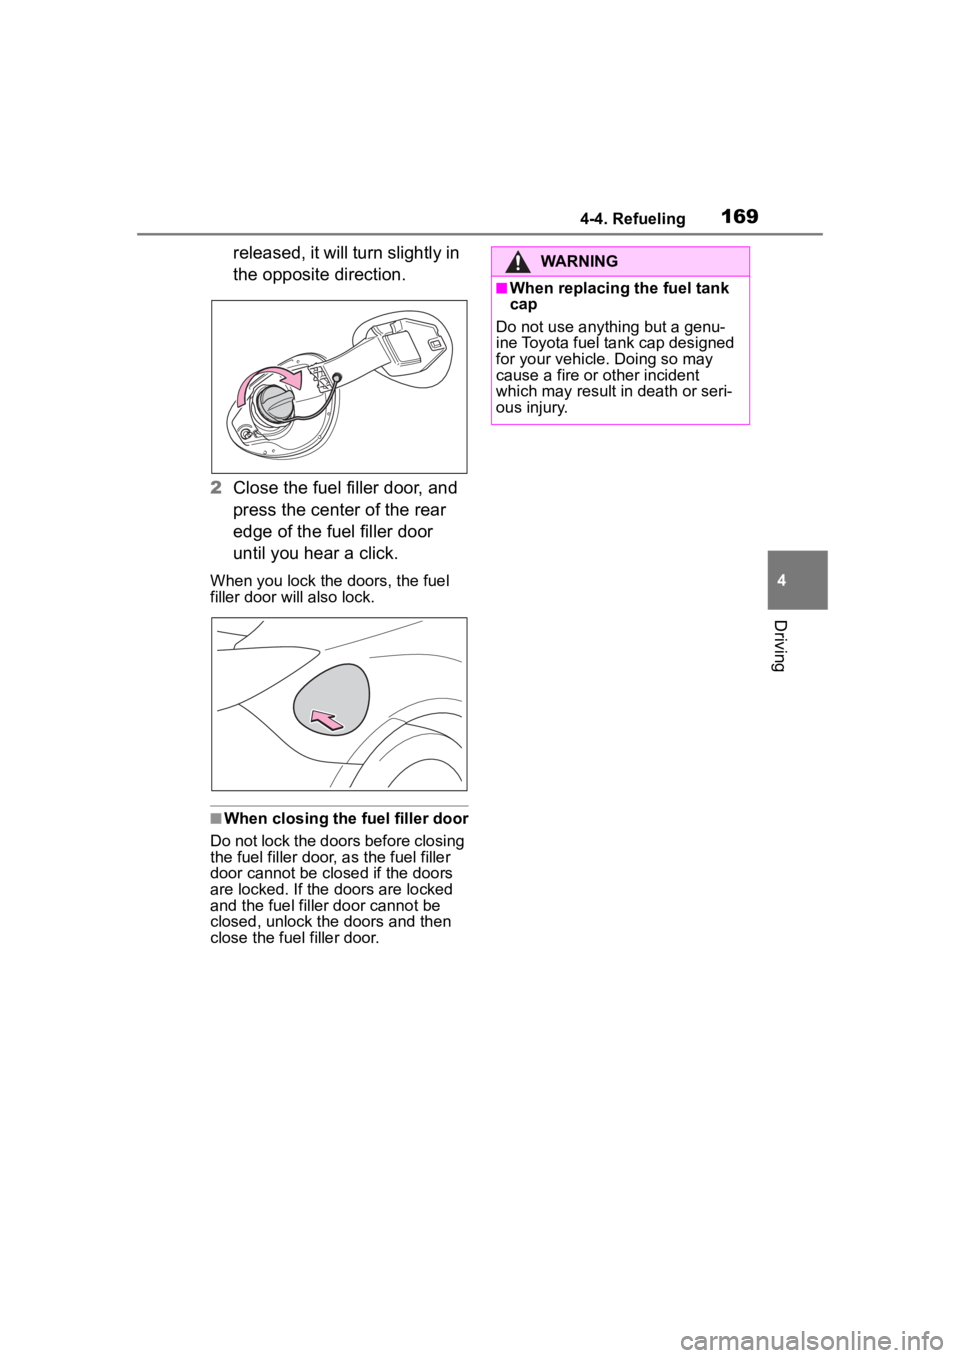
1 After refueling, turn the fuel
tank cap until you hear a
click. Once the cap is
WARNING
●Securely insert the fuel nozzle
into the fuel filler neck.
●Stop filling the tank after the fuel
nozzle automatically clicks off.
●Do not top off the fuel tank.
●Turn the cap to the right until it
clicks to ensure that it is fully
tightened. If the cap is not
securely tightened, fuel spillage
could occur in t he event of an
accident, creating a fire hazard.
NOTICE
■Refueling
●Do not spill fuel during refueling.
Doing so may damage the vehi-
cle, such as causing the emis-
sion control system to operate
abnormally or damaging fuel
system components or the vehi-
cle’s painted surface.
●Never add any cleaning agents
to the fuel tank. The addition of
a cleaning agent may cause
damage to the fuel system.
●Immediately put fuel in the tank
whenever the low fuel warning
light illuminates. Engine misfires
as a result of an empty tank
could cause damage to the
engine.
Opening the fuel tank cap
Closing the fuel tank cap
Page 169 of 449
1694-4. Refueling
4
Driving
released, it will turn slightly in
the opposite direction.
2 Close the fuel filler door, and
press the center of the rear
edge of the fuel filler door
until you hear a click.
When you lock the doors, the fuel
filler door will also lock.
■When closing the fuel filler door
Do not lock the doors before closing
the fuel filler door , as the fuel filler
door cannot be closed if the doors
are locked. If the doors are locked
and the fuel filler door can not be
closed, unlock the doors and then
close the fuel filler door.
WARNING
■When replacing the fuel tank
cap
Do not use anything but a genu-
ine Toyota fuel tank cap designed
for your vehicle. Doing so may
cause a fire or other incident
which may result i n death or seri-
ous injury.
Page 170 of 449
1704-5. EyeSight
4-5.EyeSight
*1: If equipped
*2: EyeSight is a registered trade-mark of SUBARU CORPORA-
TION.
EyeSight records a nd stores the fol-
lowing data when Pre-Collision
Braking System is operated. It does
not record conversations or other
audio data.
●Stereo camera image data
●Distance from the vehicle in front
●Vehicle speed
●Steering wheel turning angle
●Lateral movement with regards to
the direction of travel
●Accelerator pedal operation status
●Brake pedal operation status
●Shift lever position
●Odometer reading
●Data related to ABS, VSC and
TRAC
Toyota and third parties contracted
by Toyota may acquire and use the
recorded data for the purpose of
vehicle research and development.
Toyota and third parties contracted by Toyota will not disclose or pro-
vide the acquired data to any other
third party except under the follow-
ing conditions.
• The vehicle owner has given
his/her consent.
• The disclosure/provision is based on a court order or other legally
enforceable request.
• Data that has been modified so that the user and vehicle cannot
be identified is provided to a
research instituti on for statistical
processing or similar purposes.
EyeSight*1, 2
EyeSight is a driving sup-
port system that uses a
range of functions to assist
the driver in making deci-
sions in order to provide for
more safe and comfortable
driving and to reduce driver
fatigue. Making use of
images created by the ste-
reo camera, EyeSight
detects vehicles, obstacles,
traffic lanes and other items
ahead.
WARNING
Drivers are responsible for driving
safely. Always comply with all traf-
fic rules and regulations regard-
less of the fact that your vehicle is
equipped with EyeSight. Always
maintain a safe following dis-
tance between your vehicle and
the vehicle in front of you, pay
attention to your surroundings
and driving condi tions, and take
necessary actions in order to
maintain a safe following dis-
tance.
Never attempt to d rive relying on
EyeSight alone.
EyeSight is intended to assist the
driver in making decisions in order
to reduce the risk of accidents or
damage and lessen the burden on
the driver.
When an EyeSight warning is
activated, pay attention to what is
in front of you and to your sur-
roundings, and take necessary
actions. This system is not
designed to support driving in
poor visibility or in extreme
weather conditions, or to protect
against careless driving when the
driver is not paying complete
attention to the road ahead. It also
cannot prevent c ollisions from
occurring in all driving conditions.