TOYOTA AVALON 2012 XX40 / 4.G Owners Manual
AVALON 2012 XX40 / 4.G
TOYOTA
TOYOTA
https://www.carmanualsonline.info/img/14/6170/w960_6170-0.png
TOYOTA AVALON 2012 XX40 / 4.G Owners Manual
Trending: heating, battery, overheating, transmission fluid, sensor, spare wheel, instrument panel
Page 451 of 580
4
Maintenance and care
451
4-3. Do-it-yourself maintenance
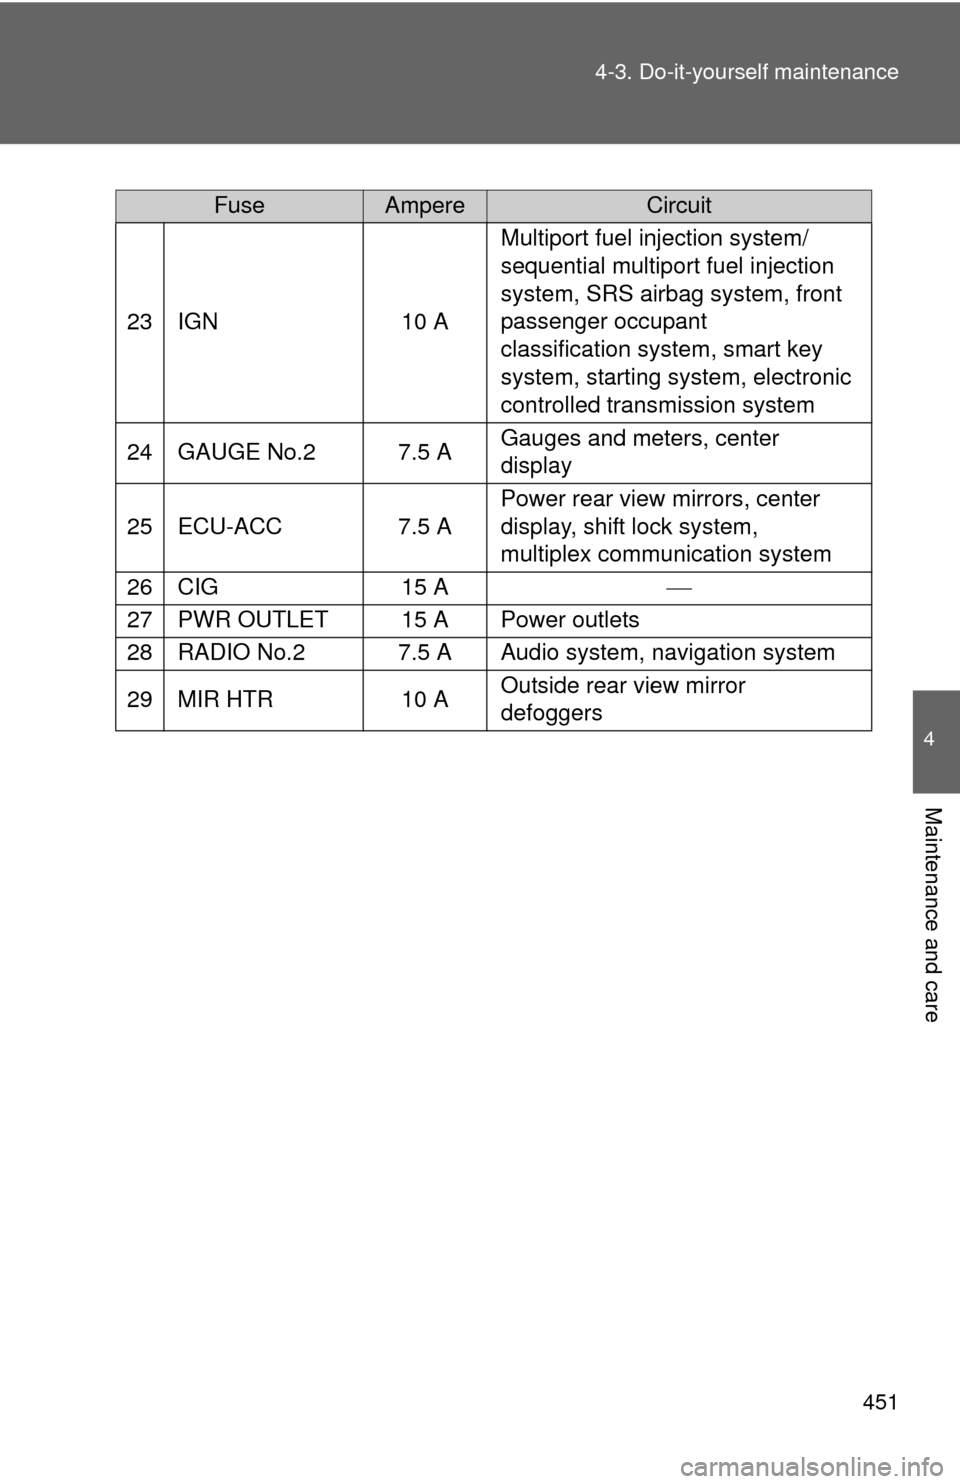
FuseAmpereCircuit
23IGN10 A
Multiport fuel injection system/
sequential multiport fuel injection
system, SRS airbag system, front
passenger occupant
classification system, smart key
system, starting system, electronic
controlled transmission system
24GAUGE No.27.5 AGauges and meters, center
display
25ECU-ACC7.5 A
Power rear view mirrors, center
display, shift lock system,
multiplex communication system
26CIG15 A
27PWR OUTLET15 APower outlets
28RADIO No.27.5 AAudio system, navigation system
29MIR HTR10 AOutside rear view mirror
defoggers
Page 452 of 580
452 4-3. Do-it-yourself maintenance
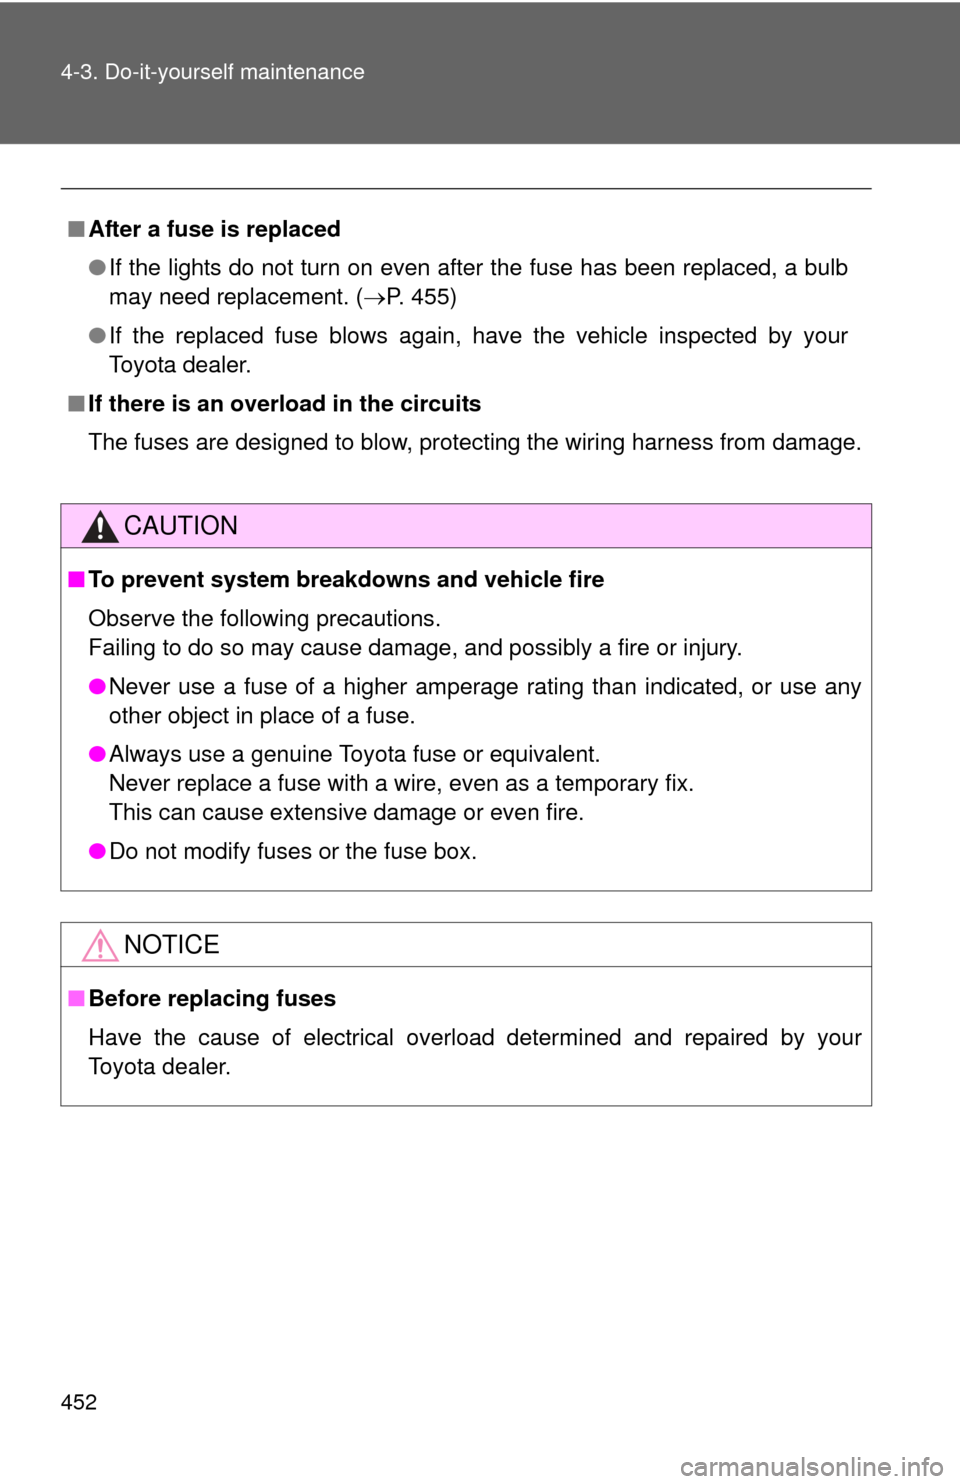
■After a fuse is replaced
●If the lights do not turn on even after the fuse has been replaced, a bulb
may need replacement. ( P. 455)
● If the replaced fuse blows again, have the vehicle inspected by your
Toyota dealer.
■ If there is an overload in the circuits
The fuses are designed to blow, protecting the wiring harness from damage.
CAUTION
■To prevent system breakdowns and vehicle fire
Observe the following precautions.
Failing to do so may cause damage, and possibly a fire or injury.
●Never use a fuse of a higher amperage rating than indicated, or use any
other object in place of a fuse.
● Always use a genuine Toyota fuse or equivalent.
Never replace a fuse with a wire, even as a temporary fix.
This can cause extensive damage or even fire.
● Do not modify fuses or the fuse box.
NOTICE
■Before replacing fuses
Have the cause of electrical overload determined and repaired by your
Toyota dealer.
Page 453 of 580
453
4-3. Do-it-yourself maintenance
4
Maintenance and care
Headlight aim (with discharge headlights)
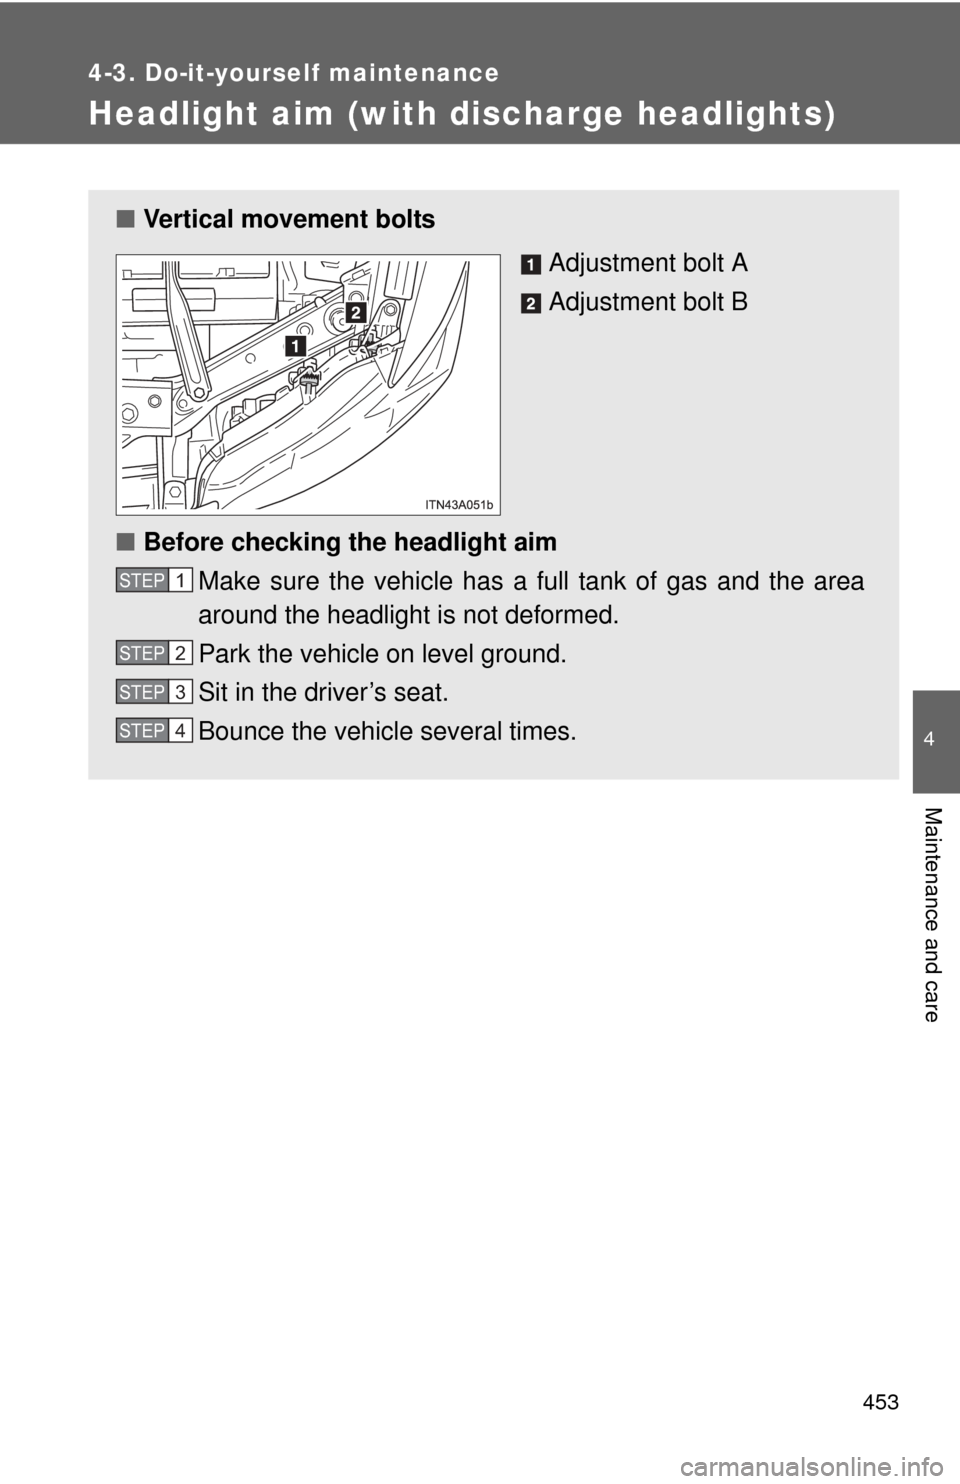
■Vertical movement bolts
Adjustment bolt A
Adjustment bolt B
■ Before checking the headlight aim
Make sure the vehicle has a full tank of gas and the area
around the headlight is not deformed.
Park the vehicle on level ground.
Sit in the driver’s seat.
Bounce the vehicle several times.
STEP1
STEP2
STEP3
STEP4
Page 454 of 580
454 4-3. Do-it-yourself maintenance
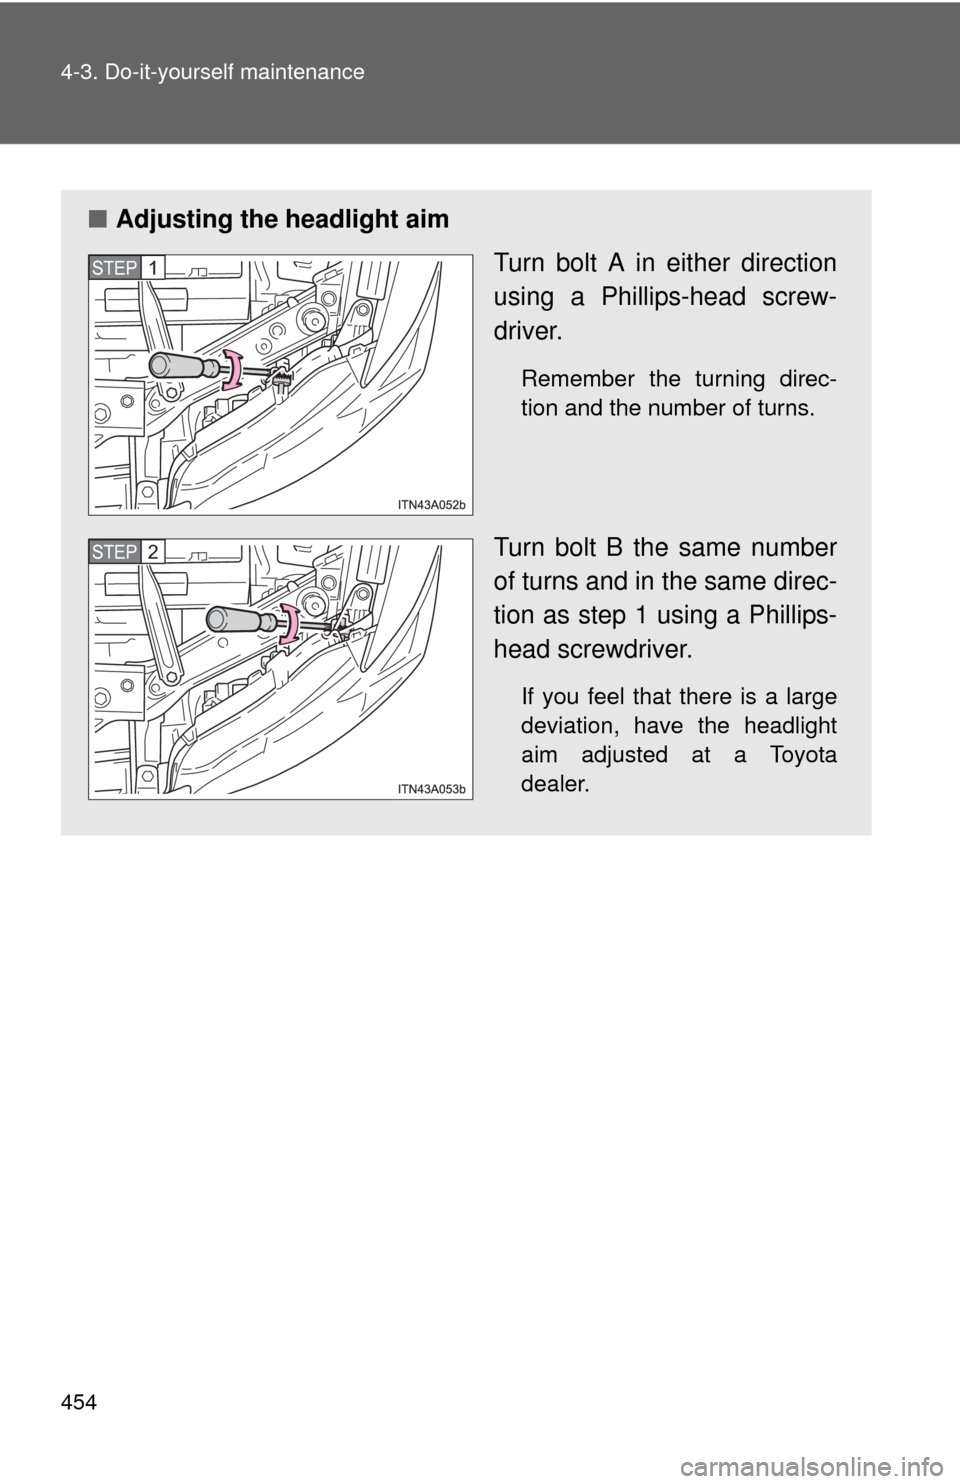
■Adjusting the headlight aim
Turn bolt A in either direction
using a Phillips-head screw-
driver.
Remember the turning direc-
tion and the number of turns.
Turn bolt B the same number
of turns and in the same direc-
tion as step 1 using a Phillips-
head screwdriver.
If you feel that there is a large
deviation, have the headlight
aim adjusted at a Toyota
dealer.
STEP1
STEP2
Page 455 of 580
455
4-3. Do-it-yourself maintenance
4
Maintenance and care
Light bulbs
You may replace the following bulbs yourself. The difficulty level of
replacement varies depending on the bulb. If necessary bulb
replacement seems difficult to perfor m, contact your Toyota dealer.
For more information about replacing other light bulbs, contact your
Toyota dealer.
■ Prepare a replacement light bulb.
Check the wattage of the light bulb being replaced. ( P. 527)
■ Remove the engine compartment cover
P. 407
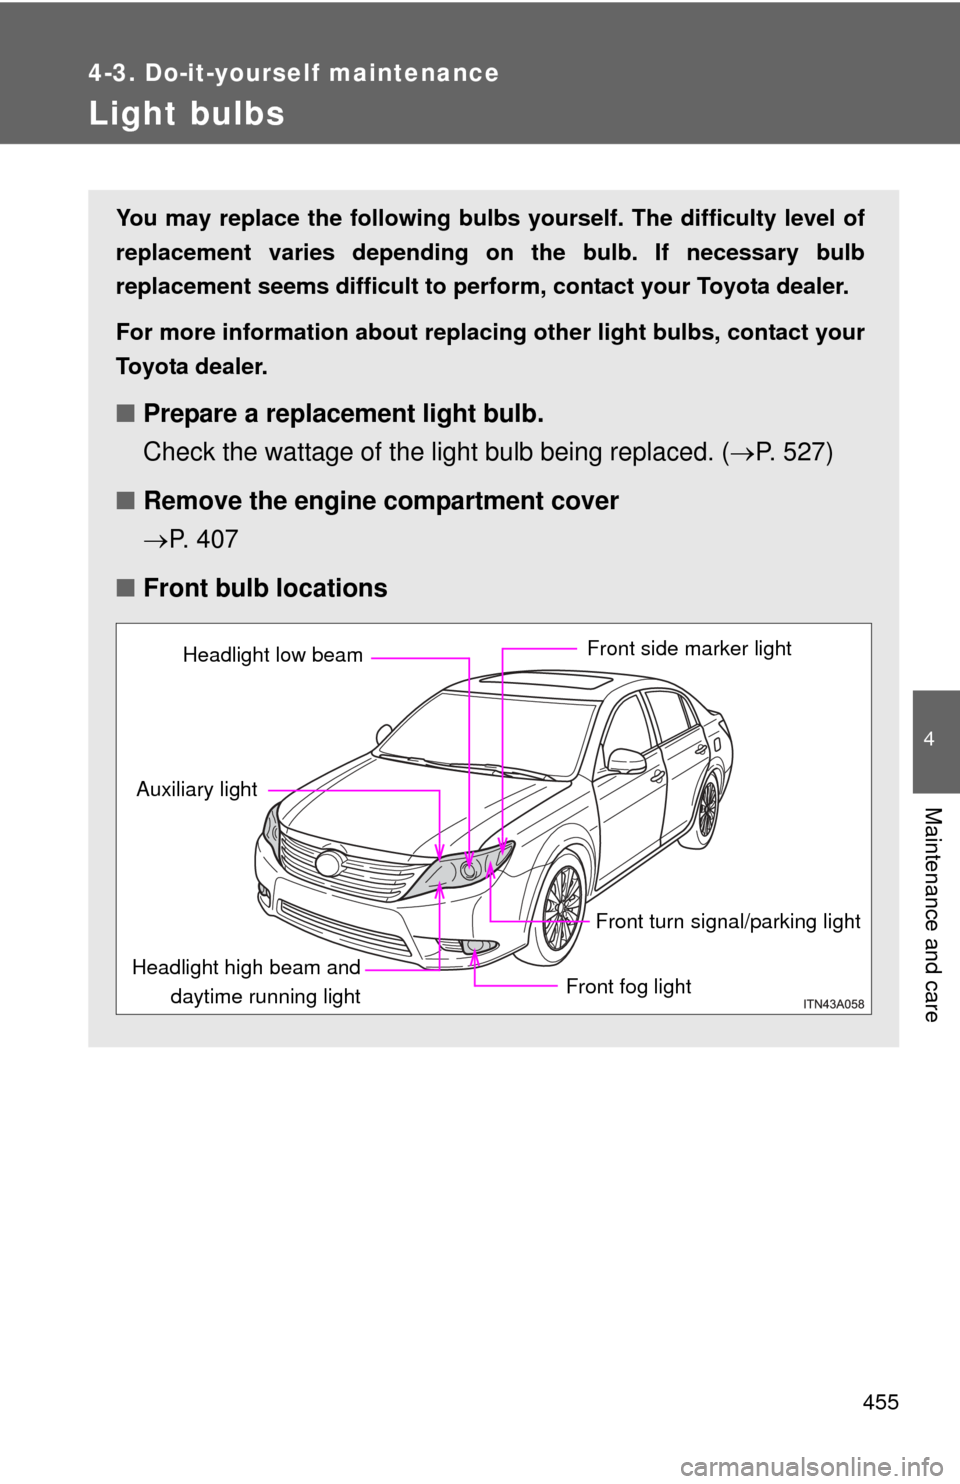
■ Front bulb locations
Front side marker light
Front turn signal/parking light
Front fog light
Headlight high beam and
daytime running light
Auxiliary light
Headlight low beam
Page 456 of 580
456 4-3. Do-it-yourself maintenance
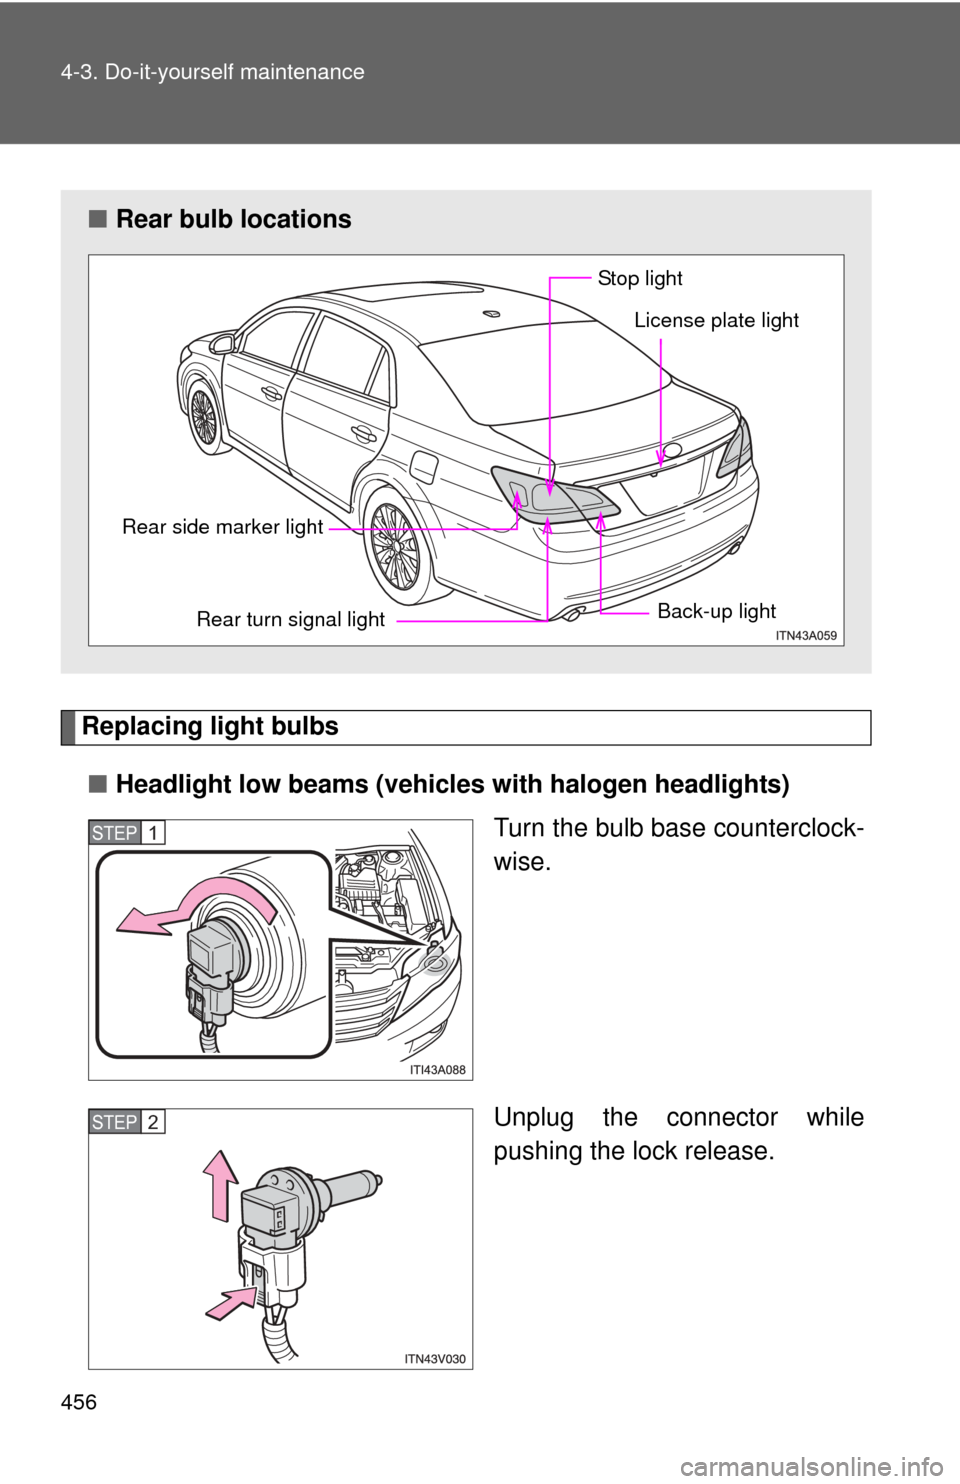
Replacing light bulbs■ Headlight low beams (vehicle s with halogen headlights)
Turn the bulb base counterclock-
wise.
Unplug the connector while
pushing the lock release.
■ Rear bulb locations
Rear side marker light
Rear turn signal light Back-up light
License plate light
St o p li gh t
STEP1
STEP2
Page 457 of 580
4
Maintenance and care
457
4-3. Do-it-yourself maintenance
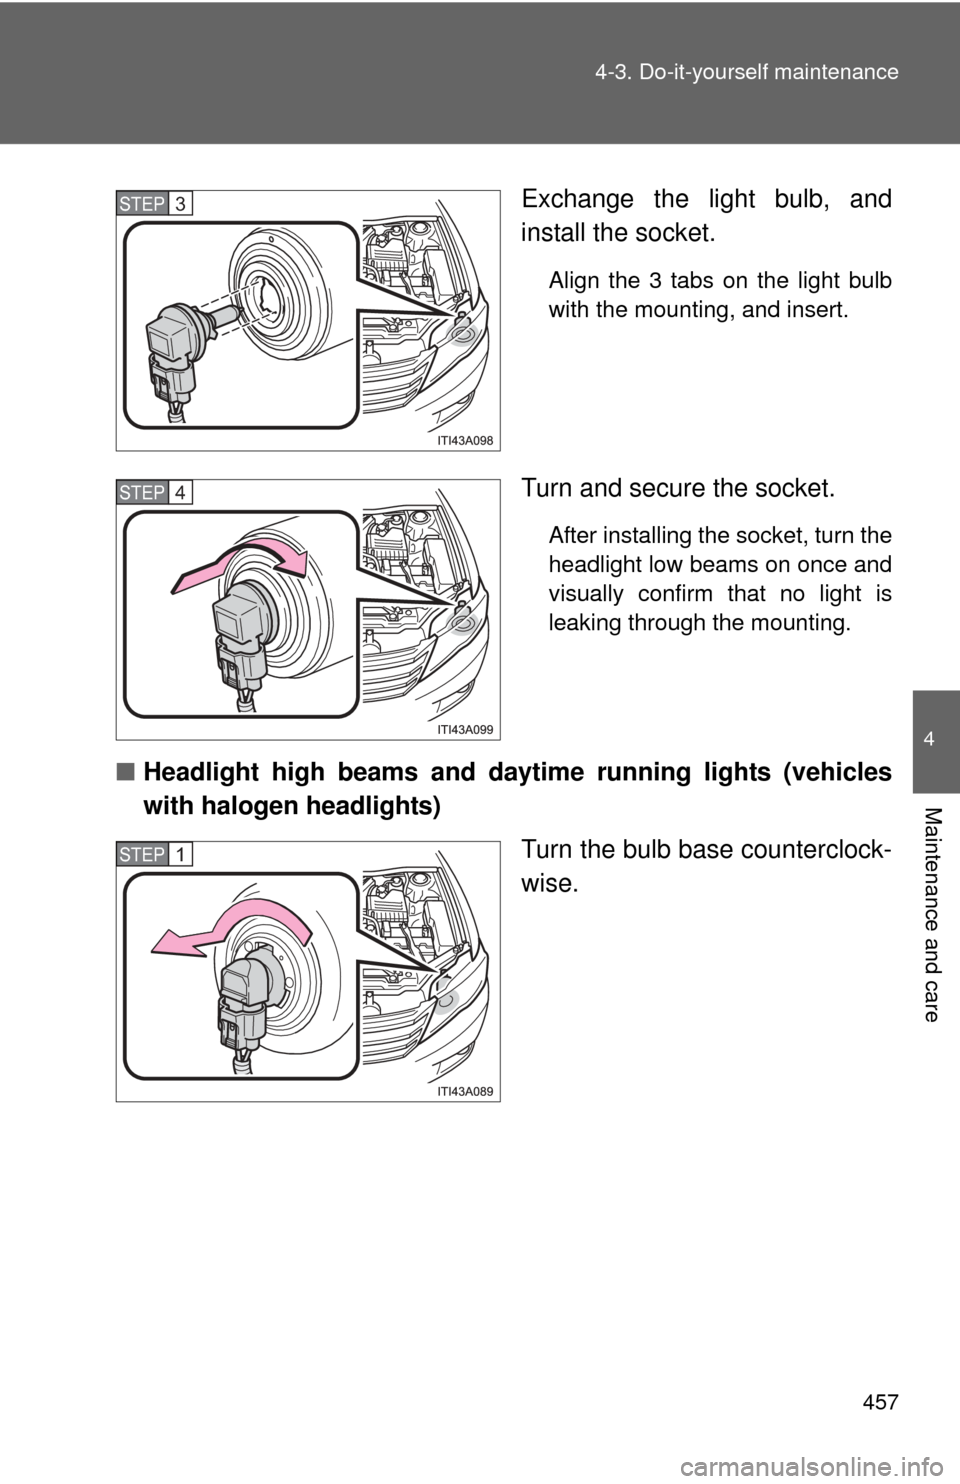
Exchange the light bulb, and
install the socket.
Align the 3 tabs on the light bulb
with the mounting, and insert.
Turn and secure the socket.
After installing the socket, turn the
headlight low beams on once and
visually confirm that no light is
leaking through the mounting.
■
Headlight high beams and d aytime running lights (vehicles
with halogen headlights)
Turn the bulb base counterclock-
wise.
STEP3
STEP4
STEP1
Page 458 of 580
458 4-3. Do-it-yourself maintenance
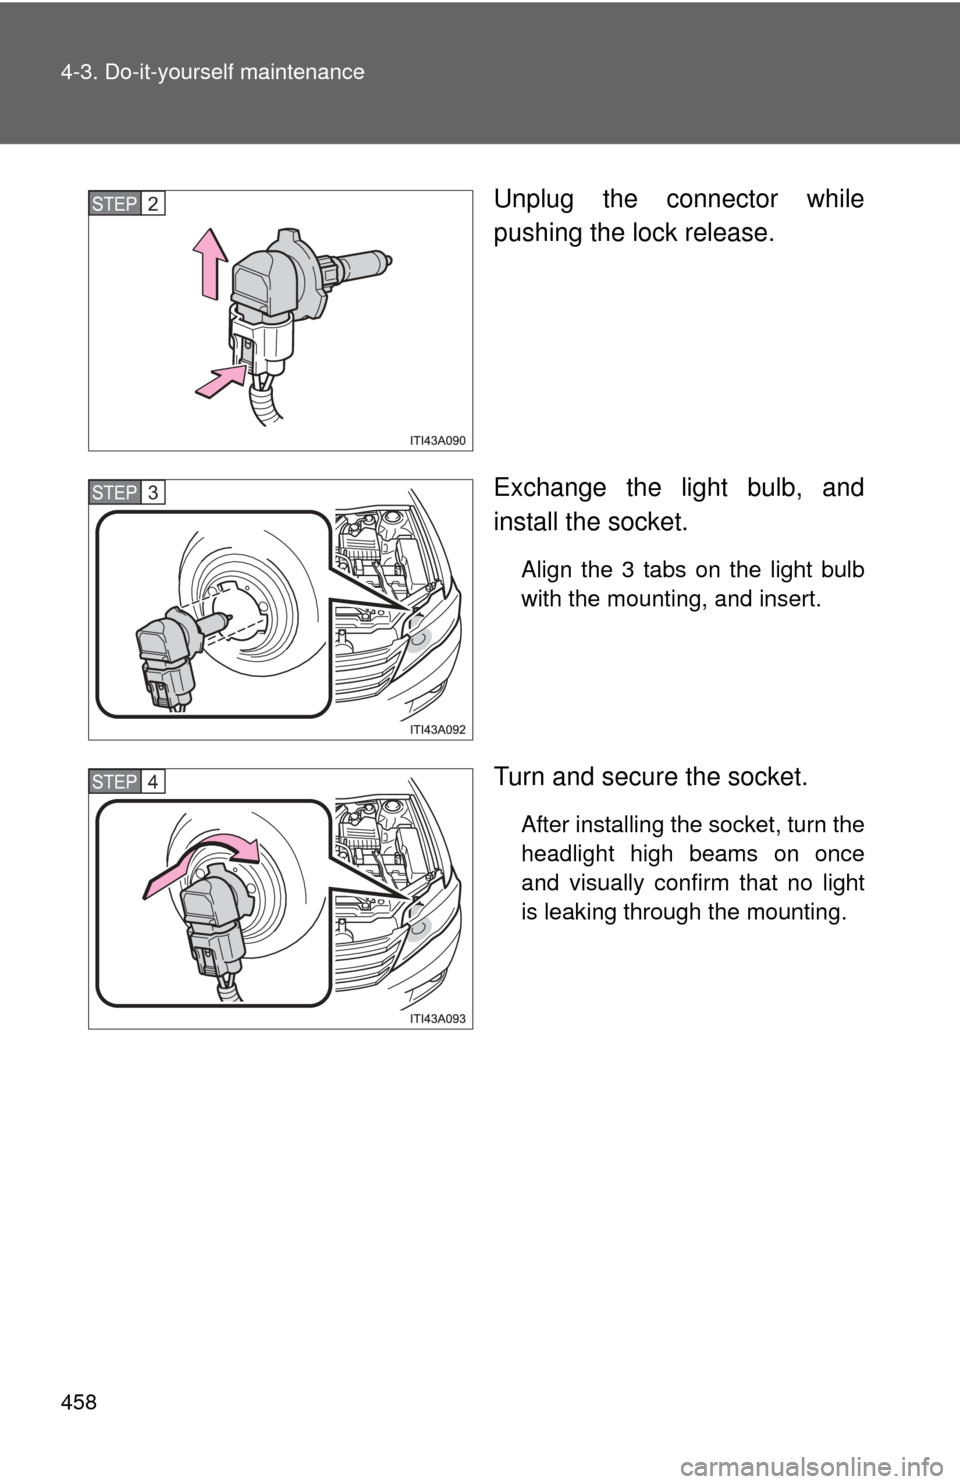
Unplug the connector while
pushing the lock release.
Exchange the light bulb, and
install the socket.
Align the 3 tabs on the light bulb
with the mounting, and insert.
Turn and secure the socket.
After installing the socket, turn the
headlight high beams on once
and visually confirm that no light
is leaking through the mounting.
STEP2
STEP3
STEP4
Page 459 of 580
4
Maintenance and care
459
4-3. Do-it-yourself maintenance
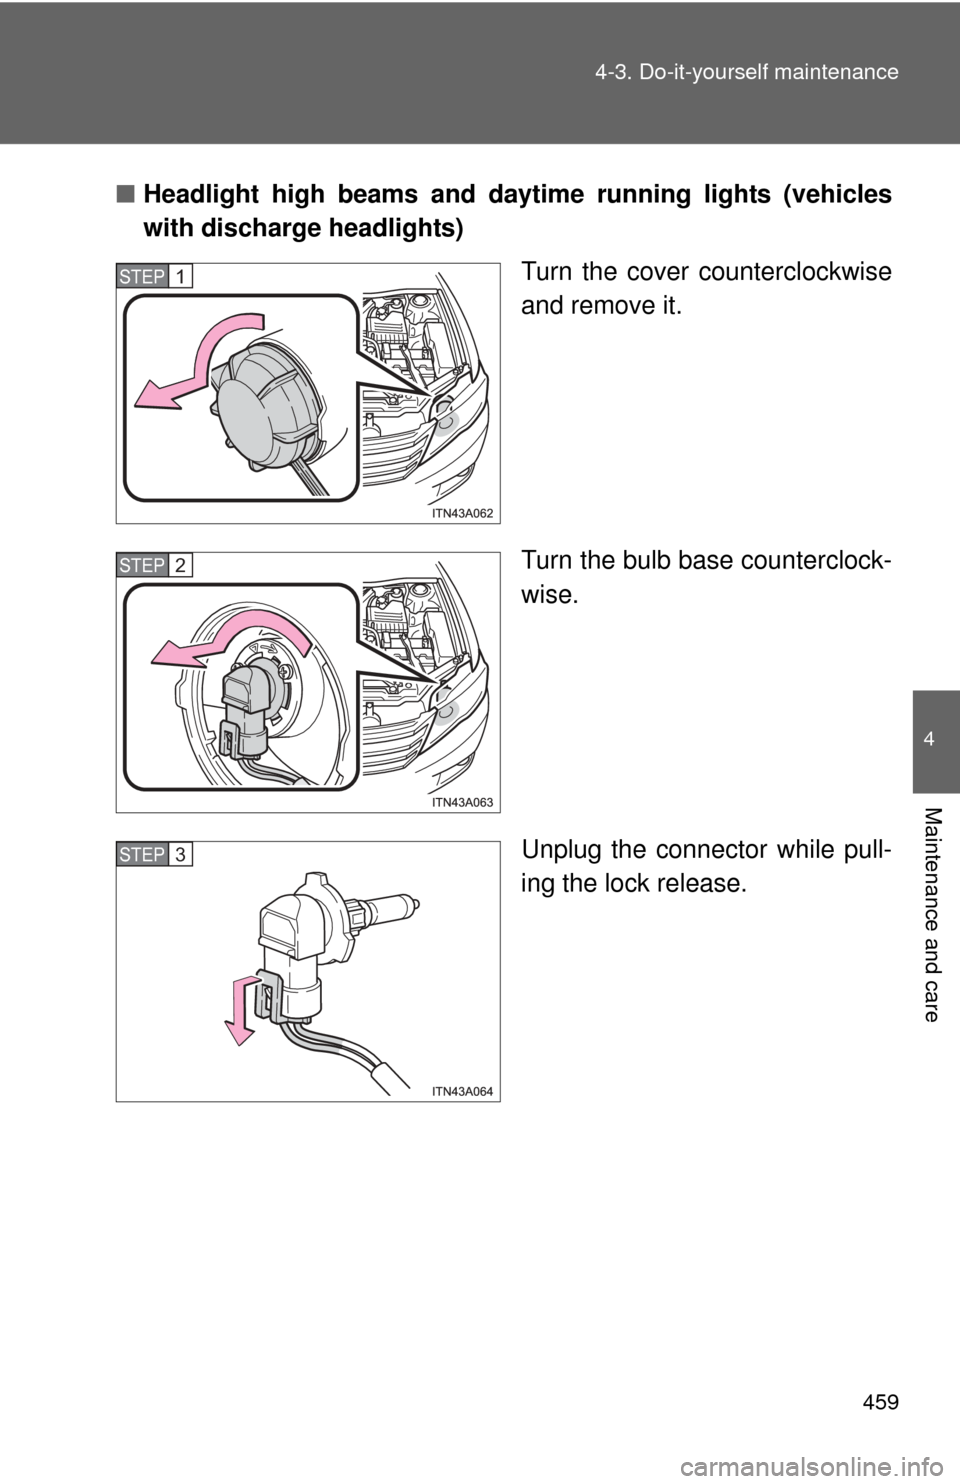
■
Headlight high beams and d aytime running lights (vehicles
with discharge headlights)
Turn the cover counterclockwise
and remove it.
Turn the bulb base counterclock-
wise.
Unplug the connector while pull-
ing the lock release.
STEP1
STEP2
STEP3
Page 460 of 580
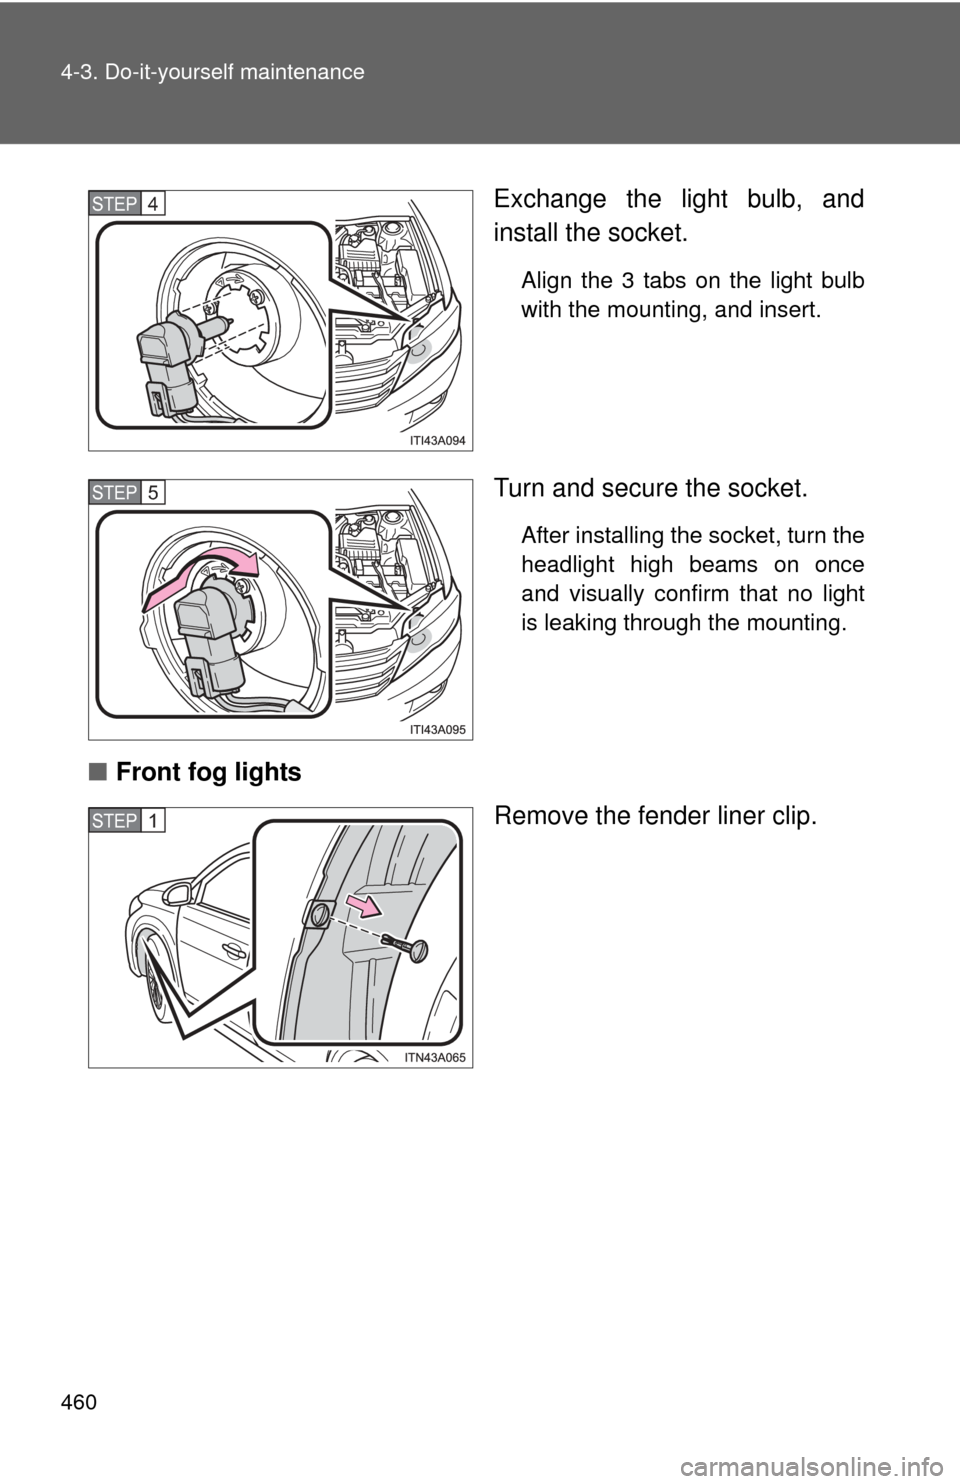
460 4-3. Do-it-yourself maintenance
Exchange the light bulb, and
install the socket.
Align the 3 tabs on the light bulb
with the mounting, and insert.
Turn and secure the socket.
After installing the socket, turn the
headlight high beams on once
and visually confirm that no light
is leaking through the mounting.
■Front fog lights
Remove the fender liner clip.
STEP4
STEP5
STEP1
Trending: wheel size, transmission fluid, fold seats, seat adjustment, warning lights, USB, interior lights
