page 48 TOYOTA AVALON 2014 XX40 / 4.G Navigation Manual
[x] Cancel search | Manufacturer: TOYOTA, Model Year: 2014, Model line: AVALON, Model: TOYOTA AVALON 2014 XX40 / 4.GPages: 346, PDF Size: 6.47 MB
Page 224 of 346
224
1. AUDIO/VIDEO SYSTEM OPERATION
The portable player will be automatically
connected under the following conditions:
• The power
ACCESSORY or ON
mode.
• When “Bluetooth* Power” is switched
from off to on.
• When the portable player is discon- nected for some reason.
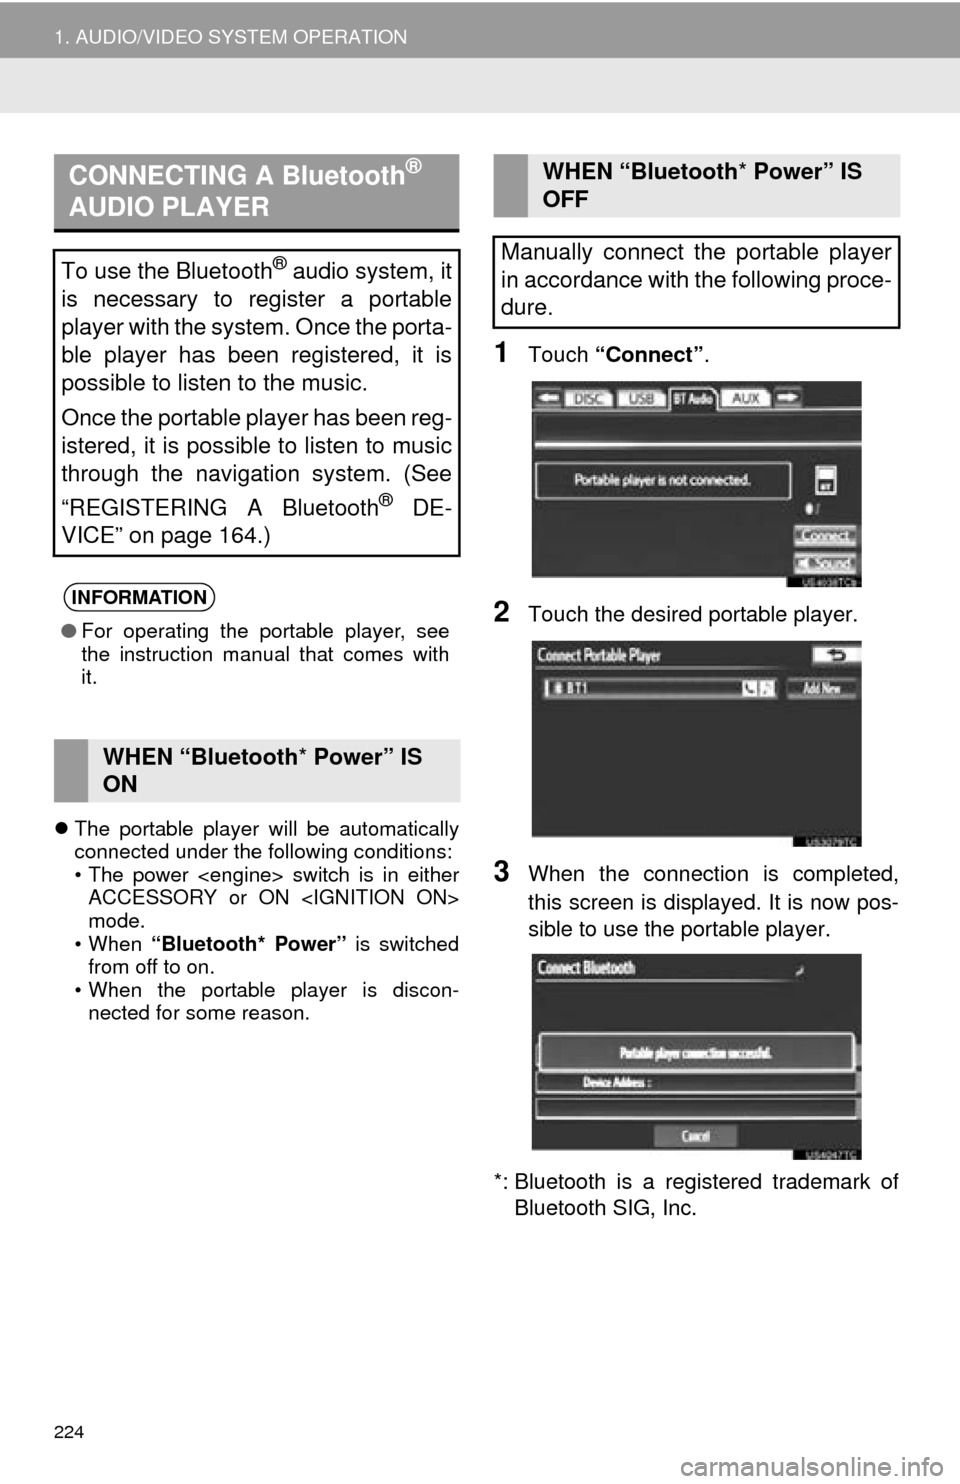
1Touch “Connect” .
2Touch the desired portable player.
3When the connection is completed,
this screen is displayed. It is now pos-
sible to use the portable player.
*: Bluetooth is a registered trademark of Bluetooth SIG, Inc.
CONNECTING A Bluetooth®
AUDIO PLAYER
To use the Bluetooth® audio system, it
is necessary to register a portable
player with the system. Once the porta-
ble player has been registered, it is
possible to listen to the music.
Once the portable player has been reg-
istered, it is possible to listen to music
through the navigation system. (See
“REGISTERING A Bluetooth
® DE-
VICE” on page 164.)
INFORMATION
● For operating the portable player, see
the instruction manual that comes with
it.
WHEN “Bluetooth * Power” IS
ON
WHEN “Bluetooth * Power” IS
OFF
Manually connect the portable player
in accordance with the following proce-
dure.
Page 225 of 346
225
1. AUDIO/VIDEO SYSTEM OPERATION
5
AUDIO/VIDEO SYSTEM
If the Bluetooth® device is disconnected
on purpose, such as it was turned off, this
does not happen. Reconnect the portable
player manually.
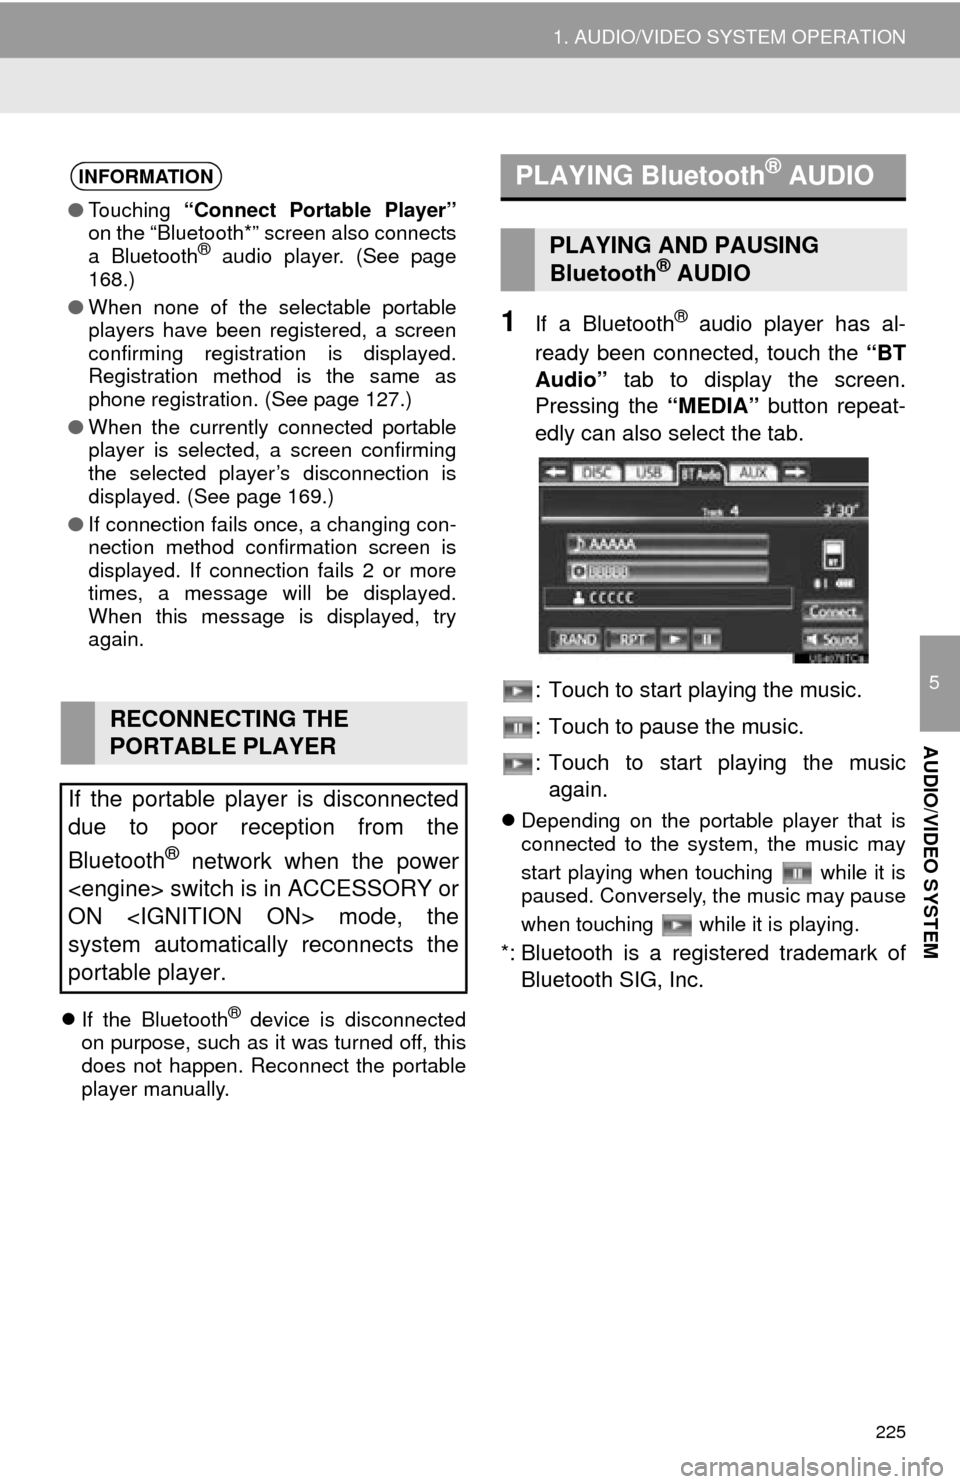
1If a Bluetooth® audio player has al-
ready been connected, touch the “BT
Audio” tab to display the screen.
Pressing the “MEDIA” button repeat-
edly can also select the tab.
: Touch to start playing the music.
: Touch to pause the music.
: Touch to start playing the music again.
Depending on the portable player that is
connected to the system, the music may
start playing when touching while it is
paused. Conversely, the music may pause
when touching while it is playing.
*: Bluetooth is a regi stered trademark of
Bluetooth SIG, Inc.
INFORMATION
● Touching “Connect Portable Player”
on the “Bluetooth*” screen also connects
a Bluetooth
® audio player. (See page
168.)
● When none of the selectable portable
players have been registered, a screen
confirming registration is displayed.
Registration method is the same as
phone registration. (See page 127.)
● When the currently connected portable
player is selected, a screen confirming
the selected player’s disconnection is
displayed. (See page 169.)
● If connection fails once, a changing con-
nection method confirmation screen is
displayed. If connection fails 2 or more
times, a message will be displayed.
When this message is displayed, try
again.
RECONNECTING THE
PORTABLE PLAYER
If the portable player is disconnected
due to poor reception from the
Bluetooth
® network when the power
ON
system automatically reconnects the
portable player.
PLAYING Bluetooth® AUDIO
PLAYING AND PAUSING
Bluetooth® AUDIO
Page 226 of 346
226
1. AUDIO/VIDEO SYSTEM OPERATION
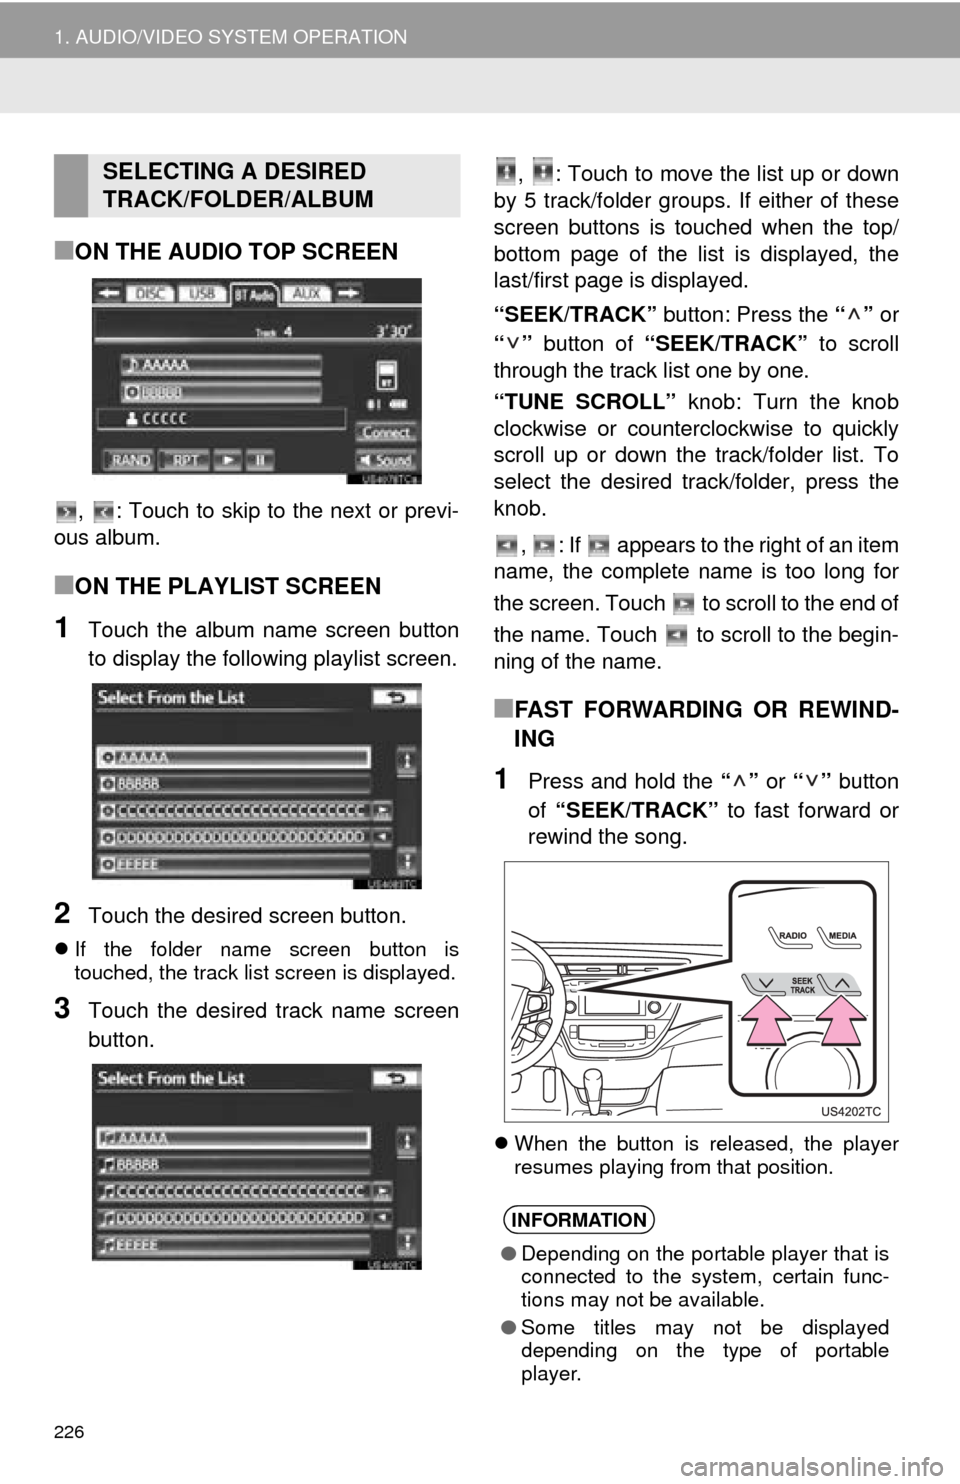
■ON THE AUDIO TOP SCREEN
, : Touch to skip to the next or previ-
ous album.
■ON THE PLAYLIST SCREEN
1Touch the album name screen button
to display the following playlist screen.
2Touch the desired screen button.
If the folder name screen button is
touched, the track list screen is displayed.
3Touch the desired track name screen
button. , : Touch to move the list up or down
by 5 track/folder groups. If either of these
screen buttons is t ouched when the top/
bottom page of the list is displayed, the
last/first page is displayed.
“SEEK/TRACK” button: Press the “” or
“” button of “SEEK/TRACK” to scroll
through the track list one by one.
“TUNE SCROLL” knob: Turn the knob
clockwise or counterclockwise to quickly
scroll up or down the track/folder list. To
select the desired track/folder, press the
knob.
, : If appears to the right of an item
name, the complete name is too long for
the screen. Touch to scroll to the end of
the name. Touch to scroll to the begin-
ning of the name.
■FAST FORWARDING OR REWIND-
ING
1Press and hold the “” or “” button
of “SEEK/TRACK” to fast forward or
rewind the song.
When the button is released, the player
resumes playing from that position.
SELECTING A DESIRED
TRACK/FOLDER/ALBUM
INFORMATION
●Depending on the portable player that is
connected to the system, certain func-
tions may not be available.
● Some titles may not be displayed
depending on the type of portable
player.
Page 227 of 346
227
1. AUDIO/VIDEO SYSTEM OPERATION
5
AUDIO/VIDEO SYSTEM
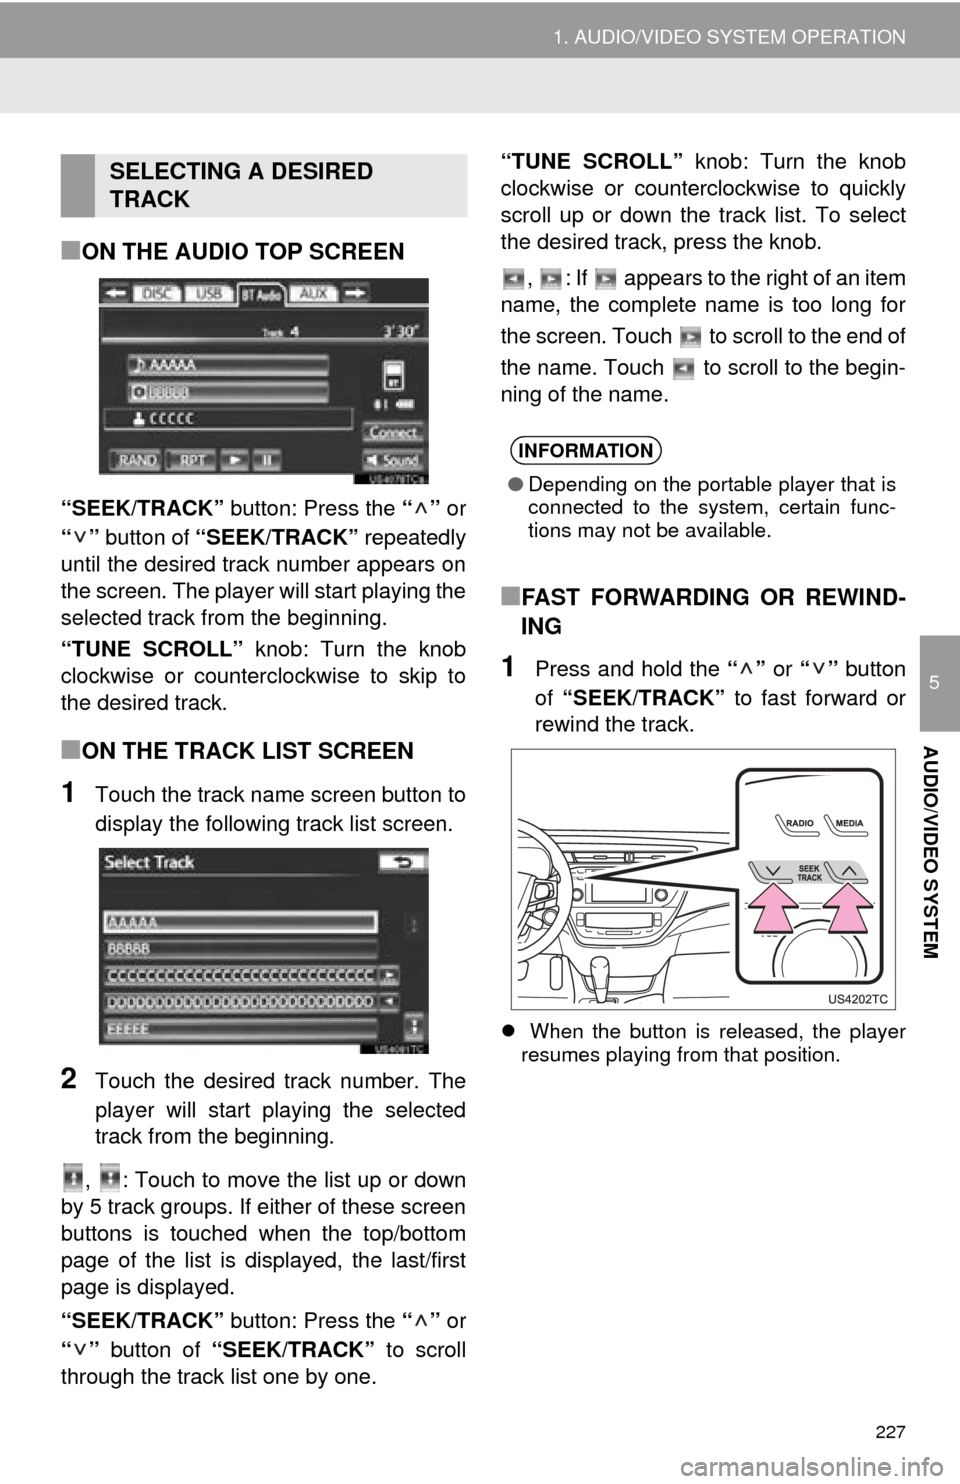
■ON THE AUDIO TOP SCREEN
“SEEK/TRACK” button: Press the “” or
“” button of “SEEK/TRACK” repeatedly
until the desired track number appears on
the screen. The player will start playing the
selected track from the beginning.
“TUNE SCROLL” knob: Turn the knob
clockwise or counterclockwise to skip to
the desired track.
■ON THE TRACK LIST SCREEN
1Touch the track name screen button to
display the following track list screen.
2Touch the desired track number. The
player will start playing the selected
track from the beginning.
, : Touch to move the list up or down
by 5 track groups. If either of these screen
buttons is touched when the top/bottom
page of the list is displayed, the last/first
page is displayed.
“SEEK/TRACK” button: Press the “” or
“” button of “SEEK/TRACK” to scroll
through the track list one by one. “TUNE SCROLL”
knob: Turn the knob
clockwise or counterclockwise to quickly
scroll up or down the track list. To select
the desired track, press the knob.
, : If appears to the right of an item
name, the complete name is too long for
the screen. Touch to scroll to the end of
the name. Touch to scroll to the begin-
ning of the name.
■FAST FORWARDING OR REWIND-
ING
1Press and hold the “” or “” button
of “SEEK/TRACK” to fast forward or
rewind the track.
When the button is released, the player
resumes playing from that position.
SELECTING A DESIRED
TRACK
INFORMATION
● Depending on the portable player that is
connected to the system, certain func-
tions may not be available.
Page 238 of 346

238
1. AUDIO/VIDEO SYSTEM OPERATION
You agree that your non-exclusive li-
cense to use the Gracenote Data, the
Gracenote Software, and Gracenote
Servers will terminate if you violate
these restrictions. If your license termi-
nates, you agree to cease any and all
use of the Gracenote Data, the
Gracenote Software, and Gracenote
Servers. Gracenote reserves all rights
in Gracenote Data, the Gracenote
Software, and the Gracenote Servers,
including all ownership rights. Under
no circumstances will Gracenote be-
come liable for any payment to you for
any information that you provide. You
agree that Gracenote, Inc. may en-
force its rights under this Agreement
against you directly in its own name.
The Gracenote service uses a unique
identifier to track queries for statistical
purposes. The purpose of a randomly
assigned numeric identifier is to allow
the Gracenote service to count que-
ries without knowing anything about
who you are. For more information,
see the web page for the Gracenote
Privacy Policy for the Gracenote ser-
vice.The Gracenote Software and each
item of Gracenote Data are licensed to
you “AS IS.” Gracenote makes no rep-
resentations or warranties, express or
implied, regarding the accuracy of any
Gracenote Data from in the Gracenote
Servers. Gracenote reserves the right
to delete data from the Gracenote
Servers or to change data categories
for any cause that Gracenote deems
sufficient. No warranty is made that
the Gracenote Software or Gracenote
Servers are error-free or that function-
ing of Gracenote Software or
Gracenote Servers will be uninterrupt-
ed. Gracenote is not obligated to pro-
vide you with new enhanced or
additional data types or categories
that Gracenote may provide in the fu-
ture and is free to discontinue its ser-
vices at any time.
GRACENOTE DISCLAIMS ALL
WARRANTIES EXPRESS OR IM-
PLIED, INCLUDING, BUT NOT LIM-
ITED TO, IMPLIED WARRANTIES
OF MERCHANTABILITY, FITNESS
FOR A PARTICULAR PURPOSE, TI-
TLE, AND NON-INFRINGEMENT.
GRACENOTE DOES NOT WAR-
RANT THE RESULTS THAT WILL BE
OBTAINED BY YOUR USE OF THE
GRACENOTE SOFTWARE OR ANY
GRACENOTE SERVER. IN NO
CASE WILL GRACENOTE BE LIA-
BLE FOR ANY CONSEQUENTIAL
OR INCIDENTAL DAMAGES OR
FOR ANY LOST PROFITS OR LOST
REVENUES.
copyright
© 2000 to present
Gracenote
Page 242 of 346
242
1. VOICE COMMAND SYSTEM OPERATION
1. VOICE COMMAND SYSTEM
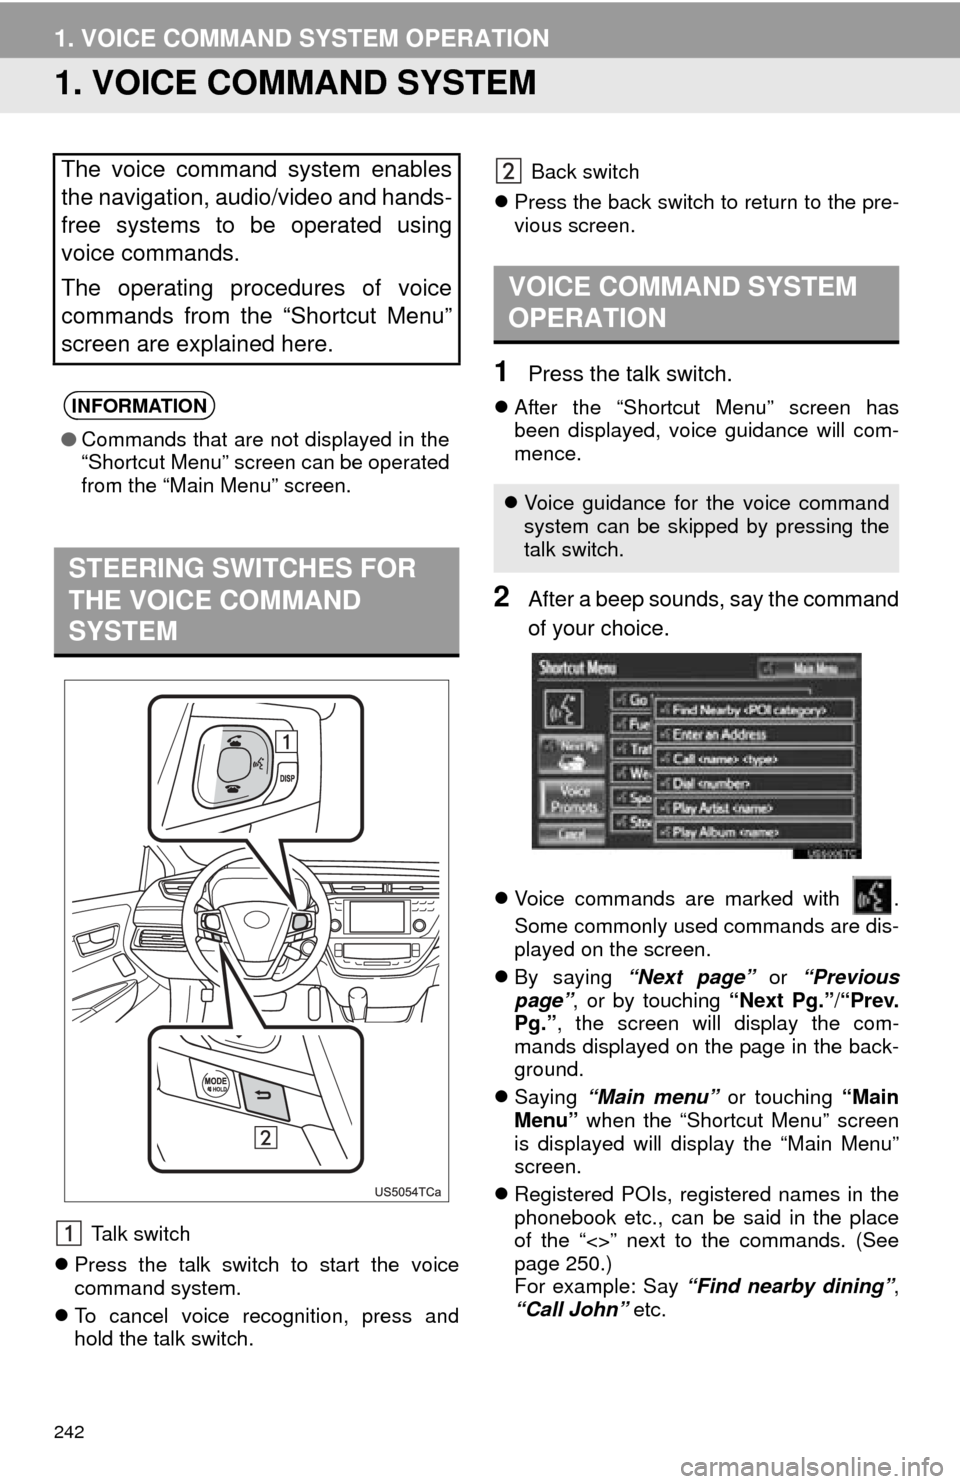
Talk switch
Press the talk switch to start the voice
command system.
To cancel voice recognition, press and
hold the talk switch. Back switch
Press the back switch to return to the pre-
vious screen.
1Press the talk switch.
After the “Shortcut Menu” screen has
been displayed, voice guidance will com-
mence.
2After a beep sounds, say the command
of your choice.
Voice commands are marked with .
Some commonly used commands are dis-
played on the screen.
By saying “Next page” or “Previous
page” , or by touching “Next Pg.”/ “Prev.
Pg.” , the screen will display the com-
mands displayed on the page in the back-
ground.
Saying “Main menu” or touching “Main
Menu” when the “Shortcut Menu” screen
is displayed will display the “Main Menu”
screen.
Registered POIs, registered names in the
phonebook etc., can be said in the place
of the “<>” next to the commands. (See
page 250.)
For example: Say “Find nearby dining” ,
“Call John” etc.
The voice command system enables
the navigation, audio/video and hands-
free systems to be operated using
voice commands.
The operating procedures of voice
commands from the “Shortcut Menu”
screen are explained here.
INFORMATION
●Commands that are not displayed in the
“Shortcut Menu” screen can be operated
from the “Main Menu” screen.
STEERING SWITCHES FOR
THE VOICE COMMAND
SYSTEM
VOICE COMMAND SYSTEM
OPERATION
Voice guidance for the voice command
system can be skipped by pressing the
talk switch.
Page 243 of 346
243
1. VOICE COMMAND SYSTEM OPERATION
6
VOICE COMMAND SYSTEM
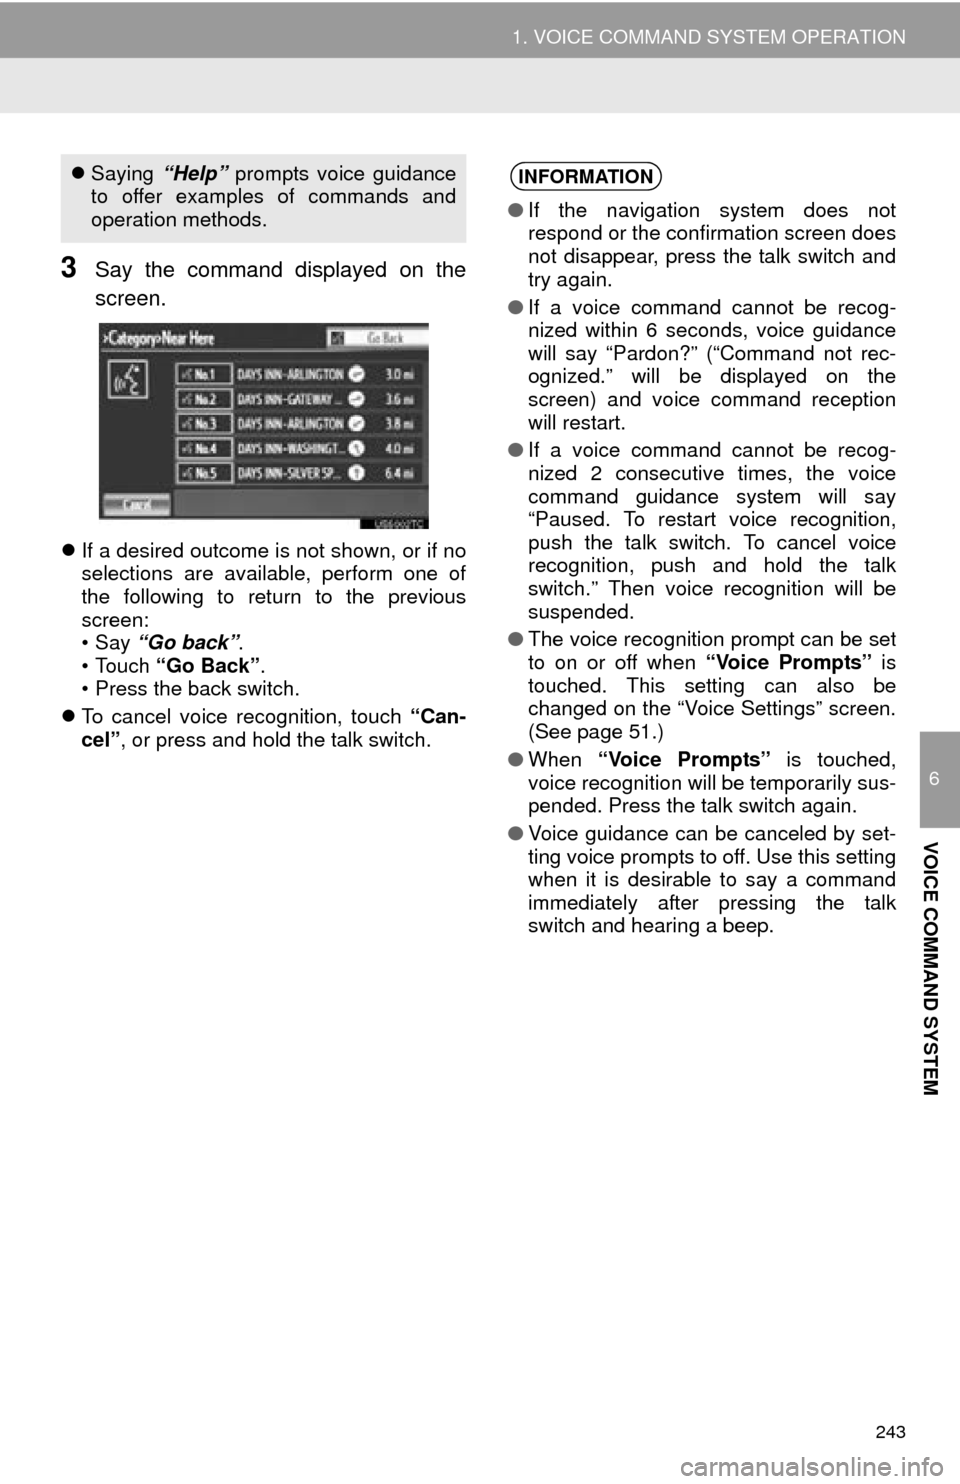
3Say the command displayed on the
screen.
If a desired outcome is not shown, or if no
selections are available, perform one of
the following to return to the previous
screen:
•Say “Go back” .
• Touch “Go Back” .
• Press the back switch.
To cancel voice recognition, touch “Can-
cel”, or press and hold the talk switch.
Saying “Help” prompts voice guidance
to offer examples of commands and
operation methods.INFORMATION
● If the navigation system does not
respond or the confirmation screen does
not disappear, press the talk switch and
try again.
● If a voice command cannot be recog-
nized within 6 seconds, voice guidance
will say “Pardon?” (“Command not rec-
ognized.” will be displayed on the
screen) and voice command reception
will restart.
● If a voice command cannot be recog-
nized 2 consecutive times, the voice
command guidance system will say
“Paused. To restart voice recognition,
push the talk switch. To cancel voice
recognition, push and hold the talk
switch.” Then voice recognition will be
suspended.
● The voice recognition prompt can be set
to on or off when “Voice Prompts” is
touched. This setting can also be
changed on the “Voice Settings” screen.
(See page 51.)
● When “Voice Prompts” is touched,
voice recognition will be temporarily sus-
pended. Press the talk switch again.
● Voice guidance can be canceled by set-
ting voice prompts to off. Use this setting
when it is desirable to say a command
immediately after pressing the talk
switch and hearing a beep.
Page 245 of 346
245
1. VOICE COMMAND SYSTEM OPERATION
6
VOICE COMMAND SYSTEM
1Press the talk switch.
2Say “Go home” .
A confirmation screen will be displayed
showing the recognition results.
3Say “Yes” or touch “Yes” .
The system starts searching for a route to
your home.
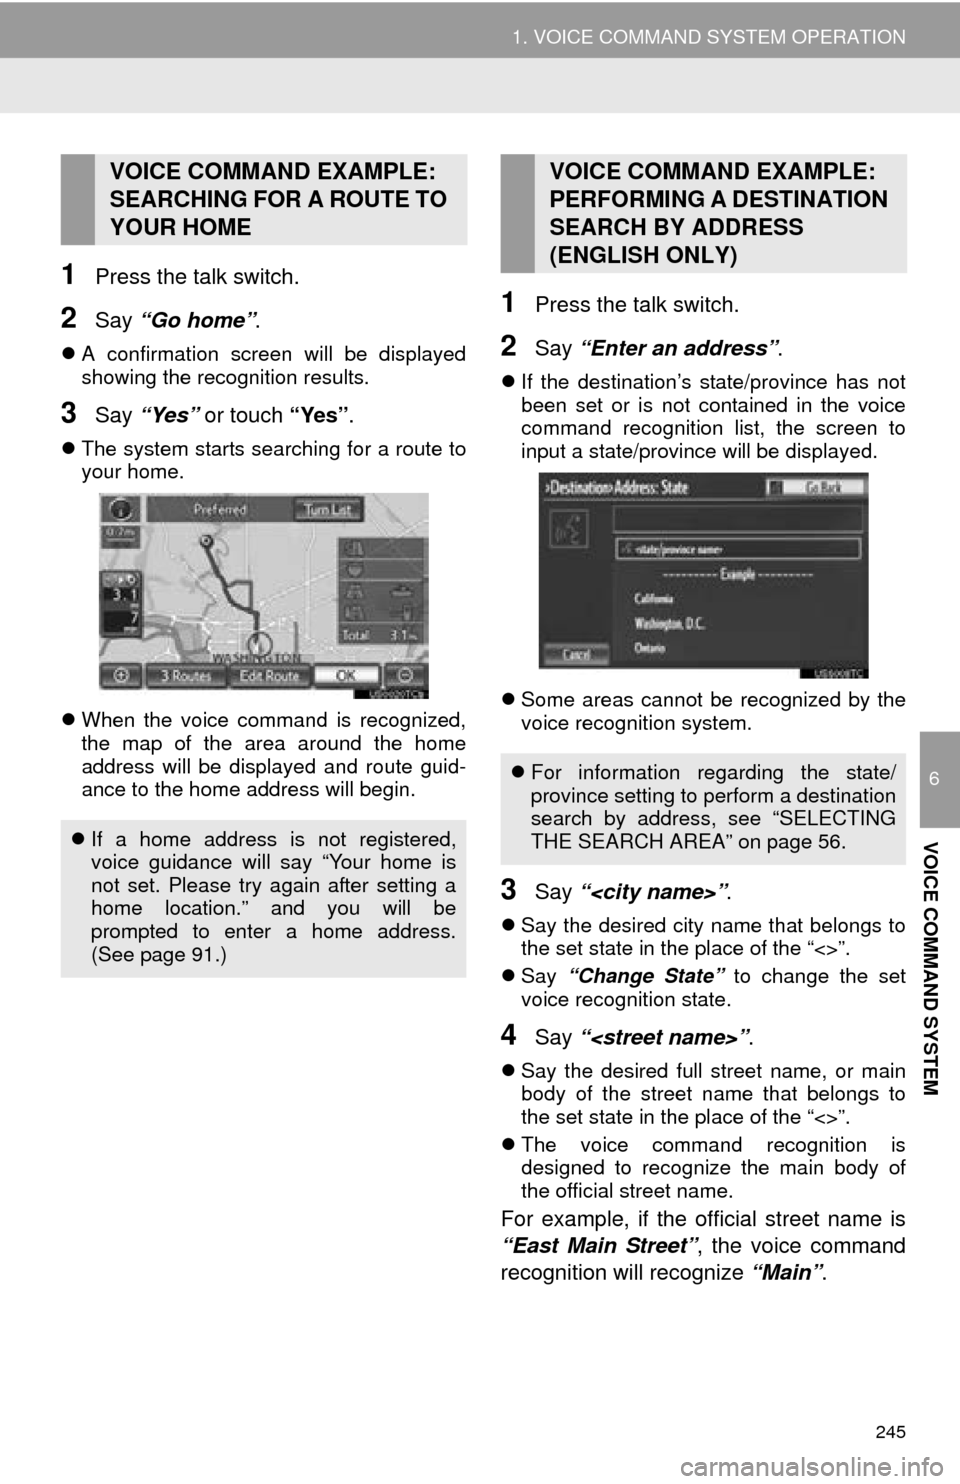
When the voice command is recognized,
the map of the area around the home
address will be displayed and route guid-
ance to the home address will begin.
1Press the talk switch.
2Say “Enter an address” .
If the destination’s state/province has not
been set or is not contained in the voice
command recognition list, the screen to
input a state/province will be displayed.
Some areas cannot be recognized by the
voice recognition system.
3Say “
Say the desired city name that belongs to
the set state in the place of the “<>”.
Say “Change State” to change the set
voice recognition state.
4Say “
Say the desired full street name, or main
body of the street name that belongs to
the set state in the place of the “<>”.
The voice command recognition is
designed to recognize the main body of
the official street name.
For example, if the o fficial street name is
“East Main Street” , the voice command
recognition will recognize “Main”.
VOICE COMMAND EXAMPLE:
SEARCHING FOR A ROUTE TO
YOUR HOME
If a home address is not registered,
voice guidance will say “Your home is
not set. Please try again after setting a
home location.” and you will be
prompted to enter a home address.
(See page 91.)
VOICE COMMAND EXAMPLE:
PERFORMING A DESTINATION
SEARCH BY ADDRESS
(ENGLISH ONLY)
For information regarding the state/
province setting to perform a destination
search by address, see “SELECTING
THE SEARCH AREA” on page 56.
Page 246 of 346
246
1. VOICE COMMAND SYSTEM OPERATION
5Say “
Say the desired number, cardinal/intercar-
dinal direction etc. in the place of the “<>”.
For example: Say “West 555”.
Inputting the house number can be
skipped.
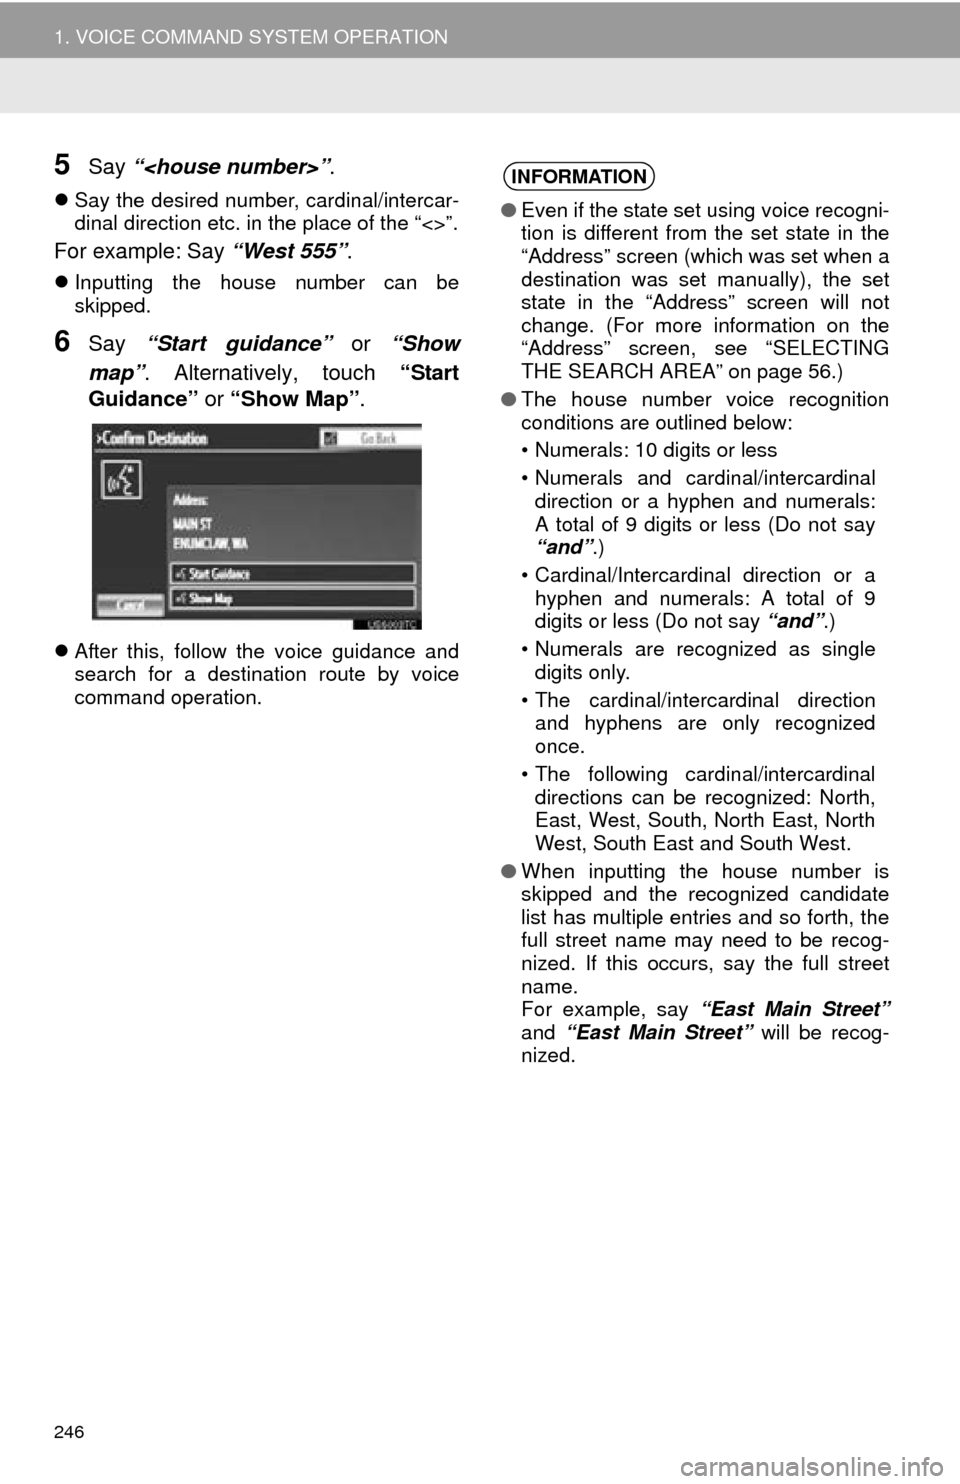
6Say “Start guidance” or “Show
map” . Alternatively, touch “Start
Guidance” or “Show Map” .
After this, follow the voice guidance and
search for a destination route by voice
command operation.
INFORMATION
●Even if the state set using voice recogni-
tion is different from the set state in the
“Address” screen (which was set when a
destination was set manually), the set
state in the “Address” screen will not
change. (For more information on the
“Address” screen, see “SELECTING
THE SEARCH AREA” on page 56.)
● The house number voice recognition
conditions are outlined below:
• Numerals: 10 digits or less
• Numerals and cardinal/intercardinal
direction or a hyphen and numerals:
A total of 9 digits or less (Do not say
“and” .)
• Cardinal/Intercardinal direction or a hyphen and numerals: A total of 9
digits or less (Do not say “and”.)
• Numerals are recognized as single digits only.
• The cardinal/intercardinal direction and hyphens are only recognized
once.
• The following cardinal/intercardinal directions can be recognized: North,
East, West, South, North East, North
West, South East and South West.
● When inputting the house number is
skipped and the recognized candidate
list has multiple entries and so forth, the
full street name may need to be recog-
nized. If this occurs, say the full street
name.
For example, say “East Main Street”
and “East Main Street” will be recog-
nized.
Page 247 of 346
247
1. VOICE COMMAND SYSTEM OPERATION
6
VOICE COMMAND SYSTEM
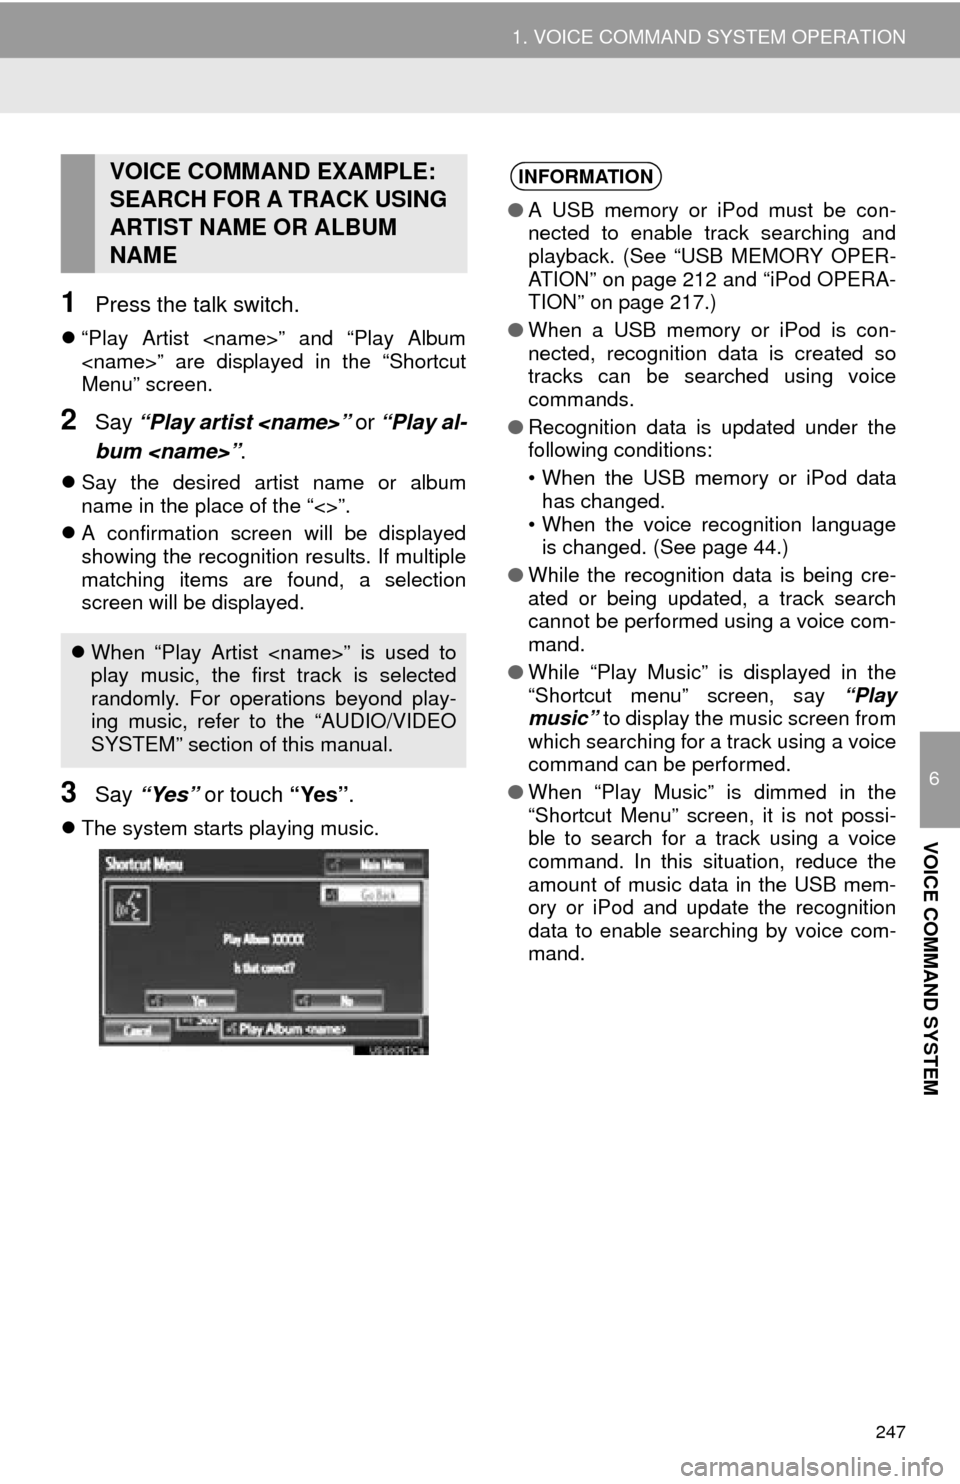
1Press the talk switch.
“Play Artist
Menu” screen.
2Say “Play artist
bum
Say the desired artist name or album
name in the place of the “<>”.
A confirmation screen will be displayed
showing the recognition results. If multiple
matching items are found, a selection
screen will be displayed.
3Say “Yes” or touch “Yes” .
The system starts playing music.
VOICE COMMAND EXAMPLE:
SEARCH FOR A TRACK USING
ARTIST NAME OR ALBUM
NAME
When “Play Artist
play music, the first track is selected
randomly. For operations beyond play-
ing music, refer to the “AUDIO/VIDEO
SYSTEM” section of this manual.
INFORMATION
● A USB memory or iPod must be con-
nected to enable track searching and
playback. (See “USB MEMORY OPER-
ATION” on page 212 and “iPod OPERA-
TION” on page 217.)
● When a USB memory or iPod is con-
nected, recognition data is created so
tracks can be searched using voice
commands.
● Recognition data is updated under the
following conditions:
• When the USB memory or iPod data
has changed.
• When the voice recognition language is changed. (See page 44.)
● While the recognition data is being cre-
ated or being updated, a track search
cannot be performed using a voice com-
mand.
● While “Play Music” is displayed in the
“Shortcut menu” screen, say “Play
music” to display the music screen from
which searching for a track using a voice
command can be performed.
● When “Play Music” is dimmed in the
“Shortcut Menu” screen, it is not possi-
ble to search for a track using a voice
command. In this situation, reduce the
amount of music data in the USB mem-
ory or iPod and update the recognition
data to enable searching by voice com-
mand.