key TOYOTA AVALON 2014 XX40 / 4.G Navigation Manual
[x] Cancel search | Manufacturer: TOYOTA, Model Year: 2014, Model line: AVALON, Model: TOYOTA AVALON 2014 XX40 / 4.GPages: 346, PDF Size: 6.47 MB
Page 131 of 346
131
1. PHONE OPERATION
4
TELEPHONE
4. CALL ON THE Bluetooth® PHONE
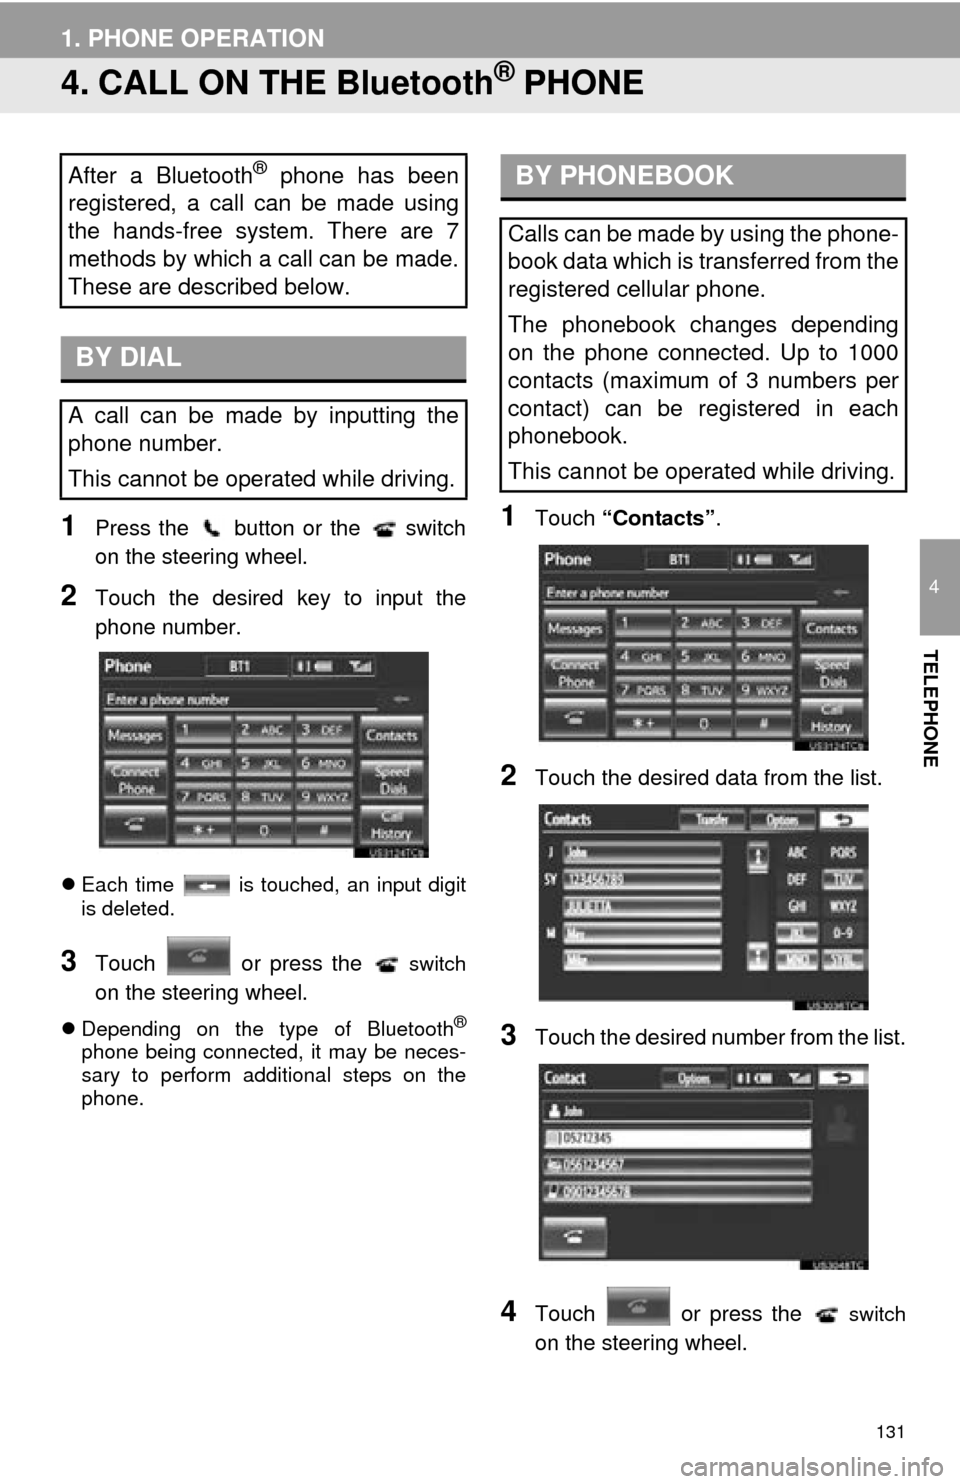
1Press the button or the switch
on the steering wheel.
2Touch the desired key to input the
phone number.
Each time is touched, an input digit
is deleted.
3Touch or press the switch
on the steering wheel.
Depending on the type of Bluetooth®
phone being connected, it may be neces-
sary to perform additional steps on the
phone.
1Touch “Contacts” .
2Touch the desired data from the list.
3Touch the desired number from the list.
4Touch or press the switch
on the steering wheel.
After a Bluetooth® phone has been
registered, a call can be made using
the hands-free system. There are 7
methods by which a call can be made.
These are described below.
BY DIAL
A call can be made by inputting the
phone number.
This cannot be operated while driving.
BY PHONEBOOK
Calls can be made by using the phone-
book data which is transferred from the
registered cellular phone.
The phonebook changes depending
on the phone connected. Up to 1000
contacts (maximum of 3 numbers per
contact) can be registered in each
phonebook.
This cannot be operated while driving.
Page 138 of 346
138
1. PHONE OPERATION
6. TALK ON THE Bluetooth® PHONE
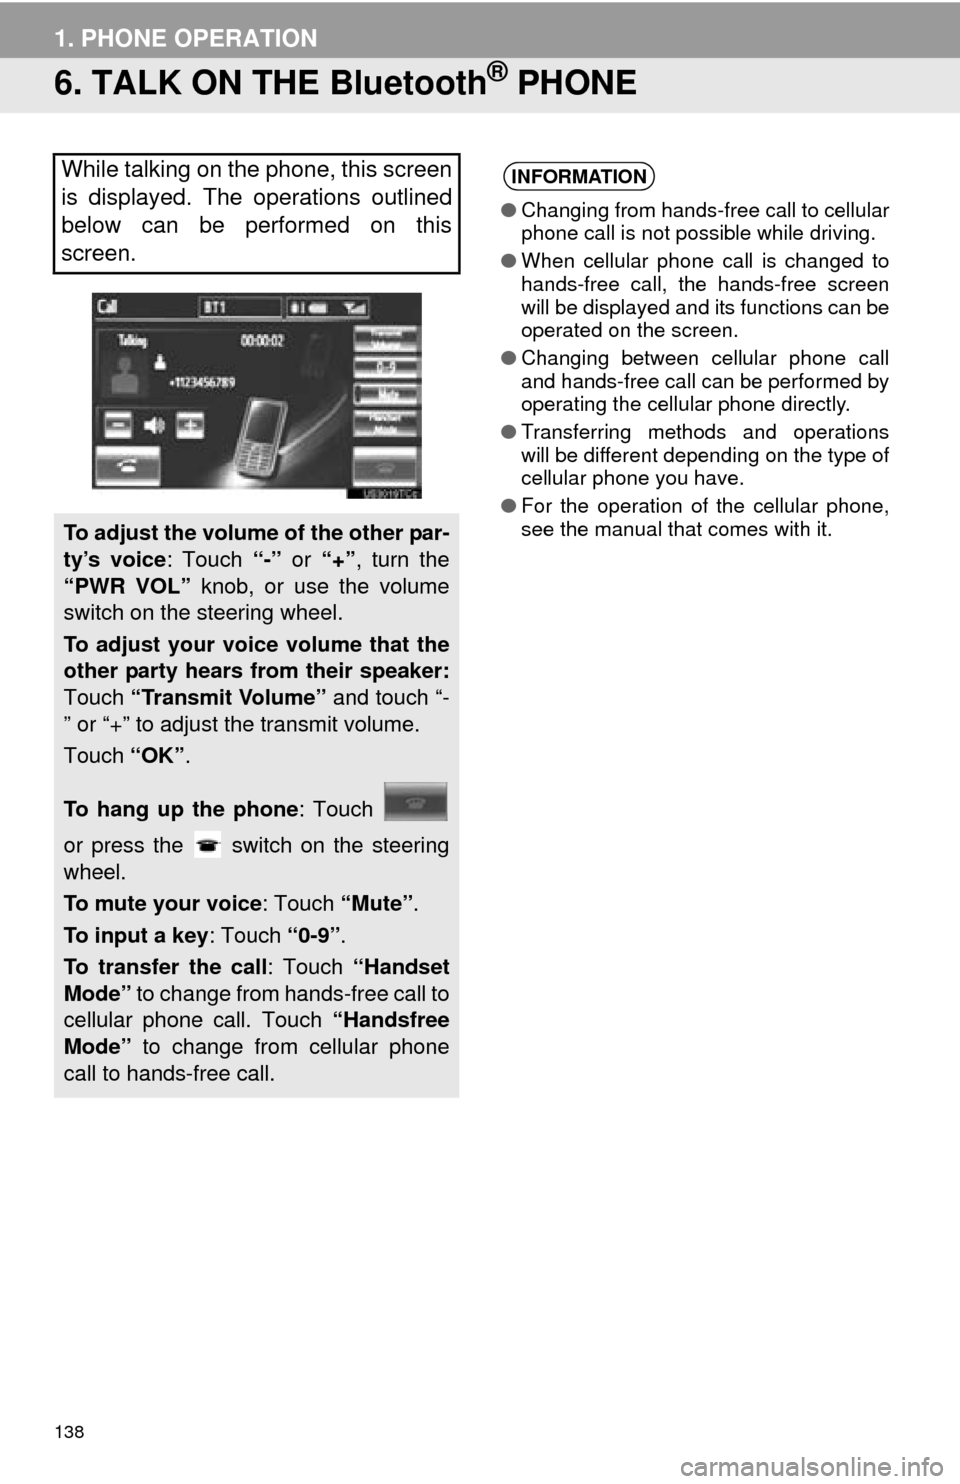
While talking on the phone, this screen
is displayed. The operations outlined
below can be performed on this
screen.
To adjust the volume of the other par-
ty’s voice: Touch “-” or “+”, turn the
“PWR VOL” knob, or use the volume
switch on the steering wheel.
To adjust your voice volume that the
other party hears from their speaker:
Touch “Transmit Volume” and touch “-
” or “+” to adjust the transmit volume.
Touch “OK”.
To hang up the phone : Touch
or press the switch on the steering
wheel.
To mute your voice : Touch “Mute”.
To input a key : Touch “0-9”.
To transfer the call : Touch “Handset
Mode” to change from hands-free call to
cellular phone call. Touch “Handsfree
Mode” to change from cellular phone
call to hands-free call.
INFORMATION
● Changing from hands-free call to cellular
phone call is not possible while driving.
● When cellular phone call is changed to
hands-free call, the hands-free screen
will be displayed and its functions can be
operated on the screen.
● Changing between cellular phone call
and hands-free call can be performed by
operating the cellular phone directly.
● Transferring methods and operations
will be different depending on the type of
cellular phone you have.
● For the operation of the cellular phone,
see the manual that comes with it.
Page 139 of 346
139
1. PHONE OPERATION
4
TELEPHONE
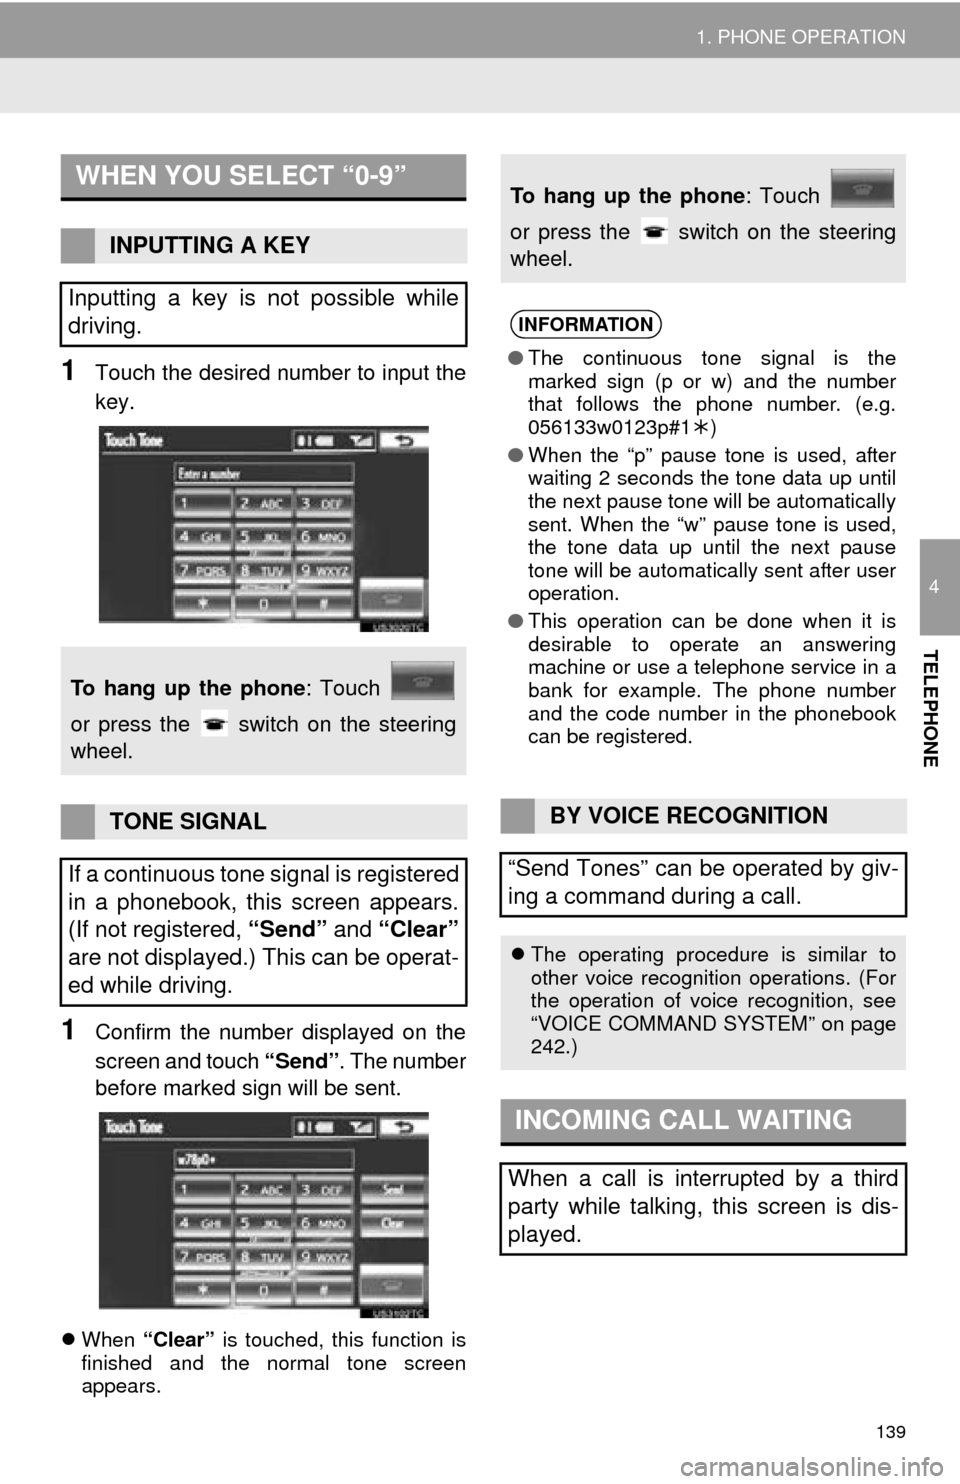
1Touch the desired number to input the
key.
1Confirm the number displayed on the
screen and touch “Send”. The number
before marked sign will be sent.
When “Clear” is touched, this function is
finished and the normal tone screen
appears.
WHEN YOU SELECT “0-9”
INPUTTING A KEY
Inputting a key is not possible while
driving.
To hang up the phone : Touch
or press the switch on the steering
wheel.
TONE SIGNAL
If a continuous tone signal is registered
in a phonebook, this screen appears.
(If not registered, “Send” and “Clear”
are not displayed.) This can be operat-
ed while driving.
To hang up the phone : Touch
or press the switch on the steering
wheel.
INFORMATION
● The continuous tone signal is the
marked sign (p or w) and the number
that follows the phone number. (e.g.
056133w0123p#1 )
● When the “p” pause tone is used, after
waiting 2 seconds the tone data up until
the next pause tone will be automatically
sent. When the “w” pause tone is used,
the tone data up until the next pause
tone will be automatically sent after user
operation.
● This operation can be done when it is
desirable to operate an answering
machine or use a telephone service in a
bank for example. The phone number
and the code number in the phonebook
can be registered.
BY VOICE RECOGNITION
“Send Tones” can be operated by giv-
ing a command during a call.
The operating procedure is similar to
other voice recognition operations. (For
the operation of voice recognition, see
“VOICE COMMAND SYSTEM” on page
242.)
INCOMING CALL WAITING
When a call is interrupted by a third
party while talking, this screen is dis-
played.
Page 149 of 346
149
2. SETUP
4
TELEPHONE
4When the transfer is complete, “Done”
will appear on the screen. Touch
“Done” .
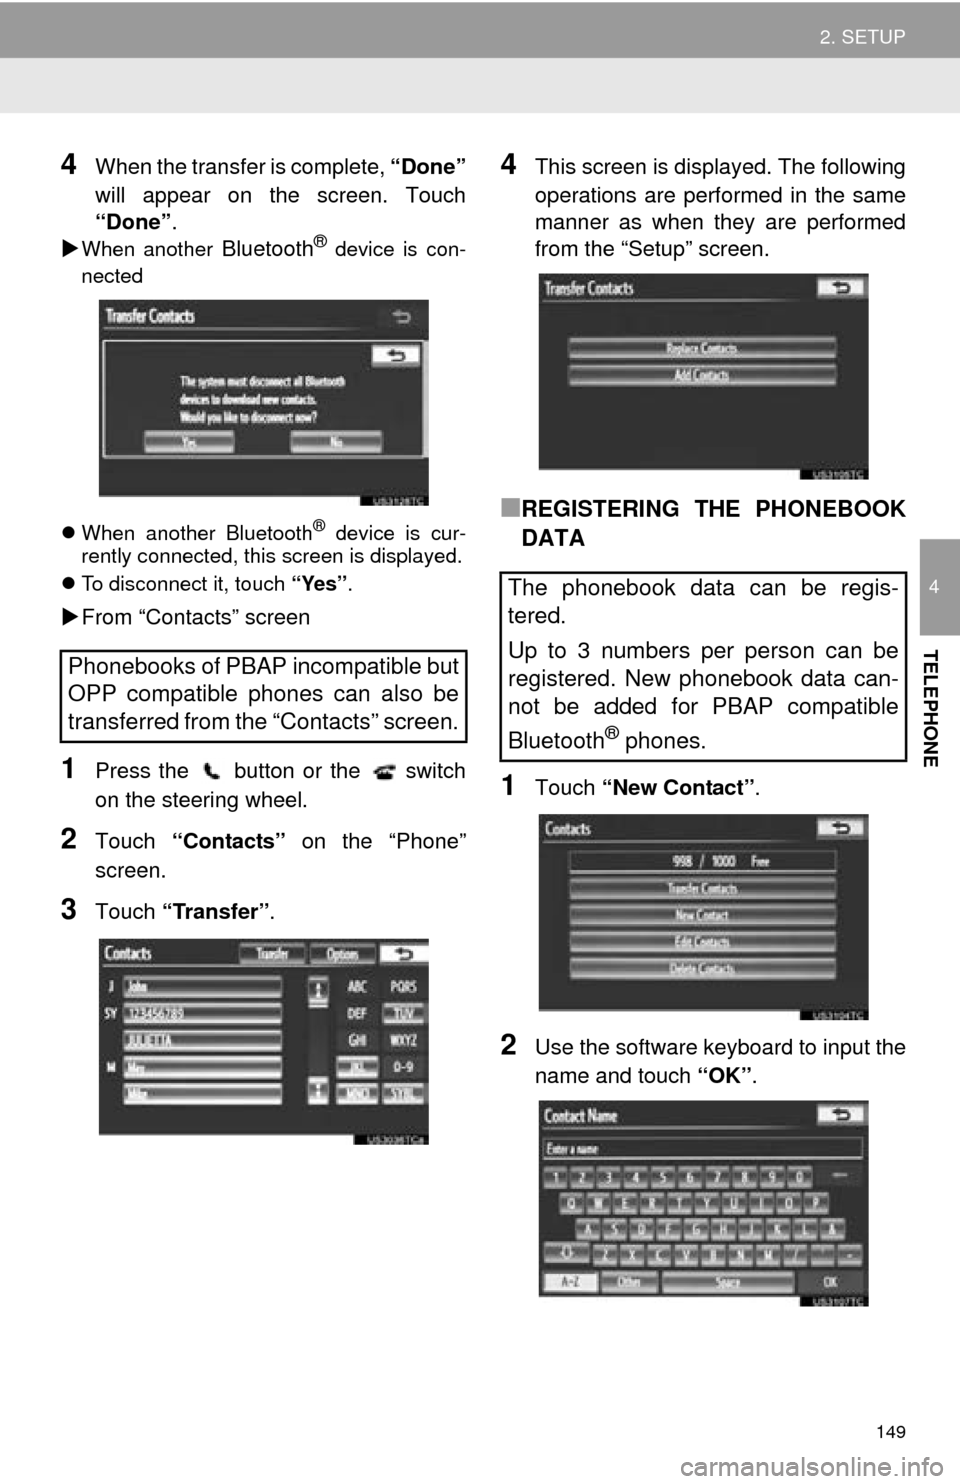
When another Bluetooth® device is con-
nected
When another Bluetooth
® device is cur-
rently connected, this screen is displayed.
To disconnect it, touch “Yes”.
From “Contacts” screen
1Press the button or the switch
on the steering wheel.
2Touch “Contacts” on the “Phone”
screen.
3Touch “Transfer” .
4This screen is displayed. The following
operations are performed in the same
manner as when they are performed
from the “Setup” screen.
■REGISTERING THE PHONEBOOK
DATA
1Touch “New Contact” .
2Use the software keyboard to input the
name and touch “OK”.
Phonebooks of PBAP incompatible but
OPP compatible phones can also be
transferred from the “Contacts” screen.
The phonebook data can be regis-
tered.
Up to 3 numbers per person can be
registered. New phonebook data can-
not be added for PBAP compatible
Bluetooth
® phones.
Page 160 of 346

160
2. SETUP
1Touch “Edit Quick Reply Messag-
es” .
2Touch the screen button correspond-
ing to the desired message.
3Use the software keyboard to edit the
message.
4Touch “OK”.
1Touch “Default” .
2Touch “Yes”.
1Press the “SETUP” button.
2Touch “Phone” on the “Setup” screen.
3Touch “Phone Display Settings” .
4Perform each setting according to the
procedures outlined on the following
pages.
5When each setting is completed, touch
“Save”.
EDIT QUICK REPLY
MESSAGES
Quick reply messages can be edited.
15 messages have already been
stored.
INITIALIZING THE SETTINGS
The settings can be initialized.
PHONE DISPLAY SETTINGS
The phone display settings can be
changed.
Page 166 of 346
166
2. SETUP
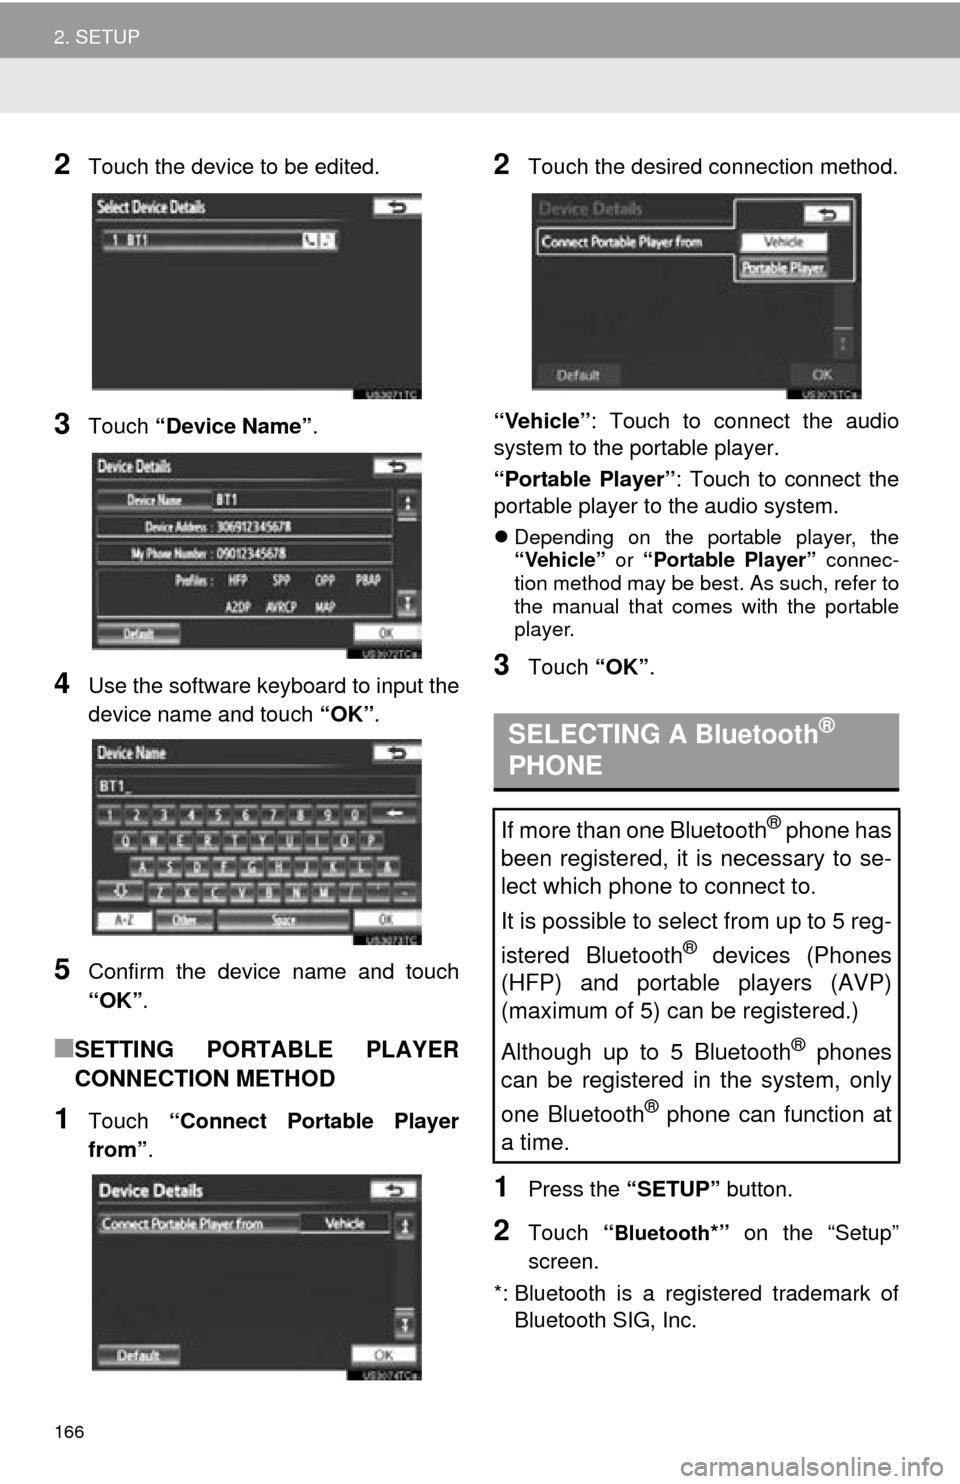
2Touch the device to be edited.
3Touch “Device Name” .
4Use the software keyboard to input the
device name and touch “OK”.
5Confirm the device name and touch
“OK”.
■SETTING PORTABLE PLAYER
CONNECTION METHOD
1Touch “Connect Portable Player
from” .
2Touch the desired connection method.
“Vehicle” : Touch to connect the audio
system to the portable player.
“Portable Player” : Touch to connect the
portable player to the audio system.
Depending on the portable player, the
“Vehicle” or “Portable Player” connec-
tion method may be best. As such, refer to
the manual that comes with the portable
player.
3Touch “OK”.
1Press the “SETUP” button.
2Touch “Bluetooth*” on the “Setup”
screen.
*: Bluetooth is a registered trademark of Bluetooth SIG, Inc.
SELECTING A Bluetooth®
PHONE
If more than one Bluetooth® phone has
been registered, it is necessary to se-
lect which phone to connect to.
It is possible to select from up to 5 reg-
istered Bluetooth
® devices (Phones
(HFP) and portable players (AVP)
(maximum of 5) can be registered.)
Although up to 5 Bluetooth
® phones
can be registered in the system, only
one Bluetooth
® phone can function at
a time.
Page 170 of 346
170
2. SETUP
■CHANGING “Bluetooth* Power”
When “Bluetooth* Power” is “On” : The
Bluetooth® device is automatically con-
nected when the power
in ACCESSORY or ON
mode.
When “Bluetooth* Power” is “Off” : The
Bluetooth
® device is disconnected, and
the system will not connect to it next time.
The “Bluetooth* Power” auto connection
state can be set on or off.
• “On” : The auto connection is turned on.
• “Off” : The auto connection is turned off.
The auto connection state cannot be
changed from “On” to “Off” while driving,
but it can be changed from “Off” to “On” .
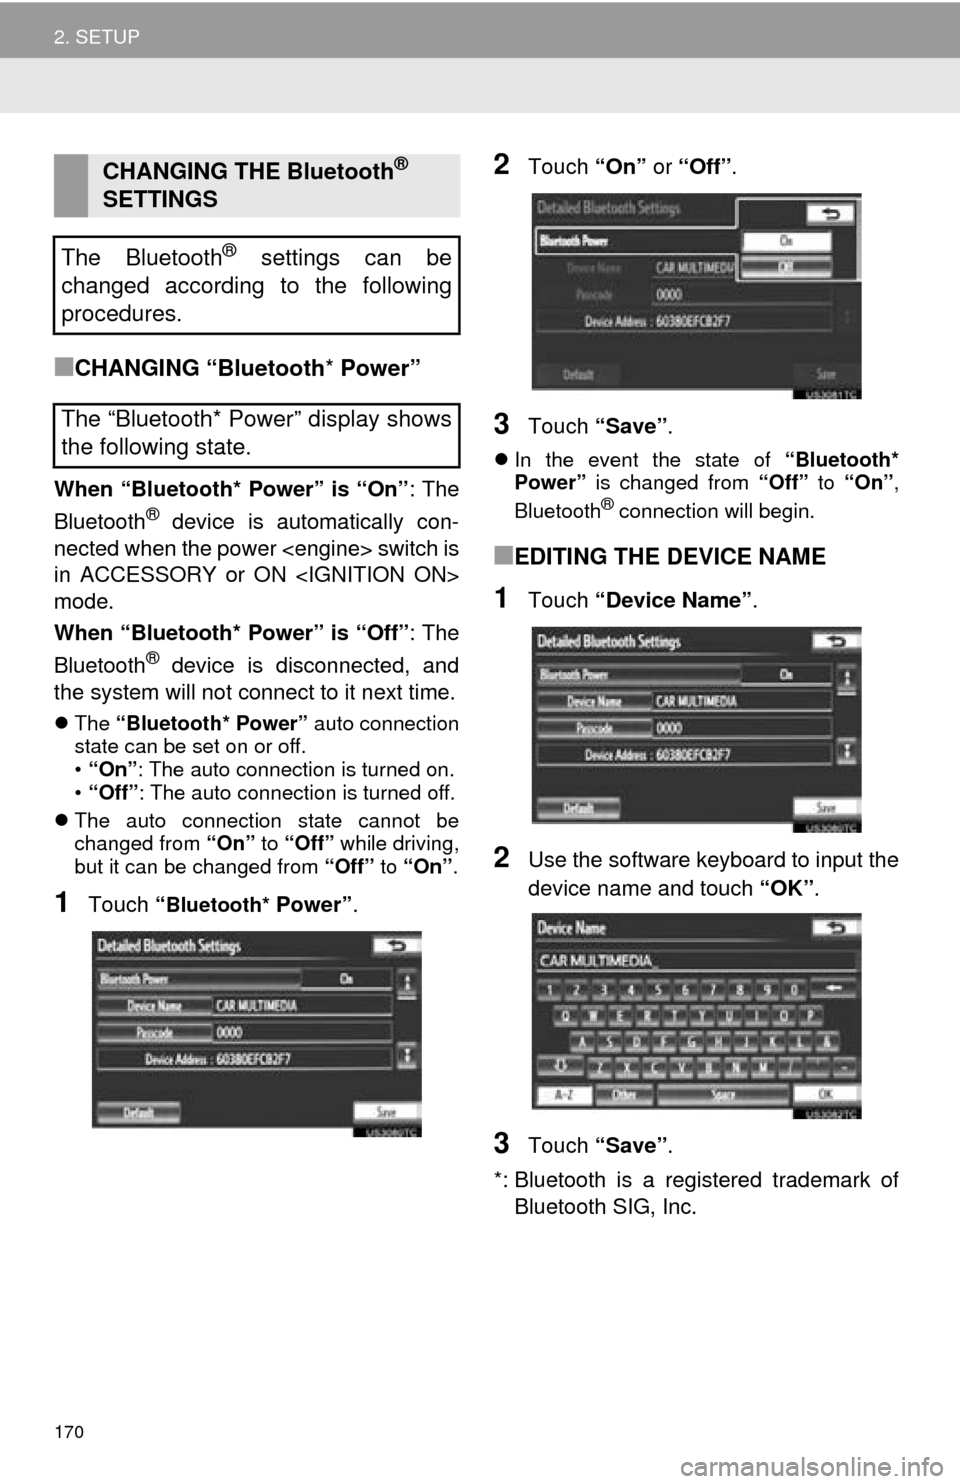
1Touch “Bluetooth* Power” .
2Touch “On” or “Off” .
3Touch “Save” .
In the event the state of “Bluetooth*
Power” is changed from “Off” to “On” ,
Bluetooth
® connection will begin.
■EDITING THE DEVICE NAME
1Touch “Device Name” .
2Use the software keyboard to input the
device name and touch “OK” .
3Touch “Save” .
*: Bluetooth is a registered trademark of Bluetooth SIG, Inc.
CHANGING THE Bluetooth®
SETTINGS
The Bluetooth
® settings can be
changed according to the following
procedures.
The “Bluetooth* Power” display shows
the following state.
Page 201 of 346
201
1. AUDIO/VIDEO SYSTEM OPERATION
5
AUDIO/VIDEO SYSTEM
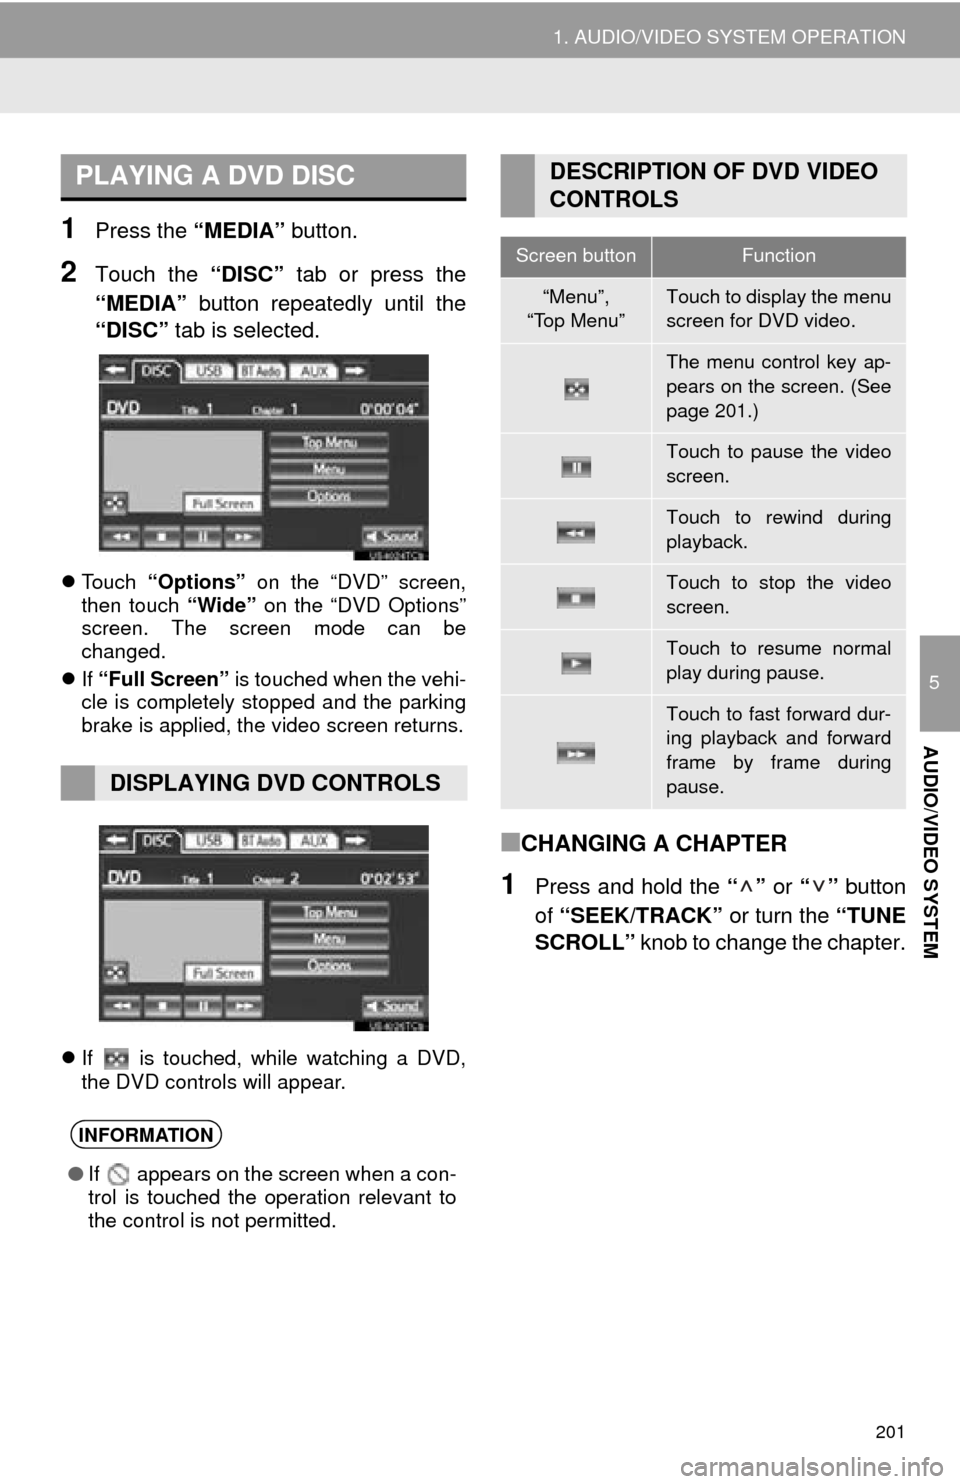
1Press the “MEDIA” button.
2Touch the “DISC” tab or press the
“MEDIA” button repeatedly until the
“DISC” tab is selected.
Touch “Options” on the “DVD” screen,
then touch “Wide” on the “DVD Options”
screen. The screen mode can be
changed.
If “Full Screen” is touched when the vehi-
cle is completely stopped and the parking
brake is applied, the video screen returns.
If is touched, while watching a DVD,
the DVD controls will appear.
■CHANGING A CHAPTER
1Press and hold the “” or “” button
of “SEEK/TRACK” or turn the “TUNE
SCROLL” knob to change the chapter.
PLAYING A DVD DISC
DISPLAYING DVD CONTROLS
INFORMATION
●If appears on the screen when a con-
trol is touched the operation relevant to
the control is not permitted.
DESCRIPTION OF DVD VIDEO
CONTROLS
Screen buttonFunction
“Menu”,
“Top Menu”Touch to display the menu
screen for DVD video.
The menu control key ap-
pears on the screen. (See
page 201.)
Touch to pause the video
screen.
Touch to rewind during
playback.
Touch to stop the video
screen.
Touch to resume normal
play during pause.
Touch to fast forward dur-
ing playback and forward
frame by frame during
pause.
Page 205 of 346
205
1. AUDIO/VIDEO SYSTEM OPERATION
5
AUDIO/VIDEO SYSTEM
■AUDIO LANGUAGE
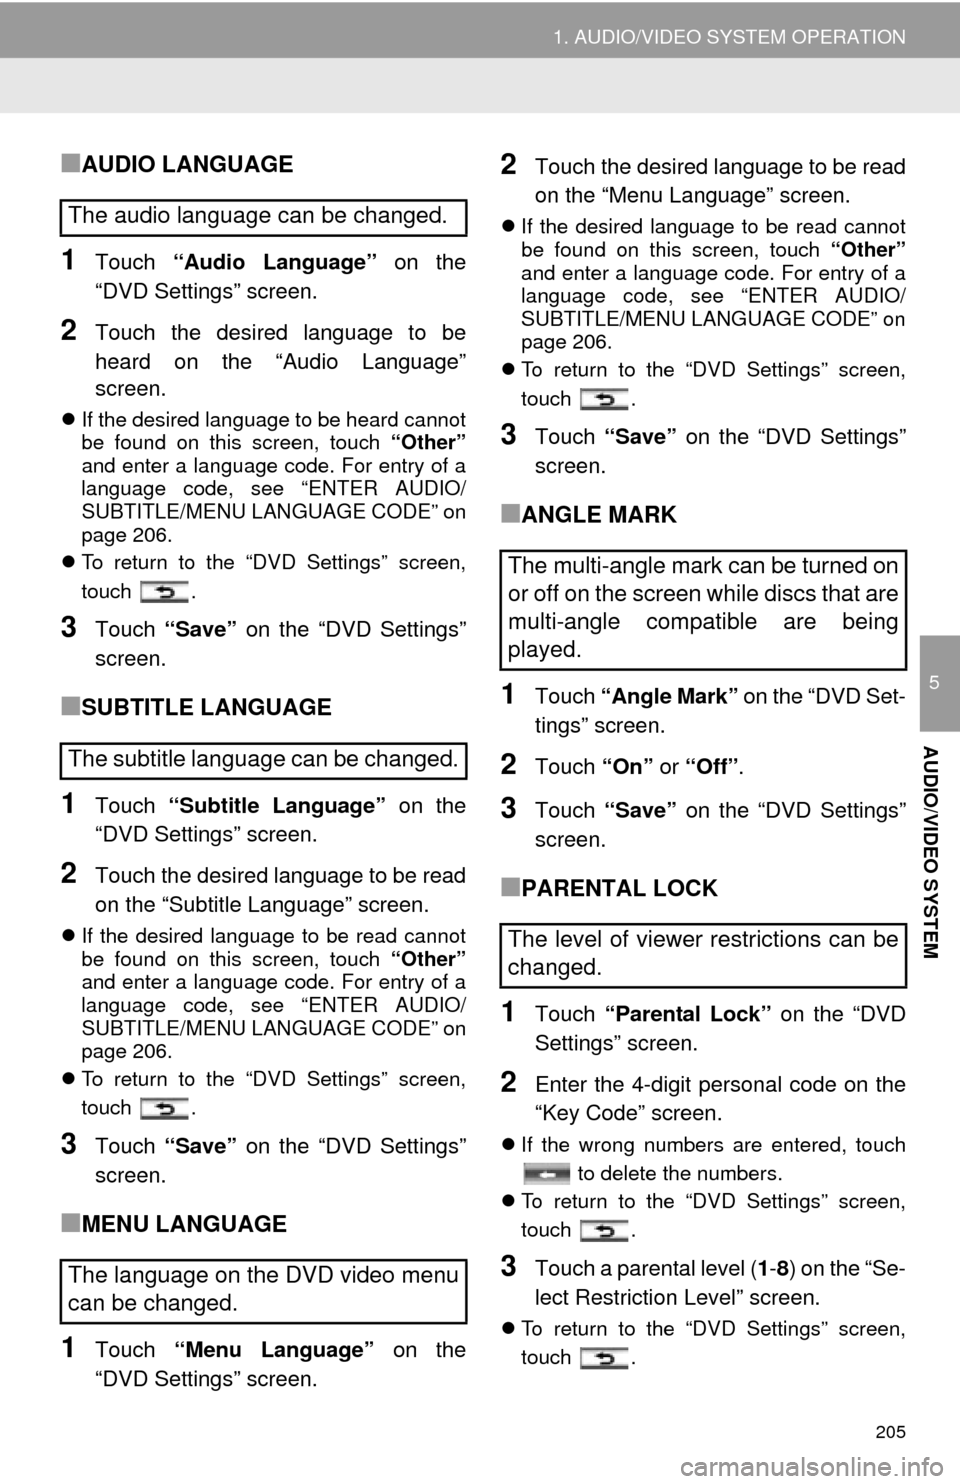
1Touch “Audio Language” on the
“DVD Settings” screen.
2Touch the desired language to be
heard on the “Audio Language”
screen.
If the desired language to be heard cannot
be found on this screen, touch “Other”
and enter a language code. For entry of a
language code, see “ENTER AUDIO/
SUBTITLE/MENU LANGUAGE CODE” on
page 206.
To return to the “DVD Settings” screen,
touch .
3Touch “Save” on the “DVD Settings”
screen.
■SUBTITLE LANGUAGE
1Touch “Subtitle Language” on the
“DVD Settings” screen.
2Touch the desired language to be read
on the “Subtitle Language” screen.
If the desired language to be read cannot
be found on this screen, touch “Other”
and enter a language code. For entry of a
language code, see “ENTER AUDIO/
SUBTITLE/MENU LANGUAGE CODE” on
page 206.
To return to the “DVD Settings” screen,
touch .
3Touch “Save” on the “DVD Settings”
screen.
■MENU LANGUAGE
1Touch “Menu Language” on the
“DVD Settings” screen.
2Touch the desired language to be read
on the “Menu Language” screen.
If the desired language to be read cannot
be found on this screen, touch “Other”
and enter a language code. For entry of a
language code, see “ENTER AUDIO/
SUBTITLE/MENU LANGUAGE CODE” on
page 206.
To return to the “DVD Settings” screen,
touch .
3Touch “Save” on the “DVD Settings”
screen.
■ANGLE MARK
1Touch “Angle Mark” on the “DVD Set-
tings” screen.
2Touch “On” or “Off” .
3Touch “Save” on the “DVD Settings”
screen.
■PARENTAL LOCK
1Touch “Parental Lock” on the “DVD
Settings” screen.
2Enter the 4-digit personal code on the
“Key Code” screen.
If the wrong numbers are entered, touch
to delete the numbers.
To return to the “DVD Settings” screen,
touch .
3Touch a parental level ( 1-8 ) on the “Se-
lect Restriction Level” screen.
To return to the “DVD Settings” screen,
touch .
The audio language can be changed.
The subtitle language can be changed.
The language on the DVD video menu
can be changed.
The multi-angle mark can be turned on
or off on the screen while discs that are
multi-angle compatible are being
played.
The level of viewer restrictions can be
changed.
Page 275 of 346
8
275
1
2
3
4
5
6
7
8
9
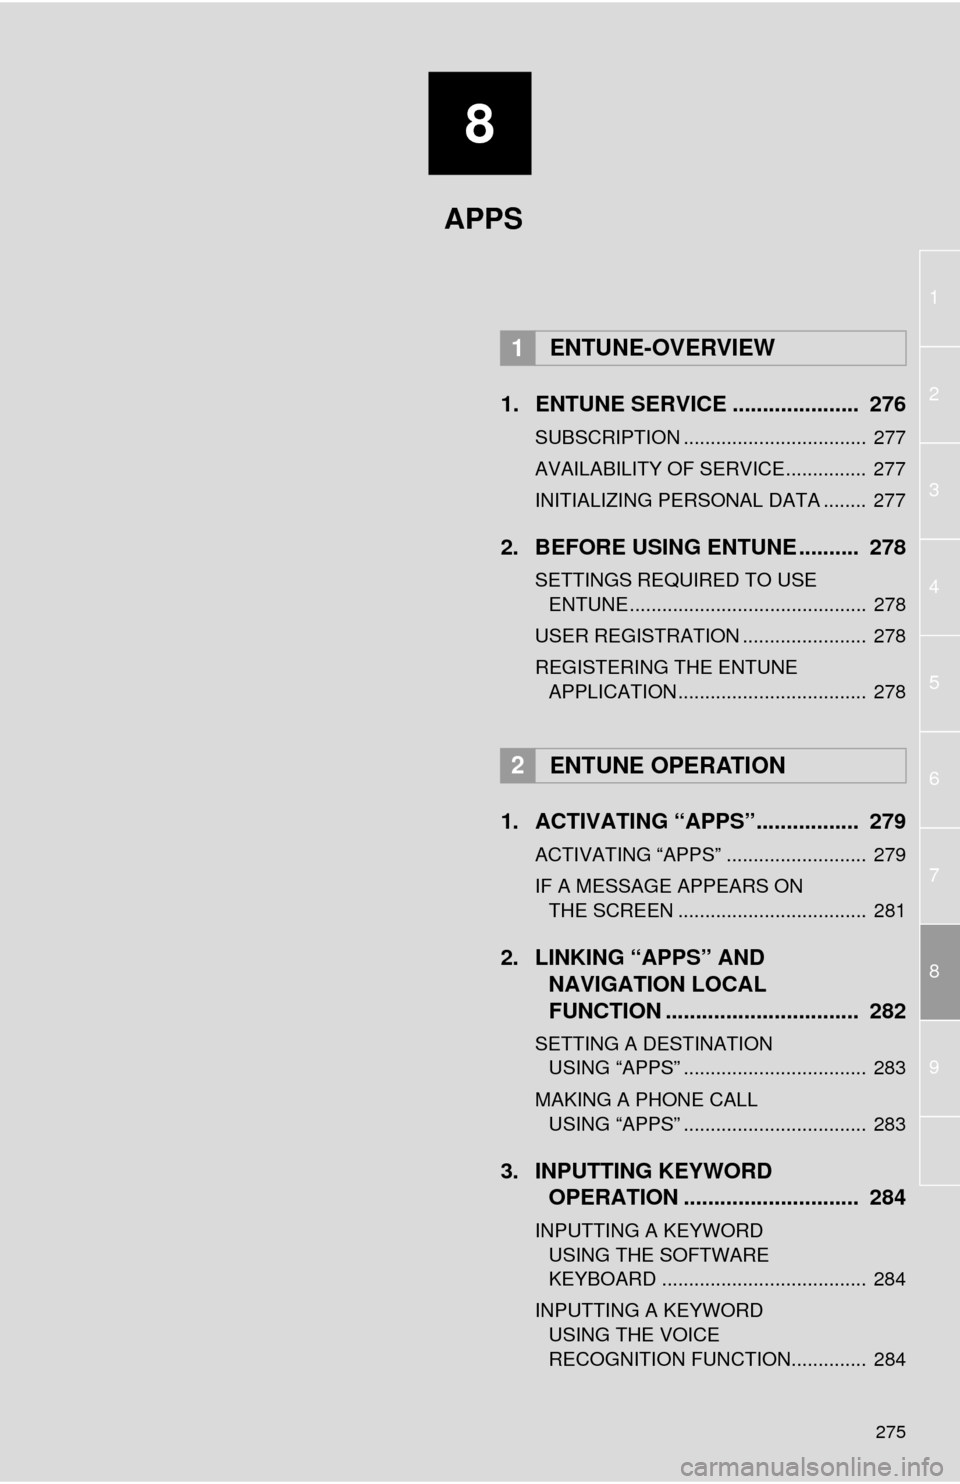
1. ENTUNE SERVICE ..................... 276
SUBSCRIPTION .................................. 277
AVAILABILITY OF SERVICE............... 277
INITIALIZING PERSONAL DATA ........ 277
2. BEFORE USING ENTUNE .......... 278
SETTINGS REQUIRED TO USE ENTUNE ............................................ 278
USER REGISTRATION ....................... 278
REGISTERING THE ENTUNE APPLICATION ................................... 278
1. ACTIVATING “APPS”.. ............... 279
ACTIVATING “APPS” .......................... 279
IF A MESSAGE APPEARS ON
THE SCREEN ................................... 281
2. LINKING “APPS” AND NAVIGATION LOCAL
FUNCTION ...... ....................... ... 282
SETTING A DESTINATION
USING “APPS” .................................. 283
MAKING A PHONE CALL USING “APPS” .................................. 283
3. INPUTTING KEYWORD OPERATION ............................. 284
INPUTTING A KEYWORD
USING THE SOFTWARE
KEYBOARD ...................................... 284
INPUTTING A KEYWORD USING THE VOICE
RECOGNITION FUNCTION.............. 284
1ENTUNE-OVERVIEW
2ENTUNE OPERATION
APPS