wheel TOYOTA AVALON 2014 XX40 / 4.G Navigation Manual
[x] Cancel search | Manufacturer: TOYOTA, Model Year: 2014, Model line: AVALON, Model: TOYOTA AVALON 2014 XX40 / 4.GPages: 346, PDF Size: 6.47 MB
Page 153 of 346
153
2. SETUP
4
TELEPHONE
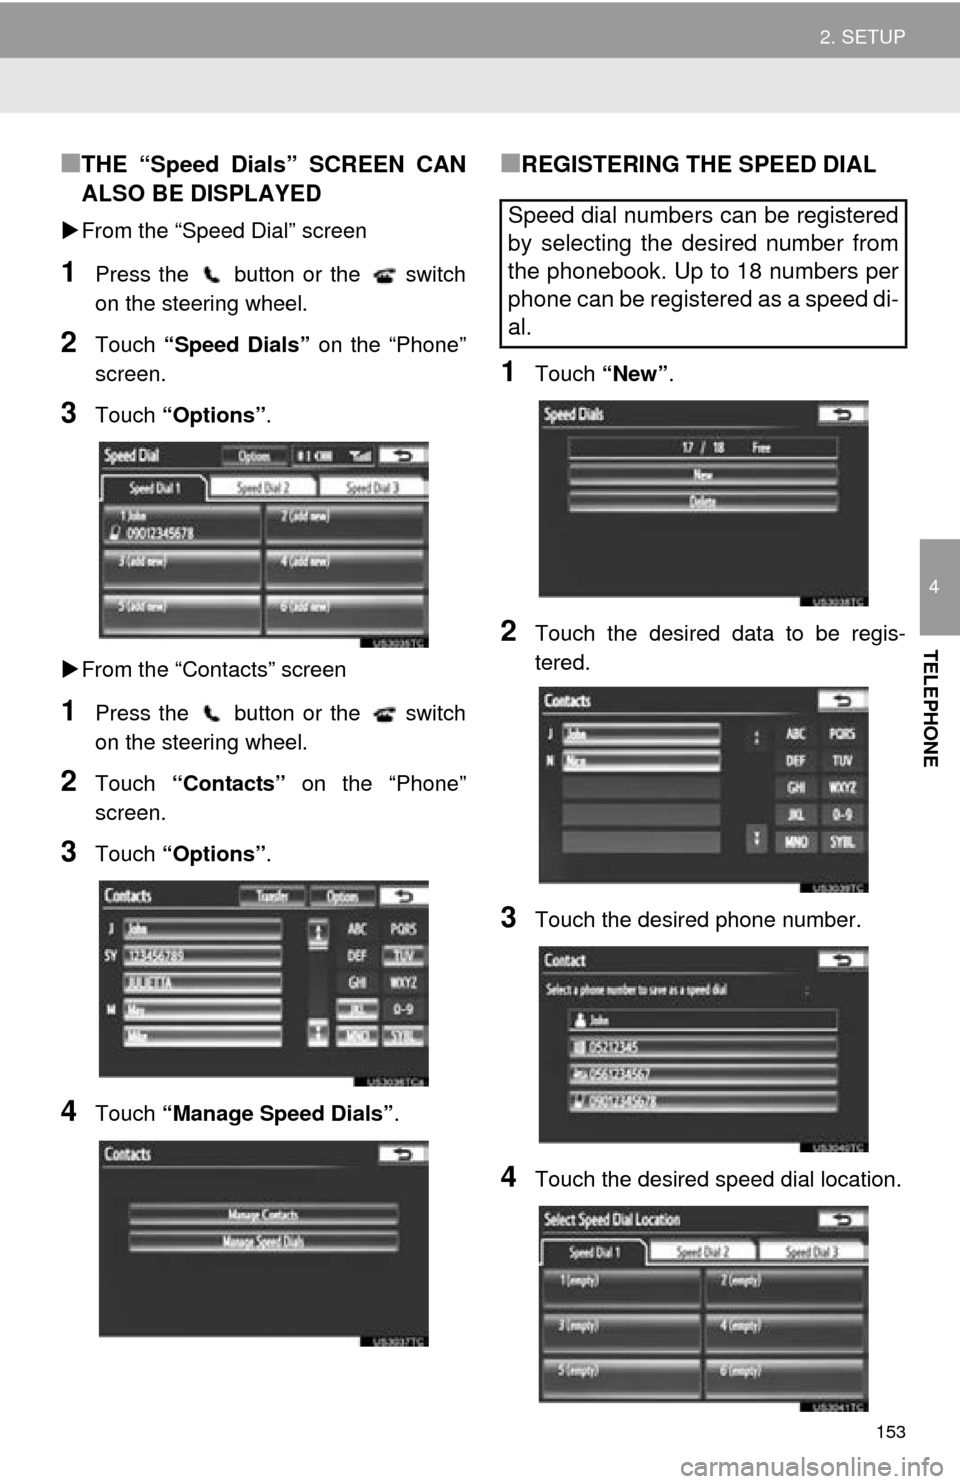
■THE “Speed Dials” SCREEN CAN
ALSO BE DISPLAYED
From the “Speed Dial” screen
1Press the button or the switch
on the steering wheel.
2Touch “Speed Dials” on the “Phone”
screen.
3Touch “Options”.
From the “Contacts” screen
1Press the button or the switch
on the steering wheel.
2Touch “Contacts” on the “Phone”
screen.
3Touch “Options”.
4Touch “Manage Speed Dials” .
■REGISTERING THE SPEED DIAL
1Touch “New”.
2Touch the desired data to be regis-
tered.
3Touch the desired phone number.
4Touch the desired speed dial location.
Speed dial numbers can be registered
by selecting the desired number from
the phonebook. Up to 18 numbers per
phone can be registered as a speed di-
al.
Page 154 of 346
154
2. SETUP
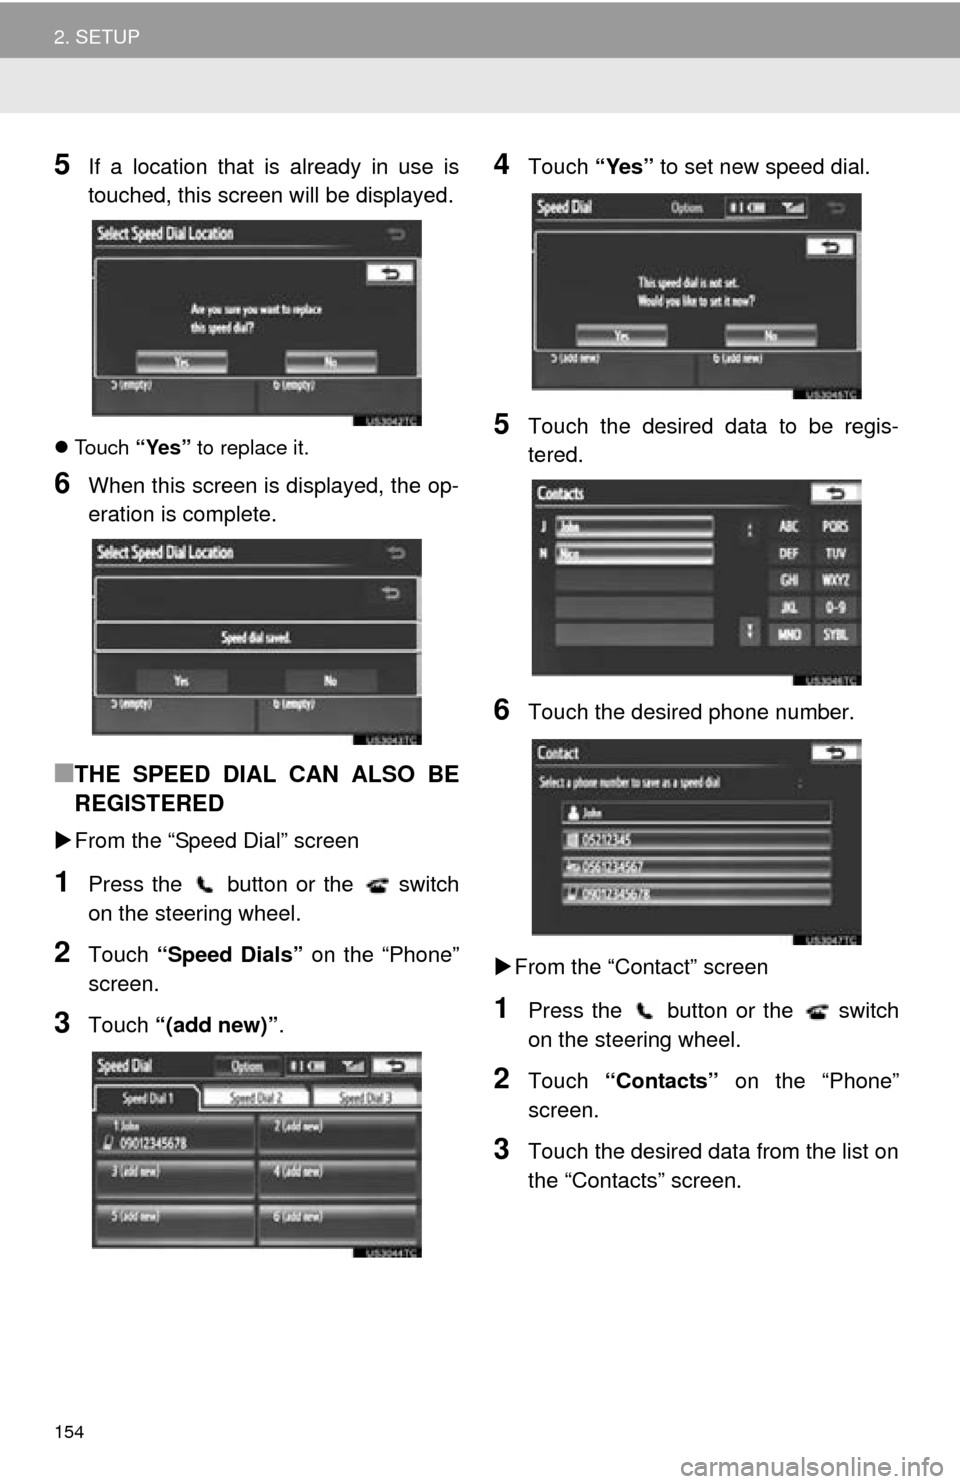
5If a location that is already in use is
touched, this screen will be displayed.
Touch “Yes” to replace it.
6When this screen is displayed, the op-
eration is complete.
■THE SPEED DIAL CAN ALSO BE
REGISTERED
From the “Speed Dial” screen
1Press the button or the switch
on the steering wheel.
2Touch “Speed Dials” on the “Phone”
screen.
3Touch “(add new)” .
4Touch “Yes” to set new speed dial.
5Touch the desired data to be regis-
tered.
6Touch the desired phone number.
From the “Contact” screen
1Press the button or the switch
on the steering wheel.
2Touch “Contacts” on the “Phone”
screen.
3Touch the desired data from the list on
the “Contacts” screen.
Page 156 of 346
156
2. SETUP
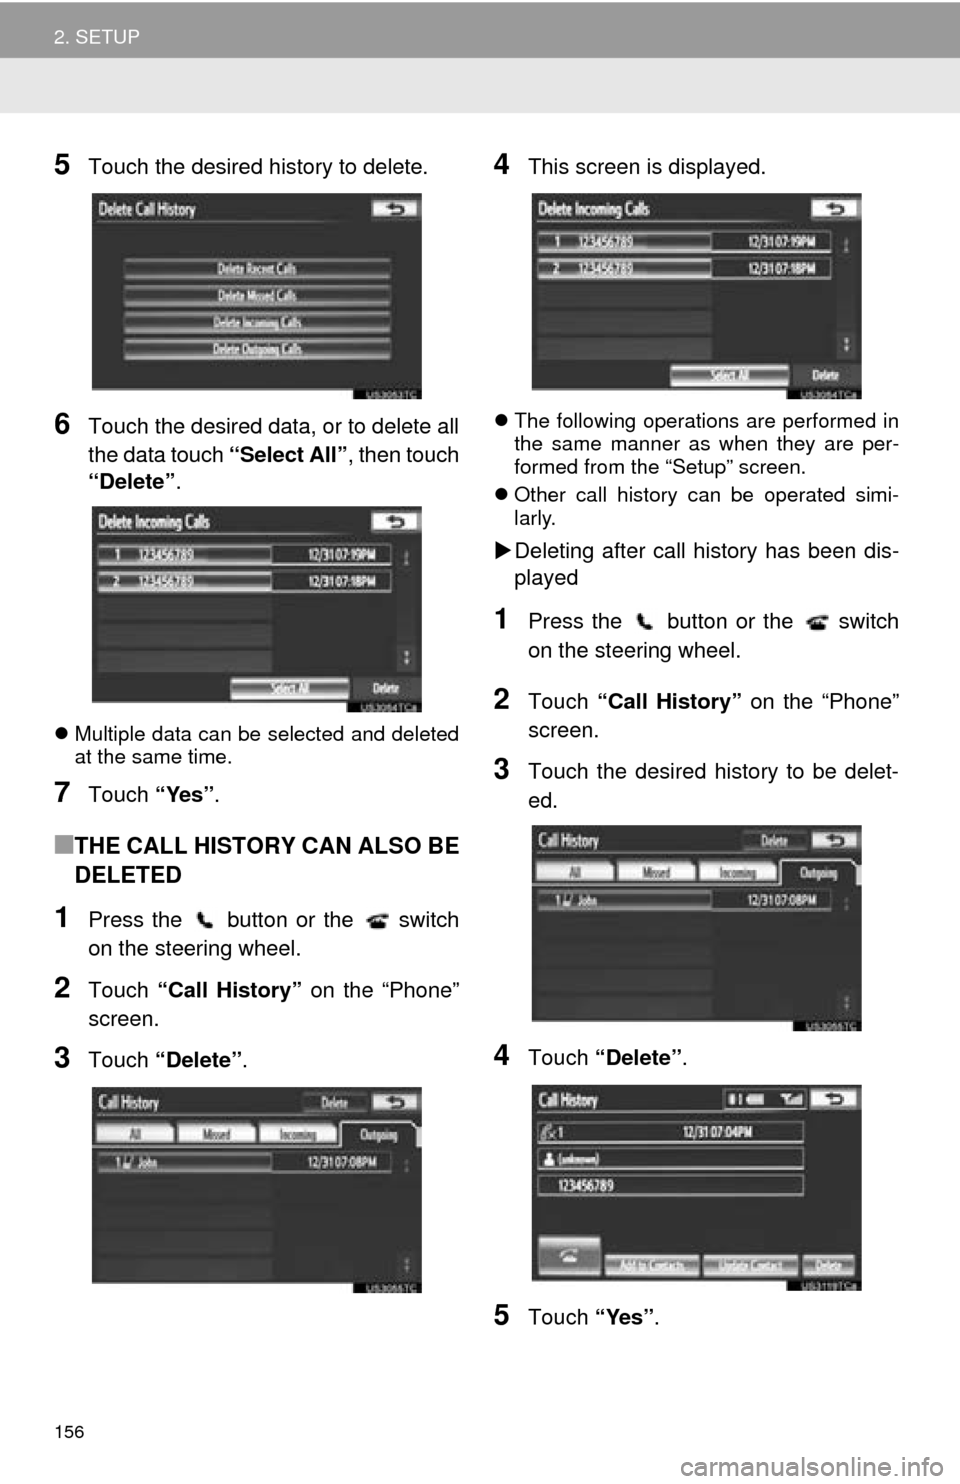
5Touch the desired history to delete.
6Touch the desired data, or to delete all
the data touch “Select All”, then touch
“Delete” .
Multiple data can be selected and deleted
at the same time.
7Touch “Yes”.
■THE CALL HISTORY CAN ALSO BE
DELETED
1Press the button or the switch
on the steering wheel.
2Touch “Call History” on the “Phone”
screen.
3Touch “Delete” .
4This screen is displayed.
The following operations are performed in
the same manner as when they are per-
formed from the “Setup” screen.
Other call history can be operated simi-
larly.
Deleting after call history has been dis-
played
1Press the button or the switch
on the steering wheel.
2Touch “Call History” on the “Phone”
screen.
3Touch the desired history to be delet-
ed.
4Touch “Delete” .
5Touch “Yes”.
Page 157 of 346
157
2. SETUP
4
TELEPHONE
1Press the “SETUP” button.
2Touch “Phone” on the “Setup” screen.
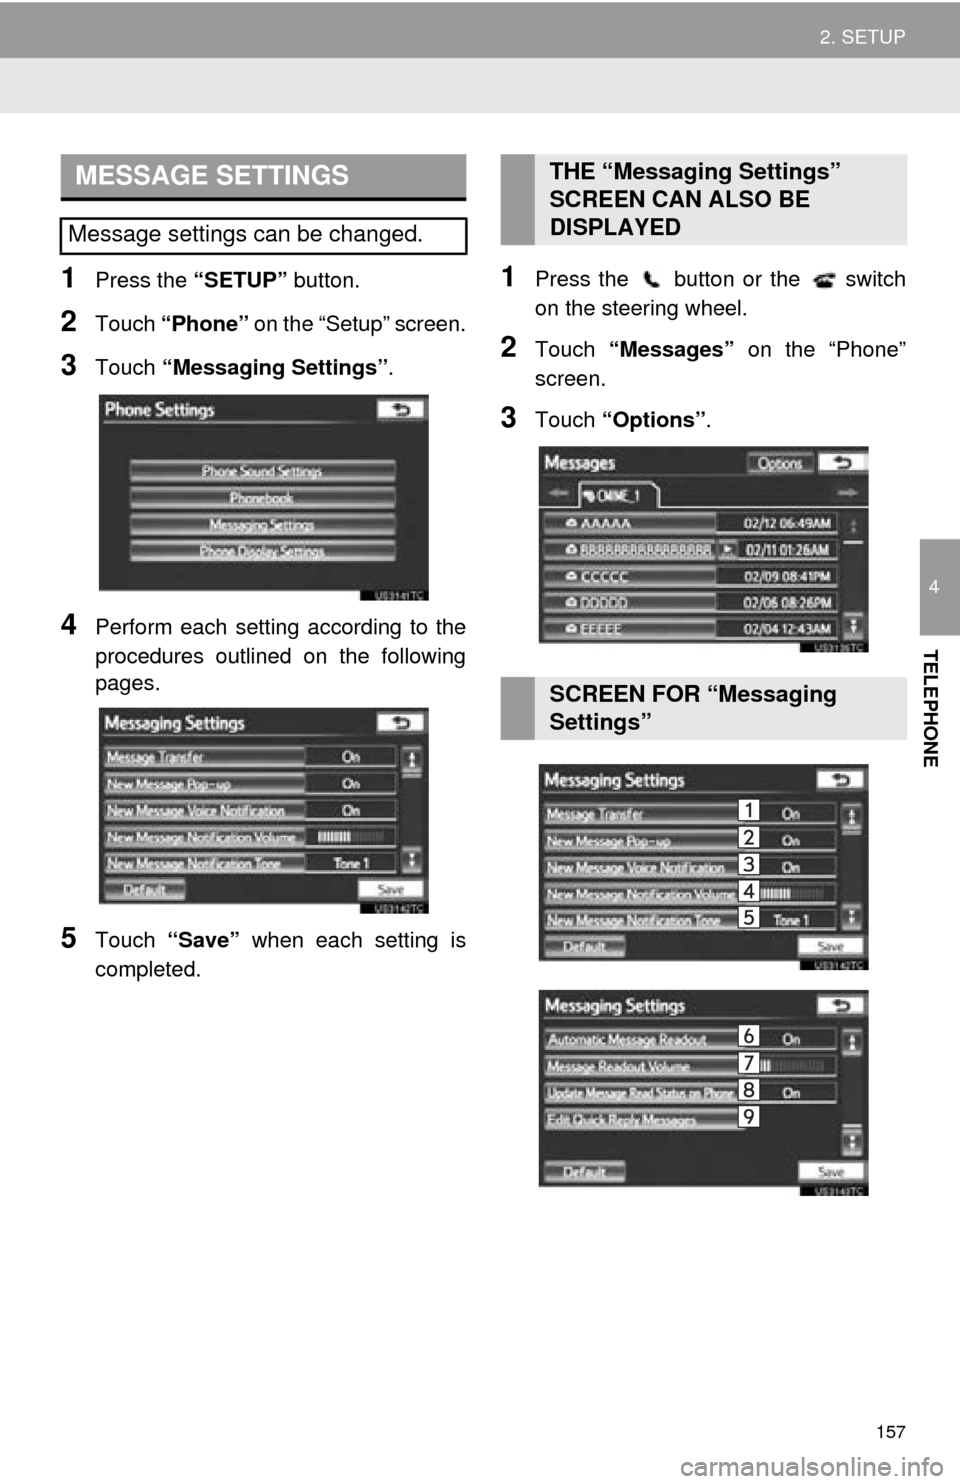
3Touch “Messaging Settings” .
4Perform each setting according to the
procedures outlined on the following
pages.
5Touch “Save” when each setting is
completed.
1Press the button or the switch
on the steering wheel.
2Touch “Messages” on the “Phone”
screen.
3Touch “Options”.
MESSAGE SETTINGS
Message settings can be changed.
THE “Messaging Settings”
SCREEN CAN ALSO BE
DISPLAYED
SCREEN FOR “Messaging
Settings”
Page 161 of 346
161
2. SETUP
4
TELEPHONE
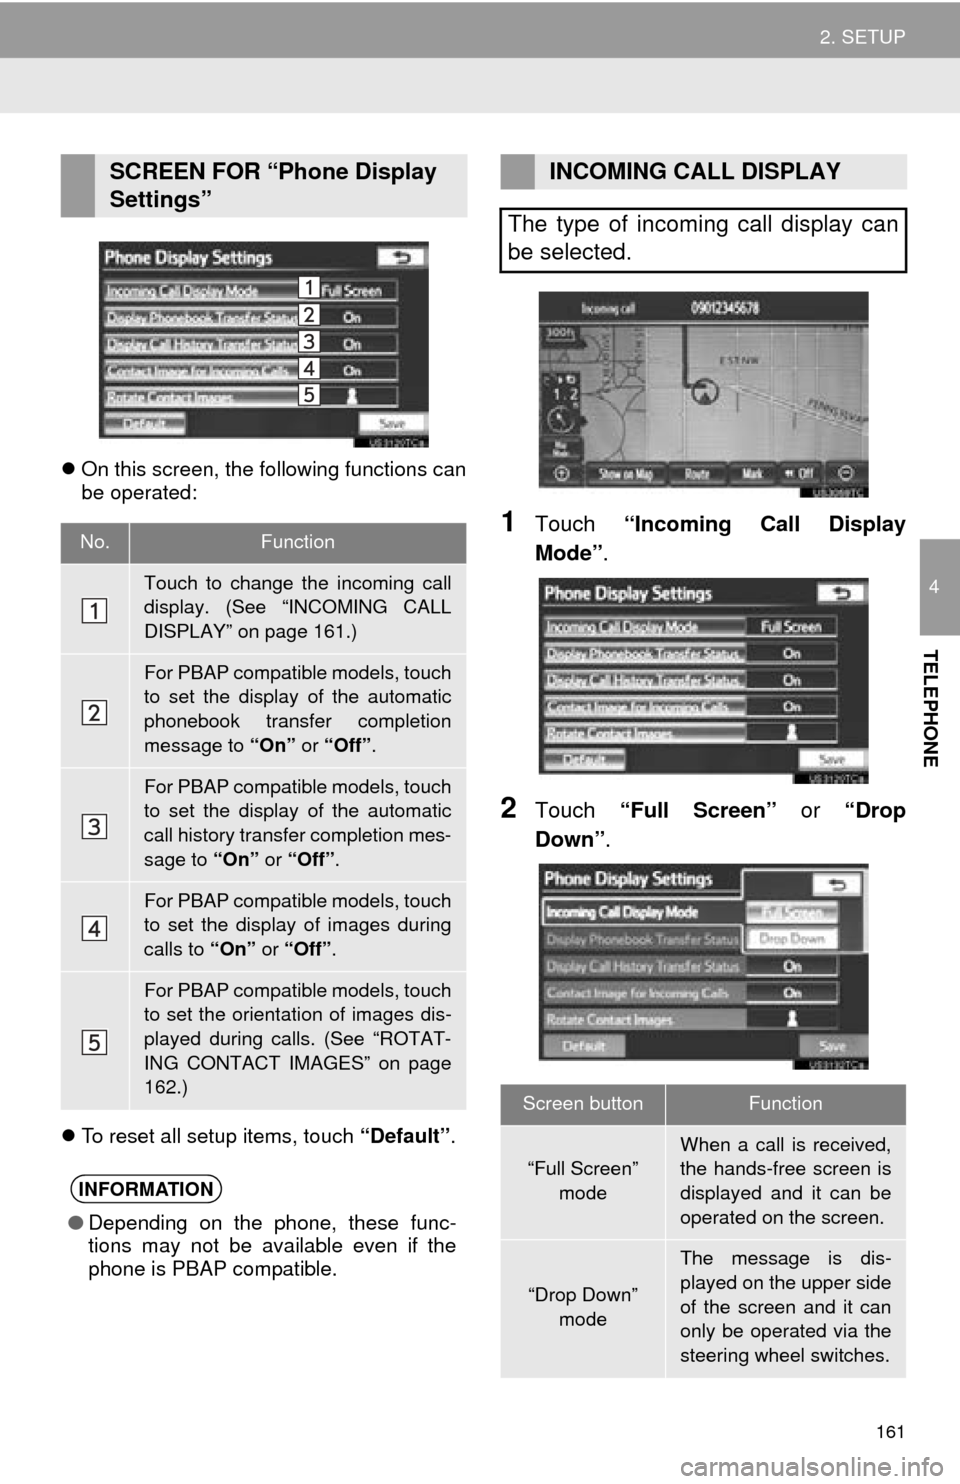
On this screen, the following functions can
be operated:
To reset all setup items, touch “Default”.
1Touch “Incoming Call Display
Mode” .
2Touch “Full Screen” or “Drop
Down”.
SCREEN FOR “Phone Display
Settings”
No.Function
Touch to change the incoming call
display. (See “INCOMING CALL
DISPLAY” on page 161.)
For PBAP compatible models, touch
to set the display of the automatic
phonebook transfer completion
message to “On” or “Off” .
For PBAP compatible models, touch
to set the display of the automatic
call history transfer completion mes-
sage to “On” or “Off” .
For PBAP compatible models, touch
to set the display of images during
calls to “On” or “Off” .
For PBAP compatible models, touch
to set the orientation of images dis-
played during calls. (See “ROTAT-
ING CONTACT IMAGES” on page
162.)
INFORMATION
●Depending on the phone, these func-
tions may not be available even if the
phone is PBAP compatible.
INCOMING CALL DISPLAY
The type of incoming call display can
be selected.
Screen buttonFunction
“Full Screen” mode
When a call is received,
the hands-free screen is
displayed and it can be
operated on the screen.
“Drop Down”
mode
The message is dis-
played on the upper side
of the screen and it can
only be operated via the
steering wheel switches.
Page 193 of 346
193
1. AUDIO/VIDEO SYSTEM OPERATION
5
AUDIO/VIDEO SYSTEM
6. RADIO OPERATION (INTERNET RADIO BROADCAST)
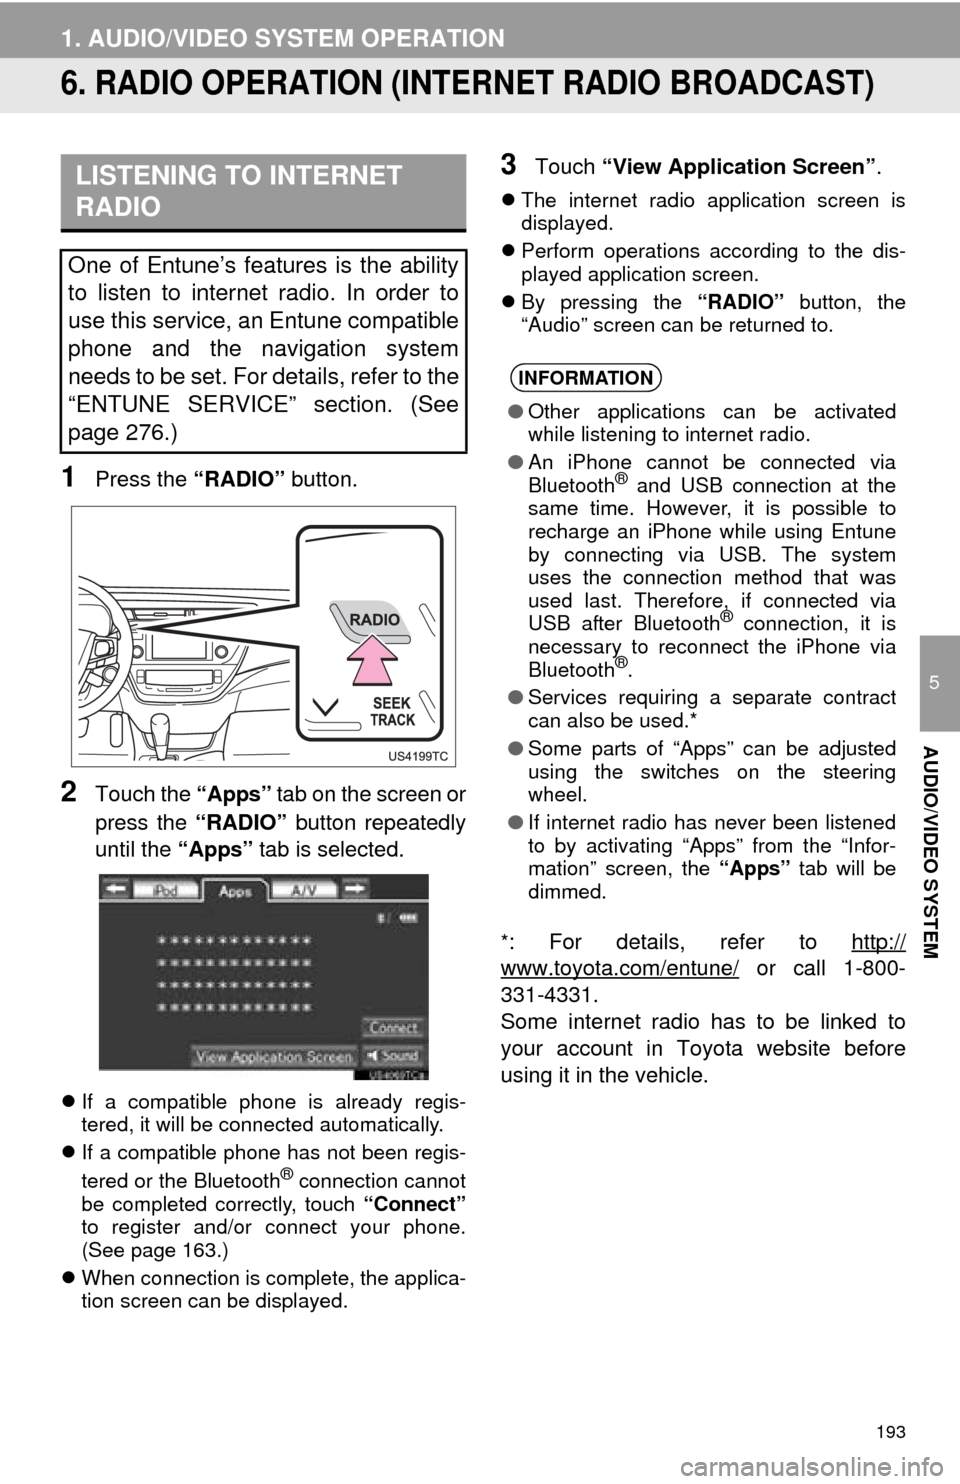
1Press the “RADIO” button.
2Touch the “Apps” tab on the screen or
press the “RADIO” button repeatedly
until the “Apps” tab is selected.
If a compatible phone is already regis-
tered, it will be connected automatically.
If a compatible phone has not been regis-
tered or the Bluetooth
® connection cannot
be completed correctly, touch “Connect”
to register and/or connect your phone.
(See page 163.)
When connection is complete, the applica-
tion screen can be displayed.
3Touch “View Application Screen” .
The internet radio application screen is
displayed.
Perform operations according to the dis-
played application screen.
By pressing the “RADIO” button, the
“Audio” screen can be returned to.
*
: For details, refer to http://
www.toyota.com/entune/ or call 1-800-
331-4331.
Some internet radio has to be linked to
your account in Toyota website before
using it in the vehicle.
LISTENING TO INTERNET
RADIO
One of Entune’s features is the ability
to listen to internet radio. In order to
use this service, an Entune compatible
phone and the navigation system
needs to be set. For details, refer to the
“ENTUNE SERVICE” section. (See
page 276.)
INFORMATION
● Other applications can be activated
while listening to internet radio.
● An iPhone cannot be connected via
Bluetooth
® and USB connection at the
same time. However, it is possible to
recharge an iPhone while using Entune
by connecting via USB. The system
uses the connection method that was
used last. Therefore, if connected via
USB after Bluetooth
® connection, it is
necessary to reconnect the iPhone via
Bluetooth
®.
● Services requiring a separate contract
can also be used.*
● Some parts of “Apps” can be adjusted
using the switches on the steering
wheel.
● If internet radio has never been listened
to by activating “Apps” from the “Infor-
mation” screen, the “Apps” tab will be
dimmed.
Page 229 of 346
229
1. AUDIO/VIDEO SYSTEM OPERATION
5
AUDIO/VIDEO SYSTEM
11. AUDIO/VIDEO REMOTE CONTROLS (STEERING SWITCHES)
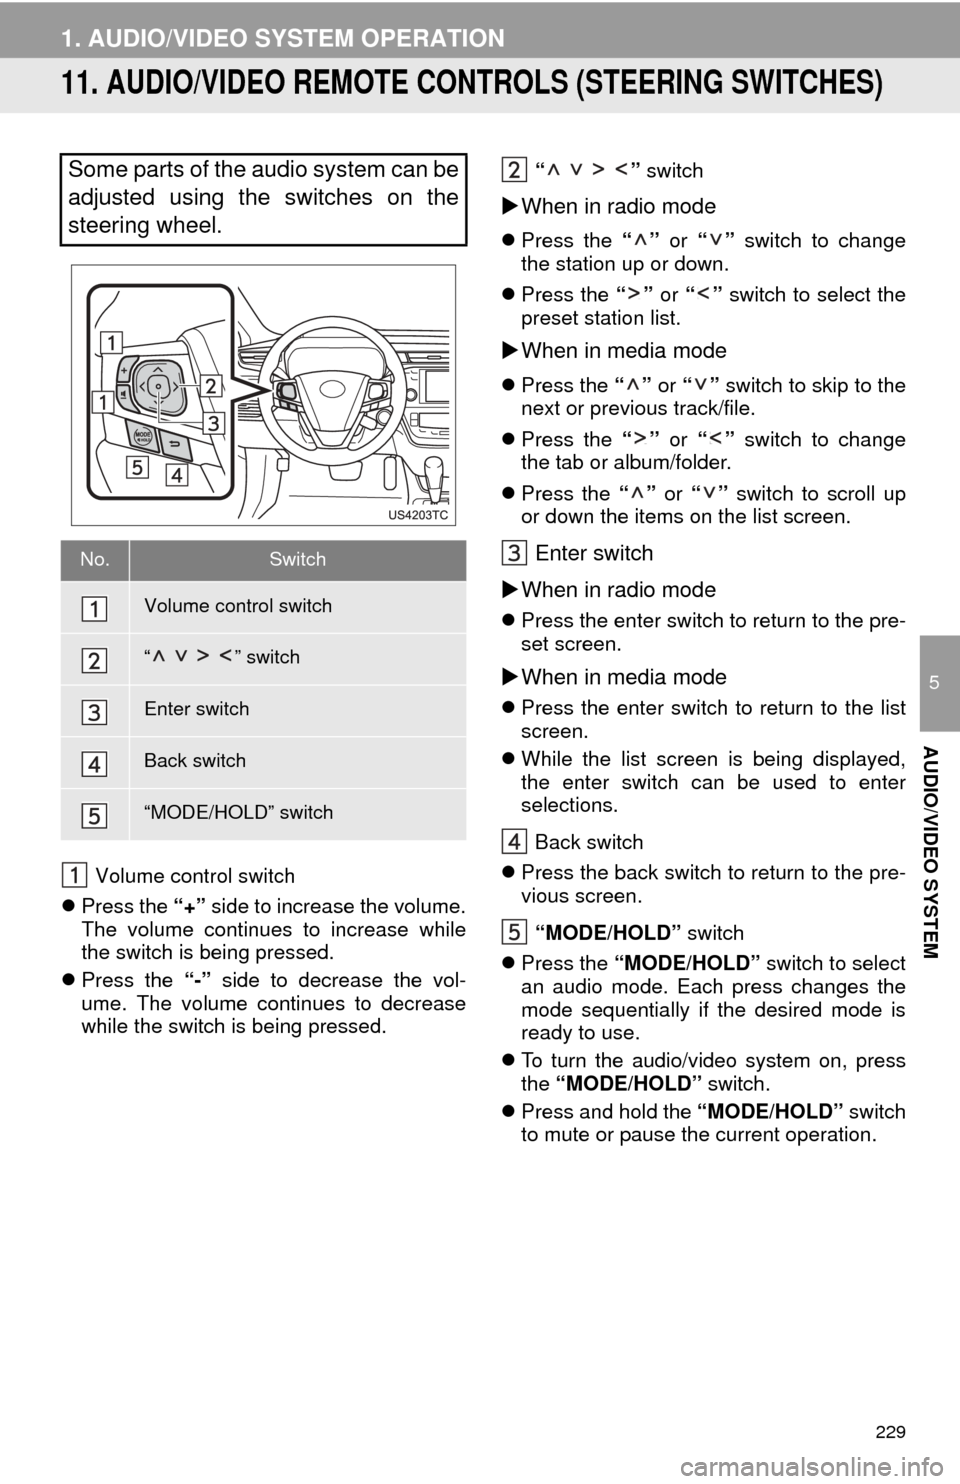
Volume control switch
Press the “+” side to increase the volume.
The volume continues to increase while
the switch is being pressed.
Press the “-” side to decrease the vol-
ume. The volume continues to decrease
while the switch is being pressed. “ ”
switch
When in radio mode
Press the “” or “” switch to change
the station up or down.
Press the “” or “” switch to select the
preset station list.
When in media mode
Press the “” or “” switch to skip to the
next or previous track/file.
Press the “” or “” switch to change
the tab or album/folder.
Press the “” or “” switch to scroll up
or down the items on the list screen.
Enter switch
When in radio mode
Press the enter switch to return to the pre-
set screen.
When in media mode
Press the enter switch to return to the list
screen.
While the list screen is being displayed,
the enter switch can be used to enter
selections.
Back switch
Press the back switch to return to the pre-
vious screen.
“MODE/HOLD” switch
Press the “MODE/HOLD” switch to select
an audio mode. Each press changes the
mode sequentially if the desired mode is
ready to use.
To turn the audio/video system on, press
the “MODE/HOLD” switch.
Press and hold the “MODE/HOLD” switch
to mute or pause the current operation.
Some parts of the audio system can be
adjusted using the switches on the
steering wheel.
No.Switch
Volume control switch
“ ” switch
Enter switch
Back switch
“MODE/HOLD” switch
Page 282 of 346
282
2. ENTUNE OPERATION
2. LINKING “APPS” AND NAVIGATION LOCAL FUNCTION
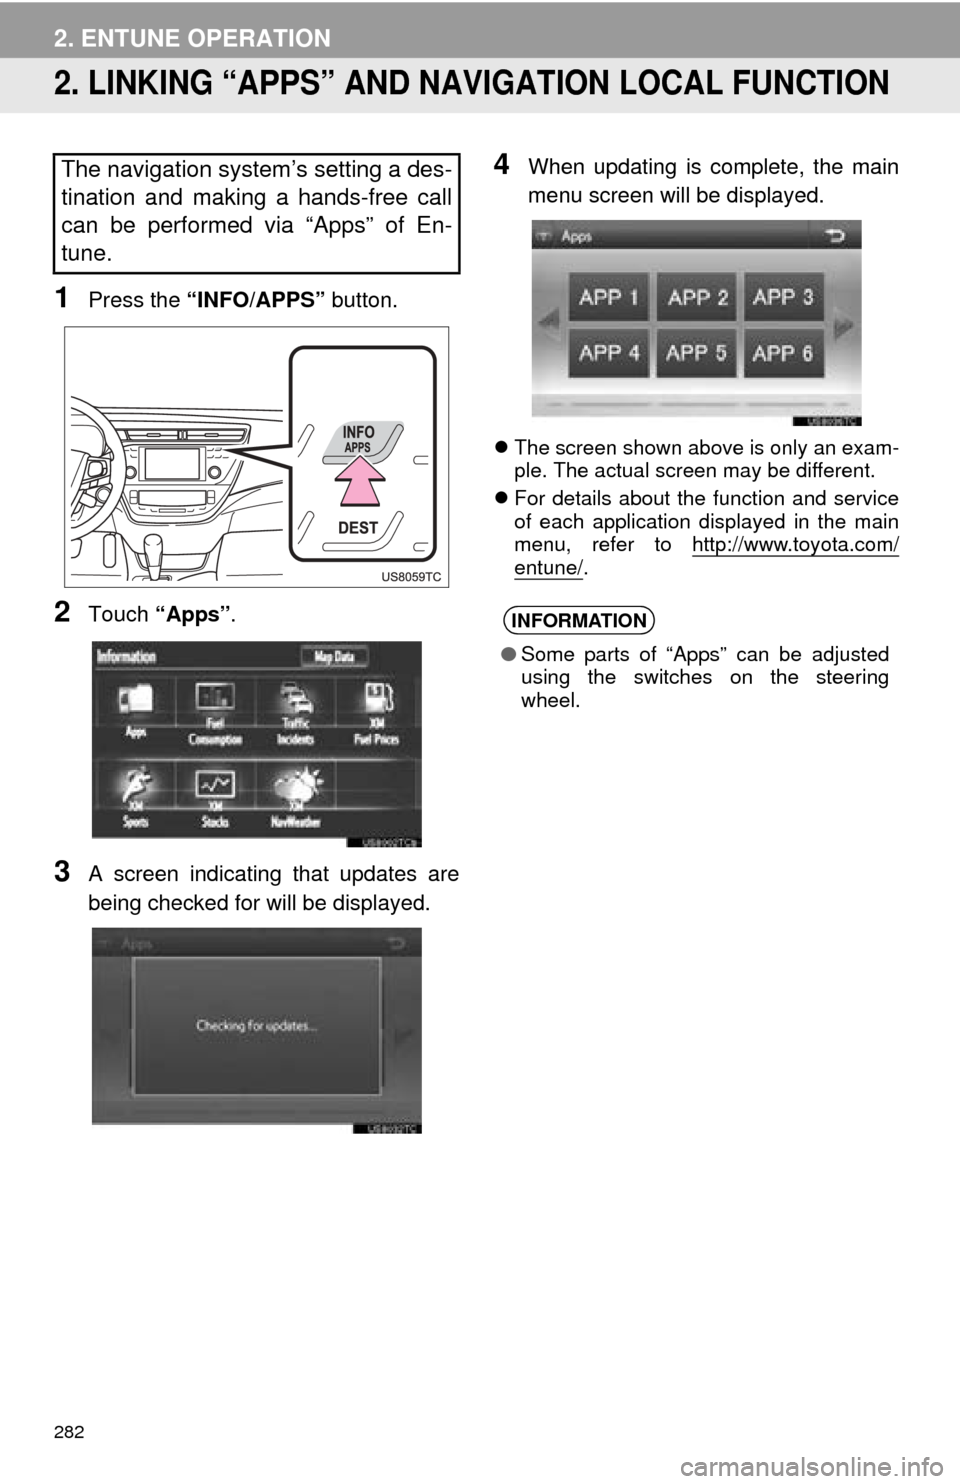
1Press the “INFO/APPS” button.
2Touch “Apps” .
3A screen indicating that updates are
being checked for will be displayed.
4When updating is complete, the main
menu screen will be displayed.
The screen shown above is only an exam-
ple. The actual screen may be different.
For details about the function and service
of each application displayed in the main
menu, refer to http://www.toyota.com/
entune/.
The navigation system’s setting a des-
tination and making a hands-free call
can be performed via “Apps” of En-
tune.
INFORMATION
●Some parts of “Apps” can be adjusted
using the switches on the steering
wheel.
Page 289 of 346
289
1. TOYOTA PARKING ASSIST MONITOR
9
PERIPHERAL MONITORING SYSTEM
CAUTION
●The instructions given are only guide-
lines. When and how much to turn the
steering wheel will vary according to
traffic conditions, road surface condi-
tions, vehicle condition, etc. when park-
ing. It is necessary to be fully aware of
this before using the parking assist sys-
tem.
● When parking, be sure to check that the
parking space will accommodate your
vehicle before maneuvering into it.
● Do not use system in the following
cases:
• On icy or slick road surfaces, or in
snow
• When using tire chains
• When the trunk is not closed com-
pletely
• On roads that are not flat or straight, such as curves or slopes.
● In low temperatures, the screen may
darken or the image may become faint.
The image could distort when the vehi-
cle is moving, or you may become
unable to see the image on the screen.
Be sure to visually check all around the
vehicle both directly and using the mir-
rors before proceeding.
● If the tire sizes are changed, the position
of the guide lines displayed on the
screen may change.
● The camera uses a special lens. The
distances between objects and pedestri-
ans that appear in the image displayed
on the screen will differ from the actual
distances. ( P.307)
Page 291 of 346
291
1. TOYOTA PARKING ASSIST MONITOR
9
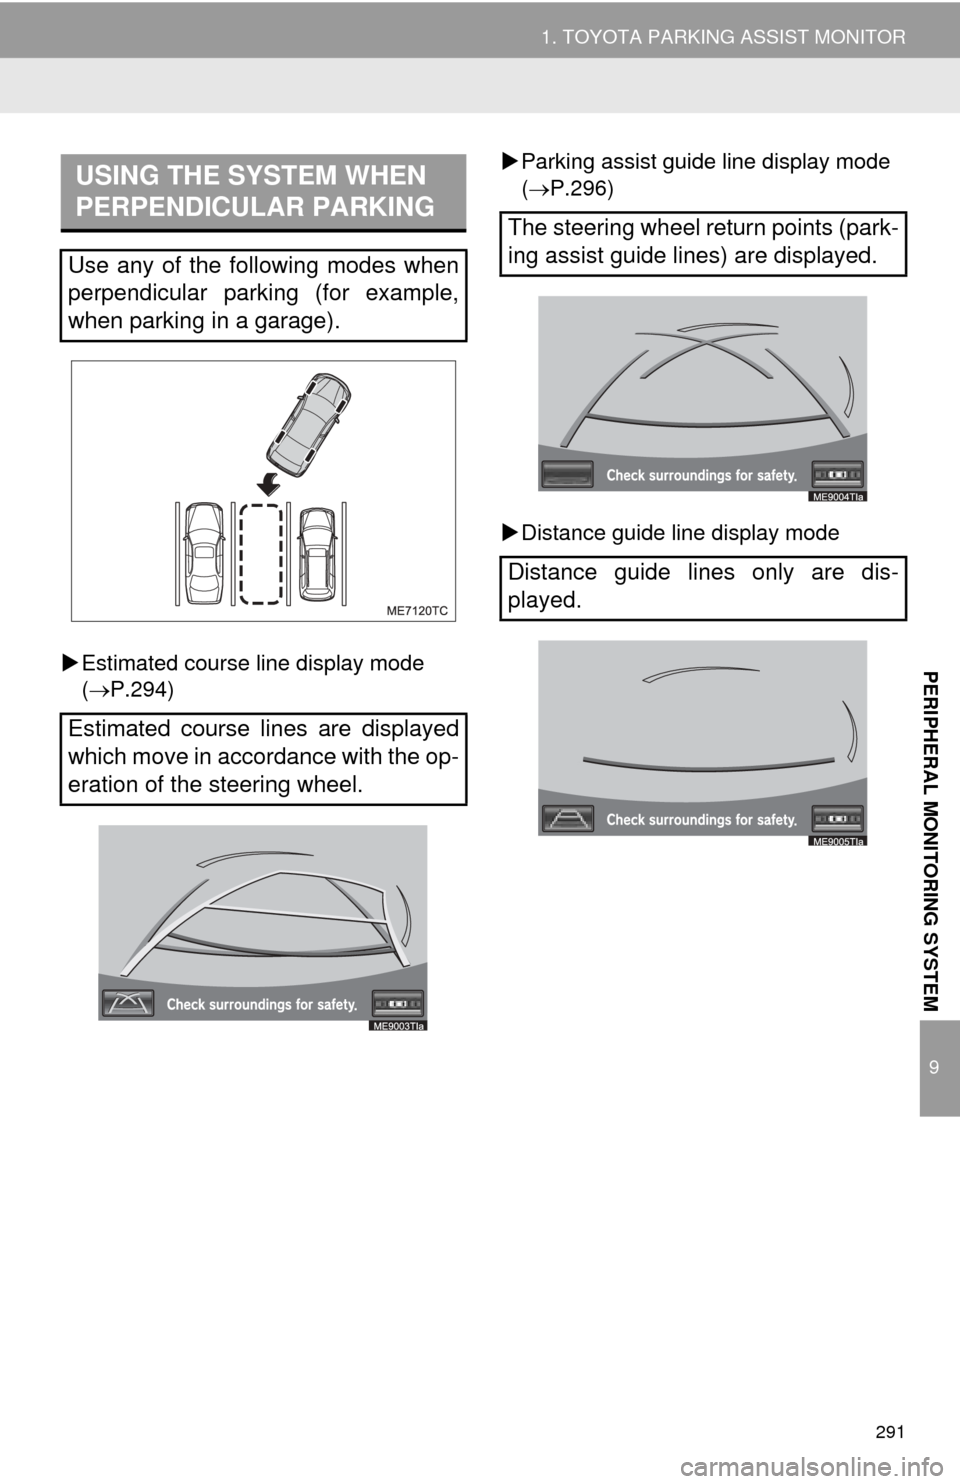
PERIPHERAL MONITORING SYSTEMEstimated course line display mode
( P.294)
Parking assist guide line display mode
(P.296)
Distance guide line display mode
USING THE SYSTEM WHEN
PERPENDICULAR PARKING
Use any of the following modes when
perpendicular parking (for example,
when parking in a garage).
Estimated course lines are displayed
which move in accordance with the op-
eration of the steering wheel.
The steering wheel return points (park-
ing assist guide lines) are displayed.
Distance guide lines only are dis-
played.