change time TOYOTA AVALON 2020 (in English) User Guide
[x] Cancel search | Manufacturer: TOYOTA, Model Year: 2020, Model line: AVALON, Model: TOYOTA AVALON 2020Pages: 540, PDF Size: 10.4 MB
Page 177 of 540

1774-1. Before driving
4
Driving
NOTICE
■When driving the vehicle
● Do not depress the accelerator and brake pedals at the same tim e during
driving, as this may restrain the engine output.
● Do not use the accelerator pedal or depress the accelerator and brake
pedals at the same time to hold the vehicle on a hill.
■ When parking the vehicle
Always set the parking brake and shift the shift lever to P. Failure to do so
may cause the vehicle to move or the vehicle may accelerate sud denly if
the accelerator pedal is accidentally depressed.
■ Avoiding damage to vehicle parts
● Do not turn the steering wheel fully in either direction and ho ld it there for
an extended period of time.
Doing so may damage the power steering motor.
● When driving over bumps in the road, drive as slowly as possibl e to avoid
damaging the wheels, underside of the vehicle, etc.
■ If you get a flat tire while driving
A flat or damaged tire may cause the following situations. Hold the steering
wheel firmly and gradually depress the brake pedal to slow down the vehi-
cle.
● It may be difficult to control your vehicle.
● The vehicle will make abnormal sounds or vibrations.
● The vehicle will lean abnormally.
Information on what to do in case of a flat tire ( P. 445)
■ When encountering flooded roads
Do not drive on a road that has flooded after heavy rain etc. D oing so may
cause the following serious damage to the vehicle:
● Engine stalling
● Short in electrical components
● Engine damage caused by water immersion
In the event that you drive on a flooded road and the vehicle i s flooded, be
sure to have your Toyota dealer check the following:
● Brake function
● Changes in quantity and quality of oil and fluid used for the e ngine, tran-
saxle, etc.
● Lubricant condition for the bearings and suspension joints (whe re possi-
ble), and the function of all joints, bearings, etc.
Page 185 of 540
1854-2. Driving procedures
4
Driving
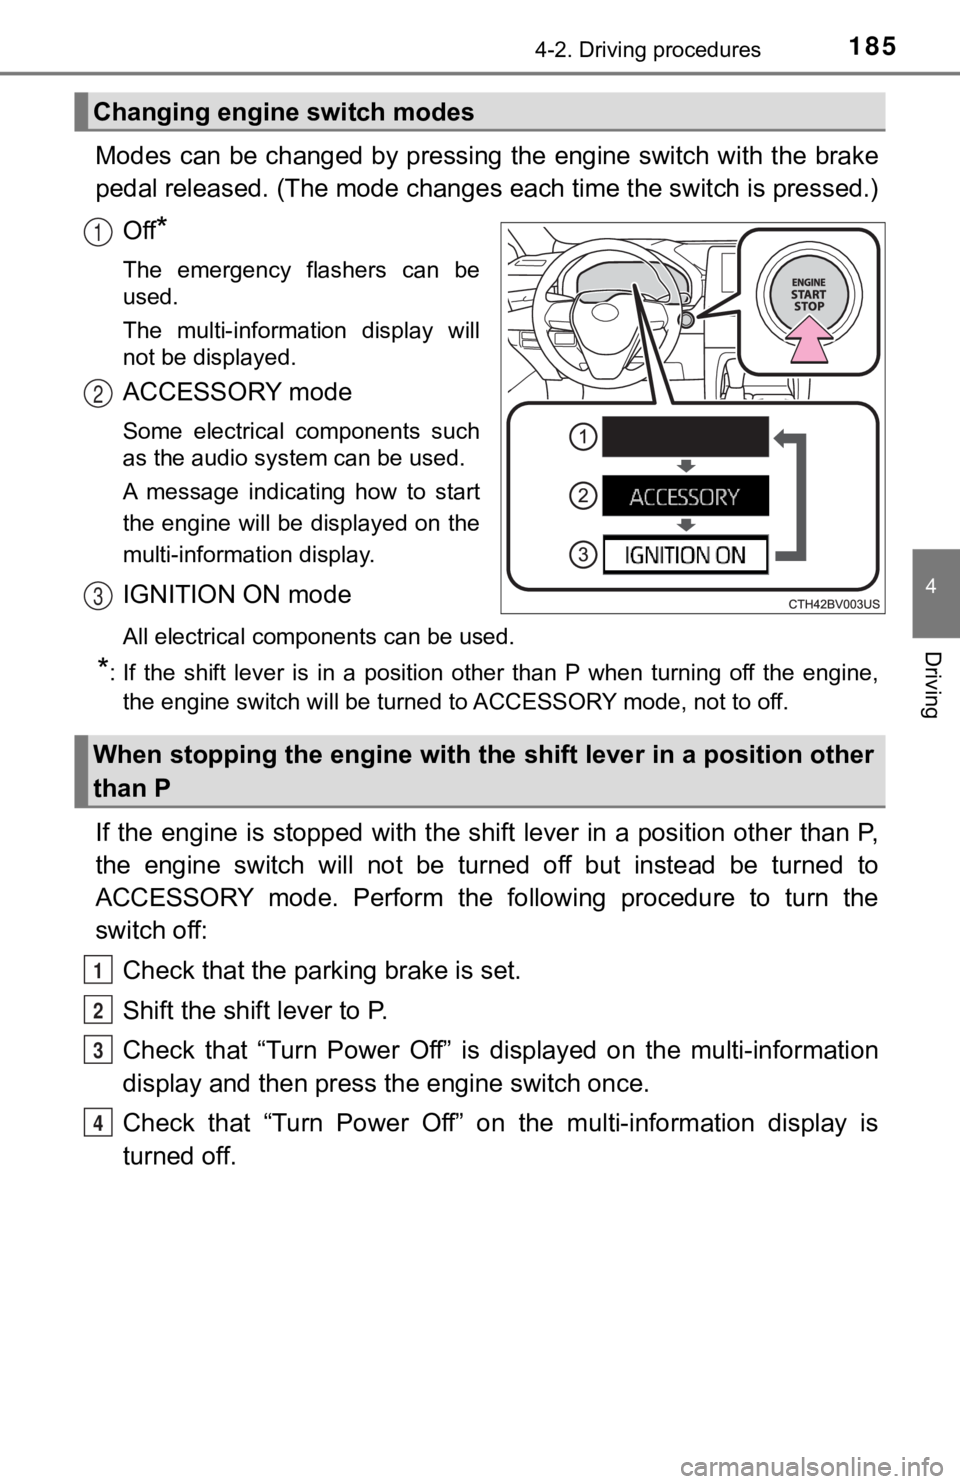
Modes can be changed by pressing the engine switch with the brake
pedal released. (The mode changes each time the switch is pressed.)
Off
*
The emergency flashers can be
used.
The multi-information display will
not be displayed.
ACCESSORY mode
Some electrical components such
as the audio system can be used.
A message indicating how to start
the engine will be displayed on the
multi-information display.
IGNITION ON mode
All electrical components can be used.
*: If the shift lever is in a position other than P when turning off the engine, the engine switch will be turned to ACCESSORY mode, not to off.
If the engine is stopped with the shift lever in a position oth er than P,
the engine switch will not be turned off but instead be turned to
ACCESSORY mode. Perform the following procedure to turn the
switch off:
Check that the park ing brake is set.
Shift the shift lever to P.
Check that “Turn Power Off” is displayed on the multi-informati on
display and then press the engine switch once.
Check that “Turn Power Off” on the multi-information display is
turned off.
Changing engine switch modes
1
2
3
When stopping the engine with the shift lever in a position other
than P
1
2
3
4
Page 187 of 540

1874-2. Driving procedures
4
Driving
■Steering lock motor overheating prevention
To prevent the steering lock motor from overheating, the motor may be sus-
pended if the engine is turned on and off repeatedly in a short period of time.
In this case, refrain from operating the engine. After about 10 seconds, the
steering lock motor will resume functioning.
■ When a message requesting the smart key system be inspected is dis-
played on the multi-information display
The system may be malfunctioning. Have the vehicle inspected by your
Toyota dealer immediately.
■ If the electronic key battery is depleted
P. 414
■ Operation of the engine switch
●If the switch is not pressed shortly and firmly, the engine swi tch mode may
not change or the engine may not start.
● If attempting to restart the engine immediately after turning t he engine
switch off, the engine may not start in some cases. After turni ng the engine
switch off, wait a few seconds before restarting the engine.
■ If the smart key system has been d eactivated in a customized setting
P. 459
WARNING
■ When starting the engine
Always start the engine while sitting in the driver’s seat. Do not depress the
accelerator pedal while starting the engine under any circumsta nces.
Doing so may cause an accident resulting in death or serious in jury.
■ Caution while driving
If engine failure occurs while the vehicle is moving, do not lo ck or open the
doors until the vehicle reaches a safe and complete stop. Activ ation of the
steering lock in this circumstance may lead to an accident, res ulting in
death or serious injury.
■ Stopping the engine in an emergency
● If you want to stop the engine in an emergency while driving th e vehicle,
press and hold the engine switch for more than 2 seconds, or press it
briefly 3 times or more in succession. ( P. 423)
However, do not touch the engine switch while driving except in an emer-
gency. Turning the engine off while driving will not cause loss of steering
or braking control, but the power assist to these systems will be lost. This
will make it more difficult to steer and brake, so you should p ull over and
stop the vehicle as soon as it is safe to do so.
● If the engine switch is operated while the vehicle is running, a warning
message will be shown on the multi-information display and a bu zzer
sounds.
● When restarting the engine after it was turned off while drivin g, shift the
shift lever to N and press the engine switch.
Page 195 of 540

1954-2. Driving procedures
4
Driving
Right turn
Lane change to the right (move
the lever partway and release
it)
The right hand signals will flash 3
times.
Lane change to the left (move
the lever partway and release
it)
The left hand signals will flash 3
times.
Left turn
■Turn signals can be operated when
The engine switch is in IGNITION ON mode.
■ If the indicator flashes faster than usual
Check that a light bulb in the front or rear turn signal lights has not burned
out.
■ If the turn signals stop flashing before a lane change has been per-
formed
Operate the lever again.
■ To discontinue flashing of the turn signals during a lane chang e
Operate the lever in the opposite direction.
Turn signal lever
Operating instructions
1
2
3
4
Page 208 of 540

2084-3. Operating the lights and wipers
■Conditions to turn the high beams on/off automatically
●When all of the following conditions are met, the high beams will be turned
on automatically (after approximately 1 second):
• The vehicle speed is approximately 21 mph (34 km/h) or more.
• The area ahead of the vehicle is dark.
• There are no vehicles ahead with headlights or tail lights turned on.
• There are few streetlights on the road ahead.
● If any of the following conditions is met, the high beams will turn off automat-
ically:
• The vehicle speed is below approximately 17 mph (27 km/h).
• The area ahead of the vehicle is not dark.
• Vehicles ahead have their headlights or tail lights turned on.
• There are many streetlights on the road ahead.
■ Camera sensor detection information
●The high beams may not be automatically turned off in the following situa-
tions:
• When a vehicle suddenly appears from around a curve
• When the vehicle is cut in front of by another vehicle
• When vehicles ahead cannot be detected due to repeated curves, road
dividers or roadside trees
• When vehicles ahead appear in a faraway lane on a wide road
• When the lights of vehicles ahead are not on
● The high beams may be turned off if a vehicle ahead that is usi ng fog lights
without its headlights turned on is detected.
● House lights, street lights, traffic signals, and illuminated billboards or signs
and other reflective objects may cause the high beams to change to the low
beams, or the low beams to remain on.
● The following factors may affect the amount of time taken for t he high
beams to turn on or off:
• The brightness of the headlights, fog lights, and tail lights of vehicles
ahead
• The movement and direction of vehicles ahead
• When a vehicle ahead only has operational lights on one side
• When a vehicle ahead is a two-wheeled vehicle
• The condition of the road (gradient, curve, condition of the r oad surface,
etc.)
• The number of passengers and amount of luggage in the vehicle
● The high beams may turn on or off unexpectedly.
● Bicycles or similar vehicles may not be detected.
Page 209 of 540

2094-3. Operating the lights and wipers
4
Driving
●In the following situations the system may not be able to correctly detect the
surrounding brightness level. This may cause the low beams to r emain on
or the high beams to flash or dazzle pedestrians or vehicles ah ead. In such
a case, it is necessary to manually switch between the high and low beams.
• When driving in inclement weather (heavy rain, snow, fog, sand storms,
etc.)
• When the windshield is obscured by fog, mist, ice, dirt, etc.
• When the windshield is cracked or damaged
• When the camera sensor is deformed or dirty
• When the temperature of the camera sensor is extremely high
• When the surrounding brightness level is equal to that of head lights, tail
lights or fog lights
• When headlights or tail lights of vehicles ahead are turned off, dirty, changing color, or not aimed properly
• When the vehicle is hit by water, snow, dust, etc. from a prec eding vehi-
cle
• When driving through an area of intermittently changing brightness and
darkness
• When frequently and repeatedly driving ascending/descending roads, or roads with rough, bumpy or uneven surfaces (such as stone-paved
roads, gravel roads, etc.)
• When frequently and repeatedly taking curves or driving on a w inding
road
• When there is a highly reflective object ahead of the vehicle, such as a sign or mirror
• When the back of a preceding vehicle is highly reflective, such as a con-
tainer on a truck
• When the vehicle's headlights are damaged or dirty, or are not aimed
properly
• When the vehicle is listing or titling due to a flat tire, a trailer being towed, etc.
• When the headlights are changed between the high beams and low
beams repeatedly in an abnormal manner
• When the driver believes that the high beams may be flashing or dazzling pedestrians or other drivers
■ Temporarily lowering sensor sensitivity
The sensitivity of the sensor can be temporarily lowered.
Turn the engine switch off while the following conditions are m et.
• The headlight switch is in .
• The headlight switch lever is in high beam position.
Turn the engine switch to the IGNITION ON mode.
Within 5 seconds after , repeat pulling the headlight switch le ver to the
original position then pushing it to the high beam position qui ckly 9 times,
then leave the lever in high beam position.
Automatic High Beam (headlights) may turn on even when the vehi cle is
stopped.
1
2
32
Page 230 of 540
2304-5. Using the driving support systems
■Enabling/disabling th e pre-collision system
The pre-collision system c an be enabled/disabled on ( P. 1 0 0 )
of the multi-information display.
The system is automatically enabled each time the engine switch is
turned to IGNITION ON mode.
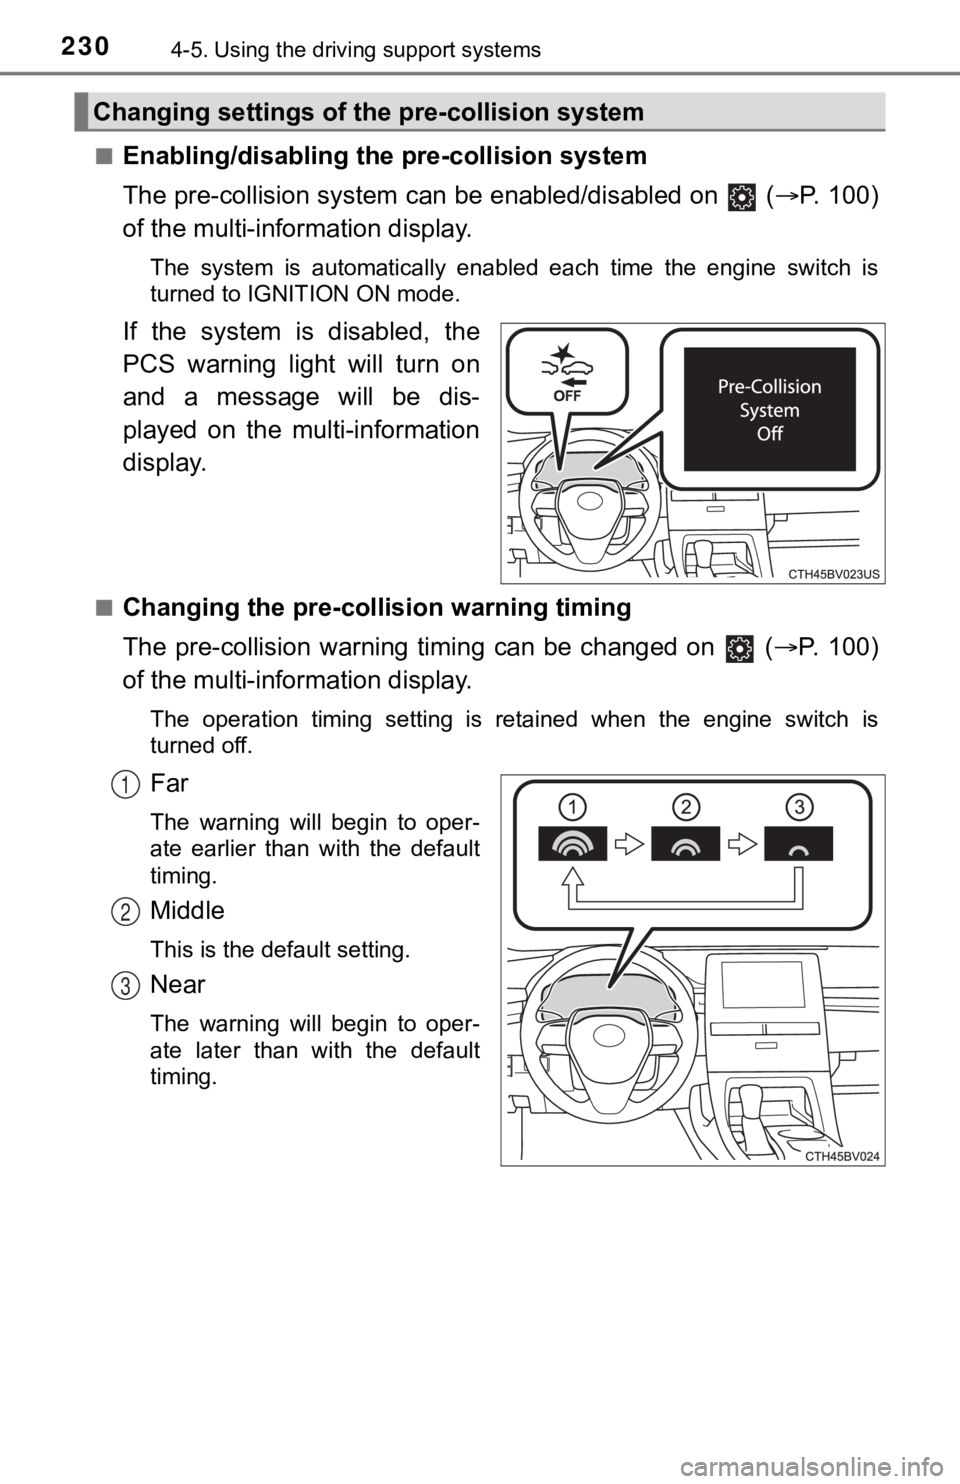
If the system is disabled, the
PCS warning light will turn on
and a message will be dis-
played on the multi-information
display.
■Changing the pre-colli sion warning timing
The pre-collision warning ti ming can be changed on ( P. 1 0 0 )
of the multi-information display.
The operation timing setting is retained when the engine switch is
turned off.
Far
The warning will begin to oper-
ate earlier than with the default
timing.
Middle
This is the default setting.
Near
The warning will begin to oper-
ate later than with the default
timing.
Changing settings of the pre-collision system
1
2
3
Page 251 of 540
2514-5. Using the driving support systems
4
Driving
This mode employs a radar sensor to detect the presence of vehicles
up to approximately 328 ft. (100 m) ahead, determines the curre nt
vehicle-to-vehicle following distance, and operates to maintain a suit-
able following distance from the vehicle ahead.
Note that vehicle-to-vehicle distance will close in when travel ing on down-
hill slopes.
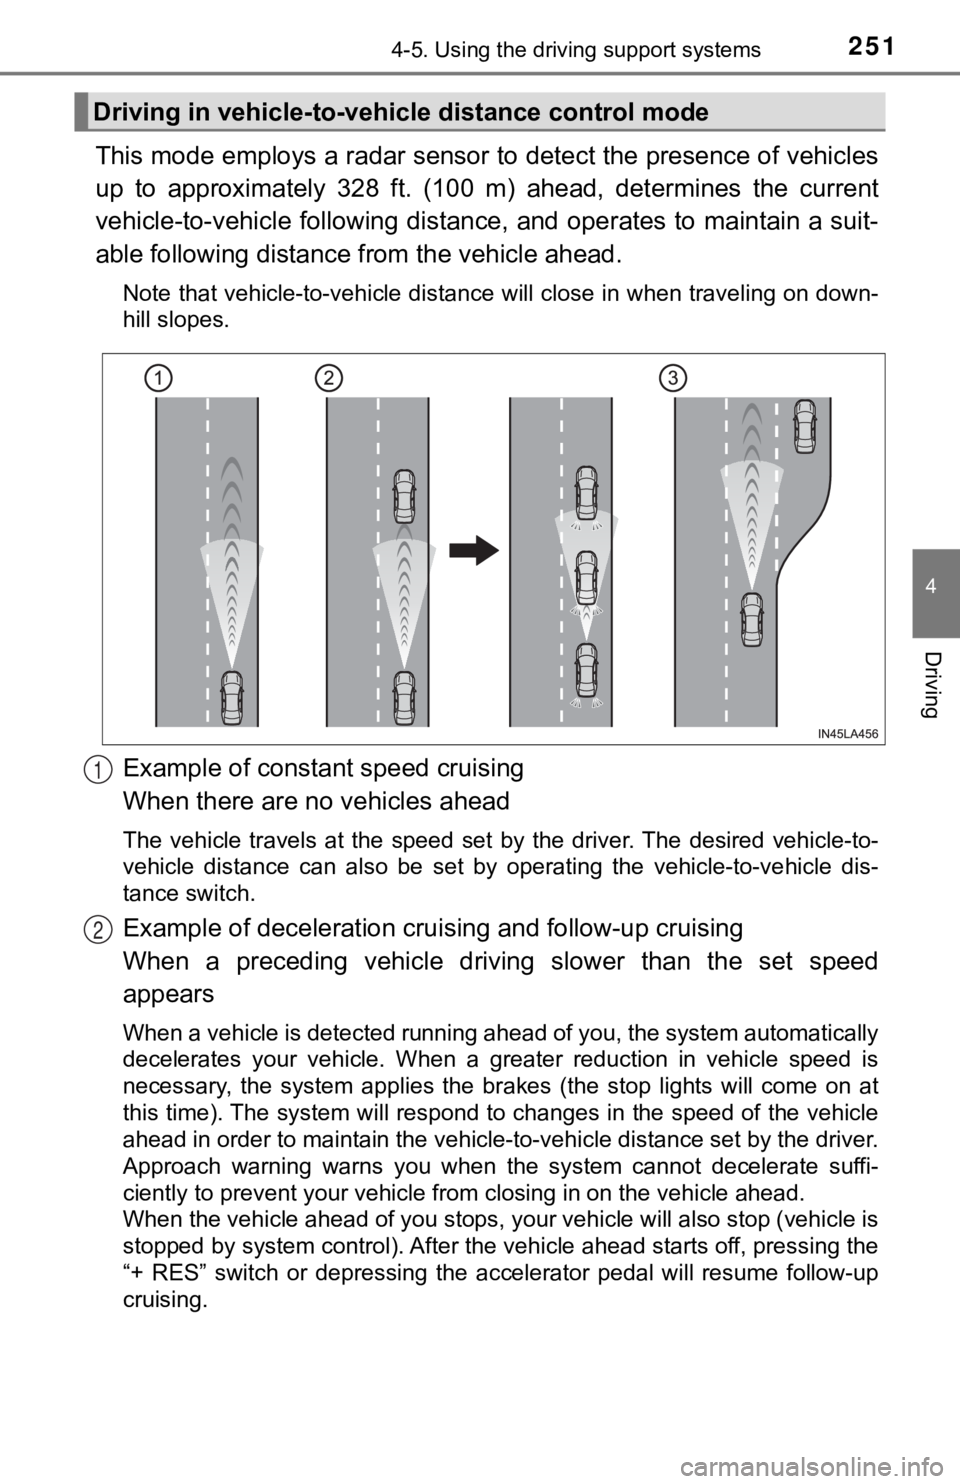
Example of constant speed cruising
When there are no vehicles ahead
The vehicle travels at the speed set by the driver. The desired vehicle-to-
vehicle distance can also be set by operating the vehicle-to-ve hicle dis-
tance switch.
Example of deceleration crui sing and follow-up cruising
When a preceding vehicle driving slower than the set speed
appears
When a vehicle is detected running ahead of you, the system automatically
decelerates your vehicle. When a greater reduction in vehicle s peed is
necessary, the system applies the brakes (the stop lights will come on at
this time). The system will respond to changes in the speed of the vehicle
ahead in order to maintain the vehicle-to-vehicle distance set by the driver.
Approach warning warns you when the system cannot decelerate su ffi-
ciently to prevent your vehicle from closing in on the vehicle ahead.
When the vehicle ahead of you stops, your vehicle will also stop (vehicle is
stopped by system control). After the vehicle ahead starts off, pressing the
“+ RES” switch or depressing the accelerator pedal will resume follow-up
cruising.
Driving in vehicle-to-vehi cle distance control mode
1
2
Page 253 of 540
2534-5. Using the driving support systems
4
Driving
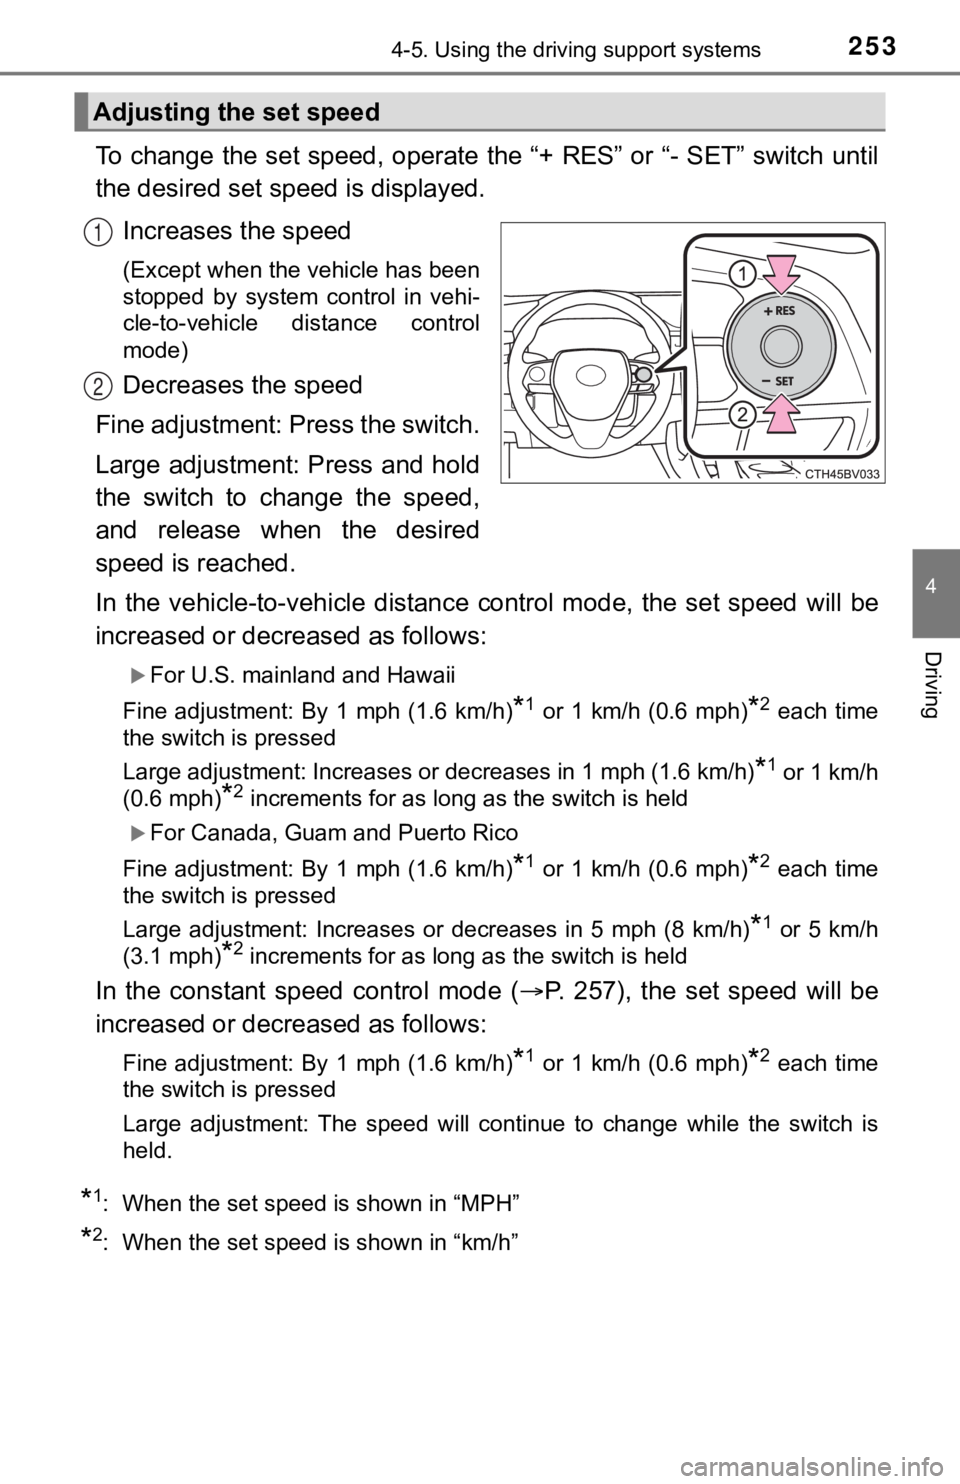
To change the set speed, operate the “+ RES” or “- SET” switch until
the desired set speed is displayed.
Increases the speed
(Except when the vehicle has been
stopped by system control in vehi-
cle-to-vehicle distance control
mode)
Decreases the speed
Fine adjustment: Press the switch.
Large adjustment: Press and hold
the switch to change the speed,
and release when the desired
speed is reached.
In the vehicle-to-vehicle distance control mode, the set speed will be
increased or decreased as follows:
For U.S. mainland and Hawaii
Fine adjustment: By 1 mph (1.6 km/h)
*1 or 1 km/h (0.6 mph)*2 each time
the switch is pressed
Large adjustment: Increases or decreases in 1 mph (1.6 km/h)
*1 or 1 km/h
(0.6 mph)
*2 increments for as long as the switch is held
For Canada, Guam and Puerto Rico
Fine adjustment: By 1 mph (1.6 km/h)
*1 or 1 km/h (0.6 mph)*2 each time
the switch is pressed
Large adjustment: Increases or decreases in 5 mph (8 km/h)
*1 or 5 km/h
(3.1 mph)
*2 increments for as long as the switch is held
In the constant speed control mode ( P. 257), the set speed will be
increased or decreased as follows:
Fine adjustment: By 1 mph (1.6 km/h)*1 or 1 km/h (0.6 mph)*2 each time
the switch is pressed
Large adjustment: The speed will continue to change while the switch is
held.
*1: When the set speed is shown in “MPH”
*2: When the set speed is shown in “km/h”
Adjusting the set speed
1
2
Page 262 of 540
2624-5. Using the driving support systems
Audio system screen (RCTA function only)
If a vehicle approaching from the right or left at the rear of the vehicle is
detected, the RCTA icon ( P. 268) for the detected side will be displayed.
RCTA
buzzer (RCTA function only)
When a vehicle approaching from the right or left rear of the v ehicle is
detected, a buzzer sounds from behind the rear seat.
Press / of the meter control switches, select .
Press
/ of the meter control sw itched, select or .
Press of the meter control switch.
Each time is pressed, t he function changes on/off.
■The outside rear view mirror indicators visibility
When under strong sunlight, the outside rear view mirror indica tor may be dif-
ficult to see.
■ RCTA buzzer hearing
RCTA function may be difficult to hear over loud noises such as high audio
volume.
■ When “Blind Spot Monitor Unava ilable” or “Rear Cross Traffic Alert
Unavailable” are shown on the multi-information display
Ice, snow, mud, etc., may be attached to the rear bumper around the sensors.
( P. 264)
The system should return to normal operation after removing the ice, snow,
mud, etc., from the rear bumper. Additionally, the sensors may not operate
normally when driving in extremely hot or cold environments.
■ When there is a malfunction in the Blind Spot Monitor
If a system malfunction is detected due to any of the following reasons, a
warning message will be displayed:
● There is a malfunction with the sensors
● The sensors have become dirty
● The outside temperature is extremely high or low
● The sensor voltage has become abnormal
Turning the BSM function/RCTA function on/off
4
5
1
2
3