change time TOYOTA AVALON 2020 Owners Manual (in English)
[x] Cancel search | Manufacturer: TOYOTA, Model Year: 2020, Model line: AVALON, Model: TOYOTA AVALON 2020Pages: 540, PDF Size: 10.4 MB
Page 8 of 540
8
Please note that this manual applies to all models and explains all equipment,
including options. Therefore, you may find some explanations fo r equipment
not installed on your vehicle.
All specifications provided in this manual are current at the t ime of printing.
However, because of the Toyota policy of continual product improvement, we
reserve the right to make changes at any time without notice.
Depending on specifications, the vehicle shown in the illustrat ions may differ
from your vehicle in terms of equipment.
Approximately five hours after the engine is turned off, you ma y hear sound
coming from under the vehicle for several minutes. This is the sound of a fuel
evaporation leakage check and, it does not indicate a malfunction.
A wide variety of non-genuine spare parts and accessories for T oyota vehi-
cles are currently available in the market. You should know tha t Toyota does
not warrant these products and is not responsible for their per formance,
repair, or replacement, or for any damage they may cause to, or adverse
effect they may have on, your Toyota vehicle.
This vehicle should not be modified with non-genuine Toyota pro ducts. Modi-
fication with non-genuine Toyota products could affect its perf ormance, safety
or durability, and may even violate governmental regulations. In addition,
damage or performance problems resulting from the modification may not be
covered under warranty.
The installation of a mobile two-way radio system in your vehic le could affect
electronic systems such as:
● Multiport fuel injection system/sequential multiport fuel injection system
● Toyota Safety Sense P
● Anti-lock brake system
● SRS airbag system
● Seat belt pretensioner system
Be sure to check with your Toyota dealer for precautionary meas ures or spe-
cial instructions regarding instal lation of a mobile two-way radio system.
For your infor mation
Main Owner’s Manual
Noise from under vehicle afte r turning off the engine
Accessories, spare parts and m odification of your Toyota
Installation of a mobile two-way radio system
Page 91 of 540
912. Instrument cluster
2
Instrument cluster
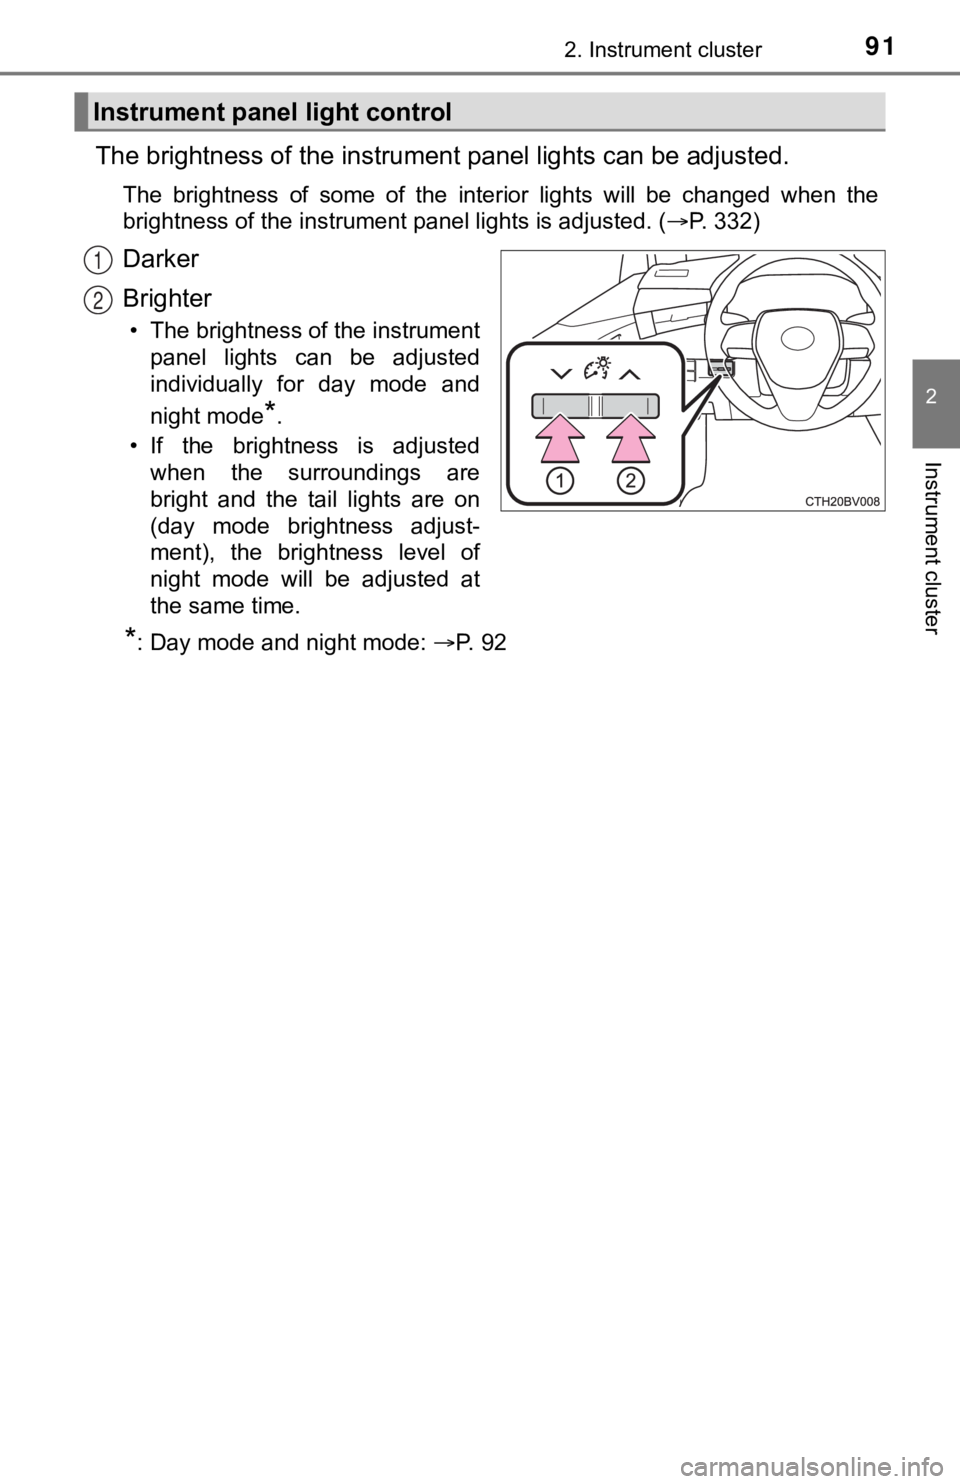
The brightness of the instrument panel lights can be adjusted.
The brightness of some of the interior lights will be changed w hen the
brightness of the instrument panel lights is adjusted. ( P. 332)
Darker
Brighter
• The brightness of the instrument
panel lights can be adjusted
individually for day mode and
night mode
*.
• If the brightness is adjusted when the surroundings are
bright and the tail lights are on
(day mode brightness adjust-
ment), the brightness level of
night mode will be adjusted at
the same time.
*: Day mode and night mode: P. 9 2
Instrument panel light control
1
2
Page 93 of 540
932. Instrument cluster
2
Instrument cluster
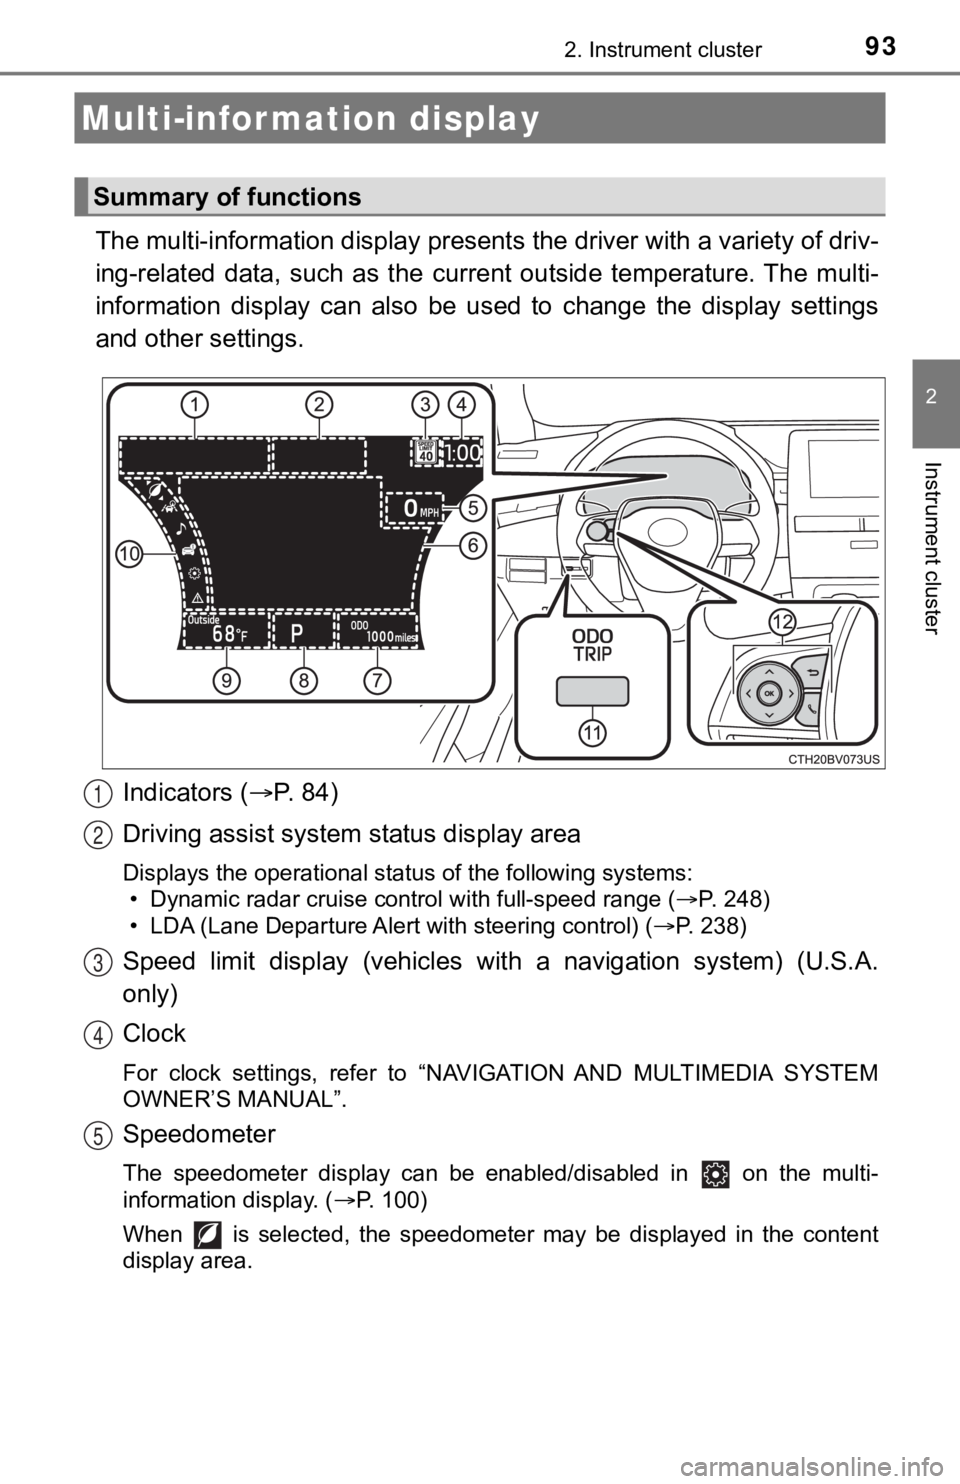
The multi-information display presents the driver with a variety of driv-
ing-related data, such as the cur rent outside temperature. The multi-
information display can also be used to change the display sett ings
and other settings.
Indicators ( P. 84)
Driving assist system status display area
Displays the operational status of the following systems:
• Dynamic radar cruise control with full-speed range ( P. 248)
• LDA (Lane Departure Alert with steering control) ( P. 238)
Speed limit display (vehicles with a navigation system) (U.S.A.
only)
Clock
For clock settings, refer to “NAVIGATION AND MULTIMEDIA SYSTEM
OWNER’S MANUAL”.
Speedometer
The speedometer display can be enabled/disabled in on the mult i-
information display. ( P. 100)
When is selected, the speedometer may be displayed in the content
display area.
Multi-infor mation display
Summary of functions
1
2
3
4
5
Page 94 of 540
942. Instrument cluster
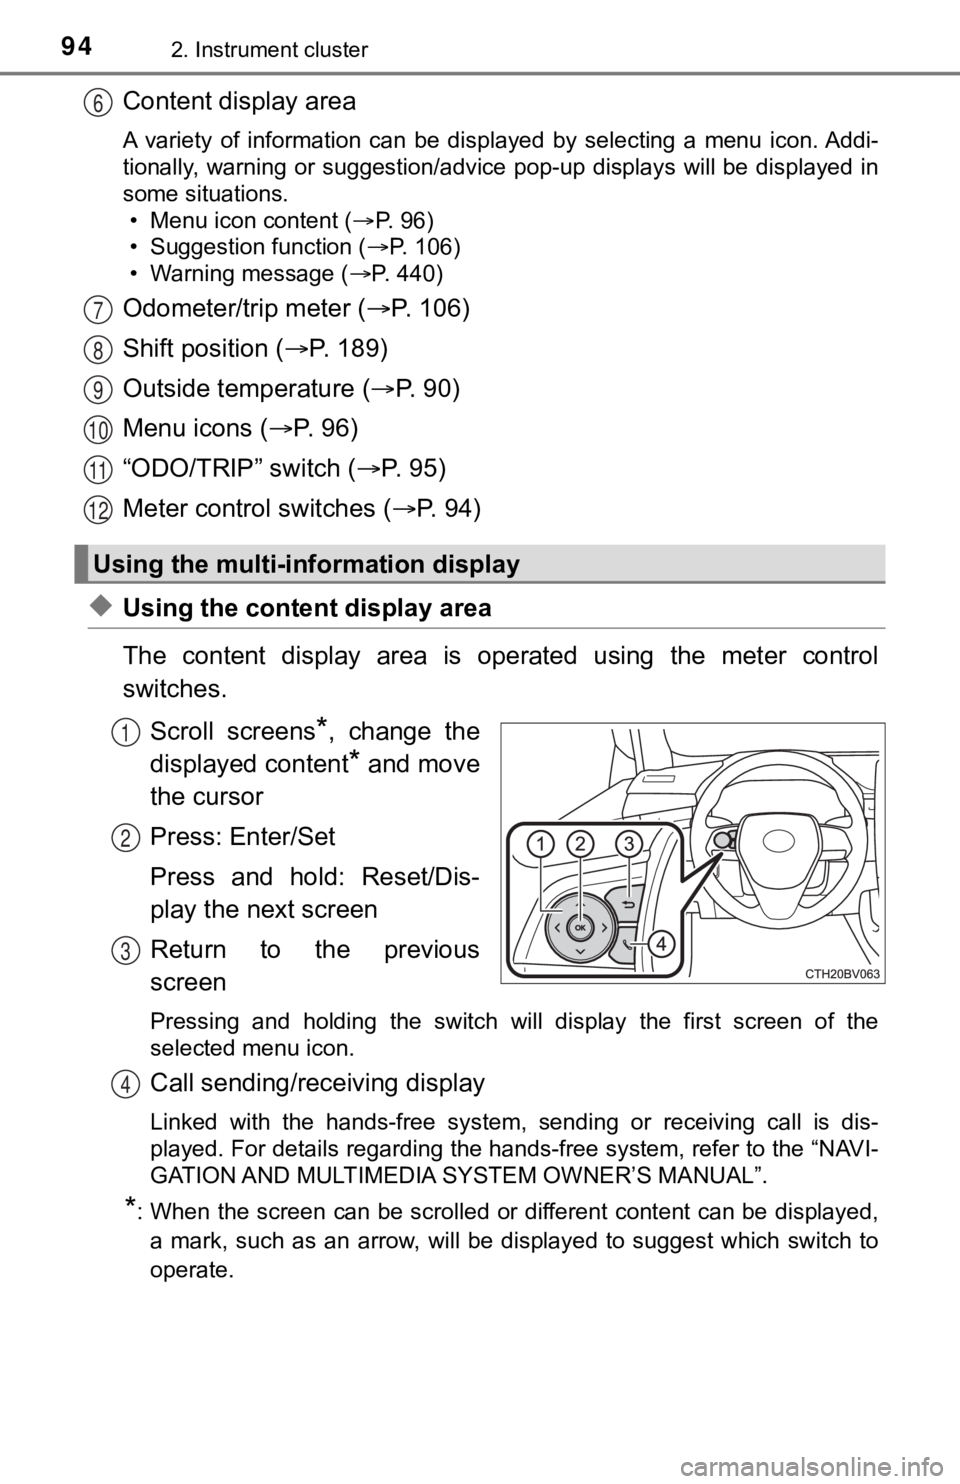
Content display area
A variety of information can be displayed by selecting a menu icon. Addi-
tionally, warning or suggestion/advice pop-up displays will be displayed in
some situations. • Menu icon content ( P. 96)
• Suggestion function ( P. 106)
• Warning message ( P. 440)
Odometer/trip meter ( P. 106)
Shift position ( P. 1 8 9 )
Outside temperature ( P. 9 0 )
Menu icons ( P. 96)
“ODO/TRIP” switch ( P. 9 5 )
Meter control switches ( P. 94)
◆Using the content display area
The content display area is operated using the meter control
switches.
Scroll screens
*, change the
displayed content
* and move
the cursor
Press: Enter/Set
Press and hold: Reset/Dis-
play the next screen
Return to the previous
screen
Pressing and holding the switch will display the first screen o f the
selected menu icon.
Call sending/receiving display
Linked with the hands-free system, sending or receiving call is dis-
played. For details regarding the hands-free system, refer to t he “NAVI-
GATION AND MULTIMEDIA S YSTEM OWNER’S MANUAL”.
*: When the screen can be scrolled or different content can be di splayed,
a mark, such as an arrow, will be displayed to suggest which sw itch to
operate.
Using the multi-information display
6
7
8
9
10
11
12
1
2
3
4
Page 95 of 540
952. Instrument cluster
2
Instrument cluster
◆Using the odometer/trip meter
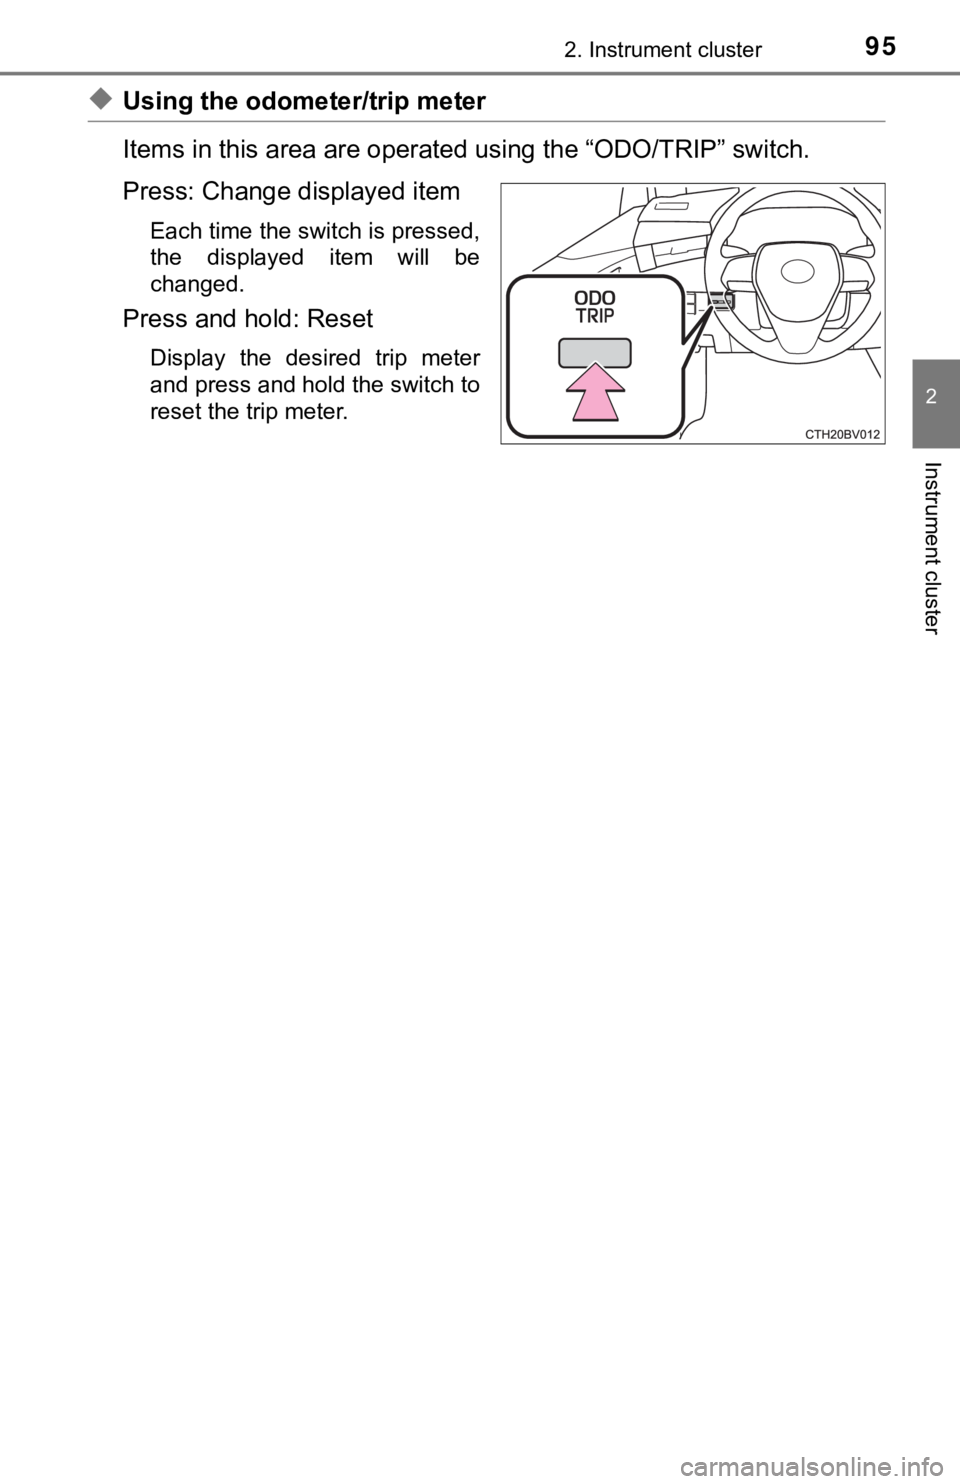
Items in this area are operated using the “ODO/TRIP” switch.
Press: Change displayed item
Each time the switch is pressed,
the displayed item will be
changed.
Press and hold: Reset
Display the desired trip meter
and press and hold the switch to
reset the trip meter.
Page 98 of 540
982. Instrument cluster
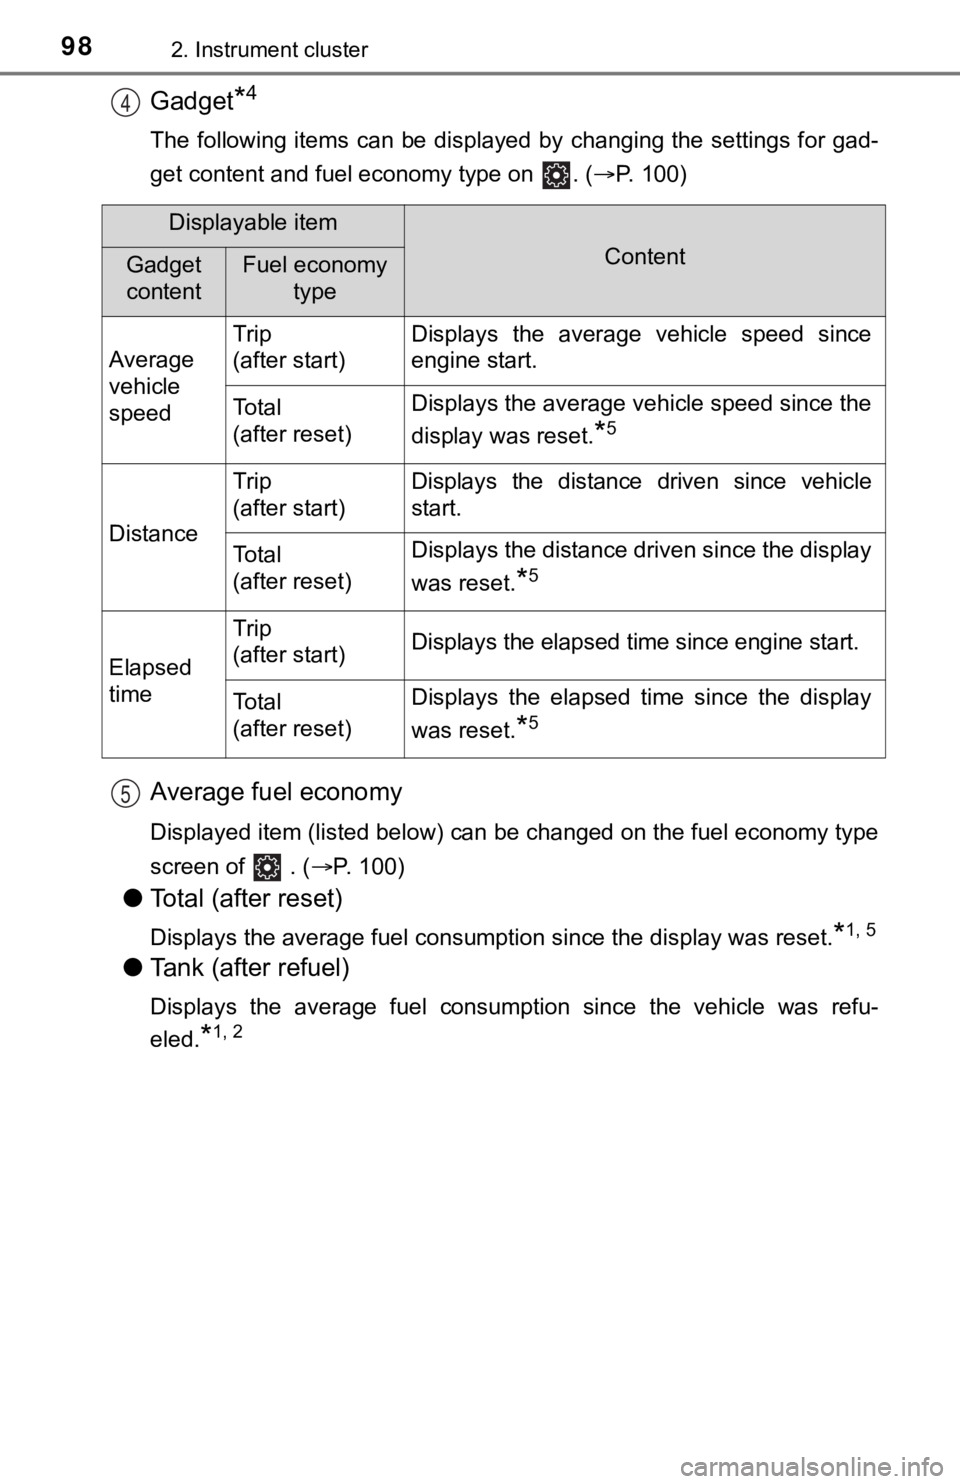
Gadget*4
The following items can be displayed by changing the settings for gad-
get content and fuel economy type on . ( P. 100)
Average fuel economy
Displayed item (listed below) can be changed on the fuel econom y type
screen of . (P. 100)
●Total (after reset)
Displays the average fuel consumption since the display was res et.*1, 5
●Tank (after refuel)
Displays the average fuel consumption since the vehicle was ref u-
eled.
*1, 2
4
Displayable item
ContentGadget
contentFuel economy type
Average
vehicle
speed Trip
(after start)
Displays the average vehicle speed since
engine start.
To t a l
(after reset)Displays the average vehicle speed since the
display was reset.
*5
Distance
Trip
(after start)Displays the distance driven since vehicle
start.
To t a l
(after reset)Displays the distance driven since the display
was reset.
*5
Elapsed
time
Trip
(after start)Displays the elapsed time since engine start.
To t a l
(after reset)Displays the elapsed time since the display
was reset.
*5
5
Page 105 of 540
1052. Instrument cluster
2
Instrument cluster
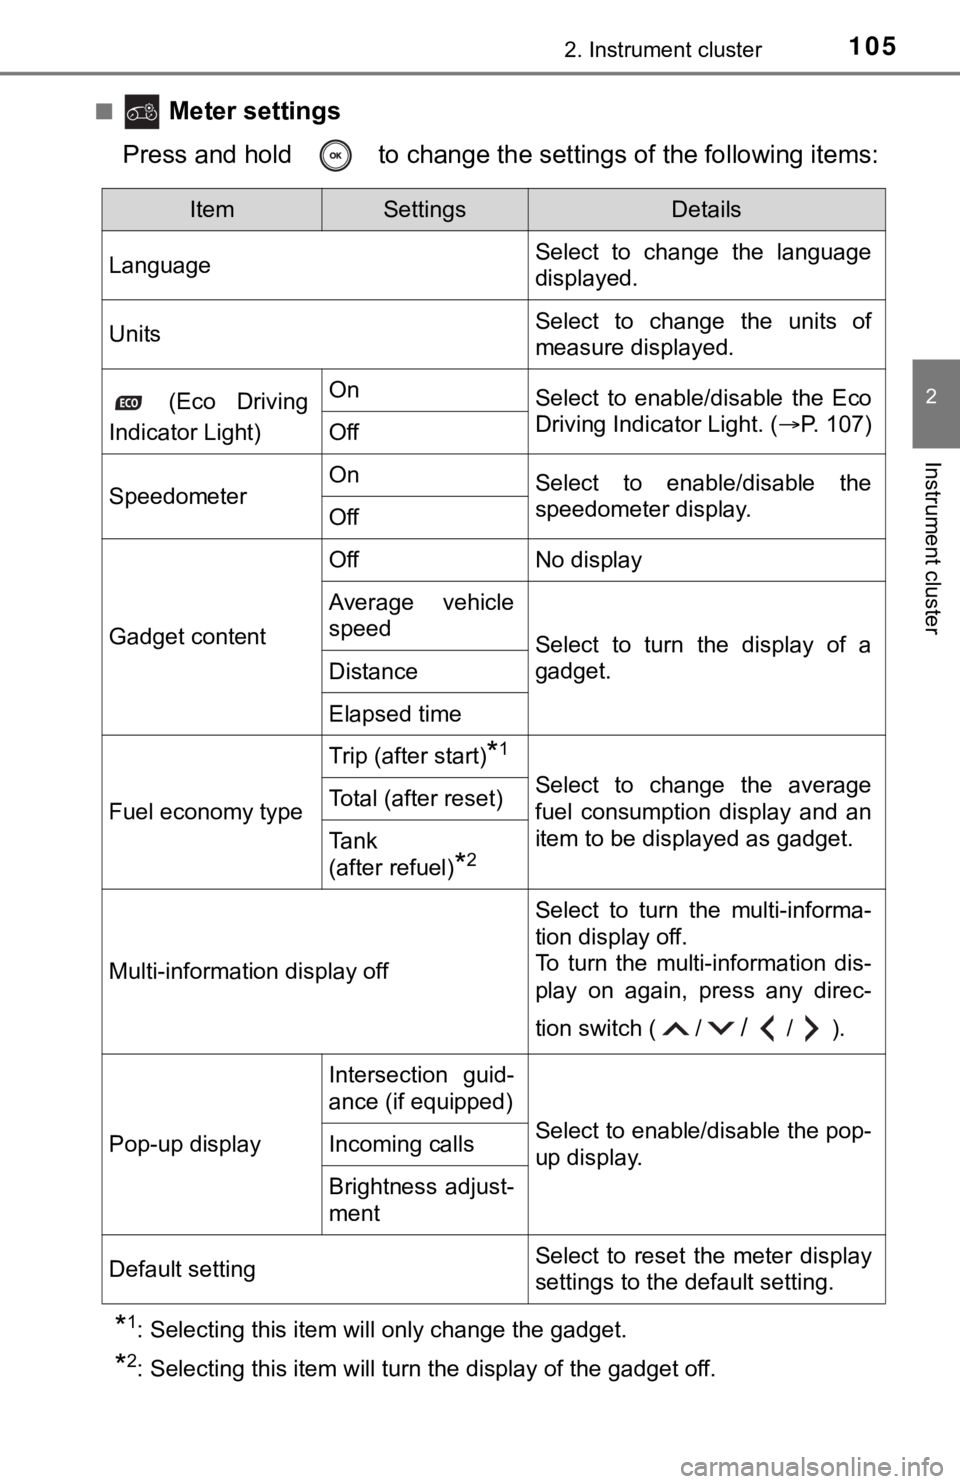
■ Meter settings
Press and hold to change the se ttings of the following items:
*1: Selecting this item will only change the gadget.
*2: Selecting this item will turn the display of the gadget off.
ItemSettingsDetails
Language Select to change the language
displayed.
UnitsSelect to change the units of
measure displayed.
(Eco Driving
Indicator Light)OnSelect to enable/disable the Eco
Driving Indicator Light. ( P. 107)
Off
SpeedometerOnSelect to enable/disable the
speedometer display.
Off
Gadget content
OffNo display
Average vehicle
speed
Select to turn the display of a
gadget.
Distance
Elapsed time
Fuel economy type
Trip (after start)*1
Select to change the average
fuel consumption display and an
item to be displayed as gadget.Total (after reset)
Tank
(after refuel)
*2
Multi-information display off
Select to turn the multi-informa-
tion display off.
To turn the multi-information dis-
play on again, press any direc-
tion switch ( /
//).
Pop-up display
Intersection guid-
ance (if equipped)
Select to enable/disable the pop-
up display.Incoming calls
Brightness adjust-
ment
Default settingSelect to reset the meter display
settings to the default setting.
Page 129 of 540
1293-2. Opening, closing and locking the doors
3
Operation of each component
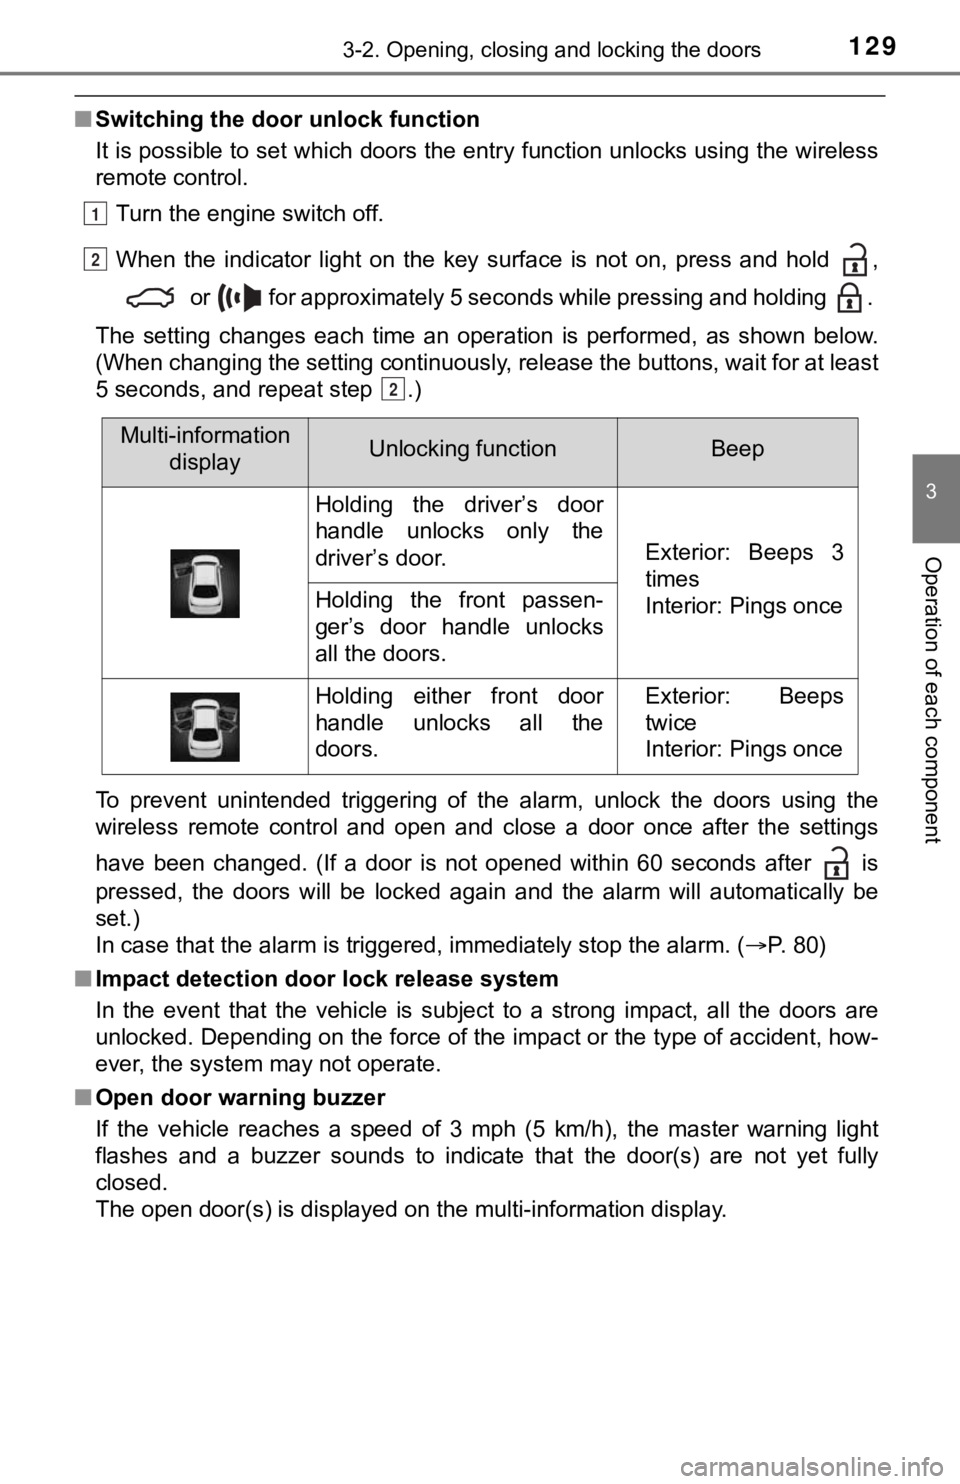
■Switching the door unlock function
It is possible to set which doors the entry function unlocks us ing the wireless
remote control.
Turn the engine switch off.
When the indicator light on the key surface is not on, press and hold ,
or for approximately 5 seconds while pressing and holding .
The setting changes each time an operation is performed, as sho wn below.
(When changing the setting continuously, release the buttons, w ait for at least
5 seconds, and repeat step .)
To prevent unintended triggering of the alarm, unlock the doors using the
wireless remote control and open and close a door once after th e settings
have been changed. (If a door is not opened within 60 seconds a fter is
pressed, the doors will be locked again and the alarm will auto matically be
set.)
In case that the alarm is triggered, immediately stop the alarm . ( P. 80)
■ Impact detection door lock release system
In the event that the vehicle is subject to a strong impact, all the doors are
unlocked. Depending on the force of the impact or the type of a ccident, how-
ever, the system may not operate.
■ Open door warning buzzer
If the vehicle reaches a speed of 3 mph (5 km/h), the master warning light
flashes and a buzzer sounds to indicate that the door(s) are no t yet fully
closed.
The open door(s) is displayed on the multi-information display.
1
2
2
Multi-information displayUnlocking functionBeep
Holding the driver’s door
handle unlocks only the
driver’s door.
Exterior: Beeps 3
times
Interior: Pings once
Holding the front passen-
ger’s door handle unlocks
all the doors.
Holding either front door
handle unlocks all the
doors.Exterior: Beeps
twice
Interior: Pings once
Page 138 of 540

1383-2. Opening, closing and locking the doors
■Note for the entry function
●Even when the electronic key is within the effective range (detection areas),
the system may not operate properly in the following cases:
• The electronic key is too close to the window or outside door handle, near
the ground, or in a high place when the doors are locked or unl ocked.
• The electronic key is near the ground or in a high place, or t oo close to
the rear bumper center when the trunk is opened.
• The electronic key is on the instrument panel, rear package tray or floor, or in the door pockets or glove box when the engine is started or engine
switch modes are changed.
● Do not leave the electronic key on top of the instrument panel or near the
door pockets when exiting the vehicle. Depending on the radio w ave recep-
tion conditions, it may be detected by the antenna outside the cabin and the
door will become lockable from the outside, possibly trapping the electronic
key inside the vehicle.
● As long as the electronic key is within the effective range, th e doors may be
locked or unlocked by anyone. However, only the doors detecting the elec-
tronic key can be used to unlock the vehicle.
● Even if the electronic key is not inside the vehicle, it may be possible to start
the engine if the electronic key is near the window.
● The doors may unlock or lock if a large amount of water splashes on the
door handle, such as in the rain or in a car wash, when the electronic key is
within the effective range. (The doors will automatically be lo cked after
approximately 60 seconds if the doors are not opened and closed.)
● If the wireless remote control is used to lock the doors when t he electronic
key is near the vehicle, there is a possibility that the door m ay not be
unlocked by the entry function. (Use the wireless remote contro l to unlock
the doors.)
● Touching the door lock sensor while wearing gloves may delay or prevent
lock operation. Remove the gloves and touch the lock sensor aga in.
● When the lock operation is performed using the lock sensor, rec ognition sig-
nals will be shown up to two consecutive times. After this, no recognition
signals will be given.
*
● If the door handle becomes wet while the electronic key is with in the effec-
tive range, the door may lock and unlock repeatedly. In this case, follow the
following correction procedures to wash the vehicle:
• Place the electronic key in a location 6 ft. (2 m) or more awa y from the
vehicle. (Take care to ensure that the key is not stolen.)
• Set the electronic key to battery-saving mode to disable the s mart key
system. ( P. 137)
● If the electronic key is inside the vehicle and a door handle b ecomes wet
during a car wash, a message may be shown on the multi-informat ion dis-
play and a buzzer will sound outside the vehicle. To turn off t he alarm, lock
all the doors.
Page 158 of 540

1583-4. Adjusting the steering wheel and mirrors
When the mirror select switch is in the “L” or “R” position, th e outside
rear view mirrors will automati cally angle downwards when the v ehicle
is reversing in order to give a better view of the ground.
To disable this function, select neither “L” nor “R” of the mirror select
switch.
■Adjusting the mirror angle when the vehicle is reversing
With the shift lever in R, adjust the mirror angle at a desired posi-
tion.
The adjusted angle will be memori zed and the mirror will automati-
cally tilt to the memorized angle whenever the shift lever is s hifted
to R from next time.
The memorized downward tilt position of the mirror is linked to the nor-
mal position (angle adjusted with the shift lever in other than R). There-
fore, if the normal position is changed after adjustment, the t ilt position
will also change.
When the normal position is changed, readjust the angle in reve rsing.
■Mirror angle can be adjusted when
The engine switch is in ACCESSORY or IGNITION ON mode.
■ When the mirrors are fogged up
The outside rear view mirrors can be cleared using the mirror d efoggers. Turn
on the rear window defogger to turn on the outside rear view mi rror defog-
gers. ( P. 324)
■ Automatic adjustment of the mirr or angle (vehicles with driving position
memory)
A desired mirror face angle can be entered to memory and recall ed automati-
cally by the driving position memory. ( P. 146)
■ Auto anti-glare function (driver’s side only) (if equipped)
When the anti-glare inside rear view mirror is set to automatic mode, the out-
side rear view mirrors will activate in conjunction with the an ti-glare inside
rear view mirror to reduce reflected light. ( P. 155)
■ Customization
Some functions can be customized. ( P. 497)
Linked mirror function when reversing (vehicles with driving
position memory)