check engine TOYOTA AVALON 2020 Owners Manual (in English)
[x] Cancel search | Manufacturer: TOYOTA, Model Year: 2020, Model line: AVALON, Model: TOYOTA AVALON 2020Pages: 540, PDF Size: 10.4 MB
Page 5 of 540

5
1
8 7 5 4
3
2
9
6
5-4. Other interior featuresOther interior features ....... 342
• Sun visors ..................... 342
• Vanity mirrors................ 342
• Power outlet .................. 343
• USB charging ports....... 344
• Wireless charger ........... 346
• Armrest ......................... 355
• Assist grips ................... 355
• Coat hooks.................... 356
Garage door opener .......... 357 6-1. Maintenance and care
Cleaning and protecting the vehicle exterior .......... 366
Cleaning and protecting the vehicle interior ........... 369
6-2. Maintenance Maintenance requirements ................... 372
General maintenance ........ 374
Emission inspection and maintenance (I/M)
programs ......................... 378
6-3. Do-it-yourself maintenance
Do-it-yourself service precautions ...................... 379
Hood .................................. 381
Positioning a floor jack....... 382
Engine compartment ......... 383
Tires................................... 393
Tire inflation pressure ........ 407
Wheels............................... 410
Air conditioning filter .......... 412
Electronic key battery ........ 414
Checking and replacing fuses ................................ 416
Light bulbs ......................... 4196Maintenance and care
Page 8 of 540
8
Please note that this manual applies to all models and explains all equipment,
including options. Therefore, you may find some explanations fo r equipment
not installed on your vehicle.
All specifications provided in this manual are current at the t ime of printing.
However, because of the Toyota policy of continual product improvement, we
reserve the right to make changes at any time without notice.
Depending on specifications, the vehicle shown in the illustrat ions may differ
from your vehicle in terms of equipment.
Approximately five hours after the engine is turned off, you ma y hear sound
coming from under the vehicle for several minutes. This is the sound of a fuel
evaporation leakage check and, it does not indicate a malfunction.
A wide variety of non-genuine spare parts and accessories for T oyota vehi-
cles are currently available in the market. You should know tha t Toyota does
not warrant these products and is not responsible for their per formance,
repair, or replacement, or for any damage they may cause to, or adverse
effect they may have on, your Toyota vehicle.
This vehicle should not be modified with non-genuine Toyota pro ducts. Modi-
fication with non-genuine Toyota products could affect its perf ormance, safety
or durability, and may even violate governmental regulations. In addition,
damage or performance problems resulting from the modification may not be
covered under warranty.
The installation of a mobile two-way radio system in your vehic le could affect
electronic systems such as:
● Multiport fuel injection system/sequential multiport fuel injection system
● Toyota Safety Sense P
● Anti-lock brake system
● SRS airbag system
● Seat belt pretensioner system
Be sure to check with your Toyota dealer for precautionary meas ures or spe-
cial instructions regarding instal lation of a mobile two-way radio system.
For your infor mation
Main Owner’s Manual
Noise from under vehicle afte r turning off the engine
Accessories, spare parts and m odification of your Toyota
Installation of a mobile two-way radio system
Page 17 of 540
17Pictorial index
Windshield wipers . . . . . . . . . . . . . . . . . . . . . . . . . . . . . . . . . P. 210
Precautions for winter season . . . . . . . . . . . . . . . . . . . . . . . . . P. 316
Fuel filler door . . . . . . . . . . . . . . . . . . . . . . . . . . . . . . . . . . . . P. 214
Refueling method . . . . . . . . . . . . . . . . . . . . . . . . . . . . . . . . . . . P. 214
Fuel type/fuel tank capacity . . . . . . . . . . . . . . . . . . . . . . . . . . . P. 474
Tires . . . . . . . . . . . . . . . . . . . . . . . . . . . . . . . . . . . . . . . . . . P. 393
Tire size/inflation pressure . . . . . . . . . . . . . . . . . . . . . . . . . P. 478
Winter tires/tire chains . . . . . . . . . . . . . . . . . . . . . . . . . . . . P. 316
Checking/rotation/tire pressur e warning system . . . . . . . . .P. 393
Coping with flat tires . . . . . . . . . . . . . . . . . . . . . . . . . . . . . . P. 445
Hood . . . . . . . . . . . . . . . . . . . . . . . . . . . . . . . . . . . . . . . . . . . . P. 381
Opening . . . . . . . . . . . . . . . . . . . . . . . . . . . . . . . . . . . . . . . . . . P. 381
Engine oil . . . . . . . . . . . . . . . . . . . . . . . . . . . . . . . . . . . . . . . . . P. 475
Coping with overheat . . . . . . . . . . . . . . . . . . . . . . . . . . . . . . . . P. 466
Front turn signal lights/parking lights . . . . . . . . . . . . . P. 195, 202
Headlights/daytime running lights . . . . . . . . . . . . . . . . . . . . P. 202
Front side marker lights . . . . . . . . . . . . . . . . . . . . . . . . . . . . P. 202
Headlights . . . . . . . . . . . . . . . . . . . . . . . . . . . . . . . . . . . . . . . P. 202
Front turn signal lights . . . . . . . . . . . . . . . . . . . . . . . . . . . . . P. 195
Daytime running lights/parking lights . . . . . . . . . . . . . . . . . P. 202
Front turn signal lights/cornering lights . . . . . . . . . . . P. 195, 202
Side turn signal lights . . . . . . . . . . . . . . . . . . . . . . . . . . . . . . P. 195
Rear turn signal lights/r ear side marker lights/
tail lights/stoplights . . . . . . . . . . . . . . . . . . . . . . . . . . . . P. 195, 202
Back-up lights
Shifting the shift lever to R . . . . . . . . . . . . . . . . . . . . . . . . . . . . P. 189
License plate lights . . . . . . . . . . . . . . . . . . . . . . . . . . . . . . . . P. 202
4
5
6
7
Light bulbs of the exter ior lights for driving
(Replacing method: P. 419, Watts: P. 480)
*: If equipped
8
9
10
11
12
13
14
15
16
17
Page 27 of 540
271-1. For safe use
1
For safety and security
WARNING
Observe the following precautions.
Failure to do so may cause the driver’s floor mat to slip, possibly interfering
with the pedals while driving. An unexpectedly high speed may result or it may
become difficult to stop the vehicle. This could lead to an acc ident, resulting in
death or serious injury.
■ When installing the driver’s floor mat
● Do not use floor mats designed for other models or different mo del year
vehicles, even if they are Toyota Genuine floor mats.
● Only use floor mats designed for the driver’s seat.
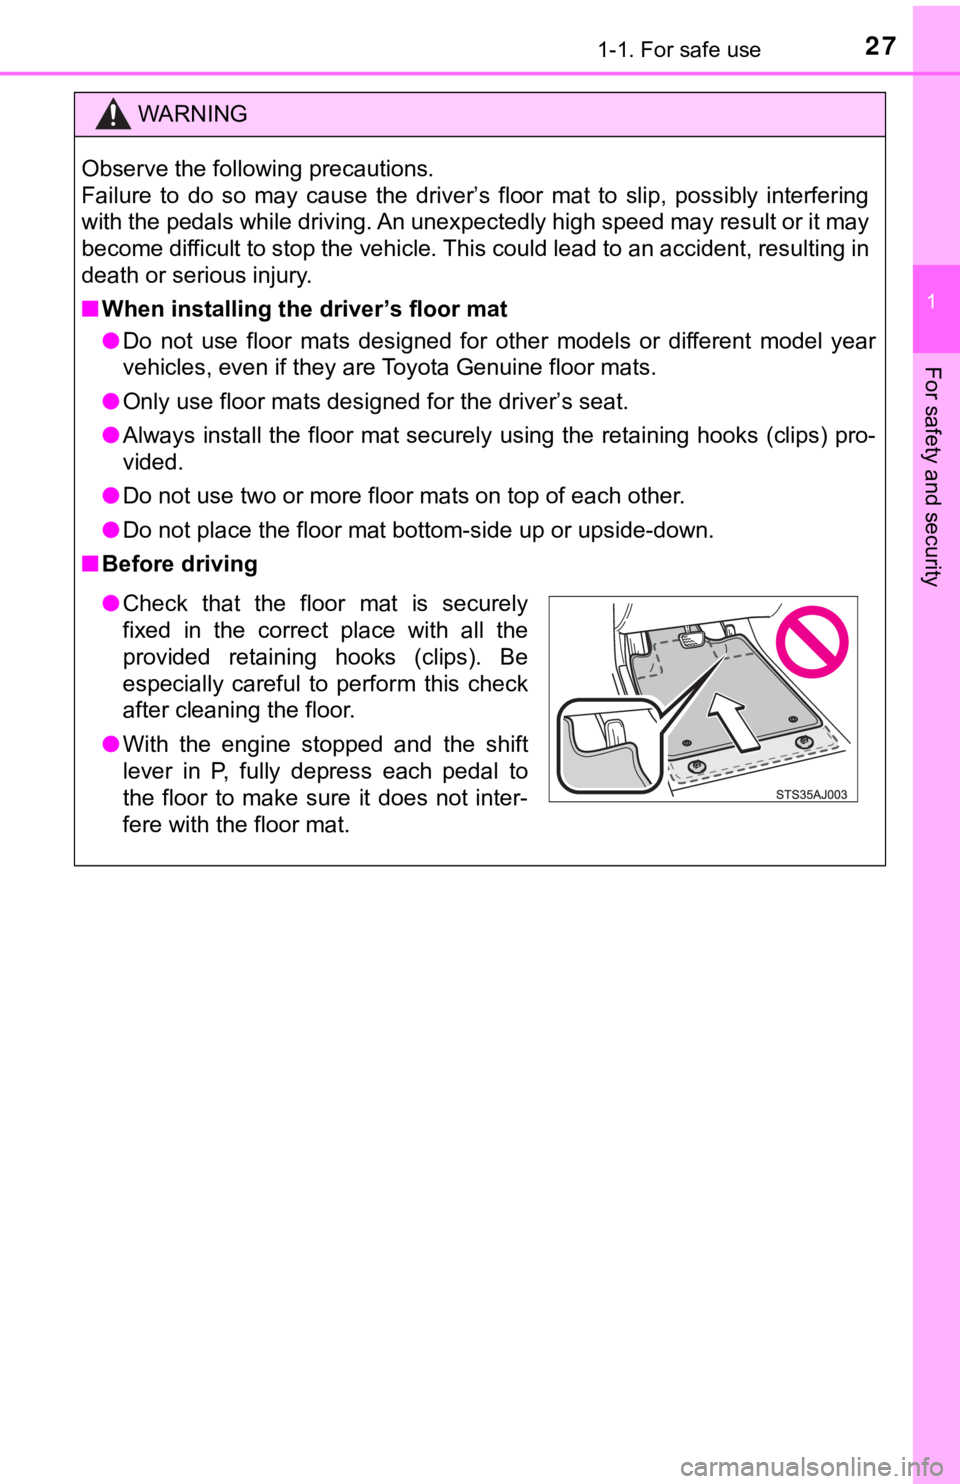
● Always install the floor mat securely using the retaining hooks (clips) pro-
vided.
● Do not use two or more floor mats on top of each other.
● Do not place the floor mat bottom-side up or upside-down.
■ Before driving
● Check that the floor mat is securely
fixed in the correct place with all the
provided retaining hooks (clips). Be
especially careful to perform this check
after cleaning the floor.
● With the engine stopped and the shift
lever in P, fully depress each pedal to
the floor to make sure it does not inter-
fere with the floor mat.
Page 70 of 540
701-1. For safe use
Exhaust gas precautions
Harmful substance to the human body is included in exhaust
gases if inhaled.
WARNING
Exhaust gases include harmful carbon monoxide (CO), which is colorless and
odorless. Observe the following precautions.
Failure to do so may cause exhaust gases enter the vehicle and may lead to
an accident caused by light-headedness, or may lead to death or a serious
health hazard.
■ Important points while driving
● Keep the trunk lid closed.
● If you smell exhaust gases in the vehicle even when the trunk l id is closed,
open the windows and have the vehicle inspected at your Toyota dealer as
soon as possible.
■ When parking
● If the vehicle is in a poorly ventilated area or a closed area, such as a
garage, stop the engine.
● Do not leave the vehicle with the engine on for a long time.
If such a situation cannot be avoided, park the vehicle in an o pen space
and ensure that exhaust fumes do not enter the vehicle interior .
● Do not leave the engine running in an area with snow build-up, or where it
is snowing. If snowbanks build up around the vehicle while the engine is
running, exhaust gases may collect and enter the vehicle.
■ Exhaust pipe
The exhaust system needs to be checked periodically. If there is a hole or
crack caused by corrosion, damage to a joint or abnormal exhaust noise, be
sure to have the vehicle inspected and repaired by your Toyota dealer.
Page 86 of 540
862. Instrument cluster
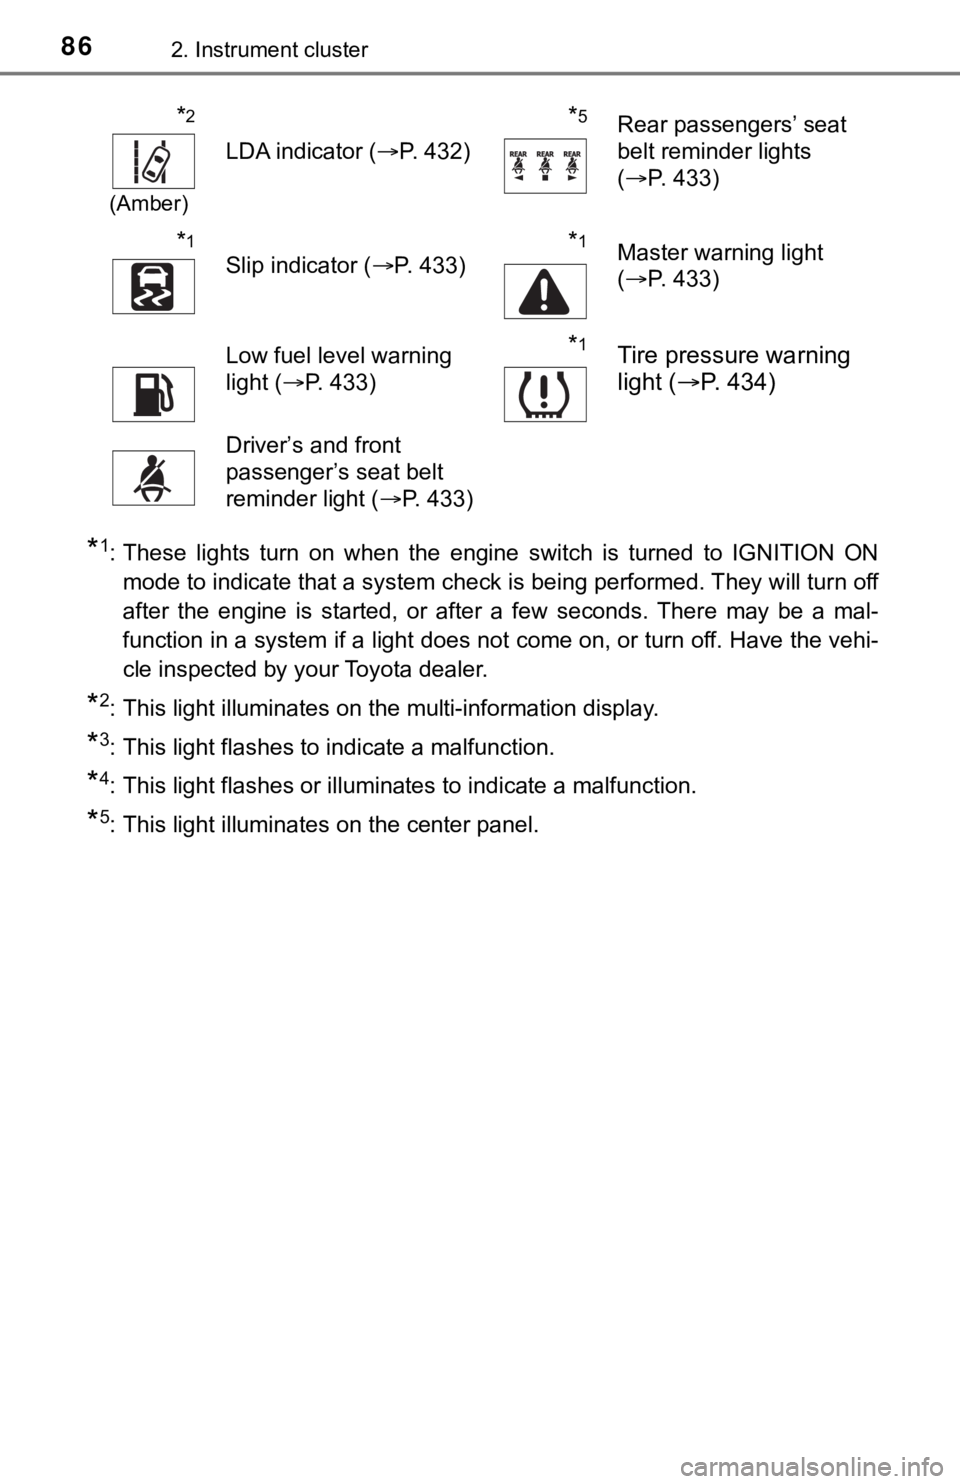
*1: These lights turn on when the engine switch is turned to IGNITION ON
mode to indicate that a system check is being performed. They will turn off
after the engine is started, or after a few seconds. There may be a mal-
function in a system if a light does not come on, or turn off. Have the vehi-
cle inspected by your Toyota dealer.
*2: This light illuminates on the multi-information display.
*3: This light flashes to indicate a malfunction.
*4: This light flashes or illuminates to indicate a malfunction.
*5: This light illuminates on the center panel.
*2
(Amber)
LDA indicator ( P. 432)
*5Rear passengers’ seat
belt reminder lights
(P. 433)
*1
Slip indicator ( P. 433)*1Master warning light
(P. 433)
Low fuel level warning
light ( P. 433)*1Tire pressure warning
light ( P. 434)
Driver’s and front
passenger’s seat belt
reminder light ( P. 433)
Page 89 of 540

892. Instrument cluster
2
Instrument cluster
*1: These lights turn on when the engine switch is turned to IGNITION ON
mode to indicate that a system check is being performed. They will turn off
after the engine is started, or after a few seconds. There may be a mal-
function in a system if a light does not come on, or turn off. Have the vehi-
cle inspected by your Toyota dealer.
*2: This light illuminates on the multi-information display.
*3: This light does not turn on when the system is disabled.
*4: This light turns on when the system is off.
*5: This light flashes to indicate that the system is operating.
*6: These indicators will illuminate in the following situations t o indicate that
the system initial check is being performed:
• When the BSM function or RCTA function is enabled and the engi ne
switch is turned to IGNITION ON mode.
• When the engine switch is in IGNITION ON mode and the BSM func tion
is enabled.
• When the engine switch is in IGNITION ON mode and the RCTA fun c-
tion is enabled. (At this time, a buzzer will also sound.)
The indicators will turn off after a few seconds. If the indicators do not
illuminate or turn off, or if a buzzer does not sound when the RCTA func-
tion is enabled, the system may be malfunctioning. Have the vehicle
inspected by your Toyota dealer.
*7: This light illuminates on the outside rear view mirrors.
*8: This light illuminates on the center panel.
*9: When the outside temperature is approximately 37°F (3°C) or lo wer, this
indicator will flash for approximately 10 seconds, then stay on .
WARNING
■If a safety system warning light does not come on
Should a safety system light such as the ABS and SRS warning lights not
come on when you start the engine, this could mean that these s ystems are
not available to help protect you in an accident, which could r esult in death
or serious injury. Have the vehicle inspected by your Toyota de aler immedi-
ately if this occurs.
Page 92 of 540
922. Instrument cluster
■The meters and display illuminate when
The engine switch is in IGNITION ON mode.
■ Brightness of the meters (day mode and night mode)
●The brightness of the meters is changed between day mode and ni ght
mode.
• Day mode: When the tail lights are off or when the tail lights are on but
the surrounding area is bright
• Night mode: When the tail lights are on and the surrounding ar ea is dark
● When in night mode, the brightness will be reduced slightly unless the
meters are set to the maximum brightness level.
■ Outside temperature display
In the following situations, the correct outside temperature ma y not be dis-
played, or the display may take longer than normal to change:
● When stopped, or driving at low speeds (less than 16 mph [25 km/h])
● When the outside temperature has changed suddenly (at the entra nce/exit
of a garage, tunnel, etc.)
● When “ ” or “E” is displayed, the system may be malfunctioning.
Take your vehicle to your Toyota dealer.
NOTICE
■ To prevent damage to the engine and its components
● Do not let the indicator needle of the tachometer enter the red zone, which
indicates the maximum engine speed.
● The engine may be overheating if the engine coolant temperature gauge is
in the red zone (H). In this case, immediately stop the vehicle in a safe
place, and check the engine after it has cooled completely. ( P. 4 6 6 )
Page 114 of 540

1142. Instrument cluster
■Head-up display
The head-up display may seem dark or hard to see when viewed th rough
sunglasses, especially polarized sunglasses.
Adjust the brightness of the head-up display or remove your sun glasses.
■ Display brightness
The brightness of the head-up display can be adjusted on of th e multi-
information display. Also, it is automatically adjusted accordi ng to the ambient
brightness.
■ Enabling/disabling of the head-up display
If the head-up display is disabled, it will remain disabled whe n the engine
switch is turned off then back to IGNITION ON mode.
■ Street name display
Only street names which are included in the map data will be displayed.
WARNING
■Before using the head-up display
● Check that the position and brightness of the head-up display i mage does
not interfere with safe driving. Incorrect adjustment of the image’s position
or brightness may obstruct the driver’s view and lead to an acc ident,
resulting in death or serious injury.
● Do not continuously look at the head-up display while driving a s you may
fail to see pedestrians, objects on the road, etc. ahead of the vehicle.
■ Caution for changing setti ngs of the head-up display
As the engine needs to be running while changing the settings of the head-
up display, ensure that the vehicle is parked in a place with adequate venti-
lation. In a closed area such as a garage, exhaust gases includ ing harmful
carbon monoxide (CO) may collect and enter the vehicle. This may lead to
death or a serious health hazard.
Page 139 of 540

1393-2. Opening, closing and locking the doors
3
Operation of each component
●The lock sensor may not work properly if it comes into contact with ice,
snow, mud, etc. Clean the lock sensor and attempt to operate it again.
● A sudden approach to the effective range or door handle may prevent the
doors from being unlocked. In this case, return the door handle to the origi-
nal position and check that the doors unlock before pulling the door handle
again.
● If there is another electronic key in the detection area, it ma y take slightly
longer to unlock the doors after the door handle is gripped.
● Fingernails may scrape against the door during operation of the door han-
dle. Be careful not to injure fingernails or damage the surface of the door.
*: This setting can be customized at your Toyota dealer.
■ When the vehicle is not driven for extended periods
●To prevent theft of the vehicle, do not leave the electronic ke y within 6 ft. (2
m) of the vehicle.
● The smart key system can be deactivated in advance. ( P. 497)
● Setting the electronic key to battery-saving mode helps to redu ce key bat-
tery depletion. ( P. 137)
■ To operate the system properly
Make sure to carry the electronic key when operating the system. Do not get
the electronic key too close to the vehicle when operating the system from the
outside of the vehicle.
Depending on the position and holding condition of the electron ic key, the key
may not be detected correctly and the system may not operate pr operly. (The
alarm may go off accidentally, or the door lock prevention func tion may not
operate.)
■ If the smart key system does not operate properly
●Locking and unlocking the doors and opening the trunk: Use the mechanical
key. ( P. 459)
● Starting the engine: P. 460
■ Customization
Some functions can be customized. ( P. 497)
■ If the smart key system has been d eactivated in a customized setting
● Locking and unlocking the doors and opening the trunk:
Use the wireless remote control or mechanical key. ( P. 125, 131, 459)
● Starting the engine and changing engine switch modes: P. 460
● Stopping the engine: P. 184