reset TOYOTA AVALON 2021 Accessories, Audio & Navigation (in English)
[x] Cancel search | Manufacturer: TOYOTA, Model Year: 2021, Model line: AVALON, Model: TOYOTA AVALON 2021Pages: 310, PDF Size: 9.68 MB
Page 259 of 310
2598-2. Setup
8
Phone
AVALON_AVALON HV_Navi_(U)
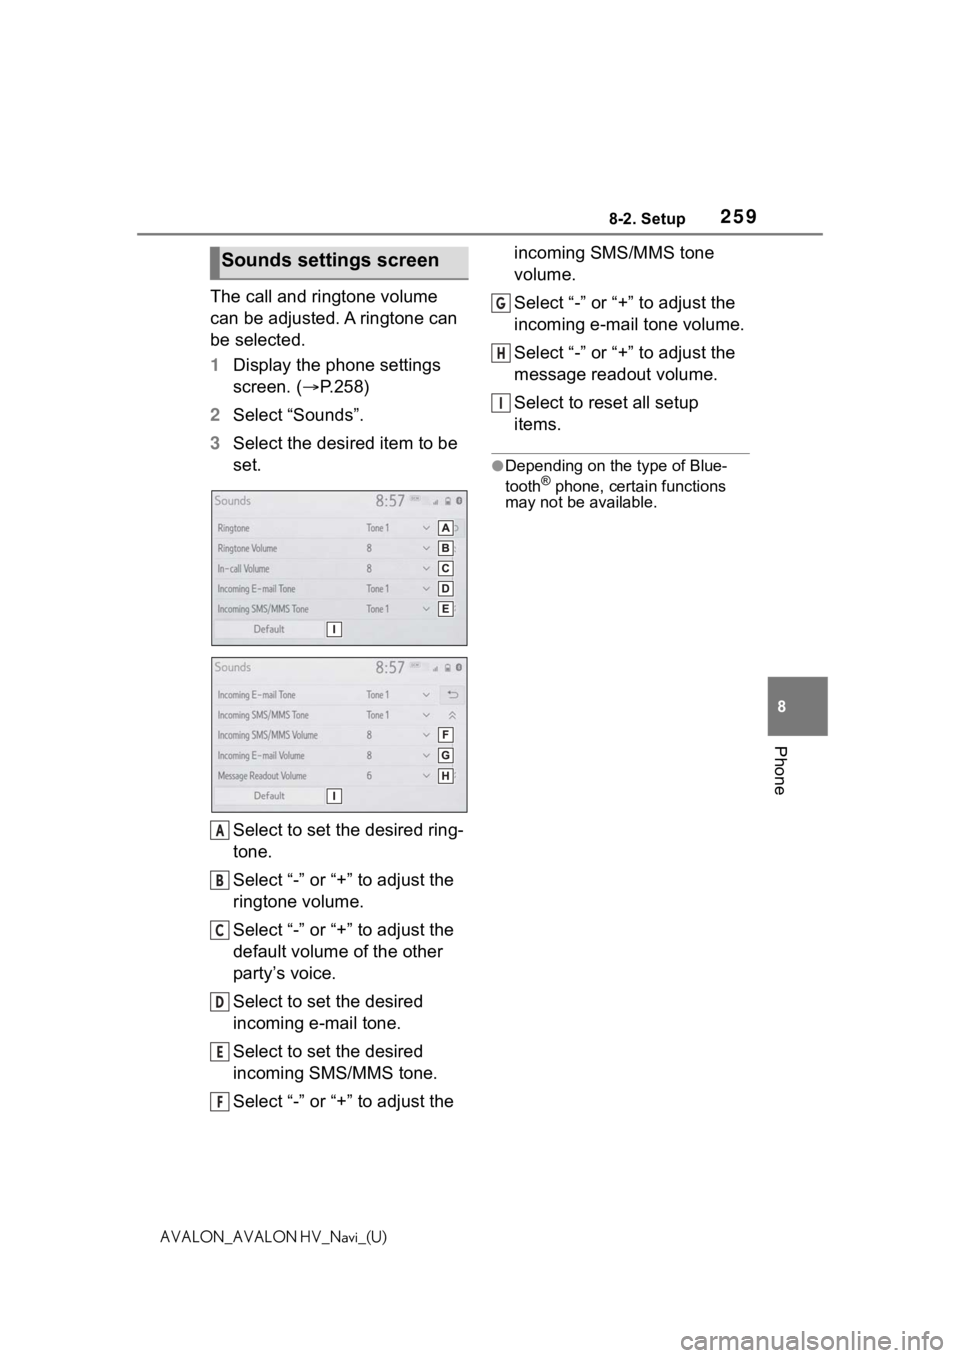
The call and ringtone volume
can be adjusted. A ringtone can
be selected.
1Display the phone settings
screen. ( P.258)
2 Select “Sounds”.
3 Select the desired item to be
set.
Select to set the desired ring-
tone.
Select “-” or “+” to adjust the
ringtone volume.
Select “-” or “+” to adjust the
default volume of the other
party’s voice.
Select to set the desired
incoming e-mail tone.
Select to set the desired
incoming SMS/MMS tone.
Select “-” or “+” to adjust the incoming SMS/MMS tone
volume.
Select “-” or “+” to adjust the
incoming e-mail tone volume.
Select “-” or “+” to adjust the
message readout volume.
Select to reset all setup
items.
●Depending on the type of Blue-
tooth® phone, certain functions
may not be available.
Sounds settings screen
A
B
C
D
E
F
G
H
I
Page 260 of 310
2608-2. Setup
AVALON_AVALON HV_Navi_(U)
1Display the phone settings
screen. ( P.258)
2 Select “Notifications/Display”.
3 Select the desired item to be
set.
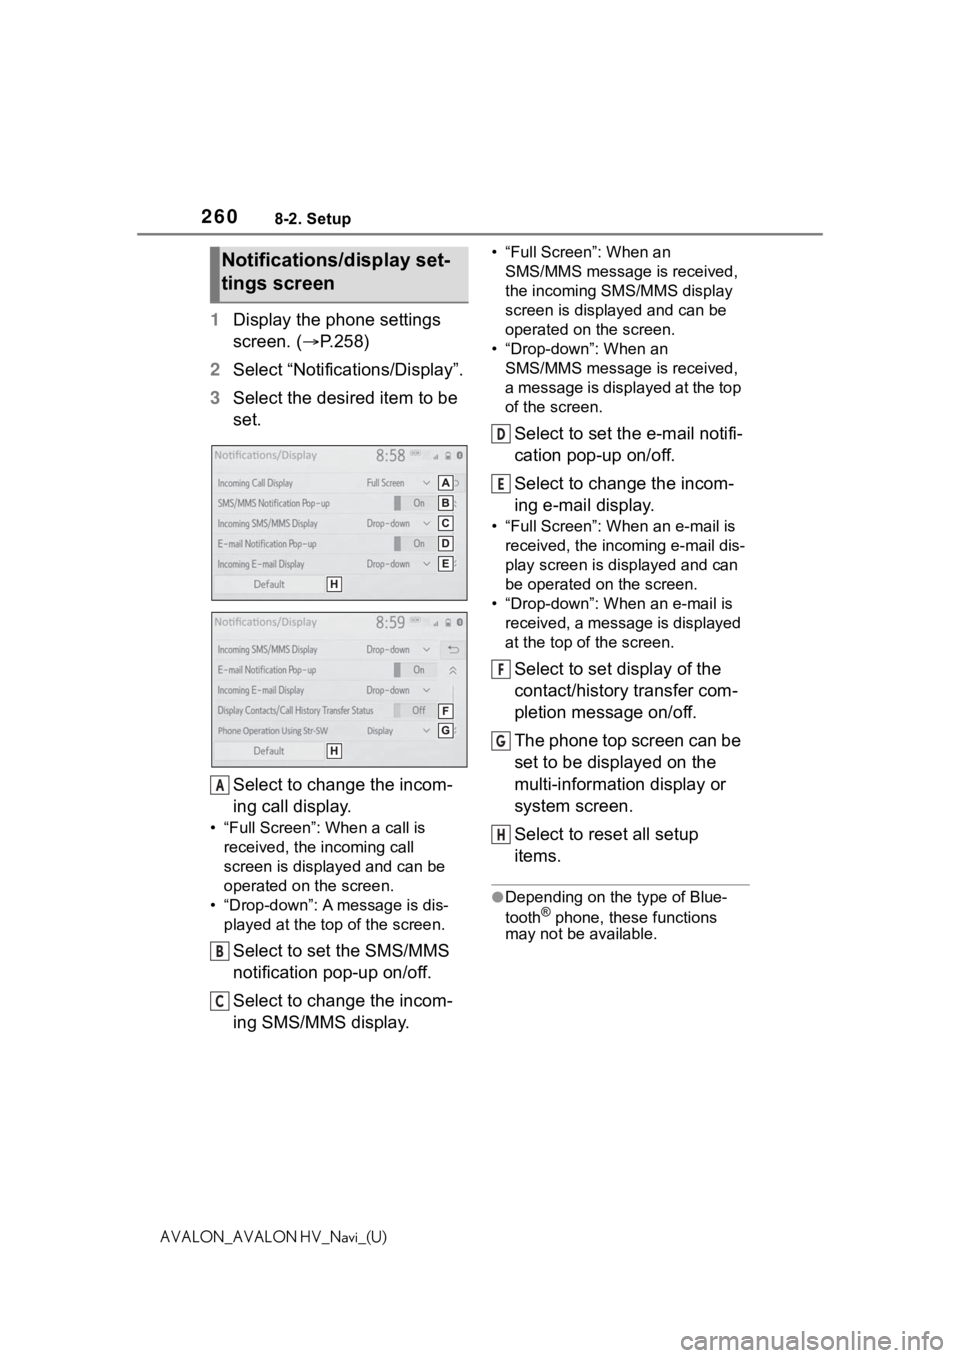
Select to change the incom-
ing call display.
• “Full Screen”: When a call is
received, the incoming call
screen is displayed and can be
operated on the screen.
• “Drop-down”: A message is dis- played at the top of the screen.
Select to set the SMS/MMS
notification pop-up on/off.
Select to change the incom-
ing SMS/MMS display.
• “Full Screen”: When an
SMS/MMS message is received,
the incoming SMS/MMS display
screen is displayed and can be
operated on the screen.
• “Drop-down”: When an SMS/MMS message is received,
a message is displayed at the top
of the screen.
Select to set the e-mail notifi-
cation pop-up on/off.
Select to change the incom-
ing e-mail display.
• “Full Screen”: Wh en an e-mail is
received, the inco ming e-mail dis-
play screen is displayed and can
be operated on the screen.
• “Drop-down”: When an e-mail is received, a message is displayed
at the top of the screen.
Select to set display of the
contact/history transfer com-
pletion message on/off.
The phone top screen can be
set to be displayed on the
multi-information display or
system screen.
Select to reset all setup
items.
●Depending on the type of Blue-
tooth® phone, these functions
may not be available.
Notifications/display set-
tings screen
A
B
C
D
E
F
G
H
Page 261 of 310
2618-2. Setup
8
Phone
AVALON_AVALON HV_Navi_(U)
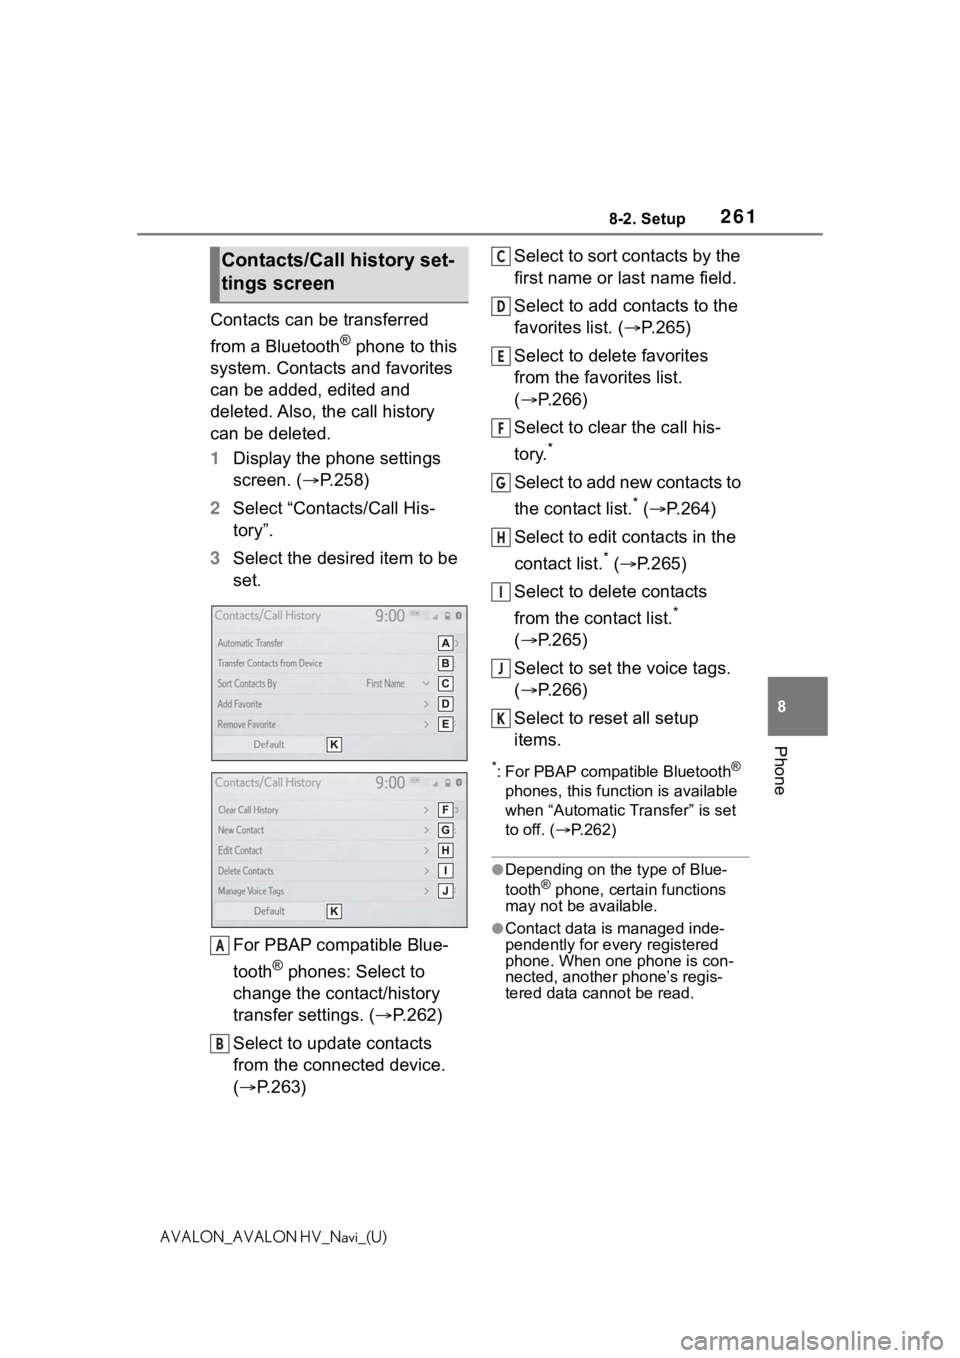
Contacts can be transferred
from a Bluetooth
® phone to this
system. Contacts and favorites
can be added, edited and
deleted. Also, the call history
can be deleted.
1 Display the phone settings
screen. ( P.258)
2 Select “Contacts/Call His-
tory”.
3 Select the desired item to be
set.
For PBAP compatible Blue-
tooth
® phones: Select to
change the contact/history
transfer settings. ( P.262)
Select to update contacts
from the connected device.
( P.263) Select to sort contacts by the
first name or last name field.
Select to add contacts to the
favorites list. (
P.265)
Select to delete favorites
from the favorites list.
( P.266)
Select to clear the call his-
tory.
*
Select to add new contacts to
the contact list.
* ( P.264)
Select to edit contacts in the
contact list.
* ( P.265)
Select to delete contacts
from the contact list.
*
( P.265)
Select to set the voice tags.
( P.266)
Select to reset all setup
items.
*: For PBAP compatible Bluetooth®
phones, this function is available
when “Automatic Transfer” is set
to off. ( P.262)
●Depending on the type of Blue-
tooth® phone, certain functions
may not be available.
●Contact data is managed inde-
pendently for every registered
phone. When on e phone is con-
nected, another phone’s regis-
tered data cannot be read.
Contacts/Call history set-
tings screen
A
B
C
D
E
F
G
H
I
J
K
Page 262 of 310
2628-2. Setup
AVALON_AVALON HV_Navi_(U)
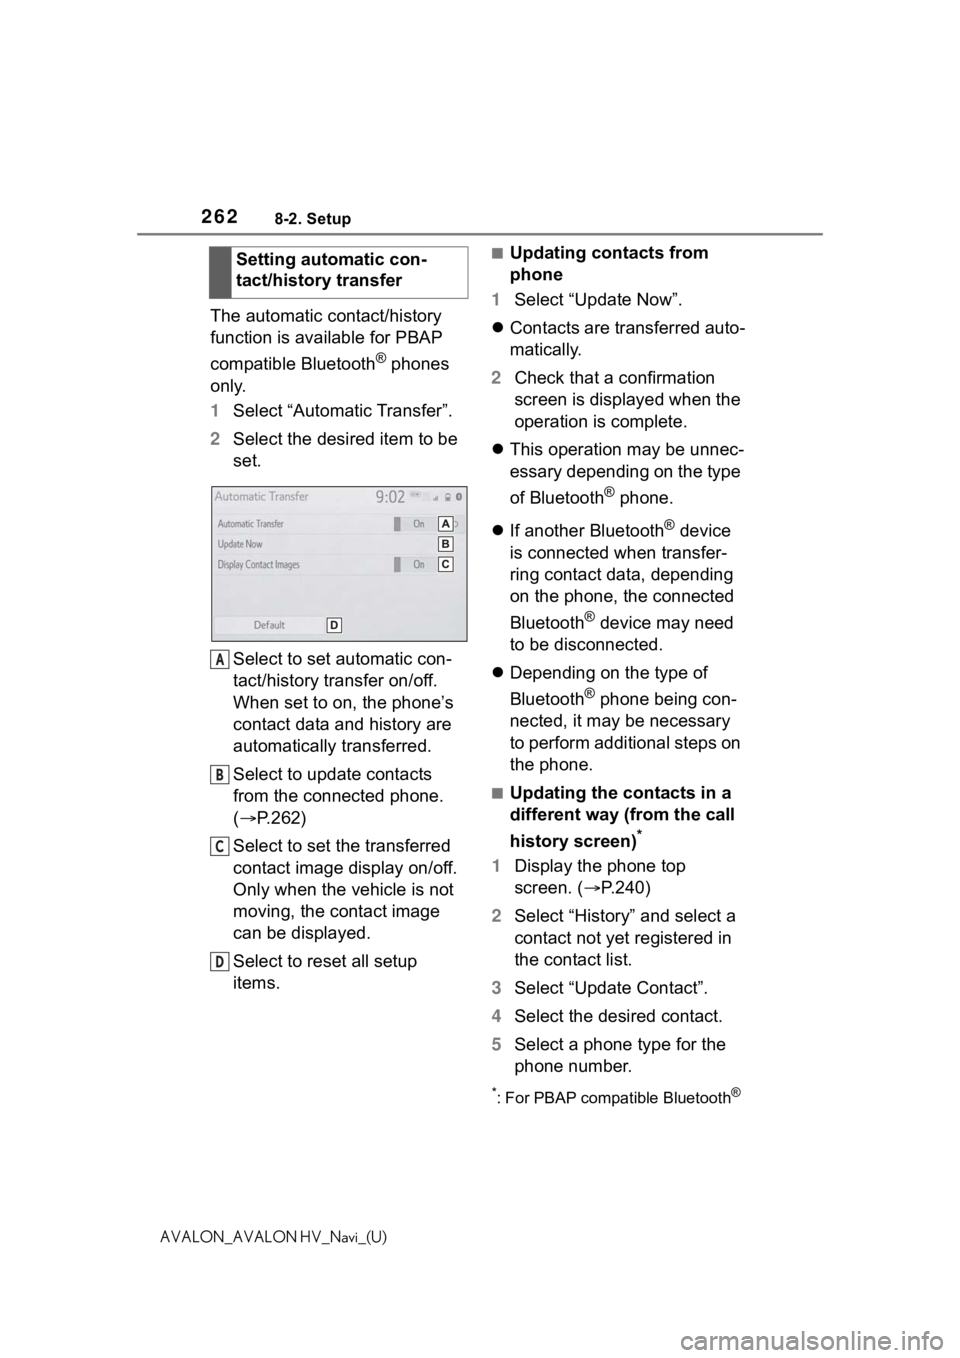
The automatic contact/history
function is available for PBAP
compatible Bluetooth
® phones
only.
1 Select “Automatic Transfer”.
2 Select the desired item to be
set.
Select to set automatic con-
tact/history transfer on/off.
When set to on, the phone’s
contact data and history are
automatically transferred.
Select to update contacts
from the connected phone.
( P.262)
Select to set the transferred
contact image display on/off.
Only when the vehicle is not
moving, the contact image
can be displayed.
Select to reset all setup
items.
■Updating contacts from
phone
1 Select “Update Now”.
Contacts are transferred auto-
matically.
2 Check that a confirmation
screen is displayed when the
operation is complete.
This operation may be unnec-
essary depending on the type
of Bluetooth
® phone.
If another Bluetooth
® device
is connected when transfer-
ring contact data, depending
on the phone, the connected
Bluetooth
® device may need
to be disconnected.
Depending on the type of
Bluetooth
® phone being con-
nected, it may be necessary
to perform additional steps on
the phone.
■Updating the contacts in a
different way (from the call
history screen)
*
1 Display the phone top
screen. ( P.240)
2 Select “History” and select a
contact not yet registered in
the contact list.
3 Select “Update Contact”.
4 Select the desired contact.
5 Select a phone type for the
phone number.
*: For PBAP compatible Bluetooth®
Setting automatic con-
tact/history transfer
A
B
C
D
Page 267 of 310
2678-2. Setup
8
Phone
AVALON_AVALON HV_Navi_(U)
4Select “OK” when voice tag
registration is complete.
■Editing a voice tag
1 Select “Edit”.
2 Select the desired contact to
edit.
3 Follow the steps in “Register-
ing a voice tag” from step 3 .
( P.266)
■Deleting the voice tag
1 Select “Delete”.
2 Select the desired contact
and select “Delete”.
3 Select “Yes” when the confir-
mation screen appears.
●Multiple data can be selected and
deleted at the same time.
●Voice tags are deleted when the
set language of the system is
changed. ( P. 6 2 )
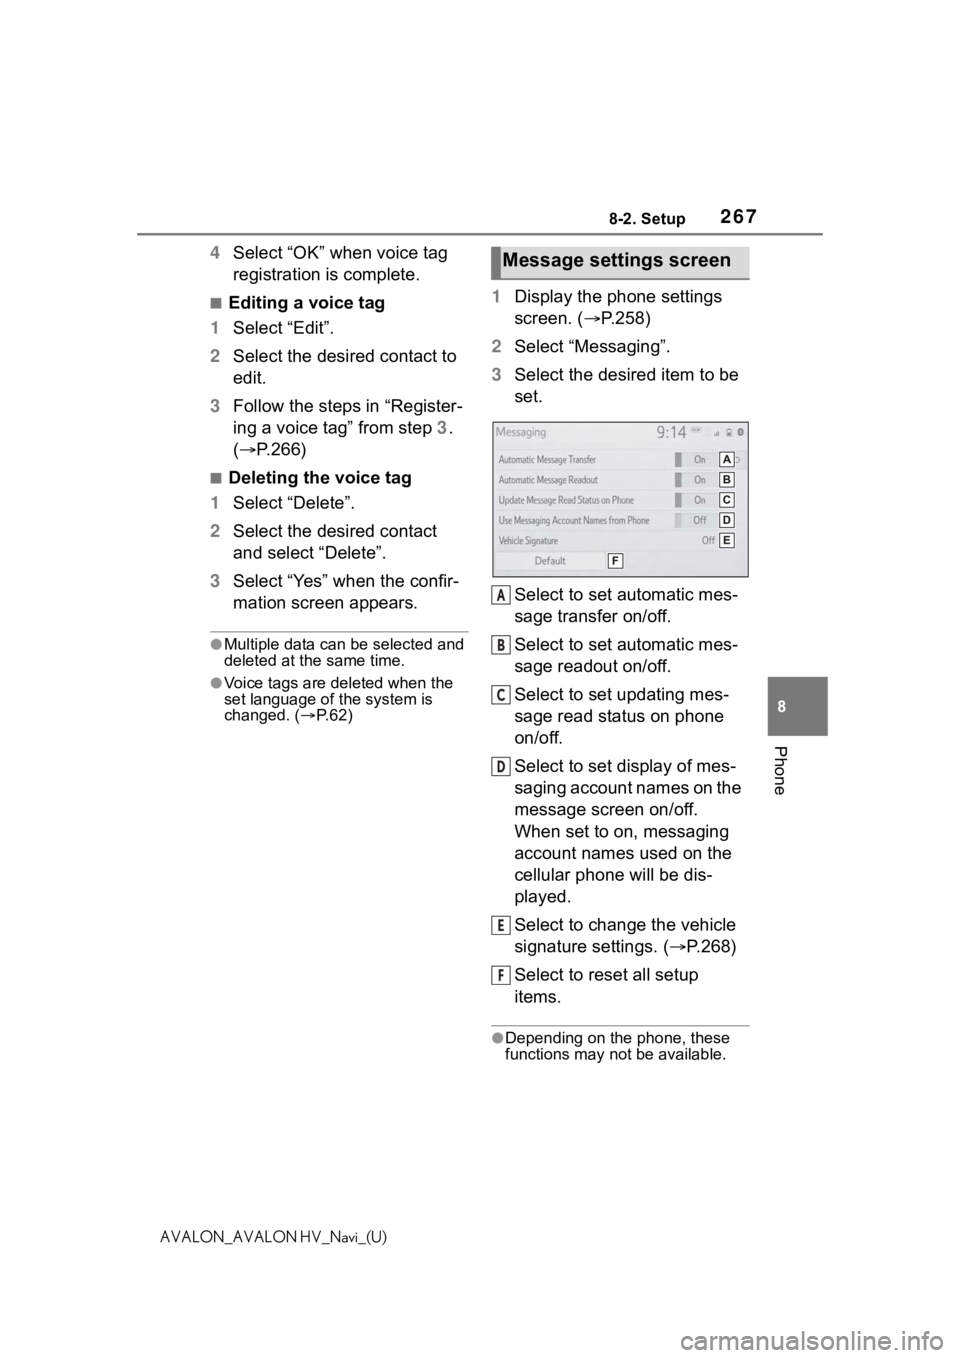
1 Display the phone settings
screen. ( P.258)
2 Select “Messaging”.
3 Select the desired item to be
set.
Select to set automatic mes-
sage transfer on/off.
Select to set automatic mes-
sage readout on/off.
Select to set updating mes-
sage read status on phone
on/off.
Select to set display of mes-
saging account names on the
message screen on/off.
When set to on, messaging
account names used on the
cellular phone will be dis-
played.
Select to change the vehicle
signature settings. ( P.268)
Select to reset all setup
items.
●Depending on the phone, these
functions may not be available.
Message settings screen
A
B
C
D
E
F
Page 268 of 310
2688-2. Setup
AVALON_AVALON HV_Navi_(U)
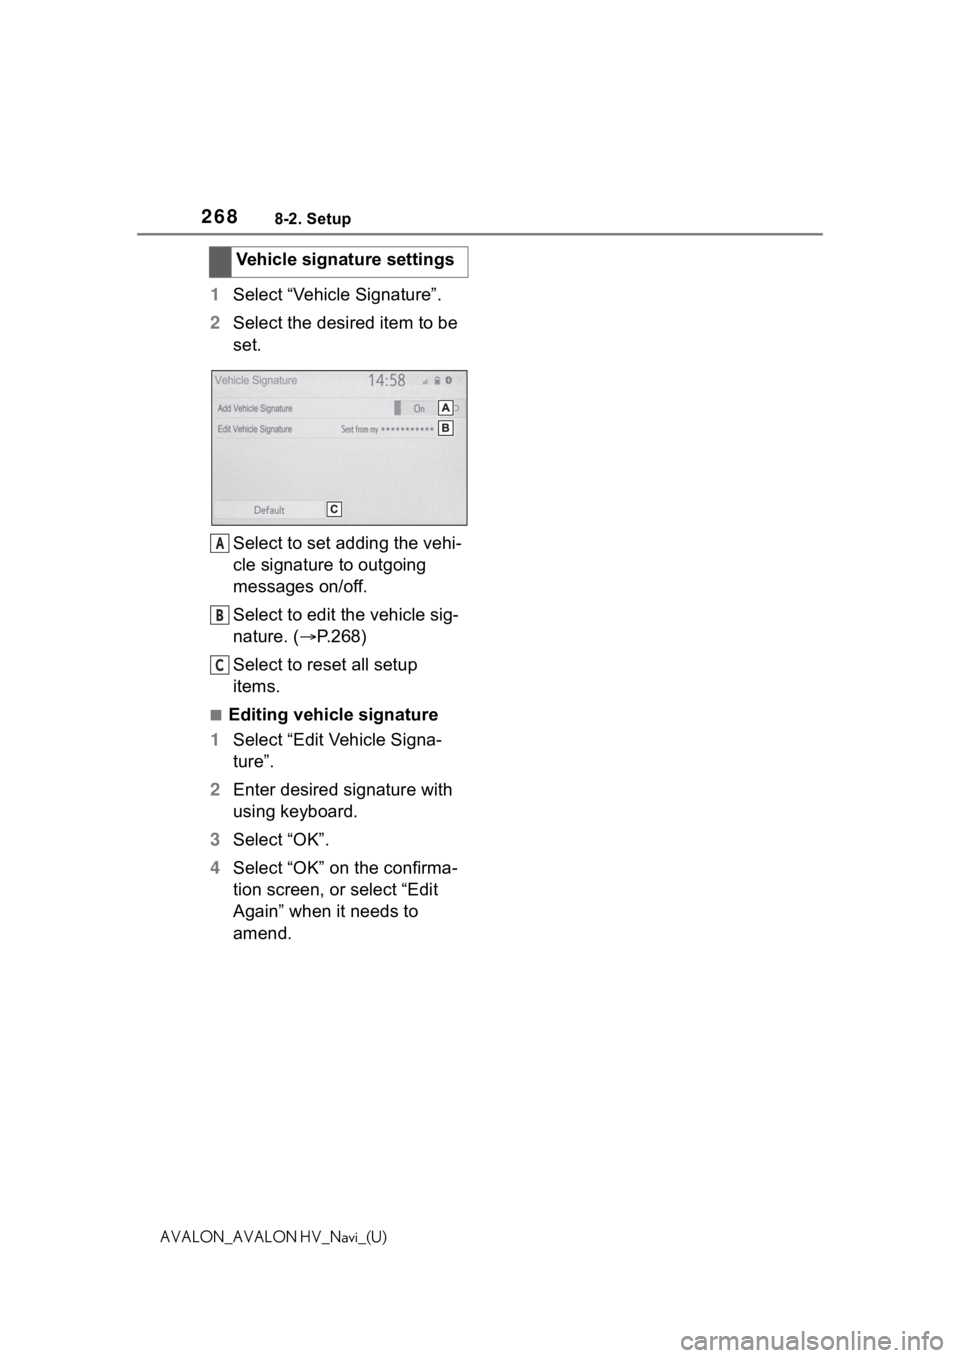
1Select “Vehicle Signature”.
2 Select the desired item to be
set.
Select to set adding the vehi-
cle signature to outgoing
messages on/off.
Select to edit the vehicle sig-
nature. ( P.268)
Select to reset all setup
items.
■Editing vehicle signature
1 Select “Edit Vehicle Signa-
ture”.
2 Enter desired signature with
using keyboard.
3 Select “OK”.
4 Select “OK” on the confirma-
tion screen, or select “Edit
Again” when it needs to
amend.Vehicle signature settings
A
B
C
Page 277 of 310
2779-1. Connected Services overview
9
Connected Services
AVALON_AVALON HV_Navi_(U)
The required operations to acti-
vate applications and connect a
smartphone to the system, and
the registration steps for the
connected services are
explained in this section.
■Subscription
Toyota apps do not require an
activation fee or monthly
recurring fees.
Services requiring a separate
contract can also be used.
*
*: For details, refer to
https://www.toyota.com/
connected-services
or call 1-800-331-4331 in the
United States,
https://www.toyota.ca/connected
or call 1-888-869-6828 in Can-
ada, and
http://www.toyotapr.com/
connected-services
or call 1-877-855-8377 in Puerto
Rico.
■Availability of function
Toyota apps is available in the
contiguous United States,
Washington D.C., Alaska,
Hawaii, the United States Vir-
gin Islands, Puerto Rico, Can-
ada and Mexico.
●Data usage fees may apply while
using Toyota apps. Confirm data
usage fees before using this func-
tion.
●For details regarding operation of
the Toyota apps, refer to
https://www.toyota.com/
connected-services
in the United States,
https://www.toyota.ca/connected
in Canada, and
http://www.toyotapr.com/
connected-services
in Puerto Rico.
●These functions are not available
in some countries or areas. Avail-
ability of functions of the Toyota
apps is dependent on network
reception level.
■Initializing personal data
The personal data used in appli-
cations can be reset. ( P. 6 6 )
The following personal data
can be deleted and returned
to their default settings:
• Downloaded contents
• Radio stations that were listened
to
●Once initialized, the data and set-
tings will be eras ed. Pay much
attention when init ializing the data.
Before using the function
Page 290 of 310
2909-3. Setup
AVALON_AVALON HV_Navi_(U)
9-3.Setup
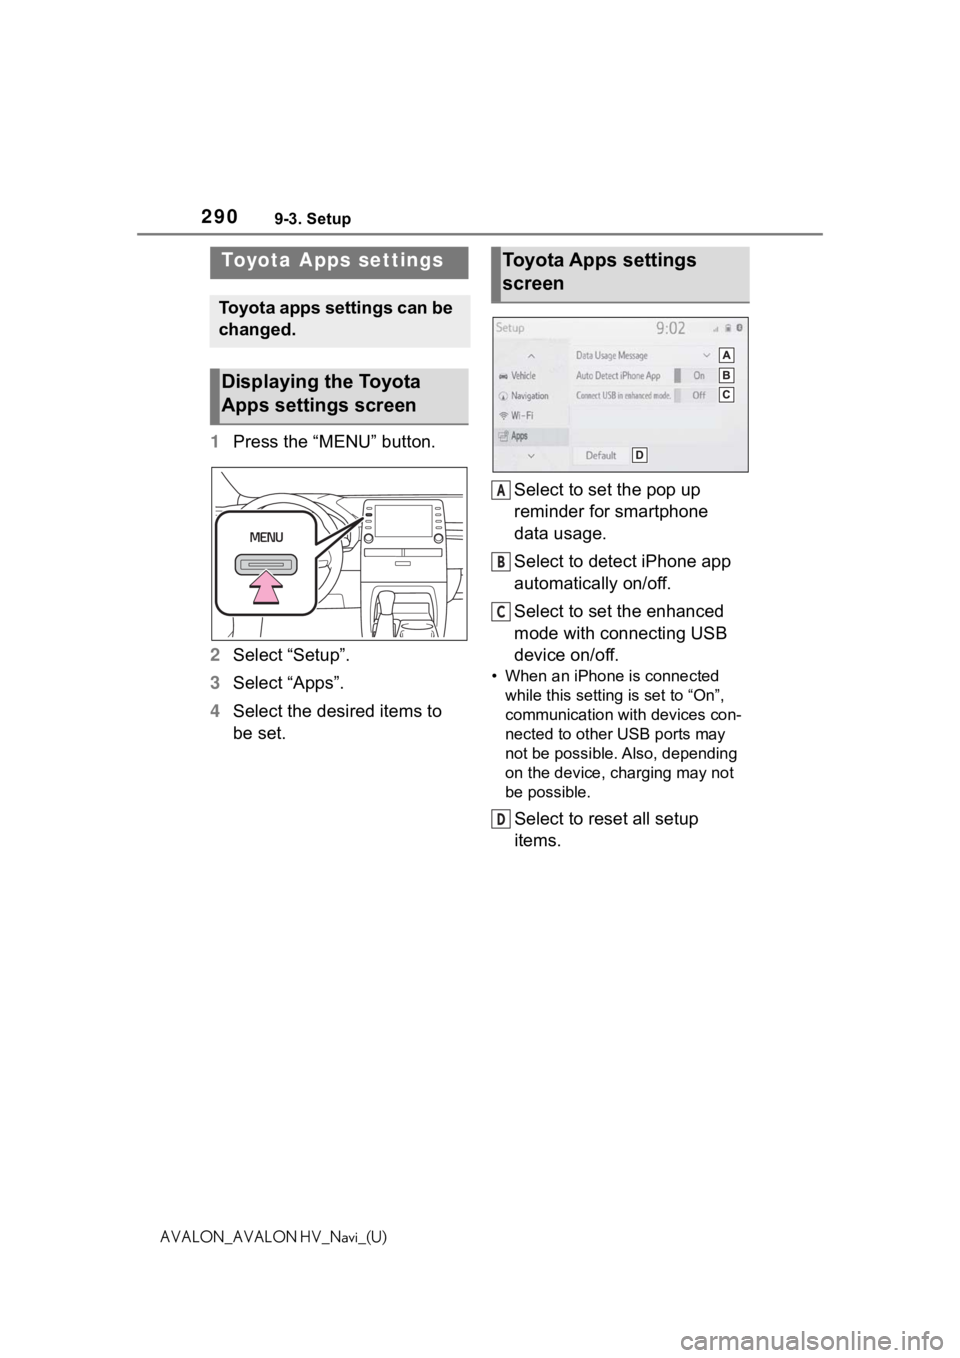
1Press the “MENU” button.
2 Select “Setup”.
3 Select “Apps”.
4 Select the desired items to
be set. Select to set the pop up
reminder for smartphone
data usage.
Select to detect iPhone app
automatically on/off.
Select to set the enhanced
mode with connecting USB
device on/off.
• When an iPhone is connected
while this setting is set to “On”,
communication with devices con-
nected to other USB ports may
not be possible. Also, depending
on the device, charging may not
be possible.
Select to reset all setup
items.
Toyota Apps settings
Toyota apps settings can be
changed.
Displaying the Toyota
Apps settings screen
Toyota Apps settings
screen
A
B
C
D
Page 294 of 310

294 Alphabetical Index
AVALON_AVALON HV_Navi_(U)Menu screen ............................. 14
Menu screen operation .......... 14
Microphone ..................... 168, 243
N
Natural language understanding ............................................... 171
Navigation ................................. 74
Navigation button (Setup screen) ................................................. 18
P
Panoramic view monitor ........ 199 Camera ................................ 227
Camera switch ..................... 201
Checking around the vehicle 205
Checking the front and around the vehicle .......................... 207
Checking the rear and around the vehicle .......................... 213
Checking the sides of the vehicle ........................................... 210
Customize ............................ 223
Difference between the screen and the actual road ............ 229
Display ................................. 201
Display switching.................. 203
Distortion of three-dimensional objects on the screen ......... 231
Driving precautions .............. 199
Magnifying function ...... 222, 234
Parking ................................. 220
Precautions .......................... 224
Things you should know....... 235
When approaching three-dimen- sional objects ..................... 232
Phone ...................................... 240 About the contacts in the contact list ....................................... 244
Phone screen operation ....... 240 Registering/Connecting a Blue-
tooth
® phone ......................242
Some basics .........................241
Troubleshooting ....................269
Voice command system .......244
When selling or disposing of the vehicle ................................245
PHONE button...................12, 240
Phone button (Menu screen) ...14
Phone button (Setup screen) ..18
Phone settings ...... ..................258
Contacts/Call history settings261
Message settings .................267
Notifications/display settings 260
Sounds settings ....................259
Placing a call using the Blue- tooth
® hands-free system....245
By call history .......................246
By contacts list .....................247
By favorites list .....................246
By home screen ...................248
By keypad.............................248
Projection button (Menu screen) .................................................14
PWR VOL knob .................12, 129
R
Radio........................................135 Available HD Radio technology...........................................140
Displaying the radi o ID .........142
How to subscribe to SiriusXM Radio Services ...................141
Presetting a station ...............136
Radio broadcast data system139
Refer to the tabl e below to iden-
tify the problem and take the
suggested corrective action 143
Troubleshooting guide ..........140
Using HD Radio technology .139
Receiving a cal l using the Blue-
tooth
® hands-free system....249