rear view mirror TOYOTA AVALON HYBRID 2020 (in English) User Guide
[x] Cancel search | Manufacturer: TOYOTA, Model Year: 2020, Model line: AVALON HYBRID, Model: TOYOTA AVALON HYBRID 2020Pages: 560, PDF Size: 11.03 MB
Page 159 of 560
1593-3. Adjusting the seats
3
Operation of each component
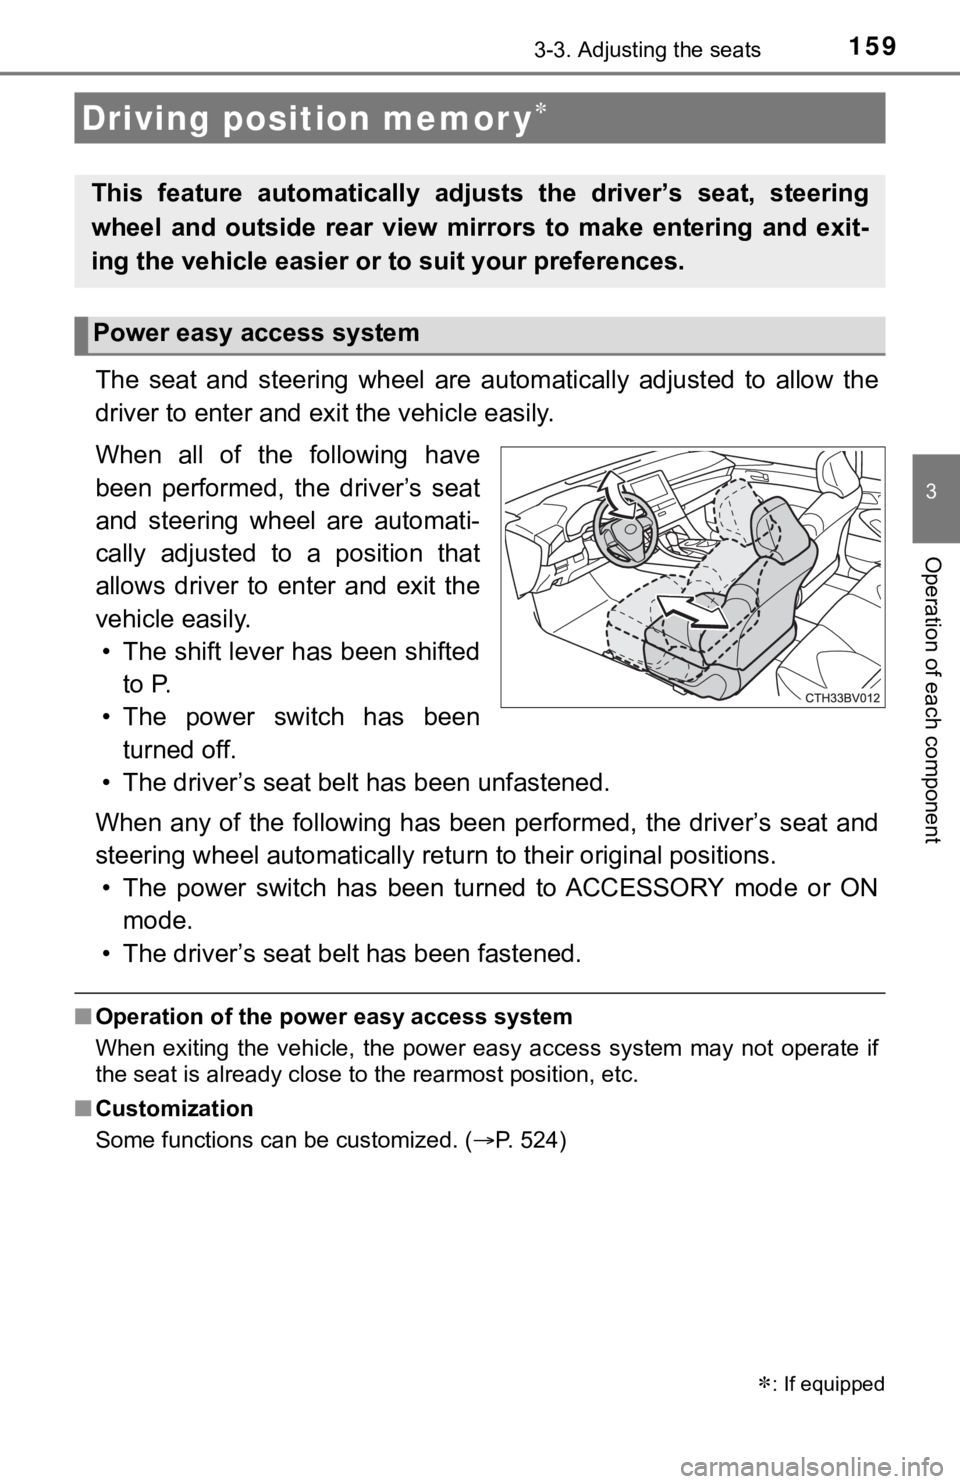
The seat and steering wheel are automatically adjusted to allow the
driver to enter and exi t the vehicle easily.
When all of the following have
been performed, the driver’s seat
and steering wheel are automati-
cally adjusted to a position that
allows driver to enter and exit the
vehicle easily. • The shift lever has been shifted to P.
• The power switch has been turned off.
• The driver’s seat belt has been unfastened.
When any of the following has be en performed, the driver’s seat and
steering wheel automatically ret urn to their original positions.
• The power switch has been turned to ACCESSORY mode or ON mode.
• The driver’s seat belt has been fastened.
■ Operation of the power easy access system
When exiting the vehicle, the power easy access system may not operate if
the seat is already close to the rearmost position, etc.
■ Customization
Some functions can be customized. ( P. 524)
Driving position memor y
: If equipped
This feature automatically adjusts the driver’s seat, steering
wheel and outside rear view mirrors to make entering and exit-
ing the vehicle easier or to suit your preferences.
Power easy access system
Page 160 of 560
1603-3. Adjusting the seats
Your preferred driving position (the position of the driver’s seat, steer-
ing wheel and outside rear view mirrors) can be recorded and re called
by pressing a button.
Two different driving positions can be recorded into memory.
■Recording procedure
Check that the shift lever is in P.
Turn the power switch to ON mode.
Adjust the driver’s seat, steerin g wheel, and outside rear view
mirrors to the desired positions.
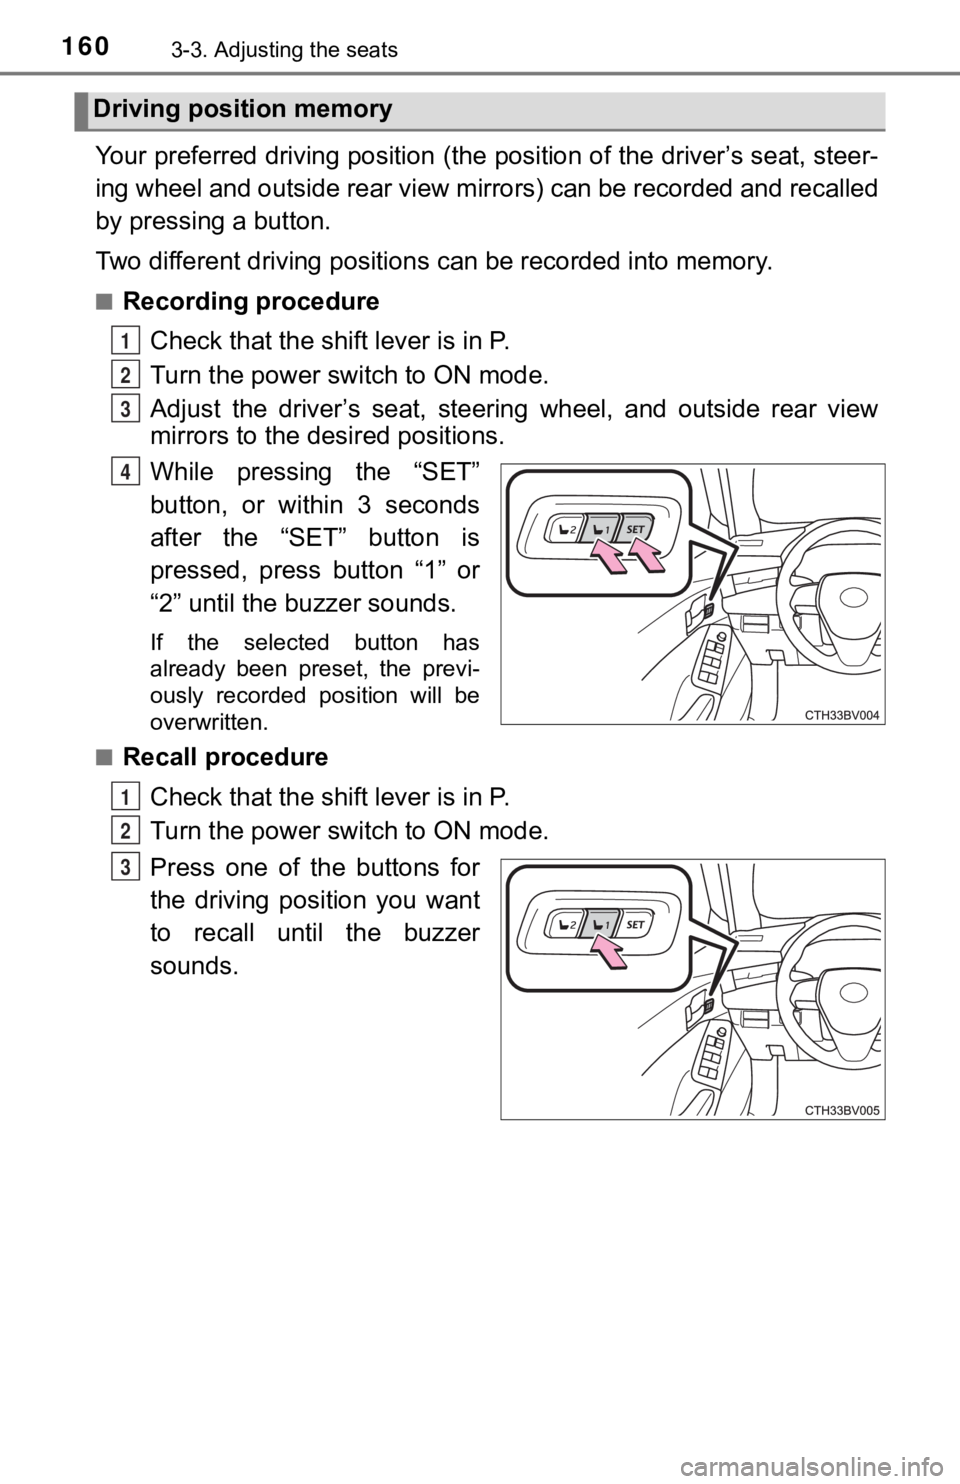
While pressing the “SET”
button, or within 3 seconds
after the “SET” button is
pressed, press button “1” or
“2” until the buzzer sounds.
If the selected button has
already been preset, the previ-
ously recorded position will be
overwritten.
■
Recall procedure
Check that the shift lever is in P.
Turn the power switch to ON mode.
Press one of the buttons for
the driving position you want
to recall until the buzzer
sounds.
Driving position memory
1
2
3
4
1
2
3
Page 162 of 560
1623-3. Adjusting the seats
Each electronic key can be registered to recall your preferred driving
position.
■Registering procedure
Record your driving position to button 1 or 2 before performing the
following:
Carry only the key you want to register, and then close the dri ver’s
door.
If 2 or more keys are in the vehicle, the driving position cann ot be
recorded properly.
Check that the shift lever is in P.
Turn the power switch to ON mode.
Recall the driving position that you want to record.
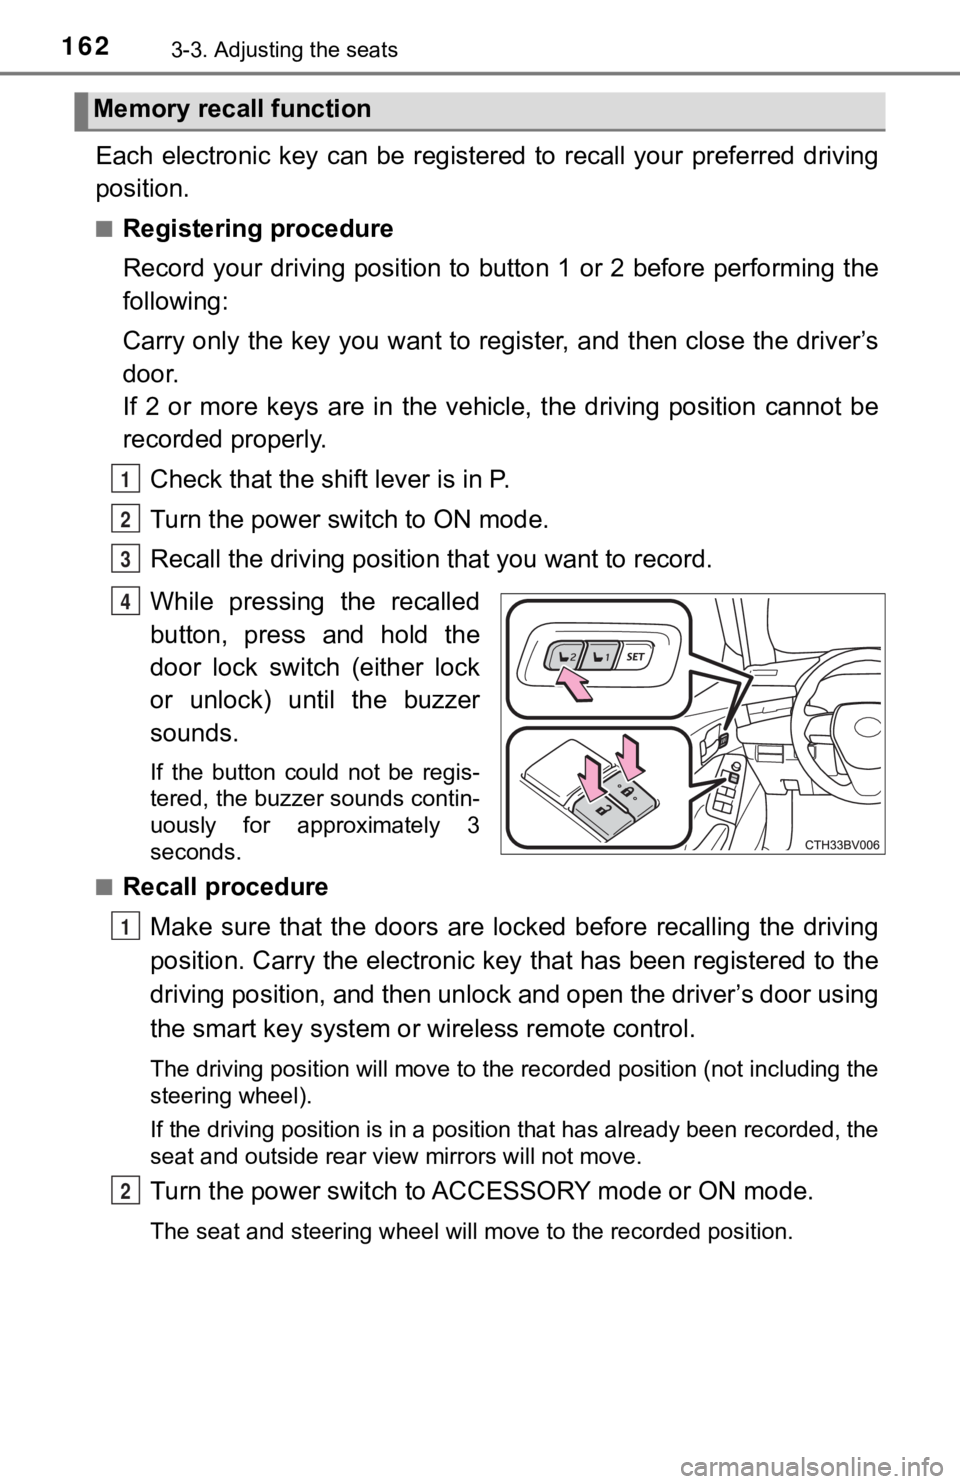
While pressing the recalled
button, press and hold the
door lock switch (either lock
or unlock) until the buzzer
sounds.
If the button could not be regis-
tered, the buzzer sounds contin-
uously for approximately 3
seconds.
■
Recall procedure
Make sure that the doors are locked before recalling the drivin g
position. Carry the electronic ke y that has been registered to the
driving position, and then unlock and open the driver’s door using
the smart key system or wireless remote control.
The driving position will move to the recorded position (not in cluding the
steering wheel).
If the driving position is in a position that has already been recorded, the
seat and outside rear view mirrors will not move.
Turn the power switch to ACCESSORY mode or ON mode.
The seat and steering wheel will move to the recorded position.
Memory recall function
1
2
3
4
1
2
Page 168 of 560
1683-4. Adjusting the steering wheel and mirrors
The height of the rear view mirror can be adjusted to suit your driving
posture.
Adjust the height of the rear view
mirror by moving it up and down.
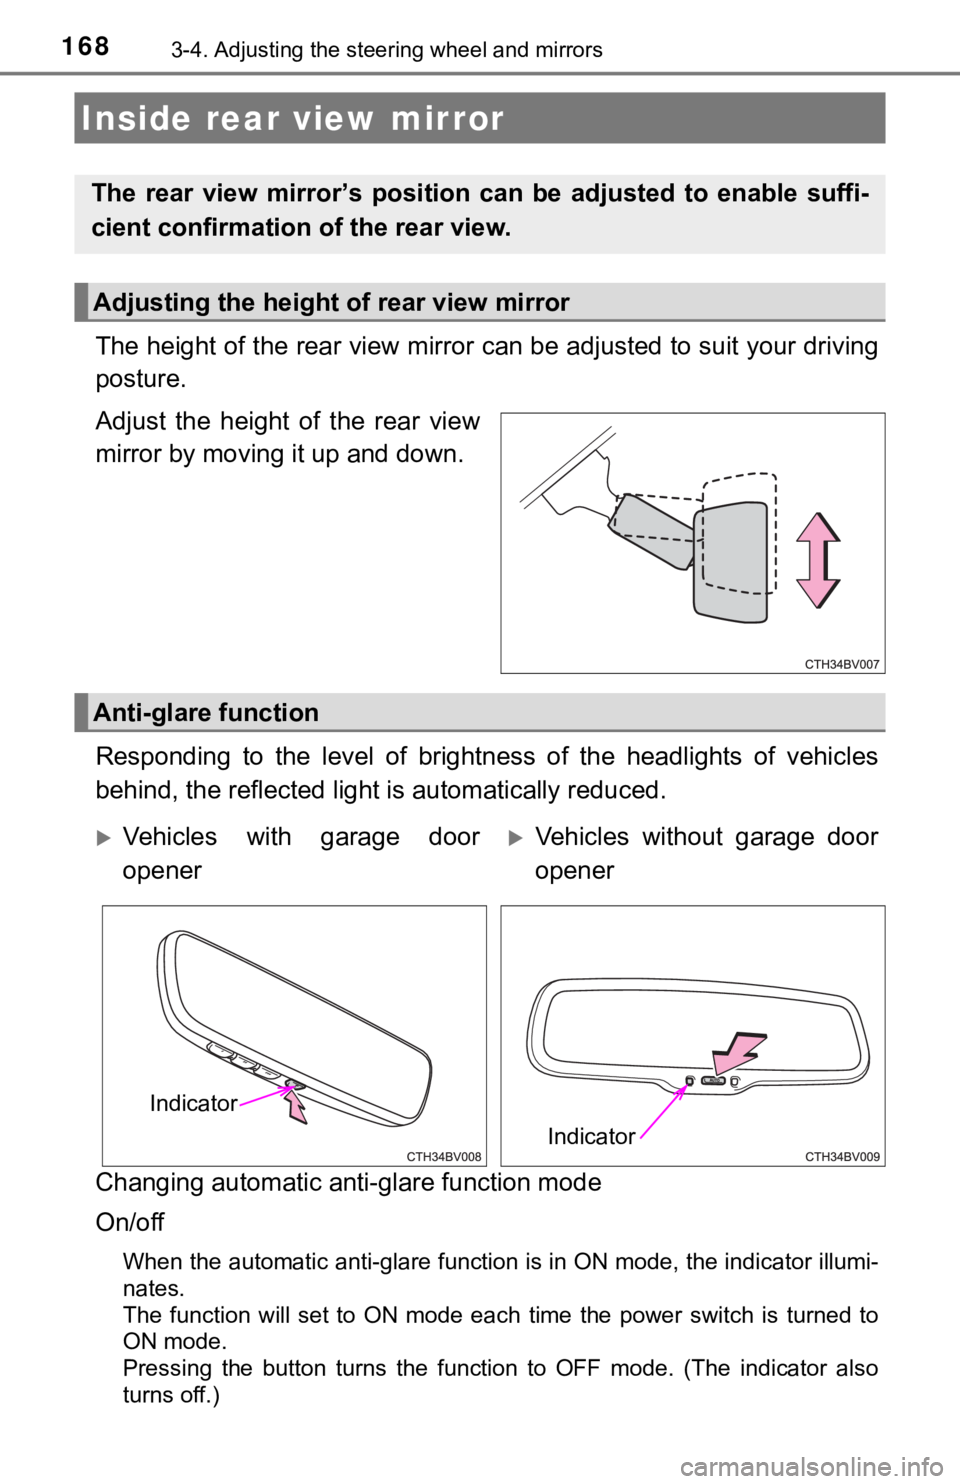
Responding to the level of brightness of the headlights of vehi cles
behind, the reflected light is automatically reduced.
Changing automatic anti- glare function mode
On/off
When the automatic anti-glare function is in ON mode, the indic ator illumi-
nates.
The function will set to ON mode each time the power switch is turned to
ON mode.
Pressing the button turns the function to OFF mode. (The indicator also
turns off.)
Inside rear view mirror
The rear view mirror’s position ca n be adjusted to enable suffi-
cient confirmation of the rear view.
Adjusting the height of rear view mirror
Anti-glare function
Vehicles with garage door
openerVehicles without garage door
opener
Indicator
Indicator
Page 170 of 560
1703-4. Adjusting the steering wheel and mirrors
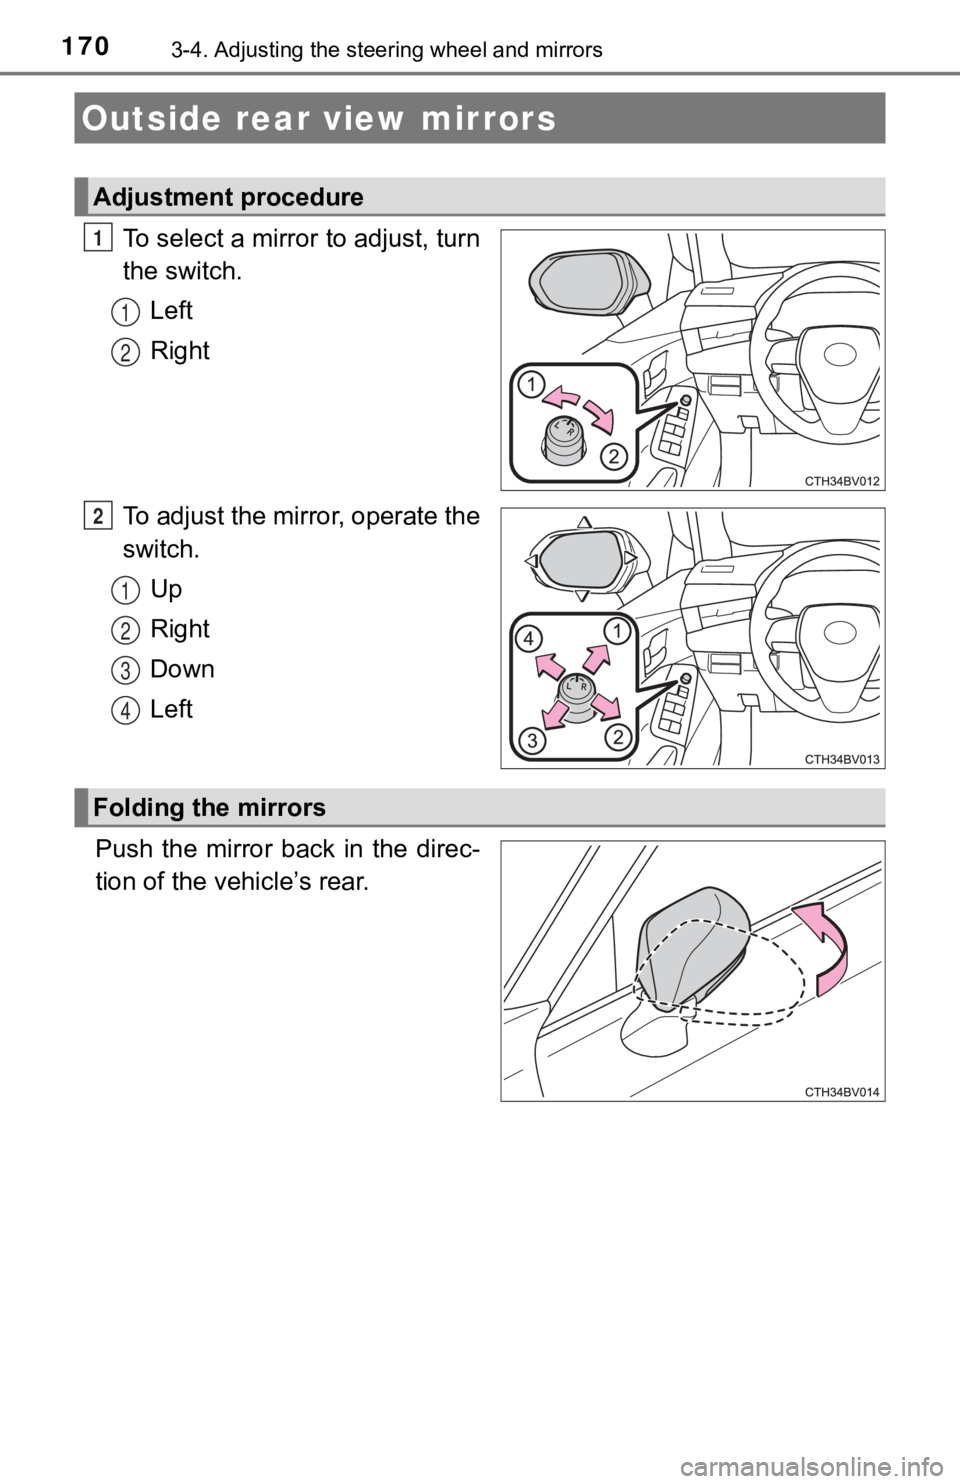
To select a mirror to adjust, turn
the switch.
Left
Right
To adjust the mirror, operate the
switch. Up
Right
Down
Left
Push the mirror back in the direc-
tion of the vehicle’s rear.
Outside rear view mirrors
Adjustment procedure
1
1
2
2
1
2
3
4
Folding the mirrors
Page 171 of 560

1713-4. Adjusting the steering wheel and mirrors
3
Operation of each component
When the mirror select switch is in the “L” or “R” position, th e outside
rear view mirrors will automati cally angle downwards when the v ehicle
is reversing in order to give a better view of the ground.
To disable this function, select neither “L” nor “R” of the mirror select
switch.
■Adjusting the mirror angle when the vehicle is reversing
With the shift lever in R, adjust the mirror angle at a desired posi-
tion.
The adjusted angle will be memori zed and the mirror will automati-
cally tilt to the memorized angle whenever the shift lever is s hifted
to R from next time.
The memorized downward tilt position of the mirror is linked to the nor-
mal position (angle adjusted with the shift lever in other than R). There-
fore, if the normal position is changed after adjustment, the t ilt position
will also change.
When the normal position is changed, readjust the angle in reve rsing.
■Mirror angle can be adjusted when
The power switch is in ACCESSORY or ON mode.
■ When the mirrors are fogged up
The outside rear view mirrors can be cleared using the mirror d efoggers. Turn
on the rear window defogger to turn on the outside rear view mi rror defog-
gers. ( P. 343)
■ Automatic adjustment of the mirr or angle (vehicles with driving position
memory)
A desired mirror face angle can be entered to memory and recall ed automati-
cally by the driving position memory. ( P. 159)
■ Auto anti-glare function (driver’s side only) (if equipped)
When the anti-glare inside rear view mirror is set to automatic mode, the out-
side rear view mirrors will activate in conjunction with the an ti-glare inside
rear view mirror to reduce reflected light. ( P. 168)
■ Customization
Some functions can be customized. ( P. 524)
Linked mirror function when reversing (vehicles with driving
position memory)
Page 172 of 560

1723-4. Adjusting the steering wheel and mirrors
WARNING
■Important points while driving
Observe the following precautions while driving.
Failure to do so may result in loss of control of the vehicle and cause an
accident, resulting in death or serious injury.
● Do not adjust the mirrors while driving.
● Do not drive with the mirrors folded.
● Both the driver and passenger side mirrors must be extended and properly
adjusted before driving.
■ When a mirror is moving
To avoid personal injury and mirror malfunction, be careful not to get your
hand caught by the moving mirror.
■ When the mirror defoggers are operating
Do not touch the rear view mirror surfaces, as they can become very hot
and burn you.
Page 185 of 560

1854-1. Before driving
4
Driving
WARNING
Observe the following precautions.
Failure to do so may result in death or serious injury.
■When starting the vehicle
Always keep your foot on the brake pedal while stopped with the “READY”
indicator is illuminated. This prevents the vehicle from creepi ng.
■ When driving the vehicle
● Do not drive if you are unfamiliar with the location of the brake and accel-
erator pedals to avoid depressing the wrong pedal.
• Accidentally depressing the accelerator pedal instead of the b rake
pedal will result in sudden acceleration that may lead to an accident.
• When backing up, you may twist your body around, leading to a diffi-
culty in operating the pedals. Make sure to operate the pedals properly.
• Make sure to keep a correct driving posture even when moving t he
vehicle only slightly. This allows you to depress the brake and accelera-
tor pedals properly.
• Depress the brake pedal using your right foot. Depressing the brake
pedal using your left foot may delay response in an emergency, result-
ing in an accident.
● The driver should pay extra attention to pedestrians when the v ehicle is
powered only by the electric motor (traction motor). As there i s no engine
noise, the pedestrians may misjudge the vehicle’s movement.
● Do not drive the vehicle over or stop the vehicle near flammable materials.
The exhaust system and exhaust gases can be extremely hot. Thes e hot
parts may cause a fire if there is any flammable material nearby.
● During normal driving, do not turn off the hybrid system. Turni ng the hybrid
system off while driving will not cause loss of steering or braking control,
however, power assist to the steering will be lost. This will m ake it more
difficult to steer smoothly, so you should pull over and stop t he vehicle as
soon as it is safe to do so.
In the event of an emergency, such as if it becomes impossible to stop the
vehicle in the normal way: P. 447
● Use engine braking (downshift) to maintain a safe speed when driving
down a steep hill.
Using the brakes continuously may cause the brakes to overheat and lose
effectiveness. ( P. 206)
● Do not adjust the display, the positions of the steering wheel, the seat, or
the inside or outside rear view mirrors while driving.
Doing so may result in a loss of vehicle control.
● Always check that all passengers’ arms, heads or other parts of their body
are not outside the vehicle.
Page 240 of 560

2404-5. Using the driving support systems
WARNING
●Do not subject the camera sensor to a strong impact.
● Do not change the installation position or direction of the cam era sensor or
remove it.
● Do not disassemble the camera sensor.
● Do not modify any components of the vehicle around the camera s ensor
(inside rear view mirror, etc.) or ceiling.
● Do not attach any accessories that may obstruct the camera sens or to the
hood, front grille or front bumper. Contact your Toyota dealer for details.
● If a surfboard or other long object is to be mounted on the roo f, make sure
that it will not obstruct the camera sensor.
● Do not modify the headlights or other lights.
Page 251 of 560

2514-5. Using the driving support systems
4
Driving
●Some pedestrians such as the following may not be detected by t he radar
sensor and camera sensor, preventing the system from operating properly:
• Pedestrians shorter than approximately 3.2 ft. (1 m) or taller than approx-
imately 6.5 ft. (2 m)
• Pedestrians wearing oversized clothing (a rain coat, long skir t, etc.), mak-
ing their silhouette obscure
• Pedestrians who are carrying large baggage, holding an umbrell a, etc.,
hiding part of their body
• Pedestrians who are bending forward or squatting
• Pedestrians who are pushing a stroller, wheelchair, bicycle or other vehi-
cle
• Groups of pedestrians which are close together
• Pedestrians who are wearing white and look extremely bright
• Pedestrians in the dark, such as at night or while in a tunnel
• Pedestrians whose clothing appears to be nearly the same color or
brightness as their surroundings
• Pedestrians near walls, fences, guardrails, or large objects
• Pedestrians who are on a metal object (manhole cover, steel plate, etc.) on the road
• Pedestrians who are walking fast
• Pedestrians who are changing speed abruptly
• Pedestrians running out from beh ind a vehicle or a large object
• Pedestrians who are extremely close to the side of the vehicle (outside
rear view mirror, etc.)
■ If the PCS warning light flashes or illuminates and a warning m essage is
displayed on the multi-information display
The pre-collision system may be temporarily unavailable or there may be a
malfunction in the system.
● In the following situations, the warning light will turn off, t he message will
disappear and the system will become operational when normal op erating
conditions return:
• When the radar sensor or camera sensor or the area around eith er sen-
sor is hot, such as in the sun
• When the radar sensor or camera sensor or the area around eith er sen-
sor is cold, such as in an extremely cold environment
• When a front sensor is dirty or covered with snow, etc.
• When the part of the windshield in front of the camera sensor is fogged
up or covered with condensation or ice
(Defogging the windshield:
P. 343)
• If the camera sensor is obstructed, such as when the hood is open or a sticker is attached to the windshield near the camera sensor
● If the PCS warning light continues to flash or remains illuminated or the
warning message does not disappear even though the vehicle has returned
to normal, the system may be malfunctioning. Have the vehicle inspected by
your Toyota dealer immediately.