change time TOYOTA AVENSIS 2015 User Guide
[x] Cancel search | Manufacturer: TOYOTA, Model Year: 2015, Model line: AVENSIS, Model: TOYOTA AVENSIS 2015Pages: 648, PDF Size: 39.64 MB
Page 228 of 648
2284-2. Driving procedures
AVENSIS_OM_OM20C20E_(EE)
Turn signal lever
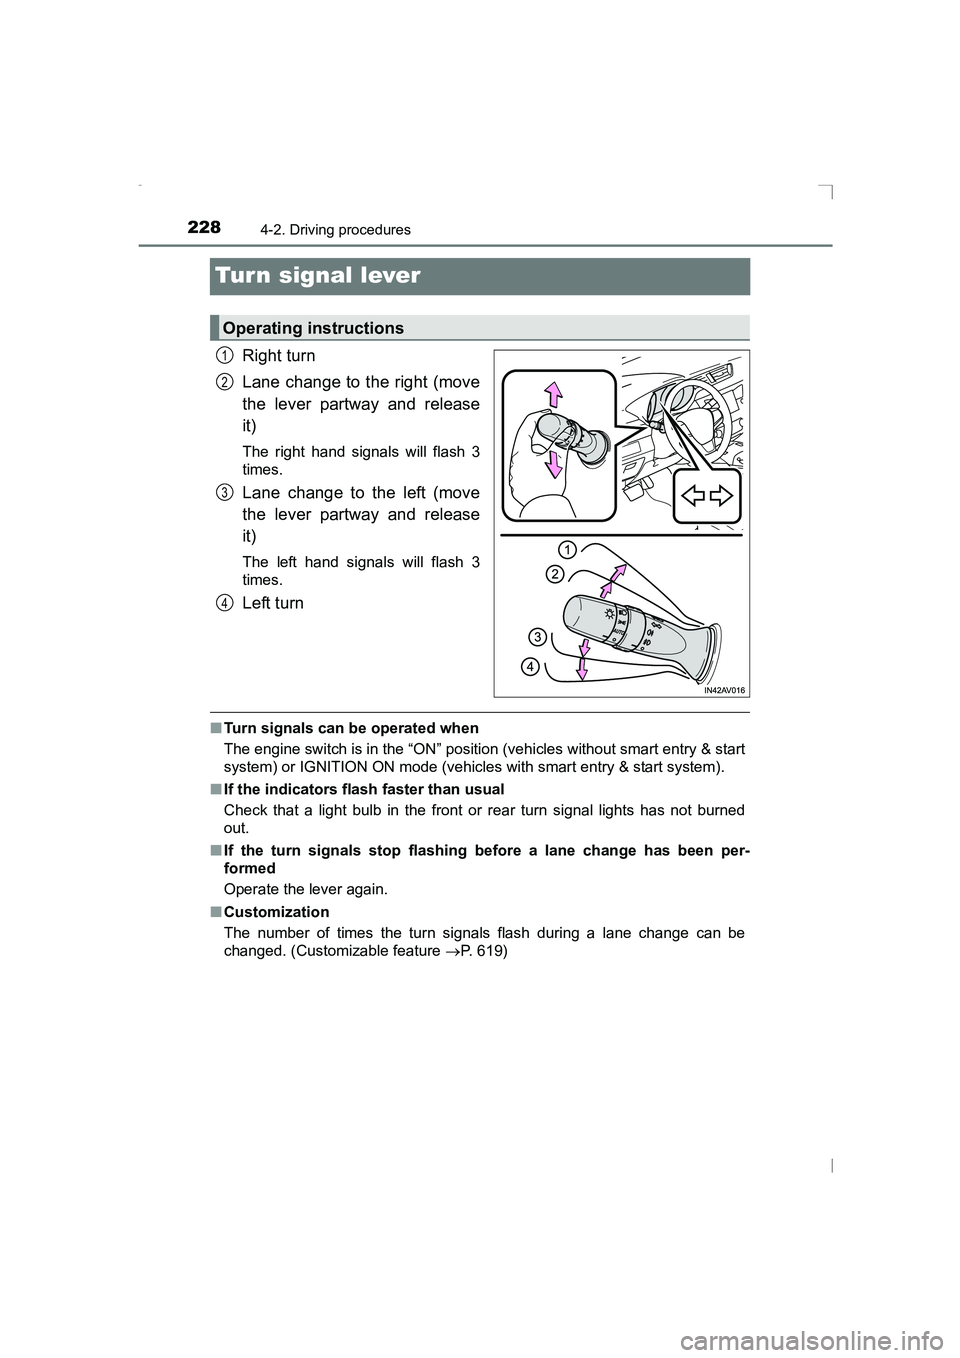
Right turn
Lane change to the right (move
the lever partway and release
it)
The right hand signals will flash 3
times.
Lane change to the left (move
the lever partway and release
it)
The left hand signals will flash 3
times.
Left turn
■Turn signals can be operated when
The engine switch is in the “ON” position (vehicles without smart entry & start
system) or IGNITION ON mode (vehicles with smart entry & start system).
■ If the indicators flash faster than usual
Check that a light bulb in the front or rear turn signal lights has not burned
out.
■ If the turn signals stop flashing before a lane change has been per-
formed
Operate the lever again.
■ Customization
The number of times the turn signals flash during a lane change can be
changed. (Customizable feature →P. 619)
Operating instructions
1
2
3
4
AVENSIS_OM_OM20C20E_(EE).book Page 228 Thursday, January 29, 2015 1:47 PM
Page 230 of 648
2304-2. Driving procedures
AVENSIS_OM_OM20C20E_(EE)■
Automatic apply function (vehicles with manual transmission)
To prevent the parking brake from being left accidentally unapplied, the park-
ing brake will be applied automatically under the following conditions:
●The vehicle is stopped.
● The engine switch is turned to the “LOCK” position (vehicles without smart
entry & start system) or off (vehicles with smart entry & start system).
■ Automatic apply mode (vehicles with manual transmission)
Automatic apply function (mode) is initially set to ON, but it can be switched
between ON and OFF as the situation demands.
●Switching automatic apply mode from ON to OFF:
Stop the vehicle in a horizontal condition and switch the engine switch to
the “ON” position (vehicles without smart entry & start system) or IGNI-
TION ON mode (vehicles with smart entry & start system).
● Switching automatic apply mode from OFF to ON:
Stop the vehicle in a horizontal condition and switch the engine switch to
the “ON” position (vehicles without smart entry & start system) or IGNI-
TION ON mode (vehicles with smart entry & start system).
Push and hold the parking brake switch for 5 seconds or more
The Auto P-off indicator light will go off.
● Temporary cancelation of the automatic apply function is available for spe-
cific circumstances (car wash, towing vehicle, etc.).
To temporarily cancel the automatic apply function of the parking brake, pull
the parking brake switch at the same time as you are switching off the vehi-
cle.
When switch is being pulled for 5 seconds or more, automatic apply mode
changes from ON to OFF.
■ Parking brake operation sound
When the parking brake operates, a motor sound (whirring sound) may be
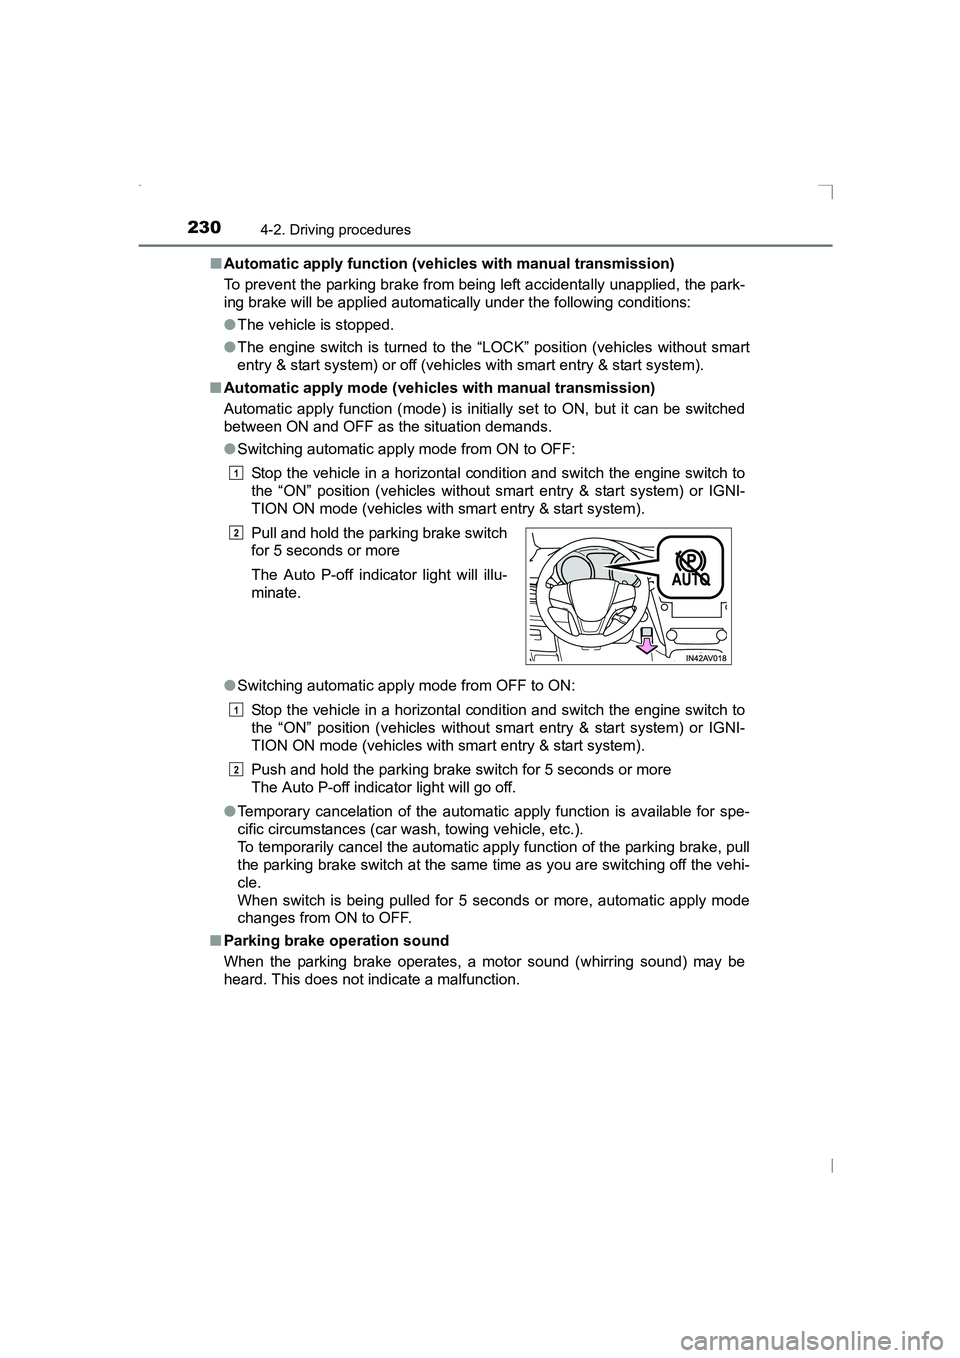
heard. This does not indicate a malfunction. Pull and hold the parking brake switch
for 5 seconds or more
The Auto P-off indicator light will illu-
minate.
1
2
1
2
AVENSIS_OM_OM20C20E_(EE).book Page 230 Thursday, January 29,
2015 1:47 PM
Page 244 of 648
2444-3. Operating the lights and wipers
AVENSIS_OM_OM20C20E_(EE)
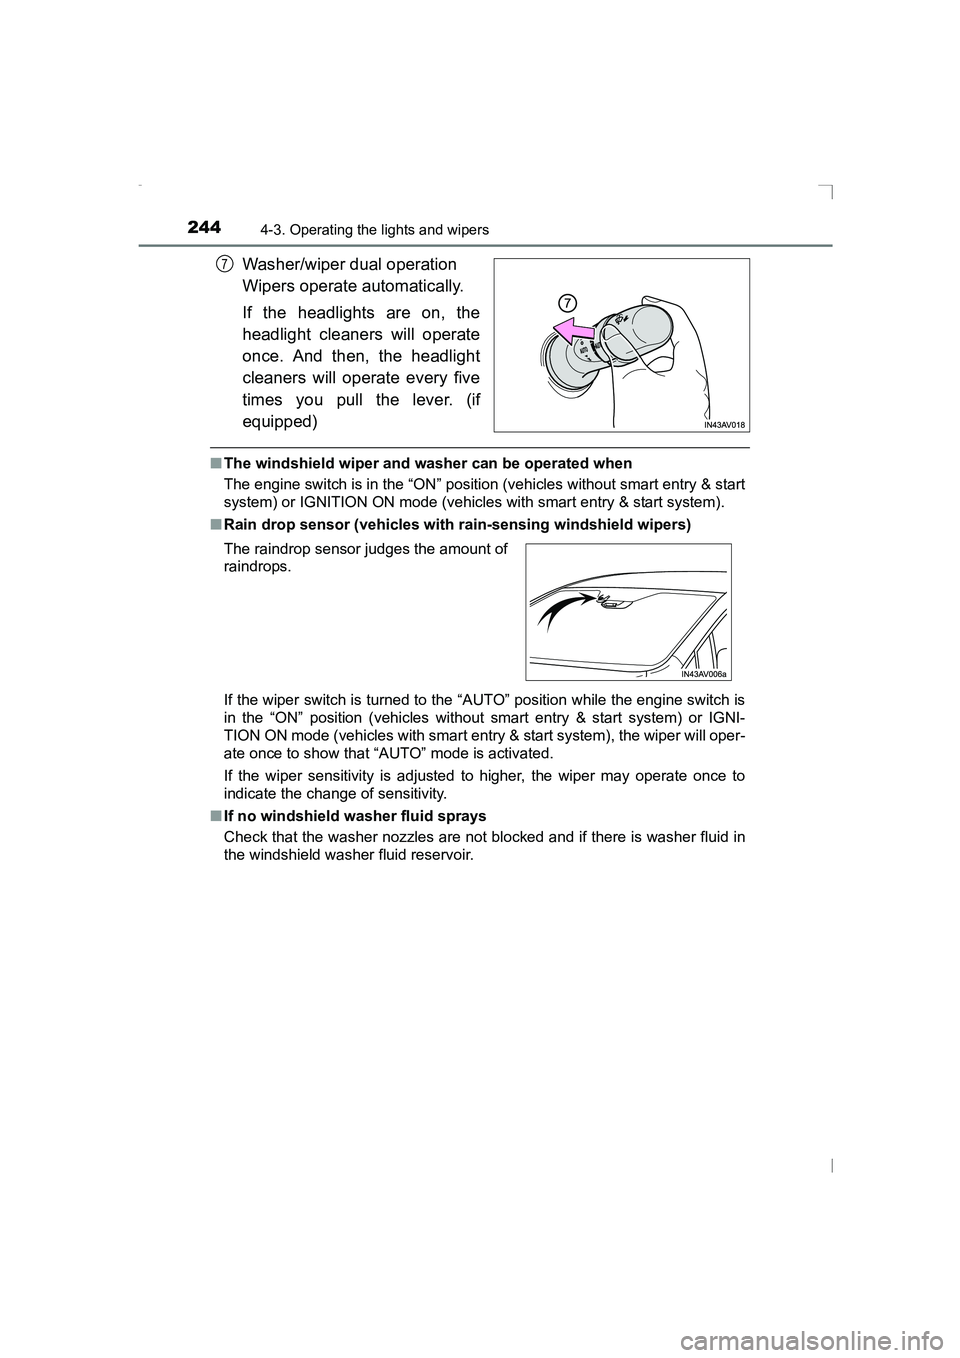
Washer/wiper dual operation
Wipers operate automatically.
If the headlights are on, the
headlight cleaners will operate
once. And then, the headlight
cleaners will operate every five
times you pull the lever. (if
equipped)
■The windshield wiper and washer can be operated when
The engine switch is in the “ON” position (vehicles without smart entry & start
system) or IGNITION ON mode (vehicles with smart entry & start system).
■ Rain drop sensor (vehicles with rain-sensing windshield wipers)
If the wiper switch is turned to the “AUTO” position while the engine switch is
in the “ON” position (vehicles without smart entry & start system) or IGNI-
TION ON mode (vehicles with smart entry & start system), the wiper will oper-
ate once to show that “AUTO” mode is activated.
If the wiper sensitivity is adjusted to higher, the wiper may operate once to
indicate the change of sensitivity.
■ If no windshield washer fluid sprays
Check that the washer nozzles are not blocked and if there is washer fluid in
the windshield washer fluid reservoir.
7
The raindrop sensor judges the amount of
raindrops.
AVENSIS_OM_OM20C20E_(EE).book Page 244 Thursday, January 29, 2015 1:47 PM
Page 254 of 648
2544-5. Toyota Safety Sense
AVENSIS_OM_OM20C20E_(EE)NOTICE
●
Do not attach window tinting to the windshield.
● If the part of the windshield in front of the front sensor is fogged up or cov-
ered with condensation or ice, use the windshield defogger to remove the
fog, condensation or ice.
● Keep the windshield clean at all times.
The pre-crash safety system may not function properly if the windshield is
dirty or covered with an oily film, water droplets, snow, etc.
If the inner side of the windshield where the front sensor is installed is dirty,
do not attempt to remove the front sensor. Contact any authorized Toyota
dealer or repairer, or another dul y qualified and equipped professional.
● If the windshield needs to be replaced, contact any authorized Toyota
dealer or repairer, or another dul y qualified and equipped professional.
● Do not install an antenna in front of the sensor.
● Do not spill liquid onto the sensor.
● Do not allow bright lights to shine into the sensor.
● Do not damage or let the lenses of the front sensor get dirty.
When cleaning the inner side of the windshield, do not let glass cleaner
contact the lenses. Also, do not touch the lenses.
For proper care of the lenses of the front sensor, contact any authorized
Toyota dealer or repairer, or another duly qualified and equipped profes-
sional.
● Do not change the installation position or direction of the sensor or remove
it. The direction of the sensor is precisely adjusted.
● Do not subject the sensor to strong impact or disassemble it.
● Do not install an electronic device or device that emits strong electric
waves near the front sensor.
● Do not place reflective objects on top of the instrument panel.
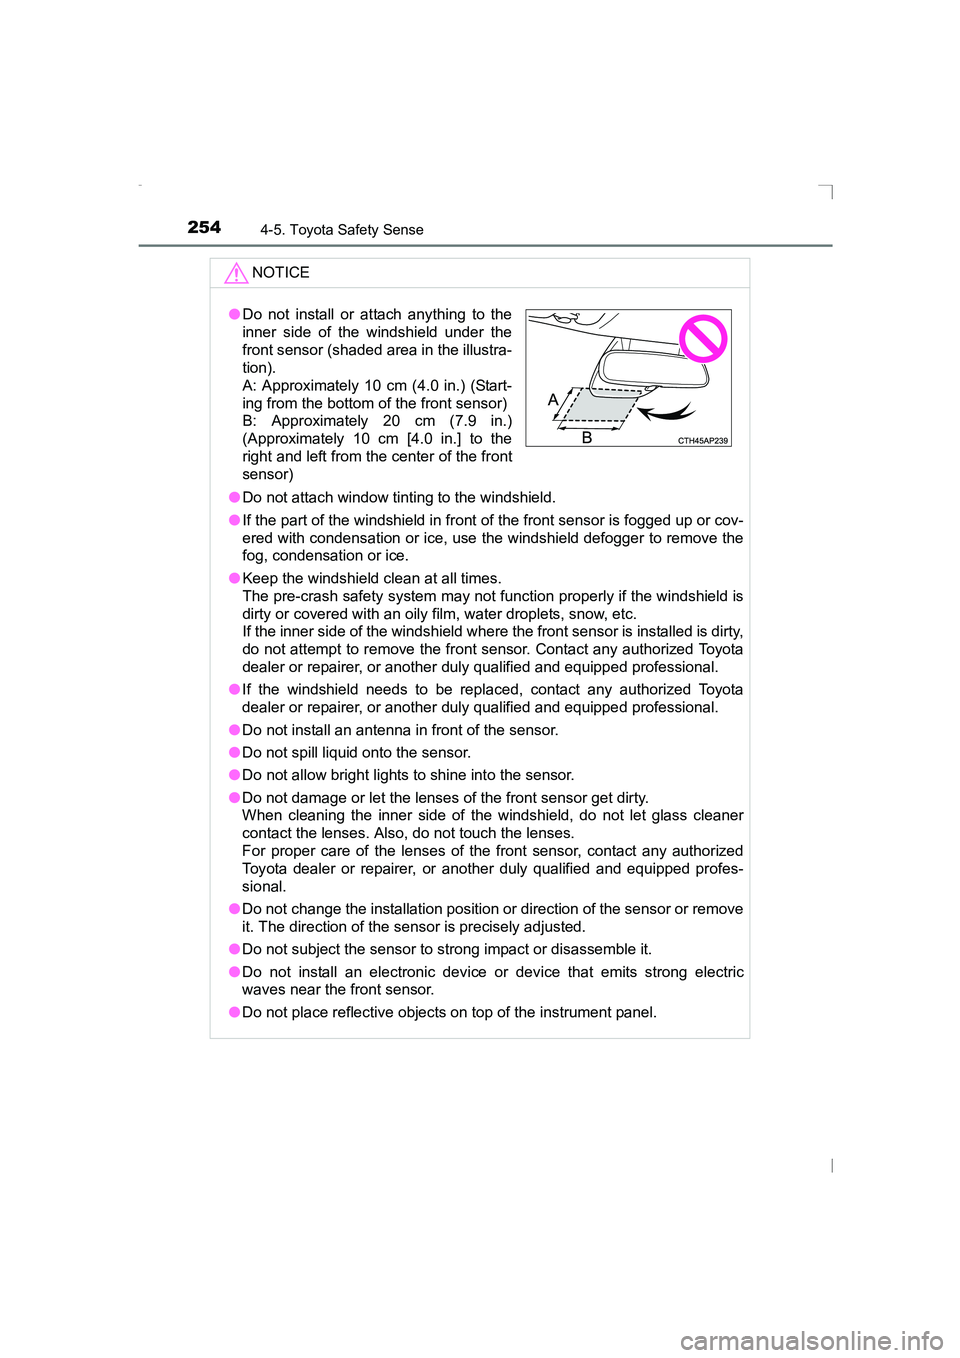
●Do not install or attach anything to the
inner side of the windshield under the
front sensor (shaded area in the illustra-
tion).
A: Approximately 10 cm (4.0 in.) (Start-
ing from the bottom of the front sensor)
B: Approximately 20 cm (7.9 in.)
(Approximately 10 cm [4.0 in.] to the
right and left from the center of the front
sensor)
sec_04-05.fm Page 254 Friday, February 20, 2015 3:43 PM
Page 256 of 648
2564-5. Toyota Safety Sense
AVENSIS_OM_OM20C20E_(EE)
◆Pre-crash braking
When the system determines that the possibility of a frontal colli-
sion with a vehicle is high, the system warns the driver. If the sys-
tem determines that the possibility of a collision is extremely high,
the brakes are automatically applied to help avoid the collision or
reduce the collision speed.
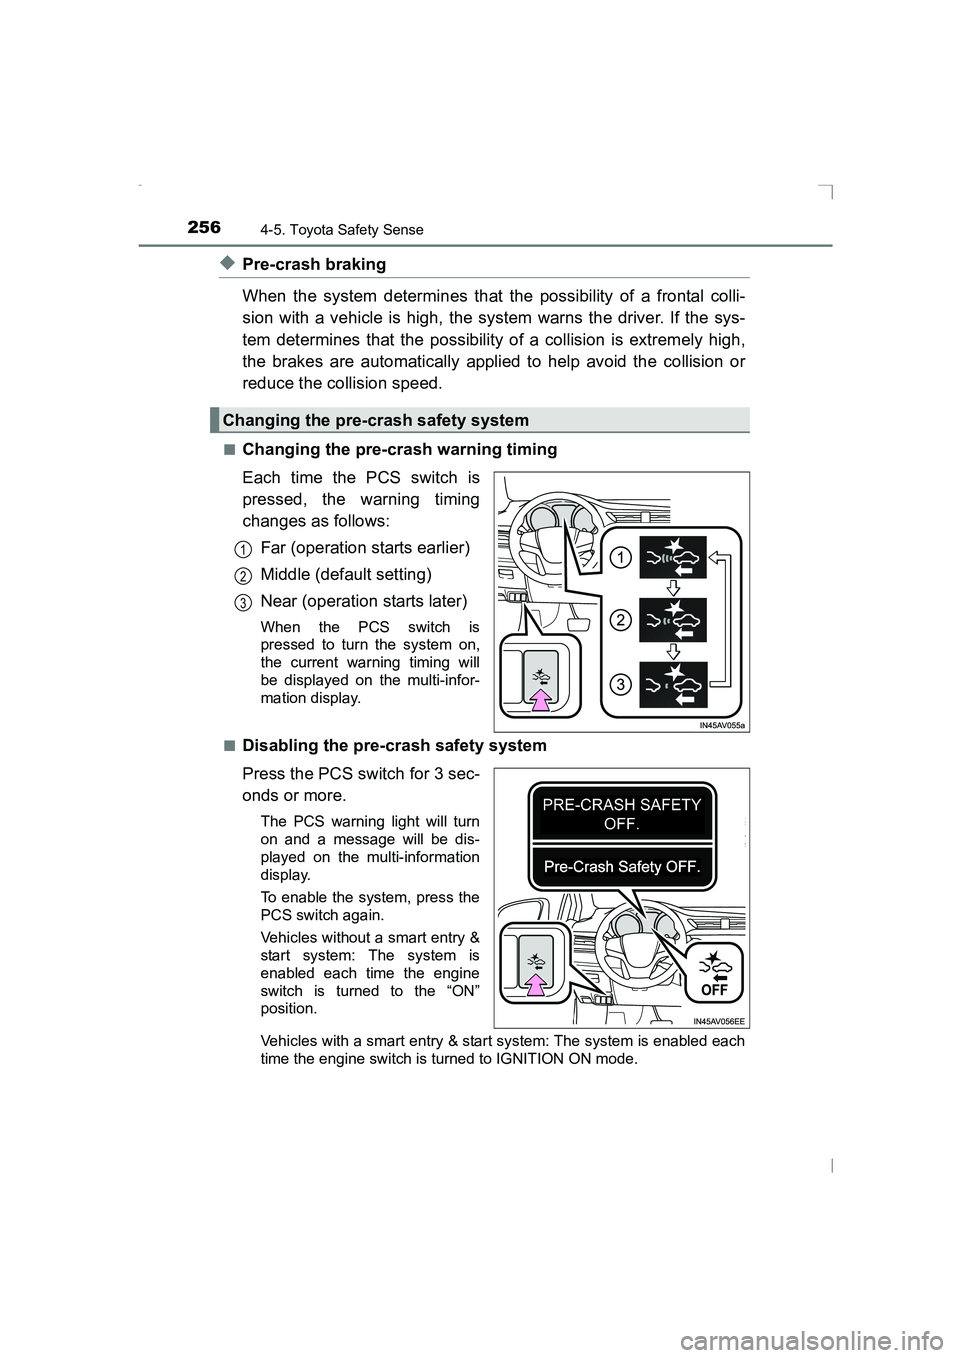
■Changing the pre-crash warning timing
Each time the PCS switch is
pressed, the warning timing
changes as follows:Far (operation starts earlier)
Middle (default setting)
Near (operation starts later)
When the PCS switch is
pressed to turn the system on,
the current warning timing will
be displayed on the multi-infor-
mation display.
■
Disabling the pre-crash safety system
Press the PCS switch for 3 sec-
onds or more.
The PCS warning light will turn
on and a message will be dis-
played on the multi-information
display.
To enable the system, press the
PCS switch again.
Vehicles without a smart entry &
start system: The system is
enabled each time the engine
switch is turned to the “ON”
position.
Vehicles with a smart entry & start system: The system is enabled each
time the engine switch is turned to IGNITION ON mode.
Changing the pre-crash safety system
1
2
3
AVENSIS_OM_OM20C20E_(EE).book Page 256 Thursday, January 29, 2015 1:47 PM
Page 266 of 648
2664-5. Toyota Safety Sense
AVENSIS_OM_OM20C20E_(EE)■
Conditions in which the func tion may not operate correctly
In the following situations, the front sensor may be unable to recognize lane
markers causing the lane departure warning function to operate incorrectly.
However, this does not indicate a malfunction.
● When driving through an area, such as a tollbooth, a crossing or before a
ticket checkpoint
● When driving on a sharp curve
● When lane markers are extremel y narrow or extremely wide
● When the vehicle leans to one side an unusual amount due to a heavy load
or improper tire inflation pressure
● When the following distance between your vehicle and the vehicle ahead is
extremely short
● When the lane markers are yellow (These may be more difficult for the sys-
tem to recognize compared to white markers.)
● When the lane markers are broken, Botts’ dots (raised pavement markers)
or stones
● When the lane markers are on a curb etc.
● When lane markers are obscured or part ially obscured by sand, dirt, etc.
● When there are shadows on the road running parallel with lane markers, or
if a shadow covers the lane markers
● When driving on a particularly bright road surface, such as concrete
● When driving on a road surface that is bright due to reflected light
● When driving in a location where the light level changes rapidly, such as the
entrance to or exit from a tunnel
● When sunlight or the headlights of oncoming vehicles are shining directly
into the camera lens
● When driving on roads that are branching or merging
● When driving on a road surface that is wet due to rain, previous rainfall,
standing water, etc.
● When the vehicle experiences strong up-and-down motion such as when
driving on an extremely rough road or on a seam in the pavement
● When headlight brightness at nighttime is reduced due to dirt on the lenses,
or when the headlights are misaligned
● When driving on winding roads or roads that are uneven
● When driving on rough or unpaved roads
● When the windshield is dirty, or if raindrops, condensation or ice are adher-
ing to the windshield.
● When the heater is blowing to the feet, the upper part of the windshield may
get fogged up and have a negative effect.
● When cleaning the inside of the windshi eld, touching the lens or getting
glass cleaner on the lens may have a negative effect.
AVENSIS_OM_OM20C20E_(EE).book Page 266 Thursday, January 29, 2015 1:47 PM
Page 278 of 648
2784-5. Toyota Safety Sense
AVENSIS_OM_OM20C20E_(EE)
In the following situations, the RSA system alerts the driver using a
warning display.
●When the vehicle speed exceeds the speed warning threshold
applied to the speed limit of the sign displayed on the multi-informa-
tion display, the sign color becomes inverted.
● If it is detected that your vehicle is overtaking when a no overtaking
sign is displayed on the multi-information display, the sign flashes.
■Automatic turn-off of RSA sign display
One or more signs automatically turn off in the following situations.
●A new sign is not recognized for a certain distance.
● The road changes due to a left or right turn, etc.
■ Conditions in which the function may not operate or detect correctly
In the following situations, RSA does not operate normally and may not rec-
ognize signs, display the incorrect sign, etc. However, this does not indicate a
malfunction.
● The front sensor is misaligned due to a strong impact being applied to the
sensor, etc.
● Dirt, snow, stickers, etc., are on the front windshield near the front sensor.
● In inclement weather such as heavy rain, fog, snow or sand storms
● Light from an oncoming vehicle, the sun, etc., enters the front sensor.
● The sign is small, dirty, faded, tilted or bent, and if an electronic sign, the
contrast is poor.
● All or part of the sign is hidden by the leaves of a tree, a pole, etc.
● The sign is only visible to the front sensor for a short amount of time.
● The driving scene (turning, lane change, etc.) is judged incorrectly.
● Even if it is a sign not appropriate for the currently traveled lane, such a sign
exists directly after a freeway branches, or in an adjacent lane just before
merging.
● Stickers are attached to the rear of the preceding vehicle.
● A sign resembling a system compatible sign is recognized.
● The vehicle is driven in a country with a different direction of traffic.
● Side road speed signs may be detected and displayed (if positioned in sight
of the front sensor) while the vehicle is traveling on the main road.
● Roundabout exit road speed signs may be detected and displayed (if posi-
tioned in sight of the front sensor) while traveling on a roundabout.
● The speed information displayed on the meter and that displayed on the
Navigation system (if equipped) may be different due to the Navigation sys-
tem using map data.
Warning display
AVENSIS_OM_OM20C20E_(EE).book Page 278 Thursday, January 29, 2015 1:47 PM
Page 281 of 648
2814-6. Using the driving support systems
4
Driving
AVENSIS_OM_OM20C20E_(EE)
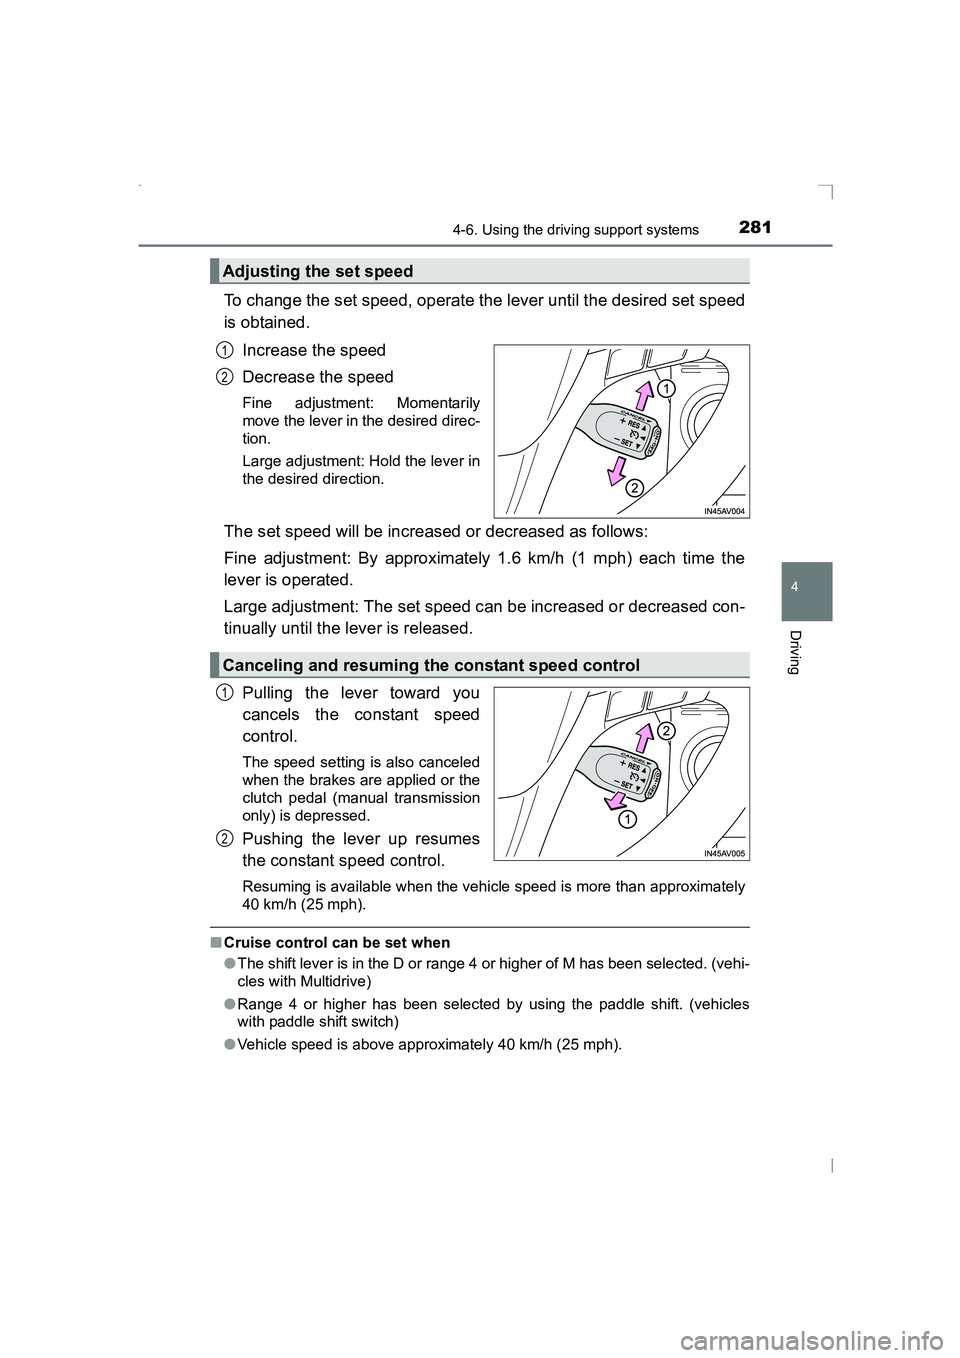
To change the set speed, operate the lever until the desired set speed
is obtained.Increase the speed
Decrease the speed
Fine adjustment: Momentarily
move the lever in the desired direc-
tion.
Large adjustment: Hold the lever in
the desired direction.
The set speed will be increased or decreased as follows:
Fine adjustment: By approximately 1.6 km/h (1 mph) each time the
lever is operated.
Large adjustment: The set speed can be increased or decreased con-
tinually until the lever is released.
Pulling the lever toward you
cancels the constant speed
control.
The speed setting is also canceled
when the brakes are applied or the
clutch pedal (manual transmission
only) is depressed.
Pushing the lever up resumes
the constant speed control.
Resuming is available when the vehicle speed is more than approximately
40 km/h (25 mph).
■Cruise control can be set when
●The shift lever is in the D or range 4 or higher of M has been selected. (vehi-
cles with Multidrive)
● Range 4 or higher has been selected by using the paddle shift. (vehicles
with paddle shift switch)
● Vehicle speed is above approximately 40 km/h (25 mph).
Adjusting the set speed
1
2
Canceling and resuming the constant speed control
1
2
AVENSIS_OM_OM20C20E_(EE).book Page 281 Thursday, January 29, 2015 1:47 PM
Page 383 of 648
3836-1. Using the air conditioning system and defogger
AVENSIS_OM_OM20C20E_(EE)
6
Interior features
■Adjusting the temperature setting (vehicles without air condi-
tioning system)
Turn the temperature control dial clockwise (warm) or counter-
clockwise (cool).
This system will supply only ambient temperature air if the dial is turned
counterclockwise (cool).
■
Adjusting the temperature setting (vehicles with air condition-
ing system)
Turn the temperature control dial clockwise (warm) or counterclock-
wise
(cool).
If is not pressed, the system will blow ambient temperature
air or heated air.
■
Adjusting the fan speed
Turn the fan speed control dial clockwise (increase) or counter-
clockwise.
Press or to turn the fan off.
■
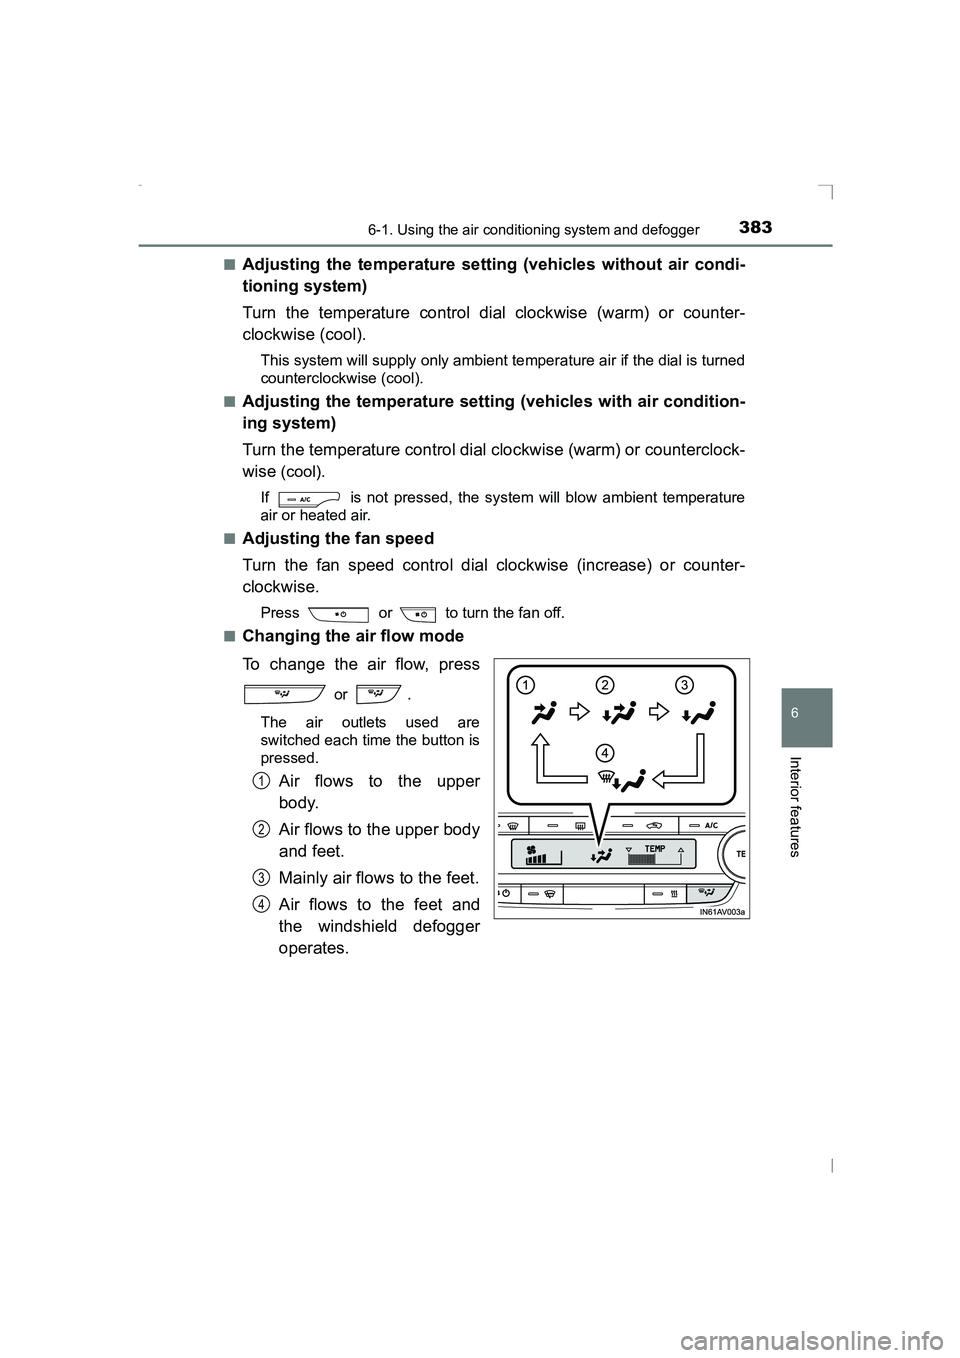
Changing the air flow mode
To change the air flow, press
or .
The air outlets used are
switched each time the button is
pressed.
Air flows to the upper
body.
Air flows to the upper body
and feet.
Mainly air flows to the feet.
Air flows to the feet and
the windshield defogger
operates.1
2
3
4
AVENSIS_OM_OM20C20E_(EE).book Page 383 Thursday, January 29, 2015 1:47 PM
Page 389 of 648
3896-1. Using the air conditioning system and defogger
AVENSIS_OM_OM20C20E_(EE)
6
Interior features
■Adjusting the temperature setting
Turning to the right increases the temperature and turning
the knob to the left decreases the temperature.
The temperature for the driver’s and front passenger’s seats can be set
separately. (→P. 390)
■
Adjusting the fan speed
Press “ ∨” (decrease) or “ ∧” (increase) on .
The fan speed is shown on the display. (7 levels)
Press or to turn the fan off.
■
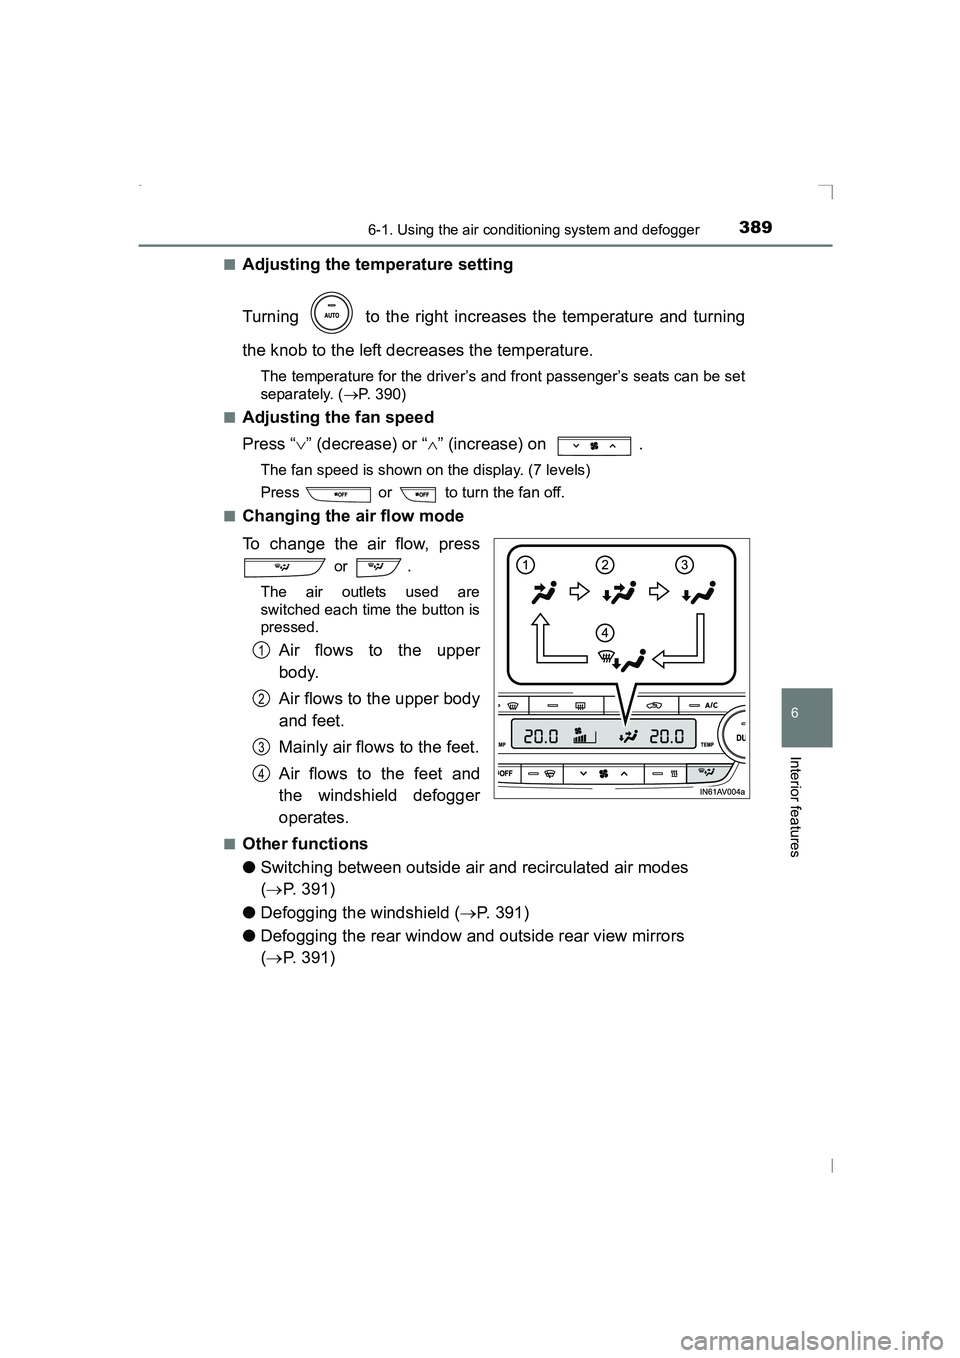
Changing the air flow mode
To change the air flow, press
or .
The air outlets used are
switched each time the button is
pressed.
Air flows to the upper
body.
Air flows to the upper body
and feet.
Mainly air flows to the feet.
Air flows to the feet and
the windshield defogger
operates.
■Other functions
●Switching between outside air and recirculated air modes
(→ P. 391)
● Defogging the windshield ( →P. 391)
● Defogging the rear window and outside rear view mirrors
(→ P. 391)
1
2
3
4
AVENSIS_OM_OM20C20E_(EE).book Page 389 Thursday, January 29, 2015 1:47 PM