TOYOTA AVENSIS 2017 (in English) Manual PDF
Manufacturer: TOYOTA, Model Year: 2017, Model line: AVENSIS, Model: TOYOTA AVENSIS 2017Pages: 661, PDF Size: 39.92 MB
Page 71 of 661
711-2. Child safety
1
AVENSIS_OM_OM20C66E_(EE)
For safety and security
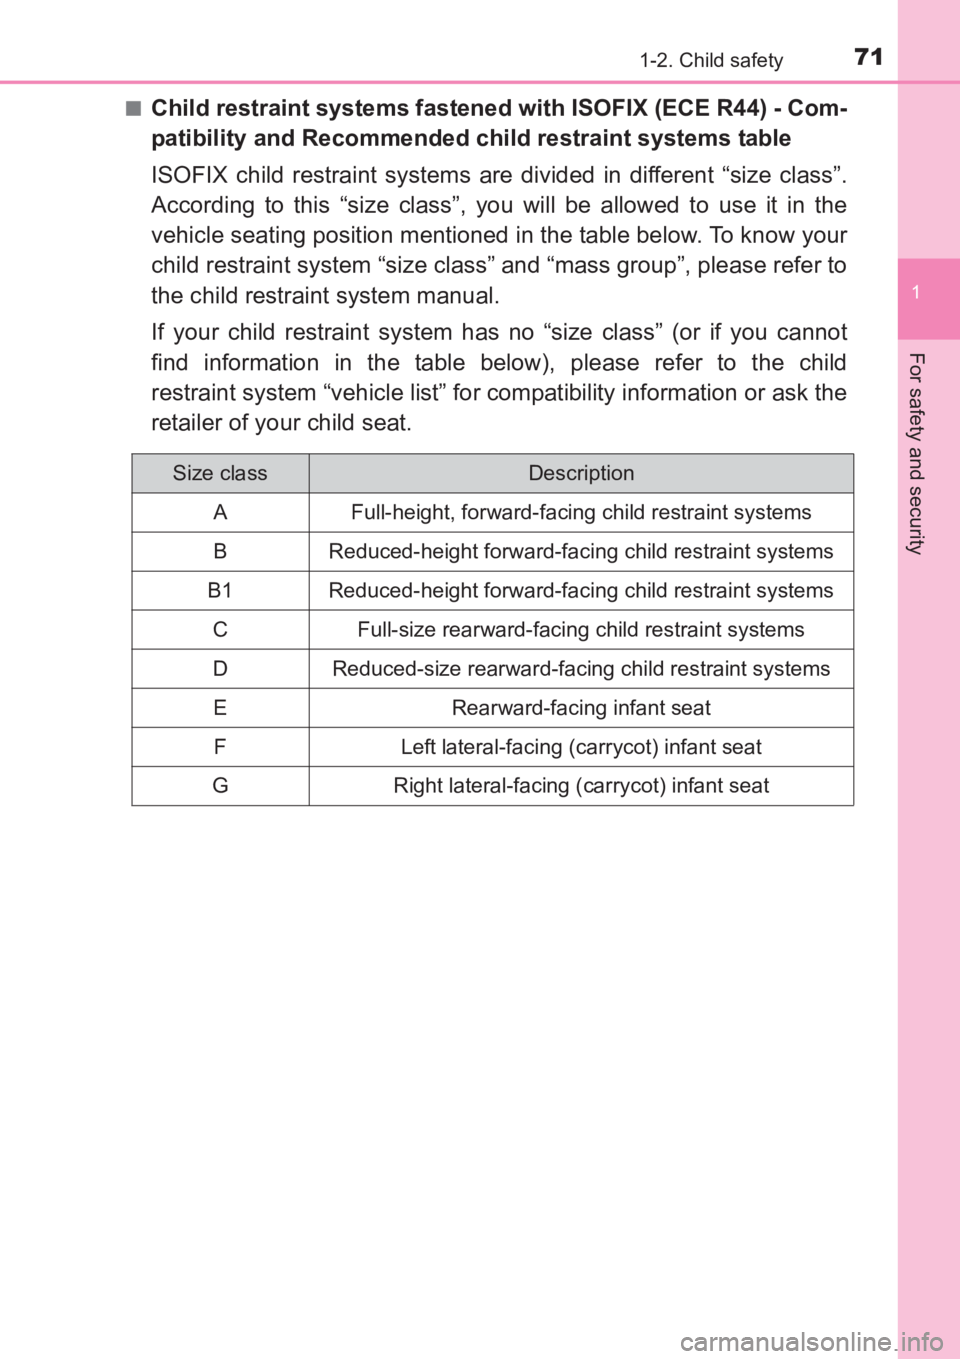
■Child restraint systems fastened with ISOFIX (ECE R44) - Com-
patibility and Recommended child restraint systems table
ISOFIX child restraint systems are divided in different “size class”.
According to this “size class”, you will be allowed to use it in the
vehicle seating position mentioned in the table below. To know your
child restraint system “size class” and “mass group”, please refer to
the child restraint system manual.
If your child restraint system has no “size class” (or if you cannot
find information in the table below), please refer to the child
restraint system “vehicle list” for compatibility information or ask the
retailer of your child seat.
Size classDescription
A Full-height, forward-facing child restraint systems
B Reduced-height forward-facing child restraint systems
B1 Reduced-height forward-facing child restraint systems C Full-size rearward-facing child restraint systems
D Reduced-size rearward-facing child restraint systemsE Rearward-facing infant seatF Left lateral-facing (carrycot) infant seat
G Right lateral-facing (carrycot) infant seat
AVENSIS_OM_OM20C66E_(EE).book Page 71 Wednesday, June 15, 201 6 4:07 PM
Page 72 of 661
721-2. Child safety
AVENSIS_OM_OM20C66E_(EE)
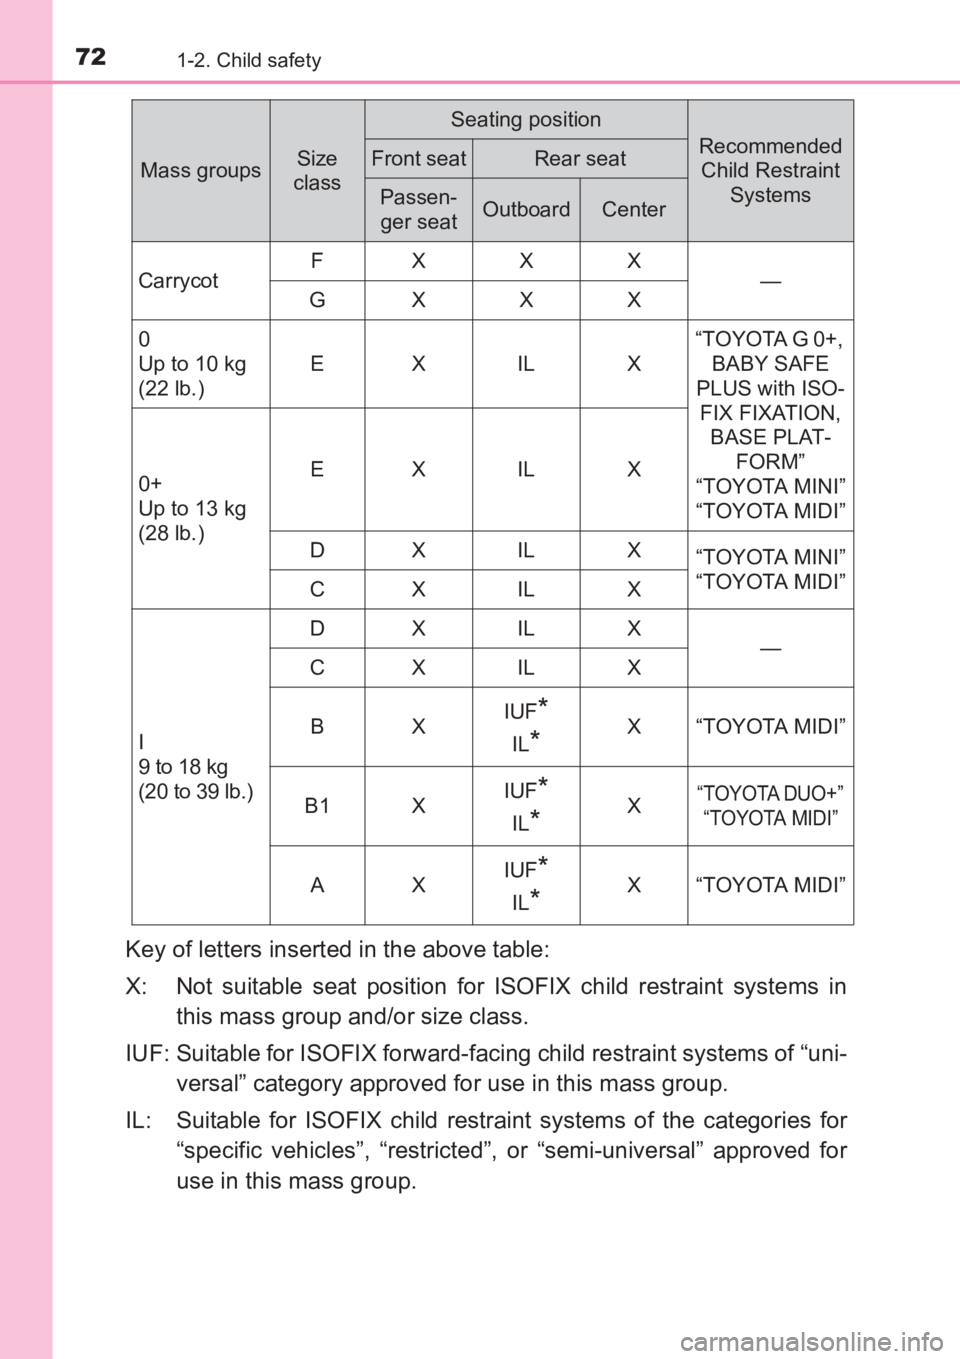
Key of letters inserted in the above table:
X: Not suitable seat position for ISOFIX child restraint systems inthis mass group and/or size class.
IUF: Suitable for ISOFIX forward-facing child restraint systems of “uni- versal” category approved for use in this mass group.
IL: Suitable for ISOFIX child restraint systems of the categories for “specific vehicles”, “restricted”, or “semi-universal” approved for
use in this mass group.
Mass groupsSize
class
Seating position
Recommended Child Restraint
SystemsFront seatRear seat
Passen-ger seatOutboardCenter
Carrycot FXXX
—
GXXX
0
Up to 10 kg
(22 lb.) EX IL X
“TOYOTA G 0+,
BABY SAFE
PLUS with ISO- FIX FIXATION, BASE PLAT-
FORM”
“TOYOTA MINI”
“TOYOTA MIDI”
0+
Up to 13 kg
(28 lb.) EX IL X
DX IL X “TOYOTA MINI”
“TOYOTA MIDI”
CX IL X
I
9 to 18 kg
(20 to 39 lb.) DX IL X
—
CX IL X
BX IUF
*
IL*X“TOYOTA MIDI”
B1 X IUF
*
IL*X“TOYOTA DUO+”
“TOYOTA MIDI”
AX IUF*
IL*X“TOYOTA MIDI”
AVENSIS_OM_OM20C66E_(EE).book Page 72 Wednesday, June 15, 201
6 4:07 PM
Page 73 of 661
731-2. Child safety
1
AVENSIS_OM_OM20C66E_(EE)
For safety and security
*: If the head restraint interferes with your child restraint system, and thehead restraint can be removed, remove the head restraint.
Otherwise, put the head restraint in the upper most position.
When securing some types of child restraint systems in rear seat, it
may not be possible to properly use the seat belts in positions next to
the child restraint without interfering with it or affecting seat belt effec-
tiveness. Be sure your seat belt fits snugly across your shoulder and
low on your hips. If it does not, or if it interferes with the child restraint,
move to a different position. Failure to do so may result in death or
serious injury.
The child restraint systems mentioned in the table may not be avail-
able outside the EU area.
● When installing a child restraint in the rear seats, adjust the front
seat so that it does not interfere with the child or child restraint sys-
tem.
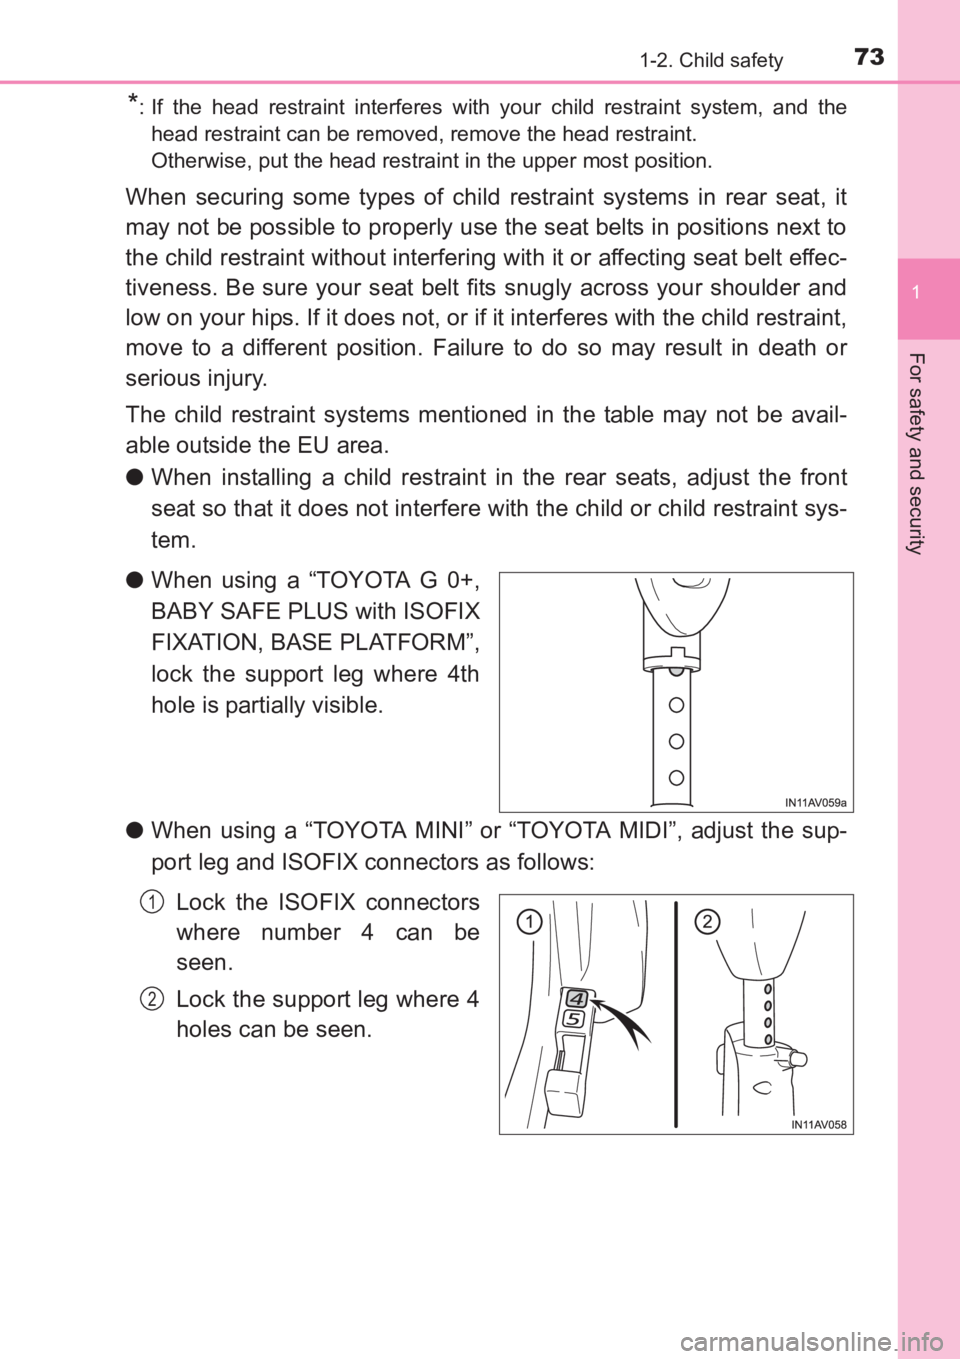
● When using a “TOYOTA G 0+,
BABY SAFE PLUS with ISOFIX
FIXATION, BASE PLATFORM”,
lock the support leg where 4th
hole is partially visible.
● When using a “TOYOTA MINI” or “TOYOTA MIDI”, adjust the sup-
port leg and ISOFIX connectors as follows:
Lock the ISOFIX connectors
where number 4 can be
seen.
Lock the support leg where 4
holes can be seen.
1
2
AVENSIS_OM_OM20C66E_(EE).book Page 73 Wednesday, June 15, 201 6 4:07 PM
Page 74 of 661
741-2. Child safety
AVENSIS_OM_OM20C66E_(EE)■
i-Size child restraint systems fastened with ISOFIX (ECE
R129) - Compatibility table
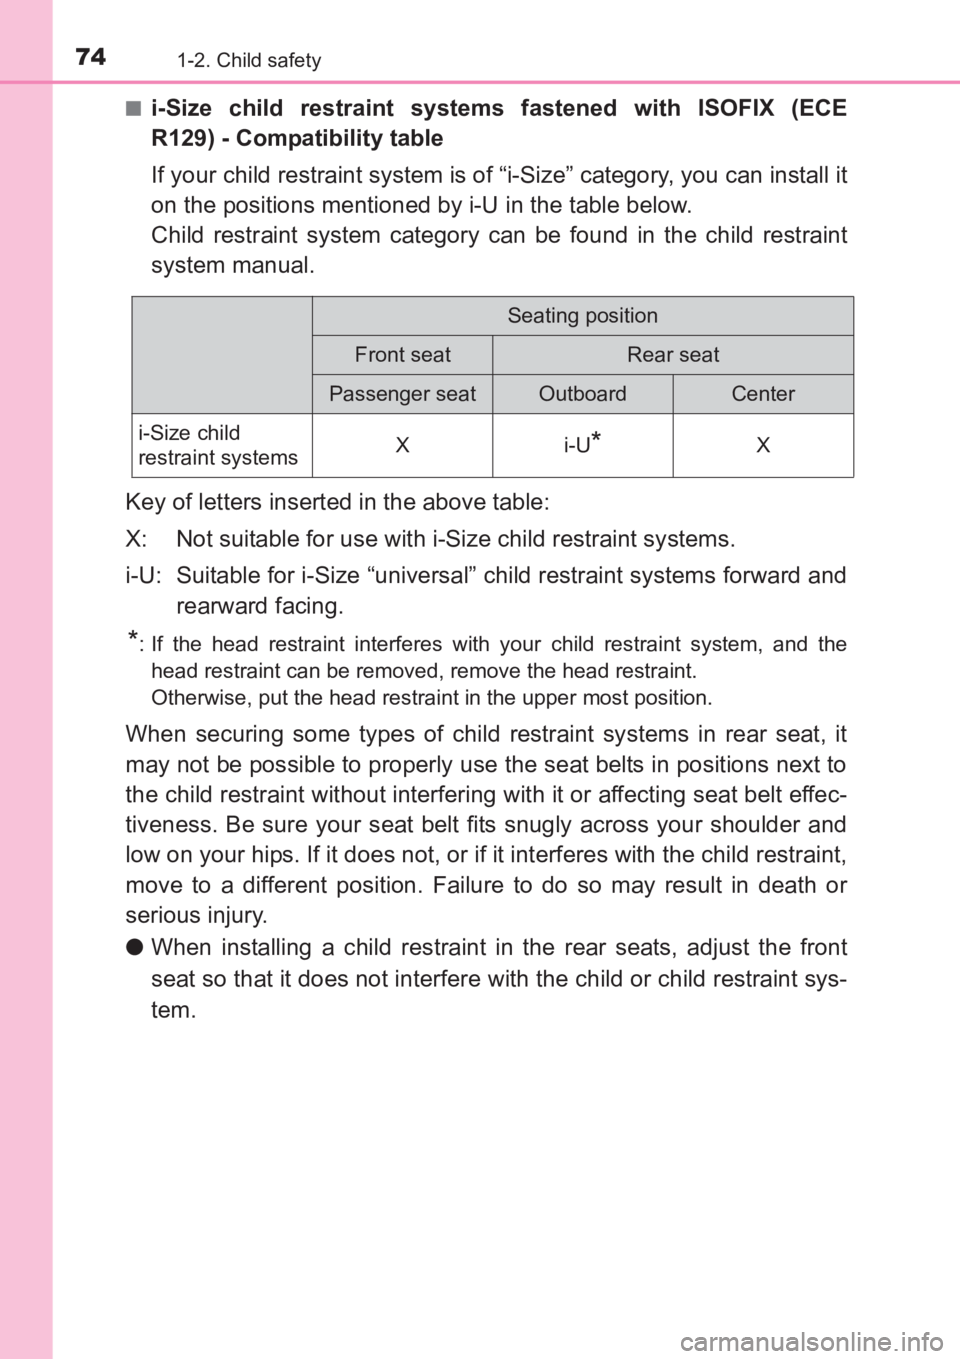
If your child restraint system is of “i-Size” category, you can install it
on the positions mentioned by i-U in the table below.
Child restraint system category can be found in the child restraint
system manual.
Key of letters inserted in the above table:
X: Not suitable for use with i-Size child restraint systems.
i-U: Suitable for i-Size “universal” child restraint systems forward and rearward facing.
*: If the head restraint interferes with your child restraint system, and thehead restraint can be removed, remove the head restraint.
Otherwise, put the head restraint in the upper most position.
When securing some types of child restraint systems in rear seat, it
may not be possible to properly use the seat belts in positions next to
the child restraint without interfering with it or affecting seat belt effec-
tiveness. Be sure your seat belt fits snugly across your shoulder and
low on your hips. If it does not, or if it interferes with the child restraint,
move to a different position. Failure to do so may result in death or
serious injury.
● When installing a child restraint in the rear seats, adjust the front
seat so that it does not interfere with the child or child restraint sys-
tem.
Seating position
Front seatRear seat
Passenger seatOutboardCenter
i-Size child
restraint systemsXi-U*X
AVENSIS_OM_OM20C66E_(EE).book Page 74 Wednesday, June 15, 201 6 4:07 PM
Page 75 of 661
751-2. Child safety
1
AVENSIS_OM_OM20C66E_(EE)
For safety and security
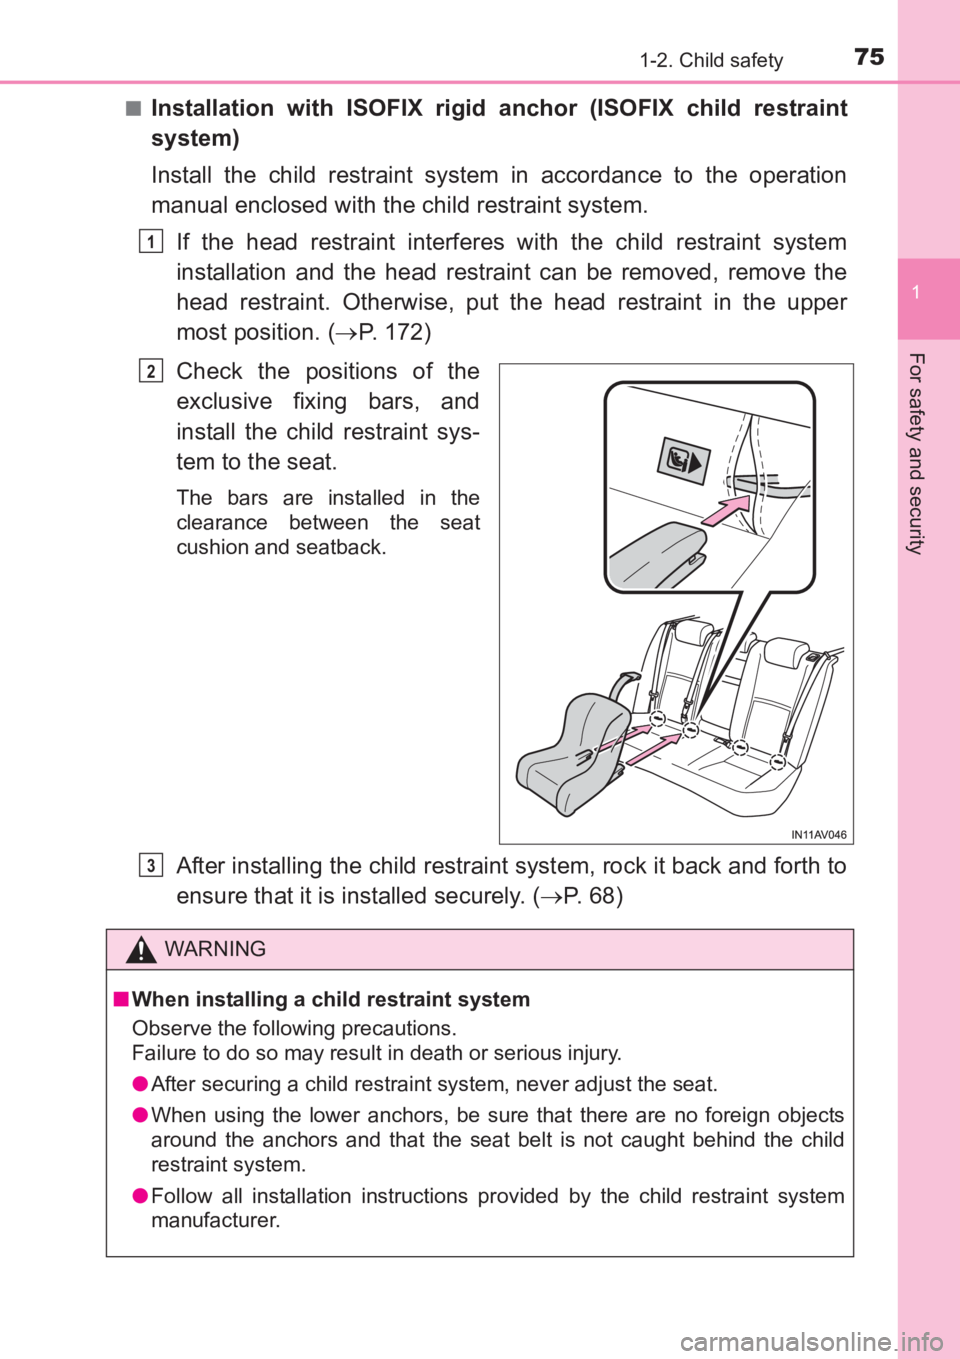
■Installation with ISOFIX rigid anchor (ISOFIX child restraint
system)
Install the child restraint system in accordance to the operation
manual enclosed with the child restraint system.If the head restraint interferes with the child restraint system
installation and the head restraint can be removed, remove the
head restraint. Otherwise, put the head restraint in the upper
most position. ( →P. 172)
Check the positions of the
exclusive fixing bars, and
install the child restraint sys-
tem to the seat.
The bars are installed in the
clearance between the seat
cushion and seatback.
After installing the child restraint system, rock it back and forth to
ensure that it is installed securely. ( →P. 6 8 )
1
2
WARNING
■ When installing a child restraint system
Observe the following precautions.
Failure to do so may result in death or serious injury.
●After securing a child restraint system, never adjust the seat.
● When using the lower anchors, be sure that there are no foreign objects
around the anchors and that the seat belt is not caught behind the child
restraint system.
● Follow all installation instructions provided by the child restraint system
manufacturer.
3
AVENSIS_OM_OM20C66E_(EE).book Page 75 Wednesday, June 15, 201 6 4:07 PM
Page 76 of 661
761-2. Child safety
AVENSIS_OM_OM20C66E_(EE)■
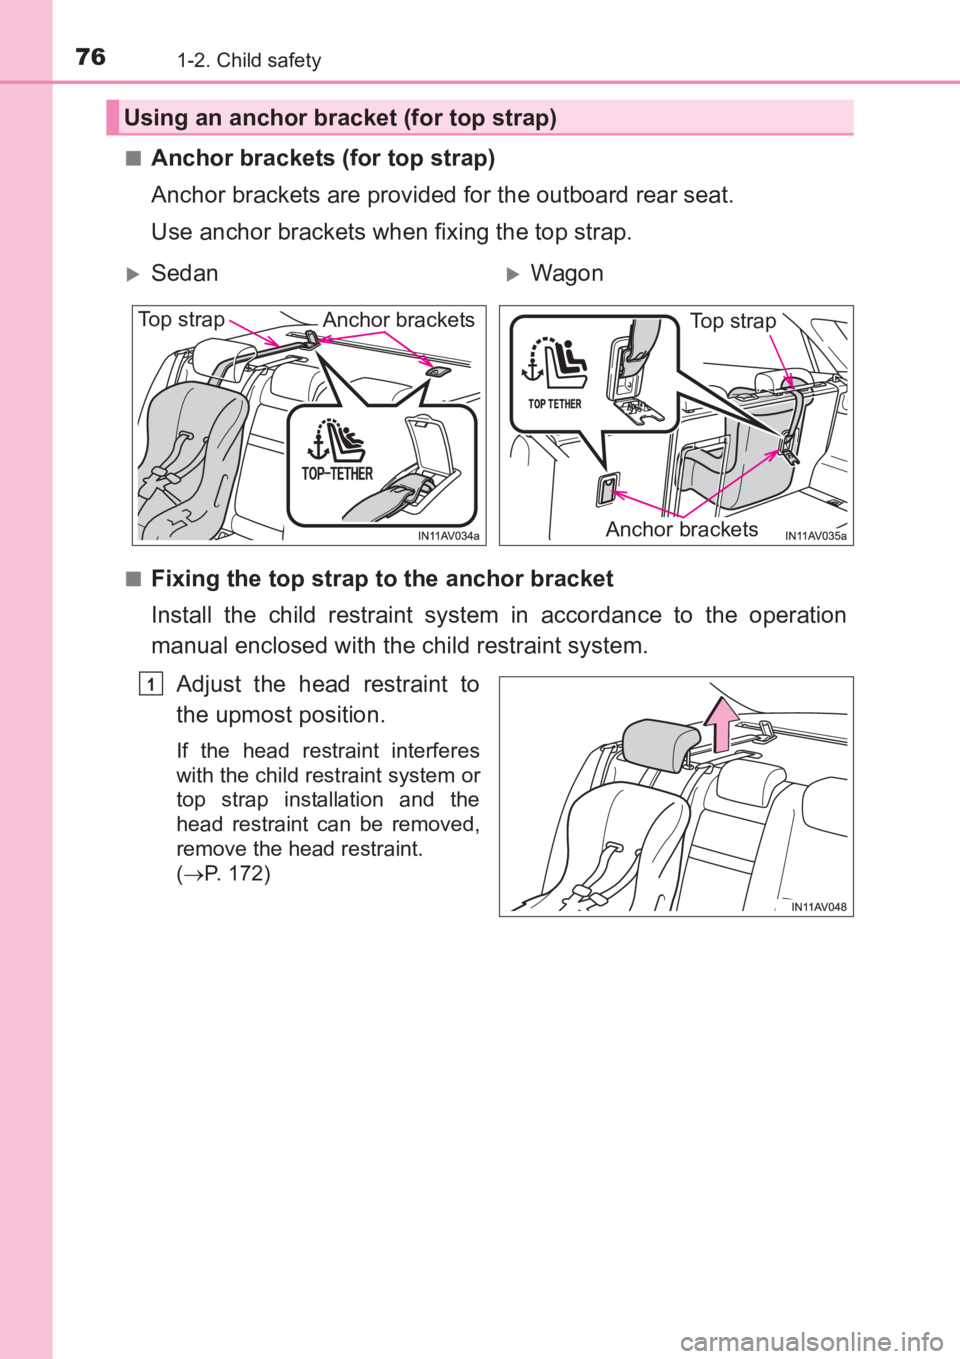
Anchor brackets (for top strap)
Anchor brackets are provided for the outboard rear seat.
Use anchor brackets when fixing the top strap.
■Fixing the top strap to the anchor bracket
Install the child restraint system in accordance to the operation
manual enclosed with the child restraint system.
Adjust the head restraint to
the upmost position.
If the head restraint interferes
with the child restraint system or
top strap installation and the
head restraint can be removed,
remove the head restraint.
(→ P. 172)
Using an anchor bracket (for top strap)
�XSedan�XWagon
Anchor bracketsTop strap
Anchor brackets
Top strap
1
AVENSIS_OM_OM20C66E_(EE).book Page 76 Wednesday, June 15, 201 6 4:07 PM
Page 77 of 661
771-2. Child safety
1
AVENSIS_OM_OM20C66E_(EE)
For safety and security
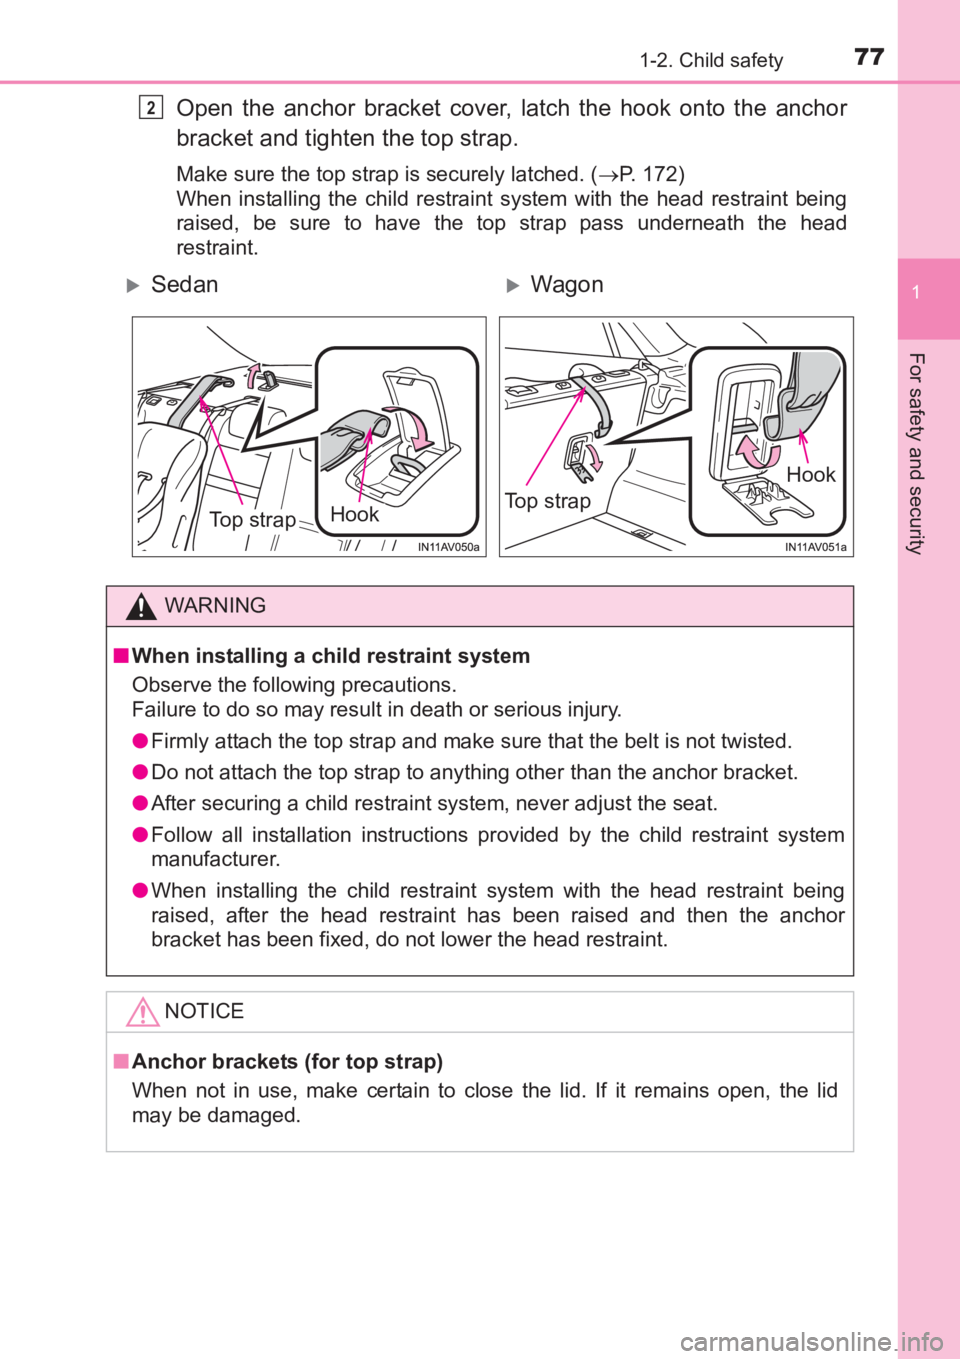
Open the anchor bracket cover, latch the hook onto the anchor
bracket and tighten the top strap.
Make sure the top strap is securely latched. (→P. 172)
When installing the child restraint system with the head restraint being
raised, be sure to have the top strap pass underneath the head
restraint.
2
�XSedan�XWagon
Hook
Top strap
Hook
Top strap
WARNING
■ When installing a child restraint system
Observe the following precautions.
Failure to do so may result in death or serious injury.
●Firmly attach the top strap and make sure that the belt is not twisted.
● Do not attach the top strap to anything other than the anchor bracket.
● After securing a child restraint system, never adjust the seat.
● Follow all installation instructions provided by the child restraint system
manufacturer.
● When installing the child restraint system with the head restraint being
raised, after the head restraint has been raised and then the anchor
bracket has been fixed, do not lower the head restraint.
NOTICE
■ Anchor brackets (for top strap)
When not in use, make certain to close the lid. If it remains open, the lid
may be damaged.
AVENSIS_OM_OM20C66E_(EE).book Page 77 Wednesday, June 15, 201 6 4:07 PM
Page 78 of 661
781-3. Theft deterrent system
AVENSIS_OM_OM20C66E_(EE)
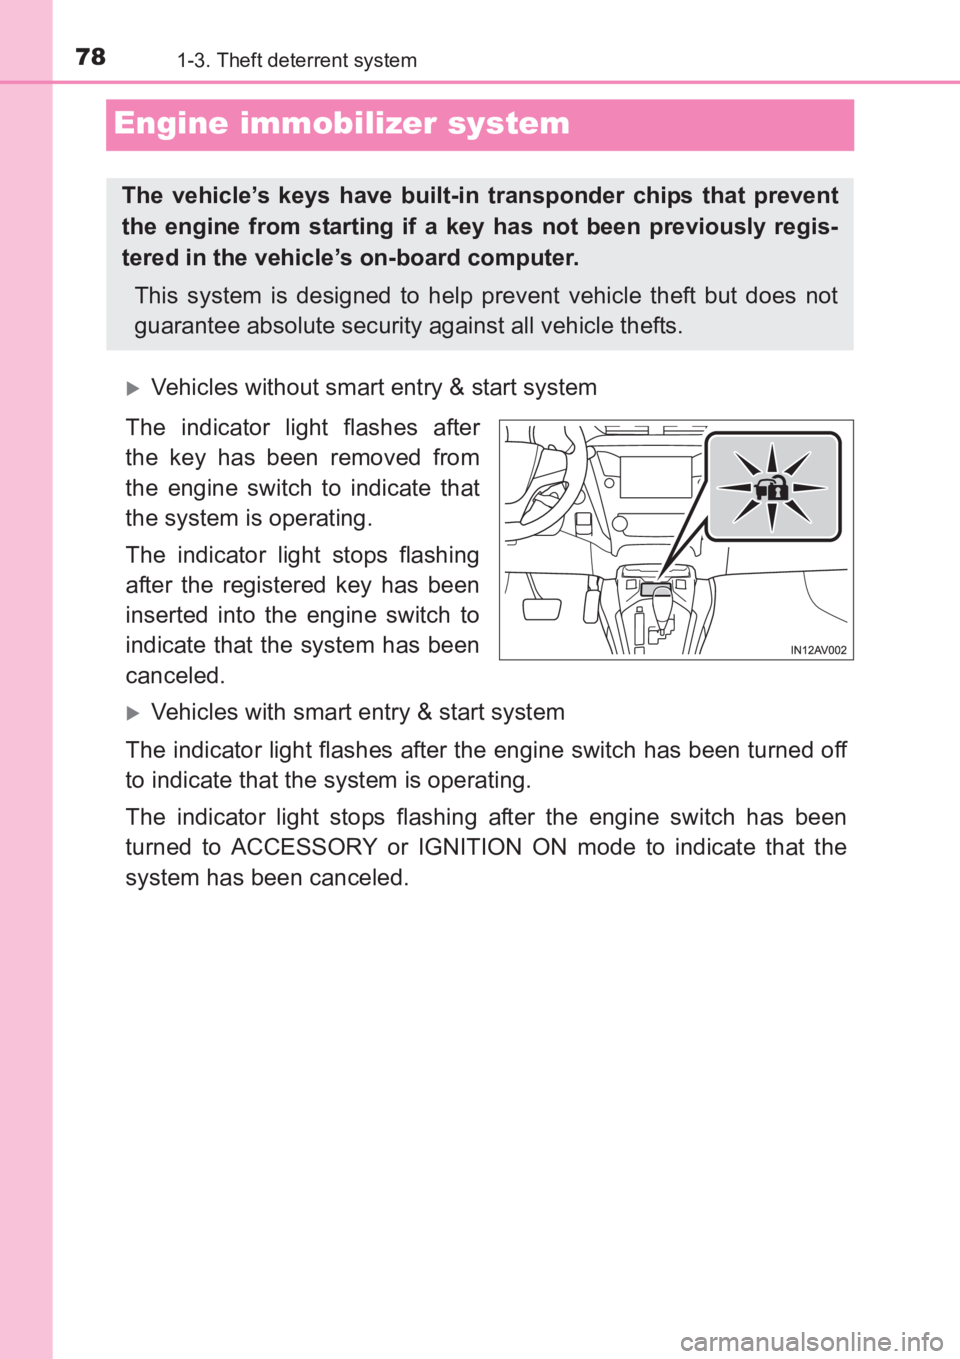
Engine immobilizer system
�XVehicles without smart entry & start system
The indicator light flashes after
the key has been removed from
the engine switch to indicate that
the system is operating.
The indicator light stops flashing
after the registered key has been
inserted into the engine switch to
indicate that the system has been
canceled.
�XVehicles with smart entry & start system
The indicator light flashes after the engine switch has been turned off
to indicate that the system is operating.
The indicator light stops flashing after the engine switch has been
turned to ACCESSORY or IGNITION ON mode to indicate that the
system has been canceled.
The vehicle’s keys have built-in transponder chips that prevent
the engine from starting if a key has not been previously regis-
tered in the vehicle’s on-board computer. This system is designed to help prevent vehicle theft but does not
guarantee absolute security against all vehicle thefts.
AVENSIS_OM_OM20C66E_(EE).book Page 78 Wednesday, June 15, 201 6 4:07 PM
Page 79 of 661
791-3. Theft deterrent system
1
AVENSIS_OM_OM20C66E_(EE)
For safety and security
■System maintenance
The vehicle has a maintenance-free type engine immobilizer system.
■ Conditions that may cause the system to malfunction
● If the grip portion of the key is in contact with a metallic object
● If the key is in close proximity to or touching a key to the security system
(key with a built-in transponder chip) of another vehicle
AVENSIS_OM_OM20C66E_(EE).book Page 79 Wednesday, June 15, 201 6 4:07 PM
Page 80 of 661
801-3. Theft deterrent system
AVENSIS_OM_OM20C66E_(EE)■
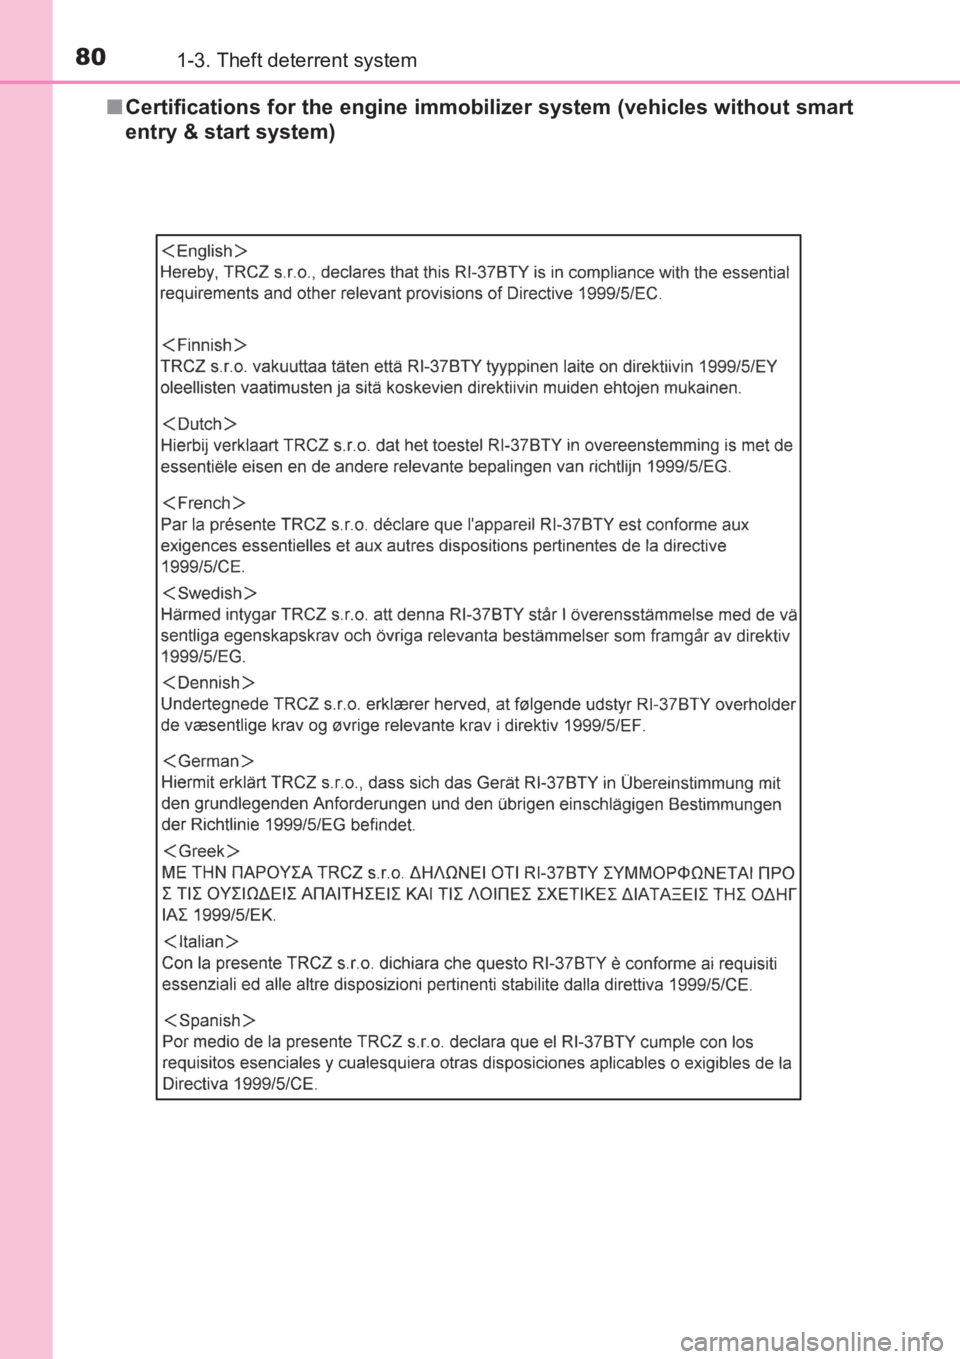
Certifications for the engine immobilizer system (vehicles without smart
entry & start system)
AVENSIS_OM_OM20C66E_(EE).book Page 80 Wednesday, June 15, 201 6 4:07 PM