engine TOYOTA AYGO 2017 Owners Manual (in English)
[x] Cancel search | Manufacturer: TOYOTA, Model Year: 2017, Model line: AYGO, Model: TOYOTA AYGO 2017Pages: 480, PDF Size: 40.72 MB
Page 345 of 480
3457-3. Do-it-yourself maintenance
7
Maintenance and care
AYGO_OM_Europe_OM99Q24E
■How to initialize the tire pressure warning system
Park the vehicle in a safe place and turn the engine switch to the
“LOCK” position (vehicles without a smart entry & start system)
or off (vehicles with a smart entry & start system).
Initialization cannot be performed while the vehicle is moving.
Adjust the tire inflation pressure to the specified cold tire inflation
pressure level. ( P. 454)
Make sure to adjust the tire pressure to the specified cold tire inflation
pressure level. The tire pressure warning system will operate based on
this pressure level.
Turn the engine switch to the “ON” position (vehicles without a
smart entry & start system) or IGNITION ON mode (vehicles with
a smart entry & start system).
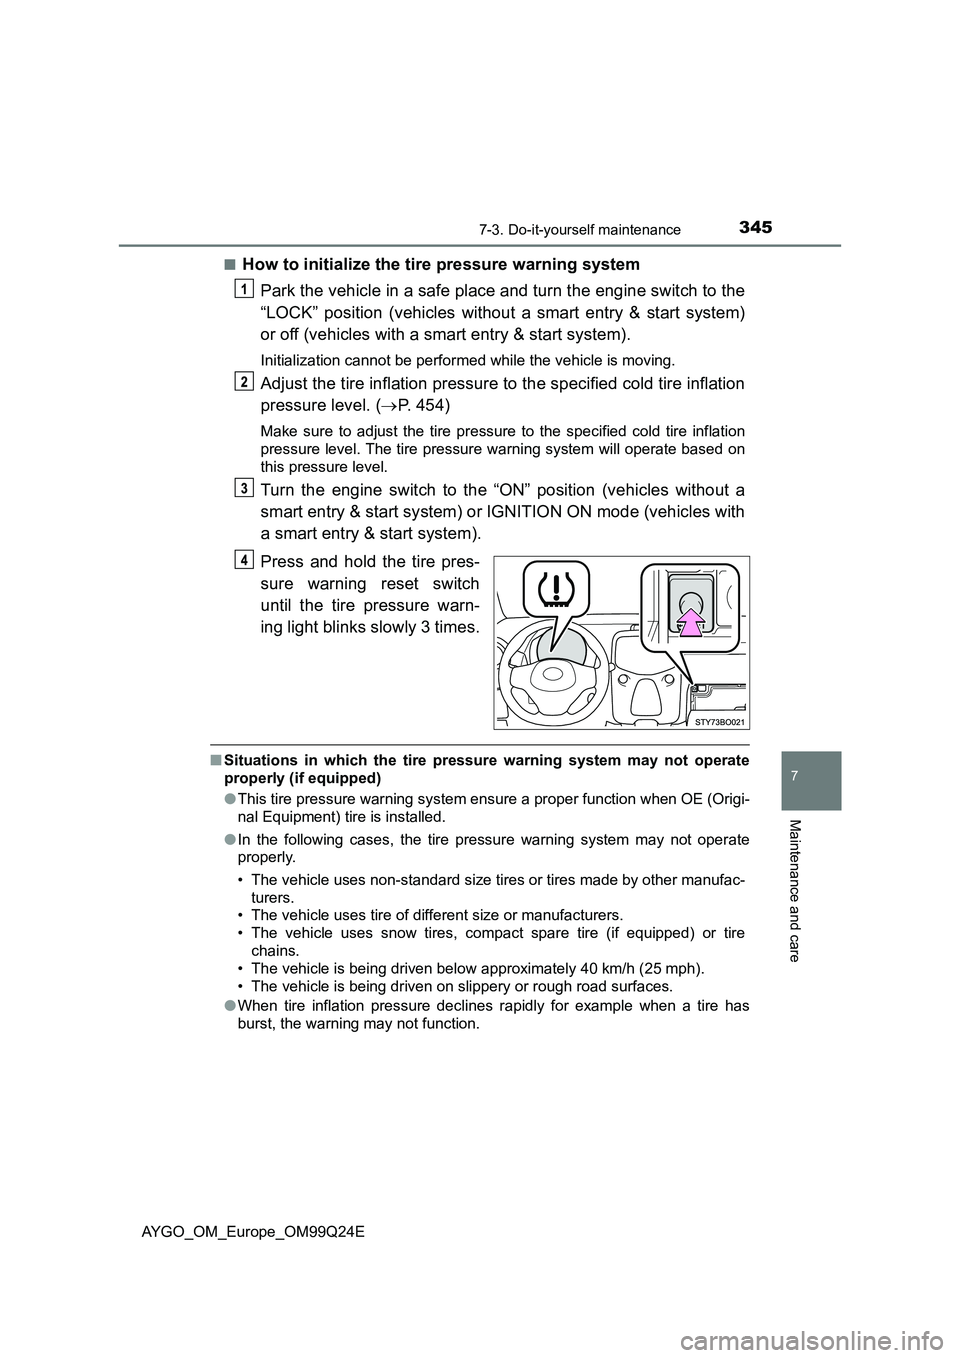
Press and hold the tire pres-
sure warning reset switch
until the tire pressure warn-
ing light blinks slowly 3 times.
■ Situations in which the tire pressure warning system may not operate
properly (if equipped)
● This tire pressure warning system ensure a proper function when OE (Origi-
nal Equipment) tire is installed.
● In the following cases, the tire pressure warning system may not operate
properly.
• The vehicle uses non-standard size tires or tires made by other manufac-
turers.
• The vehicle uses tire of different size or manufacturers.
• The vehicle uses snow tires, compact spare tire (if equipped) or tire
chains.
• The vehicle is being driven below approximately 40 km/h (25 mph).
• The vehicle is being driven on slippery or rough road surfaces.
● When tire inflation pressure declines rapidly for example when a tire has
burst, the warning may not function.
Page 353 of 480
3537-3. Do-it-yourself maintenance
7
Maintenance and care
AYGO_OM_Europe_OM99Q24E
Air conditioning filter
Vehicles without a smart entry & start system:
Turn the engine switch to the “LOCK” position.
Vehicles with a smart entry & start system:
Turn the engine switch off.
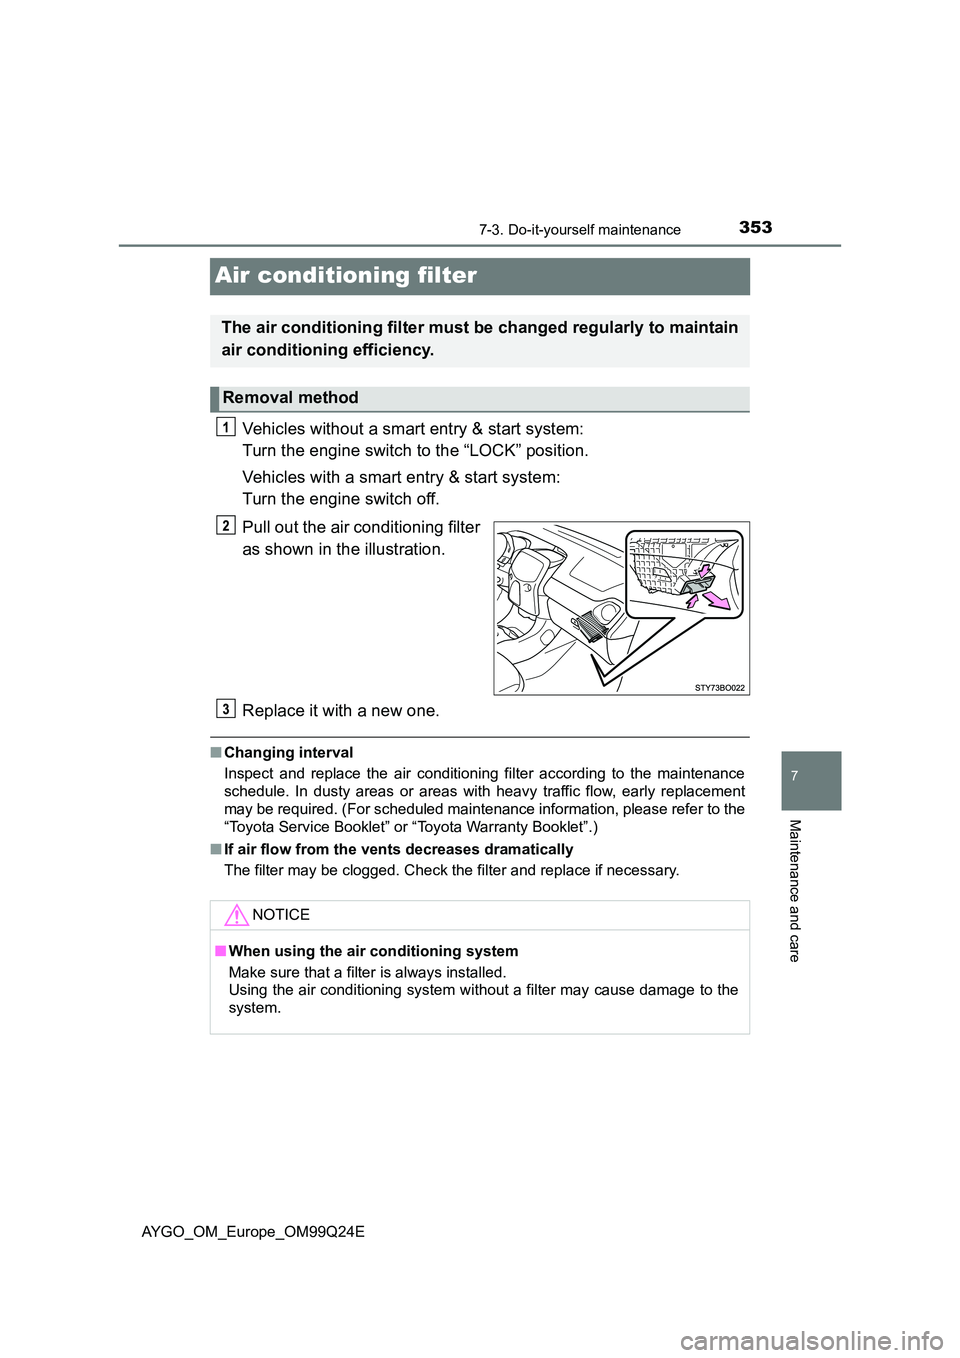
Pull out the air conditioning filter
as shown in the illustration.
Replace it with a new one.
■ Changing interval
Inspect and replace the air conditioning filter according to the maintenance
schedule. In dusty areas or areas with heavy traffic flow, early replacement
may be required. (For scheduled maintenance information, please refer to the
“Toyota Service Booklet” or “Toyota Warranty Booklet”.)
■ If air flow from the vents decreases dramatically
The filter may be clogged. Check the filter and replace if necessary.
The air conditioning filter must be changed regularly to maintain
air conditioning efficiency.
Removal method
NOTICE
■ When using the air conditioning system
Make sure that a filter is always installed.
Using the air conditi oning system without a filter may cause damage to the
system.
Page 357 of 480
3577-3. Do-it-yourself maintenance
7
Maintenance and care
AYGO_OM_Europe_OM99Q24E
Checking and replacing fuses
Vehicles without a smart entry & start system:
Turn the engine switch to the “LOCK” position.
Vehicles with a smart entry & start system:
Turn the engine switch off.
After a system failure, see “Fuse layout and amperage ratings” for
details about which fuse to check. ( P. 359)
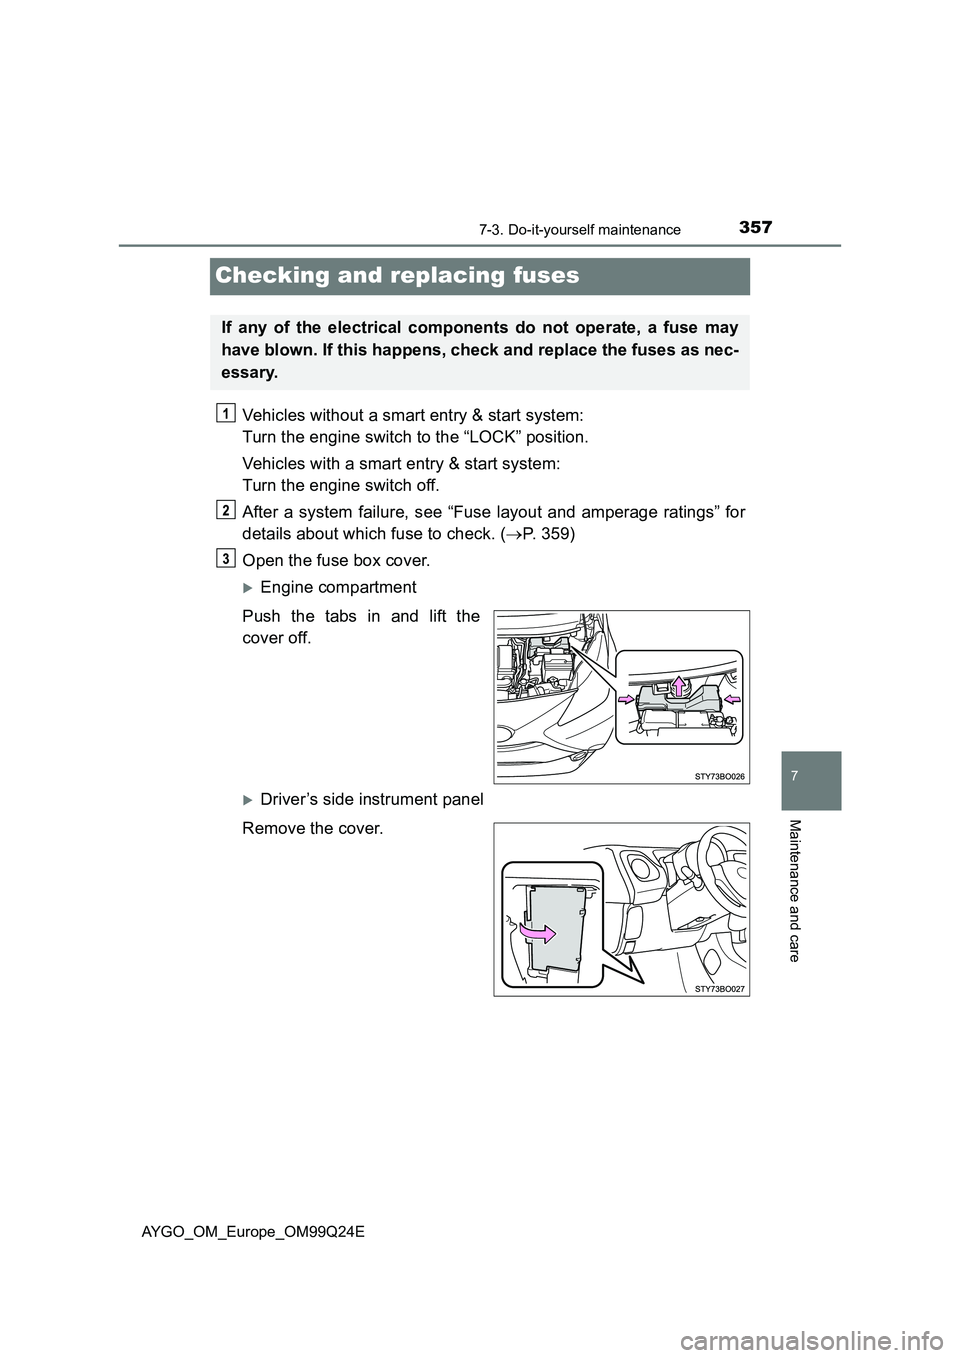
Open the fuse box cover.
Engine compartment
Push the tabs in and lift the
cover off.
Driver’s side instrument panel
Remove the cover.
If any of the electrical components do not operate, a fuse may
have blown. If this happens, check and replace the fuses as nec-
essary.
Page 359 of 480
3597-3. Do-it-yourself maintenance
7
Maintenance and care
AYGO_OM_Europe_OM99Q24E
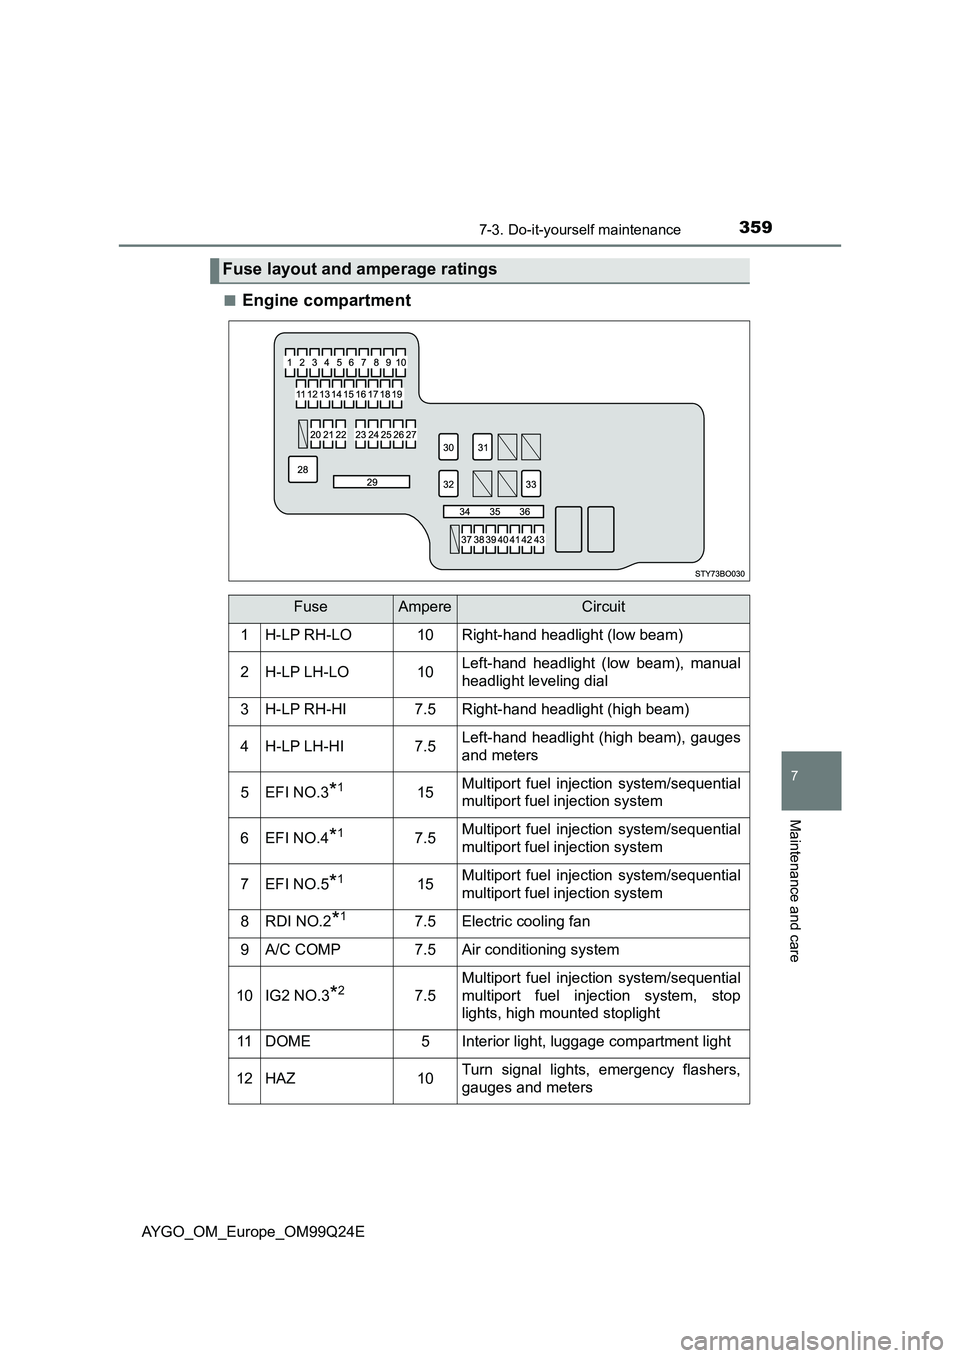
■Engine compartment
Fuse layout and amperage ratings
FuseAmpereCircuit
1H-LP RH-LO10Right-hand headlight (low beam)
2H-LP LH-LO10Left-hand headlight (low beam), manual
headlight leveling dial
3H-LP RH-HI7.5Right-hand headlight (high beam)
4H-LP LH-HI7.5Left-hand headlight (high beam), gauges
and meters
5EFI NO.3*115Multiport fuel injection system/sequential
multiport fuel injection system
6EFI NO.4*17.5Multiport fuel injection system/sequential
multiport fuel injection system
7EFI NO.5*115Multiport fuel injection system/sequential
multiport fuel injection system
8RDI NO.2*17.5Electric cooling fan
9A/C COMP7.5Air conditioning system
10IG2 NO.3*27.5
Multiport fuel injection system/sequential
multiport fuel injection system, stop
lights, high mounted stoplight
11DOME5Interior light, luggage compartment light
12HAZ10Turn signal lights, emergency flashers,
gauges and meters
Page 361 of 480
3617-3. Do-it-yourself maintenance
7
Maintenance and care
AYGO_OM_Europe_OM99Q24E
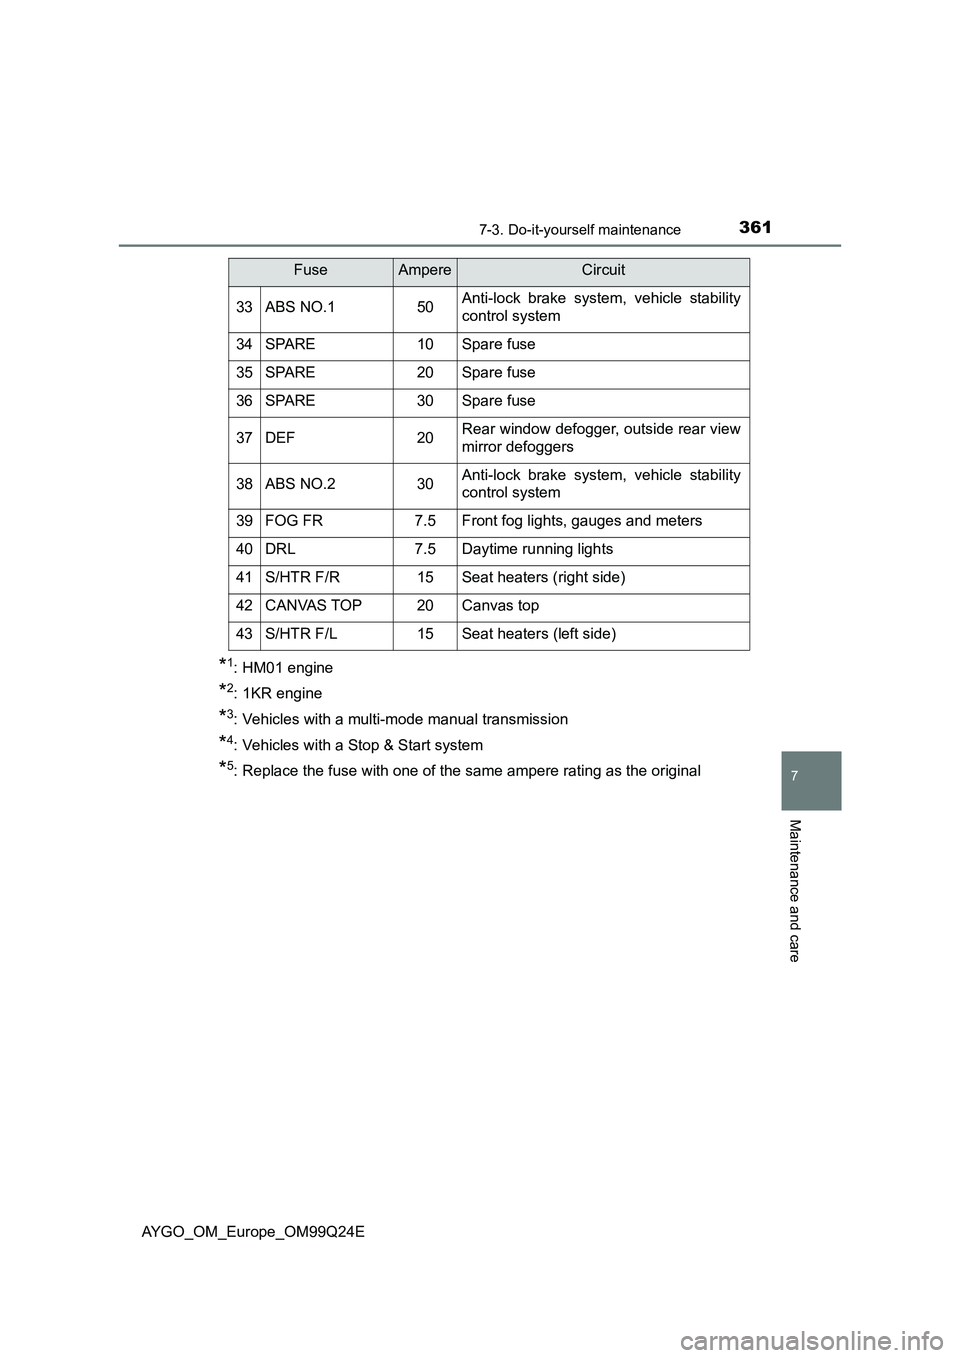
*1: HM01 engine
*2: 1KR engine
*3: Vehicles with a multi-mode manual transmission
*4: Vehicles with a Stop & Start system
*5: Replace the fuse with one of the same ampere rating as the original
33ABS NO.150Anti-lock brake system, vehicle stability
control system
34SPARE10Spare fuse
35SPARE20Spare fuse
36SPARE30Spare fuse
37DEF20Rear window defogger, outside rear view
mirror defoggers
38ABS NO.230Anti-lock brake system, vehicle stability
control system
39FOG FR7.5Front fog lights, gauges and meters
40DRL7.5Daytime running lights
41S/HTR F/R15Seat heaters (right side)
42CANVAS TOP20Canvas top
43S/HTR F/L15Seat heaters (left side)
FuseAmpereCircuit
Page 364 of 480
3647-3. Do-it-yourself maintenance
AYGO_OM_Europe_OM99Q24E
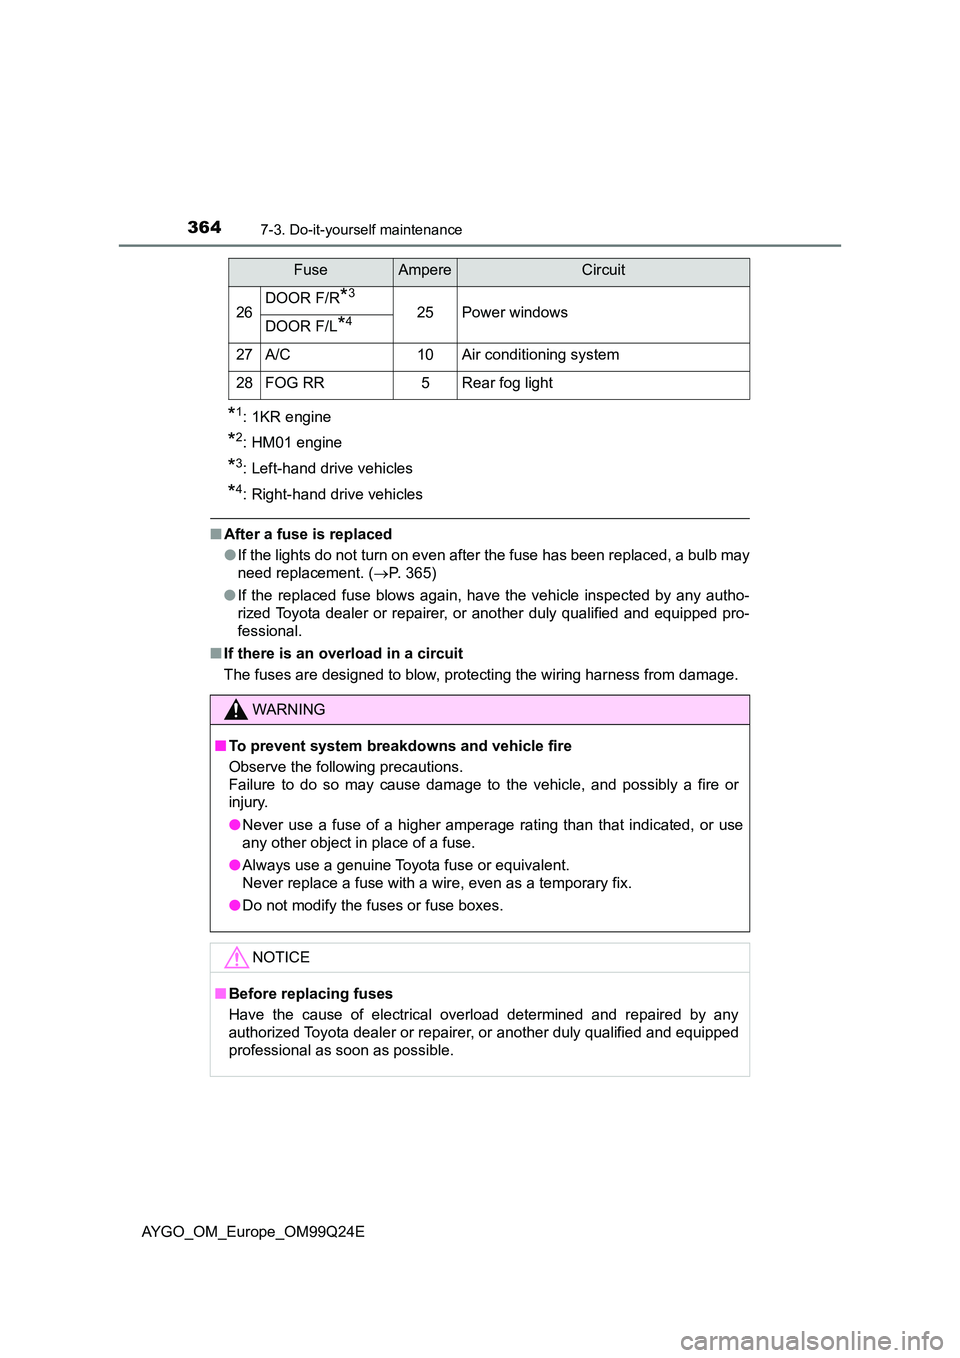
*1: 1KR engine
*2: HM01 engine
*3: Left-hand drive vehicles
*4: Right-hand drive vehicles
■After a fuse is replaced
● If the lights do not turn on even after the fuse has been replaced, a bulb may
need replacement. ( P. 365)
● If the replaced fuse blows again, have the vehicle inspected by any autho-
rized Toyota dealer or repairer, or another duly qualified and equipped pro-
fessional.
■ If there is an overload in a circuit
The fuses are designed to blow, protecting the wiring harness from damage.
26DOOR F/R*3
25Power windowsDOOR F/L*4
27A/C10Air conditioning system
28FOG RR5Rear fog light
WARNING
■ To prevent system breakdowns and vehicle fire
Observe the following precautions.
Failure to do so may cause damage to the vehicle, and possibly a fire or
injury.
● Never use a fuse of a higher amperage rating than that indicated, or use
any other object in place of a fuse.
● Always use a genuine Toyota fuse or equivalent.
Never replace a fuse with a wire, even as a temporary fix.
● Do not modify the fuses or fuse boxes.
NOTICE
■Before replacing fuses
Have the cause of electrical overload determined and repaired by any
authorized Toyota dealer or repairer, or another duly qualified and equipped
professional as soon as possible.
FuseAmpereCircuit
Page 377 of 480
377
8When trouble arises
AYGO_OM_Europe_OM99Q24E
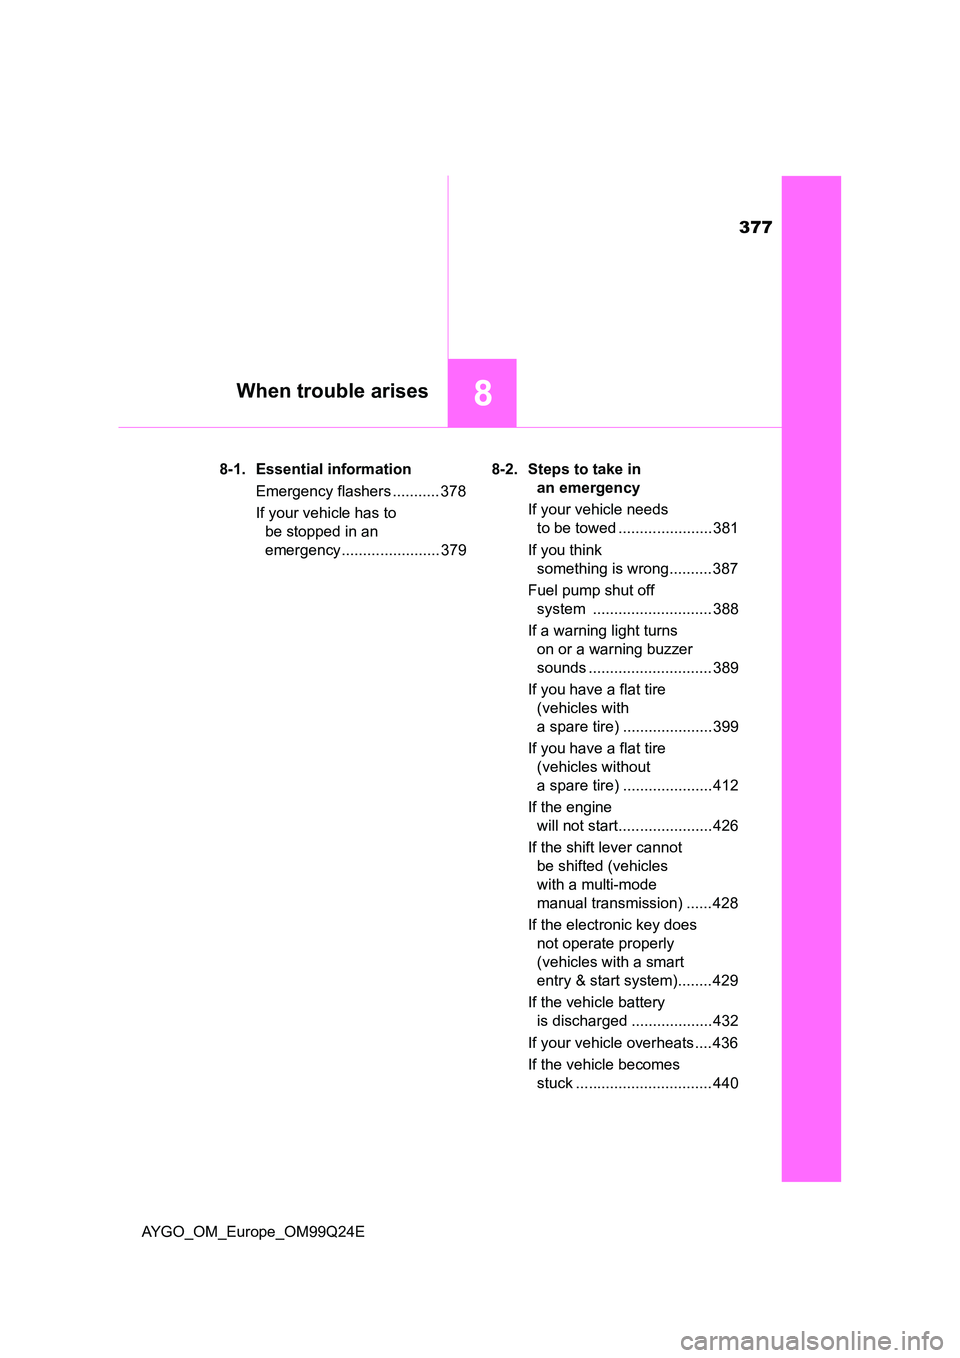
8-1. Essential information
Emergency flashers ........... 378
If your vehicle has to
be stopped in an
emergency ....................... 379
8-2. Steps to take in
an emergency
If your vehicle needs
to be towed ...................... 381
If you think
something is wrong.......... 387
Fuel pump shut off
system ............................ 388
If a warning light turns
on or a warning buzzer
sounds ............................. 389
If you have a flat tire
(vehicles with
a spare tire) ..................... 399
If you have a flat tire
(vehicles without
a spare tire) ..................... 412
If the engine
will not start...................... 426
If the shift lever cannot
be shifted (vehicles
with a multi-mode
manual transmission) ...... 428
If the electronic key does
not operate properly
(vehicles with a smart
entry & start system)........ 429
If the vehicle battery
is discharged ................... 432
If your vehicle overheats .... 436
If the vehicle becomes
stuck ................................ 440
Page 378 of 480
3788-1. Essential information
AYGO_OM_Europe_OM99Q24E
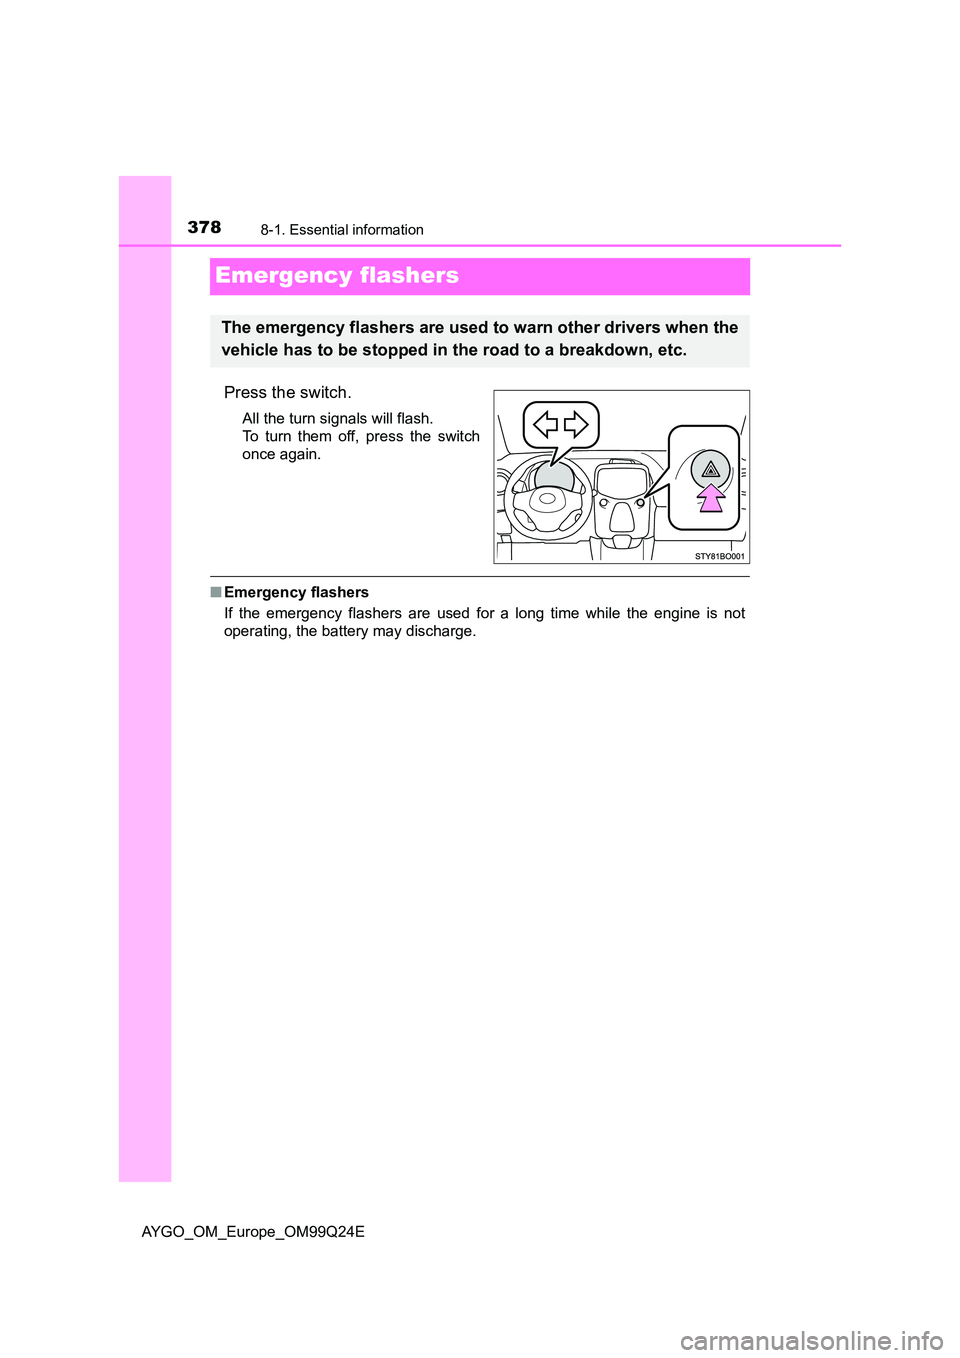
Emergency flashers
Press the switch.
All the turn signals will flash.
To turn them off, press the switch
once again.
■ Emergency flashers
If the emergency flashers are used for a long time while the engine is not
operating, the battery may discharge.
The emergency flashers are used to warn other drivers when the
vehicle has to be stopped in the road to a breakdown, etc.
Page 379 of 480
3798-1. Essential information
8
When trouble arises
AYGO_OM_Europe_OM99Q24E
If your vehicle has to be stopped in an
emergency
Steadily step on the brake pedal with both feet and firmly depress it.
Do not pump the brake pedal repeatedly as this will increase the effort
required to slow the vehicle.
Shift the shift lever to N.
If the shift lever is shifted to N
After slowing down, stop the vehicle in a safe place by the road.
Stop the engine.
If the shift lever cannot be shifted to N
Keep depressing the brake pedal with both feet to reduce vehicle
speed as much as possible.
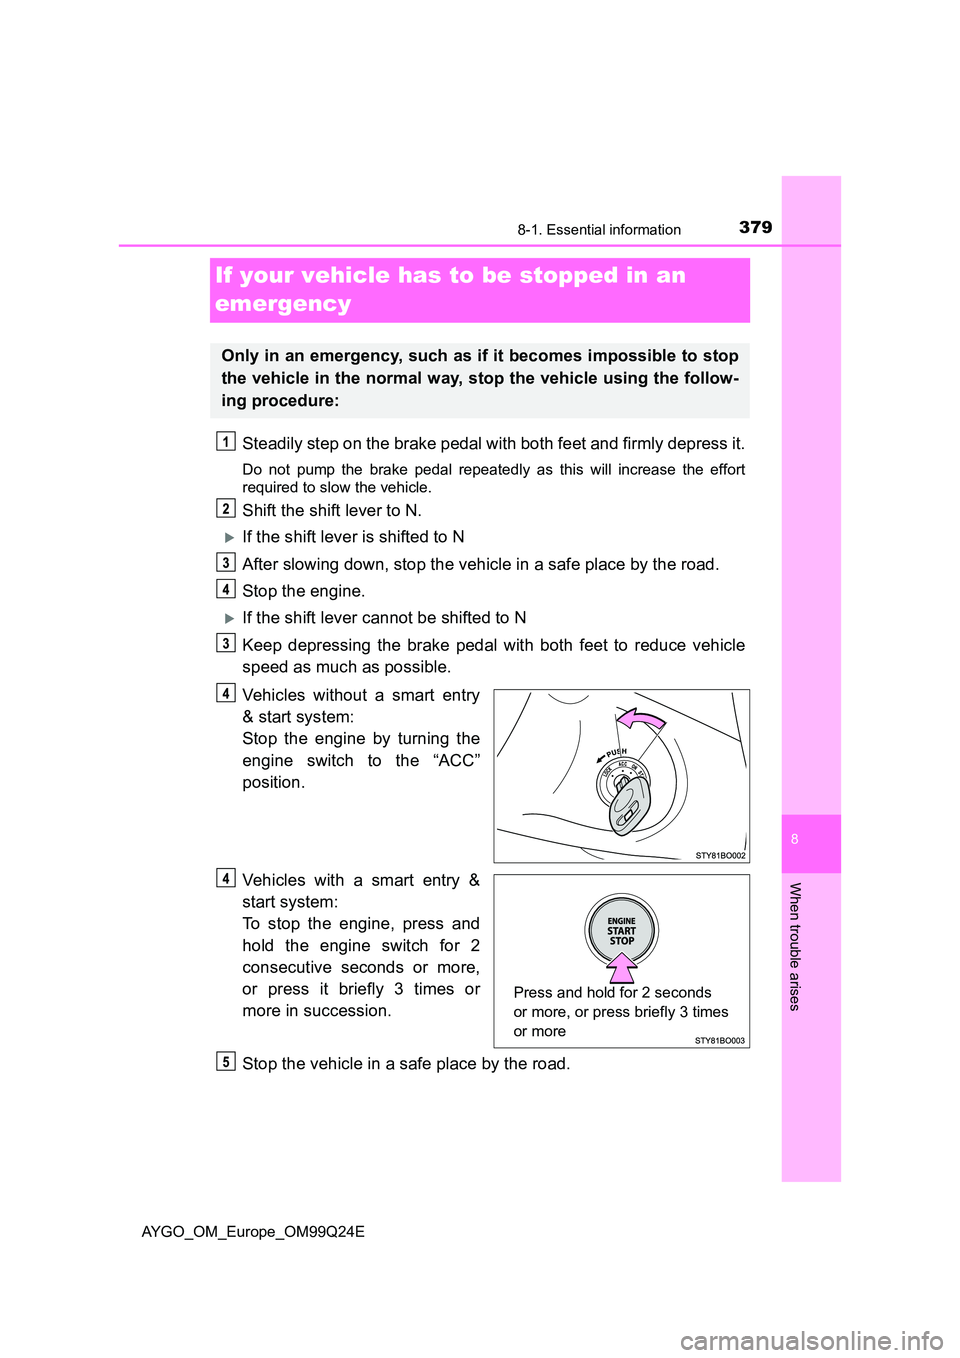
Vehicles without a smart entry
& start system:
Stop the engine by turning the
engine switch to the “ACC”
position.
Vehicles with a smart entry &
start system:
To stop the engine, press and
hold the engine switch for 2
consecutive seconds or more,
or press it briefly 3 times or
more in succession.
Stop the vehicle in a safe place by the road.
Only in an emergency, such as if it becomes impossible to stop
the vehicle in the normal way, stop the vehicle using the follow-
ing procedure:
Press and hold for 2 seconds
or more, or press briefly 3 times
or more
Page 380 of 480
3808-1. Essential information
AYGO_OM_Europe_OM99Q24E
WARNING
■If the engine has to be turned off while driving
● Power assist for the brakes and steering wheel will be lost, making the
brake pedal harder to depress and the steering wheel heavier to turn.
Decelerate as much as possible before turning off the engine.
● Vehicles without a smart entry & start system: Never attempt to remove
the key, as doing so will lock the steering wheel.