tow TOYOTA AYGO 2019 Owners Manual (in English)
[x] Cancel search | Manufacturer: TOYOTA, Model Year: 2019, Model line: AYGO, Model: TOYOTA AYGO 2019Pages: 504, PDF Size: 67.32 MB
Page 2 of 504
TABLE OF CONTENTS2
AYGO_OM_Europe_OM99R19E
For your information .......................6
Reading this manual.......................8
How to search ................................9
Pictorial index ...............................10
1-1. For safe use
Before driving.......................26
For safe driving ....................28
Seat belts .............................30
SRS airbags.........................34
Exhaust gas precautions .....46
1-2. Child safety
Airbag manual on-off
system ...............................47
Riding with children..............49
Child restraint systems ........50
1-3. Theft deterrent system
Engine immobilizer
system ...............................76
2. Instrument cluster
Warning lights
and indicators ....................96
Gauges and meters ...........101
Drive monitor display .........103
3-1. Key information
Keys .................................. 110
3-2. Opening, closing and
locking the doors
Side doors ......................... 118
Back door .......................... 123
Smart entry & start
system............................. 129
3-3. Adjusting the seats
Front seats ........................ 152
Rear seats ......................... 154
Head restraints .................. 156
3-4. Adjusting the steering
wheel and mirrors
Steering wheel .................. 158
Inside rear view mirror....... 160
Outside rear view
mirrors ............................. 161
3-5. Opening, closing
the windows and
canvas top
Power windows ................. 163
Rear side windows
(5-door models)............... 164
Canvas top ........................ 166
4-1. Before driving
Driving the vehicle ............. 170
Cargo and luggage............ 180
Trailer towing..................... 181
1For safety and security
2Instrument cluster
3Operation of
each component
4Driving
Page 5 of 504
5
1
7
8
6
5
4
3
2
9
AYGO_OM_Europe_OM99R19E
8-1. Essential information
Emergency flashers ...........406
If your vehicle has to
be stopped in an
emergency .......................407
8-2. Steps to take in
an emergency
If your vehicle needs
to be towed ......................409
If you think
something is wrong..........415
Fuel pump shut off
system ............................416
If a warning light turns
on or a warning buzzer
sounds .............................417
If you have a flat tire
(vehicles without
a spare tire) .....................427
If you have a flat tire
(vehicles with
a spare tire) .....................442
If the engine
will not start......................455
If the shift lever cannot
be shifted (vehicles
with a multi-mode
manual transmission) ......457
If the electronic key does
not operate properly
(vehicles with a smart
entry & start system) ....... 458
If the vehicle battery
is discharged ................... 461
If your vehicle overheats ... 465
If the vehicle becomes
stuck................................ 468
9-1. Specifications
Maintenance data
(fuel, oil level, etc.) .......... 472
Fuel information ................ 483
9-2. Customization
Customizable features ...... 485
9-3. Items to initialize
Items to initialize................ 486
What to do if...
(Troubleshooting) .................... 488
Alphabetical index...................... 492
8When trouble arises
9Vehicle specifications
Index
For vehicles with a multimedia system, refer to the “Multimedia
owner’s manual” for information regarding the equipment listed
below.
• Audio system• Rear view monitor system
Toyota Motor Europe NV/SA, Avenue du Bourget 60 - 1140 Brussels,
Belgium www.toyota-europe.com
Page 12 of 504
12Pictorial index
AYGO_OM_Europe_OM99R19E
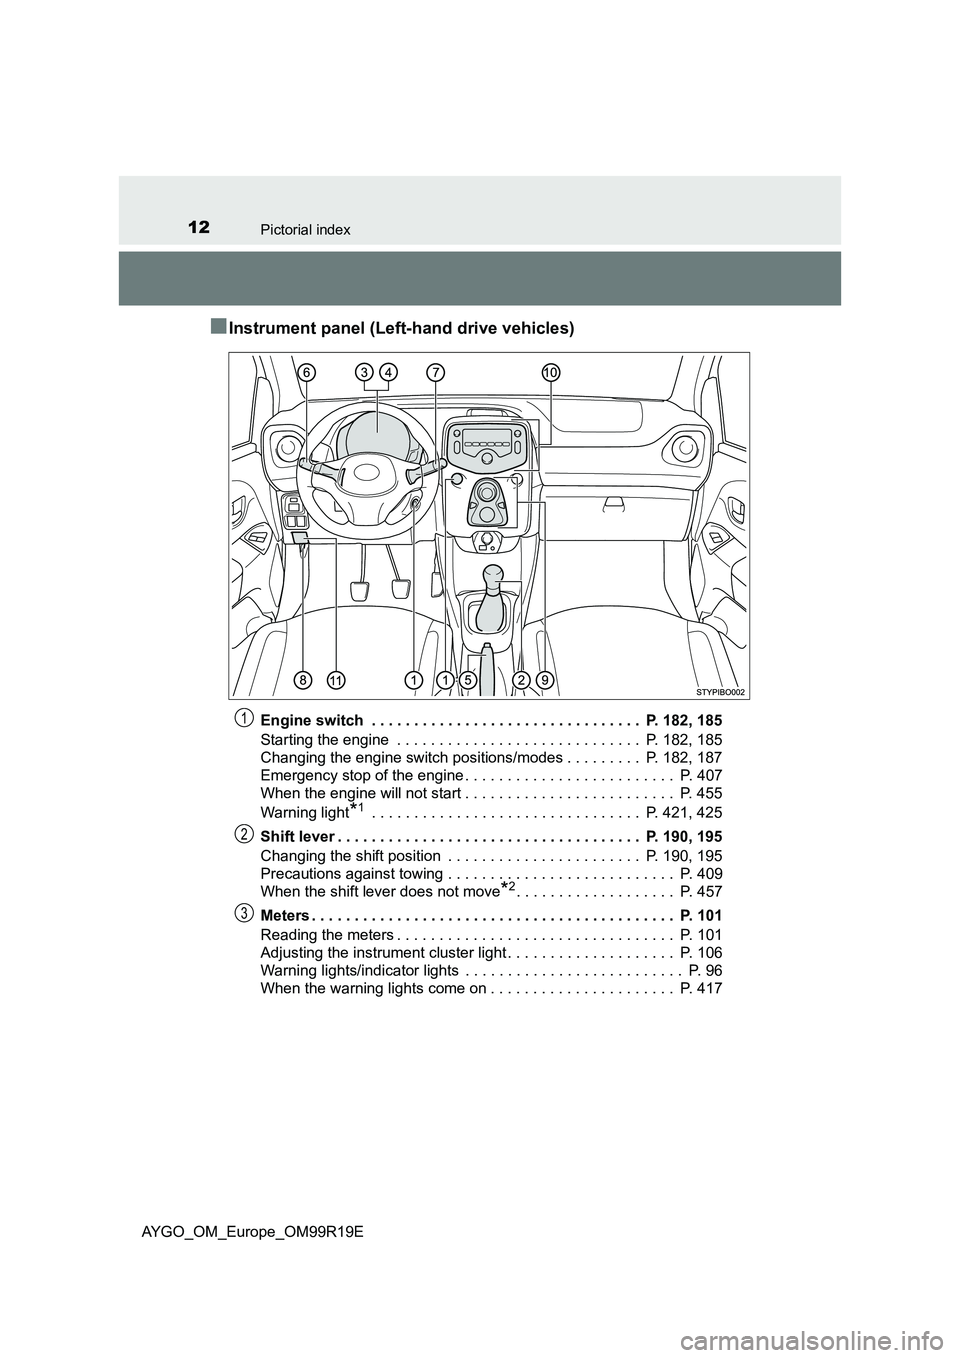
■Instrument panel (Left-hand drive vehicles)
Engine switch . . . . . . . . . . . . . . . . . . . . . . . . . . . . . . . . P. 182, 185
Starting the engine . . . . . . . . . . . . . . . . . . . . . . . . . . . . . P. 182, 185
Changing the engine switch positions/modes . . . . . . . . . P. 182, 187
Emergency stop of the engine . . . . . . . . . . . . . . . . . . . . . . . . . P. 407
When the engine will not start . . . . . . . . . . . . . . . . . . . . . . . . . P. 455
Warning light*1 . . . . . . . . . . . . . . . . . . . . . . . . . . . . . . . . P. 421, 425
Shift lever . . . . . . . . . . . . . . . . . . . . . . . . . . . . . . . . . . . . P. 190, 195
Changing the shift position . . . . . . . . . . . . . . . . . . . . . . . P. 190, 195
Precautions against towing . . . . . . . . . . . . . . . . . . . . . . . . . . . P. 409
When the shift lever does not move*2. . . . . . . . . . . . . . . . . . . P. 457
Meters . . . . . . . . . . . . . . . . . . . . . . . . . . . . . . . . . . . . . . . . . . . P. 101
Reading the meters . . . . . . . . . . . . . . . . . . . . . . . . . . . . . . . . . P. 101
Adjusting the instrument cluster light . . . . . . . . . . . . . . . . . . . . P. 106
Warning lights/indicator lights . . . . . . . . . . . . . . . . . . . . . . . . . . P. 96
When the warning lights come on . . . . . . . . . . . . . . . . . . . . . . P. 417
1
2
3
Page 18 of 504
18Pictorial index
AYGO_OM_Europe_OM99R19E
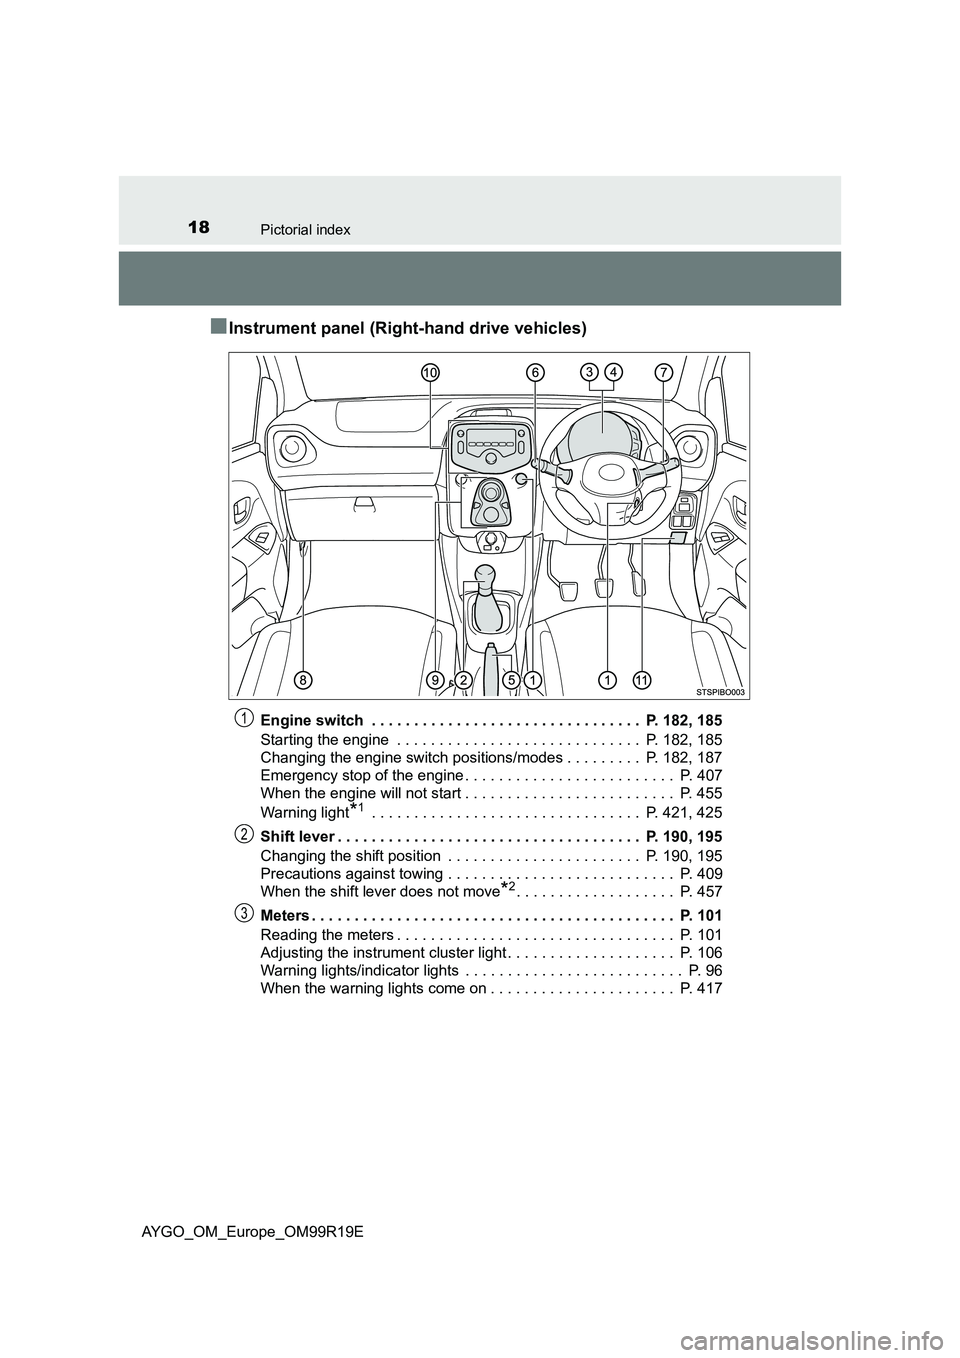
■Instrument panel (Right-hand drive vehicles)
Engine switch . . . . . . . . . . . . . . . . . . . . . . . . . . . . . . . . P. 182, 185
Starting the engine . . . . . . . . . . . . . . . . . . . . . . . . . . . . . P. 182, 185
Changing the engine switch positions/modes . . . . . . . . . P. 182, 187
Emergency stop of the engine . . . . . . . . . . . . . . . . . . . . . . . . . P. 407
When the engine will not start . . . . . . . . . . . . . . . . . . . . . . . . . P. 455
Warning light*1 . . . . . . . . . . . . . . . . . . . . . . . . . . . . . . . . P. 421, 425
Shift lever . . . . . . . . . . . . . . . . . . . . . . . . . . . . . . . . . . . . P. 190, 195
Changing the shift position . . . . . . . . . . . . . . . . . . . . . . . P. 190, 195
Precautions against towing . . . . . . . . . . . . . . . . . . . . . . . . . . . P. 409
When the shift lever does not move*2. . . . . . . . . . . . . . . . . . . P. 457
Meters . . . . . . . . . . . . . . . . . . . . . . . . . . . . . . . . . . . . . . . . . . . P. 101
Reading the meters . . . . . . . . . . . . . . . . . . . . . . . . . . . . . . . . . P. 101
Adjusting the instrument cluster light . . . . . . . . . . . . . . . . . . . . P. 106
Warning lights/indicator lights . . . . . . . . . . . . . . . . . . . . . . . . . . P. 96
When the warning lights come on . . . . . . . . . . . . . . . . . . . . . . P. 417
1
2
3
Page 37 of 504
371-1. For safe use
1
For safety and security
AYGO_OM_Europe_OM99R19E
WARNING
■SRS airbag precautions
Observe the following precautions regarding the SRS airbags.
Failure to do so may cause death or serious injury.
● The driver and all passengers in the vehicle must wear their seat belts
properly.
The SRS airbags are supplemental devic es to be used with the seat belts.
● The SRS driver airbag deploys with considerable force, and can cause
death or serious injury especially if the driver is very close to the airbag.
Since the risk zone for the driver’s airbag is the first 50 - 75 mm (2 - 3 in.)
of inflation, placing yourself 250 mm ( 10 in.) from your driver airbag pro-
vides you with a clear margin of safety. This distance is measured from
the center of the steering wheel to your breastbone. If you sit less than
250 mm (10 in.) away now, you can change your driving position in sev-
eral ways:
• Move your seat to the rear as far as you can while still reaching the ped-
als comfortably.
• Slightly recline the back of the seat. Although vehicle designs vary,
many drivers can achieve the 250 mm (10 in.) distance, even with the
driver seat all the way forward, simply by reclining the back of the seat
somewhat. If reclining the back of your seat makes it hard to see the
road, raise yourself by using a firm, non-slippery cushion, or raise the
seat if your vehicle has that feature.
• If your steering wheel is adjustable, tilt it downward. This points the air-
bag toward your chest instead of your head and neck.
The seat should be adjusted as recommended above, while still maintain-
ing control of the foot pedals, steering wheel, and your view of the instru-
ment panel controls.
Page 39 of 504
391-1. For safe use
1
For safety and security
AYGO_OM_Europe_OM99R19E
WARNING
■SRS airbag precautions
● Do not use seat accessories which cover the parts where the SRS side
airbags inflate as they may interfere with inflation of the airbags. Such
accessories may prevent the side airbags from activating correctly, disable
the system or cause the side airbags to inflate accidentally, resulting in
death or serious injury.
● Do not strike or apply significant levels of force to the area of the SRS air-
bag components.
Doing so can cause the SRS airbags to malfunction.
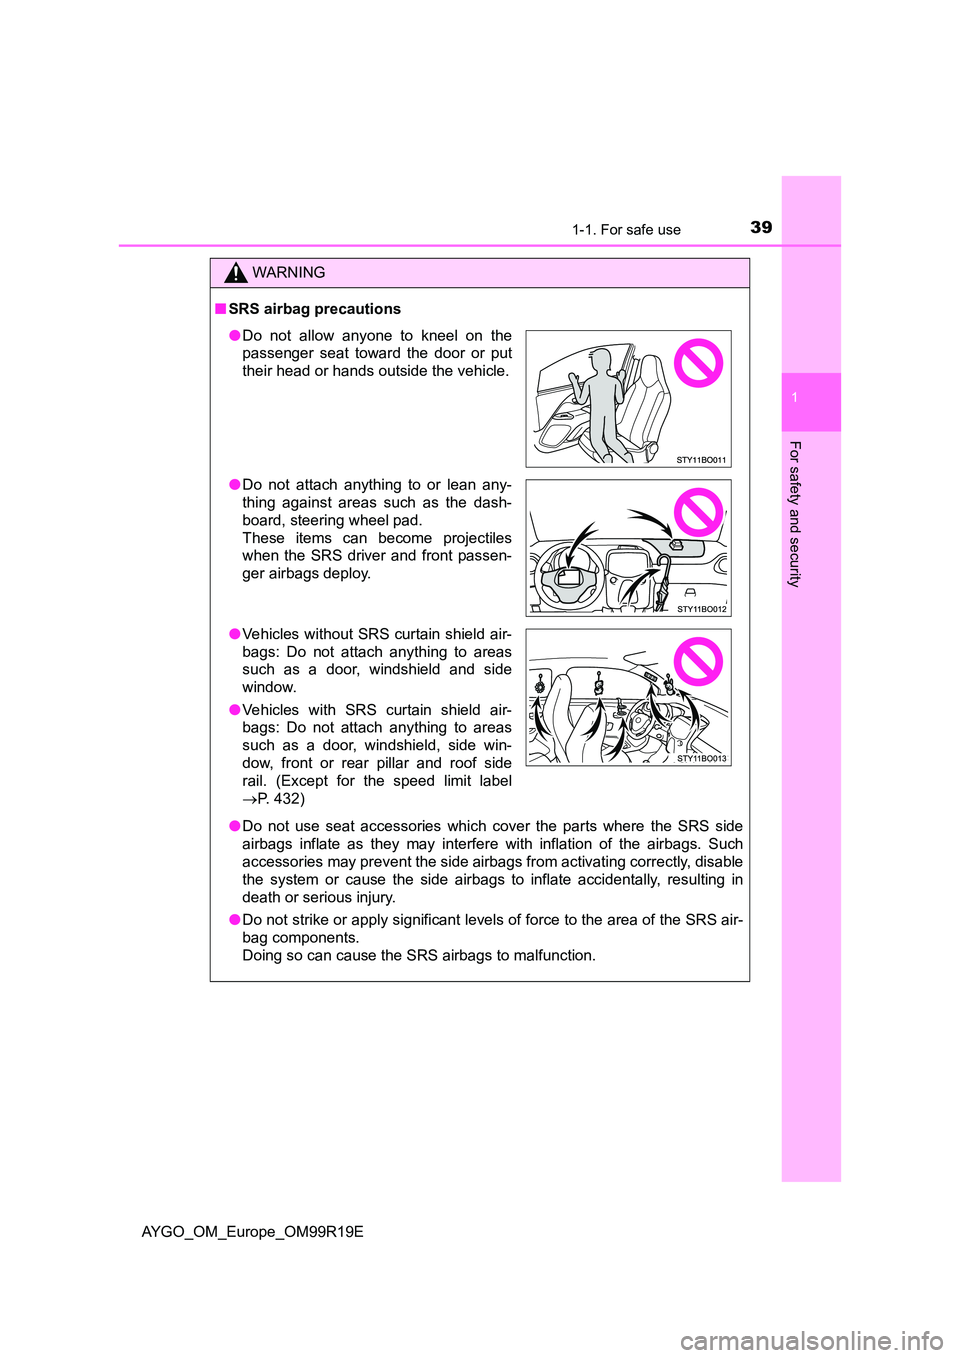
● Do not allow anyone to kneel on the
passenger seat toward the door or put
their head or hands outside the vehicle.
● Do not attach anything to or lean any-
thing against areas such as the dash-
board, steering wheel pad.
These items can become projectiles
when the SRS driver and front passen-
ger airbags deploy.
● Vehicles without SRS curtain shield air-
bags: Do not attach anything to areas
such as a door, windshield and side
window.
● Vehicles with SRS curtain shield air-
bags: Do not attach anything to areas
such as a door, windshield, side win-
dow, front or rear pillar and roof side
rail. (Except for the speed limit label
P. 432)
Page 65 of 504
651-2. Child safety
1
For safety and security
AYGO_OM_Europe_OM99R19E
◆Removing a child restraint system installed with a seat belt
Press the buckle release button and fully retract the seat belt.
When releasing the buckle, the chil d restraint system may spring up due
to the rebound of the seat cushion. Release the buckle while holding
down the child restraint system.
Since the seat belt automatically reels itself, slowly return it to the stow-
ing position.
■ When installing a child restraint system
You may need a locking clip to install the child restraint system. Follow the
instructions provided by the manufacturer of the system. If your child restraint
system does not provide a locking clip, you can purchase the following item
from any authorized Toyota retailer or Toyota authorized repairer, or any reli-
able repairer: Locking clip for child restraint system
(Part No. 73119-22010)
Page 111 of 504
1113-1. Key information
3
Operation of each component
AYGO_OM_Europe_OM99R19E
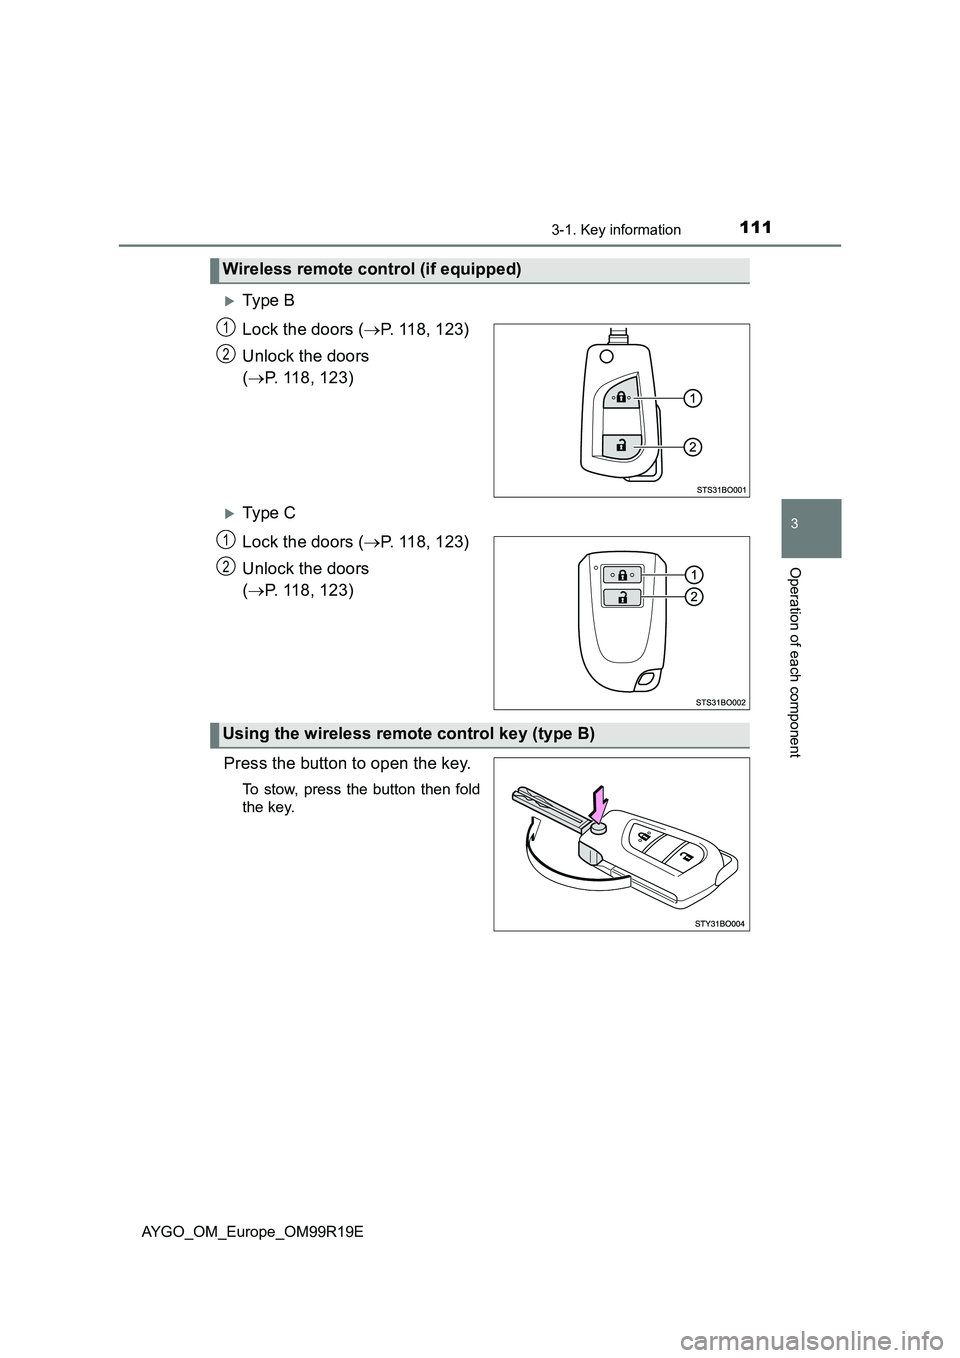
Ty pe B
Lock the doors ( P. 118, 123)
Unlock the doors
( P. 118, 123)
Ty pe C
Lock the doors ( P. 118, 123)
Unlock the doors
( P. 118, 123)
Press the button to open the key.
To stow, press the button then fold
the key.
Wireless remote control (if equipped)
1
2
1
2
Using the wireless remote control key (type B)
Page 122 of 504
1223-2. Opening, closing and locking the doors
AYGO_OM_Europe_OM99R19E
■Conditions affecting operation of the wireless remote control (if
equipped)
The wireless remote control function may not operate normally in the follow-
ing situations.
● When the wireless key battery is depleted
● Near a TV tower, radio station, electric power plant, airport or other facility
that generates strong radio waves
● When carrying a portable radio, cellular phone or other wireless communi-
cation device
● When multiple wireless keys are in the vicinity
● When the wireless key has come into contact with, or is covered by a metal-
lic object
● When a wireless key (that emits radio waves) is being used nearby
● When the wireless key has been left near an electrical appliance such as a
personal computer
● If window tint with a metallic content or metallic objects are attached to the
rear window
■ Conditions affecting operation of the smart entry & start system (if
equipped)
P. 132
WARNING
■To prevent an accident
Observe the following precautions while driving the vehicle.
Failure to do so may result in a door opening and an occupant throwing out
of the vehicle, resulting in death or serious injury.
● Ensure that all doors are properly closed.
● Do not pull the inside handle of the doors while driving.
Be especially careful for the front doors, as the doors may be opened even
if the inside lock buttons are in locked position.
● 5-door models: Set the rear door child-protector locks when children are
seated in the rear seats.
Page 132 of 504
1323-2. Opening, closing and locking the doors
AYGO_OM_Europe_OM99R19E
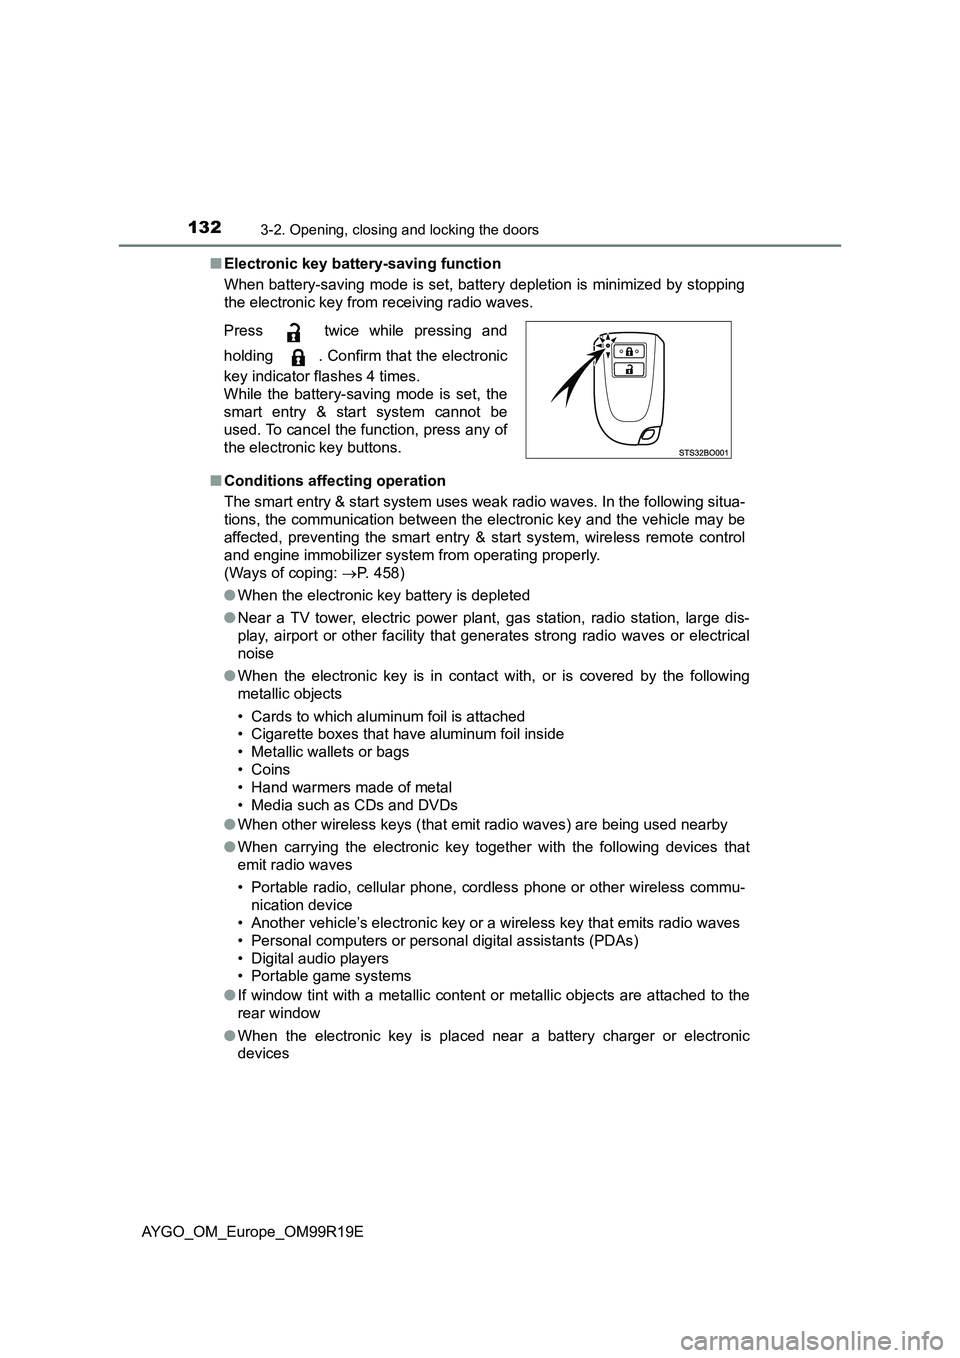
■ Electronic key battery-saving function
When battery-saving mode is set, battery depletion is minimized by stopping
the electronic key from receiving radio waves.
■ Conditions affecting operation
The smart entry & start system uses weak radio waves. In the following situa-
tions, the communication between the el ectronic key and the vehicle may be
affected, preventing the smart entry & start system, wireless remote control
and engine immobilizer system from operating properly.
(Ways of coping: P. 458)
● When the electronic key battery is depleted
● Near a TV tower, electric power plant, gas station, radio station, large dis-
play, airport or other facility that generates strong radio waves or electrical
noise
● When the electronic key is in contact with, or is covered by the following
metallic objects
• Cards to which aluminum foil is attached
• Cigarette boxes that have aluminum foil inside
• Metallic wallets or bags
• Coins
• Hand warmers made of metal
• Media such as CDs and DVDs
● When other wireless keys (that emit radio waves) are being used nearby
● When carrying the electronic key together with the following devices that
emit radio waves
• Portable radio, cellular phone, cordless phone or other wireless commu-
nication device
• Another vehicle’s electronic key or a wireless key that emits radio waves
• Personal computers or pers onal digital assistants (PDAs)
• Digital audio players
• Portable game systems
● If window tint with a metallic content or metallic objects are attached to the
rear window
● When the electronic key is placed near a battery charger or electronic
devices
Press twice while pressing and
holding . Confirm that the electronic
key indicator flashes 4 times.
While the battery-saving mode is set, the
smart entry & start system cannot be
used. To cancel the function, press any of
the electronic key buttons.