air condition TOYOTA AYGO 2021 Service Manual
[x] Cancel search | Manufacturer: TOYOTA, Model Year: 2021, Model line: AYGO, Model: TOYOTA AYGO 2021Pages: 546, PDF Size: 81 MB
Page 401 of 546
3997-3. Do-it-yourself maintenance
7
Maintenance and care
AYGO_OM_Europe_OM9A012E
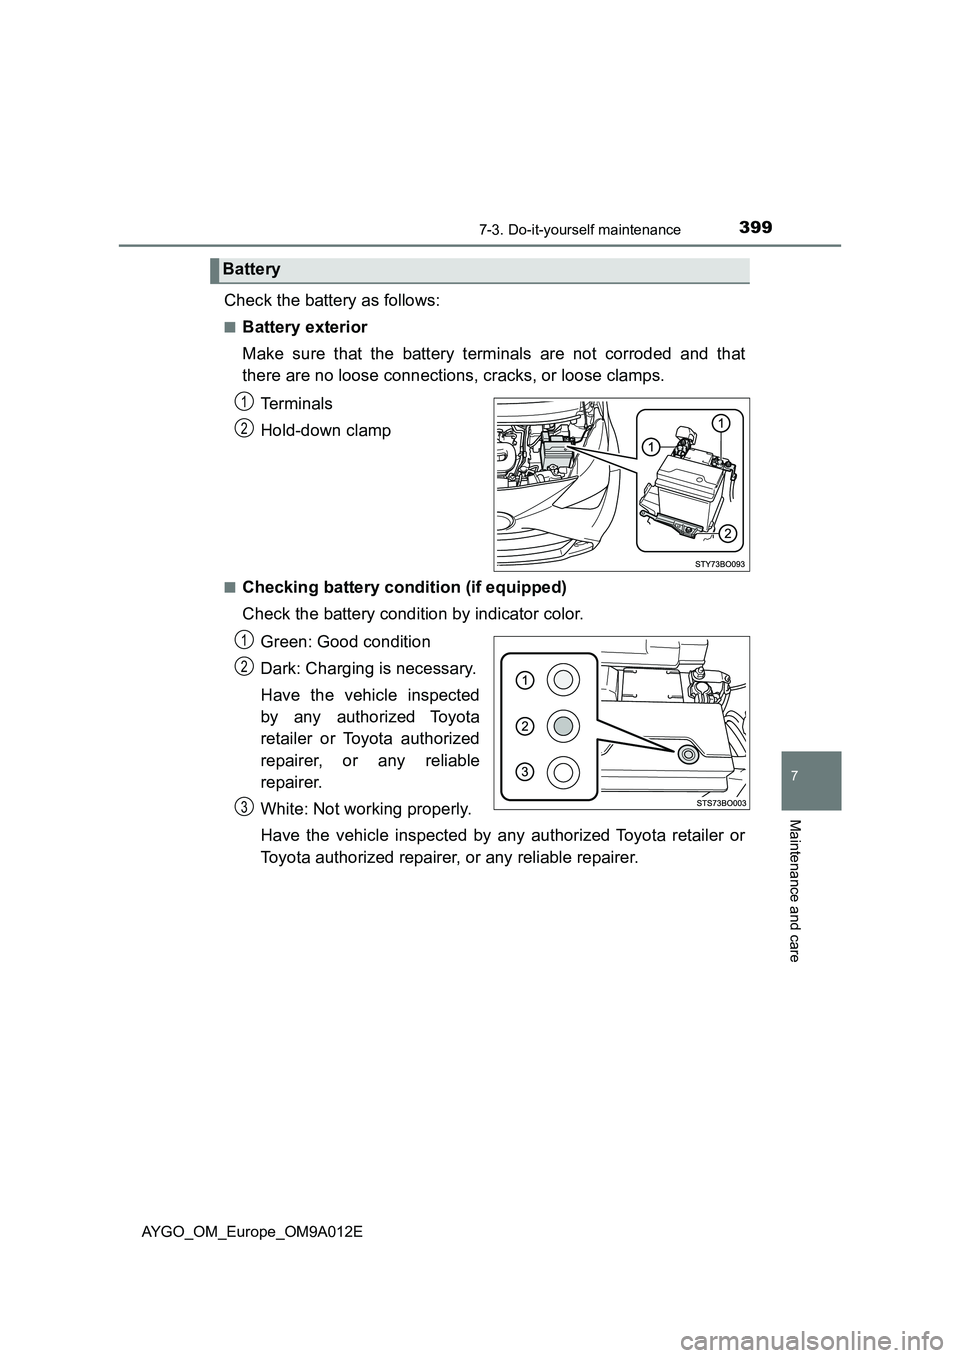
Check the battery as follows:
■Battery exterior
Make sure that the battery terminals are not corroded and that
there are no loose connections, cracks, or loose clamps.
Te r m i n a l s
Hold-down clamp
■Checking battery condition (if equipped)
Check the battery condition by indicator color.
Green: Good condition
Dark: Charging is necessary.
Have the vehicle inspected
by any authorized Toyota
retailer or Toyota authorized
repairer, or any reliable
repairer.
White: Not working properly.
Have the vehicle inspected by any authorized Toyota retailer or
Toyota authorized repairer, or any reliable repairer.
Battery
1
2
1
2
3
Page 407 of 546
4057-3. Do-it-yourself maintenance
7
Maintenance and care
AYGO_OM_Europe_OM9A012E
■When to replace your vehicle’s tires
Tires should be replaced if:
●The treadwear indicators are showing on a tire.
●You have tire damage such as cuts, splits, cracks deep enough to expose
the fabric, and bulges indicating internal damage
●A tire goes flat repeatedly or cannot be properly repaired due to the size or
location of a cut or other damage
If you are not sure, consult with any authorized Toyota retailer or Toyota
authorized repairer, or any reliable repairer.
■Tire life
Any tire over 6 years old must be checked by a qualified technician even if it
has seldom or never been used or damage is not obvious.
■Low profile tires (vehicles with 165/60R15 tires)
Generally, low profile tires will wear more rapidly and tire grip performance
will be reduced on snowy and/or icy roads when compared to standard tires.
Be sure to use snow tires or tire chains on snowy and/or icy roads and drive
carefully at a speed appropriate for road and weather conditions.
■If the tread on snow tires wears down below 4 mm (0.16 in.)
The effectiveness of the tires as snow tires is lost.
Your vehicle is equipped with a tire pressure warning system.
While the vehicle is in motion, the system monitors the fluctuations in
the wheel speed signals that are output by the speed sensor for the
brake control system.
It informs the driver if it detects a low tire inflation pressure.
◆Initializing the tire pressure warning system
■The tire pressure warning system must be initialized when
changing the tire
When the tire pressure warning system is initialized, the current tire
inflation pressure is set as the benchmark pressure.
■The initialization operation
●Make sure to carry out initialization after adjusting the tire infla-
tion pressure. Also, make sure the tires are cold before carrying
out initialization or tire inflation pressure adjustment.
●If you accidentally press the reset switch when initialization is not
necessary, adjust the tire inflation pressure to the specified level
when the tires are cold, and conduct initialization again.
Tire pressure warning system (if equipped)
Page 413 of 546
4117-3. Do-it-yourself maintenance
7
Maintenance and care
AYGO_OM_Europe_OM9A012E
WARNING
■Proper inflation is critical to save tire performance
Keep your tires properly inflated.
If the tires are not properly inflated, the following conditions may occur
which could lead to an accident resulting in death or serious injury:
● Excessive wear
● Uneven wear
● Poor handling
● Possibility of blowouts resulting from overheated tires
● Air leaking from between tire and wheel
● Wheel deformation and/or tire damage
● Greater possibility of tire damage while driving (due to road hazards,
expansion joints, sharp edges in the road, etc.)
NOTICE
■ When inspecting and adjusting tire inflation pressure
Be sure to put the tire valve caps back on.
If a valve cap is not installed, dirt or moisture may get into the valve and
cause an air leak, resulting in decreased tire inflation pressure.
Page 416 of 546
4147-3. Do-it-yourself maintenance
AYGO_OM_Europe_OM9A012E
Air conditioning filter
Vehicles without a smart entry & start system:
Turn the engine switch to the “LOCK” position.
Vehicles with a smart entry & start system:
Turn the engine switch off.
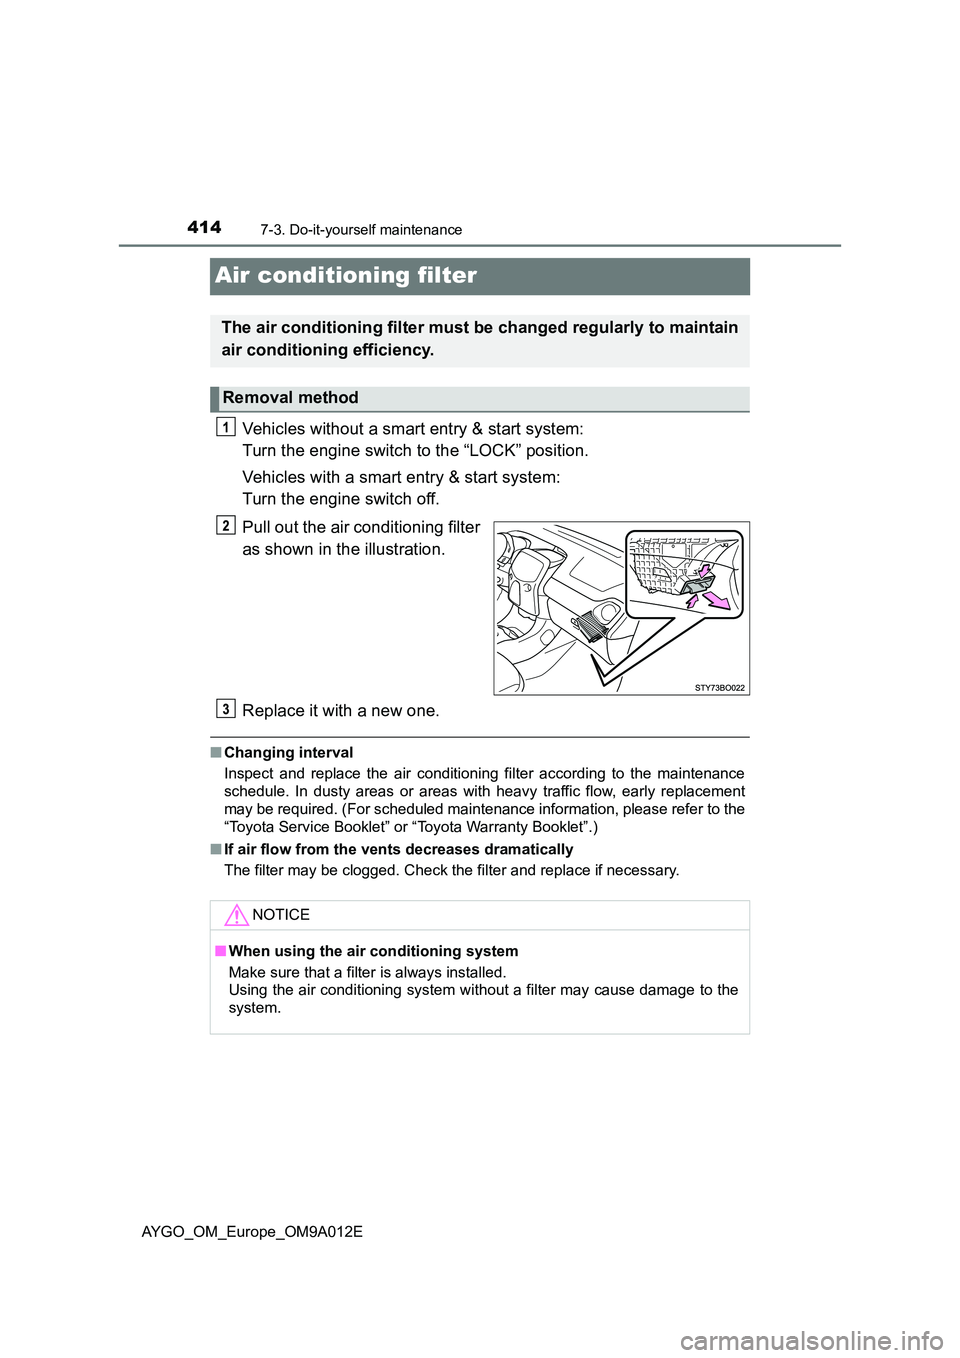
Pull out the air conditioning filter
as shown in the illustration.
Replace it with a new one.
■ Changing interval
Inspect and replace the air conditioning filter according to the maintenance
schedule. In dusty areas or areas with heavy traffic flow, early replacement
may be required. (For scheduled maintenance information, please refer to the
“Toyota Service Booklet” or “Toyota Warranty Booklet”.)
■ If air flow from the vents decreases dramatically
The filter may be clogged. Check the filter and replace if necessary.
The air conditioning filter must be changed regularly to maintain
air conditioning efficiency.
Removal method
NOTICE
■ When using the air conditioning system
Make sure that a filter is always installed.
Using the air conditi oning system without a filter may cause damage to the
system.
Page 422 of 546
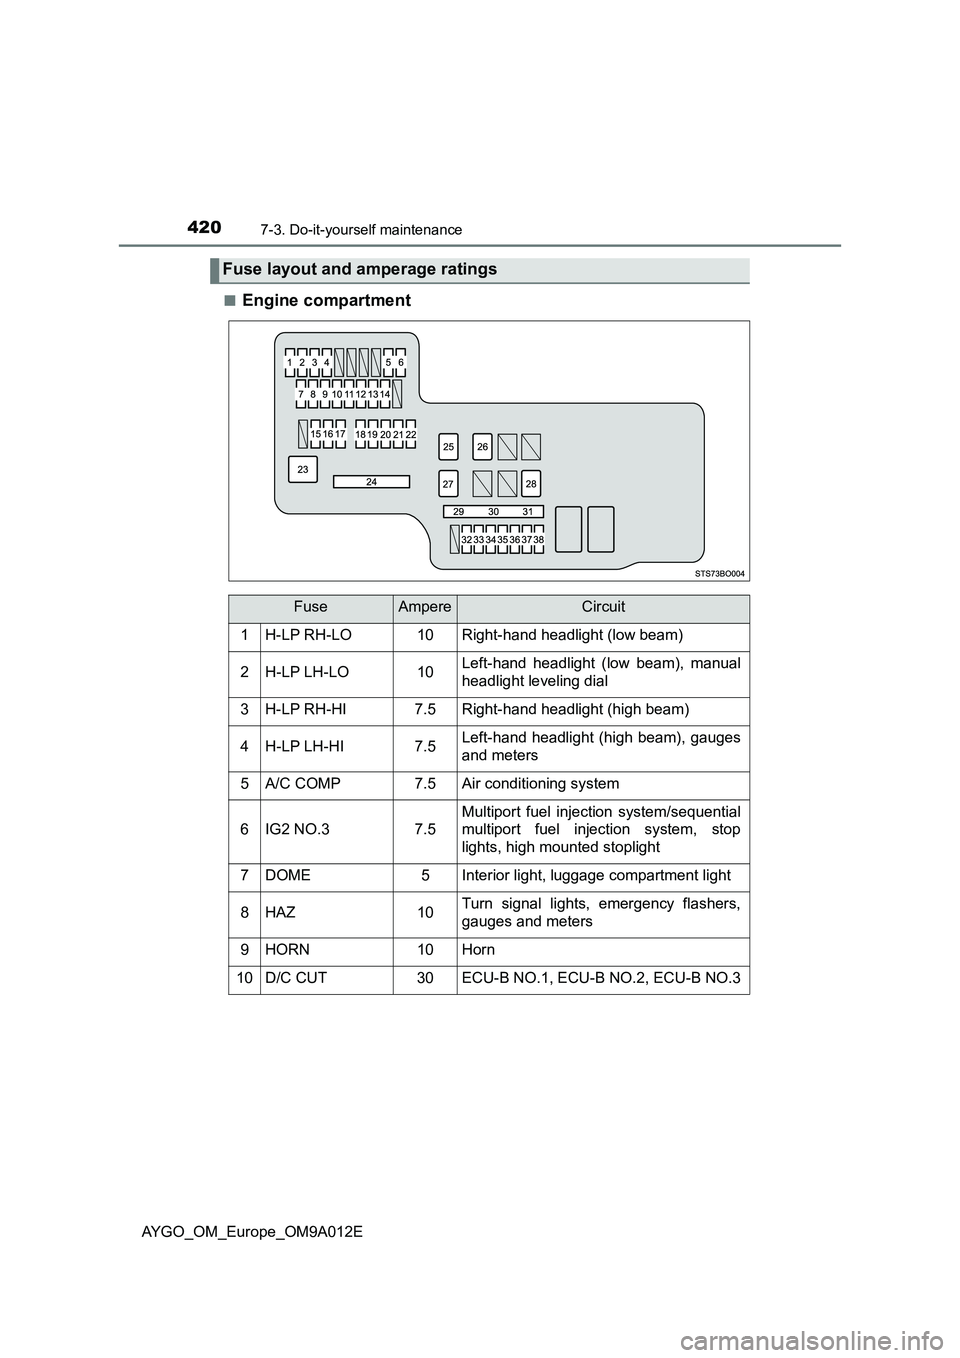
4207-3. Do-it-yourself maintenance
AYGO_OM_Europe_OM9A012E■
Engine compartment
Fuse layout and amperage ratings
FuseAmpereCircuit
1H-LP RH-LO10Right-hand headlight (low beam)
2H-LP LH-LO10Left-hand headlight (low beam), manual
headlight leveling dial
3H-LP RH-HI7.5Right-hand headlight (high beam)
4H-LP LH-HI7.5Left-hand headlight (high beam), gauges
and meters
5A/C COMP7.5Air conditioning system
6IG2 NO.37.5
Multiport fuel injection system/sequential
multiport fuel injection system, stop
lights, high mounted stoplight
7DOME5Interior light, luggage compartment light
8HAZ10Turn signal lights, emergency flashers,
gauges and meters
9HORN10Horn
10D/C CUT30ECU-B NO.1, ECU-B NO.2, ECU-B NO.3
Page 425 of 546
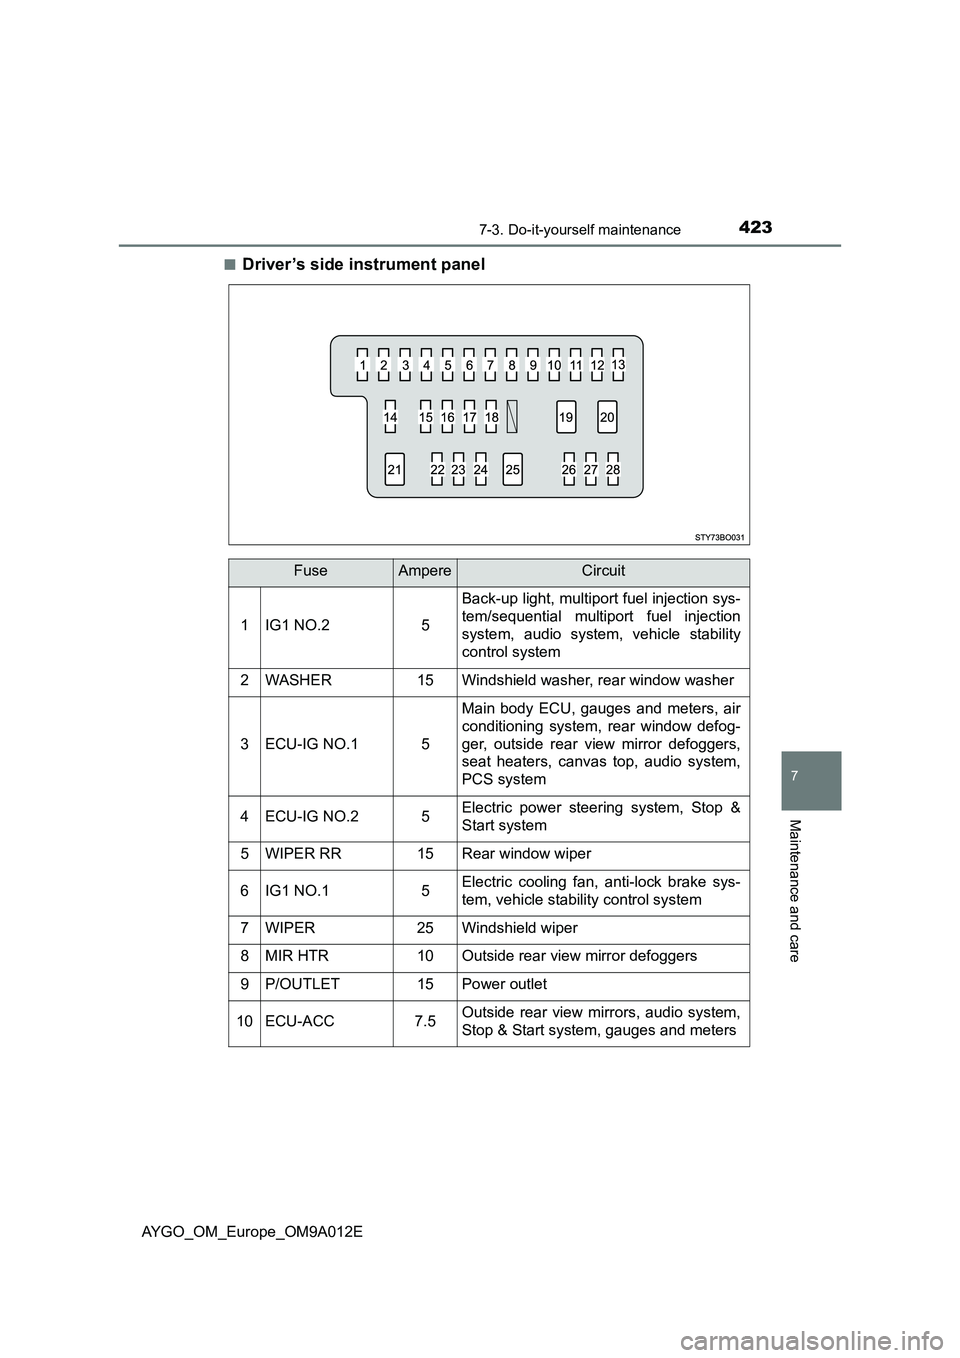
4237-3. Do-it-yourself maintenance
7
Maintenance and care
AYGO_OM_Europe_OM9A012E■
Driver ’s side instrument panel
FuseAmpereCircuit
1IG1 NO.25
Back-up light, multiport fuel injection sys-
tem/sequential multiport fuel injection
system, audio system, vehicle stability
control system
2WASHER15Windshield washer, rear window washer
3ECU-IG NO.15
Main body ECU, gauges and meters, air
conditioning system, rear window defog-
ger, outside rear view mirror defoggers,
seat heaters, canvas top, audio system,
PCS system
4ECU-IG NO.25Electric power steering system, Stop &
Start system
5WIPER RR15Rear window wiper
6IG1 NO.15Electric cooling fan, anti-lock brake sys-
tem, vehicle stability control system
7WIPER25Windshield wiper
8MIR HTR10Outside rear view mirror defoggers
9P/OUTLET15Power outlet
10ECU-ACC7.5Outside rear view mirrors, audio system,
Stop & Start system, gauges and meters
Page 426 of 546
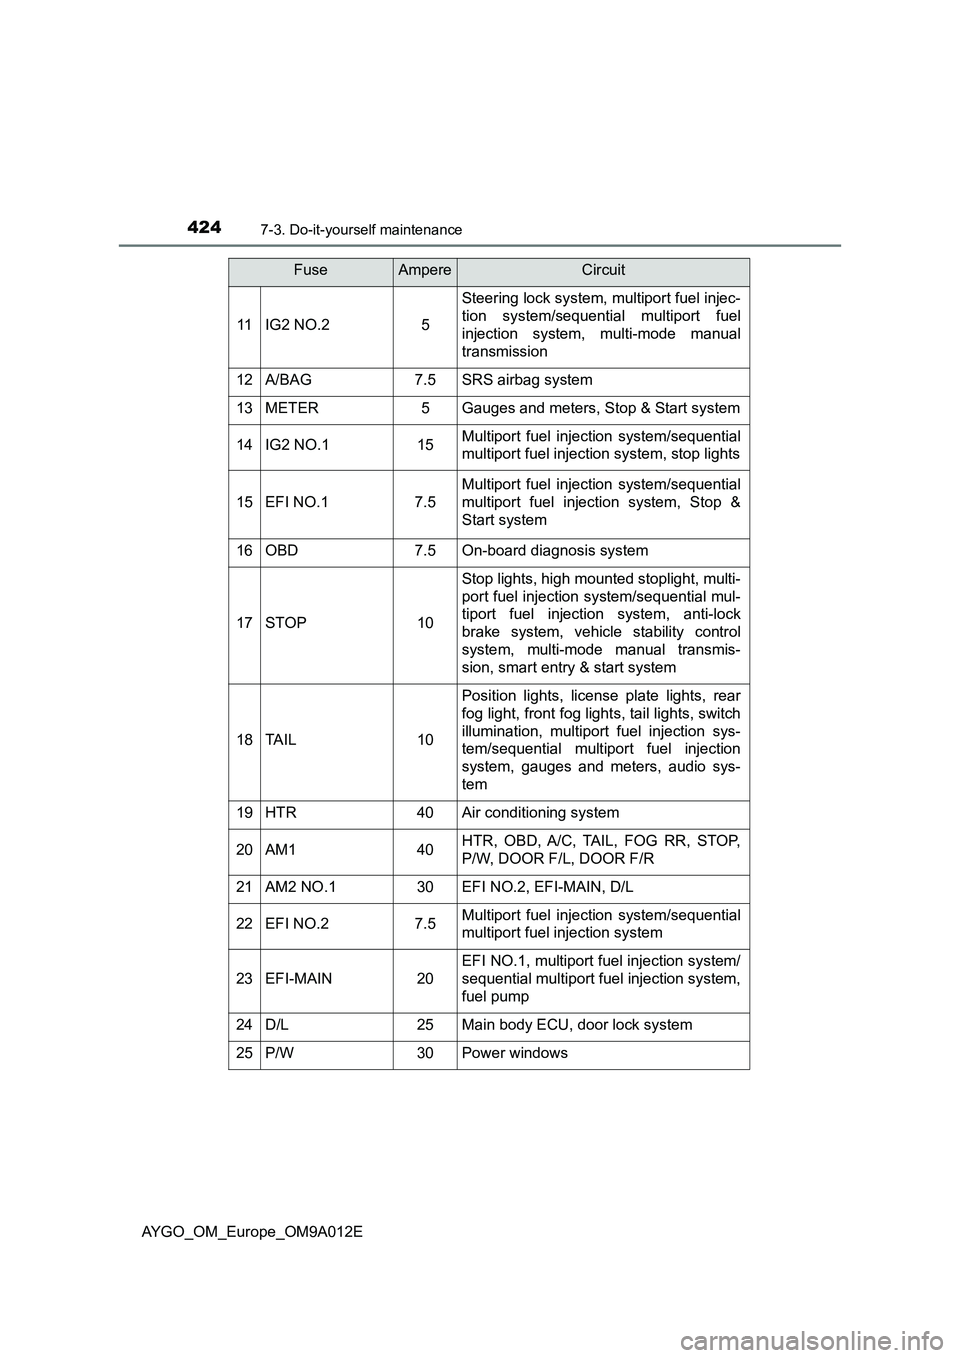
4247-3. Do-it-yourself maintenance
AYGO_OM_Europe_OM9A012E
11IG2 NO.25
Steering lock system, multiport fuel injec-
tion system/sequential multiport fuel
injection system, multi-mode manual
transmission
12A/BAG7.5SRS airbag system
13METER5Gauges and meters, Stop & Start system
14IG2 NO.115Multiport fuel injection system/sequential
multiport fuel injection system, stop lights
15EFI NO.17.5
Multiport fuel injection system/sequential
multiport fuel injection system, Stop &
Start system
16OBD7.5On-board diagnosis system
17STOP10
Stop lights, high mounted stoplight, multi-
port fuel injection system/sequential mul-
tiport fuel injection system, anti-lock
brake system, vehicle stability control
system, multi-mode manual transmis-
sion, smart entry & start system
18TA I L10
Position lights, license plate lights, rear
fog light, front fog lights, tail lights, switch
illumination, multiport fuel injection sys-
tem/sequential multiport fuel injection
system, gauges and meters, audio sys-
tem
19HTR40Air conditioning system
20AM140HTR, OBD, A/C, TAIL, FOG RR, STOP,
P/W, DOOR F/L, DOOR F/R
21AM2 NO.130EFI NO.2, EFI-MAIN, D/L
22EFI NO.27.5Multiport fuel injection system/sequential
multiport fuel injection system
23EFI-MAIN20
EFI NO.1, multiport fuel injection system/
sequential multiport fuel injection system,
fuel pump
24D/L25Main body ECU, door lock system
25P/W30Power windows
FuseAmpereCircuit
Page 427 of 546
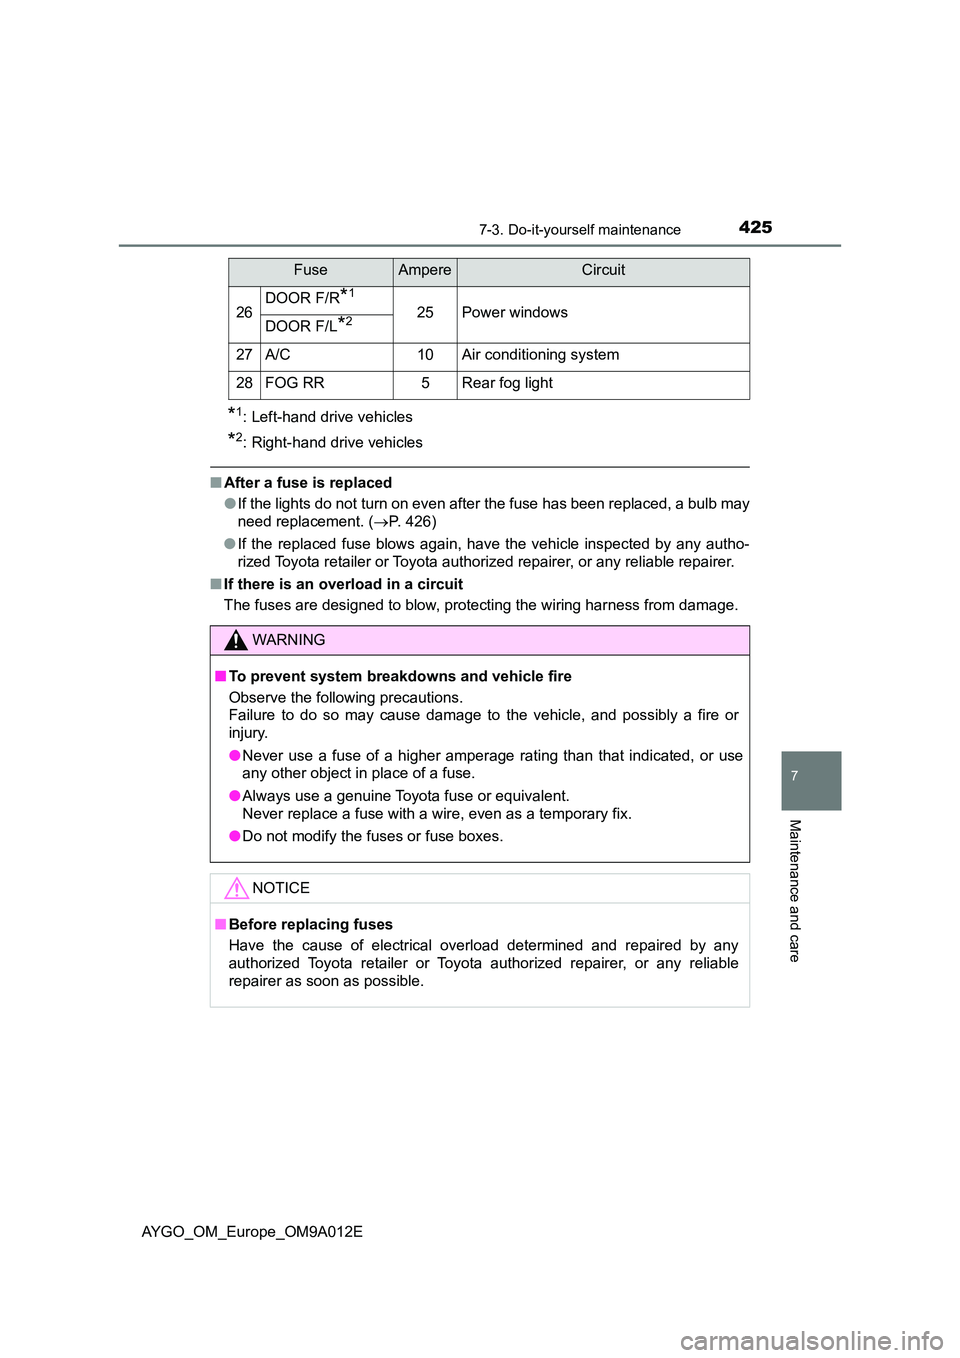
4257-3. Do-it-yourself maintenance
7
Maintenance and care
AYGO_OM_Europe_OM9A012E
*1: Left-hand drive vehicles
*2: Right-hand drive vehicles
■After a fuse is replaced
● If the lights do not turn on even after the fuse has been replaced, a bulb may
need replacement. ( P. 426)
● If the replaced fuse blows again, have the vehicle inspected by any autho-
rized Toyota retailer or Toyota authorized repairer, or any reliable repairer.
■ If there is an overload in a circuit
The fuses are designed to blow, protecting the wiring harness from damage.
26DOOR F/R*1
25Power windowsDOOR F/L*2
27A/C10Air conditioning system
28FOG RR5Rear fog light
WARNING
■ To prevent system breakdowns and vehicle fire
Observe the following precautions.
Failure to do so may cause damage to the vehicle, and possibly a fire or
injury.
● Never use a fuse of a higher amperage rating than that indicated, or use
any other object in place of a fuse.
● Always use a genuine Toyota fuse or equivalent.
Never replace a fuse with a wire, even as a temporary fix.
● Do not modify the fuses or fuse boxes.
NOTICE
■Before replacing fuses
Have the cause of electrical overload determined and repaired by any
authorized Toyota retailer or Toyota authorized repairer, or any reliable
repairer as soon as possible.
FuseAmpereCircuit
Page 449 of 546
4478-2. Steps to take in an emergency
8
When trouble arises
AYGO_OM_Europe_OM9A012E
If you think something is wrong
●Fluid leaks under the vehicle
(Water dripping from the air conditioning after use is normal.)
● Flat-looking tires or uneven tire wear
● High engine coolant temperature warning light comes on
● “STOP” indicator flashes
● Changes in exhaust sound
● Excessive tire squeal when cornering
● Strange noises related to the suspension system
● Pinging or other noises related to the engine
● Engine misses, stumbling or running roughly
● Appreciable loss of power
● Vehicle pulls heavily to one side when braking
● Vehicle pulls heavily to one side when driving on a level road
● Loss of brake effectiveness, spongy feeling, pedal almost touches
the floor
If you notice any of the following symptoms, your vehicle proba-
bly needs adjustment or repair. Contact any authorized Toyota
retailer or Toyota authorized repairer, or any reliable repairer as
soon as possible.
Visible symptoms
Audible symptoms
Operational symptoms
Page 482 of 546
4808-2. Steps to take in an emergency
AYGO_OM_Europe_OM9A012E
WARNING
■Driving to spread the liquid sealant evenly
Observe the following precautions to reduce the risk of accidents.
Failure to do so may result in a loss of vehicle control and cause death or
serious injury.
● Drive the vehicle carefully at a low speed. Be especially careful when turn-
ing and cornering.
● If the vehicle does not drive straight or you feel a pull through the steering
wheel, stop the vehicle and check the following:
• Tire condition. The tire may have separated from the wheel.
• Tire inflation pressure. If tire inflation pressure is 130 kPa (1.3 kgf/cm2
or bar, 19 psi) or less, the tire may be severely damaged.
NOTICE
■ When performing an emergency repair
● A tire should only be repaired with the emergency tire puncture repair kit if
the damage is caused by a sharp object such as nail or screw passing
through the tire tread.
Do not remove the sharp object from the tire. Removing the object may
widen the opening and disenable emergenc y repair with the repair kit.
● The repair kit is not waterproof. Make sure that the repair kit is not
exposed to water, such as when it is being used in the rain.
● Do not put the repair kit directly onto dusty ground such as sand at the
side of the road. If the repair kit vacuums up dust etc., a malfunction may
occur.
● Do not turn the bottle upside down when using it, as doing so may cause
damage to the compressor.
■ Handling the emergency tire puncture repair kit
● The repair kit power source should be 12 V DC suitable for vehicle use. Do
not connect the repair kit to any other source.
● If gasoline splatters on the repair kit, the repair kit may deteriorate. Take
care not to allow gasoline to contact it.
● Place the repair kit in a storage to prevent it from being exposed to dirt or
water.
● Store the repair kit in the luggage compartment out of reach of children.
● Do not disassemble or modify the repair kit. Do not subject parts such as
the air pressure gauge to impacts. This may cause a malfunction.