Long TOYOTA BZ4X 2022 (in English) User Guide
[x] Cancel search | Manufacturer: TOYOTA, Model Year: 2022, Model line: BZ4X, Model: TOYOTA BZ4X 2022Pages: 674, PDF Size: 120.02 MB
Page 129 of 674
127
2
Owners Manual_Europe_M42D76_en
2-2. Charging
Electric Vehicle system
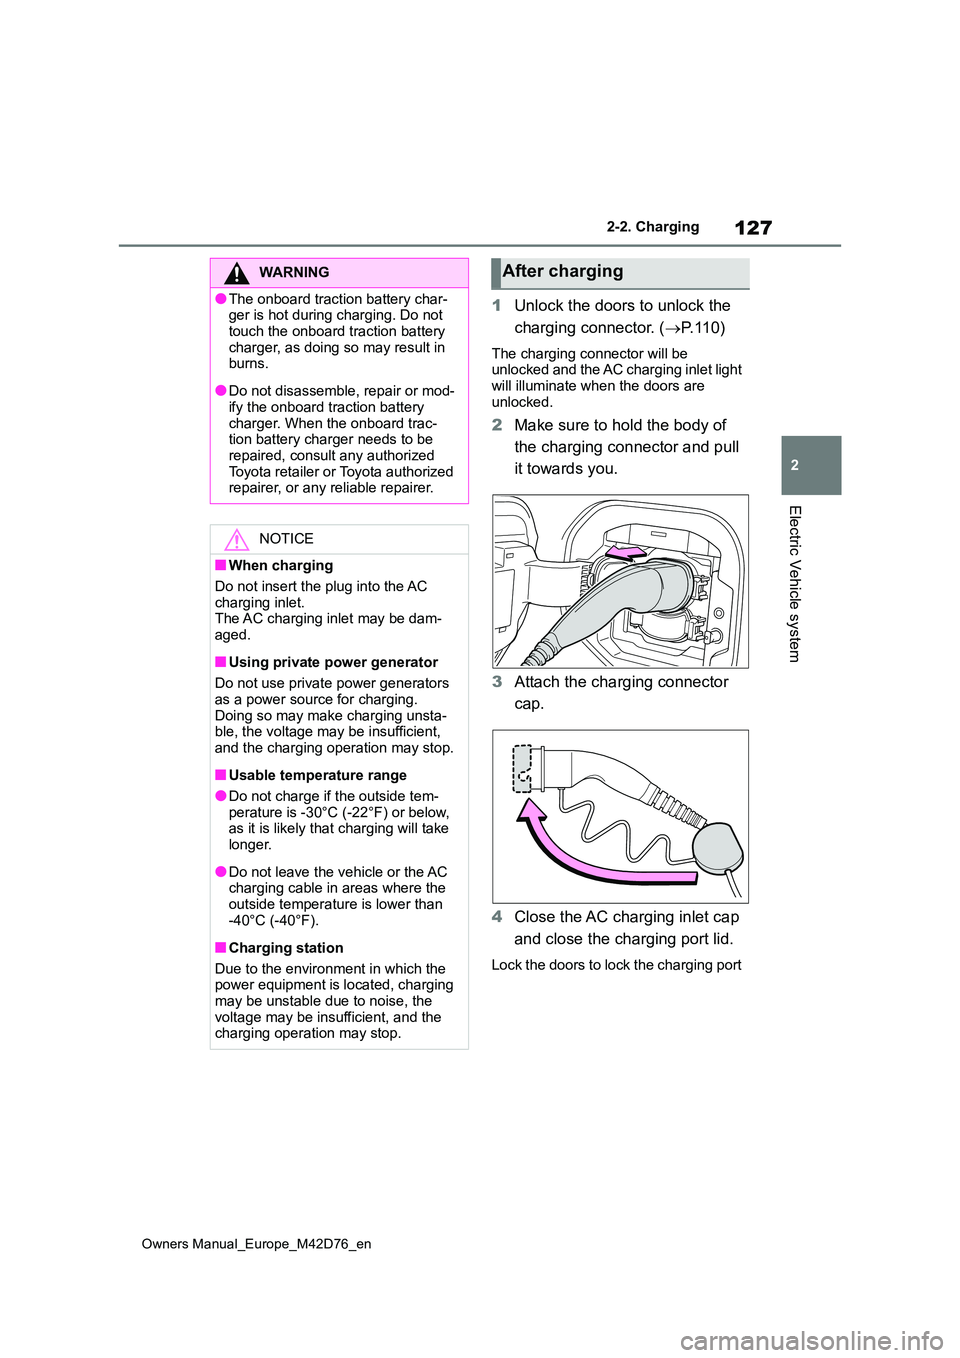
1Unlock the doors to unlock the
charging connector. ( P. 1 1 0 )
The charging connector will be unlocked and the AC charging inlet light
will illuminate when the doors are unlocked.
2 Make sure to hold the body of
the charging connector and pull
it towards you.
3 Attach the charging connector
cap.
4 Close the AC charging inlet cap
and close the charging port lid.
Lock the doors to lock the charging port
WARNING
●The onboard traction battery char- ger is hot during charging. Do not
touch the onboard traction battery charger, as doing so may result in burns.
●Do not disassemble, repair or mod-ify the onboard traction battery
charger. When the onboard trac- tion battery charger needs to be repaired, consult any authorized
Toyota retailer or Toyota authorized repairer, or any reliable repairer.
NOTICE
■When charging
Do not insert the plug into the AC charging inlet.The AC charging inlet may be dam-
aged.
■Using private power generator
Do not use private power generators as a power source for charging.
Doing so may make charging unsta- ble, the voltage may be insufficient, and the charging operation may stop.
■Usable temperature range
●Do not charge if the outside tem-
perature is -30°C (-22°F) or below, as it is likely that charging will take longer.
●Do not leave the vehicle or the AC charging cable in areas where the
outside temperature is lower than -40°C (-40°F).
■Charging station
Due to the environment in which the power equipment is located, charging
may be unstable due to noise, the voltage may be insufficient, and the charging operation may stop.
After charging
Page 130 of 674
128
Owners Manual_Europe_M42D76_en
2-2. Charging
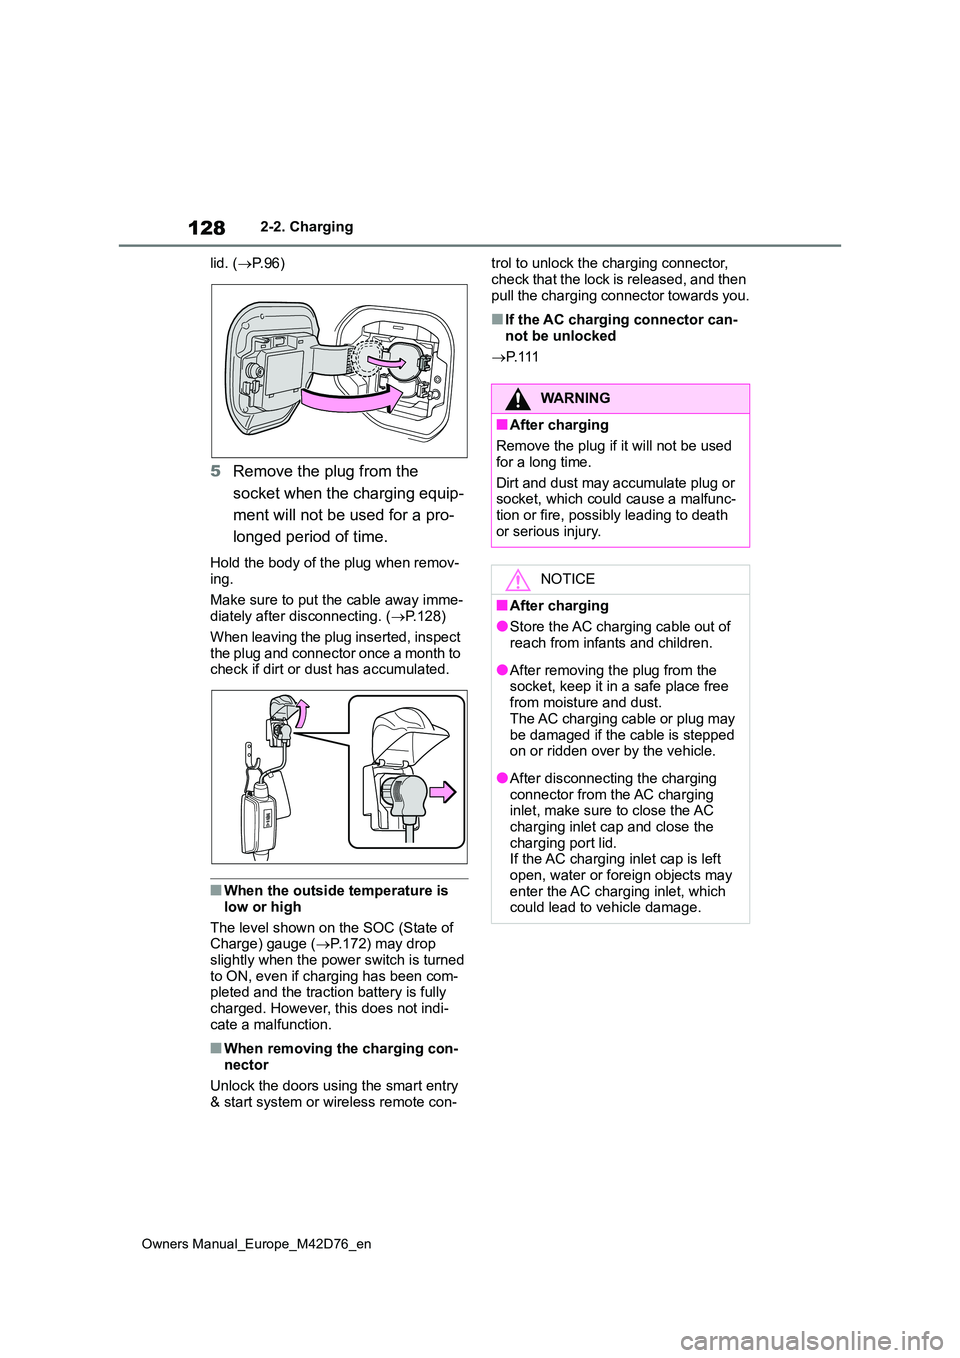
lid. ( P. 9 6 )
5Remove the plug from the
socket when the charging equip-
ment will not be used for a pro-
longed period of time.
Hold the body of the plug when remov- ing.
Make sure to put the cable away imme- diately after disconnecting. ( P.128)
When leaving the plug inserted, inspect
the plug and connector once a month to check if dirt or dust has accumulated.
■When the outside temperature is
low or high
The level shown on the SOC (State of Charge) gauge ( P.172) may drop
slightly when the power switch is turned to ON, even if charging has been com-pleted and the traction battery is fully
charged. However, this does not indi- cate a malfunction.
■When removing the charging con-nector
Unlock the doors using the smart entry & start system or wireless remote con-
trol to unlock the charging connector,
check that the lock is released, and then pull the charging connector towards you.
■If the AC charging connector can-not be unlocked
P. 1 1 1
WARNING
■After charging
Remove the plug if it will not be used
for a long time.
Dirt and dust may accumulate plug or socket, which could cause a malfunc-
tion or fire, possibly leading to death or serious injury.
NOTICE
■After charging
●Store the AC charging cable out of reach from infants and children.
●After removing the plug from the socket, keep it in a safe place free
from moisture and dust. The AC charging cable or plug may
be damaged if the cable is stepped on or ridden over by the vehicle.
●After disconnecting the charging connector from the AC charging inlet, make sure to close the AC
charging inlet cap and close the charging port lid.If the AC charging inlet cap is left
open, water or foreign objects may enter the AC charging inlet, which could lead to vehicle damage.
Page 132 of 674
130
Owners Manual_Europe_M42D76_en
2-2. Charging
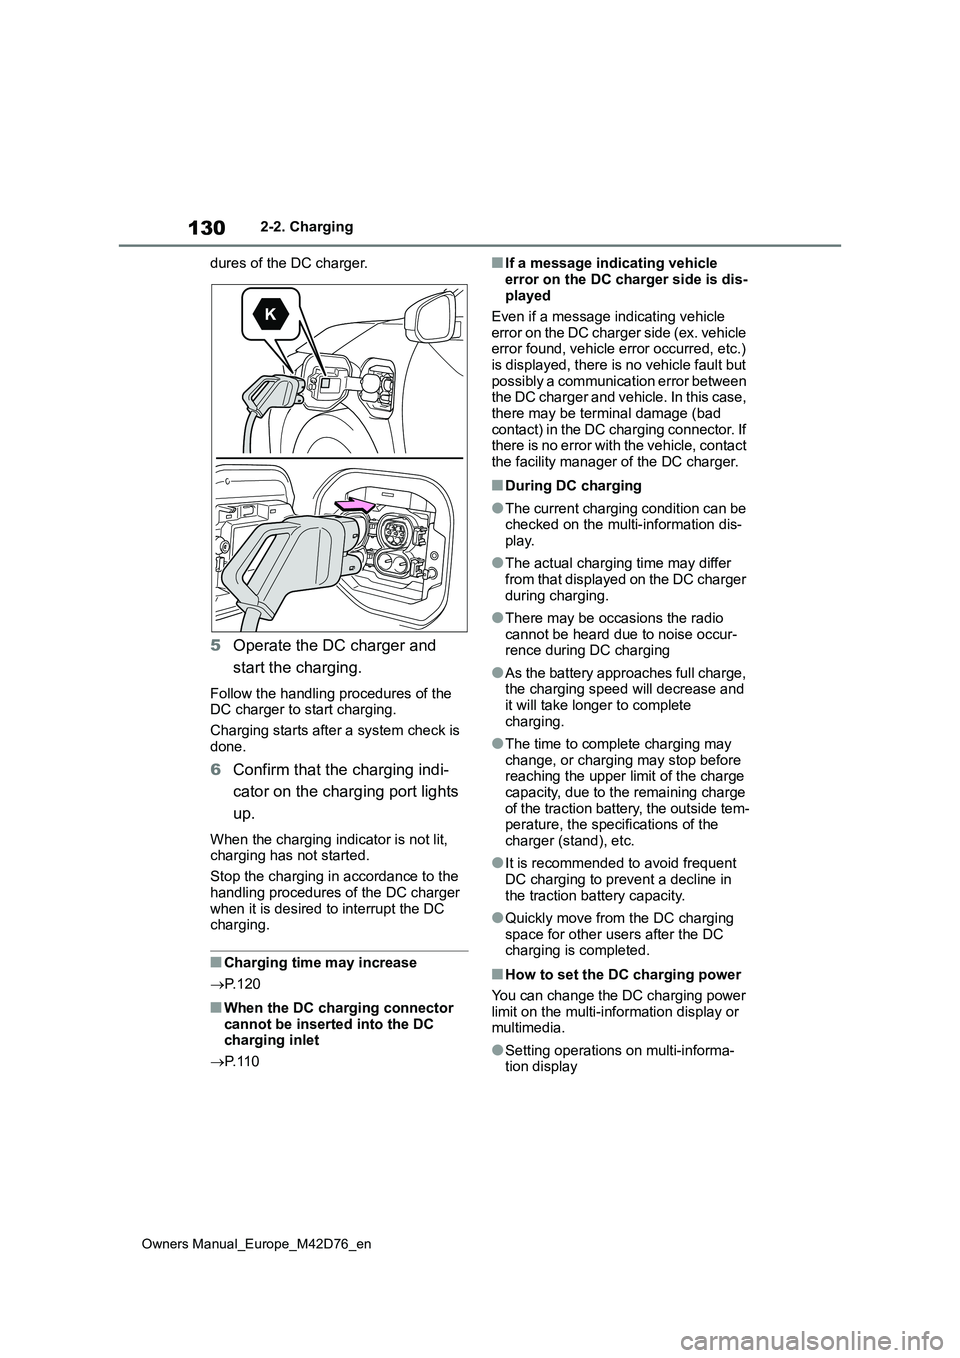
dures of the DC charger.
5 Operate the DC charger and
start the charging.
Follow the handling procedures of the DC charger to start charging.
Charging starts after a system check is
done.
6 Confirm that the charging indi-
cator on the charging port lights
up.
When the charging indicator is not lit, charging has not started.
Stop the charging in accordance to the
handling procedures of the DC charger when it is desired to interrupt the DC charging.
■Charging time may increase
P. 1 2 0
■When the DC charging connector cannot be inserted into the DC charging inlet
P. 1 1 0
■If a message indicating vehicle
error on the DC charger side is dis- played
Even if a message indicating vehicle
error on the DC charger side (ex. vehicle error found, vehicle error occurred, etc.) is displayed, there is no vehicle fault but
possibly a communication error between the DC charger and vehicle. In this case, there may be terminal damage (bad
contact) in the DC charging connector. If there is no error with the vehicle, contact the facility manager of the DC charger.
■During DC charging
●The current charging condition can be checked on the multi-information dis-
play.
●The actual charging time may differ
from that displayed on the DC charger during charging.
●There may be occasions the radio cannot be heard due to noise occur-rence during DC charging
●As the battery approaches full charge, the charging speed will decrease and
it will take longer to complete charging.
●The time to complete charging may change, or charging may stop before reaching the upper limit of the charge
capacity, due to the remaining charge of the traction battery, the outside tem-perature, the specifications of the
charger (stand), etc.
●It is recommended to avoid frequent
DC charging to prevent a decline in the traction battery capacity.
●Quickly move from the DC charging space for other users after the DC charging is completed.
■How to set the DC charging power
You can change the DC charging power limit on the multi-information display or multimedia.
●Setting operations on multi-informa-tion display
Page 143 of 674
141
2
Owners Manual_Europe_M42D76_en
2-2. Charging
Electric Vehicle system
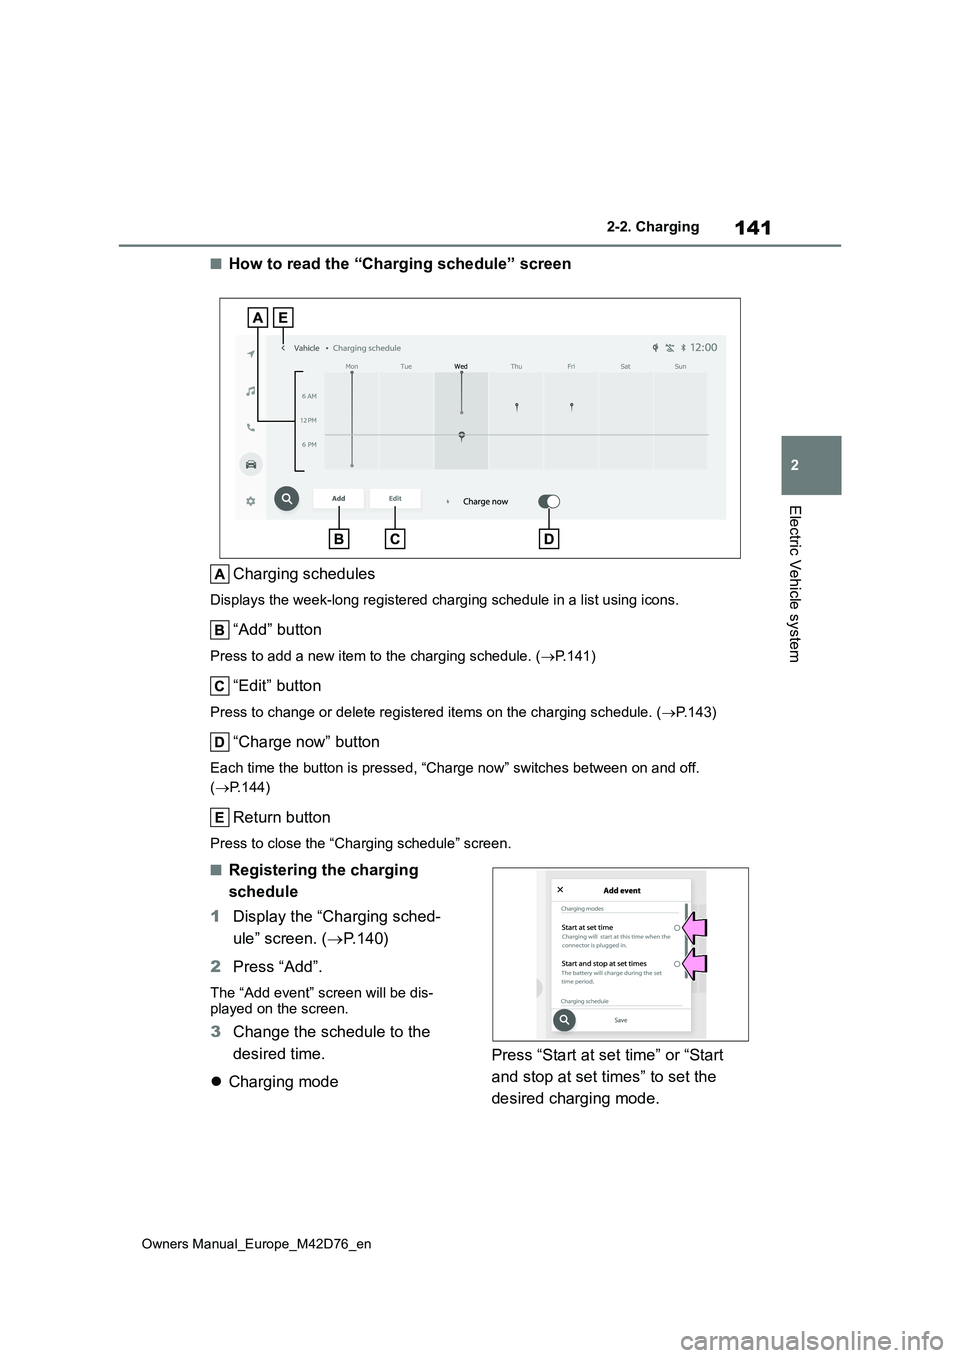
■How to read the “Charging schedule” screen
Charging schedules
Displays the week-long registered charging schedule in a list u sing icons.
“Add” button
Press to add a new item to the charging schedule. (P.141)
“Edit” button
Press to change or delete registered items on the charging schedule. (P.143)
“Charge now” button
Each time the button is pressed, “Charge now” switches between on and off.
( P.144)
Return button
Press to close the “Charging schedule” screen.
■Registering the charging
schedule
1 Display the “Charging sched-
ule” screen. ( P. 1 4 0 )
2 Press “Add”.
The “Add event” screen will be dis- played on the screen.
3 Change the schedule to the
desired time.
Charging mode
Press “Start at set time” or “Start
and stop at set times” to set the
desired charging mode.
Page 148 of 674
146
Owners Manual_Europe_M42D76_en
2-2. Charging
Mode”.
■Meter display while charging
After turning the power switch to ON while charging, the power switch auto-matically turns off if My Room Mode is
not selected within approximately 100 seconds.
■When using My Room Mode the fol-lowing may occur
●When the remaining charge of the traction battery drops to the lower
limit, the air conditioning system auto- matically stops. In that case, the air conditioning system can not operate
until the remaining charge of the trac- tion battery increases. Turn off the power switch once, then use My
Room Mode after the remaining charge of the traction battery increases.
●If the doors are unlocked while using My Room mode, the AC charging con-
nector will be unlocked and My Room mode will be stopped. To use My Room mode again, perform the opera-
tion to start it. ( P.145) In addition, when using AC charger at the public charging station, it is necessary to
perform the operation to start the charger before using My Room mode.
●The charging time of the traction bat-tery gets longer.
●Noise may be heard from the radio depending on conditions of the radio
wave.
●The surrounding area of the onboard traction battery charger in the motor
compartment may become hot.
●The electric power steering system
warning light (yellow) may turn on, but this is not a malfunction.
■Using My Room Mode during DC charging
When using My Room mode during DC charging, the state of charge completion will be lower than when not using My
Room Mode.
■When “My Room Mode” is used while the traction battery is fully charged
When the power switch is turned on
while the traction battery is fully charged
and the charging connector that sup-
plies power is connected, “Charging
Port Lid is Open” is displayed on the
multi-information display. In this case,
press on the meter control switches
to display the setting screen of “My
Room Mode”, and then select “My
Room Mode”.
When “My Room Mode” is used while
the traction battery is fully charged, the electric power of the traction battery may be consumed. In this case,
charging may be performed again.
■Warning message display
When trying to start My Room Mode or My Room Mode is being used , if a message
is displayed on the multi-information display, refer to the cor responding table and perform the appropriate correction procedures.
MessageCorrection procedure
“Traction Battery is too Low
for “My Room Mode””
There is no remaining charge of the traction battery to
start My Room Mode. Wait until the remaining charge
of the traction battery increases, start My Room Mode.
Page 150 of 674
148
Owners Manual_Europe_M42D76_en
2-2. Charging
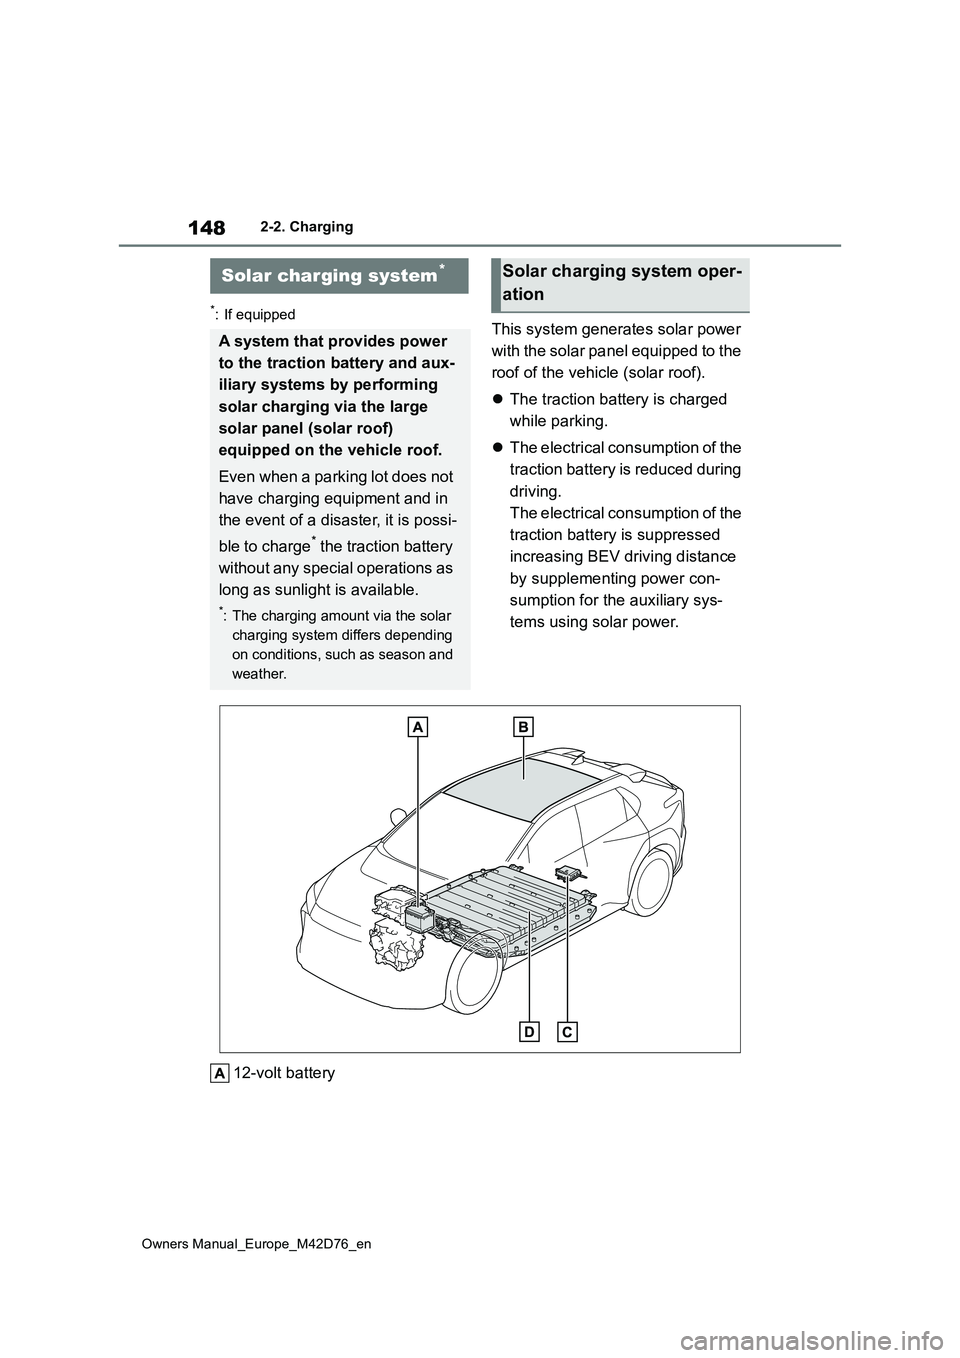
*: If equippedThis system generates solar power
with the solar panel equipped to the
roof of the vehicle (solar roof).
The traction battery is charged
while parking.
The electrical consumption of the
traction battery is reduced during
driving.
The electrical consumption of the
traction battery is suppressed
increasing BEV driving distance
by supplementing power con-
sumption for the auxiliary sys-
tems using solar power.
12-volt battery
Solar charging system*
A system that provides power
to the traction battery and aux-
iliary systems by performing
solar charging via the large
solar panel (solar roof)
equipped on the vehicle roof.
Even when a parking lot does not
have charging equipment and in
the event of a disaster, it is possi-
ble to charge* the traction battery
without any special operations as
long as sunlight is available.
*: The charging amount via the solar
charging system differs depending
on conditions, such as season and
weather.
Solar charging system oper-
ation
Page 175 of 674
173
3
Owners Manual_Europe_M42D76_en
3-1. Instrument cluster
Vehicle status information and indicators
Displays the amount of charge remaining in the traction battery.
Driving range
Displays driving range with remaining charge. (P.247)
When the air conditioning system is operating, and the driving range with the
air conditioning system on are displayed.
Odometer and trip meter display ( P.174)
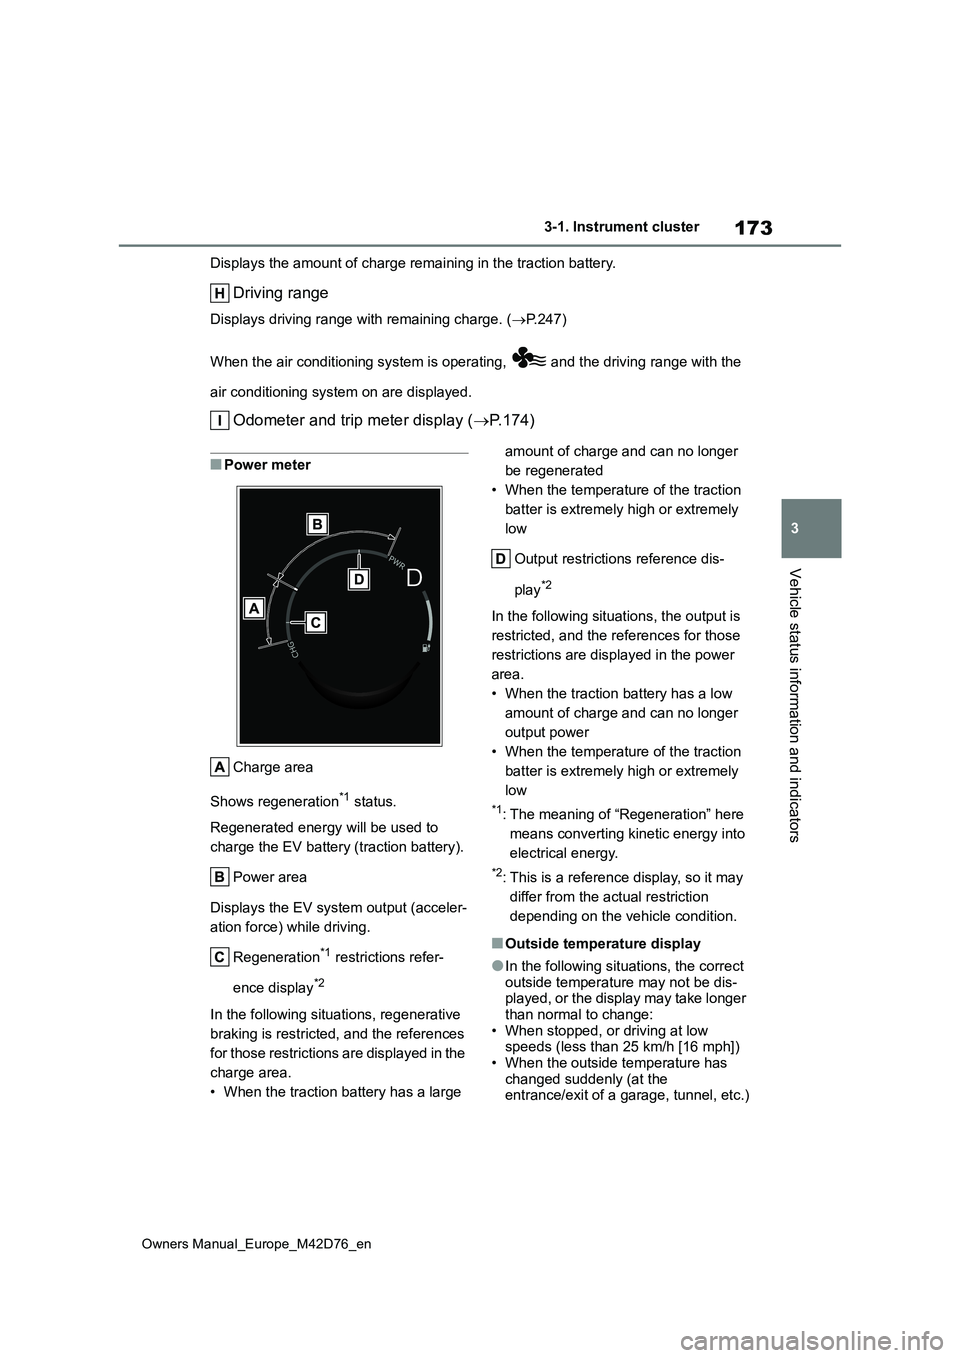
■Power meter
Charge area
Shows regeneration*1 status.
Regenerated energy will be used to
charge the EV battery (traction battery).
Power area
Displays the EV system output (acceler-
ation force) while driving.
Regeneration*1 restrictions refer-
ence display*2
In the following situations, regenerative
braking is restricted, and the references
for those restrictions are displayed in the
charge area.
• When the traction battery has a large
amount of charge and can no longer
be regenerated
• When the temperature of the traction
batter is extremely high or extremely
low
Output restrictions reference dis-
play*2
In the following situations, the output is
restricted, and the references for those
restrictions are displayed in the power
area.
• When the traction battery has a low
amount of charge and can no longer
output power
• When the temperature of the traction
batter is extremely high or extremely
low
*1: The meaning of “Regeneration” here
means converting kinetic energy into
electrical energy.
*2: This is a reference display, so it may
differ from the actual restriction
depending on the vehicle condition.
■Outside temperature display
●In the following situations, the correct outside temperature may not be dis-played, or the display may take longer
than normal to change: • When stopped, or driving at low speeds (less than 25 km/h [16 mph])
• When the outside temperature has changed suddenly (at the entrance/exit of a garage, tunnel, etc.)
Page 184 of 674
182
Owners Manual_Europe_M42D76_en
4-1. Key information
4-1.Key info rmation
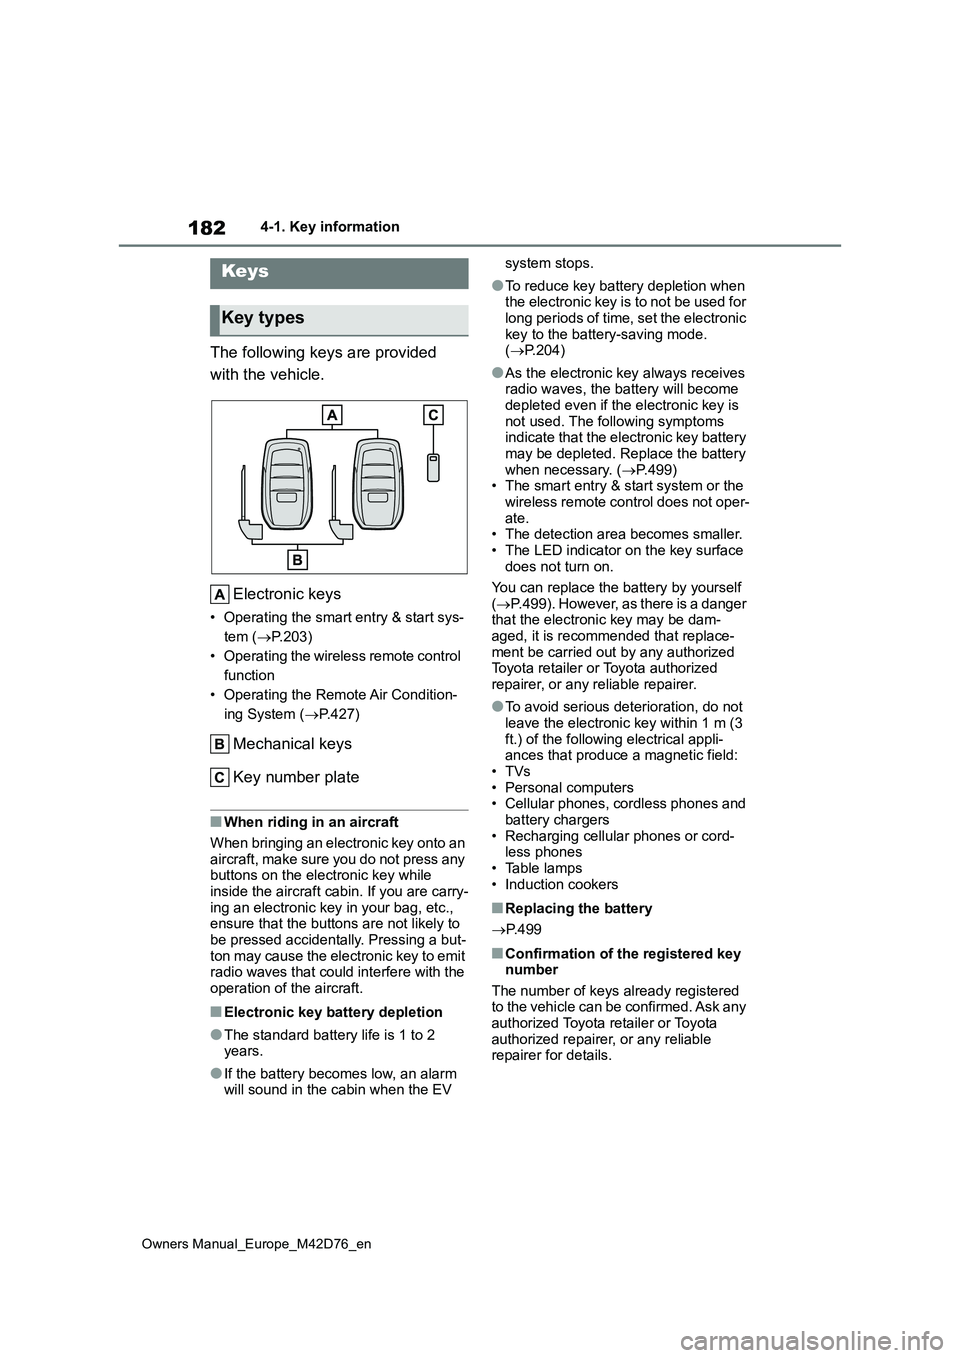
The following keys are provided
with the vehicle.
Electronic keys
• Operating the smart entry & start sys-
tem ( P.203)
• Operating the wireless remote control
function
• Operating the Remote Air Condition-
ing System ( P.427)
Mechanical keys
Key number plate
■When riding in an aircraft
When bringing an electronic key onto an
aircraft, make sure you do not press any buttons on the electronic key while inside the aircraft cabin. If you are carry-
ing an electronic key in your bag, etc., ensure that the buttons are not likely to be pressed accidentally. Pressing a but-
ton may cause the electronic key to emit radio waves that could interfere with the operation of the aircraft.
■Electronic key battery depletion
●The standard battery life is 1 to 2 years.
●If the battery becomes low, an alarm will sound in the cabin when the EV
system stops.
●To reduce key battery depletion when the electronic key is to not be used for
long periods of time, set the electronic key to the battery-saving mode. ( P.204)
●As the electronic key always receives radio waves, the battery will become
depleted even if the electronic key is not used. The following symptoms indicate that the electronic key battery
may be depleted. Replace the battery when necessary. ( P.499) • The smart entry & start system or the
wireless remote control does not oper- ate.• The detection area becomes smaller.
• The LED indicator on the key surface does not turn on.
You can replace the battery by yourself
( P.499). However, as there is a danger that the electronic key may be dam-aged, it is recommended that replace-
ment be carried out by any authorized Toyota retailer or Toyota authorized repairer, or any reliable repairer.
●To avoid serious deterioration, do not leave the electronic key within 1 m (3
ft.) of the following electrical appli- ances that produce a magnetic field:•TVs
• Personal computers • Cellular phones, cordless phones and battery chargers
• Recharging cellular phones or cord- less phones• Table lamps
• Induction cookers
■Replacing the battery
P. 4 9 9
■Confirmation of the registered key number
The number of keys already registered to the vehicle can be confirmed. Ask any authorized Toyota retailer or Toyota
authorized repairer, or any reliable repairer for details.
Keys
Key types
Page 185 of 674
183
4
Owners Manual_Europe_M42D76_en
4-1. Key information
Before driving
■If “A New Key has been Registered
Contact Your Dealer for Details” is shown on the multi-information display
This message will be displayed each time the driver’s door is opened when the doors are unlocked from the outside
for approximately 10 days after a new electronic key has been registered.
If this message is displayed but you
have not had a new electronic key regis- tered, ask any authorized Toyota retailer or Toyota authorized repairer, or any reli-
able repairer to check if an unknown electronic key (other than those in your possession) has been registered.
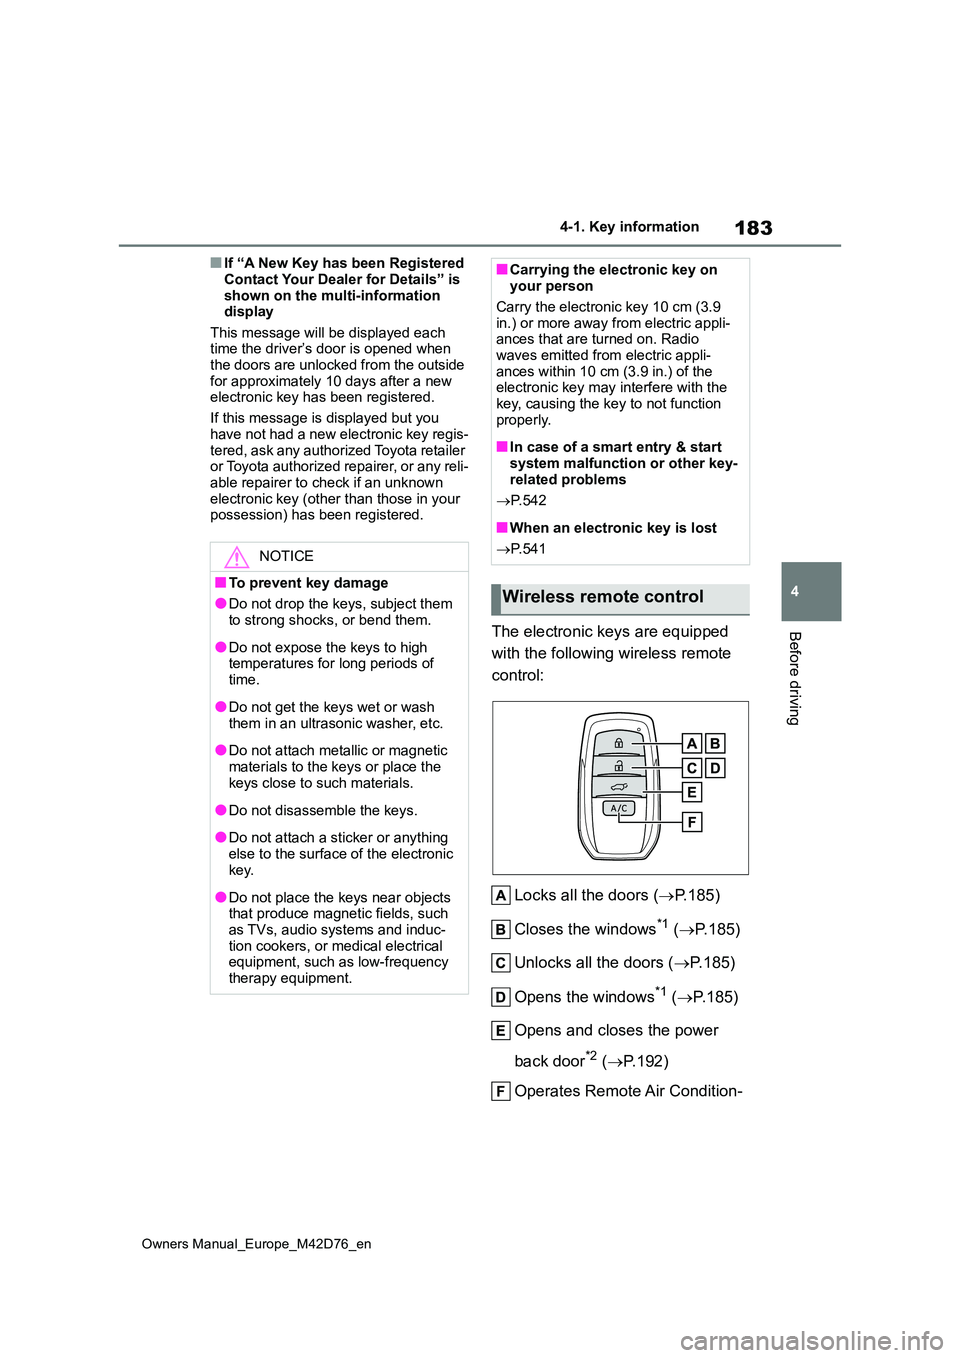
The electronic keys are equipped
with the following wireless remote
control:
Locks all the doors ( P.185)
Closes the windows*1 ( P.185)
Unlocks all the doors ( P.185)
Opens the windows*1 ( P.185)
Opens and closes the power
back door*2 ( P.192)
Operates Remote Air Condition-
NOTICE
■To prevent key damage
●Do not drop the keys, subject them to strong shocks, or bend them.
●Do not expose the keys to high temperatures for long periods of
time.
●Do not get the keys wet or wash
them in an ultrasonic washer, etc.
●Do not attach metallic or magnetic
materials to the keys or place the keys close to such materials.
●Do not disassemble the keys.
●Do not attach a sticker or anything
else to the surface of the electronic key.
●Do not place the keys near objects that produce magnetic fields, such as TVs, audio systems and induc-
tion cookers, or medical electrical equipment, such as low-frequency therapy equipment.
■Carrying the electronic key on your person
Carry the electronic key 10 cm (3.9
in.) or more away from electric appli- ances that are turned on. Radio waves emitted from electric appli-
ances within 10 cm (3.9 in.) of the electronic key may interfere with the key, causing the key to not function
properly.
■In case of a smart entry & start
system malfunction or other key- related problems
P. 5 4 2
■When an electronic key is lost
P. 5 4 1
Wireless remote control
Page 197 of 674
195
4
Owners Manual_Europe_M42D76_en
4-2. Opening, closing and locking the doors
Before driving
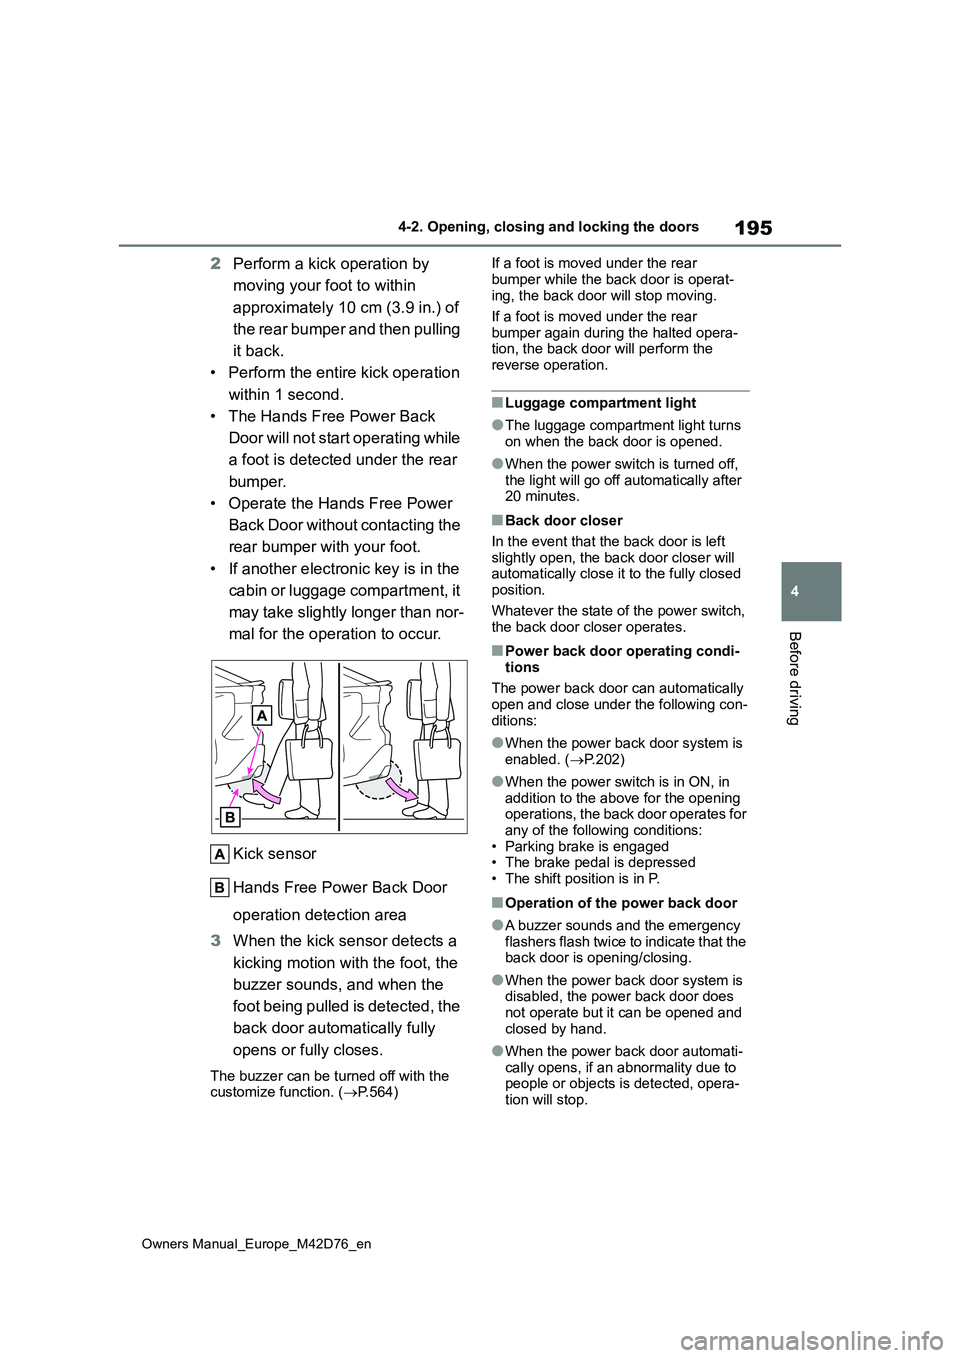
2Perform a kick operation by
moving your foot to within
approximately 10 cm (3.9 in.) of
the rear bumper and then pulling
it back.
• Perform the entire kick operation
within 1 second.
• The Hands Free Power Back
Door will not start operating while
a foot is detected under the rear
bumper.
• Operate the Hands Free Power
Back Door without contacting the
rear bumper with your foot.
• If another electronic key is in the
cabin or luggage compartment, it
may take slightly longer than nor-
mal for the operation to occur.
Kick sensor
Hands Free Power Back Door
operation detection area
3 When the kick sensor detects a
kicking motion with the foot, the
buzzer sounds, and when the
foot being pulled is detected, the
back door automatically fully
opens or fully closes.
The buzzer can be turned off with the customize function. ( P.564)
If a foot is moved under the rear
bumper while the back door is operat- ing, the back door will stop moving.
If a foot is moved under the rear
bumper again during the halted opera- tion, the back door will perform the reverse operation.
■Luggage compartment light
●The luggage compartment light turns on when the back door is opened.
●When the power switch is turned off, the light will go off automatically after 20 minutes.
■Back door closer
In the event that the back door is left slightly open, the back door closer will automatically close it to the fully closed
position.
Whatever the state of the power switch, the back door closer operates.
■Power back door operating condi-
tions
The power back door can automatically open and close under the following con-
ditions:
●When the power back door system is
enabled. ( P.202)
●When the power switch is in ON, in
addition to the above for the opening operations, the back door operates for
any of the following conditions: • Parking brake is engaged• The brake pedal is depressed
• The shift position is in P.
■Operation of the power back door
●A buzzer sounds and the emergency
flashers flash twice to indicate that the back door is opening/closing.
●When the power back door system is disabled, the power back door does not operate but it can be opened and
closed by hand.
●When the power back door automati-
cally opens, if an abnormality due to people or objects is detected, opera-tion will stop.