Long TOYOTA BZ4X 2022 (in English) Owner's Guide
[x] Cancel search | Manufacturer: TOYOTA, Model Year: 2022, Model line: BZ4X, Model: TOYOTA BZ4X 2022Pages: 674, PDF Size: 120.02 MB
Page 246 of 674
244
Owners Manual_Europe_M42D76_en
5-2. Driving procedures
mechanical key, the EV system can-
not be started using the smart entry & start system. However, if the elec-tronic key is carried inside the vehicle
and the doors are locked ( P.188), the EV system can be started.
■When the ambient temperature is low, such as during winter driving
conditions
●When starting the EV system, the
flashing time of the “READY” indicator may be long. Leave the vehicle as it is until the “READY” indicator is steady
on, as steady means the vehicle is able to move.
●When the traction battery is extremely cold (below approximately -30°C [-22°F]) under the influence of the out-
side temperature, it may not be possi- ble to start the EV system. In this case, try to start the EV system again
after the temperature of the traction battery increases due to the outside temperature increase, etc.
■Sounds and vibrations specific to
an battery electric vehicle
P. 8 4
■If the 12-volt battery is discharged
The EV system cannot be started using
the smart entry & start system. Refer to P.544 to restart the EV system.
■Electronic key battery depletion
P. 1 8 2
■Conditions affecting operation
P. 2 0 4
■Note for the entry function
P. 2 0 5
■Steering lock function (if equipped)
●After turning the power switch off and opening and closing the doors, the steering wheel will be locked due to
the steering lock function. Operating the power switch again automatically cancels the steering lock.
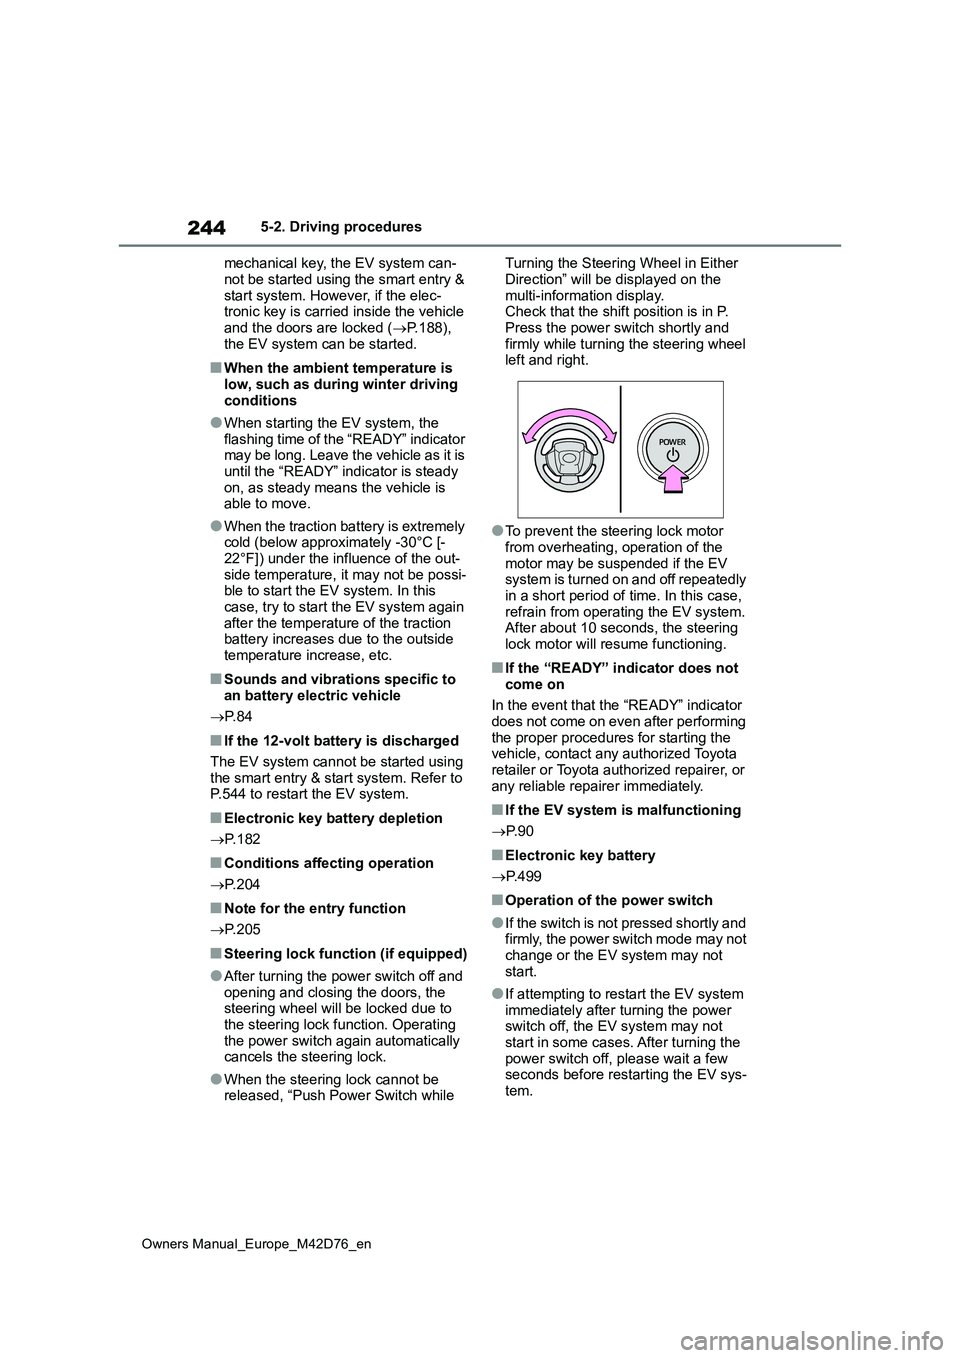
●When the steering lock cannot be released, “Push Power Switch while
Turning the Steering Wheel in Either
Direction” will be displayed on the multi-information display.Check that the shift position is in P.
Press the power switch shortly and firmly while turning the steering wheel left and right.
●To prevent the steering lock motor from overheating, operation of the
motor may be suspended if the EV system is turned on and off repeatedly in a short period of time. In this case,
refrain from operating the EV system. After about 10 seconds, the steering lock motor will resume functioning.
■If the “READY” indicator does not
come on
In the event that the “READY” indicator does not come on even after performing
the proper procedures for starting the vehicle, contact any authorized Toyota retailer or Toyota authorized repairer, or
any reliable repairer immediately.
■If the EV system is malfunctioning
P. 9 0
■Electronic key battery
P. 4 9 9
■Operation of the power switch
●If the switch is not pressed shortly and firmly, the power switch mode may not
change or the EV system may not start.
●If attempting to restart the EV system immediately after turning the power switch off, the EV system may not
start in some cases. After turning the power switch off, please wait a few seconds before restarting the EV sys-
tem.
Page 248 of 674
246
Owners Manual_Europe_M42D76_en
5-2. Driving procedures
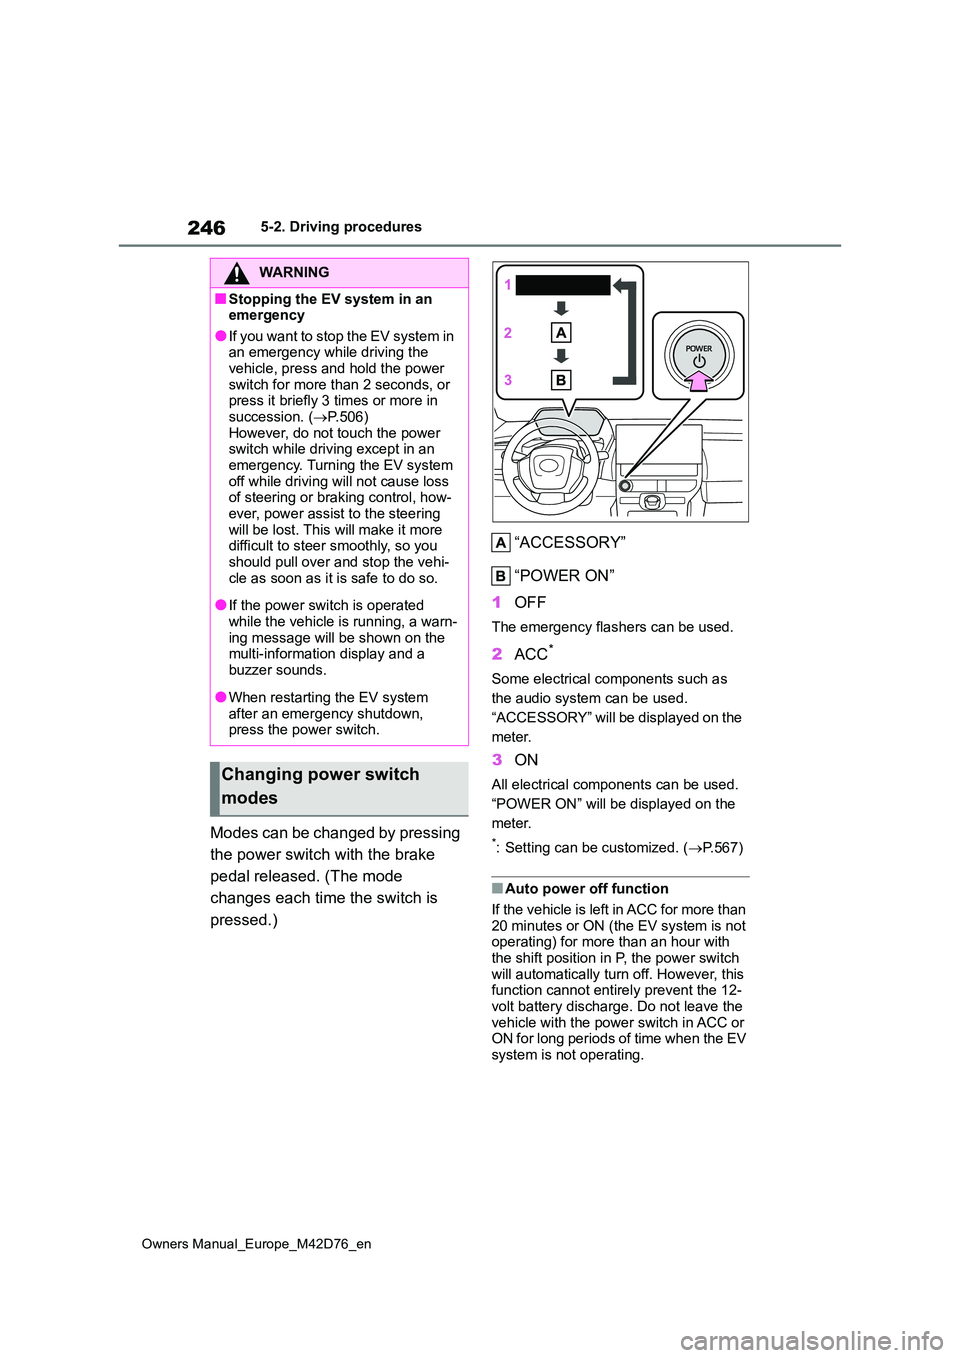
Modes can be changed by pressing
the power switch with the brake
pedal released. (The mode
changes each time the switch is
pressed.)
“ACCESSORY”
“POWER ON”
1 OFF
The emergency flashers can be used.
2ACC*
Some electrical components such as
the audio system can be used.
“ACCESSORY” will be displayed on the
meter.
3 ON
All electrical components can be used.
“POWER ON” will be displayed on the
meter.
*: Setting can be customized. ( P.567)
■Auto power off function
If the vehicle is left in ACC for more than
20 minutes or ON (the EV system is not operating) for more than an hour with the shift position in P, the power switch
will automatically turn off. However, this function cannot entirely prevent the 12-volt battery discharge. Do not leave the
vehicle with the power switch in ACC or ON for long periods of time when the EV system is not operating.
WARNING
■Stopping the EV system in an emergency
●If you want to stop the EV system in an emergency while driving the vehicle, press and hold the power
switch for more than 2 seconds, or press it briefly 3 times or more in succession. ( P.506)
However, do not touch the power switch while driving except in an emergency. Turning the EV system
off while driving will not cause loss of steering or braking control, how-ever, power assist to the steering
will be lost. This will make it more difficult to steer smoothly, so you should pull over and stop the vehi-
cle as soon as it is safe to do so.
●If the power switch is operated
while the vehicle is running, a warn- ing message will be shown on the multi-information display and a
buzzer sounds.
●When restarting the EV system
after an emergency shutdown, press the power switch.
Changing power switch
modes
Page 249 of 674

247
5
Owners Manual_Europe_M42D76_en
5-2. Driving procedures
Driving
■Restraining sudden start (Drive-
Start Control)
P. 2 3 4
■If a message about a shift operation is shown
To prevent the shift position from being selected incorrectly or the vehicle from moving unexpectedly, the shift position
may be changed automatically or oper- ating the rotary shifter may be required. In this case, change the shift position
following the messages on the multi- information display.
■After recharging/reconnecting the 12-volt battery
P. 4 7 4
NOTICE
■To prevent 12-volt battery dis- charge
●Do not leave the power switch in ACC or ON for long periods of time without the EV system on.
●If “ACCESSORY” or “POWER ON” is displayed on the multi-informa-
tion display while the EV system is not operating, the power switch is not OFF. Exit the vehicle after turn-
ing the power switch off.
Transmission
Select the shift position
depending on your purpose
and situation.
Shift position purpose and
functions
Shift positionObjective or function
P
Parking the vehi-
cle/starting the EV sys-
tem
RReversing
N
Neutral
(Condition in which the
power is not transmit-
ted)
DNormal driving
Page 254 of 674
252
Owners Manual_Europe_M42D76_en
5-2. Driving procedures
tor pedal is released, becomes
stronger than usual.
■When Regeneration Boost cannot be used In the following cases, the system does not operate.
●When “X-MODE” is activated (If equipped)
●When the brake system or EV system is malfunctioning
●When regenerative braking is limited
regenerative braking may be restricted
in the following situations:
• When the amount of charge of the
traction battery is high • When the temperature of the traction battery is low or extremely high
• When the temperature of the electric motor or power control unit is extremely high
• When regenerative braking is continu- ally used for a long time
■Regenerative Braking
●The vehicle cannot be stopped by just releasing the accelerator pedal. Step on the brake pedal when the vehicle is
stopped.
●If the power switch is turned off and
then the EV system is restarted, the Regeneration Boost will be turned off.
●When driving at high speeds, the feel-ing of deceleration due to regenera-
tive braking is smaller than in a normal car.
●The maximum deceleration varies depending on the vehicle speed.
●Regeneration Boost cannot be used when the following message is dis-played on the multi-information dis-
play. When decelerating, firmly step on the brake to decelerate.
• “Regeneration Boost Unavailable XMODE Activated”• “Regeneration Boost Temporarily
Unavailable Press Brake to Deceler- ate”
• “Regeneration Boost Temporarily
Unavailable See Owner’s Manual”
■Stop lights turning ON
When the regenerative braking force exceeds a certain level, the stop lights
turns on.
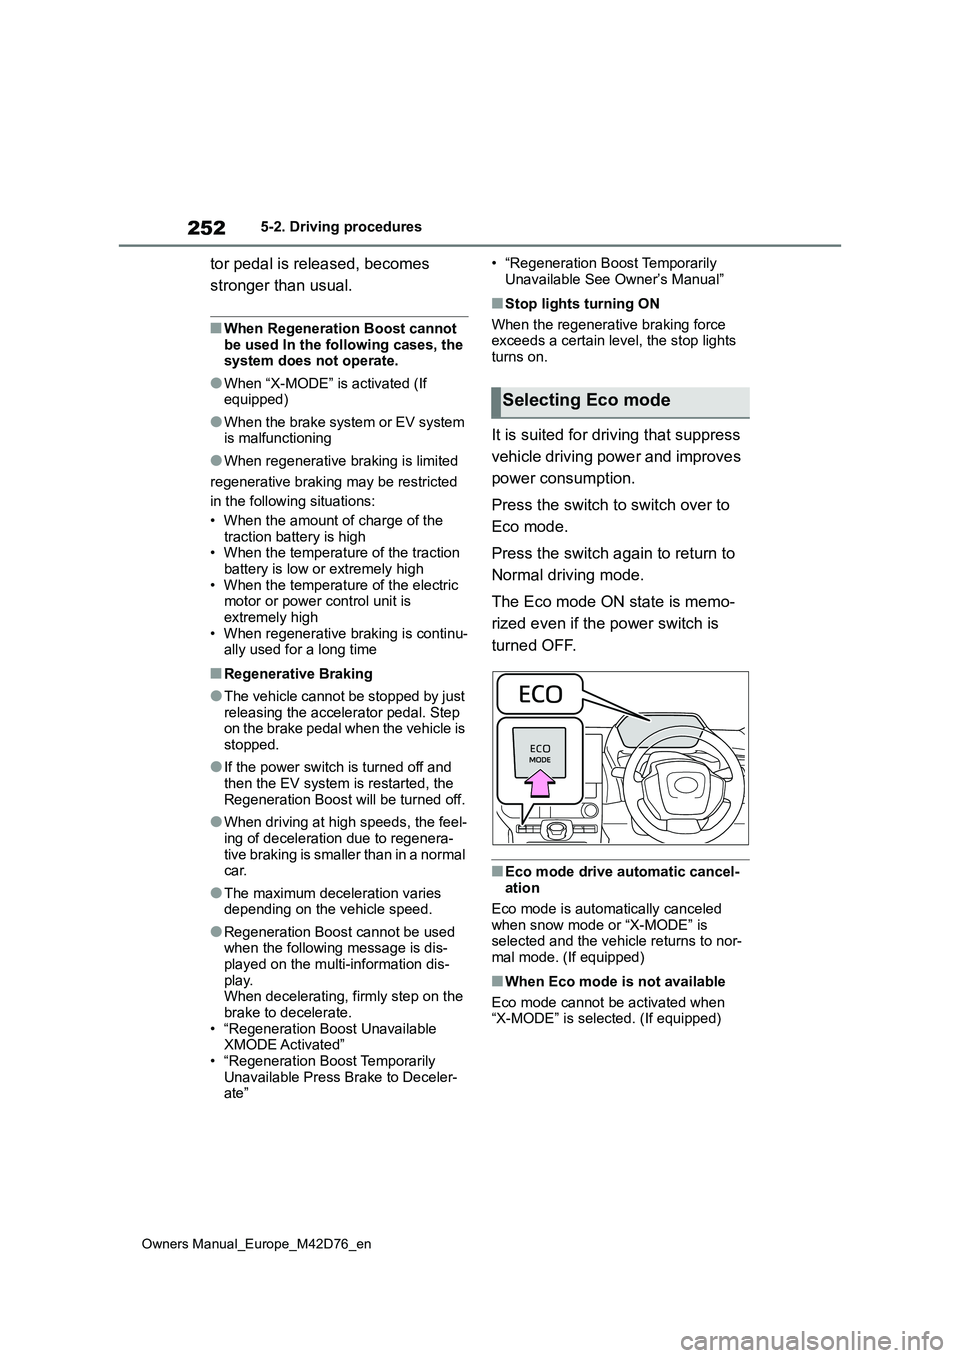
It is suited for driving that suppress
vehicle driving power and improves
power consumption.
Press the switch to switch over to
Eco mode.
Press the switch again to return to
Normal driving mode.
The Eco mode ON state is memo-
rized even if the power switch is
turned OFF.
■Eco mode drive automatic cancel- ation
Eco mode is automatically canceled
when snow mode or “X-MODE” is selected and the vehicle returns to nor-
mal mode. (If equipped)
■When Eco mode is not available
Eco mode cannot be activated when “X-MODE” is selected. (If equipped)
Selecting Eco mode
Page 260 of 674
258
Owners Manual_Europe_M42D76_en
5-2. Driving procedures
■When an inspection at any autho-
rized Toyota retailer or Toyota authorized repairer, or any reliable repairer is necessary
When the brake hold standby indicator (green) does not illuminate even when the brake hold switch is pressed with the
brake hold system operating conditions met, the system may be malfunctioning. Have the vehicle inspected at any
authorized Toyota retailer or Toyota authorized repairer, or any reliable repairer.
■If “Brake Hold Malfunction Press
Brake to Deactivate Visit Your Dealer” or “Brake Hold Malfunction Visit Your Dealer” is displayed on
the multi-information display
The system may be malfunctioning. Have the vehicle inspected by any
authorized Toyota retailer or Toyota authorized repairer, or any reliable repairer immediately.
■Warning messages and buzzers
Warning messages and buzzers are used to indicate a system malfunction or to inform the driver of the need for cau-
tion. If a warning message is shown on the multi-information display, read the message and follow the instructions.
■If the brake hold operated indicator
flashes
P. 5 2 1
WARNING
■When the vehicle is on a steep
incline
When using the brake hold system on a steep incline, exercise caution. The
brake hold function may not hold the vehicle in such a situation.
■When stopped on a slippery road
The system cannot stop the vehicle when the gripping ability of the tires
has been exceeded. Do not use the system when stopped on a slippery road.
NOTICE
■When parking the vehicle
The brake hold system is not
designed for use when parking the vehicle for a long period of time. Turn-ing the power switch off while the sys-
tem is holding the brake may release the brake, which would cause the vehicle to move. When operating the
power switch, depress the brake pedal, shift the shift position to P and set the parking brake.
Page 262 of 674
260
Owners Manual_Europe_M42D76_en
5-3. Operating the lights and wipers
■Light reminder buzzer
A buzzer sounds when the power switch is turned off or turned to ACC and the driver’s door is opened while the lights
are turned on.
■Automatic headlight leveling sys- tem (if equipped)
The level of the headlights is automati-
cally adjusted according to the number of passengers and the loading condition of the vehicle to ensure that the head-
lights do not interfere with other road users.
■12-volt battery-saving function
In order to prevent 12-volt the battery of
the vehicle from discharging, if the light
switch is in the or position
when the power switch is turned off, the
12-volt battery saving function will oper-
ate and automatically turn off all the
lights after approximately 20 minutes.
When the power switch is turned to ON, the 12-volt battery-saving function will be disabled.
When any of the following are per- formed, the 12-volt battery-saving func-tion is canceled once and then
reactivated. All the lights will turn off automatically 20 minutes after the 12-volt battery- saving function has been
reactivated:
●When the headlight switch is operated
●When a door is opened or closed
■Customization
Settings (e.g. light sensor sensitivity)
can be changed. (Customizable features: P.567)
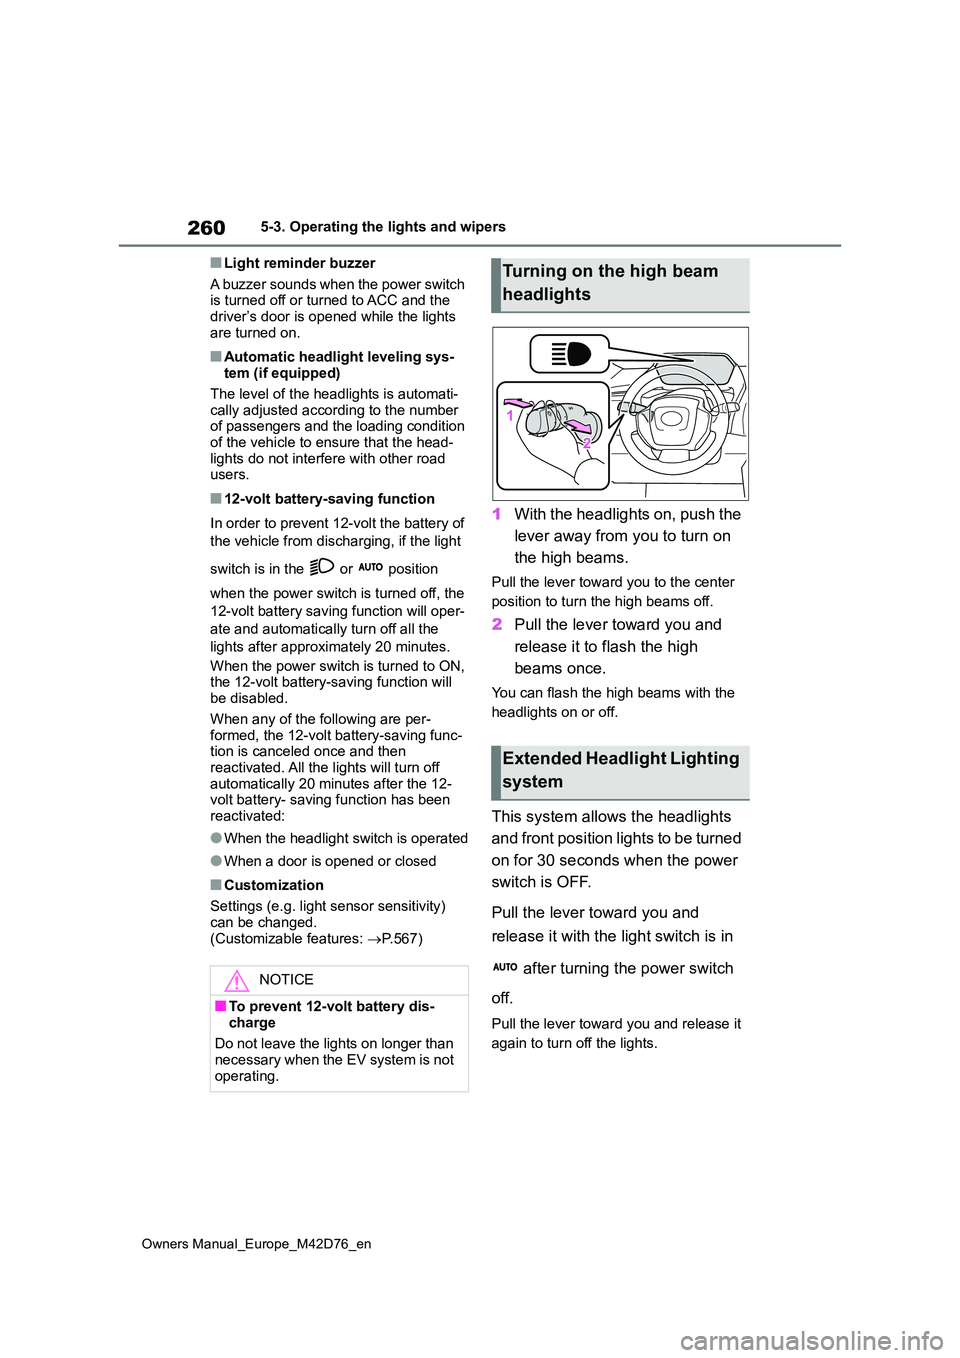
1With the headlights on, push the
lever away from you to turn on
the high beams.
Pull the lever toward you to the center
position to turn the high beams off.
2 Pull the lever toward you and
release it to flash the high
beams once.
You can flash the high beams with the
headlights on or off.
This system allows the headlights
and front position lights to be turned
on for 30 seconds when the power
switch is OFF.
Pull the lever toward you and
release it with the light switch is in
after turning the power switch
off.
Pull the lever toward you and release it
again to turn off the lights.
NOTICE
■To prevent 12-volt battery dis-
charge
Do not leave the lights on longer than necessary when the EV system is not
operating.
Turning on the high beam
headlights
Extended Headlight Lighting
system
Page 271 of 674
269
5
Owners Manual_Europe_M42D76_en
5-3. Operating the lights and wipers
Driving
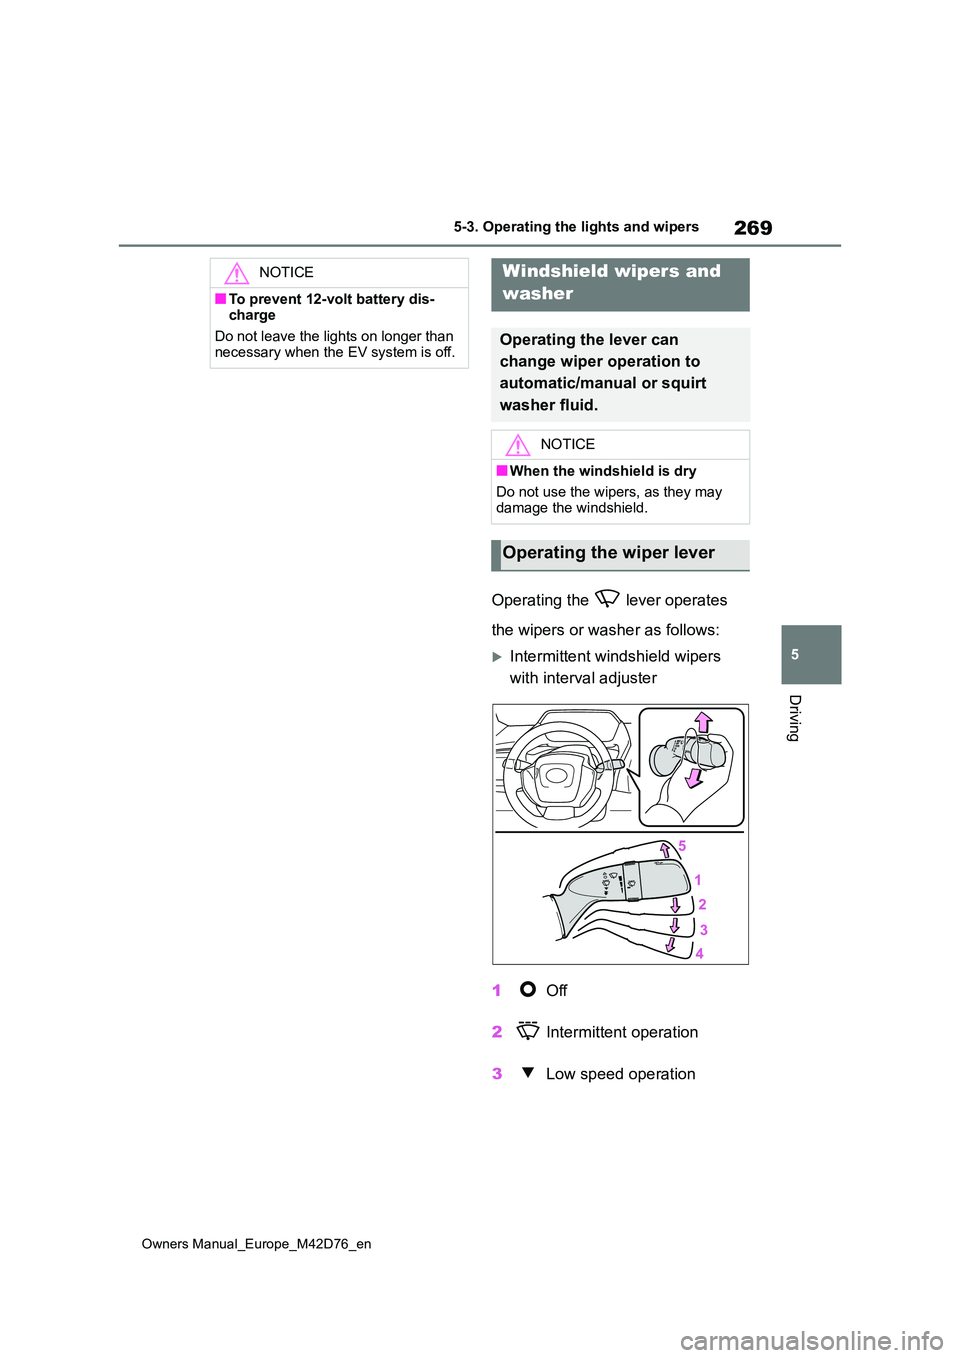
Operating the lever operates
the wipers or washer as follows:
Intermittent windshield wipers
with interval adjuster
1 Off
2 Intermittent operation
3 Low speed operation
NOTICE
■To prevent 12-volt battery dis- charge
Do not leave the lights on longer than necessary when the EV system is off.
Windshield wipers and
washer
Operating the lever can
change wiper operation to
automatic/manual or squirt
washer fluid.
NOTICE
■When the windshield is dry
Do not use the wipers, as they may damage the windshield.
Operating the wiper lever
Page 274 of 674
272
Owners Manual_Europe_M42D76_en
5-3. Operating the lights and wipers
WARNING
■Caution regarding the use of windshield wipers in AUTO mode
(vehicles with rain-sensing wind- shield wipers)
The windshield wipers may operate
unexpectedly if the sensor is touched or the windshield is subject to vibra-tion in AUTO mode. Take care that
your fingers, etc. do not become caught in the windshield wipers.
■Caution regarding the use of washer fluid
When it is cold, do not use the washer
fluid until the windshield becomes warm. The fluid may freeze on the windshield and cause low visibility.
This may lead to an accident, result- ing in death or serious injury.
NOTICE
■When the washer fluid tank is empty
Do not operate the switch continually
as the washer fluid pump may over- heat.
■When a nozzle becomes blocked
In this case, contact any authorized
Toyota retailer or Toyota authorized repairer, or any reliable repairer.Do not try to clear it with a pin or other
object. The nozzle will be damaged.
■To prevent 12-volt battery dis-
charge
Do not leave the wipers on longer than necessary when the EV system
is off.
Page 280 of 674
278
Owners Manual_Europe_M42D76_en
5-4. Using the driving support systems
WARNING
●Always keep the windshield clean.
• If the windshield is dirty or covered
with an oily film, water droplets, snow, etc., clean the windshield.
• Even if a glass coating agent is
applied to the windshield, it will still be necessary to use the windshield wipers to remove water droplets,
etc., from the area of the windshield in front of the front camera.
• If the inner side of the windshield
where the front camera is installed is dirty, contact any authorized Toyota retailer or Toyota authorized
repairer, or any reliable repairer
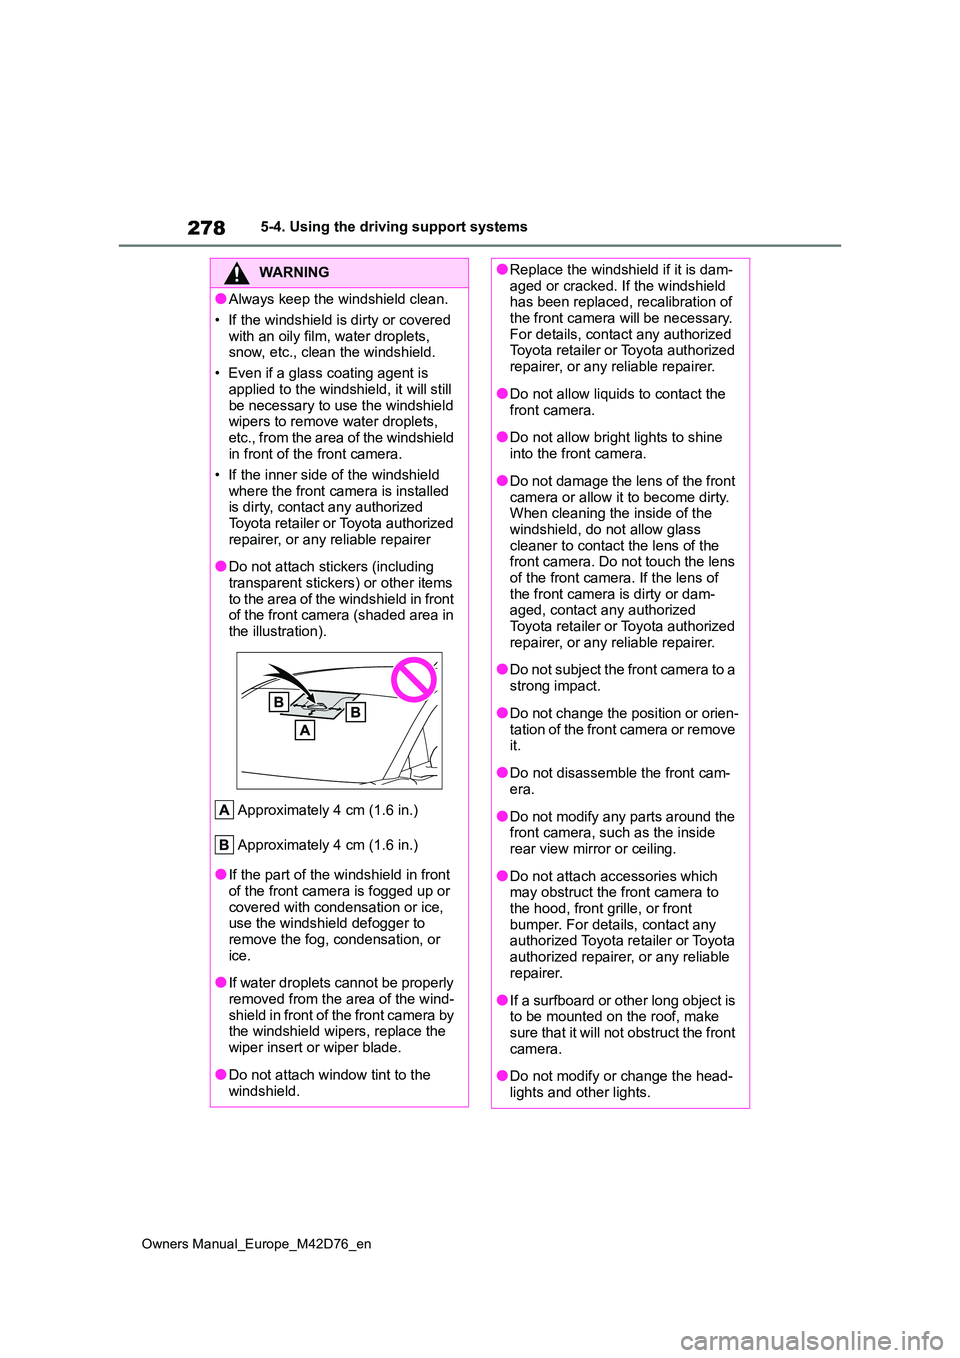
●Do not attach stickers (including
transparent stickers) or other items to the area of the windshield in front of the front camera (shaded area in
the illustration).
Approximately 4 cm (1.6 in.)
Approximately 4 cm (1.6 in.)
●If the part of the windshield in front of the front camera is fogged up or
covered with condensation or ice, use the windshield defogger to remove the fog, condensation, or
ice.
●If water droplets cannot be properly
removed from the area of the wind- shield in front of the front camera by the windshield wipers, replace the
wiper insert or wiper blade.
●Do not attach window tint to the
windshield.
●Replace the windshield if it is dam- aged or cracked. If the windshield has been replaced, recalibration of
the front camera will be necessary. For details, contact any authorized Toyota retailer or Toyota authorized
repairer, or any reliable repairer.
●Do not allow liquids to contact the
front camera.
●Do not allow bright lights to shine
into the front camera.
●Do not damage the lens of the front
camera or allow it to become dirty. When cleaning the inside of the windshield, do not allow glass
cleaner to contact the lens of the front camera. Do not touch the lens of the front camera. If the lens of
the front camera is dirty or dam- aged, contact any authorized Toyota retailer or Toyota authorized
repairer, or any reliable repairer.
●Do not subject the front camera to a
strong impact.
●Do not change the position or orien-
tation of the front camera or remove it.
●Do not disassemble the front cam-era.
●Do not modify any parts around the front camera, such as the inside rear view mirror or ceiling.
●Do not attach accessories which may obstruct the front camera to
the hood, front grille, or front bumper. For details, contact any authorized Toyota retailer or Toyota
authorized repairer, or any reliable repairer.
●If a surfboard or other long object is to be mounted on the roof, make sure that it will not obstruct the front
camera.
●Do not modify or change the head-
lights and other lights.
Page 281 of 674

279
5
Owners Manual_Europe_M42D76_en
5-4. Using the driving support systems
Driving
■Situations in which the sensors
may not operate properly
●When the height or inclination of the
vehicle has been changed due to modifications
●When the windshield is dirty, fogged up, cracked or damaged
●When the ambient temperature is high or low
●When mud, water, snow, dead insects, foreign matter, etc., is attached to the front of the sensor
●When in inclement weather such as heavy rain, fog, snow, or a sandstorm
●When water, snow, dust, etc., is
thrown up in front of the vehicle, or when driving through mist or smoke
●When the headlights are not illumi-nated while driving in the dark, such as at night or when in a tunnel
●When the lens of a headlight is dirty and illumination is weak
●When the headlights are misaligned
●When a headlight is malfunctioning
●When a the headlights of another
vehicle, sunlight, or reflected light shines directly into the front camera
●When the brightness of the surround-ing area changes suddenly
●When driving near a TV tower, broad-casting station, electric power plant,
WARNING
■Front camera installation area on the windshield
If the system determines that the windshield may be fogged up, it will automatically operate the heater to
defog the part of the windshield around the front camera. When clean-ing, etc., be careful not to touch the
area around the front camera until the windshield has cooled sufficiently, as touching it may cause burns.
■Precautions for the driver moni-tor camera (if equipped)
Observe the following precautions. Failure to do so may lead to malfunc-tion of the driver monitor camera and
the systems not operating properly, possibly leading to an accident result-ing in death or serious injury.
●Do not subject the driver monitor camera or its surrounding area to
strong impact.
If subjected to a strong impact, the
driver monitor camera may move out
of alignment and the driver may no
longer be detected correctly. In this
case, have the vehicle inspected by
any authorized Toyota retailer or
Toyota authorized repairer, or any reli-
able repairer.
●Do not disassemble or modify the driver monitor camera.
●Do not attach accessories, stickers (including transparent stickers), etc. to the driver monitor camera or its
surrounding area.
●Do not allow the driver monitor
camera or its surrounding area to get wet.
●Do not cover the driver monitor camera or place anything in front of it.
●Keep the lens of the driver monitor camera free from damage.
●Do not touch the lens of the driver monitor camera or allow it to become dirty.
When there is dirt or fingerprints on
the camera lens, clean it with a dry,
soft cloth so as to not mark or dam-
age it.
●When cleaning the lens, do not use
detergents or organic solvents that may damage plastic.