steering TOYOTA BZ4X 2022 (in English) User Guide
[x] Cancel search | Manufacturer: TOYOTA, Model Year: 2022, Model line: BZ4X, Model: TOYOTA BZ4X 2022Pages: 674, PDF Size: 120.02 MB
Page 50 of 674

48
Owners Manual_Europe_M42D76_en
1-2. Child safety
WARNING
■When installing a child restraint system
For safety reasons, always install a child restraint system in a rear seat. In the event that the rear seat cannot be
used, the front seat can be used as long as the airbag manual on-off sys-tem is set to “OFF”.
If the airbag manual on-off system is left on, the strong impact of the airbag deployment (inflation) may cause
serious injury or even death.
■When a child restraint system is
not installed on the front passen- ger seat
Ensure that the airbag manual on-off
system is set to “ON”. If it is left off, the airbag may not deploy in the event of an accident,
which may result in serious injury or even death.
Riding with children
Observe the following precau-
tions when children are in the
vehicle.
Use a child restraint system
appropriate for the child, until
the child becomes large
enough to properly wear the
vehicle’s seat belt.
It is recommended that chil-
dren sit in the rear seats to
avoid accidental contact with
the steering wheel, wiper
switch, etc.
Use the rear door child-protec-
tor lock or the window lock
switch to avoid children open-
ing the door while driving or
operating the power window
accidentally. ( P.188, 221)
Do not let small children oper-
ate equipment which may
catch or pinch body parts,
such as the power window,
hood, back door, seats, etc.
WARNING
■When children are in the vehicle
Never leave children unattended in the vehicle, and never allow children to have or use the key.
Children may be able to start the vehi- cle or shift the vehicle into neutral. There is also a danger that children
may injure themselves by playing with the windows or other features of the vehicle. In addition, heat build-up or
extremely cold temperatures inside the vehicle can be fatal to children.
Page 148 of 674
146
Owners Manual_Europe_M42D76_en
2-2. Charging
Mode”.
■Meter display while charging
After turning the power switch to ON while charging, the power switch auto-matically turns off if My Room Mode is
not selected within approximately 100 seconds.
■When using My Room Mode the fol-lowing may occur
●When the remaining charge of the traction battery drops to the lower
limit, the air conditioning system auto- matically stops. In that case, the air conditioning system can not operate
until the remaining charge of the trac- tion battery increases. Turn off the power switch once, then use My
Room Mode after the remaining charge of the traction battery increases.
●If the doors are unlocked while using My Room mode, the AC charging con-
nector will be unlocked and My Room mode will be stopped. To use My Room mode again, perform the opera-
tion to start it. ( P.145) In addition, when using AC charger at the public charging station, it is necessary to
perform the operation to start the charger before using My Room mode.
●The charging time of the traction bat-tery gets longer.
●Noise may be heard from the radio depending on conditions of the radio
wave.
●The surrounding area of the onboard traction battery charger in the motor
compartment may become hot.
●The electric power steering system
warning light (yellow) may turn on, but this is not a malfunction.
■Using My Room Mode during DC charging
When using My Room mode during DC charging, the state of charge completion will be lower than when not using My
Room Mode.
■When “My Room Mode” is used while the traction battery is fully charged
When the power switch is turned on
while the traction battery is fully charged
and the charging connector that sup-
plies power is connected, “Charging
Port Lid is Open” is displayed on the
multi-information display. In this case,
press on the meter control switches
to display the setting screen of “My
Room Mode”, and then select “My
Room Mode”.
When “My Room Mode” is used while
the traction battery is fully charged, the electric power of the traction battery may be consumed. In this case,
charging may be performed again.
■Warning message display
When trying to start My Room Mode or My Room Mode is being used , if a message
is displayed on the multi-information display, refer to the cor responding table and perform the appropriate correction procedures.
MessageCorrection procedure
“Traction Battery is too Low
for “My Room Mode””
There is no remaining charge of the traction battery to
start My Room Mode. Wait until the remaining charge
of the traction battery increases, start My Room Mode.
Page 170 of 674
168
Owners Manual_Europe_M42D76_en
3-1. Instrument cluster
3-1.In strument clu ste r
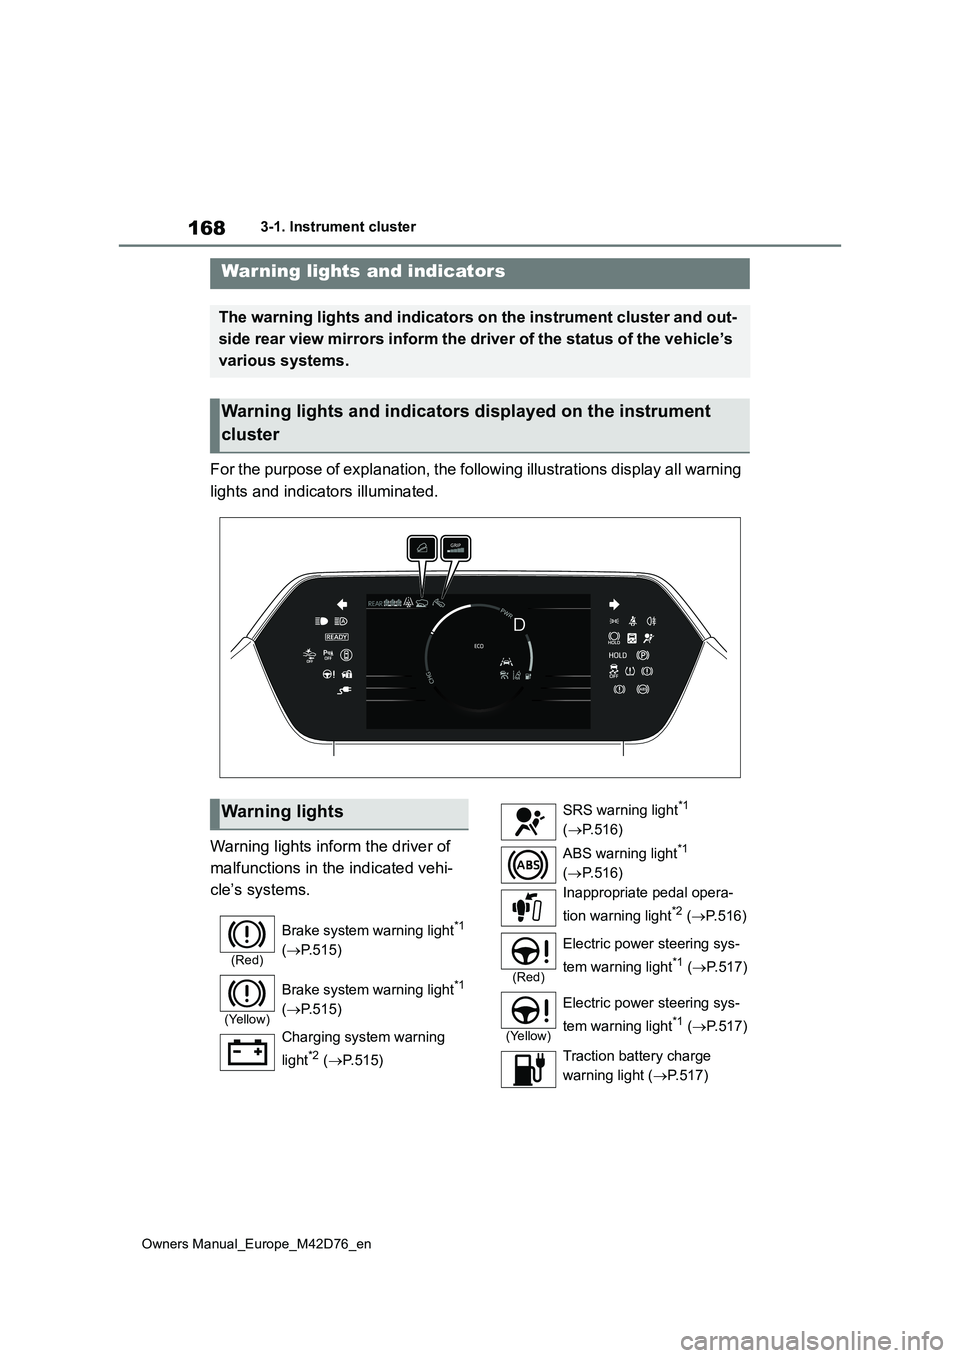
For the purpose of explanation, the following illustrations display all warning
lights and indicators illuminated.
Warning lights inform the driver of
malfunctions in the indicated vehi-
cle’s systems.
Warning lights and indicators
The warning lights and indicators on the instrument cluster and out-
side rear view mirrors inform the driver of the status of the v ehicle’s
various systems.
Warning lights and indicators displayed on the instrument
cluster
Warning lights
(Red)
Brake system warning light*1
( P.515)
(Yellow)
Brake system warning light*1
( P.515)
Charging system warning
light*2 ( P.515)
SRS warning light*1
( P.516)
ABS warning light*1
( P.516)
Inappropriate pedal opera-
tion warning light*2 ( P. 5 1 6 )
(Red)
Electric power steering sys-
tem warning light*1 ( P.517)
(Yellow)
Electric power steering sys-
tem warning light*1 ( P.517)
Traction battery charge
warning light ( P.517)
Page 183 of 674
4
181
Owners Manual_Europe_M42D76_en
4
Before driving
Before driving
4-1. Key information
Keys.................................. 182
4-2. Opening, closing and locking
the doors
Side doors ........................ 185
Back door ......................... 189
Smart entry & start system 203
4-3. Adjusting the seats
Front seats........................ 208
Rear seats ........................ 209
Head restraints ................. 211
4-4. Adjusting the steering wheel
and mirrors
Steering wheel .................. 215
Inside rear view mirror ...... 216
Outside rear view mirrors . 217
4-5. Opening, closing the win-
dows
Power windows................. 219
4-6. Favorite settings
Driving position memory ... 222
My Settings ....................... 226
Page 217 of 674
215
4
Owners Manual_Europe_M42D76_en
4-4. Adjusting the steering wheel and mirrors
Before driving
4-4.Adjusting the steering whe el an d mirrors
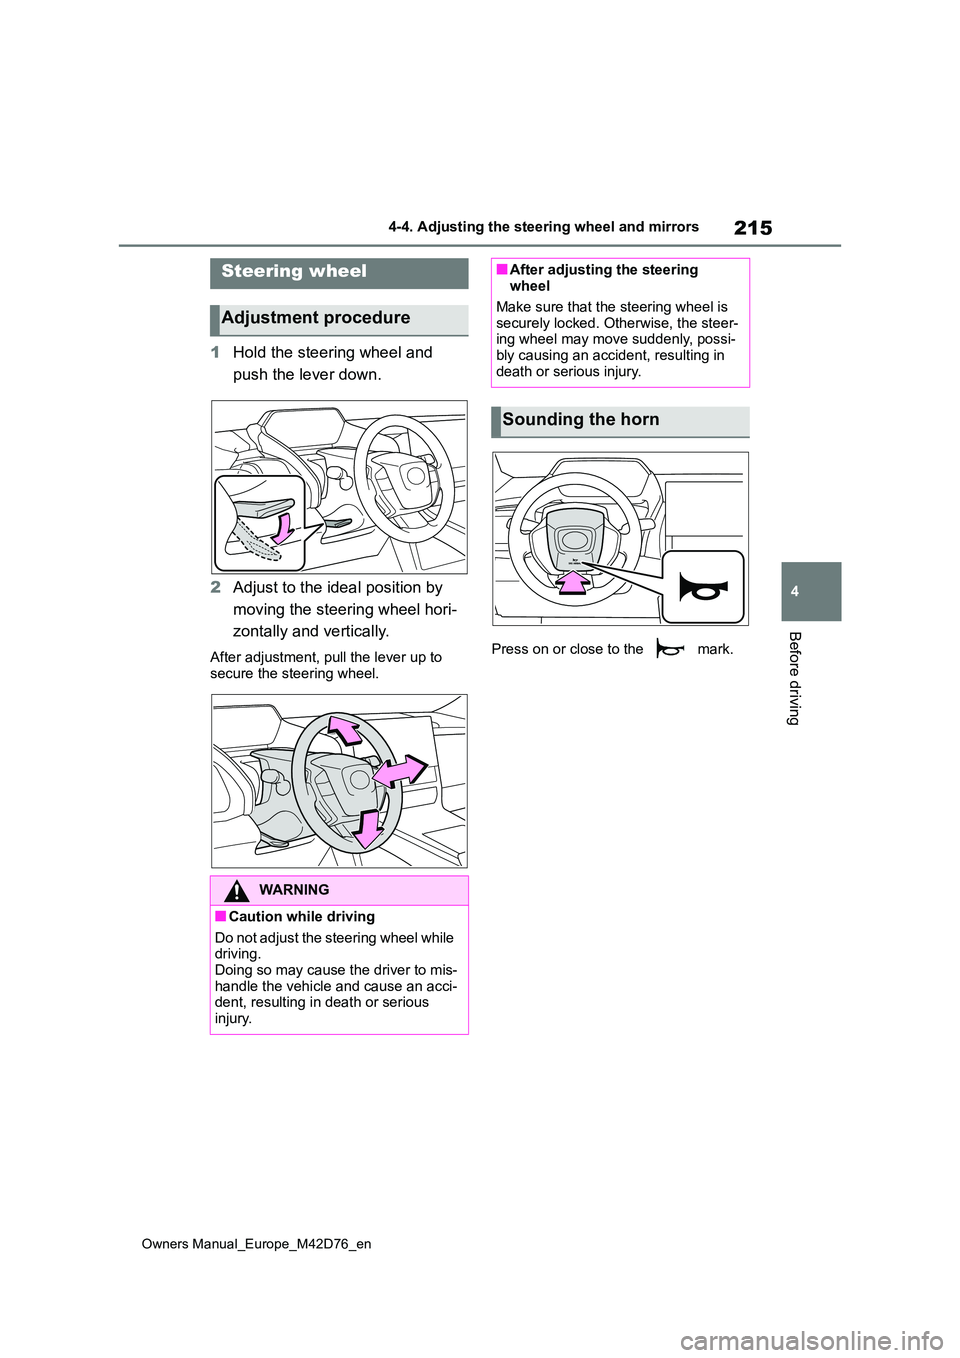
1Hold the steering wheel and
push the lever down.
2 Adjust to the ideal position by
moving the steering wheel hori-
zontally and vertically.
After adjustment, pull the lever up to
secure the steering wheel.
Press on or close to the mark.
Steering wheel
Adjustment procedure
WARNING
■Caution while driving
Do not adjust the steering wheel while driving.Doing so may cause the driver to mis-
handle the vehicle and cause an acci- dent, resulting in death or serious injury.
■After adjusting the steering wheel
Make sure that the steering wheel is
securely locked. Otherwise, the steer- ing wheel may move suddenly, possi-bly causing an accident, resulting in
death or serious injury.
Sounding the horn
Page 218 of 674
216
Owners Manual_Europe_M42D76_en
4-4. Adjusting the steering wheel and mirrors
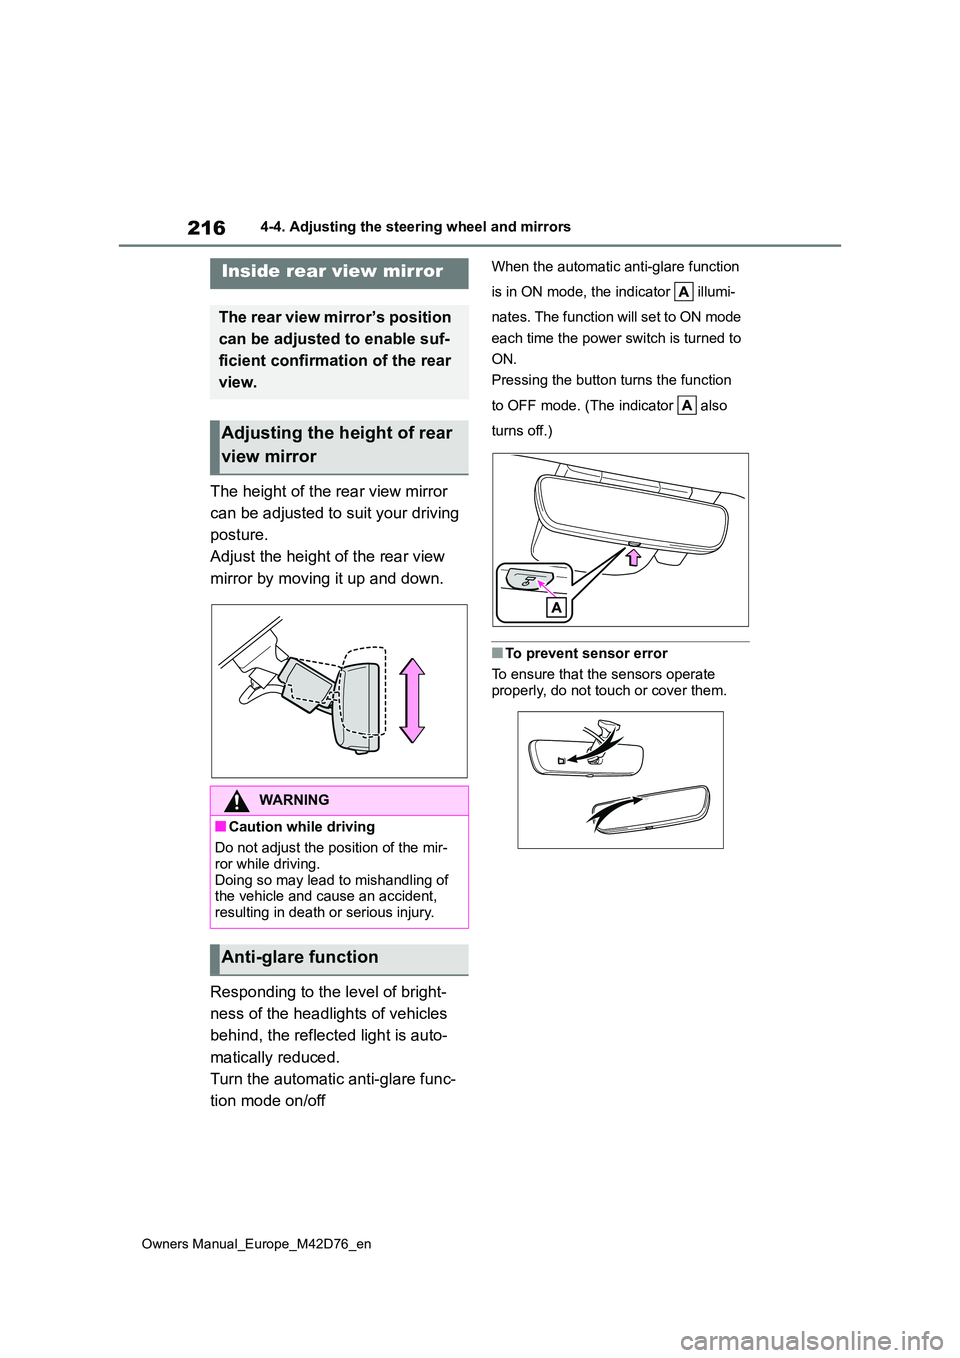
The height of the rear view mirror
can be adjusted to suit your driving
posture.
Adjust the height of the rear view
mirror by moving it up and down.
Responding to the level of bright-
ness of the headlights of vehicles
behind, the reflected light is auto-
matically reduced.
Turn the automatic anti-glare func-
tion mode on/off
When the automatic anti-glare function
is in ON mode, the indicator illumi-
nates. The function will set to ON mode
each time the power switch is turned to
ON.
Pressing the button turns the function
to OFF mode. (The indicator also
turns off.)
■To prevent sensor error
To ensure that the sensors operate
properly, do not touch or cover them.
Inside rear view mirror
The rear view mirror’s position
can be adjusted to enable suf-
ficient confirmation of the rear
view.
Adjusting the height of rear
view mirror
WARNING
■Caution while driving
Do not adjust the position of the mir-
ror while driving. Doing so may lead to mishandling of the vehicle and cause an accident,
resulting in death or serious injury.
Anti-glare function
Page 219 of 674
217
4
Owners Manual_Europe_M42D76_en
4-4. Adjusting the steering wheel and mirrors
Before driving
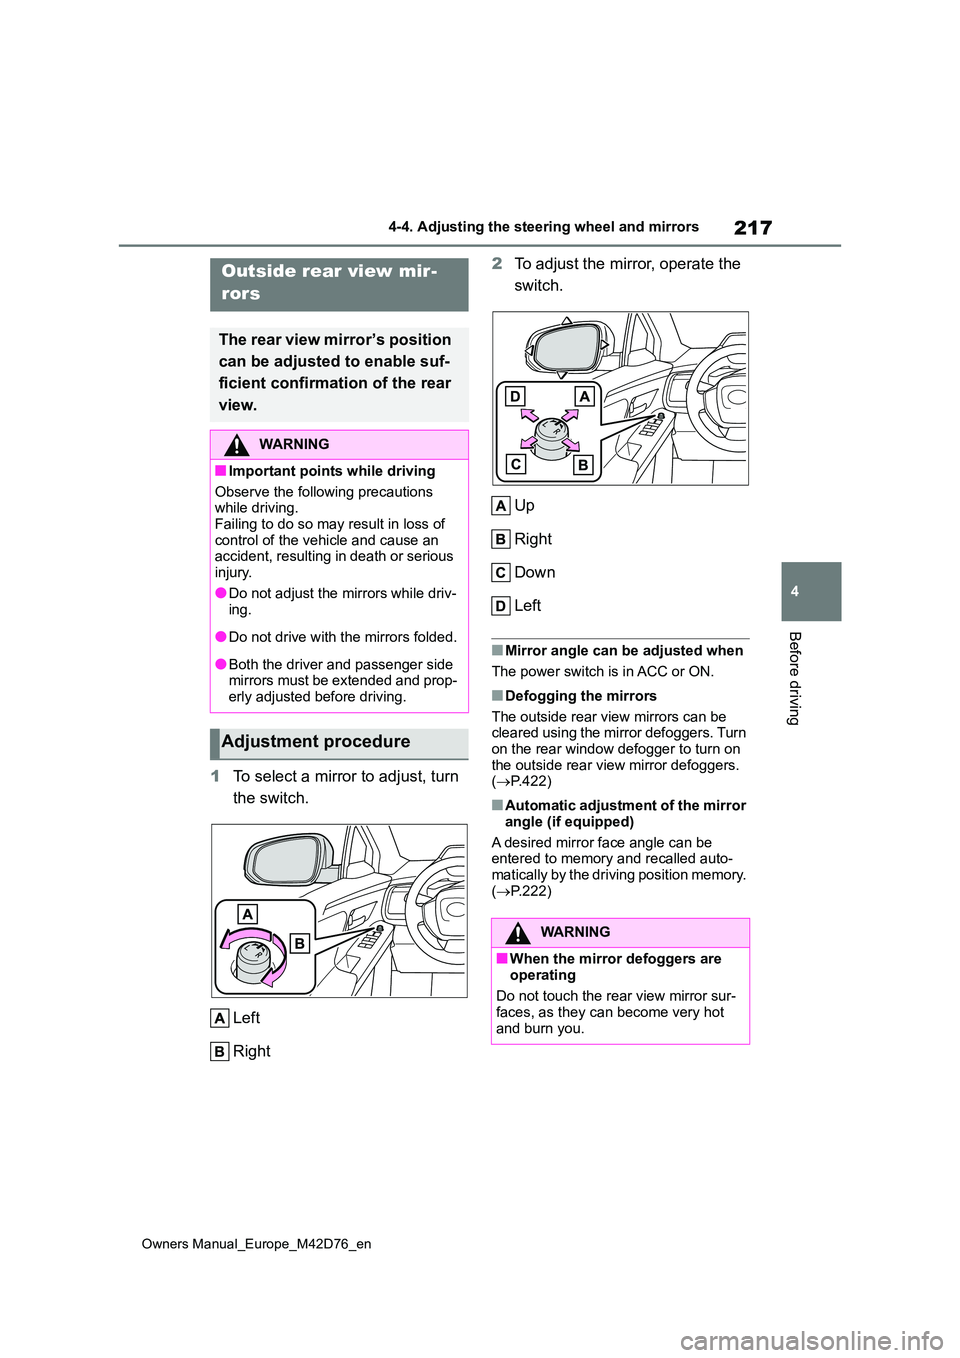
1To select a mirror to adjust, turn
the switch.
Left
Right
2 To adjust the mirror, operate the
switch.
Up
Right
Down
Left
■Mirror angle can be adjusted when
The power switch is in ACC or ON.
■Defogging the mirrors
The outside rear view mirrors can be cleared using the mirror defoggers. Turn
on the rear window defogger to turn on the outside rear view mirror defoggers. ( P.422)
■Automatic adjustment of the mirror
angle (if equipped)
A desired mirror face angle can be entered to memory and recalled auto-
matically by the driving position memory. ( P.222)
Outside rear view mir-
rors
The rear view mirror’s position
can be adjusted to enable suf-
ficient confirmation of the rear
view.
WARNING
■Important points while driving
Observe the following precautions while driving.
Failing to do so may result in loss of control of the vehicle and cause an accident, resulting in death or serious
injury.
●Do not adjust the mirrors while driv- ing.
●Do not drive with the mirrors folded.
●Both the driver and passenger side mirrors must be extended and prop-erly adjusted before driving.
Adjustment procedure
WARNING
■When the mirror defoggers are
operating
Do not touch the rear view mirror sur- faces, as they can become very hot
and burn you.
Page 220 of 674
218
Owners Manual_Europe_M42D76_en
4-4. Adjusting the steering wheel and mirrors
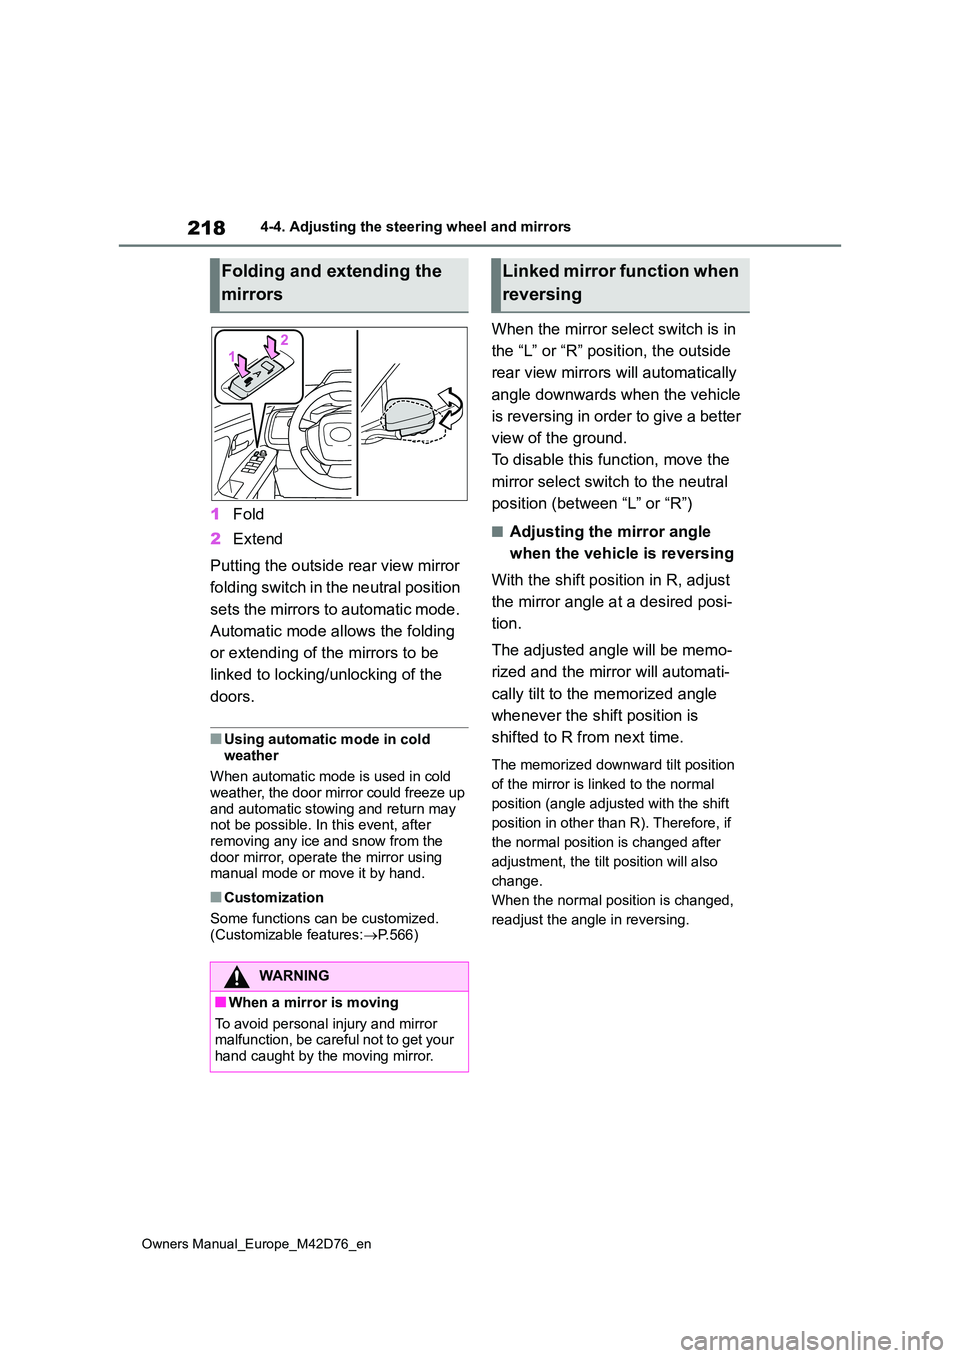
1Fold
2 Extend
Putting the outside rear view mirror
folding switch in the neutral position
sets the mirrors to automatic mode.
Automatic mode allows the folding
or extending of the mirrors to be
linked to locking/unlocking of the
doors.
■Using automatic mode in cold
weather
When automatic mode is used in cold weather, the door mirror could freeze up
and automatic stowing and return may not be possible. In this event, after removing any ice and snow from the
door mirror, operate the mirror using manual mode or move it by hand.
■Customization
Some functions can be customized.
(Customizable features: P.566)
When the mirror select switch is in
the “L” or “R” position, the outside
rear view mirrors will automatically
angle downwards when the vehicle
is reversing in order to give a better
view of the ground.
To disable this function, move the
mirror select switch to the neutral
position (between “L” or “R”)
■Adjusting the mirror angle
when the vehicle is reversing
With the shift position in R, adjust
the mirror angle at a desired posi-
tion.
The adjusted angle will be memo-
rized and the mirror will automati-
cally tilt to the memorized angle
whenever the shift position is
shifted to R from next time.
The memorized downward tilt position
of the mirror is linked to the normal
position (angle adjusted with the shift
position in other than R). Therefore, if
the normal position is changed after
adjustment, the tilt position will also
change.
When the normal position is changed,
readjust the angle in reversing.
Folding and extending the
mirrors
WARNING
■When a mirror is moving
To avoid personal injury and mirror malfunction, be careful not to get your hand caught by the moving mirror.
Linked mirror function when
reversing
Page 226 of 674
224
Owners Manual_Europe_M42D76_en
4-6. Favorite settings
shift position is in P)
For details, refer to the “Multimedia owner’s manual”.
■Seat positions that can be memo-rized ( P.208)
The adjusted positions other than the position adjusted by lumbar support switch can be recorded.
■Operating the driving position
memory after turning the power switch to OFF
Recorded seat positions can be acti-
vated up to 180 seconds after the driver’s door is opened and another 60 seconds after it is closed again.
■In order to correctly use the driving
position memory function
If a seat position is already in the fur- thest possible position and the seat is
operated in the same direction, the recorded position may be slightly differ-ent when it is recalled.
■When recalling the driving position
Take care so that a head restraint does not contact the ceiling or a sun visor.
■If the 12-volt battery is discon-nected
The memorized positions are erased.
■When the recorded seat position cannot be recalled
The seat position may not be recalled in
some situations when the seat position is recorded in a certain range. For details, contact any authorized Toyota
retailer or Toyota authorized repairer, or any reliable repairer.
■Jam protection function
While the driving position is recalled or
the power easy access system is oper- ating, if an object is stuck behind the front seat, the front seat will stop and
then slightly move forward. When the jam protection function operates, the seat stops at a position other than the
set seat position. Check the seat posi- tion.
■Registering procedure
Record your driving position to but-
ton “1” or “2” before performing the
following:
Carry only the key you want to reg-
ister, and then close the driver’s
door.
If 2 or more keys are in the vehicle,
the driving position cannot be
recorded properly.
1 Check that the shift position is in
P.
2 Turn the power switch to ON.
3 Recall the driving position that
you want to record.
4 While pressing the recalled but-
ton, press and hold the door
lock switch (either lock or
unlock) until the buzzer sounds.
If the driving position could not be regis-
tered, the buzzer sounds continuously
WARNING
■Seat adjustment caution
Take care during seat adjustment so
that the seat does not strike the rear passenger or squeeze your body against the steering wheel.
Registering/recall/canceling
an electronic key to driving
position (memory recall
function)
Page 232 of 674

230
Owners Manual_Europe_M42D76_en
5-1. Before driving
●Drive carefully when it starts to rain,
because the road surface will be especially slippery.
●Refrain from high speeds when driv-ing on an expressway in the rain, because there may be a layer of water
between the tires and the road sur- face, preventing the steering and brakes from operating properly.
■Restraining the EV system output
(Brake Override System)
●When the accelerator and brake ped-
als are depressed at the same time, the EV system output may be restrained.
●A warning message is displayed on the multi-information display while the
system is operating.
■Breaking in your new Toyota
To extend the life of the vehicle, observ- ing the following precautions is recom-
mended:
●For the first 300 km (186 miles):
Avoid sudden stops.
●For the first 800 km (500 miles):
Do not tow a trailer.
●For the first 1000 km (621 miles):
• Do not drive at extremely high speeds.• Avoid sudden acceleration.
• Do not drive at a constant speed for extended periods.
WARNING
Observe the following precautions.
Failure to do so may result in death or serious injury.
■When starting the vehicle
Always keep your foot on the brake pedal while stopped with the
“READY” indicator is illuminated. This prevents the vehicle from creeping.
■When driving the vehicle
●Do not drive if you are unfamiliar with the location of the brake and
accelerator pedals to avoid depressing the wrong pedal.
• Accidentally depressing the accel- erator pedal instead of the brake pedal will result in sudden accelera-
tion that may lead to an accident.
• When backing up, you may twist
your body around, leading to diffi- culty in operating the pedals. Make sure to operate the pedals properly.
• Make sure to keep a correct driving posture even when moving the
vehicle only slightly. This allows you to depress the brake and accelera-tor pedals properly.
• Depress the brake pedal using your right foot. Depressing the brake
pedal using your left foot may delay response in an emergency, result-ing in an accident.
●The driver should pay extra atten-tion to pedestrians. As there is no
engine noise, the pedestrians may misjudge the vehicle’s movement. Even though the vehicle is
equipped with the Acoustic Vehicle Alerting System, drive with care as pedestrians in the vicinity may still
not notice the vehicle if the sur- rounding area is noisy.
●During normal driving, do not turn off the EV system. Turning the EV system off while driving will not
cause loss of steering or braking control, however, power assist to the steering will be lost. This will
make it more difficult to steer smoothly, so you should pull over and stop the vehicle as soon as it is
safe to do so. In the event of an emergency, such as if it becomes impossible to stop the vehicle in the
normal way: P. 5 0 6