Manual door TOYOTA BZ4X 2022 (in English) Owner's Manual
[x] Cancel search | Manufacturer: TOYOTA, Model Year: 2022, Model line: BZ4X, Model: TOYOTA BZ4X 2022Pages: 674, PDF Size: 120.02 MB
Page 98 of 674
96
Owners Manual_Europe_M42D76_en
2-2. Charging
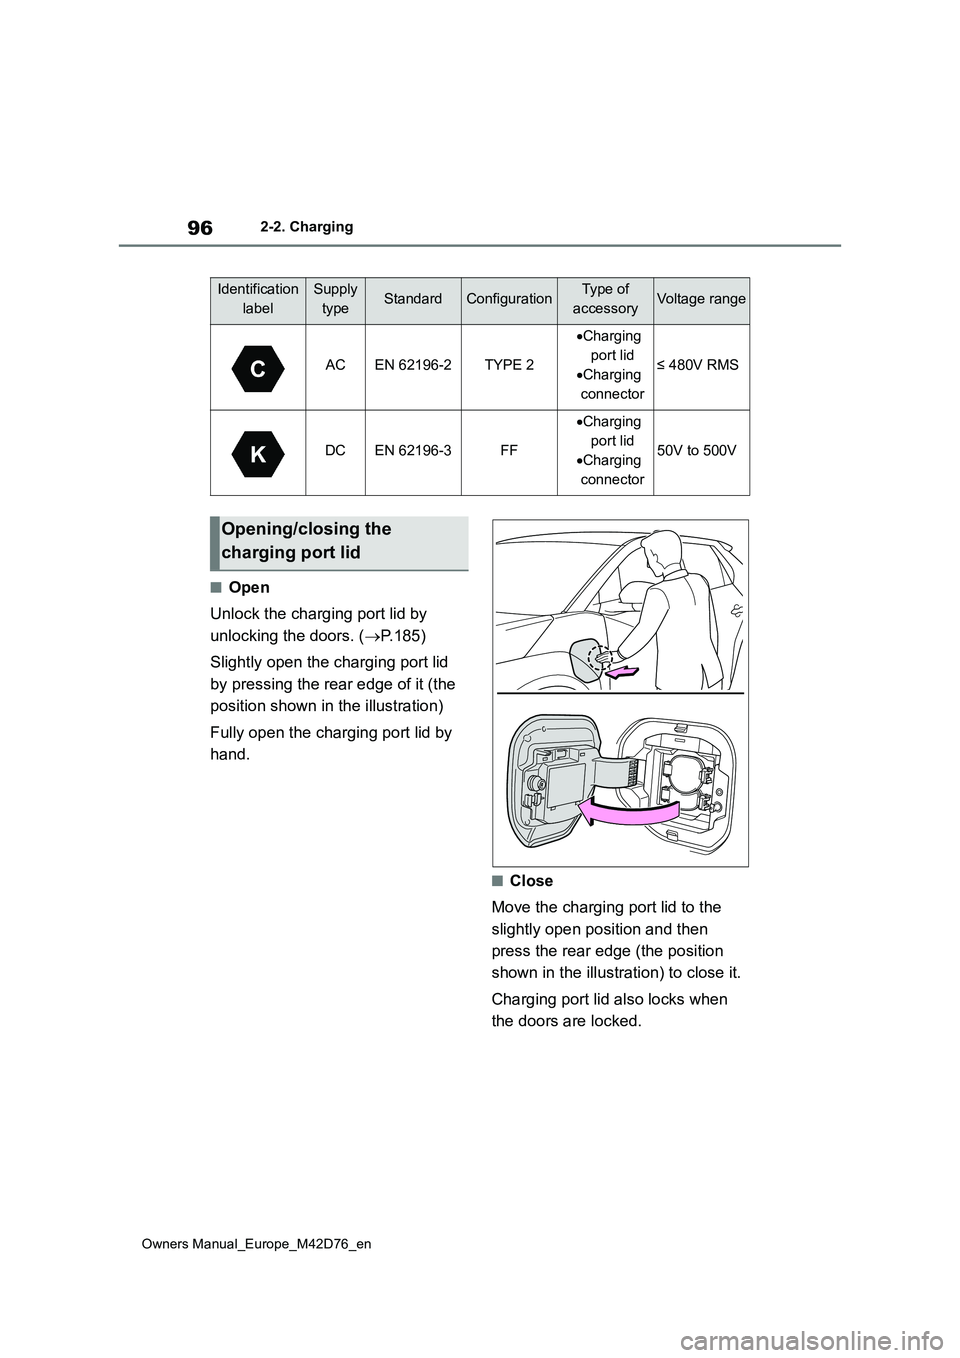
■Open
Unlock the charging port lid by
unlocking the doors. ( P.185)
Slightly open the charging port lid
by pressing the rear edge of it (the
position shown in the illustration)
Fully open the charging port lid by
hand.
■Close
Move the charging port lid to the
slightly open position and then
press the rear edge (the position
shown in the illustration) to close it.
Charging port lid also locks when
the doors are locked.
Identification
label
Supply
typeStandardConfigurationType of
accessoryVoltage range
ACEN 62196-2TYPE 2
Charging
port lid
Charging
connector
≤ 480V RMS
DCEN 62196-3FF
Charging
port lid
Charging
connector
50V to 500V
Opening/closing the
charging port lid
Page 99 of 674
97
2
Owners Manual_Europe_M42D76_en
2-2. Charging
Electric Vehicle system
■The charging port lid will be locked when
●In the following cases, the charging port lid will be locked.• The doors are locked with the wireless
remote control • The doors are locked with the smart entry & start system
• The doors are locked with the mechanical key
●The charging port lid will automatically be locked if the security feature locks the doors when the charging port lid is
closed. ( P.186)
●If the charging port lid is closed after
the doors are locked, the charging port lid will not be locked. In that case, after unlocking the doors once, the
charging port lid can be locked by locking the doors.
■Lid lifter
●The charging lid is not closed if the lifter is pushing in before closing the charging lid. In that case, while
unlocking the door, push again and release the lid lifter, and close the
charging lid again.
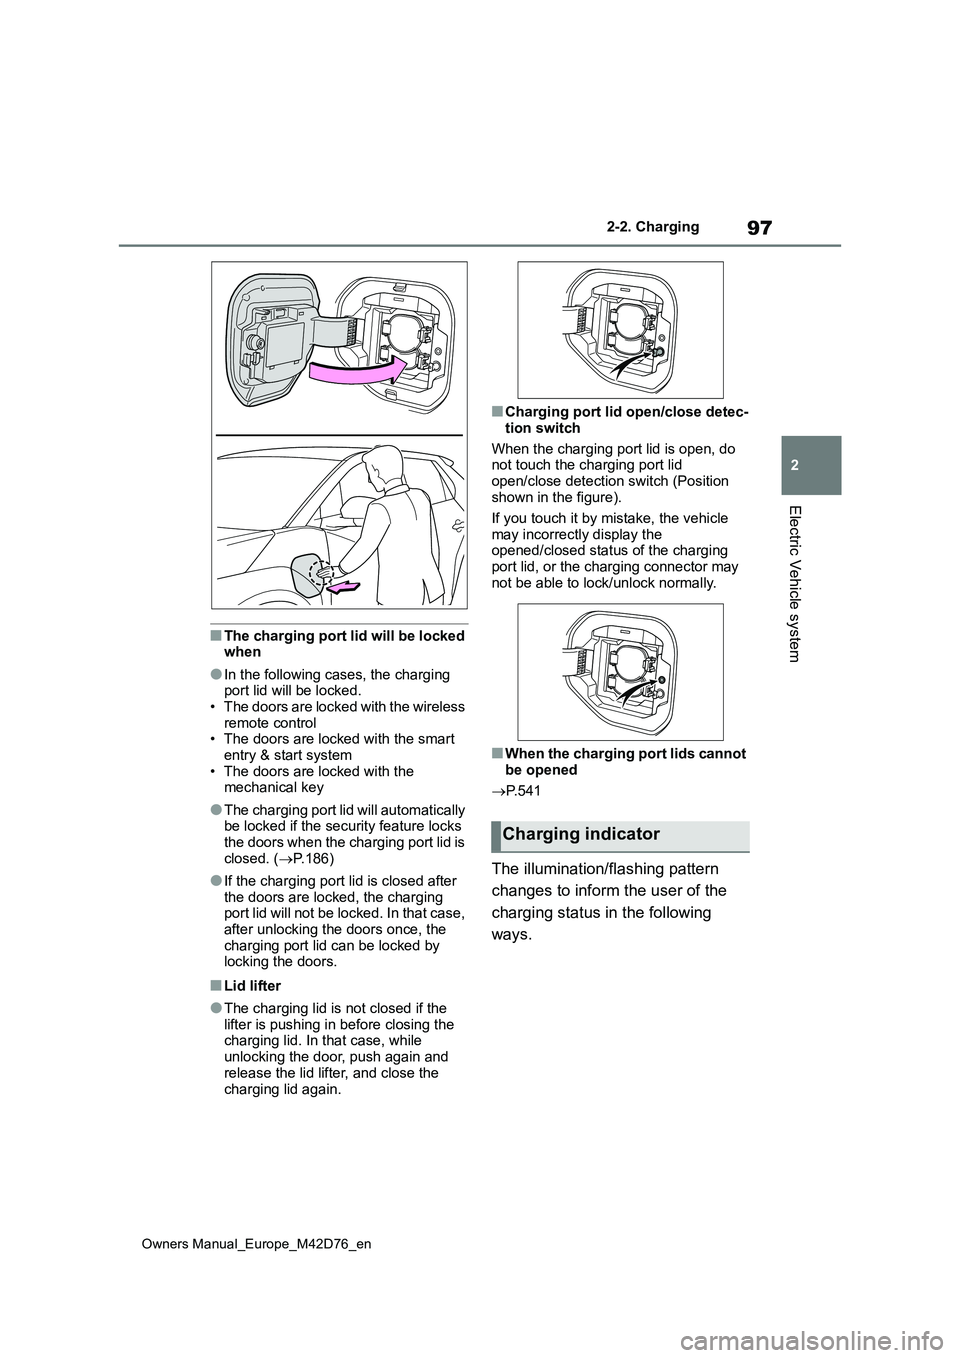
■Charging port lid open/close detec-
tion switch
When the charging port lid is open, do not touch the charging port lid
open/close detection switch (Position shown in the figure).
If you touch it by mistake, the vehicle
may incorrectly display the opened/closed status of the charging port lid, or the charging connector may
not be able to lock/unlock normally.
■When the charging port lids cannot
be opened
P. 5 4 1
The illumination/flashing pattern
changes to inform the user of the
charging status in the following
ways.
Charging indicator
Page 110 of 674
108
Owners Manual_Europe_M42D76_en
2-2. Charging
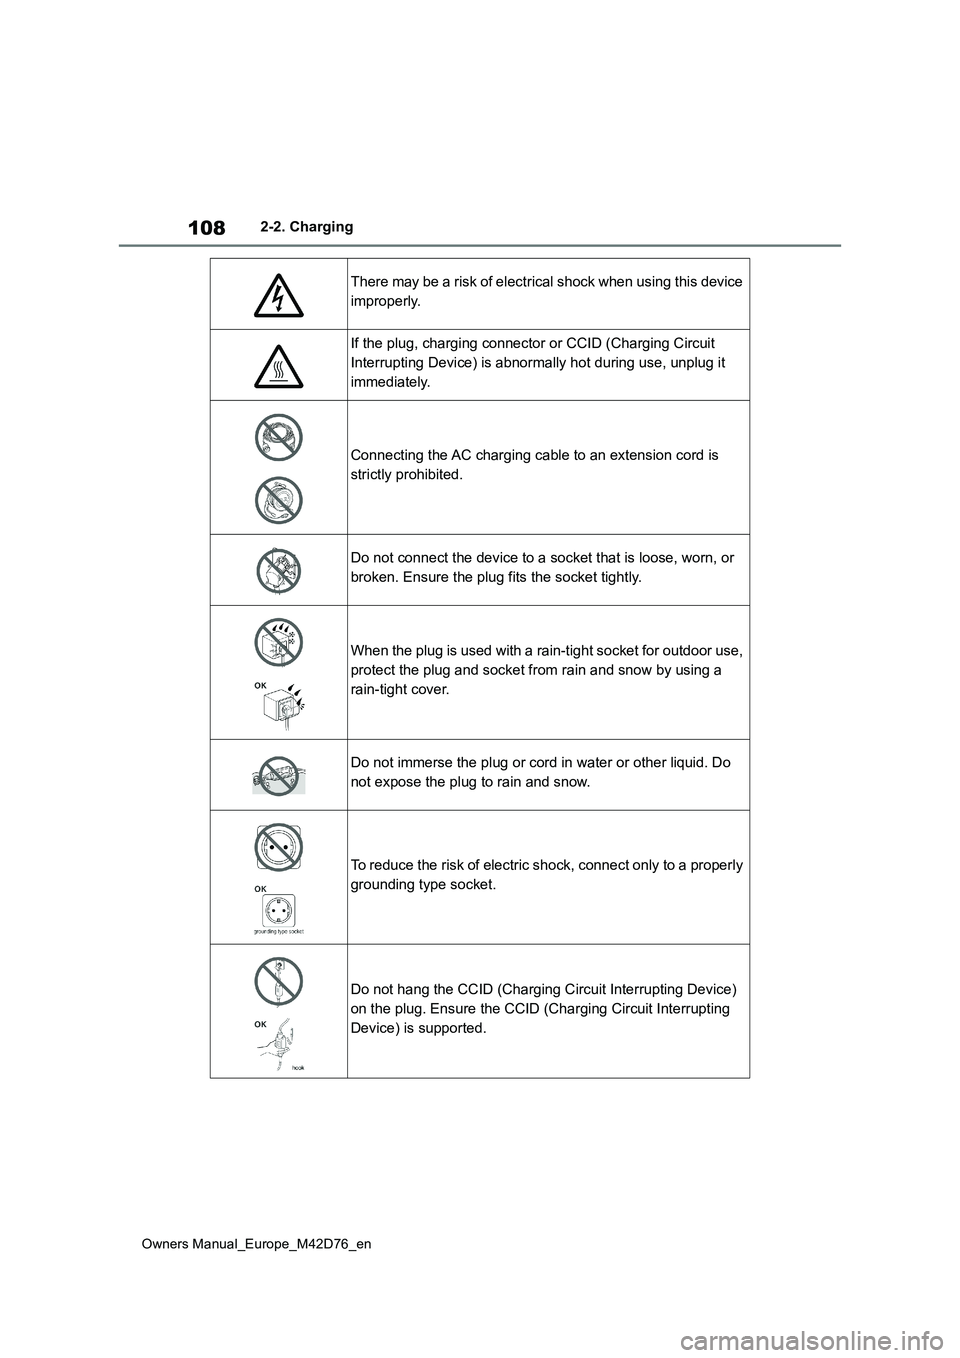
There may be a risk of electrical shock when using this device
improperly.
If the plug, charging connector or CCID (Charging Circuit
Interrupting Device) is abnormally hot during use, unplug it
immediately.
Connecting the AC charging cable to an extension cord is
strictly prohibited.
Do not connect the device to a socket that is loose, worn, or
broken. Ensure the plug fits the socket tightly.
When the plug is used with a rain-tight socket for outdoor use,
protect the plug and socket from rain and snow by using a
rain-tight cover.
Do not immerse the plug or cord in water or other liquid. Do
not expose the plug to rain and snow.
To reduce the risk of electric shock, connect only to a properl y
grounding type socket.
Do not hang the CCID (Charging Circuit Interrupting Device)
on the plug. Ensure the CCID (Charging Circuit Interrupting
Device) is supported.
Page 112 of 674
110
Owners Manual_Europe_M42D76_en
2-2. Charging
■Locking the charging connec-
tor
The AC charging connector will be
automatically locked when inserting
it into the AC charging inlet.
■Unlocking the charging con-
nector
The AC charging connector will be
unlocked when the doors are
unlocked using the smart entry &
start system or wireless remote
control.
The AC charging connector locks
when connected and unlocks when
the door is unlocked, so lock-
ing/unlocking the AC charging con-
nector does not necessarily
correspond to locking/unlocking the
door.
If the door is unlocked and the AC
charging connector is locked, you
can unlock it by doing the following:
• When using the smart entry &
start system, lock the door once
and then unlock it again.
(→P.185)
• When using the wireless remote
control, press the unlock button
to unlock the door. (→P.185)
■AC charging connector lock func-
tion
If the AC charging connector is locked/unlocked repeatedly, it may not
work temporary due to protect the sys- tem by AC charging system. In this case, wait for a while before connecting
the AC charging connector to AC charging inlet again.
The AC charging connector lock func-
tion does not guarantee that theft of the AC charging cable will be prevented, and is not necessarily effective for all
mischiefs.
■Security function for unlocking
If the AC charging connector is not removed within approximately 30 sec-
onds after the vehicle is unlocked, the security function automatically locks the connector again.
■Unlocking the AC charging connec-
tor during charging
If the AC charging connector is unlocked during charging, charging will be
stopped. Once the security function ( P.77) works, charging may not restart automatically. In this case, remove the
AC charging connector* and insert it again.*: When the AC charging connector is
removed, the charging schedule will
be updated. ( P.134)
■When the AC charging connector cannot be inserted into the AC
charging inlet
Check that the connector lock pin is not lowered.
If the connector lock pin is lowered, the connector lock is operating. Unlock the doors using the smart entry & start sys-
Locking and unlocking
AC charging connector
The AC charging connector
will be locked when it is con-
nected to the AC charging
inlet, preventing the AC
charging cable from being dis-
connected while charging.
Locking and unlocking the
AC charging connector
Page 113 of 674
111
2
Owners Manual_Europe_M42D76_en
2-2. Charging
Electric Vehicle system
tem or wireless remote control and
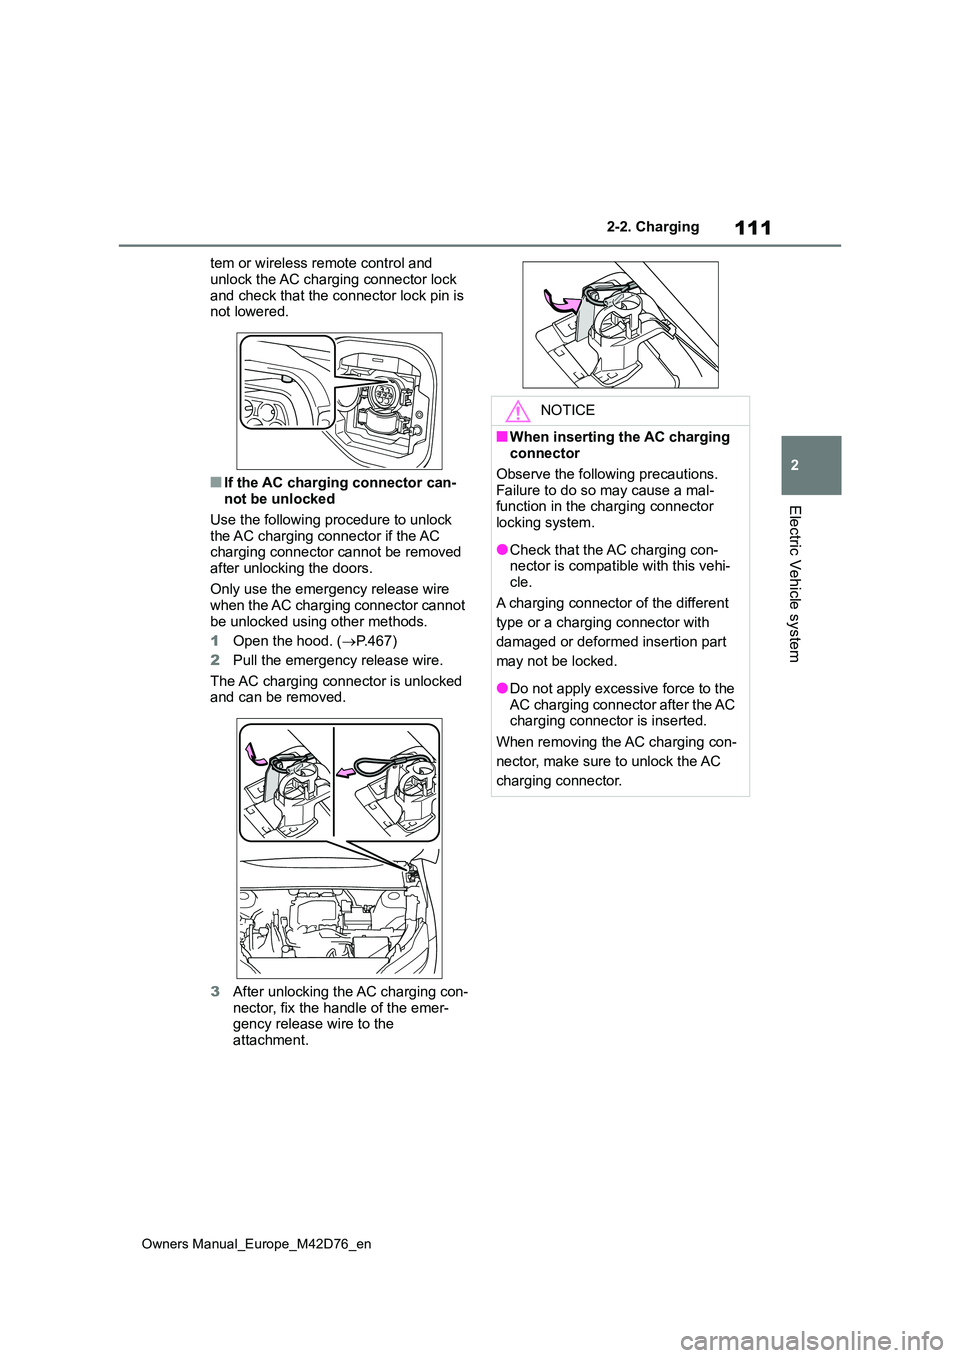
unlock the AC charging connector lock and check that the connector lock pin is not lowered.
■If the AC charging connector can-not be unlocked
Use the following procedure to unlock the AC charging connector if the AC charging connector cannot be removed
after unlocking the doors.
Only use the emergency release wire when the AC charging connector cannot
be unlocked using other methods.
1 Open the hood. (P.467)
2 Pull the emergency release wire.
The AC charging connector is unlocked and can be removed.
3 After unlocking the AC charging con- nector, fix the handle of the emer-gency release wire to the
attachment.
NOTICE
■When inserting the AC charging connector
Observe the following precautions.
Failure to do so may cause a mal- function in the charging connector locking system.
●Check that the AC charging con-nector is compatible with this vehi-
cle.
A charging connector of the different
type or a charging connector with
damaged or deformed insertion part
may not be locked.
●Do not apply excessive force to the AC charging connector after the AC charging connector is inserted.
When removing the AC charging con-
nector, make sure to unlock the AC
charging connector.
Page 114 of 674
112
Owners Manual_Europe_M42D76_en
2-2. Charging
Connect to an AC 220 V - 240 V
socket with a Residual Current
Circuit-Breaker (RCCB) and a
circuit breaker. Use of a 13A indi-
vidual circuit is strongly recom-
mended to ensure AC charging
cable will operate properly.
We strongly recommend that you
use an exclusive connection
from the junction box for
charging. If you connect on a
socket that is on a shared circuit,
and other electrical appliances
are used on other sockets on the
same circuit, then the circuit
breaker might trip.*
Ensure that the junction box is
equipped with a Residual Cur-
rent Circuit-Breaker (RCCB). If it
is not, have one installed by a
duly qualified professional.
When charging outdoors, make
sure to connect to a rain-tight
socket that is certified for outdoor
use. Checking Residual Current
Circuit-Breaker (RCCB) opera-
tion before its use is recom-
mended.
• Check whether there are any local
BEV-charging regulations in place,
and adhere to them.
*: For detailed information, consult an
electrician.
■The charging environment
For safe charging, the following charging equipment and settings are recommended.
●Rain-tight socket
When charging outdoors, connect the
plug to a rain-tight socket, and ensure
that the plug remains waterproof while
the plug is connected.
●Dedicated circuit • To reduce the risk of fire, connect only to an at least 13A branch circuit with
an over-current protection. • To reduce the risk of electric shock when working with the plug, connect
to a socket that has a Residual Cur- rent Circuit-Breaker (RCCB) installed.
●Remote switch
Allows the electricity from the socket to
be interrupted by operating a switch,
thus allowing safe removal and insertion
of the plug on rainy days.
Power sources that can
be used
An external power source that
fulfills the follo wing criteria is
necessary for charging this
vehicle.
Confirm this before charging.
WARNING
■Warnings for electrical faults
Make sure to observe the precautions
in this Owner’s Manual when charging the vehicle.
Failure to use a power source that ful-
fills the requirements, or failure to observe the regulations while charging could lead to an accident,
possibly resulting in death or serious injury.
Power sources
Page 119 of 674
117
2
Owners Manual_Europe_M42D76_en
2-2. Charging
Electric Vehicle system
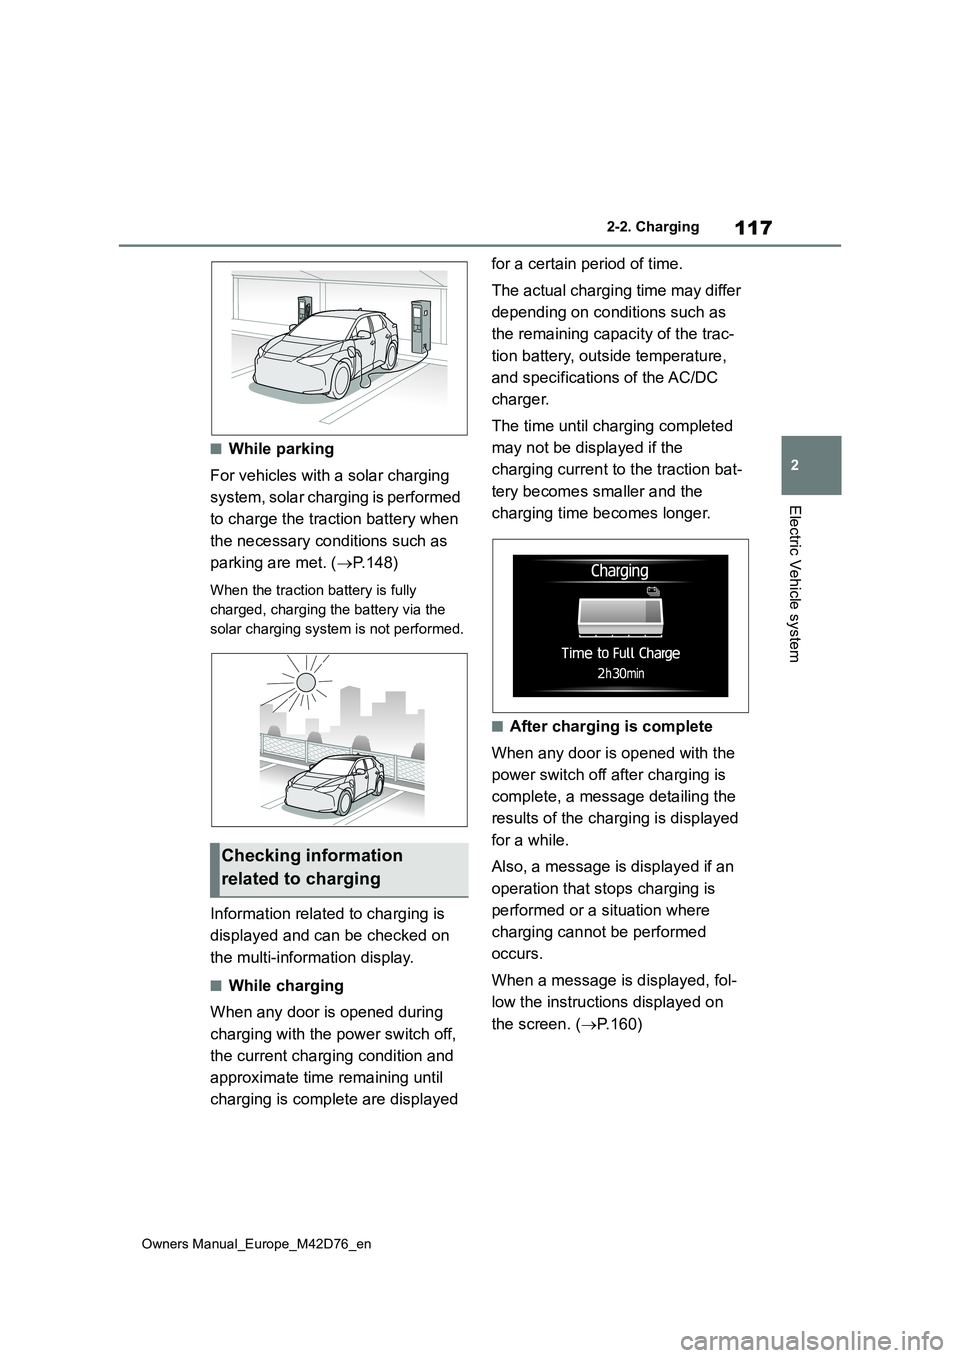
■While parking
For vehicles with a solar charging
system, solar charging is performed
to charge the traction battery when
the necessary conditions such as
parking are met. ( P.148)
When the traction battery is fully
charged, charging the battery via the
solar charging system is not performed.
Information related to charging is
displayed and can be checked on
the multi-information display.
■While charging
When any door is opened during
charging with the power switch off,
the current charging condition and
approximate time remaining until
charging is complete are displayed
for a certain period of time.
The actual charging time may differ
depending on conditions such as
the remaining capacity of the trac-
tion battery, outside temperature,
and specifications of the AC/DC
charger.
The time until charging completed
may not be displayed if the
charging current to the traction bat-
tery becomes smaller and the
charging time becomes longer.
■After charging is complete
When any door is opened with the
power switch off after charging is
complete, a message detailing the
results of the charging is displayed
for a while.
Also, a message is displayed if an
operation that stops charging is
performed or a situation where
charging cannot be performed
occurs.
When a message is displayed, fol-
low the instructions displayed on
the screen. ( P.160)
Checking information
related to charging
Page 120 of 674
118
Owners Manual_Europe_M42D76_en
2-2. Charging
■Safety functions
●The EV system will not start while the charging cable is attached to the vehi-
cle, even if the power switch is oper- ated.
●If the charging cable is connected while the “READY” indicator is illumi-nated, the EV system will stop auto-
matically and driving will not be possible.
Things to know before
charging
Make sure to r ead the follow-
ing precautions before
charging the traction battery.
WARNING
■Caution when charging
People with implantable cardiac pace- makers or cardiac resynchronization
therapy-pacemakers should not carry out the charging procedure. Ask someone else to do it.
●Do not approach the charger and charging cable while charging. Charging procedure may affect the
operation of such devices.
●Do not remain in the vehicle during
charging. Charging procedure may affect the operation of such devices.
●Do not enter the vehicle even to take something out of the luggage
compartment. Charging procedure may affect the operation of such devices.
■When the charging cable is con-nected to the vehicle
Do not change the shift position from
P.
In the unlikely event that the charging cable has been damaged, the shift
position may change from P to another position and the vehicle could move, possibly leading to an acci-
dent.
■Charging precautions
This vehicle has been designed to allow charging from an external power source using an AC charging
cable for exclusive use with standard household AC sockets.
However, the vehicle differs greatly
from standard household electrical goods in the following ways, and incorrect usage could cause fire or
electric shock, possibly leading to death or serious injury.
●When 220 V - 240 V charging, a large amount of current will flow for a long time.
●Charging can be conducted out-doors.
NOTICE
■Charging precautions
To charge properly, follow the proce- dure after reading the explanation
below. Charging is intended to be car- ried out by licensed drivers only who properly understand the charging pro-
cedure.
●Do not allow people who is not
used to charging, such as children, to perform charging without super-vision.
Also, keep the AC charging cable out of reach of infants.
●When charging with a charger, fol-low the procedures for using each charger.
Page 124 of 674

122
Owners Manual_Europe_M42D76_en
2-2. Charging
to the wall with screws.
3 Unlock the doors and open the
charging port lid. ( P. 9 5 )
The charging inlet light will illumi-
nate.
4 Open the AC charging inlet cap.
5 Remove the charging connec-
tor cap and secure it to the
cable.
6 Make sure to hold the body of
the charging connector and
insert it firmly and fully into the
AC charging inlet.
When connecting the charging connec- tor into the AC charging inlet, make sure that the identification symbols are
the same.
When the charging connector is inserted straight as far as possible, it
will automatically lock.
Check that the charging indicator illumi- nates. If the charging indicator does not
illuminate, the charging connector is not
locked.*
Page 125 of 674
123
2
Owners Manual_Europe_M42D76_en
2-2. Charging
Electric Vehicle system
*: If the charging connector is not firmly
inserted, locking operation will be
performed several times.
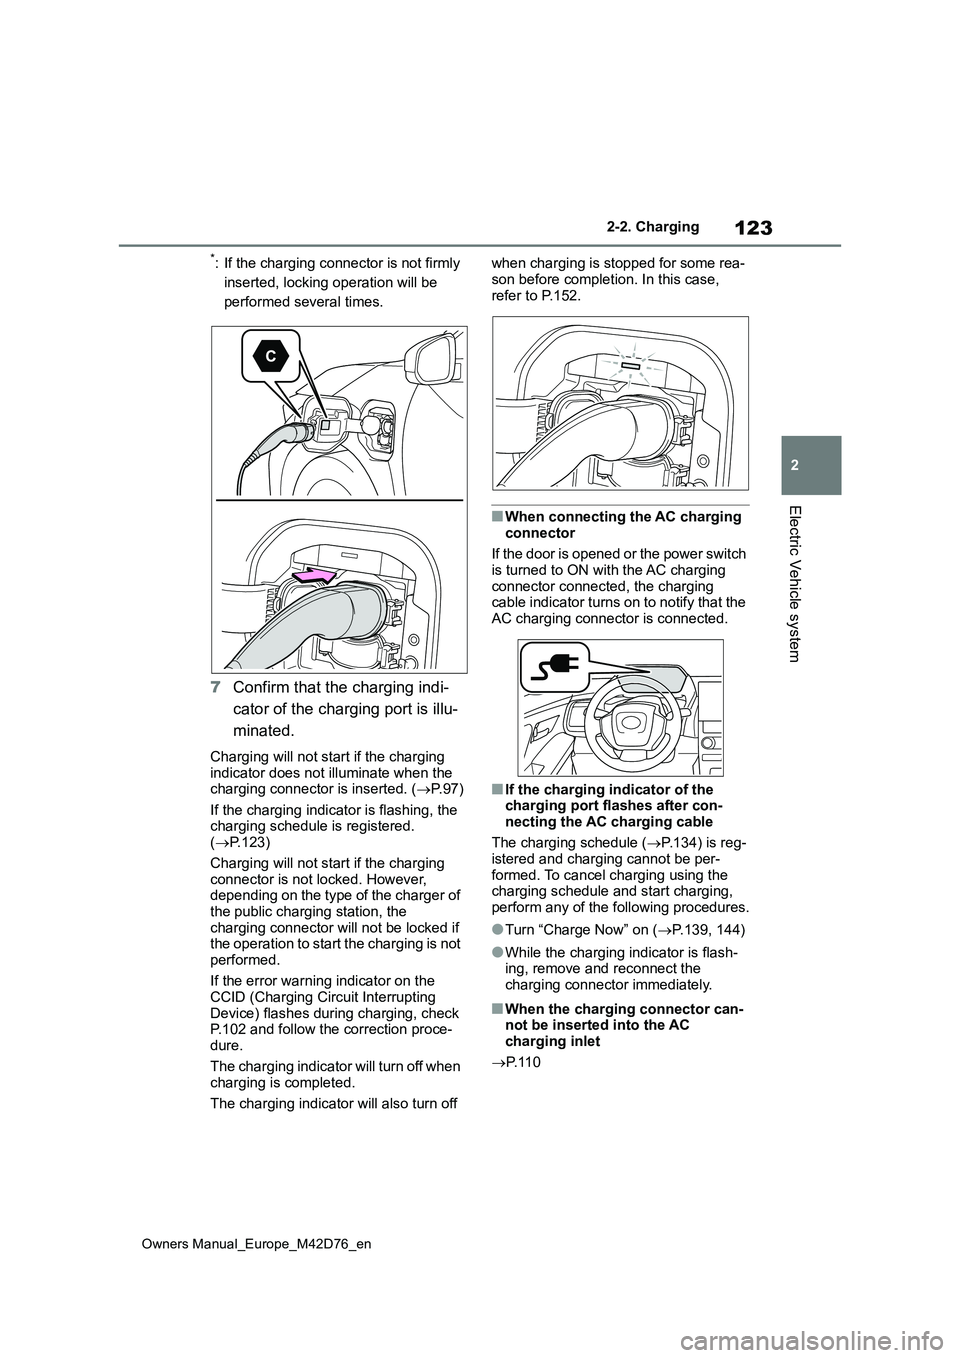
7 Confirm that the charging indi-
cator of the charging port is illu-
minated.
Charging will not start if the charging indicator does not illuminate when the charging connector is inserted. ( P. 9 7 )
If the charging indicator is flashing, the charging schedule is registered. ( P.123)
Charging will not start if the charging connector is not locked. However, depending on the type of the charger of
the public charging station, the charging connector will not be locked if the operation to start the charging is not
performed.
If the error warning indicator on the CCID (Charging Circuit Interrupting
Device) flashes during charging, check P.102 and follow the correction proce-dure.
The charging indicator will turn off when charging is completed.
The charging indicator will also turn off
when charging is stopped for some rea-
son before completion. In this case, refer to P.152.
■When connecting the AC charging
connector
If the door is opened or the power switch is turned to ON with the AC charging
connector connected, the charging cable indicator turns on to notify that the AC charging connector is connected.
■If the charging indicator of the charging port flashes after con-
necting the AC charging cable
The charging schedule ( P.134) is reg- istered and charging cannot be per-
formed. To cancel charging using the charging schedule and start charging, perform any of the following procedures.
●Turn “Charge Now” on ( P.139, 144)
●While the charging indicator is flash- ing, remove and reconnect the
charging connector immediately.
■When the charging connector can- not be inserted into the AC charging inlet
P. 1 1 0